
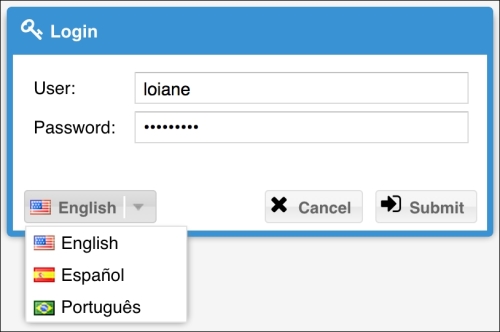
Sometimes you want to ship the project or product that you are working on overseas, and so having the translation capability is very important. After all, not everyone understands or speaks the same language that you do. And this is what we are going to implement in this topic: a multilingual component that we can use to translate the labels of this project. So at the end of this topic, this is going to be our output:
The idea is to store the user language preference locally, so the next time the user loads the application, the preferred language will be automatically set. And when the user changes the language, the application needs to be reloaded, so the new translations can be loaded into the memory.
If we take a look at the screenshot we showed at the beginning of this topic, we can notice that the multilingual component is a button, and when we click on the arrow, a menu pops up with the available languages.
The button with the arrow is a split button component, which has a Menu, and each language option is a Menu Item of the Menu. So, let's go ahead and create a new class named Packt.view.locale.Translation containing the characteristics we described.
We need to create a new file named Translation.js under the app/view/locale folder with the following code inside it:
Ext.define('Packt.view.locale.Translation', {
    extend: 'Ext.button.Split',   //#1
    xtype: 'translation',         //#2

    menu: {               //#3
        xtype: 'menu',    //#4
        items: [
            {
                xtype: 'menuitem', //#5
                iconCls: 'en',
                text: 'English'
            },
            {
                xtype: 'menuitem', //#6
                iconCls: 'es',
                text: 'Español'
            },
            {
                xtype: 'menuitem', //#7
                iconCls: 'pt_BR',
                text: 'Português'
            }
        ]
    }
});
So, the class that we created is extending from the split button class (#1). A split button class is one that provides a built-in drop-down arrow that can fire an event separately from the default click event of the button. Typically, this would be used to display a drop-down menu that provides additional options to the primary button action. And we are also assigning the xtype class to this class (#2) that we used to instantiate it in the Header class.
Then, on menu (#3) configuration, we need to create an instance of the menu class (#4) followed by menuitems of the menu class, which are going to represent each locale option. So we have: an option to translate to English (#5)—and it will also show the American flag (en); an option to translate to Spanish (#6)—and it will also show the flag of Spain (es); and also an option to translate to Portuguese (#7)—and it will also display the flag of Brazil (pt_BR).
We can add as many options as we need to. For each translate option, we only need to add new menuitems of the menu class.
The next step now is to add the CSS for iconCls, which we used in the translation component of the application CSS. To keep our code more organized (and leave room to add more languages and more flag icons if needed), we are going to create a new file named flagIcons.scss inside the sass/etc folder with the following content:
.pt_BR {
  background-image:url('images/app/flags/br.png') !important;
}

.en {
  background-image:url('images/app/flags/us.png') !important;
}

.es {
  background-image:url('images/app/flags/es.png') !important;
}Inside the all.scss file, we need to import this file we created. Add the following code on the second line (right after we imported the Font Awesome file):
@import "flagIcons";
But what about the icons? Font Awesome does not have flag icons. We are going to use the Flag set from FamFamFam (http://www.famfamfam.com/), which are free to use for any purpose (Creative Commons License). Create the folder flags under the directory resources/images/app, and copy and paste the flag icons. You might need to rename them to comply with the names we are using in this example.
Now, the translation component is ready (only what is going to be displayed to the user). We are going to use the translation component in two places of our project: on the Login screen and before the Logout button on Header (which is already in place).
Let's add it to the Login screen. Open the Packt.view.login.Login class again. On the toolbar, we will add it as the first item so that it can look exactly as we showed in the screenshot at the beginning of this topic:
items: [
  {      xtype: 'translation'  },
  {
      xtype: 'tbfill'
  },
  //...
]
We cannot forget to add the class to the requires declaration of the Login screen class:
requires: [
    ' Packt.view.locale.Translation '
],
If we reload the application (do not forget to have sencha app watch executed on the terminal while we make all these changes), we are going to be able to see what we have developed until now.
We need to store the translations somewhere in our project. We are going to store the translations for each language on a JavaScript file inside the resources/locale folder. As we are going to use iconCls as the ID to load the translation files, we need to create three files: en.js, es.js, and pt_BR.js. Inside each file, we will create a JavaScript object named translations, and each attribute of this object will be a translation. All translation files must be the same; the only thing that will be different is the value of each attribute that will contain the translation.
For example, the following code is for the en.js file:
translations = {
    login: "Login",
    user: "User",
    password: "Password",

    cancel: "Cancel",
    submit: "Submit",
    logout: 'Logout',

    capsLockTitle: 'Caps Lock is On',
    capsLockMsg1: 'Having Caps Lock on may cause you to ',
    capsLockMsg2: 'enter your password incorrectly.',
    capsLockMsg3: 'You should press Caps Lock to turn it ',
    capsLockMsg4: 'off before entering your password.'
};
The following code is for pt_BR.js, which contains the Brazilian Portuguese translations:
translations = {
    login: "Login",
    user: "Usuário",
    password: "Senha",

    cancel: "Cancelar",
    submit: "Enviar",
    logout: 'Logout',

    capsLockTitle: 'Caps Lock está ativada',
    capsLockMsg1: 'Se Capslock estiver ativado, isso pode fazer ',
    capsLockMsg2: 'com que você digite a senha incorretamente.',
    capsLockMsg3: 'Você deve pressionar a tecla Caps lock para ',
    capsLockMsg4: 'desativá-la antes de digitar a senha.'
};
The following code is the es.js code, which contains the Spanish translations:
translations = {
    login: "Login",
    user: "Usuario",
    password: "Contraseña",

    cancel: "Cancelar",
    submit: "Enviar",
    logout: 'Logout',

    capsLockTitle:'Bloq Mayús está Activado',
    capsLockMsg1:'Tener el Bloq Mayús activado puede causar que ',
    capsLockMsg2:'introduzca su contraseña de forma incorrecta.',
    capsLockMsg3:'Usted debe presionar Bloq Mayús para apagarlo ',
    capsLockMsg4:'antes de escribir la contraseña.'
};
As we can see, the files are the same; however, the translation is different. As the application grows, we will add more translations to it, and it is a good practice to maintain the files organized in the same way to facilitate changing any translation in the future.
To apply the translations on the components that we have developed until now is very simple: we need to use the translations dictionary we created instead of the string that is going to represent the label.
For example, in the Packt.view.view.Login class, we have the title of the window, the fieldLabel of the username and password, and the text of the Cancel and Submit buttons. The labels are hardcoded, and we want to get the translation from the translation files.
So, we need to replace the title of the :Login window with the following:
title: translations.login,
We need to replace the fieldLabel of username textfield with the following:
fieldLabel: translations.user,
We need to replace the fieldLabel of password textfield with the following:
fieldLabel: translations.password,
We need to replace the text of the Cancel button with the following:
text: translations.cancel
We need to replace the text of the Submit button with the following:
text: translations.submit
And so on. We can also apply the translation for the Logout button and also to the CapsLockTooltip class.
Our idea for the translate component is to store the language preference of the user somewhere. We could use cookies for this, but what we want is very simple, and cookies are included with every HTTP request. We want to store this information for the long term and also use something that can be persisted beyond a page refresh or the fact that the user closed the browser. And the perfect option is to use local storage, one of the new features of HTML5.
Ext JS has support for local storage; it can be used with LocalStorageProxy, but we need something simpler, and using the HTML5 feature itself on the code is simpler. And it also demonstrates that we can use other APIs along with the Ext JS API.
Local storage is not supported by every browser; it is only supported by IE 8.0+, Firefox 3.5+, Safari 4.0+, Chrome 4.0+, Opera 10.5+, iPhone 2.0+, and Android 2.0+. We will build a nice page warning the user to upgrade the browser later on in this book. We will also use other HTML5 features along with Ext JS in other screens as well. So, for now, we need to know that this code, which we will implement now, does not work on every browser.
Note
For more information about HTML5 storage, please visit http://diveintohtml5.info/storage.html.
We want this code to be loaded right before we instantiate the Ext JS application. So, for this reason, we are going to add it right before Ext.define('Packt.Application', { in the app/Application.js file:
function loadLocale(){

    var lang = localStorage ? (localStorage.getItem('user-lang') || 'en') : 'en',
        file = Ext.util.Format.format("resources/locale/{0}.js", lang);

    Ext.Loader.loadScript({url: file, onError: function(){
        alert('Error loading locale file. Please contact system administrator.'),
    }});
}

loadLocale(); //#1
So, first, we are going to verify that localStorage is available. If it is available, we are going to check whether there is an item named user-lang stored on localStorage; if not, English will be the default language. Even if localStorage is not available, English will be set as the default language.
Then, we create a variable named file that is going to receive the path of the translation file that must be loaded by the application.
After we have the url formatted, we are going to load it using Ext.Loader. The loadScript method loads the specified script URL and calls the supplied callbacks (if any). It accepts onLoad and onError callbacks. In our case, there is no need for a success callback (onLoad). If there is any error while loading the locale file, the application will not load, so the onError callback is interesting and needed in this case so that the user can contact support in the event of an error (try renaming the en.js file to simulate an error).
To avoid creating global variables (since this is not a good JavaScript practice), we wrapped our code in a function. Therefore, we need to call the function (#1) right before Ext.define('Packt.Application'.
By the time our application is loaded, it will have all the translations available.
Now comes the final part of the code of the translation component. When the user selects a different language, we need to reload the application so that the loadLocale function is executed again and load the new language chosen by the user.
To do so, we will create a new Controller in our application just to handle the translation component. The question here is: do we use MVC (which we will cover in the next chapter) or MVVM now? The answer depends on your personal preference. For this capability, we will continue using MVVM, or better, the ViewController, for a simple reason: both files (TranslationController.js and Translation.js) are located in the same directory (app/view/locale). And this means that it is easier to copy and paste this component to use it in other projects (we can copy the locale folder altogether).
So we need to create a new class named Packt.view.locale.TranslationController, and to create this class, we need to create a new file named TranslationController.js under the app/view/locale folder. In this controller, we will need to listen to two events: one fired by the translation component itself and the other one fired by menuitems:
Ext.define('Packt.view.locale.TranslationController', {
    extend: 'Ext.app.ViewController',
    alias: 'controller.translation'
});
Let's go back to the Translation.js file and add TranslationController as the ViewController so that we can start listening to the events:
requires: [
    'Packt.view.locale.TranslationController'
],

controller: 'translation',
The split button has two events, which are the click (fired because it is a button) and the arrowclick events, fired when the user clicks on the arrow. We are not interested in either event. Inside the split button, there is a Menu class with menuitems, and each menuitem represents a locale file. The MenuItem component also fires the click event when clicked on. So we can add the click listener to each MenuItem—or even better, add a defaults configuration to menu, as follows (which is going to be applied to all items):
xtype: 'menu',
defaults:{    listeners: {        click: 'onMenuItemClick'    }},
Now, we can go back to TranslationController and implement the onMenuItemClick method, as follows:
onMenuItemClick: function(item, e, options){

    var menu = this.getView(); //#1

    menu.setIconCls(item.iconCls); //#2
    menu.setText(item.text);       //#3

    localStorage.setItem("user-lang", item.iconCls); //#4

    window.location.reload(); //#5
}
First, we will get the reference to the translation component (#1). Then, we will update the split button iconCls and text with iconCls and text of the selected Menu Item (#2 and #3). Next, we will update the new language selected by the user on localStorage (#4), and finally, we will ask the browser to reload the application (#5).
There is still one detail missing. When we load the application, the translation component does not have text or an icon configured. We also need to take care of this. We could listen to the beforerender or render events to update these two properties before the component is displayed to the user, but there is a very important detail: the ViewController is created very early in the component's life cycle, and for this reason, it is not possible to listen to these events.
There are three methods that we can use that can execute some tasks during the key points of the component's life cycle according to the Sencha documentation:
beforeInit: This method can be overridden in order to operate on the view prior to itsinitComponentmethod being called. This method is called immediately after the controller is created, which occurs duringinitConfigcalled from the component constructor.Init: This is called shortly afterinitComponenthas been called on the view. This is the typical time to perform initialization for the controller now that the view is initialized.initViewModel: This is called when the view's ViewModel is created (if one is defined).
As we want the translation component to have iconCls and text when it is rendered, we can use the init method in TranslationController to execute this logic for us:
init: function() {
    var lang = localStorage ? (localStorage.getItem('user-lang') || 'en') : 'en',
        button = this.getView();

    button.setIconCls(lang); //#1

    if (lang == 'en'){       //#2
        button.setText('English'),
    } else if (lang == 'es'){
        button.setText('Español'),
    } else {
        button.setText('Português'),
    }
}
First, we will verify that there is localStorage, and if positive, we will get the language that was stored. If there is no localStorage, or the preferred language was not stored yet (the first time the user uses the application or the user has not changed the language yet), the default language will be English. Then, we will set the iconCls of the split button as the flag of the selected language (#1).
If the selected language is English, we will set the split button text as "English" (#2), and if the selected language is Spanish, we will set the split button text as "Español" (#8); otherwise, we will set the text as "Português" (Portuguese).
Note
This controller is also available in the MVC architecture. You can take a look at the differences between the MVC and MVVM implementation at http://goo.gl/ajaIao.
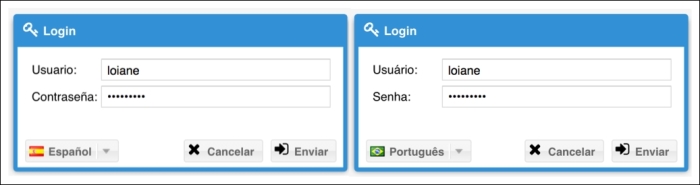
If we execute the application, we can change the preferred language and see that the result is a translated application, as follows:
As usual, there is one last thing missing. We are translating only the labels of the application. Form errors and other messages that are part of the Ext JS API are not translated. Ext JS provides locale file support. All we need to do is add the JavaScript locale file on the HTML page. To do so, we are going to add the following code inside the loadLocale function in the Application.js file:
var extJsFile = Ext.util.Format.format("ext/packages/ext-locale/build/ext-locale-{0}.js", lang);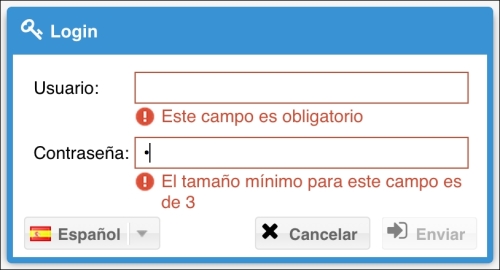
Ext.Loader.loadScript({url: extJsFile});And now, if we try to execute the application again, we will be able to see that all the Ext JS messages will also be translated. For example, if we change the translation to Spanish, the form validation errors will also be in Spanish:
Now, the locale support of the application is completed!
After applying the locale, change labelWidth to 70 inside the Login class. You can change msgTarget to 'side' or increase the height of the window so that the form validation messages can be properly displayed in other languages as well.