
"In my opinion, the vast majority of scripts written … are not very original, well-written, or interesting. It has always been that way, and I think it always will be." | ||
| --Viggo Mortensen | ||
In anything more than the simplest of QlikView applications, the script is where we spend a very large percentage of our development time.
When we discussed the performance tuning of our applications (Chapter 1, Performance Tuning and Scalability), we discussed that almost all of the effort to make our applications more efficient and to consume less memory will be made in the script. Even when we tune expressions in the frontend, then this is more than likely going to be supported by script work.
All data modeling work is going to be in the script. Of course, implementing an ETL process is something that we do in the script. We can use the script to simplify advanced expressions.
Almost everything we discussed in this book so far is either directly script-related or directly influenced by what we do in the script. Therefore, to truly be a QlikView master, you need to master the QlikView script.
This chapter is all about learning great ways of manipulating data in the script. If you can master these methods, then you are well on your way to mastery of the whole product.
These are the topics we'll cover in this chapter:
- Counting records
- Loading data quickly
- Applying variables and the Dollar-sign Expansion in the script
- Using control structures
- Examining advanced Table File Wizard options
- Looking at data from different directions
- Reusing the code
We will have a quick look at some of the basic concepts that we should be aware of when first starting to load data. Anyone who has done basic QlikView training should be familiar with the concepts here, but it is worth reviewing them.
We don't have to use Table Files Wizard to load data from file sources, but it is very useful to help us generate the necessary script to load the data correctly. We have some buttons in the script editor that give us access to Table Files Wizard:
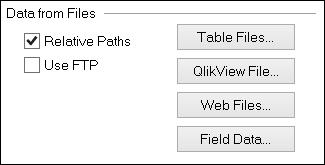
These buttons are listed in the following table:
Some of us might have (accidentally or on purpose) clicked on the Back button in the first screen that appears on Table Files Wizard and discovered the actual first page, which corresponds to three of the buttons:
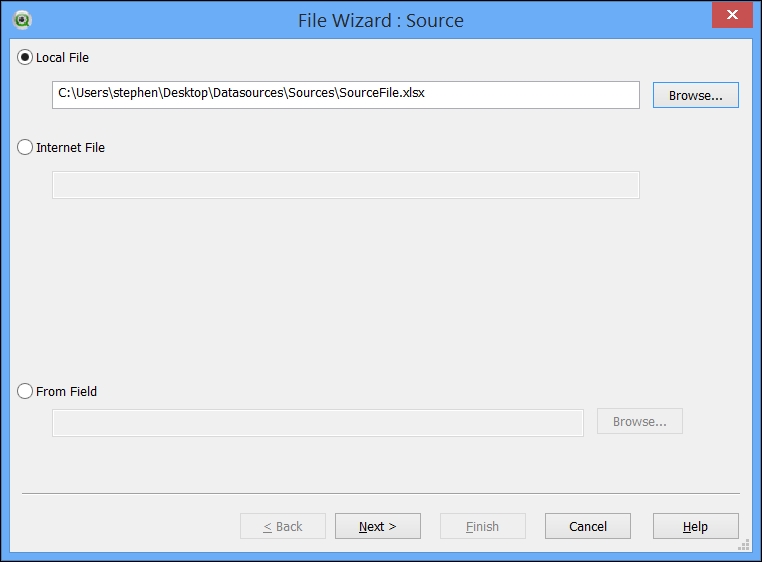
When we load a file in QlikView, we can either use an absolute or a relative path.
When discussing file paths, an absolute path means the full path to a file starting with either a drive letter or a UNC path, for example, C:QVDocumentsFinanceSourcesBudget.xls or \QVServerQVDocumentsFinanceSourcesBudget.xls.
A relative path means that the path is expressed relative to another path. The default start path is the location of the QlikView QVW file. So, if we have our QVW in:
C:QVDocumentsFinanceApps
Then, the relative path to the source file is:
..SourcesBudget.xls
We can also specify an alternate start path using the Directory statement. So, if we issue this command:
Directory 'C:QVDocumentsFinance';Then, the relative path the source file becomes:
SourcesBudget.xls
Alternatively, you can also use:
.SourcesBudget.xls
If we turn on the Relative Paths checkbox on the Data tab in the script editor, then Table Files Wizard will return the path as a relative path, relative to the document location. It will also automatically add a Directory statement like this:
Directory;
A Directory statement without specifying a path is actually superfluous, as it means to just use the default path—the location of the QVW file. Therefore, we can feel free to delete this statement if we don't want to use it.
The main reason why it is preferable to use relative paths instead of absolute paths is transportability—we can move a folder system from one server (for example, a development server) to another (for example, a preproduction system) and all of the paths should still work without having to make any edits to the script.
If the Wizard detects that the file content is just text, it usually guesses that we are dealing with a delimited file and will have a guess at what the delimiter is from the data:
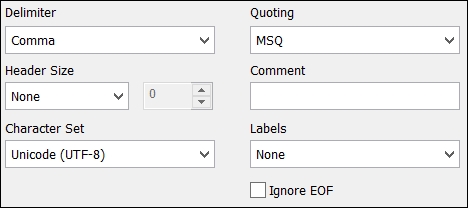
It is often quite good at detecting some of these settings, especially the Character Set value, but we might need to tweak these sometimes. Usually, the tweak is just setting the Labels option from None to Embedded Labels.
If the first line of the file contains the labels, then we should choose the
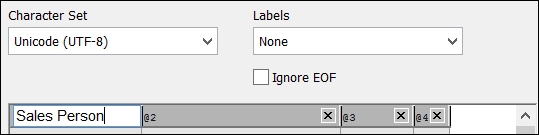
Embedded Labels option. If we choose None, then the fields will be named @1, @2, @3, and so forth. We can, of course, rename these fields like this:
LOAD
     @1 as SalesPerson,
     @2 as Company,
     @3 as [Sales Value],
     @4 as [Number of Orders]
FROM
[..SourcesSalesReport.csv]
(txt, utf8, no labels, comment is #, delimiter is ',', msq);
To facilitate this, the wizard allows us to change the name in the data display grid, and then it will generate the As statement for us:
Besides changing the Labels options, we might also add an entry under Comment. Here, we can define a value that might appear at the beginning of a line in the text file (# or // are common), which indicates that this line is a comment and we don't need to load it. Rows beginning with this text will be ignored.
When the data source has been outputted by a reporting system, it is quite common that the data is in a fixed width format. Every value in each report column takes up the same amount of space, with spaces added wherever necessary to pad the values out to fit. Consider the following example:
Country        Sales $  No. Orders
Germany      92,981.20          29
USA          26,265.16          16
France       25,002.56          15
To load this in QlikView, we just need to tell the wizard exactly the width each row takes up, and this can be done by a click of the mouse:

The field names that are generated by the wizard contain the position of the first character and the last character separated by a colon:
LOAD @1:12,
     @13:24,
     @25:n
FROM
[..SourcesCountryReport.txt]
(fix, utf8);
The last field will usually have n specified as the ending character. This indicates the end of line position.
We are free to modify these manually, if we need to, as well as adding field aliases. We can even have fixed positions overlapping if it makes sense to do so:
LOAD [@1:20] As Field1,
     [@8:24] As Field2,
[@16:n] As Field3The wizard is very good at dealing with XML data, from simple tables to more complex relationships. For example, we can have an XML file with data like this:
<?xml version="1.0" encoding="utf-8" standalone="yes"?>
<CountryCity>
<Country name="USA">
  <City>New York</City>
  <City>Dallas</City>
  <City>Boston</City>
</Country>
<Country name="Austria">
  <City>Graz</City>
<City>Salzburg</City>
</Country>
<Country name="Belgium">
  <City>Bruxelles</City>
  <City>Charleroi</City>
</Country>
</CountryCity>
We can see that the previous data includes values in both tags and elements and also that there is a hierarchy of data between country and city.
When we load this data into Table Files Wizard, the tool automatically recognizes the hierarchies as different tables:

When we click on Finish in the wizard, it will generate the code to load each of the tables, with an automatically generated ID field to associate them:
// Start of [CountryCity.xml] LOAD statements
City:
LOAD City%Table,
    %Key_Country_DDD45FBB422C070A
// Key to parent table: CountryCity/Country
FROM [..SourcesCountryCity.xml]
(XmlSimple, Table is [CountryCity/Country/City]);

Country:
LOAD name,
    %Key_Country_DDD45FBB422C070A
// Key for this table: CountryCity/Country
FROM [..SourcesCountryCity.xml]
(XmlSimple, Table is [CountryCity/Country]);
// End of [CountryCity.xml] LOAD statements
Of course, we should probably think about joining these tables together and then dropping the key field.
QlikView can handle most HTML files that have tables defined (sometimes, it has difficulty with XHTML). You can either connect to a file locally or a web URL.
For example, if you want to grab the currency conversion rates from the front page of http://www.xe.com/, enter the link as follows:
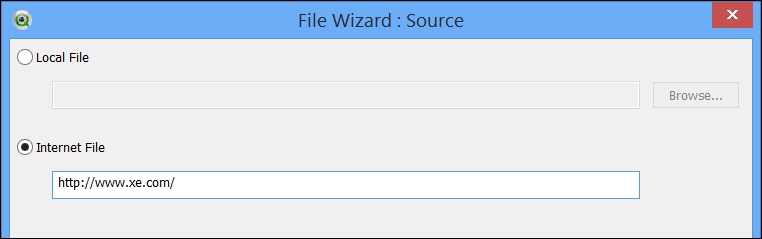
The wizard will connect to the website and retrieve information about all of the tables on the page. In this case, there is just one:
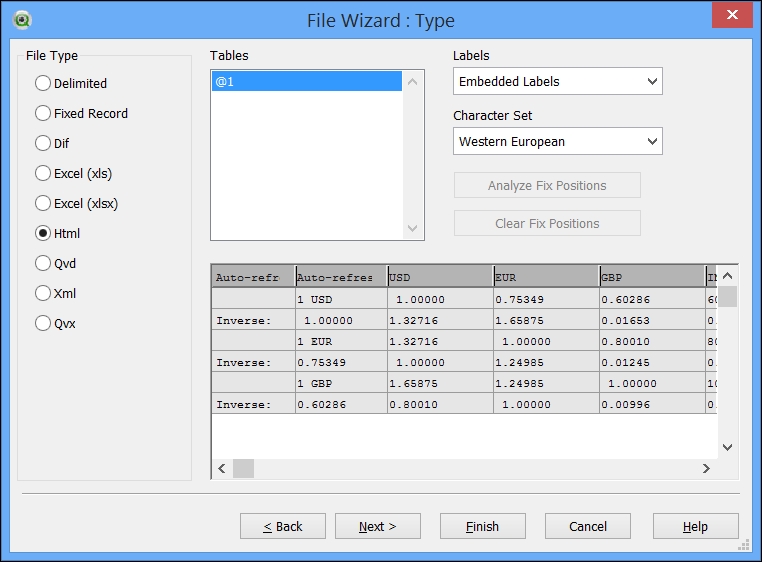
In other cases, you might need to click through the list of tables offered, @1, @2, @3, and so forth, and use the preview window to identify the correct one. The script might look like this:
LOAD [Auto-refresh  15x      0 : 59],
     [Auto-refresh  15x      0 : 591],
     USD,
     EUR,
     GBP,
     INR,
     AUD,
     CAD,
     ZAR,
     NZD,
     JPY
FROM
[http://www.xe.com/]
(html, codepage is 1252, embedded labels, table is @1);
It could be that the field name that is identified doesn't actually work when you try the reload (as in this case). You could try playing with the spacing—this works here:
LOAD [Auto-refresh15x0 : 59],
     [Auto-refresh15x0 : 591],
You can replace the fields with just a *:
LOAD *
FROM
[http://www.xe.com]
(html, codepage is 1252, embedded labels, table is @1);
When it comes to QVD or QVX files, we don't get to modify any settings in the wizard to change the way the file is handled. Setting such as Embedded Labels, Delimiter, Header Size, and so forth, are meaningless when loading a QVD, as all of the information that is needed to interpret the file is already embedded in the file.
QlikView can connect to almost every on-premise database system in the world. In fact, the only ones that we might have trouble with are very archaic ones that do not have open drivers.
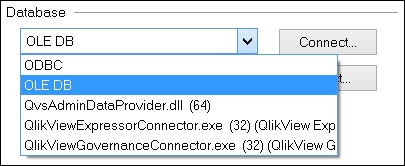
QlikView can use one of the three different driver types to connect to databases:
When we look at the Data tab in the script editor, we see a dropdown that allows us to select the driver type that we want to use:
Once we have selected the driver type that we want to use, we click on the Connect… button, which will open a dialog that is appropriate to the selected driver. For ODBC, we don't need to provide any of the connection detail, just the username and password, and the dialog will look like this:

The connection dialog for OLEDB is different because we need to provide connection information. The OLEDB dialog is one that many developers will be familiar with because it comes from the operating system, not from QlikView. We first need to select the correct database driver, and then we can provide connection-specific information. For example, if we used a SQL Server connection, it might look like this:

Any custom connector will have its own dialog. Some have no dialogs at all!
The purpose of all of the dialogs is to generate a Connect To statement. This is the statement that tells QlikView how to connect to the driver that is being used.
The Connect To statement is usually preceded by an indication of the connection type: ODBC, OLEDB, or CUSTOM. If the connection type is omitted, then ODBC is assumed.
Here is an example ODBC Connect To statement:
ODBC CONNECT TO QVData_ODBC (XUserId is IMcKXZFMCC, XPassword is GRdHfABOQDbKWZJFeE);
We can see that all we need is the ODBC name because the rest of the information necessary to make the connection is already configured within the ODBC connection. We have provided the username and password in the dialog box and QlikView will encrypt them so that casual viewers will not be able to see them.
Compare the ODBC Connect To statement to an OLEDB Connect To statement:
OLEDB CONNECT TO [Provider=SQLNCLI11.1;Integrated Security=SSPI;Persist Security Info=False;User ID="";Initial Catalog=QVData;Data Source=QVENTSQLWH;Use Procedure for Prepare=1;Auto Translate=True;Packet Size=4096;Workstation ID=SRVR1;Initial File Name="";Use Encryption for Data=False;Tag with column collation when possible=False;MARS Connection=False;DataTypeCompatibility=0;Trust Server Certificate=False;Application Intent=READWRITE];
In this case, all of the information necessary to make the connection will be listed in the Connect string. This is similar to a Custom Connect To statement:
CUSTOM CONNECT TO "Provider=QvsAdminDataProvider.dll;host=localhost;XUserId=HONSdKD;XPassword=bfAXSUC;";
Prior to QlikView Version 10, if your database vendor only supplied a 32-bit version of its driver, you can only connect to it with a 32-bit version of QlikView. This causes a lot of problems for QlikView customers running 64-bit server versions that could not perform automatic reloads without having to run a 32-bit QlikView desktop from the command line.
In QlikView Version 10.0, the Force 32 Bit option was introduced to overcome this problem. Now, along with specifying the connection string, we can also specify whether a 32- or 64-bit connection should be used in the Connect To statement:
ODBC CONNECT32 TO [QVData] (XUserId is WAKVcARMNLacWYB);
QlikView actually calls separate processes to open the connections and run queries. They are QVConnect32.exe and QVConnect64.exe, which are 32-bit and 64-bit applications, respectively. If we call a Connect To or Connect64 To statement using a 64-bit version of QlikView, QVConnect64.exe will be executed. If we call Connect32 To, then QVConnect32.exe will be executed. QlikView running on a 32-bit system can only execute QVConnect32.exe.
The Force 32 Bit option in the Data tab will mean that clicking on the Connect button will open 32-bit versions of the dialog that have access to 32-bit drivers. These dialogs will also generate a Connect32 To statement instead of just a Connect To statement.
Once we have created a connection of any type, its details are cached in the document. This allows us to access the Select button and retrieve information about the tables and views in our database:

This wizard is a very useful tool because it allows us to interrogate the data structures in the database, preview the data that these tables and views contained, and generate appropriate SQL to retrieve the data.
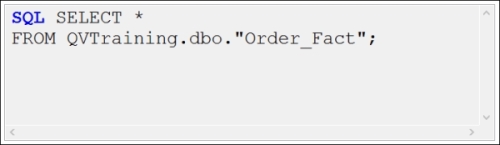
The default option is for the wizard to generate a very simple Select * query to retrieve the data:
We can also select specific fields from the list of fields to create a more specific, yet still quite simple, query:

We can also turn on the (highly recommended) Preceding Load checkbox. This places a QlikView Load statement above the SQL statement. This preceding Load statement allows us to apply QlikView functions to the data as we are loading it from the database. A SQL statement with a preceding Load statement might look like this:
LOAD OrderID,
OrderDate,
CustomerID,
EmployeeID,
//Freight,
    "LineNo",
ProductID,
    Quantity,
SalesPrice,
LineValue,
LineCost;
SQL SELECT *
FROM QVTraining.dbo."Order_Fact";
We might note that even though the SQL query is a very simple Select *, we still get the full field list in the preceding Load statement.
Note the piece of script that the Freight field is commented out. Even though there will be a Freight field loaded from the database, if we do not load it in the preceding Load statement, then the field will not make it into the final data model.