
Setting Up Various Types of Questions
The following sections explain, in detail, how to set up various questions types in Moodle.
The order in which I list the explanations follows the popularity of use. For instance, Multiple Choice, Matching, and True/False are more popular with instructors than Random Short-Answer Matching and Embedded Answers (Cloze).
Note that after you give your question a name, you don't have to state what type of question it is because as soon as you save the question, Moodle lists it with a specific icon representing the question type. The icons make it easier for you to organize and identify the question type, giving you the freedom to name them as you wish. Table 11-1 lists all the questions with the corresponding icons. The icons help you identify the questions when you view or move them into your quiz (discussed later in the chapter). If you need more assistance, visit http://docs.moodle.org/en/Question_bank.
Table 11-1 Question Types and Icons Used in the Question Bank
| Question Icon | Question Type |
| Calculated | |
| Description | |
| Essay | |
| Matching | |
| Embedded answers (Cloze) | |
| Multiple choice | |
| Short answer | |
| Numerical | |
| Random short-answer matching | |
| True/false |
Multiple choice
![]() Multiple-choice questions enable you to set up single and multiple-answer questions, upload images, and give specific answers weights to calculate grades. To create a new multiple-choice question, follow these instructions:
Multiple-choice questions enable you to set up single and multiple-answer questions, upload images, and give specific answers weights to calculate grades. To create a new multiple-choice question, follow these instructions:
- Click the Questions link in the Administration block on your course front page.
Moodle takes you to the Question Bank page, shown in Figure 11-8.
- From the Category drop-down list, select your category, and from the Create New Question drop-down list, select Multiple Choice.
Figure 11-8: Adding a question to the Question Bank.

Don't forget to change the category where you want to store the questions. Moodle leaves the default category unless you select yours from the drop-down list.
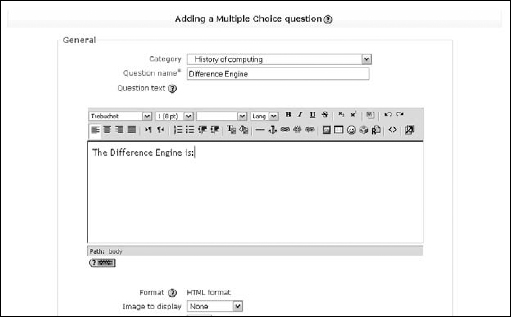
Moodle takes you to the Adding a Multiple Choice Question setup page, shown in Figure 11-9.
- In the Question Name text box, give the question a name.
I suggest you use a descriptive name to identify your question. Naming the question by topic, unit, theme, class, and so on will be helpful as your question bank grows. Setting a generic name like Question 1 or Intro 1 won't help you when you have several hundred questions in your question bank. Moodle adds an icon to the question to identify its type. Refer to Table 11-1, which lists all the icons.
- In the Question Text field, add your question.
Figure 11-9: Adding a multiple-choice question.
- If you want to include an image with your question, select your image from the Image to Display drop-down list.
In the Image to Display drop-down list, Moodle lets you choose from all the images saved in your directory. You need to have images uploaded to Moodle in order to be able to add them to questions. You don't have the option to browse your hard drive. Refer to Chapter 5 for details on how to upload images.
- In the Default Question Grade text box, shown in Figure 11-10, enter a whole number, and the percentage will be calculated based on this.
This is the maximum grade for the question.
 The fields with asterisks are required fields.
For simplicity, each of my questions tends to be worth 1 unless it has several parts, such as the matching short answer, where I may allocate it 4 or 5 (25/20% for each answer).
- In the General Feedback field, add the general feedback that your learners will see when they complete the question.
This isn't based on the response and isn't necessary if you're giving feedback per correct or incorrect answers. You can leave this field blank, if you'd like. Learners see general feedback only if you selected the Feedback option in the Immediately after the attempt column of the Review Options are when you set up the quiz. See the “Creating a Quiz Body” section for more information on adjusting feedback settings.
Figure 11-10: Choosing multiple-choice question options.

- From the One or Multiple Answers drop-down list, select an option to determine whether your question will have only one correct answer or multiple answers.
- Select the Shuffle the Choices check box if you want the choices shuffled on each new attempt.
- From the Number the Choices drop-down list, you have an option to choose the style of numbering for the answers.
The default is lowercase alphabet (such as a, b, c).
- For the sections labeled Choice 1–Choice 5, compose the choices for your question. Specify the following information for each choice:
- • Answer: Write your answer.
- • Grade: If this choice is incorrect, leave the default, NONE, or from the drop-down list select the percentage mark for the particular question. If you have only one correct answer, select 100%. If multiple answers are correct, divide 100% by the correct answers. For instance, if two answers are correct, each grade would be 50%.
- • Feedback: Add your feedback for the choices, if you're using the feedback options, telling students why their answers are incorrect (for each incorrect answer) or providing a positive statement for the correct one.
- If you need more choices, click the Blanks for 3 More Choices button.
- In the General Feedback section, you can indicate what feedback to display For Any Correct Response, For Any Partially Correct Response, and For Any Incorrect Response.
This feedback feature is useful if you have more than one choice.
- Click the Save Changes button.
Moodle takes you to a busy question and category page. I refer to this as my Questions workspace page. See Figure 11-11 depicting the new question on the right. All the functionality in this workspace is described in the later section “Viewing, Editing, and Adding Questions to Quizzes.”
Figure 11-11: Questions workspace page.

Matching
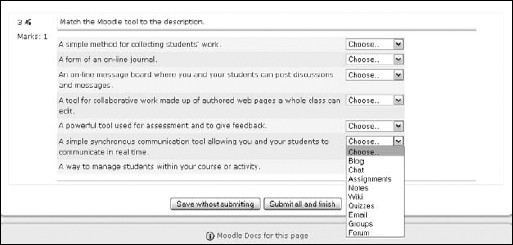
![]() Matching questions provide learners with a drop-down list to a question. They're useful for many different assessment activities such as memorizing, visual identification, and language understanding. See Figure 11-12. To set up a matching question, follow these steps:
Matching questions provide learners with a drop-down list to a question. They're useful for many different assessment activities such as memorizing, visual identification, and language understanding. See Figure 11-12. To set up a matching question, follow these steps:
- Follow Steps 1–7 in the preceding section. In Step 2, select Matching from the Create New Question drop-down list. (Refer to Figure 11-8.)
I entered Match the Moodle Tools with the Description as the question.
Figure 11-12: A matching question.
- If you want to shuffle the questions (if you allow for multiple attempts — that's when this feature is useful), select the Shuffle the Choices check box.
- In the Question boxes for Questions 1–3, add the questions with the answer below.
You need to add at least three questions in order for Moodle to accept the matching question, and you must include up to three answers. You can leave one or more blank questions, with extra answers so that you don't have one answer to each question. For example, you can add seven descriptive questions and have 10 answers in the drop-down list.
- Click the Save Changes button.
Moodle returns you to the Question Bank editing page, where you can preview the question and add it to your quiz.
![]() When you're creating a series of questions of the same type, you don't need to go through this process each time if the only thing you're doing is changing the question and the answers. To save yourself time, here's what you do: Open an existing question of any type; keep all the same settings; change the Name (such as Moodle basics Q2); add the new question and answers; and at the bottom, instead of clicking the Save Changes button, click the Save as New Question button.
When you're creating a series of questions of the same type, you don't need to go through this process each time if the only thing you're doing is changing the question and the answers. To save yourself time, here's what you do: Open an existing question of any type; keep all the same settings; change the Name (such as Moodle basics Q2); add the new question and answers; and at the bottom, instead of clicking the Save Changes button, click the Save as New Question button.
True/false
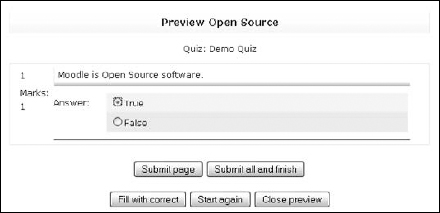
![]() The true/false question is a very familiar format that is simple to implement. (See Figure 11-13.) The only thing you need to remember when you're setting up feedback for this question type is that the first answer, whether true or false, is the correct answer.
The true/false question is a very familiar format that is simple to implement. (See Figure 11-13.) The only thing you need to remember when you're setting up feedback for this question type is that the first answer, whether true or false, is the correct answer.
Figure 11-13: The Preview question page.
Follow these steps to create a True/False question.
- Click the Questions link in the Administration block on your course front page.
Moodle takes you to the Question Bank page shown earlier in Figure 11-8.
- From the Category drop-down list, select your category, and from the Create New Question drop-down list, select True/False.
Moodle takes you to the Adding a True and False Question setup page.
- From the Question Category drop-down list, choose the category where you want the question to be stored.
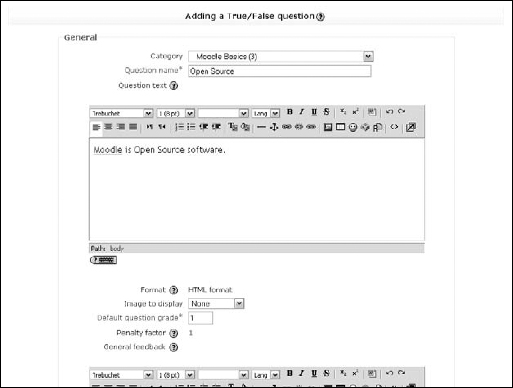
The Adding a True/False Question page appears, as shown in Figure 11-14.
Figure 11-14: Adding a True/False question.
- Follow Steps 3–7 in the section “Multiple choice,” earlier in this chapter.
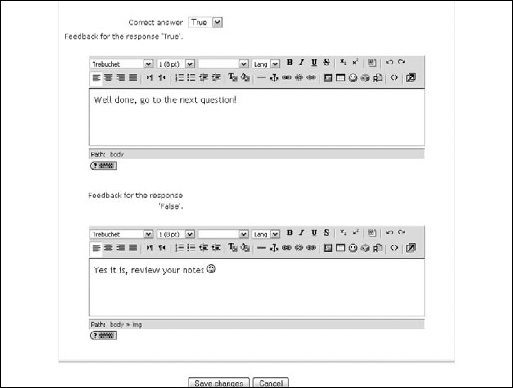
- From the Correct Answer drop-down list, shown in Figure 11-15, choose True or False.
Notice Moodle prompts you that the first answer has to be the correct one. Add feedback for the True answer if you think it may be helpful.
- (Optional) Enter feedback for the False answer.
- Click the Save Changes button.
Moodle returns you to the Question Bank editing page, where you can preview the question and add it to your quiz.
Figure 11-15: Choosing the answer and adding feedback.
Short answer
![]() The setup for a short-answer question is similar to the setup of the questions discussed previously in this chapter. The most important thing to remember when setting up the short-answer question is to keep answers as short as possible. The Moodle quiz engine evaluates whether the answer is right or wrong by exact matching, character for character, in the order you specify. Warn your learners about spelling errors. There is no implied intelligence that can deduce an answer if the wording is correct in context but phrased differently. Think about possible acceptable answers, enter them, and use a wildcard as a space holder for text when appropriate.
The setup for a short-answer question is similar to the setup of the questions discussed previously in this chapter. The most important thing to remember when setting up the short-answer question is to keep answers as short as possible. The Moodle quiz engine evaluates whether the answer is right or wrong by exact matching, character for character, in the order you specify. Warn your learners about spelling errors. There is no implied intelligence that can deduce an answer if the wording is correct in context but phrased differently. Think about possible acceptable answers, enter them, and use a wildcard as a space holder for text when appropriate.
Moodle uses the asterisk character (*) to indicate a wildcard allowing any sets of characters between words, within words, before a word, or after a word. Table 11-2 shows how you can use a wildcard with a two-word answer (Paris and London in this example) and how Moodle would grade it.
Here are some things to remember when working with wildcards:
- Standard practice for using the wildcard is to place the wildcard answer last in the list of questions/answers so that Moodle knows what to do if nothing else matches.
- Wildcards are needed because Moodle finds the answers by comparing characters exactly to your answers. So spell the words correctly — and tell your students to spell them correctly, or the answers will be marked incorrect.
| Paris*London | 100% |
| *Paris* or *London* | 50% |
| * | 0% |
| “Paris London”, “Paris, London”, “Paris; London”, “Paris & London”, “Paris and London”, “Paris or London”, “Paris not London” | All acceptable, so you need to be careful |
To set up a short-answer question, follow these steps:
- Follow Steps 1–2 in the section “Multiple choice,” earlier in this chapter.
Be sure to select Short Answer from the Create New Question drop-down list in Step 2.
- In the Question Text box, add the question.
If you want to leave a blank space, use the underscore character, as in, “______was the first American president.”
- In the General Feedback field, add feedback your learners will see when they complete the question.
Include feedback if it would be useful to the goals of the assignment.
- From the Case Sensitivity drop-down list, you have an option to decide whether case is important in the answer. The default is No, Case Is Unimportant. Select Yes if case is important.
- In the Answer 1–3 fields, fill in the following information:
- • Answer: Enter the answers you will accept. Don't forget about the wildcard and that it should be used as the last answer.
- • Grade: Assign a percentage grade. If a word is frequently misspelled, you can allocate partial credit.
- • Feedback: Add feedback for any answer or leave it blank.
If you want to add feedback for all wrong answers, use the wildcard (the asterisk, *) as the only answer, and leave None as the grade. If you need to add more possible answers, click the Blanks for 3 More Choices button under the Answer 3 field.
- Click the Save Changes button.
Moodle returns you to the Question Bank editing page, where you can preview the question and add it to your quiz.
The bottom portions of Figures 11-16 and 11-17 show how the quiz looks with one correct and one incorrect short answer.
Numerical
![]() You will quickly see that numerical questions are much like the short-answer questions discussed in the preceding section; the difference is that you can set answers in an error range you specify. You can also accept answers in multiple units (such as metric and imperial). For your learners, the look and feel are identical to short-answer questions.
You will quickly see that numerical questions are much like the short-answer questions discussed in the preceding section; the difference is that you can set answers in an error range you specify. You can also accept answers in multiple units (such as metric and imperial). For your learners, the look and feel are identical to short-answer questions.
To set up a numeric question, follow these steps:
- Follow Steps 1–2 in the section “Multiple choice,” earlier in this chapter.
Be sure to select Numerical from the Create New Question drop-down list in Step 2.
- In the Question Text box, add your equation and/or the Question.
This can include an equation, text, or an image of a formula if the Algebra filter or TeX filter is not enabled. See Chapter 13 and the companion Web site, www.dummies.com/go/moodlefd, for more information on how to enable the filters. You need administrative privileges. Enabling these filters allows you to use mathematic notations. These filters enable math functions to be added to the WYSIWYG editing bar.
Figure 11-16: Previewing the question.

Figure 11-17: The results of a submitted quiz.

- If you want an image, select it from the Image to Display drop-down list.
You have to upload the image to your Moodle folders first. Moodle displays the image right after the textual question and before the answer field.
- In the Default Question Grade field, enter the maximum grade/points for the question.
For example, enter 1 point for each question.
- The Penalty Factor field is applicable only if you set up the question in Adaptive mode only. You can add 0 or just leave as is.
Moodle ignores the setting if it isn't set in Adaptive mode.
- If feedback would be useful, add general feedback that will appear when the learner answers the question.
The general feedback is not based on the answer.
- In the sections Answer 1–3, fill in the following information for each answer:
- • Answer: Enter the answer.
- • Grade: Select the default grade from the drop down list.
- • Accepted Error: Enter the accepted error range for the answer. For example if the answer is 10, and you will accept 9.5 or 10.5, enter .5 as your accepted error range. Add feedback for the accepted answer. This is what the learner will see if she got the question correct.
You also have to specify incorrect answers using the wildcard (the asterisk character, *) as the answer and setting the grade to NONE. If you need more choices, click the Blanks for 3 More Choices button, and Moodle adds three more answer fields.
- In each of the Unit fields, add the unit and, if needed, add the multiplier.
You can specify metric and imperial units. For example, if the answer is 5, accept 5cm or add .01 as the multiplier for cm to m. Moodle will accept 5, 5cm, and .05m as correct answers.
- Click the Save Changes button.
Moodle returns you to the Question Bank editing page, where you can preview the question and add it to your quiz.
Random short-answer matching
![]() The random short-answer matching questions are very easy to set up, and they add variety to your quiz, test, or worksheet. Your learners will just think it's another matching question. To set it up, you give an introduction to the set of matching questions, and Moodle randomly selects short-answer subquestions from the current category (make sure the short questions are included in the category), creating a drop-down list of all correct answers. Moodle shuffles the questions and answers, selecting different question for each new attempt at the quiz.
The random short-answer matching questions are very easy to set up, and they add variety to your quiz, test, or worksheet. Your learners will just think it's another matching question. To set it up, you give an introduction to the set of matching questions, and Moodle randomly selects short-answer subquestions from the current category (make sure the short questions are included in the category), creating a drop-down list of all correct answers. Moodle shuffles the questions and answers, selecting different question for each new attempt at the quiz.
The topic has to be the same, or the answers in the questions won't make sense. For example, categories of capital cities and countries should include questions/answers on only capitol cities and countries. If you include questions about French verbs, the answers will be mixed up and not make sense. This is when subcategories become useful. Remember that each question is weighted equally to generate overall points.
To set up a random short-answer matching question, take these steps:
- Follow Steps 1–3 in the section “Multiple choice,” earlier in this chapter. Be sure to select Random Short-Answer Matching from the Create New Question drop-down list in Step 2.
- In the Question Text box, inform the learners of what they're matching and the learning goals, or use Moodle's default text.
- In the General Feedback field, add feedback if it would be helpful.
- From the Number of Questions to Select drop-down list, select how many questions you want to add to the matching questions.
 It's important you don't add more than the number of short-answer questions you have in the question bank under the category.
 - Click the Save Changes button.
Moodle returns you to the Question Bank editing page, where you can preview the question and add it to your quiz or edit it.
Essay
![]() Essay questions are designed to contain a question you set, and your learners can enter one to two paragraphs of text. Essay questions can be embedded with other question types. Moodle cannot score these questions; you have to score them yourself and enter the grade manually. Until you mark the grade, the learner will receive a score of 0.
Essay questions are designed to contain a question you set, and your learners can enter one to two paragraphs of text. Essay questions can be embedded with other question types. Moodle cannot score these questions; you have to score them yourself and enter the grade manually. Until you mark the grade, the learner will receive a score of 0.
![]() If you use essay with other question types in a quiz, Moodle will correct all the other questions and push the grade to the learner's grade book. Learners can see their grades right away, so I advise that you include in your instruction a note that Moodle will record a 0 mark because it is waiting for you to mark the essay.
If you use essay with other question types in a quiz, Moodle will correct all the other questions and push the grade to the learner's grade book. Learners can see their grades right away, so I advise that you include in your instruction a note that Moodle will record a 0 mark because it is waiting for you to mark the essay.
To grade an essay in a submitted quiz, select the Results tab from the Editing Quiz page, and then under the tabs, click the Manual Grading link, which takes you to a page where you can read and score the essay and add comments.
To set up an essay question, here's what you do:
- Follow Steps 1–3 in the section “Multiple choice,” earlier in this chapter. Be sure to select Essay from the Create New Question drop-down list in Step 2.
- In the Question Text field, write your question and, if necessary, any instructions.
- In the General Feedback box, add general feedback.
Adding Moodle-generated feedback in most circumstances is helpful, though for essay questions you have options to add comments when you mark the essays, so you can leave the fields blank
- Click the Save Changes button.
Moodle returns you to the Question Bank editing page, where you can preview the question and add it to your quiz or edit it.
Calculated
![]() The main purpose of using the Calculated question type is if you're teaching math and you want to create multiple questions by using a specific formula with different numerical values. Moodle will randomly pull the numbers from a dataset you can specify. For example, to set up a worksheet to practice division problems, creating two placeholders and a division sign, such as {a} / {b}, tells Moodle to select values for a and b automatically. Each time the test is taken, different values will be added, and your learners will be presented with a new practice activity each time. Just think all the time this will save you marking practice work sheets!
The main purpose of using the Calculated question type is if you're teaching math and you want to create multiple questions by using a specific formula with different numerical values. Moodle will randomly pull the numbers from a dataset you can specify. For example, to set up a worksheet to practice division problems, creating two placeholders and a division sign, such as {a} / {b}, tells Moodle to select values for a and b automatically. Each time the test is taken, different values will be added, and your learners will be presented with a new practice activity each time. Just think all the time this will save you marking practice work sheets!
To set up a calculated question, take these steps:
- Follow Steps 1–3 in the section “Multiple choice,” earlier in this chapter. Be sure to select Calculated from the Create New Question drop-down list in Step 2.
- In the Question Text box, shown in Figure 11-18, add the question your learners need to answer.
Make sure you use at least one wildcard and add the values Moodle will randomly assign in curly brackets. For example, you could enter {x} * {y} /{a}.
- Fill in the Default Question Grade and Penalty Factor fields, if necessary.
Penalty factor is necessary only if you are using Adaptive mode.
Moodle ignores the penalty factor if you did not select Adaptive mode in the quiz setup page.
- Add general feedback if needed.
- In the Answer section, shown in Figure 11-19, enter the following information:
Figure 11-18: Setting up the Calculated question.

Figure 11-19: Setting acceptable answers.

- • Correct Answer Formula: Add the correct answer formula. Moodle needs to recognize a formula, such as {a}/{b}, in order to set up the question. See the correct syntax formula at http://docs.moodle.org/en/Question_bank.
- • Grade: From the drop-down list, select 100% grade value for the correct answer. You need to select 100% unless you set up the quiz at a different percentage.
- • Tolerance: Select the tolerance of error you will accept. For example, choosing a relative error of .05 could be acceptable for my preceding division example.
- • Tolerance Type: From the drop-down list, select the type of tolerance (relative, nominal, or geometric).
- • Correct Answer Shows: Decide on the precise number of significant figures or decimal places you will accept for the correct answer. Moodle sets 2 as the default.
- • Format: From the drop-down list, choose the option that indicates decimals or significant figures.
- In the Feedback field, add answer feedback as appropriate.
- If required, add units for the correct answer (meters, oz, kg, and so on), as shown in Figure 11-20.
You can add both metric and imperial.
- Click the Next Page button.
Moodle opens another page for you to complete, as shown in Figure 11-21.
Figure 11-20: Indicating units.
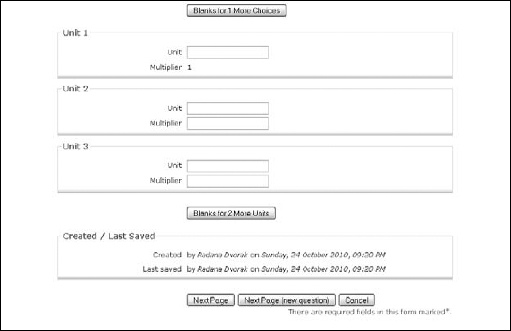
Figure 11-21: Choosing wildcard options.
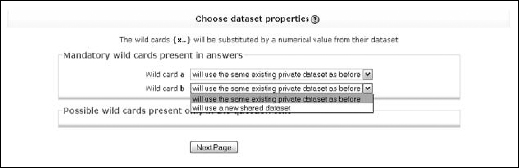
- In the Mandatory Wild Cards Present in Answers section, decide whether you want to use the same existing private data set as before or use a new shared data set. These are your choices:
- • Private: If you select this option, you're restricting Moodle to use it with this question only.
- • Shared: If you select this option, you allow Moodle to share it with other calculated questions within the same category. This option will save you time.
- Click the Next Page button.
Moodle takes you to page 3, shown in Figure 11-22.
Figure 11-22: Creating a dataset.

- Create a dataset for questions(s) in the category.
All you need to do is generate a series of values for the placeholders. It's better to shoot for generating more values because Moodle will not have to repeat values. For simplicity, I let Moodle create values. Here's the information you need to fill in:
- • Param: Add the value you want to start with.
- • Range of Values: Enter the range of values in the fields and enter the lower and upper limits for the values you would accept.
- • Decimal Places: Choose a number of decimal places for the value.
- • Distribution: Choose the distribution of values between the limits. Uniform means any value between the limits is equally likely to be generated; Loguniform means that values toward the lower limit are more likely.
- Scroll down to the Add section and select the Force Regeneration option.
- Click the Get New Items to Add Now button.
- Click the Save Changes button.
Moodle returns you to the Question Bank editing page.
Embedded answers (Cloze)
![]() If you want to set questions within text, use the embedded answers (Cloze) question-type. Often, instructors like to take a passage from text and embed short-answer, multiple-choice, or fill-in numerical questions right into the passage. This question type is often used with language instruction. A Cloze question comprises a piece of text from which a number of words have been removed. A learner is required to insert the missing words. In some cases, the missing words are supplied as a single list from which the student has to select, which, in effect, is matching a word with the space where it belongs. Simply, it's just a matching question embedded in text and can be represented as a selection in a drop-down list of possible answers.
If you want to set questions within text, use the embedded answers (Cloze) question-type. Often, instructors like to take a passage from text and embed short-answer, multiple-choice, or fill-in numerical questions right into the passage. This question type is often used with language instruction. A Cloze question comprises a piece of text from which a number of words have been removed. A learner is required to insert the missing words. In some cases, the missing words are supplied as a single list from which the student has to select, which, in effect, is matching a word with the space where it belongs. Simply, it's just a matching question embedded in text and can be represented as a selection in a drop-down list of possible answers.
![]() You cannot use a graphical interface for this question type, and you need to use specific syntax to embed the format. Using third-party software, such as Hot Potatoes, is the simplest way to design these types of questions, and then you can import them right into Moodle.
You cannot use a graphical interface for this question type, and you need to use specific syntax to embed the format. Using third-party software, such as Hot Potatoes, is the simplest way to design these types of questions, and then you can import them right into Moodle.
To create an embedded answer, follow these steps:
- Follow Steps 1–3 in the section “Multiple choice,” earlier in this chapter. Be sure to select Embedded Answers (Cloze) from the Create New Question drop-down list in Step 2.
- In the Question Text field, shown in Figure 11-23, add the question text with the embedded answers using the specific syntax.
See the bullets at the end of this list for a summary of the syntax. You can find more information on how to use the syntax on the Moodle.org Web site (http://docs.moodle.org/en/Embedded_Answers_%28Cloze%29_question_type).
Figure 11-23: Setting up an Embedded Answers (Cloze) question.
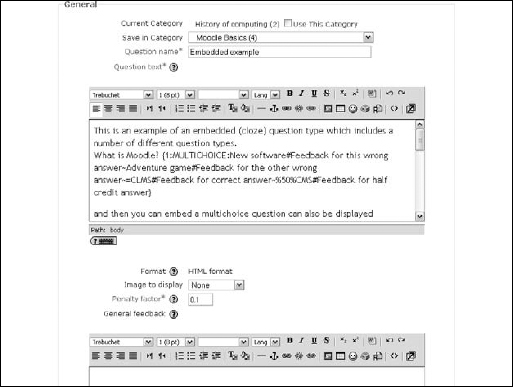
- Fill in the default Question Grade and Penalty Factor text boxes (if in Adaptive mode).
The Penalty factor is important only if you set the Adaptive mode in the Quiz. If you did not set it, the Penalty factor will be ignored.
Note: You will be adding the weight value for the grade inside the Cloze questions – it's part of the syntax.
- In the General Feedback field, add feedback if is useful to the learning goals.
- Click the Decode and Verify the Question Text button.
Moodle gives you a preview of the questions, answers, and points to test if you entered the correct syntax.
- Click the Save Changes button.
Moodle returns you to the Question Bank editing page.
Here's the syntax you can use with Cloze questions:
- All question type items are coded inside curled braces { }.
- The number that appears between the opening brace and the colon, such as 1 in {1:, is the weighting of that item; if it's set at 1 for all the items, you don't need to specify it, so you can have {:.
- After the colon, you have the item question type: MULTICHOICE, SHORTANSWER, NUMERICAL.
- If you've installed the REGEXP question type plugin, you can also use the REGEXP question type.
- The syntax for MULTICHOICE and SHORTANSWER is nearly the same; the only difference is in the way the item displays to the student.
- The order of the various answers is indifferent (except if you want a catch-all for wrong answers; see the next bullet point).
- In the SHORTANSWER type, you may want to put a catch-all (wrong) answer in order to send “wrong, try again” feedback; you can do this by inserting an asterisk (*) as the very last expected answer in your formula.
- A correct answer is preceded with the equal sign (=) or a percentage (usually %100%). Note: The equal sign doesn't seem to work with SHORTANSWER.
- A wrong answer is preceded with nothing or a percentage (usually %0%).
- You can allocate points between 0 and 100 to some questions if you put the appropriate percentage in your quiz setup.
- All answers except the first one are separated from one another by a tilde (~).
- Answers can be followed by an optional feedback message, preceded with the pound sign (#). If there is no feedback message, # can be present or absent — it does not matter.
- The feedback message and correct answer are displayed in a small Feedback pop-up window upon mouse hovering (if and when the correct answer and/or feedback have been declared accessible to the students in the Quiz settings). You can use HTML tags to format your feedback. It can help not to have the form fields for the answers too close to each other.
- Unfortunately in MULTICHOICE MODE, you can't have the answers scrambled. In SHORTANSWER mode, it is not possible to make the answers case-sensitive.
Description
![]() Description is not a question type. Moodle developers have added this option to the question bank because a number of individual questions do not allow for instructions, and you may need to add content between questions. This tool works similar to the label resource: All it does is allow you to add text (or graphics) to instruct learners. For example, instructors have used the description option to present a map to students and then present a series of multiple choice questions. Another example is language teachers using it to display a few paragraphs in a foreign language, and then they can check whether learners can understand the passage by asking them to read it and answer a series of following questions. Use this functional utility creatively to support your quiz activities as you find need.
Description is not a question type. Moodle developers have added this option to the question bank because a number of individual questions do not allow for instructions, and you may need to add content between questions. This tool works similar to the label resource: All it does is allow you to add text (or graphics) to instruct learners. For example, instructors have used the description option to present a map to students and then present a series of multiple choice questions. Another example is language teachers using it to display a few paragraphs in a foreign language, and then they can check whether learners can understand the passage by asking them to read it and answer a series of following questions. Use this functional utility creatively to support your quiz activities as you find need.
The description option is quite simple to set up. Follow the same procedure as for other question types. There is no grade allocation. After adding your content and/or image, you can add general feedback in a text box provided, but most likely you won't have any use for feedback here. Like with all the other question types, make sure you choose the correct category and don't forget to save your changes.