
Viewing, Editing, and Adding Questions to Quizzes
The Moodle Question Bank editing page has a number of different tools that enable you to add the questions to your quiz, preview them, edit them, and move them between categories and quizzes. Moodle uses icons to depict the questions and functions. Refer to Table 11-2 for the icons and their explanations. (To access the Question Bank page, click the Questions link in the Course Administration block, located on the left side of the course front page.)
Editing the question bank and quiz
The Quiz Question page is divided into two parts: Questions in This Quiz and Question Bank.
Question Bank
The Question Bank section is on the right (see Figure 11-24) with a number of different tools to manage your questions and categories. You have three drop-down lists:
- Category: This drop-down list enables you to display your questions stored in specific categories you created. You also have options to include various questions by selecting the check boxes, Display Questions from Sub-Categories Too and Also Show Old Questions. If you create a very long list of questions, and the question names are too generic and don't give you enough information to identify specific questions, select the Show Question Text in the Question List check box to add the text above the question in the list.
- Create New Question: This drop-down list offers all the question types. Use this list when you need to add a new question.
- Question sorting: Moodle allows you to sort your questions by type, name, or date created.
Figure 11-24: Adding questions to a quiz.
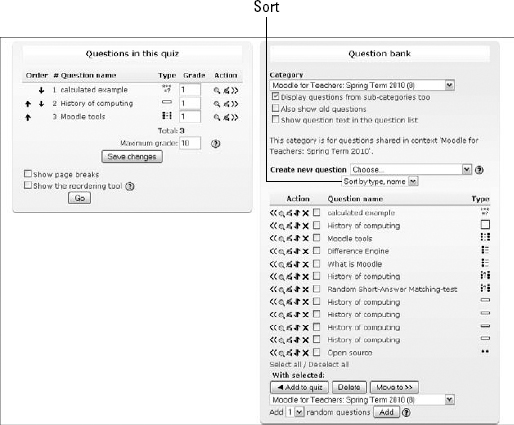
Below the drop-down lists are your questions with certain tools to view, edit, delete, and move them. Table 11-2 shows all the icons and their functionality. Below the list of questions, you have four operations you can carry out with selected questions. Notice that you can select individual questions by using the check box in front of the questions or by clicking the Select All or Deselect All links. Furthermore, you can use the following buttons:
- Add to Quiz: Selected questions are moved to the quiz question list located on left side of the page. Note you can move the question only once.
- Delete: Selected questions are deleted.
- Move To: Selected questions are moved to a different category that's selected using the drop-down list.
- Add: Click this button to add random questions. Select from the drop-down list how many questions you want randomly added to the quiz. Each attempt results in different questions.
Questions in this quiz
After moving questions to the left section titled Questions in This Quiz, you have more tools to help you organize, structure, edit, and preview your quiz. Refer to Figure 11-24; starting from the left, here are the columns in the table of questions:
- Order: Order the questions by clicking the up and down arrows next to the questions.
- Question Name: Lists the name of the question.
- Type: The icon depicts the type of question.
- Grade: In the input box, set the number of points for each question. Think about the type of question and the points you will add. For example, you may want to give a matching question, requiring 10 matches, more points than a True or False question. Moodle weighs each question to match the total points possible that you allocated the quiz when you set it up. Below the total points, you can set the Maximum Grade for the whole quiz. This number can be larger than the total — Moodle simply rescales the grades out of a maximum grade.
- Action: You can preview each question by selecting the magnifying glass icon. A new window opens with options to complete the question and several buttons: Submit the Page, Submit All and Finish, Fill with Correct, Start Again, and Close Window. The options allow you to see correct and incorrect answers with the feedback you've added.
Below the table of questions, you find these two check boxes:
- Show Page Breaks: If you want to add page breaks, after several questions, select the check box, and Moodle adds a Next button. I recommend you do add page breaks if you have many questions; otherwise, your learners will have to scroll.
- Show the Reordering Tool: Selecting the reordering tool allows you to increase line numbers between questions, starting at the top. Moodle increases lines in a factor of 10, leaving you room to insert new questions. You can leave the default or increase by a factor of 10 (recommended). Using line numbers and changing line numbers by the questions are ways to reorder the questions. If you added page breaks, the new pages are also given line numbers. However, if you remove the show page breaks, the line numbers aren't displayed, and only gaps show. I don't use the line numbers because they're a bit cumbersome. I find that by ordering question using page breaks and Moodle's own numbering system, the quiz is displayed well and efficiently.
When you're finished, don't forget to click the Save Changes button!
Previewing the quiz
After previewing your individual questions and adding them to your quiz, you need to preview and take the quiz yourself to make sure the layout, feedback, and points allocated for each question are all correct. From your Editing Quiz page, select the Preview Tab, and Moodle takes you to the quiz.
 To get to the Editing Quiz page, click the quiz from the Activities block on the course front page, and then select the Edit tab. Table 11-3 shows the icons you see on the Editing Quiz page.
Table 11-3 Moodle Editing Quiz Page Icons
If you set a keyword for the quiz, you need to enter it. Take the quiz, submit the answers, and finish. When you submit the finished quiz, Moodle returns a page with the results, as shown in Figure 11-25. Notice all the information Moodle gives to learners just below the name of the quiz: You see the date and time when the quiz was taken and completed, the time it took, the total points scored out of the maximum, the percentage grade, and general feedback.
Below the scores, Moodle displays the answers. In this particular example, if the answer is incorrect, the correct answer is not displayed because the teacher set up the quiz to let each student take it four times. If the student's answer is incorrect on the last try, the correct answers are displayed.
Figure 11-25: Reviewing a submitted quiz.

![]() If you allowed for shuffling within multiple-choice questions and have a combined answer (such as a, b, and c are all correct but answers d and e are not), shuffling doesn't work because the answers don't combine the same way the next time the student takes the quiz. (a, b, and c may include d as a, b, or c.) In this case, I recommend you use All or None as one of the multiple-choice options instead of a, b, and c. Be careful about using All of the Above as an answer because this answer may appear as a. You can, of course, choose not to use shuffling within multiple-choice questions and then not worry about inconsistencies if you have more than one answer correct and/or use All of the Above.
If you allowed for shuffling within multiple-choice questions and have a combined answer (such as a, b, and c are all correct but answers d and e are not), shuffling doesn't work because the answers don't combine the same way the next time the student takes the quiz. (a, b, and c may include d as a, b, or c.) In this case, I recommend you use All or None as one of the multiple-choice options instead of a, b, and c. Be careful about using All of the Above as an answer because this answer may appear as a. You can, of course, choose not to use shuffling within multiple-choice questions and then not worry about inconsistencies if you have more than one answer correct and/or use All of the Above.