3. Adding Pictures and Graphics

In this chapter, you learn techniques for working with pictures and other graphics. Topics include the following:
![]() Moving and Resizing Pictures
Moving and Resizing Pictures
![]() Working with the Picture Tools
Working with the Picture Tools
![]() Creating and Formatting WordArt
Creating and Formatting WordArt
![]() Inserting Borders & Accents
Inserting Borders & Accents
In Chapter 2, “Working with Page Elements,” you learned how to make adjustments to the page elements such as margins, orientation, paper size, color schemes, and backgrounds. In this chapter, you learn how to add and work with visual elements such as photos, WordArt, borders, and accents. Then, Chapter 4, “Adding Text Boxes,” shows you how to create and work with text boxes, so you can sneak in some information with your visuals.
Without question, adding photographs to your publication is the most popular way to incorporate colorful visuals. Realistic, razor-sharp-focused images immediately elevate a publication’s status and the credibility of the information within it. Publisher 2016 has a powerful collection of picture tools.
Inserting Pictures
Pictures are a powerful way to communicate. They guide readers through a publication by catching their eye, creating interest, illustrating key ideas, and controlling the flow. Key concepts can be reinforced and clarified by using informative picture captions and relevant images.
Think about the last marketing piece you got in the mail. What initially drew enough of your interest to glance at it, rather than just tossing it into the recycle bin? Unless it’s an “everything is free” flyer, it was probably the illustrations. Bright, colorful, briefly informative—they communicate as much as the text. Even more so to a reader in a hurry.
Inserting Pictures Stored Locally
When the image you want to use is stored either on your computer, or a computer on your network, you simply browse for the file to bring it in to the publication. In the next section, you learn how to locate an image online.
1. Click the Insert tab on the Ribbon. The Pictures command button is in the Illustrations group, along with the Online Pictures, Shapes, and Picture Placeholder command buttons.
2. Click the Pictures command button. The Insert Picture dialog box opens.

3. Use the Navigation pane on the left to browse to the folder that contains the picture you want to insert. If you are unsure how to browse through folders on your network, ask someone for help.
4. When you find the correct image, select it, and then click Insert (or double-click the image). Publisher inserts the image into the publication.

Picture Formats
Publisher 2016 accepts picture files in BMP, GIF, JPG, PNG, TIF, and WMF formats.
Inserting Pictures Stored Online
1. Click the Insert tab on the Ribbon. The Online Pictures command button is next to the Pictures button in the Illustrations group.
2. Click the Online Pictures command button. The Insert Pictures dialog box opens. This dialog box has Bing search built-in and a link to your OneDrive account. There are also links to help you insert photos from your Facebook and Flickr accounts.

3. Type a search phrase in the Search Bing box, and then click Search (magnifying glass) to get things started.

4. Initially, the search results contain images that are licensed under Creative Commons. There is an advisory to read the specific license for an image that you want to use to make sure you can comply.
5. Scroll down to see more search results.
6. Select one or more images; then click Insert to add them to your publication.

7. Alternatively, you can select an image from one of your OneDrive folders.

8. Click a folder to view the pictures within.

Understand Licensing
The standard warning is “just because you CAN use a photo from the Web, doesn’t mean you should.” Copyright issues are very complicated and no one wants to “steal” someone else’s work. If the image you want to use is not specifically labeled as free, you need to take a few minutes to read the licensing requirements. It may be as simple as adding a simple attribution in small print.
9. Select the photo that you want to use.
10. Click Insert to place it in the publication.

Inserting Pictures from the Scratch Area
When you insert pictures, either those stored locally or those found online, you always have the option to insert multiple pictures. Just as you select more than one file at a time, you select multiple pictures by clicking the first one and then holding down the Ctrl key to click the others. The selected files are placed in a “scratch area” of the workspace.
Using the scratch area, you can get all your pictures open and then drag and drop them as you need them. You can also drag and drop pictures from the publication back to the scratch area. It is like having a white-board on the side with your photographs tacked up waiting to be used.
1. Click the Insert tab.
2. Click the Pictures or the Online Pictures command button, depending on where your pictures are stored. Browse to where the pictures are stored.

3. Click to select the first picture, and then hold down the Ctrl key to select the rest.
4. Click Insert to place the selected pictures in the scratch area of the Publisher workspace.

5. You can now drag and drop pictures from the scratch area to the publication.

Moving and Resizing a Picture
Invariably, you will need to resize an inserted picture and also reposition it. And although that may sound intimidating, it’s actually super easy. You simply click and drag a picture to move it; and you click and drag the sizing handles to resize it.
1. Move the mouse pointer over the inserted image until you see the four-headed arrow. This is the universal move pointer.
2. Click and drag the picture to the preferred location; then release the mouse button to drop it there. You’ll see a “ghost” image of the picture to show you where the image will be positioned when you drop it.

3. To resize a picture, you must first select it. When you do, the sizing handles appear. There are circles at each corner, and squares on the sides.
4. Position the mouse pointer over a sizing handle and wait for the two-sided arrow to appear. This is the universal resizing pointer.
5. When you see the resizing pointer, click and drag the sizing handle to increase or decrease the size of the picture.
6. If you want to make absolutely sure that the picture maintains its original proportions, click and drag one of the corner handles.

Text Boxes
This was a “quick and dirty” introduction to moving and resizing an image (which is actually a file contained in a graphic box). These same techniques apply to moving and resizing text boxes, which you learn more about in Chapter 4.
Rotating Images
Notice the circle at the top of the image? You will also see this on text boxes (covered in Chapter 4). When you hover over this circle, the pointer changes to a clockwise facing arrow. This is a universal rotation handle. Clicking and dragging this handle rotates the image. Notice that as you click and drag, the pointer actually turns into a circle made up of four arrows. This new pointer appears as the image rotates.
Inserting Picture Placeholders
Picture placeholders are handy when you know how much room you want to dedicate to a photograph, but you aren’t exactly sure which photograph you will use. A picture placeholder can be moved and resized so that it literally holds the space that the photo will occupy. In this way, you can continue to format the rest of the publication.
1. Click the Insert tab on the Ribbon. The Picture Placeholder command button is the right-most button in the Illustrations group.
2. Click the Picture Placeholder command button. The picture placeholder appears in the publication. You can now move and resize this placeholder so that it takes up as much space as the picture when you insert that later.

3. When you are ready to replace the picture placeholder with an image, click the Insert Picture button in the center of the picture placeholder to open the Insert Pictures dialog box.

4. Using one of these methods to locate the picture, select and insert it into the publication, replacing the picture placeholder. You can continue to adjust the size and position of the picture until you are satisfied.


Delete a Picture
If you change your mind and you want to get rid of a picture, just select it and press Delete. If you accidentally delete the wrong picture, press Ctrl+Z or click the Undo button to reverse your action.
Working with the Picture Tools
As you work, you may notice that when you have a picture selected, a new tab displays above the Format tab—the Picture Tools tab. When this tab displays, a special set of commands, exclusively for pictures, is available on the Ribbon.
In this next section, you learn how to use the most frequently used features: creating captions, selecting a style, wrapping text around a picture, swapping pictures, and using corrections and recolor.
Creating a Caption
We all do it—we skim over headlines and glance at the photographs to decide if we are interested in reading further. Picture captions can be used to make a point, not just to describe what is in the picture.
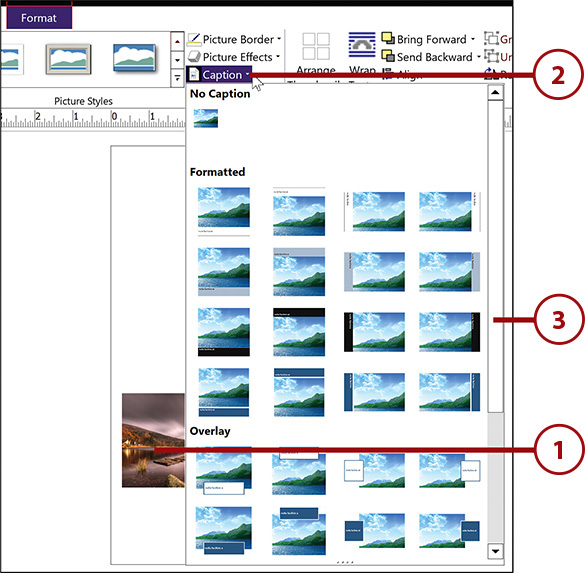
1. Select the picture to display the Picture Tools on the Ribbon.
2. Click Caption to open the palette of caption styles.
3. Scroll down to see the rest of the caption styles.
Style Pop-ups
If you hover over one of the caption styles, a pop-up appears with the title of that style.
4. Click the caption style you would like to use. When you do, a small text box appears below the picture. There are now two more tabs on the Format tab: the Drawing Tools tab and the Text Box Tools tab.

5. Select the sample caption text in the text box. When you do, the Picture Tools tab disappears and the Drawing Tools and the Text Box Tools tabs remain. This is a perfect example of how Publisher 2016 puts the tools you need right at your fingertips.
6. Type the caption text.
7. Format the caption text with the Formatting QuickMenu that appears. When you are done, click outside the caption text box to continue editing the publication.

Selecting a Picture Style
As with many design elements in Publisher, you can apply a collection of styles to pictures. Styles are your new best friend. They contain a series of formatting settings that you can apply to a picture all at once.
There are 24 different picture styles that you can preview and apply in just seconds. You can save so much time with styles, you may actually go out to lunch!
1. Select the picture to display the Picture Tools on the Ribbon. You may have to click the Format tab here.
2. Scroll through the picture styles.
3. Alternatively, you can click the More button to display a large palette with all the picture styles displayed.

4. When you highlight a style with the mouse pointer, the selected picture is updated to show you a preview of that style. The title of that style appears briefly when you highlight it.
5. Select one of the styles to apply it to the selected picture.
6. If you change your mind, and you want to remove a style, click Clear Picture Style at the bottom of the Picture Styles palette.

Wrapping Text Around a Picture
Building an effective, persuasive publication is enough of a challenge without worrying about excess white space around the images. And if you combine pictures and text, there will likely be gaps between them. Easy enough—select a text wrapping option, just as you would in Word.
1. Select the picture to display the Picture Tools on the Ribbon. You may have to click the Format tab here.
2. Click the Wrap Text command button to open a drop-down list of options.
3. Move the mouse pointer down through the Wrap Text options to preview that setting on the text and picture.
4. Select the setting that works best for you. Publisher reformats the text according to the setting you chose.

The More Layout Options command at the bottom of the Wrap Text options opens a Format Picture dialog box with tabs for Colors and Lines, Size, Layout, Picture, and Alt Text. The options in this dialog box enable you to make specific adjustments to the picture.
Swapping Pictures
Well, you’ve found two pictures that you think illustrate your point perfectly. The problem is you can’t decide which one should be the larger, more prominent image. It’s so easy to swap two pictures back and forth; you will probably do it just for fun. Simply select two pictures and click the Swap Pictures button.
1. Select the first picture.
2. Hold down the Shift key and then select the second picture.
3. Click the Swap command button.
4. Click Swap to swap the two selected pictures.

The Swap Formatting Only option swaps the formatting that you assigned to the selected pictures without altering the size and position of the originals.
Using Corrections and Recolor
The Corrections and Recolor options enable you to adjust the brightness, contrast, and picture color options. It’s a brilliant move to present a dozen options or so, let the user preview the effect, and then allow them to dig in deeper with additional options. You saw quite a bit of this with the page design options in Chapter 2.
1. Select the picture that you want to adjust.
2. Click the Corrections command button to display a large palette with the selected photograph shown with a variety of different brightness and contrast settings.

3. Move the mouse pointer over the thumbnail images, previewing the effect of that setting on the selected picture.
4. The original picture setting is shown in the middle of the options. The currently highlighted option is also selected and a pop-up identifies the brightness and contrast settings.
5. The selected picture is updated to reflect the currently highlighted setting, so you can immediately see the results. When you find the ideal setting, select the thumbnail to apply that brightness/contrast setting to the picture.

6. With the picture still selected, click the Recolor command button.
7. Move the mouse pointer over the color settings to see a preview of the setting applied to the selected picture. A pop-up identifies the name and specific RGB settings.

8. Click More Variations to open a color palette with the scheme colors, standard colors, and recently selected colors. In this way, you can choose another color to use as a recolor option.

Reset Formatting
If you change your mind, and you want to start over, you can reset the picture formatting. Select the picture, and then click Reset Picture in the Adjust group.
Setting a Picture Background
Quite a few options are available for creating a background for a picture. So many in fact, you may forget why you wanted to create the background in the first place. You will recognize the options for a picture background from the steps to create a page background, covered in Chapter 2.
2. Click the Background command button to display a palette of options: No Background, Solid Background, and Gradient Background.
3. Click More Backgrounds to display the Format Background dialog box. This is the same dialog box that you worked with in Chapter 2.

4. Select one of the option buttons to display the specific settings that can be adjusted for each type of fill.

5. For example, select Gradient Fill, and then make your adjustments to the gradient options that appear.
6. Click OK when you are satisfied with the settings and you are ready to apply it as the picture background.

Master Backgrounds
Creating a picture background is an excellent example of the use of master pages. If you create your background on the master page, it is automatically applied to all the pages in the publication. For more information on setting up and editing master pages, see Chapter 8.
Adding WordArt
WordArt does just what it sounds like—it lets you create art out of words. You type in a word or phrase and then manipulate it to create art. The results may not fall into the “polished and professional” category, but the casualness of the result is friendlier, warmer—maybe less intimidating?
Whatever the case, WordArt started as a small utility that you ran outside of Word. It has become so popular that Microsoft built it in and continues to include it in each new release. It’s simple to use and fun!
Inserting WordArt
Inserting WordArt into a publication is a two-step process: select the style, type the text, and voila! You can then consider that job done, or you can use the WordArt Tools to format and tweak the design. Be warned—a little “minor” tweaking can turn into a 2-hour playtime.
1. Click the Insert tab to display those options.
2. Click the WordArt command button. This opens a palette of WordArt styles.
3. Click the style that best suits your publication. You can always change it later.

4. The Edit WordArt Text dialog box appears with the sample text highlighted, so all you have to do is start typing. Your new text automatically replaces the sample text.
5. If necessary, select a different font from the drop-down list.
6. Select a different size here if you like.
7. Click OK when you finish.


You may have already seen WordArt in Word or PowerPoint. In the Office 2016 suite, it is available in Excel, Publisher, and Outlook as well. The WordArt command button is located on the Insert tab.
Formatting WordArt
When WordArt is selected in a publication, there is a new WordArt Tools tab on the Format tab. The tools enable you to select a different style, change the shape, select a fill, and apply effects to the shape.
1. To change the shape of the WordArt, click the More button to display the same large palette of styles you saw in the previous section, when you inserted the WordArt.
2. Click the Change Shape command button to open a palette of shapes you can assign.
3. Move the mouse pointer over the shapes in the palette to get a preview of how the WordArt will look if you assign that shape.

4. Click the Shape Fill command button to open a palette of Scheme Colors, Standard Colors, and Recent Colors.
5. Click here to select a picture as the fill for the shape.
6. Click here to select a gradient for the shape.
7. Click here to select a texture for the shape.
8. Click here to select a pattern for the shape.

9. Click the Shape Effects command button to open a list of different effects that can be applied to the WordArt.
10. Each of the Effects options opens a palette where you can preview and select an effect. There is also an Options option that opens a dialog box where specific settings can be made.

Adding Borders & Accents
Another way you can quickly add professionally designed graphics to your publication is to select them from the Building Blocks Library. Just as a template provides you with premade publications you can use immediately, the Building Blocks Library provides you with premade graphics that you can use immediately. You can find everything from headings and pull quotes to calendars to advertisements to logos to frames and decorative lines.
1. Click the Insert tab to display those options.
2. Click the Borders & Accents command button in the Building Blocks group.
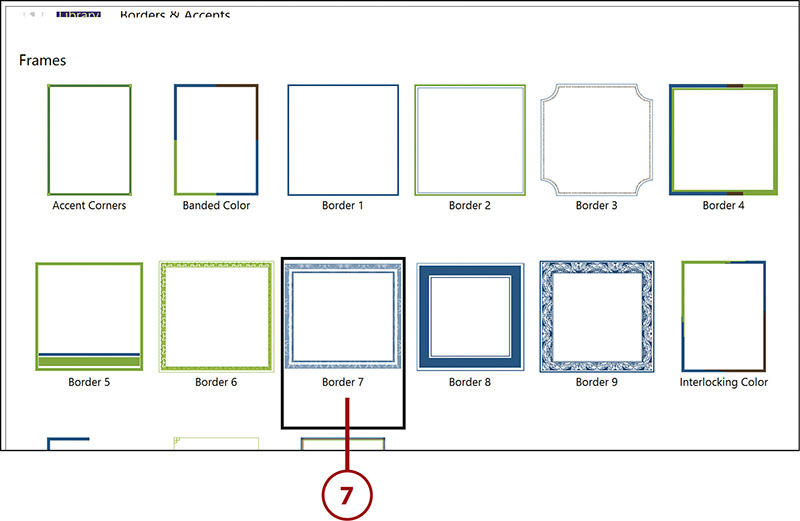
3. Scroll down to preview the Bars, Emphasis, and Frames options.
4. Click More Borders and Accents to display the Building Block Library dialog box.

5. Scroll down to browse through the Bars, Boxes, Emphasis, Frames, Lines, and Patterns.
6. Click one of the thumbnails to display a larger image and the name of the item.

7. Double-click an item to insert it into the publication.