
7. Incorporating Tables

In this chapter, you learn techniques for incorporating tables into your publications. Topics include the following:
![]() Inserting, Resizing, and Moving Tables
Inserting, Resizing, and Moving Tables
![]() Using the Layout Tools to Make Changes to the Table Contents
Using the Layout Tools to Make Changes to the Table Contents
![]() Using the Design Tools to Make Changes to the Table
Using the Design Tools to Make Changes to the Table
![]() Importing Spreadsheets and Graphs
Importing Spreadsheets and Graphs
Whenever you need to organize information into rows and columns (in a grid), you want to use tables. They are super easy to create, manipulate, and format. In just a few minutes, you can create lists, invoices, schedules, fill-in-the-blank forms, and much more.
The contents of a table cell are not limited to text. Photographs, clip art, and other types of graphics can be placed in a cell. With the ability to print the lines (or not), tables will quickly become your go-to tool for presenting information in columns.
Creating, Resizing, and Moving Tables
Creating a table takes seconds. Planning how you want to set up the table takes a little longer. First, sketch out an idea of how you want to organize the information. How many columns will you need? Second, try to guess the number of rows, but those are easy to add. Columns—not so much. It can be done, but it usually requires tweaking the size of all the other columns.
As far as Publisher is concerned, the table is just like any other “box.” You can click and drag it to move and resize it just like you did with the pictures and text boxes in Chapter 3, “Adding Pictures and Graphics,” and Chapter 4, “Adding Text Boxes,” respectively.
Inserting Tables
There are two methods to create a table: click and drag across a grid, or use a dialog box where you can type in the number of rows and columns. Which method you use depends on how comfortable you are with the mouse. If you have trouble with the finer movements, just use the dialog box.
1. Click the Insert tab to switch to those options.
2. Click the Table button to open the Insert Table grid. This is where you click and drag to create the table.

3. Click and drag across the grid to select the number of rows and columns you want. When the dimensions are correct, release the mouse button to create the table.

Table Terminology
Tables are similar to spreadsheets, so the terminology is similar. The intersection of a row and column is called a cell. As you enter text, Publisher wraps the words within the cell, adding lines to the row to accommodate what you type. Therefore, a row is as tall as the tallest cell within it.
4. For this example, undo the creation of the table so that you can create a new one using the second method. Press Ctrl+Z or click Undo.
5. Click the Insert tab.
6. Click the Table button to open the Insert Table grid.
7. Click Insert Table at the bottom of the grid. This opens the Create Table dialog box.

8. Specify the number of rows here.
9. Specify the number of columns here.
10. Click OK to create the table.

Resizing Columns
One of the first things you’ll want to do after you create a table is to resize the columns (skinny columns for dates, wider columns for descriptions). Simply hover the pointer over a column border and wait for the double-arrow to appear. Click and drag to resize that column. Rows adjust their size automatically. Should you want to manually resize a row, hover over a row border, and then click and drag it to resize the row.
Resizing Tables
It’s usually apparent when you start entering the information if you need to increase the size of the table. If you find that you need more room, either for more columns or for wider columns, consider using a landscape page, which is 11″ wide, versus the 8½″ wide portrait page.
There are two methods for resizing tables: Use the mouse to click and drag the sizing handles or use a dialog box and type in exact dimensions.

1. Select the table so that a thick border appears around it.
2. Hover over a sizing handle until the double-headed arrow appears.

3. Click and drag the sizing handle to increase or decrease the size of the table.
4 Release the mouse button when the size is right.

5. Right-click the table to display the QuickMenu.
6. Click Format Table.

7. In the Format Table dialog box, click the Size tab.

9. Type the width here.
10. Click OK to adjust the size.

Moving Tables
Just as with resizing, you have a couple options for repositioning a table. The first is to simply click and drag the table to a new location. The second is to use the Format Table dialog options to set a precise position on the page.
1. Select the table so that a thick border appears around it.
2. Hover over a border until you see the four-headed arrow. This is the universal move pointer.
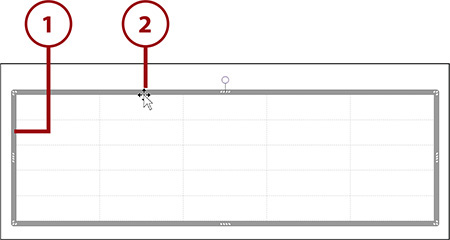
3. Click and drag the table to a new location.
4. Release the mouse button to drop the table into position.
5. Alternatively, right-click the table to display the QuickMenu.


7. In the Format Table dialog box, click the Layout tab.
8. Type the Horizontal position here.
9. Open the adjacent From drop-down list and choose an option.
10. Type the Vertical position here.
11. Open the adjacent From drop-down list and choose an option.
12. Click OK to adjust the position.

Working with Layout Tools
The formatting commands for tables are divided into two categories: layout and design. The Layout tools are for working with rows, columns, and cells; the Design tools are for polishing the overall look of the table. Specifically, you use the Layout tools to insert rows and columns, to merge cells, and to split them. There is even a command button to insert diagonals in a cell.
The alignment options are used to position the contents of a cell, in the cell. You can change the text direction, which is fantastic when you want to label narrow columns—you simply rotate it sideways and use a tall header row.
Inserting/Deleting Rows and Columns
Sometimes when you start entering information into a table, you realize you are trying to put in too much text. To pare down a table, you can remove rows and columns.
1. Click inside the table where you want to insert a row.
2. Click the Layout tab (of the Table Tools tab).

3. Insert a row above the insertion point.

4. With the new row still selected, click Delete.
5. Click Delete Rows.

Undo Deletions
Remember, if you accidentally delete something important, you can always Undo the deletion. Press Ctrl+Z or click Undo.
Right-Click Menus
Some people live and die by the right-click menus. They are handy for frequent tasks, such as inserting or deleting a row/column. Right-click where you want to insert or delete the row/column; then click either Insert or Delete. Click your choice from the submenu.
6. Click in the table where you want to insert a column.
7. Click Insert Left or Insert Right to insert the column to the right or left of the insertion point.

8. With the new column still selected, click Delete and then Delete Columns.

Merging and Splitting Cells
Publisher lets you merge one or more cells together into one big cell. For example, you can create a title row by joining the cells in the top row together. If you change your mind later, you can always reverse the process by splitting the joined cells. You can split only previously merged cells (returning them to their original layout).
1. Click inside a table to display the Table Tools tab.
2. Click the Layout tab.

3. Select the cells that you want to merge (Shift+arrows).
4. Click Merge Cells to join the selected cells into one big cell.

5. With the newly merged cell still selected, click Split Cells to return them to their original layout.

Adding Diagonals
The Diagonals feature splits a table cell from the left down to the right, or from the right down to the left. Select one or more cells, click Diagonals, and then Click Divide Down or Divide Up. To remove a diagonal, select the cell(s), and then click Diagonals, No Division.
Aligning Contents in a Cell
Publisher makes it incredibly easy for you to align the contents of a cell within that cell. There are nine handy buttons on the Layout tab: Align Top Left, Align Top Center, Align Top Right, Align Center Left, Align Center, Align Center Right, Align Bottom Left, Align Bottom Center, Align Bottom Right.
1. Click inside a table to display the Table Tools.
2. Click the Layout tab.

3. Select the cells that you want to align.
4. Click one of the alignment buttons.
Vertical Text
The direction of text in a cell can be changed from horizontal to vertical with just a simple click. Click in the cell, and then click Text Direction. Click it again to switch back.


Publisher has some preset margin settings to choose from. Cell margins can be set to narrow (.04″ on all sides), moderate (.06″ on all sides), or wide (.1″ on all sides). There’s also a Custom Margins option where you can type in exactly what you want.
Setting a Table Size
Sometimes you need to create a form to exact specifications. If you need to set a specific size for the table, do it with the Height and Width options in the Size group.
1. Click inside a table to display the Table Tools.
2. Click the Layout tab.
3. Type a specific height here.
4. Type a specific width here.
5. Set the table to grow as you add more text.

Wrapping Text
The Wrap Text command button in the Arrange group opens a list where you can choose how you want text to wrap around the table. The choices are None, Square, Tight, Top and Bottom, Through, and Inline with Text. These are the same options you saw when you worked with pictures and text boxes in Chapters 3 and 4, respectively.
Working with Design Tools
Up until now, you’ve learned how to work with cells, rows, and columns using the tools on the Layout tab. In this section, you learn how to use the Design tools to improve and manage the appearance of the table as a whole. By far, the most popular option is to apply one of the predefined table styles to bring color and polish to a table. Other features include applying a fill to a cell or selected cells and setting border options.
Applying a Table Style
There is a gallery of table styles that can be applied to a table. Rather than formatting the lines, fill, and other elements separately, a table style lets you format all those in one step.
1. Click inside a table to display the Table Tools.
2. Click the Design tab.
3. Scroll down through the table styles.
4. Click the More button to open the palette.

5. Click one of the styles to apply it to the table.
6. Scroll down to see the complete list of styles.
7. Click the dialog launcher to open the Format Table dialog box.

QuickTips
If you hover over one of the table styles in the palette, a QuickTip appears identifying the name of that style.
9. Set the line options here.
10. Click OK when you finish.

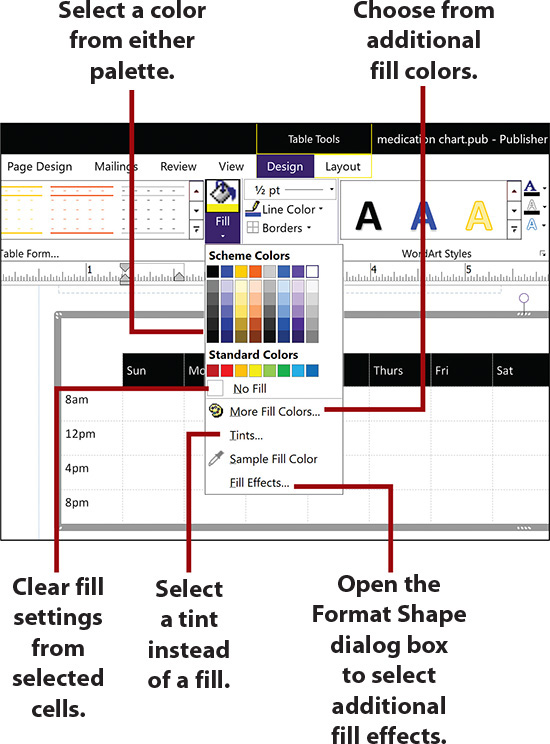
Applying a Fill to a Cell
A fill is a colored or shaded cell background. A fill color can be applied as a solid color or in a pattern. The same fill options that you saw when you worked with pictures and text boxes are available for table cells.
1. Click inside a table to display the Table Tools.
2. Click the Design tab.

3. Select the cell or cells that you want to apply a fill to.
4. Click the Fill command button to open a palette of options.

Selecting Border Options
Initially, a table doesn’t have a border. The thick border you see on-screen when you select it is a nonprintable border. It exists solely to delineate the dimensions of the table, as do the gridlines inside of the table. Those gray lines will not print either. You can easily add borders—using the border options.
1. Click inside a table to display the Table Tools.
2. Click the Design tab.

3. Select the cell(s) that you want to assign a border to.
4. Right-click in the selected cell(s) to display the QuickMenu.
5. Click Format Table.
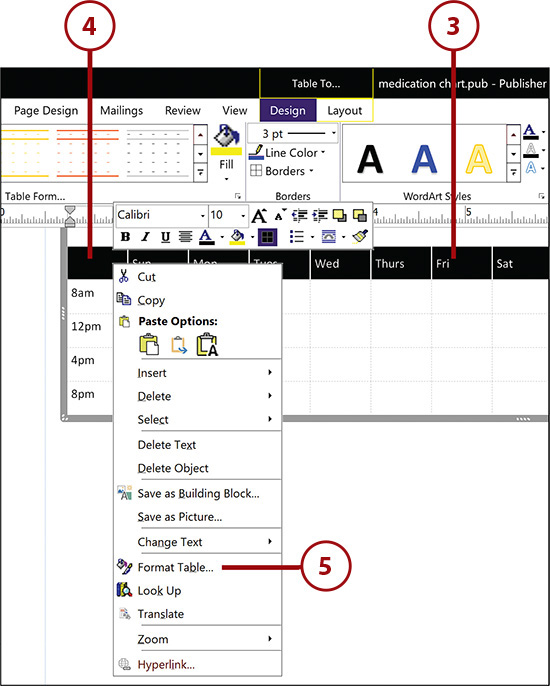
Format Table Dialog Box
Although you can select from the Borders, Line Color, and Line Weight lists in the Borders group of the Design tab, it’s more intuitive to use the Format Table dialog box. You can preview the settings before you actually apply them to the table.
6. Click one of the preset buttons to assign a border to the cell(s).
7. Change the color of the border.
8. Click the spinner arrows to increase or decrease the line width.
9. Click OK when you are satisfied with the preview.

Importing Excel Spreadsheets and Graphs
If someone has already gone to the trouble to build a spreadsheet, and subsequently, some persuasive graphs, bring them right into Publisher! The beauty of software integration, and Microsoft Office suite integration in particular, is that you can import an Excel spreadsheet and graph seamlessly.
Importing a Spreadsheet
Sometimes, presenting the actual data is the most compelling way to deliver a report. Numbers don’t lie, as is said, so a spreadsheet that shows how the numbers are related can be invaluable.
1. Click the Insert tab.
2. Click the Object command button to display the Insert Object dialog box.

3. Click Create from File to switch to browse features.

4. Click the Browse button to browse your system for the spreadsheet file.

5. When you locate the file, click Open.

6. Click OK to insert the file.

Importing Spreadsheets
Often, when you import a spreadsheet, you are left with a bunch of empty rows and columns. There is another method that is ideal for small spreadsheets: In Excel, select only the cells that you want to appear, and then press Ctrl+C to copy. Switch to Publisher, and then press Ctrl+V to paste the selected cells into the publication.
Paste Spreadsheet into Table
If you want to manipulate the rows and columns of data after you bring it into Publisher, you can paste a spreadsheet into a table. That table must already have the same number of rows and columns as the selected spreadsheet.
Link to a Spreadsheet
You may have noticed the Link check box in the Insert Object dialog box. This option creates a link to the spreadsheet, so any changes made in the spreadsheet will be reflected in the Publisher publication the next time it is opened.
Importing a Graph
Importing a graph into Publisher is a great way to illustrate your point and to capture your audience’s attention. Nothing grabs them like a colorful graph, especially when it illustrates the data clearly and quickly.
As with almost everything in Publisher, there are a few ways to import a chart. Your time is valuable—let’s go straight to the quickest and easiest way to import a chart into Publisher: copy and paste. Seriously.
1. In Excel, select the chart you want to import into Publisher.
2. On the Home tab, click Copy.

3. Back in Publisher, click Paste.

4. Select the imported chart to resize, move, or otherwise continue editing.
