
2. Working with Page Elements

In this chapter, you learn how to work with page elements. Topics include the following:
![]() Adjusting Page Margins
Adjusting Page Margins
![]() Choosing Another Paper Size
Choosing Another Paper Size
![]() Moving and Deleting Pages
Moving and Deleting Pages
![]() Selecting Another Color Scheme
Selecting Another Color Scheme
Now that you know you can get a running start with the templates, you can put your fear of creating an entire publication from scratch to rest. It’s time to learn how to make adjustments to those templates (or other publications that are available to you). This chapter covers working with page elements.
You’ll be pleased to find that much of this chapter will look familiar. Changing the margins in Publications isn’t much different from changing them in Word. The steps to change the paper size and orientation are also similar to those in Word. Thank goodness!
Changing the Margins
In Publisher, you don’t actually set margins—you set margin guides at a certain position, and then line up items on the guides. Publisher starts out with margin guides set to .75″ on all sides. To alter these settings, use the Margins command on the Page Design tab.
1. Click the Page Design tab to display those options.
2. Click the Margins command button to open the palette of predefined options.
3. Click one of the four predefined options to quickly set all four margins.
4. Click the Custom Margins command to open the Layout Guides dialog box where you can set all four margins at once.

5. Click the spinner arrows to increase or decrease the setting, or click in the box and type the setting.
6. Click OK when you are finished.

Master Pages
Notice that the Layout Guides dialog box has an option for the Master Pages. You’ll learn how to work with master pages in Chapter 8, “Working with Master Pages.”
Changing the Orientation
Should you decide that you prefer to lay out your document on a landscape page, you can switch from portrait to landscape, and back again. You can find the Orientation command on the Page Setup tab.
1. Click the Page Design tab.
2. Click the Orientation command button to open the palette of options.
3. Select your preferred orientation and Publisher reformats the page. Your design may or may not be suited to the new orientation. If you don’t like the results, just switch back.

Put Another Way
If you have trouble remembering the difference between portrait and landscape, just think about how a beautiful sunset looks and that you would normally see that spread out across the width of a page (landscape).
Changing the Paper Size
When you start a typical blank publication, it is formatted for an 8½″ × 11″ piece of paper. You’ve just seen how you can rotate that page to a landscape orientation, or 11″ × 8 ½″. Just as you might expect, Publisher supports the most common paper sizes, and the vast collection of other blank page sizes that you first saw in the section, “Browsing Through the Built-In Templates” in Chapter 1, “Getting Started with Publisher 2016.”
1. In the Backstage, click New to display the New page.
2. Click the More Blank Page Sizes button to open a seemingly infinite list of page sizes to choose from.
3. Scroll down through the Standard sizes, through the Publication types, where the paper sizes are organized by type, down to the Manufacturers, where the wealth of paper sizes lies.
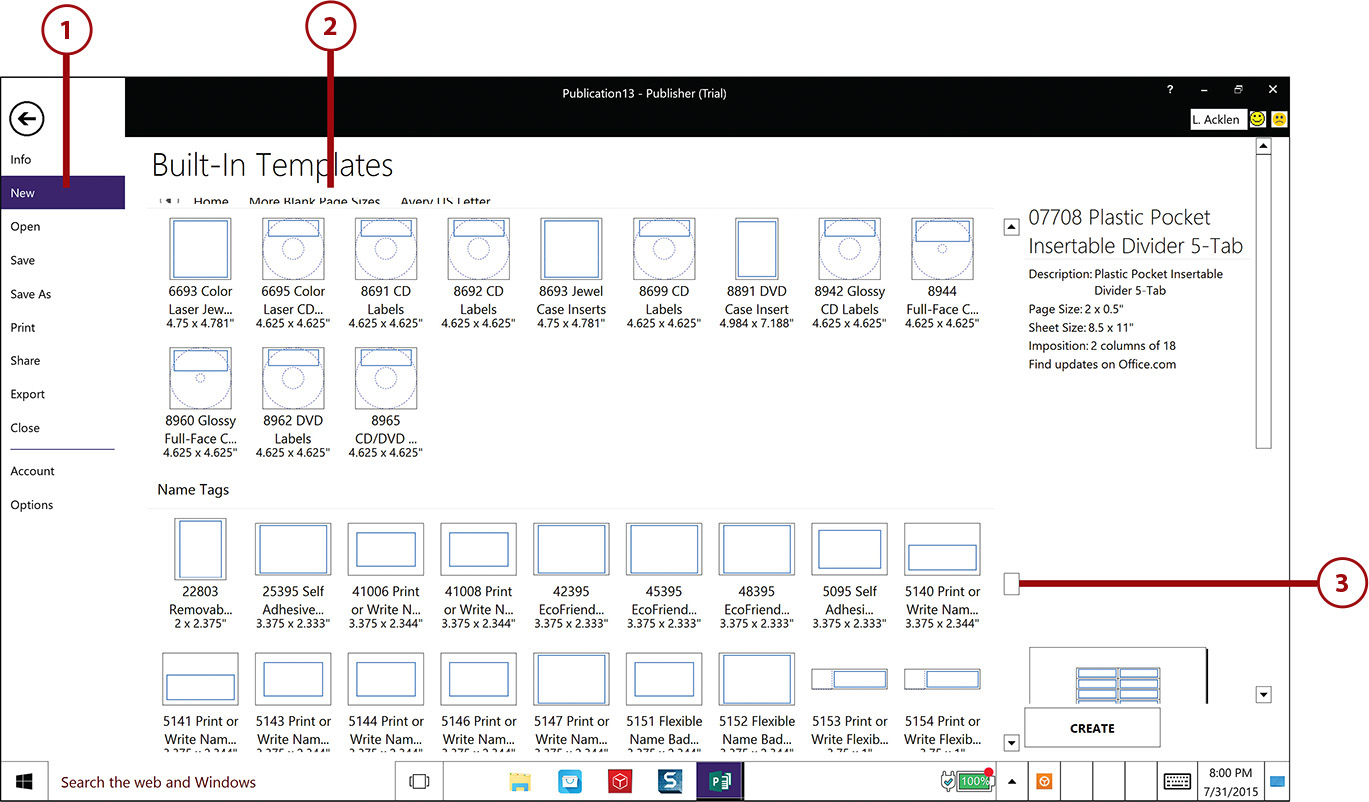
4. When you find the paper size you want, a single click displays information about that template in the right pane.
5. A double-click opens that template in the workspace.

Publisher 2016 enables you to create your own custom page sizes, so you can tackle any size project. In the list of More Blank Page Sizes, just under the Standard paper sizes, you can find the Create New Page Size button. Click this button to open the Create New Page Size dialog box where you can specify the height and width of the page and margin guide settings, all in one place.
Working with Pages
New pages can be added to a publication with two simple clicks. New pages can be blank, or they can be duplicates of another page. The entire process is geared toward being as quick and easy as possible.
As you work in this multipage publication, you see how the Navigation pane makes moving through the publication simple—scroll up and down through the publication and click the page you want to move to.
Rearranging pages is surprisingly easy using the Navigation pane. Simply click and drag the page to its location, and then drop it into place. Multiple pages can be selected and moved (or copied) all at once.
Creating New Pages
New pages can be added at any time because you have control over the placement, so don’t worry about the number of pages you may need when you begin. Add them as you go along.
1. Click the Insert tab to display those options.
2. Click the small arrow at the bottom of the Page command button to open the drop-down list of options.
3. Click Insert Blank Page to insert a blank page after the selected page.

4. Click Insert Duplicate Page to insert a duplicate of the selected page after that page.
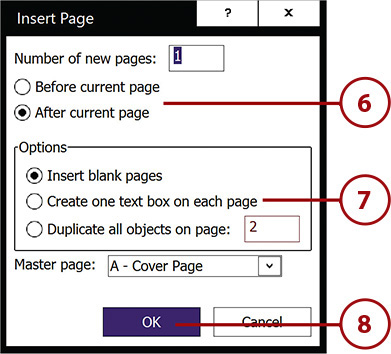
5. Click Insert Page to open the Insert Page dialog box.

6. To insert multiple pages before or after the selected page, make those selections in the top section.
7. Now, select from the three options that could save you a lot of time duplicating.
8. Click OK to insert the pages.
Blank Pages
If you just want to create a blank page after the selected page, click the Insert tab, and then click the Page command button (not the small arrow).
Moving Pages
It doesn’t take long to figure out how to move and copy things in Word to save time. The same principles apply in Publisher. For example, say you duplicate a page to act as a model for a new page. The two identical pages are next to each other, and you need to move the duplicate page further down in the publication.
You can accomplish this in two ways. The method you choose depends on your comfort level with clicking and dragging. It’s faster to click and drag, but you have more control in the dialog box.
1. Click the page you want to move and drag it down (or up) through the publication. You see a ghost image of the selected page scrolling down (or up) as you drag.

2. When you get to the location where you want the page, release the mouse and drop it into position.

3. Alternatively, you can right-click the page you want to move. This opens a menu of options.
4. Click Move to display the Move Page dialog box.

5. Select Before to insert the new page before the selected page, or leave After selected to insert the new page after the selected page.
6. Select the place within your publication where you want this page to go.
7. Click OK to move the page.

Deleting Pages
As you continue to work with your publication, you may end up with a stray page or two. You can easily deleted these extra pages. Publisher gives you a nice warning if you are about to delete a page that contains objects.
1. Right-click the page you want to delete.
2. Click Delete. If there is so much as a single space on the page, you see a warning message.

3. Click Yes to confirm the deletion or No if you want to take a second look.

Undo Deletions
Don’t forget—even if you do accidentally delete a page that has something you need—as long as you Undo (Ctrl+Z) right away, you can bring it all back.
Changing the Color Scheme
A color scheme is a collection of colors used in the various elements of a page. Selecting a different scheme is the quickest way to personalize a template or to fine-tune a publication. There are more than 20 Built-in schemes and more than 70 Built-in Classic schemes, and you can create your own. You’ll be like a kid in a candy store when you start looking at all the choices!
Previewing and Picking a New Scheme
As you move the pointer over a new color scheme, Publisher 2016 shows you how that scheme will look dynamically. In other words, as you highlight a new scheme, the publication underneath is updated, so you can immediately see the results.
1. Click the Page Design tab. Focus on the Schemes group. Initially, you see a small subset of the available schemes.

2. Move the mouse pointer over these schemes and watch how your publication is updated.
3. Click the scroll arrows to move slowly through the list of schemes.
4. Click the More arrow at the bottom of the scroll bar to display a large palette of schemes. This large palette makes it easy to see all the combinations.

5. Move the pointer through these schemes, to see if any suit your preferences.

Creating a Custom Color Scheme
If you have a few minutes and a clear vision of what you want, you can create your own scheme. The components of a color scheme are one main color, five accent colors, and two colors to mark your hyperlinks.
1. At the bottom of the Schemes palette, click Create New Color Scheme to open the Create New Color Scheme dialog box.

2. First, type a name for your scheme in the Color Scheme Name box. For example, type Menu1.
3. To change the main color in the scheme, click the drop-down arrow next to Main to open a color palette. The current color displays in the left column, so you can compare it to the new color that you select from the palette. And yes, if you click More Colors, you can create your own custom color!
4. Continue opening palettes for each of the accent colors, and if necessary, change the hyperlink and followed hyperlink colors as well. Experiment with different combinations to your heart’s delight!
5. Click Save to create the custom scheme.

6. The newly created color scheme is shown at the top of the list.

Changing the Page Background
Setting a page background is a small, important detail. It adds another level of luxury to the publication. Publisher 2016 has a great collection of built-in backgrounds that are solid and in gradient patterns. And here as well, you can create your own custom background. Honestly, with all the customizing you can do, it’s a wonder you get any work done at all!
Selecting a Page Background
The Background button is in the Page Background group on the Page Design tab. The Publisher 2016 interface includes a palette of options to choose from and a magic button that opens a dialog box where you can select from a bunch of different options at once.
1. Click the Page Design tab.
2. Click the Background button to display the palette of backgrounds.

3. Highlight one of the solid backgrounds and notice how the pop-up identifies the percentage of tint and the number of the accent. Select a solid background from one of the 12 options (varying shades and intensities) to apply it.
4. Highlight one of the gradient backgrounds and notice how the pop-up identifies the accent number and whether the gradient is horizontal or vertical. Select a gradient background from the eight types available.

Creating a Custom Background
This time you create a custom background, but not in the sense that you can name, as you did with the color scheme, but in the sense that you can select from the entirety of the options in one place. Maybe in a future release, Microsoft will add the ability to name the background so that you can use it again.
Selecting Solid Fill Options
In the Format Background dialog box, there are several different types of fills. The Solid Fill option displays the two components that you can customize: color and transparency.
1. Click the Page Design tab.
2. Click the Background button to display the palette of backgrounds.
3. Click More Backgrounds.

4. In the Format Background dialog box, select Solid Fill. The two options for a solid fill are color and transparency.
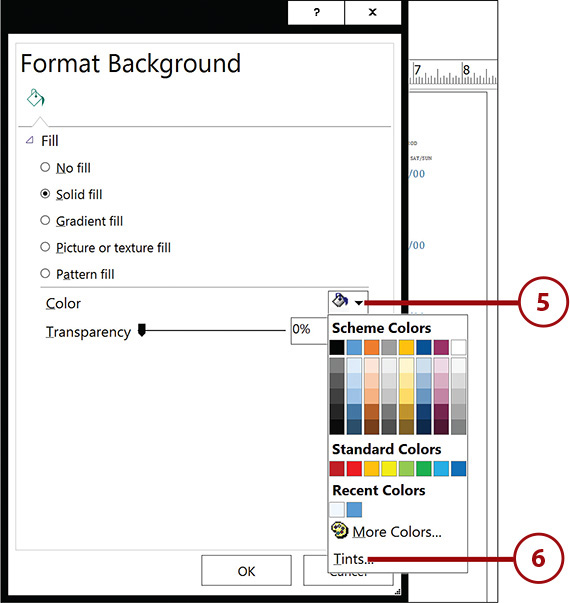
5. Click the Fill Color button to open a palette of colors: Scheme Colors, Standard Colors, Recent Colors, and the More Colors option, which opens a Colors dialog box where you can pull colors off the color wheel.
6. Click the Tints option to open the Tints dialog box.

7. There are 21 different tints and shades you can select. Click one of the tints/shades and notice how Publisher identifies the percentage of tint/shade and shows a bigger sample in the lower-right corner.
8. Click the Base Color drop-down arrow to open a palette of suggestions and the usual More Colors command, which lets you choose colors from the color wheel.
9. Select another base color. Publisher updates the tint/shade palette to reflect that new color.
10. When you are satisfied with your level of tint/shade in your color, click OK to return to the Format Background dialog box.


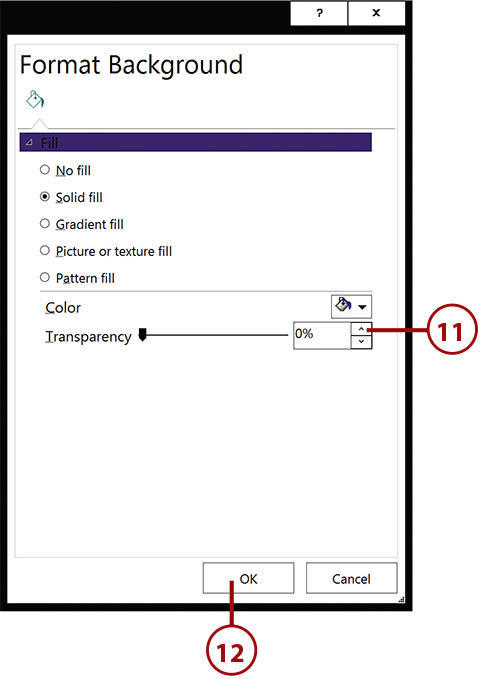
11. Click the Transparency spinner arrows or select the percentage and type your own percentage. A higher transparency makes the background lighter so you can read the text better.
12. When you are satisfied with your selections, click OK.
Pick Base Color
It may be easier to select the right tint/shade if the base color is chosen first.
Selecting Gradient Fill Options
The Gradient Fill option has quite a few options that can be set: present gradients, type, direction, angle, gradient stops, color, position, and transparency. Suffice it to say that you can open each palette and drop-down list and make your selections.
2. Click the Background button to display the palette of backgrounds.
3. Click More Backgrounds.

4. In the Format Background dialog box, select Gradient Fill to display those options.
5. Make your selections. When you are satisfied, click OK.

Selecting Picture or Texture Fill Options
The Picture or Texture Fill option does exactly what it says—it lets you select a picture or a texture to use for a fill pattern. It’s fairly self-explanatory. The options look a little intimidating, so try to focus on selecting a texture from the palette and leaving the fine-tuning for another time.
1. Click the Page Design tab.
2. Click the Background button to display the palette of backgrounds.
3. Click More Backgrounds.

Master Pages
If you want the background that you so painstakingly created to apply to all the pages in the publication, you must make your selections on the master page. For more information on setting up and editing master pages, see Chapter 8.
4. In the Format Background dialog box, select Picture or Texture Fill to display those options.
5. Click one of the buttons to insert a picture from a file, from the clipboard, or from an online source.
6. Click the Texture button to display a palette of choices. Select one of the textures.
7. When you are satisfied with your selections, click OK.

Selecting a Pattern Fill
Applying a pattern fill is actually a three-step process. First, you choose a pattern. Second, you select a foreground color. Third, you select a background color.
1. Click the Page Design tab.
2. Click the Background button to display the palette of backgrounds.
3. Click More Backgrounds.

4. In the Format Background dialog box, select Pattern Fill to display those options.
5. Click one of the patterns in the Pattern palette.
6. Click the Foreground button to display a palette of colors. Select the color you want to use for the foreground in the pattern.
7. Click the Background button to display the palette of colors. Select the color you want to use for the background in the pattern.
8. When you are satisfied with your selections, click OK.
