
1. Getting Started with Publisher 2016

In this chapter, you learn how to get started with Publisher and to perform various tasks. Topics include the following:
![]() Identifying the Publisher Window Elements
Identifying the Publisher Window Elements
![]() Becoming Familiar with the Template Collection
Becoming Familiar with the Template Collection
![]() Creating and Printing a Calendar
Creating and Printing a Calendar
Publisher is the ultimate diamond-in-the-rough application. Surprisingly, some Office users don’t know of its existence, and if they do, they mistakenly think it’s an intimidating desktop publishing program. Before you go any further, you should know that it is one of the easiest, and certainly the most fun, of the applications in the Office suite.
There are hundreds of templates to choose from, with more added to the online resource library all the time. There is so much untapped potential to improve the appearance of your business documents, to improve consistency across your presentation documents, and to save untold thousands on professional printing costs. In addition, when you need the quality of professional printing, Publisher can generate a file that contains everything you need.
Because Publisher can run on both touch screen devices and traditional PCs, I use “click” to represent both click and tap, and “double-click” to represent both double-click and double-tap.
Identifying the Publisher Window Elements
For the moment, assume you have not used Publisher before and you may be struggling to make sense of the Publisher window. Even if you’ve used other desktop publishers and you’re familiar with the concepts, when you sit down to a new application, you need to know where your tools are located.
If you are coming from Publisher 2013, the new features are all under the hood—they aren’t readily apparent from the interface, so you won’t notice a difference at first.

• Ribbon—The Ribbon is the thick bar at the top of the workspace. It is composed of tabs and command buttons. You can collapse the Ribbon so that it takes up less room in the workspace.
• Quick Access toolbar—The Office 2016 apps all have a Quick Access toolbar. You can customize the toolbar to suit you; simply click the down arrow to open a list of buttons that you can add (and remove) from the toolbar.
• Tabs—Publisher 2016 has seven tabs: File, Home, Insert, Page Design, Mailings, Review, and View. These tabs contain commands in a logical grouping.
• Groups—Related commands are organized into groups. Each group has a label. All these visual cues help you locate commands.
• Dialog launchers—In many cases, a group will have a small down-pointing arrow in the lower-right corner of the “box.” This is a dialog launcher. Clicking this button opens a dialog box where you can make multiple changes at once.
• Command buttons—Command buttons contain the name of the command and a visual representation of it. Click the button to execute the command (or open a palette of options).
• Rulers—Publisher has both a vertical ruler and a horizontal ruler to help you position objects with precision.
• Page navigation pane—When you work with a multipage publication, you can move quickly through it by scrolling through the Page navigation pane and clicking the page you want to edit.
Getting Familiar with the Ribbon Tabs
Rather than grouping commands in a menu structure, the Ribbon organizes related commands into tabs that contain groups of commands. It’s a visual way to organize commands, and rest assured—everything is still there. For those commands that you use frequently, the shortcut keys that you are familiar with still work in Publisher 2016.
1. Click the Page Design tab. This tab contains the commands you need to insert objects, such as photos, borders, tables, and text boxes.
2. Click the small down-facing arrow in the lower-right corner of a Page Setup group.

Group Names
Notice that the Ribbon commands are separated by thin vertical lines, which form a box. The name of the group is at the bottom of that box. The first two commands on the Page Design tab—Change Template and Options—are in the Template group; Margins, Orientation, and Size are in the Page Setup group; and so on.
Dialog Launchers
The small down-facing arrows in the lower-right corner of some groups are called dialog launchers. The dialog launcher in the lower corner of the Page Setup group opens the Page Setup dialog box, where you can make changes to multiple options at once.
3. Click the spinner arrows to increase or decrease the margin setting, or simply click in the box and type the setting.
4. Click OK to save your changes and close the dialog box, or click Cancel to close without saving.

5. Click the Margins command button to open a palette of options. Click in the work area, or click the Margins button again to clear the palette.
6. Click the File tab. This takes you to the Backstage view.
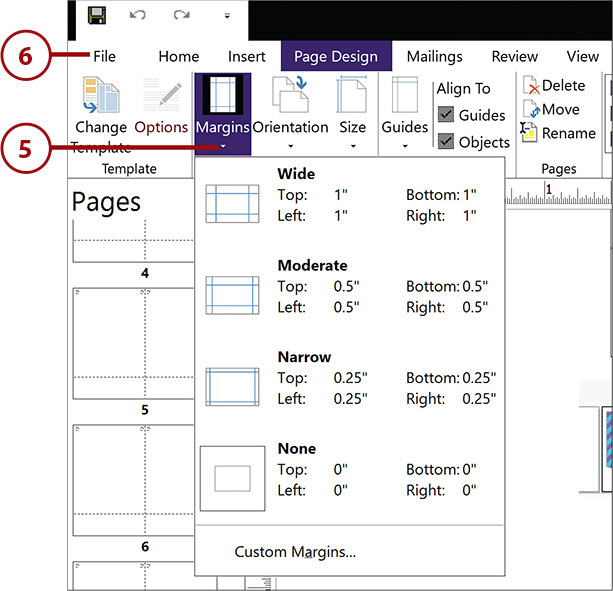
The Margins command opens a palette of frequently used options to put settings at your fingertips. Simply click one of the options—Wide, Moderate, Narrow, or None—to set your publication margins to those settings. The Custom Margins... command at the bottom of the palette opens the Layout Guides dialog box, where you can set custom margins.
Publication Details
The Backstage has commands to show detailed information for a publication; to open, save, print, share, and export publications; and to make changes to your account settings and general Publisher options.

Minimizing the Ribbon
The Ribbon is great! It’s visual, and after a short adjustment period, extremely intuitive. The biggest downside is the size—the Ribbon does take up more room than a menu bar. At least until you collapse it. Right-click the Ribbon and choose Collapse Ribbon. Voila! All you see now are the tab names. To revert back to a full Ribbon, make sure you right-click in an area between tab names, and then select the Collapse Ribbon command again to deselect it.
Touring the Template Collection
If your job is anything like mine, you want to learn the ins-and-outs later. Right now, you need to get something out and you want it to look polished and professional. So right off, Publisher’s superpower comes into play—templates.
Hundreds of templates are available that are built-in to Publisher, and thousands are available online. Adding to that, updates can be made on-the-fly to Office 2016, so there is a good chance that more templates will be added as time goes on, both to the built-in collection and the online collection. Don’t even get me started on the user community templates!
Browsing Through the Built-In Templates
The idea behind templates is that you simply fill in the blanks, drop in your company logo and information, and print. If you aren’t picky, you can generate an entire collection of business documents with a few simple edits. And if you are, you can turn a well-designed template into your own personal success story as you customize Publisher’s templates for your company.

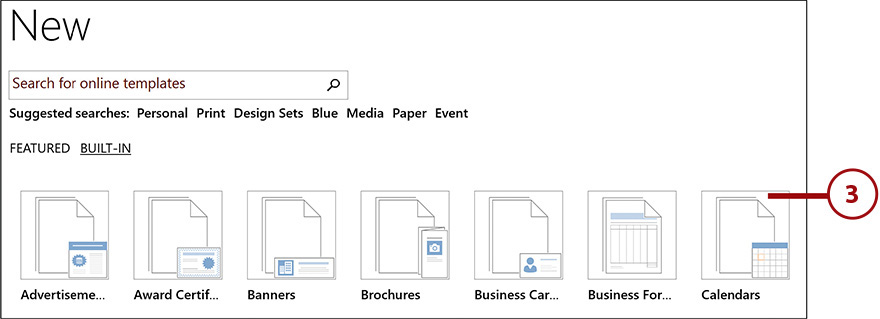
1. In the Backstage, click New to display the New page.
2. Click Built-In to display the templates that are included in Publisher 2016.
From the New page, you can browse through the built-in templates, quickly download from a collection of featured templates, and search through the entire online collection.
3. Click Calendars to display the built-in calendar templates.
Everything Is a Template?
You may recognize the New page—it’s the first thing you see when you start Publisher. It becomes second nature to either double-click the portrait or landscape representation of a blank document to create something from scratch. So yes, everything in Publisher is based on a template—even a blank publication.
4. Click and drag the “internal” scroll box to scroll down through the full-page templates until you reach the wallet sizes, blank sizes, and predefined templates from other manufacturers.

5. Click Home to return to the New page where you can choose another category.
6. Click the Back arrow to move to the previously viewed selection of templates.

7. Click the Back button at the top of the Backstage options to return to the workspace.

Browsing Through the Featured Templates
The Featured templates are representative of the kind of templates you can find online. When you select a Featured template, you are in fact downloading that template. There are two important items in the Featured templates that can be easily overlooked: More Blank Page Sizes and Welcome.
1. Click the More Blank template to display the More Blank Page Sizes page.
2. Scroll down through the page to the Publication Types and Manufacturers categories.
3. Open up the Manufacturer folder for the type of paper that you need to use.
4. Click the Home button to return to the New page.


Business Cards
Say you have a page of Avery business cards. Rather than creating the business card form from scratch, open up the Avery folders to locate that business card form. Clicking the form opens a blank page where you can immediately start creating cards.
The Welcome template on the New page is actually a short tutorial that takes you through the steps to create a vacation photo album. As you move through the publication, you learn how to use some of the new features in Publisher 2016.
Searching for a Template Online
1. At the top of the New page, you see the Search for online templates search box. Type a key word or two to describe what you want to search for.
2. Click the Start Searching button. You see a message stating that a search through thousands of online templates is taking place.
3. When the search is complete, you see a thumbnail picture representing a template that matched one or more of the key words. Double-click this thumbnail to download and open the template in Publisher.

Creating a Calendar
Now that you have a good idea of the breadth of templates you can work with, you’re probably ready to use one! A few minutes ago, you got a chance to quickly scroll through the calendars. Now, take a minute to look closely so that you can select one that will work for you. Fill in the blanks and print. Done!
Selecting a Calendar Template
As you look around in the template categories, notice that the Borders Calendar template has a matching Borders letterhead template—and a Borders informational flyer, Borders business card, and so on. A small business might find a theme that matches its vision and begin generating its business documents in just minutes.
1. In the Backstage, click New, Built-In, and then Calendars to display the list of calendar templates. Scroll down through the designs, checking the appearance in the Preview pane.
2. Click the Color Scheme drop-down to view the color schemes.
3. Double-click a template to open it in the workspace.

Schemes
While you are previewing the templates, select a new scheme. It is automatically applied to all the calendar templates, so you can see how they will look.
Customizing Templates
Customizing the templates is easier than you think—using Business Information Sets. You can create multiple sets to quickly insert contact information for your company, clients, and associates. See Chapter 6, “Customizing Publications,” for more information.
4. Click the zoom slider to adjust the size of the text onscreen to make it easier to edit.
5. Select the caption and then select a larger font size.

Printing the Calendar
In the spirit of keeping it quick and simple, these next two sections quickly go over printing and saving. There will be a lot more information on both topics later.
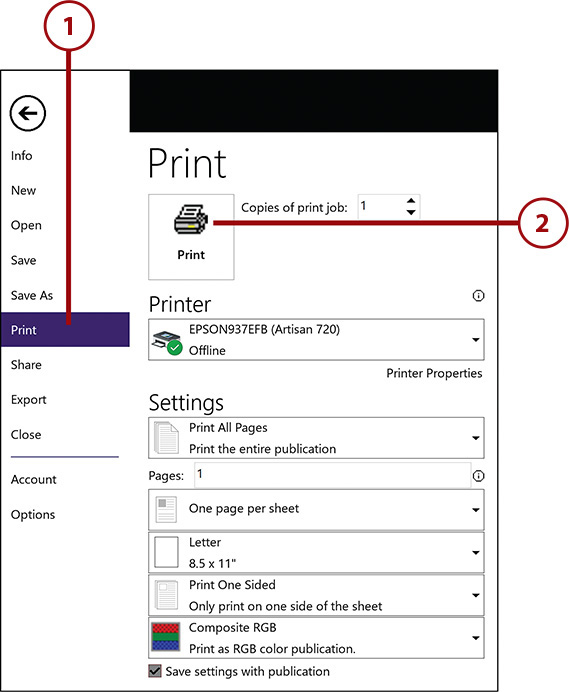
1. In the Backstage (click the File tab), and click Print. The Print page appears with the default printer selected.
2. Click Print. The calendar is sent to the printer, the Print page clears, and you are returned to the workspace.
Saving Publications
See Chapter 5, “Saving and Printing Publications,” for more details on saving publications, including saving to other formats; and printing, including printing only specific pages and setting up photo printing.
Saving the Calendar
You may or may not want to save the calendar you’ve been working on. If you are interested in editing further, or if you want to continue to use it as a sample file, save it before you close Publisher. Otherwise, when prompted, choose not to save your changes.
1. On the Quick Access toolbar, click the Save icon. Publisher slides over to Backstage and displays the Save As page.

2. Click This PC to display possible locations where you might want to save a document. For this example, click the Documents folder. The Save As dialog box opens.

3. Type calendar in the File Name box.
4. Click Save. Publisher takes you back to the workspace, the calendar is saved, and you are free to continue working or to exit Publisher.

Getting Help
We all need help—especially when we learn a new app or a new interface. Before you feel your blood pressure rising, stop and click the question mark on the title bar and let Publisher guide you.
Displaying Help
The Help window has been pared down and simplified. Simply type a few key words to describe what you are looking for, and then navigate through the search results. Although you can print help topics, you really shouldn’t. You can always get back to it.
1. On the title bar, click the question mark (otherwise known as the Microsoft Publisher Help button). As noted in the pop-up, you can also press F1.

2. Type a search phrase in the Search box.
3. Click the magnifying glass to start the search.

4. Scroll down through the list of help topics.
5. Click a help topic title to display it in the window.

Navigating Through the Help Topics
Reading through one help screen often leads to another. Soon enough, you’ve navigated through a series of topics and you may want to retrace your steps. The Back and Forward buttons move just as you would expect.
1. Click the Back button to move backward through previous help topics.
2. Click the Forward button to move forward through the help topics.
3. Click the Close button to close the Help window.
