
CHAPTER 16
Manufacturing Execution
Manufacturing Execution deals with the day-to-day activities of the shop floor—releasing jobs, issuing material, reporting progress, and recording production completion. In addition, it must handle events that are exceptions to the daily routine—scrapping material, substituting parts, and rework. And, it supports these activities across all manufacturing methods—discrete, repetitive, flow—and all manufacturing strategies.
Several Oracle applications provide the manufacturing execution functions described in this chapter—Work in Process (WIP) provides the basic functionality; Manufacturing Scheduling provides graphical, constraint-based scheduling; Flow Manufacturing adds the ability to create flow schedules; and Oracle Shop Floor Management (OSFM) provides enhanced functionality for lot-based production, such as semiconductor fabrication.
This chapter describes these activities. It starts with a high-level overview, describes each activity in detail, and then highlights any unique characteristics of an activity or transaction for each of the manufacturing methods or strategies.
Overview
The typical data flow for most manufacturing execution activities is shown in Figure 16-1. This shows the major activities associated with most production methods and strategies, though many variations are possible. The following sections describe the activities at a high level; each activity is detailed in this chapter.

FIGURE 16-1. Manufacturing execution flow
Information Flow
In most environments, manufacturing is driven by the planning applications (MRP or ASCP), Order Management, or a combination of both. In addition, there are sometimes requirements for non-scheduled manufacturing—for example, rework of defective or outdated material, or production engineering prototypes.
The planning applications generate planned orders that represent recommendations to create repetitive schedules, discrete jobs, or purchase requisitions. Implementing these suggestions from planning, either manually or automatically, creates the corresponding jobs or schedules. (Implementing a planned order as a purchase requisition does not directly affect manufacturing.) Manufacturing based on planned orders is typical in companies employing a make-to-stock strategy and is often used to manufacture subassemblies in a make-to-order environment.
In a make-to-order environment, production of the finished products is initiated by the sales orders themselves. For configured products, the process includes a step that automatically creates the configured item; when the configured item is generated, Oracle provides a program to automatically create discrete jobs from the sales order demand for items identified as Assemble to Order, whether configured or predefined.
Companies that employ a flow manufacturing strategy will typically generate flow schedules from the sales order demand. You can also create flow schedules from the planned orders coming from the planning process; this can streamline the manufacturing process, but it strays from the flow ideal of pure “demand pull.”
Unplanned events, such as the need to rework defective material, or requirements not normally represented in planning or order management, such as building a prototype, also require manufacturing resources. These can be formally represented in the system by manually created discrete jobs (usually “non-standard” jobs), or production can simply be recorded using a Work Order-less Completion transaction, described later.
During manufacturing, the component material is removed from stock for use in the product being made. This material issue can be done with an explicit transaction, or it can be automated when the appropriate operation or entire job is completed. Oracle refers to the automated issue of components as backflushing, and the components to be backflushed as pull components. See the section titled “Material Requirements” for a full discussion. Figure 16-1 does not show the issue activity for a flow schedule; component material is always backflushed at completion.
Particularly for long lead-time items, you might want to record the progress of the job through the routing; this is the function of a move transaction. A move transaction can record a movement between different steps within a single operation (called intra-operation steps, discussed later) or a move between operations. Move transactions are only allowed for jobs or schedules that use routings, and for such jobs or schedules, at least one move is required prior to completion.
Jobs or schedules with routings will typically incur resource charges (e.g., labor), based on the routing definition. Like material issues, resource charges can be performed explicitly or automated as an operation is completed. Oracle refers to this automated process as Autocharging. (See the “Resource Requirements” section for further discussion.)
In some businesses, it is common to outsource all or part of the production; this is called Outside Processing and requires the integration of Work In Process and Purchasing. Outside Processing is detailed later in this chapter.
Finally, jobs or schedules are completed. This adds the quantity produced to inventory, and completes the job or schedule when the total quantity complete equals or exceeds the initial quantity of the job or schedule. Flow schedules are completed with a Work Order-less Completion transaction, which also backflushes all component material, and autocharges all resources at the standard rate and quantity. The Work Order-less Completion transaction can also be used to record unplanned production.
Material Requirements
When you create a job or repetitive schedule, the system takes a “snapshot” of the bill of material, extended by the job or schedule quantity, to identify the component material required. The snapshot uses the start date of the job or schedule to select the effective components, although you can override this by selecting a different effectivity by specifying a date or revision. The primary bill of material is used unless you select an alternate bill (or implement a suggestion from ASCP that uses an alternate bill).
Components designated as Phantoms are exploded to their non-phantom components during this process.
The resulting material requirements serve several purposes:
![]() Pick Lists and Pull Lists The material requirements serve as the basis for the pick list (a document that identifies the material to be explicitly issued), and the pull list (a document that identifies material to be moved to replenish the location from which it will be backflushed).
Pick Lists and Pull Lists The material requirements serve as the basis for the pick list (a document that identifies the material to be explicitly issued), and the pull list (a document that identifies material to be moved to replenish the location from which it will be backflushed).
![]() Material Control The WIP Supply Type determines how the material will be supplied to WIP. A supply type of “Push” identifies material that will be issued; a supply type of “Operation Pull” identifies material that will be backflushed at the completion of an operation; and a supply type of “Assembly Pull” identifies material that will be backflushed upon assembly completion. The Supply Subinventory and Locator identify the location from which backflush material will be taken, or, in the case of Push material, the default location on the Material Issue transaction.
Material Control The WIP Supply Type determines how the material will be supplied to WIP. A supply type of “Push” identifies material that will be issued; a supply type of “Operation Pull” identifies material that will be backflushed at the completion of an operation; and a supply type of “Assembly Pull” identifies material that will be backflushed upon assembly completion. The Supply Subinventory and Locator identify the location from which backflush material will be taken, or, in the case of Push material, the default location on the Material Issue transaction.
![]() Modification Most attributes of the material requirements can be modified; for example, you can specify substitute or additional material to be used or change the supply type.
Modification Most attributes of the material requirements can be modified; for example, you can specify substitute or additional material to be used or change the supply type.
![]() Shortage Reporting The material requirements serve as the basis for reporting shortages. Two types of shortages are reported: true shortages, indicating that insufficient material is available to meet the requirements within the organization, and shortages based on the supply subinventory/locator, indicating that material needs to be moved to the point of use.
Shortage Reporting The material requirements serve as the basis for reporting shortages. Two types of shortages are reported: true shortages, indicating that insufficient material is available to meet the requirements within the organization, and shortages based on the supply subinventory/locator, indicating that material needs to be moved to the point of use.
![]() Planning Material requirements for discrete jobs are used in subsequent MRP or ASCP plans; i.e., any changes or substitutions you make are reflected in subsequent material plans. As described in Chapter 8, planning does not recognize modifications to material requirements for repetitive schedules.
Planning Material requirements for discrete jobs are used in subsequent MRP or ASCP plans; i.e., any changes or substitutions you make are reflected in subsequent material plans. As described in Chapter 8, planning does not recognize modifications to material requirements for repetitive schedules.
Material requirements for flow schedules are not generated ahead of time, but calculated at the time of the Work Order-less Completion transaction. By default, these requirements use the primary bill of material effective as of the date and time of the transaction, although you can override the effective date, revision, or select an alternate bill.
Scheduling
Just as creating a job or repetitive schedule takes a snapshot of the bill of material, it also takes a snapshot of the routing. Based on the routing resources and the job quantity, the system schedules the job or repetitive schedule. For a discrete job, the schedule shows the anticipated start and completion date for each operation in the routing; for a repetitive schedule, the schedule indicates the start and stop dates for the first and last units at each operation.
Standard scheduling utilizes the capacity defined for a resource within a department. For example, if a resource is not available on the weekend, the operation where it is used will not be scheduled for the weekend. But standard scheduling does not consider the load placed on a resource by other jobs or schedules; that capability is offered by the Manufacturing Scheduling product, described later.
Operations
The operations for a job or schedule carry the scheduling information. They also serve as the basis for reporting quantities completed and drive the online dispatch list. Like the material requirements, you can modify the job operations to represent one-time changes in the process—use of alternate work centers or inclusion of additional operations, for example.
Resource Requirements
As part of the operations copied, creating the job or schedule copies the resources attached to each operation in the routing. These resources are used to generate the schedule and are the basis of resource charging. Like the operations themselves, the job resources can be modified.
![]() NOTE
NOTE
To delete operations or resources from a job or schedule, you must have no activity recorded against the operation or resource. If necessary, you can reverse any transactions you have performed and then delete the operation or resource.
Intra-Operation Steps
As you record the progress of a job or repetitive schedule, you can move the quantity to any of five intra-operation steps:
![]() Queue Quantities in the Queue step at an operation are available at the operation, waiting to be started. Releasing a job or schedule loads the job or schedule quantity to the queue at the first operation on the routing.
Queue Quantities in the Queue step at an operation are available at the operation, waiting to be started. Releasing a job or schedule loads the job or schedule quantity to the queue at the first operation on the routing.
![]() Run The Run step represents quantities for which production has started.
Run The Run step represents quantities for which production has started.
![]() To Move This step indicates quantities that have been successfully completed and are ready to move to the next operation or quantities at the end of the job ready to move to stock.
To Move This step indicates quantities that have been successfully completed and are ready to move to the next operation or quantities at the end of the job ready to move to stock.
![]() Scrap The Scrap step represents quantities that have been completed through the operation and then deemed unusable and scrapped. Scrapping is reversible, but while a quantity remains in the scrap step, it is assumed that it is “in the dumpster.” If the scrap quantity of a job exceeds the anticipated scrap (represented by the item’s shrinkage rate), the planning process will see less than it originally expected and might replan to cover the shortage, if necessary. The scrap operation also lets you remove the value of the scrap from the job by charging it to a scrap account.
Scrap The Scrap step represents quantities that have been completed through the operation and then deemed unusable and scrapped. Scrapping is reversible, but while a quantity remains in the scrap step, it is assumed that it is “in the dumpster.” If the scrap quantity of a job exceeds the anticipated scrap (represented by the item’s shrinkage rate), the planning process will see less than it originally expected and might replan to cover the shortage, if necessary. The scrap operation also lets you remove the value of the scrap from the job by charging it to a scrap account.
![]() Reject The Reject step is similar to the Scrap step, but has no effect on planning or accounting. You might think of Reject as representing material awaiting disposition; you might decide to complete it, rework it, or scrap it. But as long as the quantity remains in the Reject step, it is assumed that it will be completed.
Reject The Reject step is similar to the Scrap step, but has no effect on planning or accounting. You might think of Reject as representing material awaiting disposition; you might decide to complete it, rework it, or scrap it. But as long as the quantity remains in the Reject step, it is assumed that it will be completed.
Figure 16-2 graphically depicts the relationship between these steps. A key concept illustrated in this figure is the notion of an operation completion. Any step past the Run step counts as a completion of the designated quantity at that operation. This is important because completion of an operation drives backflushing and autocharging. Operation pull components are backflushed, and WIP Move resources are charged only for quantities moved past the Run step. Note that Scrap and Reject indicate completion of the operation, implying that the material and resources at that operation were used; if material is delivered to an operation and determined to be defective before work starts, you should scrap it at the prior operation to avoid incurring charges from the current operation.

FIGURE 16-2. Intra-operation steps
Production Methods
As noted earlier, manufacturing execution supports a number of production methods and stocking strategies—discrete, repetitive, flow, assemble to order, and configure to order. The next few sections highlight the key features of each method or strategy; later sections describe the various manufacturing activities as they pertain to each method.
Discrete
Discrete production records all production activities against a discrete job, sometimes called a work order, shop order, or production order. A discrete job represents a plan to produce a specific quantity of an item on a given date. All material issues, both manual and backflush, and all resource charges, automatic or manual, are charged to a specific job. Completion and scrap are recorded against the job, and detailed variances are calculated for each job when it is closed.
Besides standard production, discrete jobs can produce assemble to order (ATO) items and configure to order (CTO) items; both of these topics are discussed later. Additionally, you can define non-standard jobs for unplanned production like rework; non-standard jobs are discussed later in this chapter.
Repetitive
As noted in Chapter 8, repetitive production models high-volume production of standard items over a period of time. Production is recorded against a repetitive schedule that represents a plan to produce an item at a given daily rate for a period of time. Material and resources are charged to the item and production line; the system automatically applies the charges to the earliest repetitive schedule for that item and line. Material or resource variances are calculated for the item and line when an accounting period is closed.
Flow
Flow manufacturing is a manufacturing strategy that attempts to minimize all non-value-added activity; it is often part of a “lean” or “agile” manufacturing philosophy. In its purest form, manufacturing is driven only by actual customer orders; for this reason, flow is also referred to as “demand pull” or sometimes “just in time” manufacturing.
From an execution standpoint, the goal of eliminating non-value-added activities implies a simplicity of transactions—flow production is recorded with a simple, one-step, work order-less completion transaction, which backflushes all component material and autocharges all resources, regardless of the BOM or routing setup. This single transaction was designed to be as simple as possible, but it does afford you the opportunity to record exceptions, such as material substitution, or the use of alternate bills, routings, effectivities, or revisions.
Though sometimes confused with repetitive manufacturing, flow is quite different. It is designed for production of mixed products on a production line, one at a time, at the rate of production dictated by the demand; repetitive is intended for production of the same product at a standard rate for a period of time. And flow manufacturing can be used to produce ATO and CTO products as well as standard items; repetitive can only produce standard, non-ATO items.
Flow schedules can be generated from sales orders or planned orders, but they serve only as a means of communicating production requirements to the shop floor. They do not carry material requirements, operations, and resources like discrete jobs or repetitive schedules.
Assemble to Order
Assemble to Order is a stocking strategy where the products are built only in response to a customer order, rather than being built to stock in anticipation of demand. To utilize discrete jobs to produce on an ATO basis, you must explicitly define the item as an ATO item, using the Assemble to Order attribute found on the Order Management tab of the Master Items or Organization Items form. Discrete jobs for such items are created automatically and linked to the driving sales order; completed quantities are automatically reserved to the sales order.
You can also use Flow Manufacturing to fulfill customer orders; this, too, can be considered ATO. In this case, you do not need to set the item’s Assemble to Order attribute, but you do need to link the item to a production line with a flow routing if you want to create flow schedules. (To simply record work order-less completions of standard items without creating flow schedules, no special setup is needed.)
Configure to Order
Configure to Order (CTO) is a variation of the assemble-to-order strategy. The difference is that the item must first be configured from a set of options before it can be manufactured. Options can be chosen using Oracle Configurator or simple model/option selection in Order Management; when chosen, the system automatically creates a unique item, bill, routing, and cost. This configured item is then manufactured like an ATO item using either discrete or flow manufacturing methods.
Configuring Oracle Work in Process
Configuring Oracle Work in Process requires setting parameters for each organization in which production will occur and defining accounting classes to identify the valuation and variation accounts to hold production values. Optional setup steps include creating shop floor statuses, which can be used to prevent move transactions at certain points in the routing; maintaining individual employee labor rates, to charge an employee’s actual rate of pay to a job or schedule; and setting a number of profile options. These setup steps are described in the following sections.
WIP Parameters
The WIP Parameters form, shown in Figure 16-3, defines the basic rules and defaults for Work in Process for each of your inventory organizations. The form contains multiple tabs, each of which lets you define different defaults based on your manufacturing requirements:

FIGURE 16-3. WIP Parameters establish many execution defaults
![]() Discrete This tab defines defaults that apply primarily to discrete production—the Default Discrete Class, described later, which controls the accounting for jobs; lot numbering defaults; and the parameter Respond to Sales Order Changes. This parameter determines if WIP will put a job for a configured item on hold when you de-link the job from the Sales Order line.
Discrete This tab defines defaults that apply primarily to discrete production—the Default Discrete Class, described later, which controls the accounting for jobs; lot numbering defaults; and the parameter Respond to Sales Order Changes. This parameter determines if WIP will put a job for a configured item on hold when you de-link the job from the Sales Order line.
![]() NOTE
NOTE
You must define and save the WIP Parameters record for an organization before you can define Accounting Classes for that organization. Thus, to add a default accounting class, you must first save the parameters without an accounting class, define the accounting class, and then return to the WIP parameters form to specify the accounting class as the default.
![]() Repetitive The Repetitive tab contains two fields—Recognize Period Variances and Auto Release Days. The Recognize Period Variances field determines if you book variances for all repetitive schedules when you close an Inventory accounting period or only for repetitive schedules that are cancelled or completed with no further charges allowed. Generally, users choose to recognize variances only for cancelled or completed schedules; if you recognize variances for all schedules, a schedule that is in process might result in a large unfavorable variance in one period (for example, if you have issued all material but performed no completions) and a favorable variance in the next period. Auto Release Days specifies a window within which a subsequent unreleased schedule will be automatically released as you complete an earlier schedule.
Repetitive The Repetitive tab contains two fields—Recognize Period Variances and Auto Release Days. The Recognize Period Variances field determines if you book variances for all repetitive schedules when you close an Inventory accounting period or only for repetitive schedules that are cancelled or completed with no further charges allowed. Generally, users choose to recognize variances only for cancelled or completed schedules; if you recognize variances for all schedules, a schedule that is in process might result in a large unfavorable variance in one period (for example, if you have issued all material but performed no completions) and a favorable variance in the next period. Auto Release Days specifies a window within which a subsequent unreleased schedule will be automatically released as you complete an earlier schedule.
![]() Move Transaction This tab lets you specify whether you require a scrap account when you move to a scrap intra-operation step or whether a scrap account is optional. You also control whether you can dynamically create new operations with a move transaction (by moving to a new operation) and whether you can move past a step that has a status that prohibits moves out of that step. (See “Shop Floor Statuses,” later in this chapter.)
Move Transaction This tab lets you specify whether you require a scrap account when you move to a scrap intra-operation step or whether a scrap account is optional. You also control whether you can dynamically create new operations with a move transaction (by moving to a new operation) and whether you can move past a step that has a status that prohibits moves out of that step. (See “Shop Floor Statuses,” later in this chapter.)
![]() Backflush Defaults On this tab, you can specify a default backflush subinventory and locator, used if the job or schedule’s material requirements do not identify a subinventory/locator to backflush a component. Backflushing is the automated issue of specified components; it is discussed in detail later in this chapter. Unless your material control needs are very simple, you should probably specify a dummy location as the default; if that location is driven negative, it will indicate that you have not specified a real backflush location for one or more products. This tab also lets choose the selection method for backflushing lot-controlled components and the verification method—All or Exceptions Only. Choosing Exceptions Only requires verification only if there is a shortage of the component and might result in less stringent lot control and traceability.
Backflush Defaults On this tab, you can specify a default backflush subinventory and locator, used if the job or schedule’s material requirements do not identify a subinventory/locator to backflush a component. Backflushing is the automated issue of specified components; it is discussed in detail later in this chapter. Unless your material control needs are very simple, you should probably specify a dummy location as the default; if that location is driven negative, it will indicate that you have not specified a real backflush location for one or more products. This tab also lets choose the selection method for backflushing lot-controlled components and the verification method—All or Exceptions Only. Choosing Exceptions Only requires verification only if there is a shortage of the component and might result in less stringent lot control and traceability.
![]() Intraoperation This tab lets you enable or disable intra-operations steps for the organization. The system will always use the Queue step at the first operation of the routing and the To Move step at the last operation; others are optional. For example, you might decide not to use the Run step or to disable either the Scrap or Reject steps.
Intraoperation This tab lets you enable or disable intra-operations steps for the organization. The system will always use the Queue step at the first operation of the routing and the To Move step at the last operation; others are optional. For example, you might decide not to use the Run step or to disable either the Scrap or Reject steps.
![]() Outside Processing The Outside Processing tab lets you specify a default shop floor status for outside processing operations to prevent a manual move past or out of the operation. It also lets you choose the point at which requisitions are created for outside processing services.
Outside Processing The Outside Processing tab lets you specify a default shop floor status for outside processing operations to prevent a manual move past or out of the operation. It also lets you choose the point at which requisitions are created for outside processing services.
![]() Scheduling This tab lets you enable constraint-based scheduling (discussed in the “Manufacturing Scheduling” section) and determine the constraints that will be considered.
Scheduling This tab lets you enable constraint-based scheduling (discussed in the “Manufacturing Scheduling” section) and determine the constraints that will be considered.
![]() Other The Other tab lets you select a default ATP Rule for component ATP and a Default Overcompletion Tolerance.
Other The Other tab lets you select a default ATP Rule for component ATP and a Default Overcompletion Tolerance.
WIP Accounting Classes
WIP Accounting Classes define groups of GL accounts that are used for valuation and variance reporting for different types of production. You define separate accounting classes for Standard Discrete jobs, Repetitive Schedules, Asset Non-Standard jobs, Expense Non-Standard jobs, and Lot-based Standard Discrete (used with Oracle Shop Floor Management).
For each class, you define the five valuation and four variance accounts to be used for production associated with the class. There is no separate account for material overhead variance because material overhead is earned only on completion to inventory. If there is a material overhead discrepancy (due to material substitution, for example), it is included in the Material Usage variance.
You can define as many of these classes as you need. The class you name as the default for discrete production will be used on standard discrete jobs and flow completions. Repetitive schedules get their accounting class from the production line/item association. You can override these as necessary when you create new jobs or schedules or when you perform a work order-less completion.
Shop Floor Statuses
Shop Floor Statuses are codes you apply to specific intra-operation steps in a job or schedule. They can be purely descriptive, or they can prohibit moves out of the specific step to which they are attached. Definition of a status is very simple—enter a status code, enter an optional description, and check the Allow Moves box if that status will allow moves out of the operation step.
These statuses work in conjunction with two WIP Parameters mentioned earlier in this chapter. The parameter Allow Moves Over No Move Shop Floor Statuses in the Move Transaction tab determines if you can move past a step that has a status that prohibits moves. And the parameter Shop Floor Status for PO Move Resources identifies a status that will automatically be applied to outside processing operations that include a PO Move resource. Such resources will generate an automatic Move transaction when the outside processing PO is received; in such a case, you do not want anyone performing a manual move transaction, or the automatic move transaction might fail. By applying a status that prohibits moves, you prevent this situation.
Labor Rates
If you want to charge actual labor rates in WIP, you must maintain the rates for individual employees. Employees are defined in Oracle’s Human Resources (HR) applications, but HR labor rates are not currently used in WIP.
Use the Employee Labor Rates form to define employee labor rates. For an employee, define one or more labor rates with effectivity dates. These rates will be used only if you manually charge a resource defined as a Person and if you specify an employee when you charge the resource.
If the resource indicates that you will charge the actual rate, not the standard rate (i.e., the Standard Rate box is unchecked), the job or schedule will be charged for the employee rate times the hours reported; any variance that results will be booked to the efficiency variance account identified in the job or schedule’s accounting class. If the resource indicates that you will charge the standard rate, the job or schedule will be charged at the standard rate of the resource, and the employee rate will be used to generate a rate variance. This rate variance will be booked to the variance account defined for the resource.
Profile Options
As in all applications, several profile options control manufacturing execution. A few of the more common options are as follows:
![]() WIP:Discrete Job Prefix This enables you to specify a prefix that will be used with the system-generated number that identifies a job, called the job name. You might want to set this profile by user or responsibility, to identify the source of different discrete jobs.
WIP:Discrete Job Prefix This enables you to specify a prefix that will be used with the system-generated number that identifies a job, called the job name. You might want to set this profile by user or responsibility, to identify the source of different discrete jobs.
![]() WIP:Job Name Updatable This profile determines whether you can change the job name after you create the job.
WIP:Job Name Updatable This profile determines whether you can change the job name after you create the job.
![]() WIP:Requirement Nettable Option This profile controls whether you can see component availability in all subinventories or only in subinventories identified as Nettable. If you want to restrict who can issue material from non-nettable subinventories (e.g., discrepant material), you could set this profile to “View only nettable subinventories” at the site level and set it to View All Subinventories for the users or responsibilities that can issue non-nettable material.
WIP:Requirement Nettable Option This profile controls whether you can see component availability in all subinventories or only in subinventories identified as Nettable. If you want to restrict who can issue material from non-nettable subinventories (e.g., discrepant material), you could set this profile to “View only nettable subinventories” at the site level and set it to View All Subinventories for the users or responsibilities that can issue non-nettable material.
![]() WIP:Move Completion Default The Move Completion Default profile specifies if a move transaction to the To Move step of the last operation for a job will automatically attempt to complete the quantity into inventory.
WIP:Move Completion Default The Move Completion Default profile specifies if a move transaction to the To Move step of the last operation for a job will automatically attempt to complete the quantity into inventory.
![]() WIP:Exclude Open ECOs This profile determines how WIP views ECO revised items with an Open status. If you set this profile to Yes, WIP will exclude such open ECOs from affecting the material requirements of a job or schedule you create. You might want to set this profile by user or responsibility if you want certain users to be able to create a job for a pending ECO in an Open status, for example, to build a prototype of a pending revision.
WIP:Exclude Open ECOs This profile determines how WIP views ECO revised items with an Open status. If you set this profile to Yes, WIP will exclude such open ECOs from affecting the material requirements of a job or schedule you create. You might want to set this profile by user or responsibility if you want certain users to be able to create a job for a pending ECO in an Open status, for example, to build a prototype of a pending revision.
![]() WIP:See Engineering Items The See Engineering Items profile controls access to Engineering items, bills, and routings. Here, too, you might want to selectively set this profile at the user or responsibility level to control who can create jobs or schedules for products that have not yet been released from engineering.
WIP:See Engineering Items The See Engineering Items profile controls access to Engineering items, bills, and routings. Here, too, you might want to selectively set this profile at the user or responsibility level to control who can create jobs or schedules for products that have not yet been released from engineering.
In addition, a number of TP (Transaction Processing) profiles control the processing (online, concurrent, or background) for the various WIP transactions. For example, the profile TP:WIP Material Transactions Form determines the processing mode for component issues and returns; the profile TP:WIP Completion Transaction Form determines the processing mode for assembly completions or returns.
Several of the TP profiles let you specify the first field you typically enter on various transaction forms. For example, the profile TP:WIP Completion Transaction First Field specifies the field in which the cursor is positioned when you invoke the completion transaction. You can set the value to Job, Assembly, Line, or Sales Order. Job is the appropriate setting for discrete manufacturing because you will typically specify the job number. If you predominantly use repetitive manufacturing, you should set the profile to Assembly or Line because you will identify repetitive schedules by Assembly and Line. And if you use ATO, you might want to set the profile Sales Order and identify the job by the Sales Order to which it is linked. Similar profiles specify the first field for the Material Transaction, Move Transaction, and Resource Transaction forms. If you employ a variety of manufacturing methods, you can set these profiles at the user or responsibility level.
Defining Jobs and Production Schedules
The following sections describe the tools and methods for defining and maintaining the different production orders and schedules that Oracle provides—Discrete Jobs, Repetitive Schedules, and Flow Schedules.
Discrete
Discrete Jobs are perhaps the most versatile production vehicle in the Oracle E-Business Suite. They are used for multiple manufacturing strategies—make to stock, assemble to order, configure to order—and for non-standard production requirements such as rework and prototype production. Discrete Jobs can be created in several ways—by releasing planned orders from the planning application; by autocreating jobs based on ATO or CTO sales orders; through an open interface; or manually as needed. In order to create a discrete job, the item’s Build in WIP attribute must be enabled.
Creating Discrete Jobs
As noted earlier, discrete jobs can be created when you release planned orders from the MRP or ASCP planner workbenches, described in Chapters 10 and 11. Normally, such jobs will be created using the bill and routing effective as of the planned start date of the job and using the default accounting class from the organization’s WIP parameters. If necessary, you can override many of these defaults using the Release Properties tab on the Supply/Demand window of the Planner Workbench.
The process uses the open WIP Job/Schedule Interface; releasing the job loads the interface tables and submits a request to run the WIP Mass Load program; no user intervention is required.
You can create jobs manually, using the Discrete Jobs form, shown in Figure 16-4. The following information is required:

FIGURE 16-4. Manually create and modify discrete jobs with the Discrete Jobs form
![]() Job (name) More commonly called the job or work order number, this will automatically default, although you can override it manually. If you have set a prefix using the WIP:Discrete Job Prefix profile, the applicable prefix will be added to the system-generated number.
Job (name) More commonly called the job or work order number, this will automatically default, although you can override it manually. If you have set a prefix using the WIP:Discrete Job Prefix profile, the applicable prefix will be added to the system-generated number.
![]() NOTE
NOTE
Job Names are generated by an Oracle database sequence, WIPJOB_NUMBER_S. There is only one sequence used across an entire installation; this implies that you will not have “gapless” numbering within an organization (other organizations’ jobs will use numbers from the same sequence) or within a prefix. Also, because the job name is generated by the sequence before the job is saved, if you clear or exit the form without saving, you will have gaps in your job numbers.
![]() Type This defaults to Standard, but you can change it to Non-standard to create a non-standard job; non-standard jobs are discussed later in this chapter.
Type This defaults to Standard, but you can change it to Non-standard to create a non-standard job; non-standard jobs are discussed later in this chapter.
![]() Assembly This is the item number of the product you are building on this job; it is not required for non-standard jobs.
Assembly This is the item number of the product you are building on this job; it is not required for non-standard jobs.
![]() Class The accounting class of the job. This field defaults for Standard jobs based on your WIP parameters, but can be overridden. You must enter it manually for a non-standard job to determine the type of accounting performed.
Class The accounting class of the job. This field defaults for Standard jobs based on your WIP parameters, but can be overridden. You must enter it manually for a non-standard job to determine the type of accounting performed.
![]() Status The status defaults to Unreleased, but you can specify Released or Hold when you create the job.
Status The status defaults to Unreleased, but you can specify Released or Hold when you create the job.
![]() Start (quantity) The quantity you plan to start for this job; this will determine the material requirements.
Start (quantity) The quantity you plan to start for this job; this will determine the material requirements.
![]() NOTE
NOTE
The MRP Net quantity should be used only if you want to exclude quantities from being considered by planning, for reasons other than planned shrinkage.
![]() Start or Completion Date The date you plan to start or complete the job. If your assembly has a routing, the other date will be calculated by scheduling the routing operations; if the assembly has no routing, the item’s lead time will be used. For non-standard jobs without routing, your must enter both the start and completion dates.
Start or Completion Date The date you plan to start or complete the job. If your assembly has a routing, the other date will be calculated by scheduling the routing operations; if the assembly has no routing, the item’s lead time will be used. For non-standard jobs without routing, your must enter both the start and completion dates.
When you create a job, the system determines the effectivity of the bill and routing based on the anticipated start date of the job; if you enter a start date, the date you enter is used; if you enter only a completion date, the system estimates the start date by applying the item’s fixed and variable lead time and estimating the start date.
The system explodes the assembly’s bill of material to create the material requirements for the job, as described earlier. It also uses the routing to create a schedule for the job; if you enter a start job, WIP schedules forward from the start date; if you enter a completion job, WIP uses backward scheduling.
![]() NOTE
NOTE
If your item lead times do not closely reflect the item’s routing, you might encounter some minor anomalies when backward scheduling—the system estimates a start date, selects the effective routing operations based on that estimated start date, and then backward schedules from your specified completion date. If the routing information does not correspond to the lead time, scheduling might result in a start date different from the date used to select the routing.
If the assembly has no effective bill or routing, you will receive a warning message, but the job will be created. If you want to prevent the creation of jobs for which there is no bill or routing, you can disable the item’s Build in WIP attribute, either directly or through status control.
Other tabs on the Discrete Jobs form enable you to select alternate bills or routings, and the effectivities for those bills or routings, either by entering the effective date, or by specifying the corresponding item or routing revision. You can also enter or change the default completion location (this defaults from the routing), enter a description for the job, specify project and task information, and add Demand Class information. And you can view summary job history (quantities completed, scrapped, and remaining; and release, completion, and close dates).
Discrete Job Statuses
Discrete jobs will typically go through five different statuses:
![]() Unreleased The job is awaiting release; no material, movement, or resource transactions can be recorded against the job, although you can modify the job or print paperwork.
Unreleased The job is awaiting release; no material, movement, or resource transactions can be recorded against the job, although you can modify the job or print paperwork.
![]() Released The job is ready to start or in process. Releasing a job moves the job quantity to the Queue of the first operation. Releasing a job also sets the Release Date of the job to the current system date; this date is not modifiable.
Released The job is ready to start or in process. Releasing a job moves the job quantity to the Queue of the first operation. Releasing a job also sets the Release Date of the job to the current system date; this date is not modifiable.
![]() NOTE
NOTE
Although you can backdate WIP material, move, and resource transactions subject to the same rules defined in Inventory (e.g., the accounting period must be open), WIP imposes an additional restriction—you cannot date a WIP transaction prior to the release date of the job or schedule.
![]() Complete The job is complete, and no further output is expected. WIP assigns this status automatically when you complete the total quantity for the job, or you can assign it manually. You can still charge material and resources to a complete job; this is especially useful if you do not record such charges at the time they are incurred.
Complete The job is complete, and no further output is expected. WIP assigns this status automatically when you complete the total quantity for the job, or you can assign it manually. You can still charge material and resources to a complete job; this is especially useful if you do not record such charges at the time they are incurred.
![]() Complete - No Charges This status indicates that no further charges or activity is permitted; you cannot issue or modify material transactions or charge resources. This status is always applied manually to discrete jobs; it is intended to signify that someone has reviewed the job and verified that all appropriate charges have been recorded.
Complete - No Charges This status indicates that no further charges or activity is permitted; you cannot issue or modify material transactions or charge resources. This status is always applied manually to discrete jobs; it is intended to signify that someone has reviewed the job and verified that all appropriate charges have been recorded.
![]() Closed The Closed status books any job variances for the job; it is often an accounting function.
Closed The Closed status books any job variances for the job; it is often an accounting function.
There are two additional statuses, intended to handle exceptions:
![]() Hold This status prohibits further material or resource charges against the job, until the status is changed.
Hold This status prohibits further material or resource charges against the job, until the status is changed.
![]() Cancelled The Cancelled status designates a job you no longer want to transact or use in planning.
Cancelled The Cancelled status designates a job you no longer want to transact or use in planning.
All statuses are reversible, although Closed and Cancelled typically signify the end of production.
Updating Discrete Jobs
Most information on a discrete job can be modified before you close the job, but modifications are subject to some common-sense restrictions.
You can change most job header information on the Discrete Jobs form. A typical change is to release or hold a job. One notable exception is the Accounting Class—it cannot be changed after you save the job. You can change the start or completion date to reschedule the job, and you can change job quantities. You can increase the job quantity at any time, but you cannot decrease the quantity of a released job below the quantity that currently exists at the queue step of the first operation. (You can reverse move transactions to return the desired quantity to the queue, if necessary, and then reduce the job quantity.)
Though material requirements and job operations are visible from the Discrete Jobs form, you must use separate forms to modify them.
Use the Material Requirements form to add, modify, or delete material requirements. You can adjust requirements to any job that is not Cancelled or Closed with no charges allowed, but some restrictions apply to deleting or reducing requirement quantities—you cannot delete a requirement for which activity has occurred (but you can reverse the transactions, if necessary); and you cannot reduce a requirement to less than what was already issued or backflushed. However, you can reverse transactions, if necessary, to allow any modification to requirements.
You can also create material requirements “on the fly,” by issuing material not required on the original job or schedule; this is described further in the “Material Control” section.
Use the Operations form to add, modify, or delete job operations or resource requirements. You can adjust operations on any job that is not Cancelled, Closed, or Complete with no changes allowed; you can only adjust operations for Repetitive Schedules that are unreleased. As with requirements, you can add operations, resources, or increase resource requirements at any time, but you cannot delete operations or resources, or reduce resource requirements, after activity has occurred for that operation or resource. Again, you can reverse transactions if necessary to allow modifications.
You can add operations “on the fly” based on the setting of the WIP parameter Allow Creation of New Operations. If this parameter is enabled, you can perform a move transaction to an operation sequence number that did not exist on the job; the operation will be dynamically created. This can be useful for in-line rework. For example, you might decide that all or a portion of the job quantity needs some additional processing. Operations created in this manner have little detail; you must use the Operations form to provide details, including resource requirements.
Simulating Discrete Jobs
The Simulate Discrete Jobs form lets you simulate a discrete job to determine if you have sufficient material and capacity before beginning production. Enter the assembly, dates, and quantity as you would for a job, and use the Operations and Components buttons to view the routing, resource information, and material requirements.
If the simulation is acceptable and you want to create a job, select Tools I Save Simulated Jobs from the menu bar. This opens a window where you can specify the job class, status, and description, and save the simulation as an actual job.
Non-Standard Jobs
Non-standard jobs (NSJ) are used for non-standard production activity, such as rework, prototype production, or even simple maintenance operations. You can create non-standard jobs on the Discrete Jobs form by specifying the Type as Non-Standard and selecting the appropriate accounting class to distinguish the NSJ as an Asset or Expense class. Asset jobs are customarily used for jobs that result in creation of a product, such as rework (creating a usable product from discrepant material), or prototype production. Expense jobs are used for activities where you simply want to charge material or resources to an expense account (e.g., maintenance).
Non-standard jobs differ from standard discrete jobs in that no bill of material or routing is automatically selected. You can create requirements and operations manually, as discussed earlier, or select any bill or routing when you create the job. For example, you might have a recurring upgrade or rework activity that you perform frequently; you might have an alternate bill that includes the standard components needed for the upgrade. Or, you might want to build a prototype of a new product, using a bill of material from an existing product as the starting point.
![]() NOTE
NOTE
Non-standard jobs emphasize flexibility; you do not have to select a bill or routing for the assembly you are building, so use caution that you do not inadvertently select the wrong bill or routing.
Subsequent processing of NSJs is the same as standard discrete jobs.
Repetitive
Repetitive Schedules are used to represent ongoing production of standard products over a period of time. They are used for standard products only; although you can modify their requirements or operations, the planning products do not recognize such modifications.
In order to define repetitive schedules, you must create at least one production line, using the Production Lines form; and associate your repetitive assemblies to the appropriate lines, using the Repetitive Line/Assembly Associations form.
Creating Repetitive Schedules
You can create repetitive schedules from the MRP or ASCP Planner Workbenches (described in Chapters 10 and 11), or you can create them manually with the Repetitive Schedules form shown in Figure 16-5.

FIGURE 16-5. Use the Repetitive Schedules form to create and modify repetitive schedules
To create a schedule manually, enter the production line and associated assembly. To specify the quantity to be produced, enter any two of the following: the Daily Quantity (i.e., rate) of production; the Number of Days of production, including decimals if necessary; and the Total Quantity desired; the form will calculate the missing element. Enter one of the four dates associated with the schedule: the First Unit Start Date, First Unit Completion Date, Last Unit Start Date, or Last Unit Completion Date. The system will calculate the remaining dates based on the item’s lead time and number of days of production. Refer to Chapter 8 for further discussion of the various characteristics of a repetitive schedule.
Repetitive Schedule Statuses
Repetitive schedules use many of the same statuses as discrete jobs, but there are a few differences in how the statuses are applied. Unreleased and Released are basically the same as for discrete jobs, although repetitive schedules can be automatically released based on the setting of the WIP parameter Auto Release Days.
Repetitive schedules are never closed; they use only the two Completed statuses. However, there are differences in how the statuses are assigned. If you complete the planned quantity on a repetitive schedule and there is another released schedule for the same assembly/line in the future (or if the next schedule is automatically released), the current schedule will be automatically assigned a status of Complete - No Charges. The assumption is that any additional charges can be applied to the next schedule. But if there is no released schedule in the future, the status will be changed to Complete, so that you can make any additional charges to the current schedule.
You can hold or cancel repetitive schedules just like discrete jobs. In addition, repetitive schedules that are created from the Planner Workbench are given a status of Pending-Mass Loaded as described in Chapter 8.
Updating Repetitive Schedules
Repetitive schedules can be updated much like discrete jobs; however, if there are multiple active schedules for the same assembly and line, you cannot add or delete operations or change standard operation codes or the count point, autocharge, or backflush flags.
Flow Manufacturing
Flow manufacturing is intended to facilitate flexible manufacturing of standard or configured items on a mixed-model manufacturing line. As discussed earlier, the flow philosophy emphasizes the elimination of all non-value-added activity; as a result, flow manufacturing offers simplified scheduling and execution activities compared to discrete or repetitive manufacturing. To communicate your production schedule to the floor, you can utilize flow schedules, or you can complete flow production without scheduling at all, if you have a method of communicating your production schedule and sequence.
Flow Scheduling Setup
Most setup for flow manufacturing is the same as for discrete production; however, there are two additional requirements if you want to create flow schedules—you must have your products associated with production lines by means of a flow routing (described in Chapter 4), and you must define scheduling rules.
Scheduling rules determine the priority in which demands will be selected for scheduling and the production sequence. You define scheduling rules on the Define Scheduling Rules form. Give each rule a name indicative of its use. Choose one of the following scheduling methods to determine how mixed model production will be sequenced:
![]() Mixed Model This method provides the most detailed scheduling of mixed model production. It will suggest a production sequence that interleaves production of mixed models, based on the proportion of demand. Use this method if your line produces multiple products, with differing resource requirements but little or no setup differences. For example, Neptune builds several models of desktop computers on the same line; some include CD/RW drives, and others do not. Mixed model scheduling attempts to schedule alternating production of models to avoid creating a bottleneck at the operation that installs the CD/RW drives.
Mixed Model This method provides the most detailed scheduling of mixed model production. It will suggest a production sequence that interleaves production of mixed models, based on the proportion of demand. Use this method if your line produces multiple products, with differing resource requirements but little or no setup differences. For example, Neptune builds several models of desktop computers on the same line; some include CD/RW drives, and others do not. Mixed model scheduling attempts to schedule alternating production of models to avoid creating a bottleneck at the operation that installs the CD/RW drives.
![]() Level Daily Rate This method attempts to schedule the same amount of mixed products each day, but does not sequence production of individual units.
Level Daily Rate This method attempts to schedule the same amount of mixed products each day, but does not sequence production of individual units.
![]() No Level Load The No Level Load method simply schedules production according to the priority criteria in your rule; it does not attempt to balance the production of multiple models. This makes sense if there is little difference in the resources required to product multiple models.
No Level Load The No Level Load method simply schedules production according to the priority criteria in your rule; it does not attempt to balance the production of multiple models. This makes sense if there is little difference in the resources required to product multiple models.
Figure 16-6 illustrates these different leveling methods.

FIGURE 16-6. Line Scheduling Leveling methods
In addition to the scheduling method, identify the criteria you want to use to select and prioritize the demands you schedule. Select one or more of the criteria for each rule and identify its order of priority. You can choose any combination of the following criteria:
![]() Order Due Date
Order Due Date
![]() Order Entry Date
Order Entry Date
![]() Order Priority
Order Priority
![]() Order Promise Date
Order Promise Date
![]() Order Request Date
Order Request Date
![]() Order Schedule Date
Order Schedule Date
Line Scheduling Workbench
Create Flow Schedules on the Line Scheduling Workbench, by specifying the pool of demand you want to schedule, the scheduling rule to use, and the date(s) for which you want to create schedules. The Line Scheduling Workbench is shown in Figure 16-7.

FIGURE 16-7. The Line Scheduling Workbench lets you create and review flow schedules
To create flow schedules, select the line you want to schedule. In the Unscheduled Orders region of the form, select the type of demand for which you want to create flow schedules—Sales Orders or Planned Orders from an MRP or ASCP plan. In this region, specify the demand due dates you want to consider for scheduling. Then, in the Scheduling zone, specify the scheduling rule and dates for which you want to create schedules. Click the Create Flow Schedules button, and the system will display the Flow Schedule Summary window for the schedules you are about to create. You can view the details, including the schedule sequence, by clicking the Details button. Save your work to create the flow schedules. Figure 16-8 graphically depicts this process.

FIGURE 16-8. Line scheduling process
You cannot modify or delete individual flow schedules; if you need to make changes to the overall production schedule, you can delete the schedules for a range of lines and dates and re-create the schedules. Select Tools I Delete Flow Schedules from the menu bar, and enter the desired parameters for the concurrent request.
Assemble to Order
You can execute an assemble to order (ATO) strategy using either flow schedules or discrete jobs. In fact, flow manufacturing is, by its purest definition, an ATO strategy—you only build based on actual orders. However, Oracle documentation distinguishes between flow and ATO; when referring to ATO, it generally implies execution using discrete jobs, and the same convention is used in this book. If the item being built is a standard item with a predefined bill and routing, the overall process is very similar to standard discrete manufacturing, with one additional step—the automatic creation of the discrete job, linked to the sales order. Configure to order is a variation of this strategy, but generally involves the creation of a unique item; it is discussed separately.
AutoCreating Jobs
The AutoCreate Final Assembly Schedules program in WIP can automatically create discrete jobs for items identified as ATO items. This concurrent program accepts the following parameters:
![]() Sales Orders Use this to create a final assembly schedule for a single sales order only. If you select this option, Offset Days and Load Type are unavailable.
Sales Orders Use this to create a final assembly schedule for a single sales order only. If you select this option, Offset Days and Load Type are unavailable.
![]() Offset Days This defines the window in which you will create final assembly schedules for multiple orders; the program will create jobs for all the sales orders that must be started within this window to meet their due dates.
Offset Days This defines the window in which you will create final assembly schedules for multiple orders; the program will create jobs for all the sales orders that must be started within this window to meet their due dates.
![]() Load Type Choose whether you want to create jobs for configured items, non-configured items (i.e., standard ATO items), or both.
Load Type Choose whether you want to create jobs for configured items, non-configured items (i.e., standard ATO items), or both.
![]() Status Select a default status (Released, Unreleased, or On Hold) for the jobs.
Status Select a default status (Released, Unreleased, or On Hold) for the jobs.
![]() Organization The organization for which you want to create final assembly schedules.
Organization The organization for which you want to create final assembly schedules.
![]() Class Code The accounting class for the jobs. (This is available only if you select an Organization because accounting classes are organization-specific.)
Class Code The accounting class for the jobs. (This is available only if you select an Organization because accounting classes are organization-specific.)
Jobs created by this program are automatically linked to the sales order that placed the demand. You can view the associated sales order using the Sales Order button on the Discrete Jobs form. If you unlink the sales order from the job to make modifications, the job can automatically be put on hold based on the setting of the WIP parameter Respond to Sales Order Changes.
If necessary, you can also create jobs manually. The process is identical to creating a standard discrete job, but you have the option of linking the job to the sales order.
![]() TIP
TIP
To link a job to the sales order, you must identify the sales order by the three segments of the sales order flexfield: Order Number, Order Type, and Order Source. There is no list of values provided for the individual segments, but using the Combinations button in the flexfield window can make it easier to find the sales order.
Configure to Order (CTO)
Configure to Order (CTO) is a variation of an ATO stocking strategy. It includes the additional step of automatically creating a unique item, bill, routing, and cost for the configuration being built and then follows the same flow as a predefined ATO item.
AutoCreating Configuration Items, Bills, and Routings
The program AutoCreate Configuration Items creates items, bills, and routings from the selections reflected in Order Management, as described in Chapter 12. The program is part of Oracle Bills of Material; it accepts the following parameters:
![]() Sales Order Number, Release Offset Days, and Organization These parameters perform the same selection function as they do in the AutoCreate Final Assembly Schedule program, described earlier.
Sales Order Number, Release Offset Days, and Organization These parameters perform the same selection function as they do in the AutoCreate Final Assembly Schedule program, described earlier.
![]() Perform Leadtime Calculation This parameter will calculate fixed and variable lead time for the configuration, based on the configured routing. If your routing times vary considerably based on optional operations, you should set this parameter to Yes. If you don’t use optional operations, or if they have little or no effect on the lead time, you can set this parameter to No; in this case, the configuration’s lead time attributes will be copied from its base model.
Perform Leadtime Calculation This parameter will calculate fixed and variable lead time for the configuration, based on the configured routing. If your routing times vary considerably based on optional operations, you should set this parameter to Yes. If you don’t use optional operations, or if they have little or no effect on the lead time, you can set this parameter to No; in this case, the configuration’s lead time attributes will be copied from its base model.
![]() Perform Flow Calculations Similar to the Perform Lead Time Calculation parameter, this parameter is used to invoke the flow calculations for configurations created with a flow routing. See Chapter 7 for more information.
Perform Flow Calculations Similar to the Perform Lead Time Calculation parameter, this parameter is used to invoke the flow calculations for configurations created with a flow routing. See Chapter 7 for more information.
AutoCreating Jobs
When the configuration has been created, the AutoCreate Final Assembly Schedules program, described earlier, creates discrete jobs for the configuration item. BOM includes a request set, named AutoCreate Configuration Items and Load Work Orders, that runs both programs together. In a heavy CTO environment, you might want to schedule this request set to automatically run at a regular interval.
You can also create flow schedules for these configurations, using the Line Scheduling Workbench, as described earlier.
Work Order Interface
You can also import discrete jobs and repetitive schedules from external sources using the Work Order Interface. You can also use the interface to add and change component requirements, add and change job operations and operation resources, and update operation resource usage.
In Release 11 i, the interface consists of two tables—the WIP_JOB_SCHEDULE_ INTERFACE and the WIP_JOB_DTLS_INTERFACE. Load header information in the WIP_JOB_SCHEDULE_INTERFACE table; load component, operation, or resource information in the WIP_JOB_DTLS_INTERFACE table.
Process data in the interface by running the WIP Mass Load program. You can view data in the interface table Pending Jobs and Schedules form; for jobs in error, use the Errors button to navigate to the Pending Jobs and Schedule Errors window. You can use this form to update failed rows and mark them for resubmission or delete them from the interface table. You can also choose to run the Work Order Interface report as part of the import process.
Material Control
Material Control deals with activities that involve material—either the component material that is issued or the assembly being produced that is ultimately received into inventory. Typical activities include the issue or backflush of components and the completion of assemblies into stock. This section discusses the issue activities and their reversal, as well as other types of material control, including by-product recovery and treatment of phantom assemblies. Completions are discussed later in this chapter.
Material Requirements
The material requirements for a job or repetitive schedule determine most of the material control activities for the components used. The requirements, created when the job or schedule is created, specify the quantity, supply type, and supply subinventory and locator for each component. And the table that maintains requirement information, WIP_REQUIREMENT_OPERATIONS, tracks the quantity issued to identify shortages.
The component’s Yield Factor from the bill of material inflates requirement quantities; these quantities serve as the default for issue transactions and determine the quantities that will be backflushed.
![]() NOTE
NOTE
Backflushing will always use the component yield factor to adjust the quantity that is backflushed; there is no way to disable this behavior. Consider this carefully when assigning yield factors to backflush components.
WIP Supply Type
The WIP Supply Type determines how the component item will be supplied to WIP. You can enter a supply type for an item and override it in the Bill of Material, as described in Chapter 4.
Oracle provides the following supply types:
![]() Push Material is explicitly issued to a job or schedule, using the WIP Material Transaction. Material that is not issued is never relieved from inventory or charged to the job or schedule.
Push Material is explicitly issued to a job or schedule, using the WIP Material Transaction. Material that is not issued is never relieved from inventory or charged to the job or schedule.
![]() Assembly Pull Material is automatically pulled (backflushed) as the assembly is completed into stock.
Assembly Pull Material is automatically pulled (backflushed) as the assembly is completed into stock.
![]() Operation Pull Material is backflushed as the operation at which it is used is completed; see the “Intra-Operation Steps” section, earlier in this chapter, for a discussion of operation completion.
Operation Pull Material is backflushed as the operation at which it is used is completed; see the “Intra-Operation Steps” section, earlier in this chapter, for a discussion of operation completion.
![]() Phantom A traditional phantom, or “transient,” subassembly. Unless phantoms are explicitly transacted, they are never issued to WIP; rather, their components are added to the WIP requirements as if the phantom did not exist. See the “Phantom Assemblies” section later in this chapter. Oracle supports multiple levels of phantoms.
Phantom A traditional phantom, or “transient,” subassembly. Unless phantoms are explicitly transacted, they are never issued to WIP; rather, their components are added to the WIP requirements as if the phantom did not exist. See the “Phantom Assemblies” section later in this chapter. Oracle supports multiple levels of phantoms.
![]() Bulk Bulk material is never charged to WIP, unless you perform an explicit issue transaction for the specific bulk component. Items such as glue, sealant, shims, etc. that do not lend themselves to an exact quantity on the bill of material might be listed as bulk components. This provides documentation of the material to be used, but does not impact inventory or WIP valuation.
Bulk Bulk material is never charged to WIP, unless you perform an explicit issue transaction for the specific bulk component. Items such as glue, sealant, shims, etc. that do not lend themselves to an exact quantity on the bill of material might be listed as bulk components. This provides documentation of the material to be used, but does not impact inventory or WIP valuation.
![]() Supplier Supplier material (called Vendor material in earlier releases) is intended to designate material provided by your supplier as part of their outside processing service. As such, this material is never issued to WIP and not planned in the planning applications.
Supplier Supplier material (called Vendor material in earlier releases) is intended to designate material provided by your supplier as part of their outside processing service. As such, this material is never issued to WIP and not planned in the planning applications.
Supply Subinventory and Locator
The supply subinventory and locator define the location from which the component is normally supplied to WIP. These attributes come from the bill of material or from the item master; if they are null for a pull (backflushed) component, the default value from the WIP Parameters is used.
These attributes are especially important for backflushed components, as they define the location from which material is backflushed. For Push material, they indicate the default location that will appear on the WIP Material transaction and the supply location that prints on the picklist. You can also run a variation of the shortage report to show material that is short in its designated supply subinventory/locator.
Component Issues and Returns
Components with a supply type of Push must be explicitly issued to a job or schedule, using the WIP Material Transactions form shown in Figure 16-9. To issue open requirements, select a transaction type of WIP component issue and select the radio button labeled Include All Material (the default). Click Continue, and you will open the WIP component issue window. This window shows all open requirements that meet your selection criteria, with the default quantity and supply location from the WIP requirements. You can accept all the defaults by clicking Done, or you can override the information as necessary. If one or more components are lot or serial controlled, use the Lot/Serial button to designate the correct lots or serial numbers.

FIGURE 16-9. Record component issues and returns with the WIP Material Transactions form
The material transaction offers many options to reflect different types of material activity. You can limit the scope of the issue to material required at a specific department or operation by including these selection criteria on the first window of the form. You can issue excess material by overriding the quantity on the transaction window—for example, you might have a full reel, carton, or drum of material and want to issue the entire amount (and return the excess later). Similarly, you can issue less than the default quantity, if you do not have sufficient quantity to fulfill the requirement.
For repetitive schedules, indicate the Start Date and number of Schedule Days for which you want to issue material; the material transaction will calculate the quantity needed for that many days of production. You can use a decimal quantity in the Schedule Days field if you want to issue material for less than a full day’s production.
You can also perform material substitution with the material transaction. Select the Specific Component criteria in the first window, and enter any item in the transaction window; the new item will be issued to the job and added to the material requirements.
![]() NOTE
NOTE
You will receive a warning if the material is not on the bill of material or not used at the designated operation, but there is no restriction on the items you can issue in this manner. You can also issue material that is designated as pull (backflush) material; again you receive a warning, but will be allowed to proceed. Issuing backflush material will fulfill the requirements, and the material will not be backflushed in addition to the issue.
To return excess material, or simply to reverse an incorrect transaction, select a transaction type of WIP component return and proceed as before.
![]() CAUTION
CAUTION
Be especially carefully when processing a return transaction with the Specific Component criterion. Just as there is no restriction on what material you can issue, there is no restriction on what you can return—you can return any item, whether it is on the bill of material for the assembly or it has been issued to the job. This capability can be helpful for “disassembly” types of work, but can play havoc with inventory accuracy if not carefully controlled.
Backflushing
To streamline manufacturing, many companies will employ backflushing for some or all of the components of a job or repetitive schedule. The assumption is that if a certain quantity has been completed, the correct components were used. Backflushing, sometimes called post-deduct, automatically issues material based on completion of a quantity at an operation or completion of a quantity of a job into inventory. Material requirements with a supply type of Assembly Pull are backflushed as the finished assembly on the job is completed into inventory; requirements designated as Operation Pull are backflushed as a quantity is completed at the operation where they are used. See the section titled “Intra-Operation Steps” earlier in this chapter, for a discussion of what constitutes an operation completion.
![]() NOTE
NOTE
If you use operation-based backflushing, it is important that your bills of material accurately reflect the correct routing operation where the component is consumed; inventory accuracy and WIP costing are affected.
Backflush material is automatically deducted from the supply subinventory and locator specified in the material requirements; if there is no backflush location specified, the default from the WIP parameters is used. Backflushing may drive inventory negative in the supply location, even if your Inventory parameters prohibit negative inventory in the organization. The profile INV:Override Neg for Backflush controls this.
![]() NOTE
NOTE
If the component is under revision quantity control, backflushing will only backflush the current revision, based on the date of the transaction. If you backflush revision-controlled parts, review quantities in their supply locations carefully and decide how you want to handle parts at the old revision level. For example, you might decide to rework the old revision or manually issue the old revision to the work order to override the backflush logic.
Because backflushing is an automated process, there is no opportunity to override the quantity or location at the time of the transaction. However, you can modify the material requirements prior to backflushing, or you can still perform manual issue and return transactions as described earlier, to adjust backflushed quantities. For example, if a quantity of the component was damaged during assembly, you could issue extra material to replace it. Similarly, if you used less than the requirements indicated, you could return the excess material after it was backflushed.
A work order-less completion transaction always backflushes all required components—Push, Assembly Pull, and Operation Pull; it does not backflush components with a supply type Bulk or Vendor.
By-Product Recovery
You can represent by-products in your bills of material by including components with a negative quantity. This represents material that will be recovered from the job. MRP and ASCP planning will see these quantities as planned supply; this technique has been used with MRP systems for many years.
On the shop floor, you must receive this material back into stock. From a transaction standpoint, you can do this in several ways. If you designate the by-product as Operation or Assembly Pull, WIP will in effect perform a reverse backflush at operation or assembly completion and automatically return the material to the designated supply location. If you designated the by-product as a Push item, you must explicitly receive it back to stock, using the WIP Material Transaction. Select a transaction type of Negative component issue, and select the Include All Material radio button. Clicking Continue will show all the un-received by-products, optionally limited by additional selection criteria (operation, department, or subinventory). To reverse the recovery of by-products, select a transaction type of Negative component return.
![]() TIP
TIP
If you find the transaction types confusing, consider defining your own transaction types in inventory; for example, you could define a type called By-Product Recovery, with a source type of Job or Schedule and an action of Negative Component Issue.
Phantom Assemblies
Phantom assemblies are collections of parts that are grouped together with a bill of material, but not normally built and stocked; rather, the phantom assembly serves as a convenient mechanism to attach the same set of parts to multiple bills and to centralized changes to those parts—if you change the bill of the phantom, you effectively change all the assemblies that use that phantom. Phantoms are sometimes referred to as “blow-through” or “transient subassemblies.”
Although some will debate whether a true phantom can be built or stocked; in Oracle applications, both activities are possible. In fact, in Oracle applications, you can designate an item or a component as a phantom; this means that you can use an assembly as phantom in one bill but not another, or even on a specific discrete job.
When you create a job or repetitive schedule, WIP explodes any components designated as phantoms to their non-phantom components; these components become the material requirements for the job and drive the material control activities and shortage reporting.
![]() NOTE
NOTE
The planning products will net any on-hand quantities of the phantom assemblies before creating demand on their components, but WIP does not mirror this logic. If you want to use stock of a phantom that might be on-hand, you must explicitly issue it to the job or include it in the job’s material requirements.
Open Transaction Interface
WIP component issues and returns, as well as completions and returns, are basically Inventory transactions. Like most Inventory activities, you can process these transactions with the Inventory Open Transaction Interface, described in Chapter 15. This might be particularly useful if you are using automated material handling or data collection equipment that can provide the needed data without additional operator intervention.
Shop Floor Control
Shop Floor Control activities are those that record the progress of a job or schedule on the production floor. Normally, these activities record the progression of a job or repetitive schedule through the operations on the routing; they might also include the scrapping or rejecting of the assembly during production, reflected by the intraoperation step to which you move all or part of the job. (See the discussion of intra-operation steps earlier in this chapter.) Shop Floor activities depend on the use of routings; although Oracle does not require routings to report production, routings are necessary to perform the shop floor activities described in this section.
Shop Floor moves can trigger backflushing of component material, as described earlier, and can also trigger autocharging of resources. Resource charging, whether automatic or manual, is discussed later, in the “Resource Management” section.
Dispatch Reports and Job Paperwork
In many environments, shop floor activity is driven by a dispatch list—a report or screen that shows scheduled work by department. The printed dispatch list can be sorted by operation start of complete date and is typically run for a range of dates. You can limit the output to a range of departments or a specific schedule group (to group similar products), and you can choose whether to show released jobs only or include unreleased jobs. In production, you might want to schedule this report to run every night; be sure to select the option Increment date parameters each run if you schedule this job to run at regular intervals.
Many businesses also employ a job packet or job traveler; this is a packet of information that contains routing and bill of material information and may also include other information, such as a drawing. In Oracle applications, the primary document for this purpose is the Discrete Job Routing Sheet (or Repetitive Routing Sheet); these reports list all routing and schedule information, as well as component information by operation. The routing sheet can be run for a range of jobs, schedule groups, or a range of scheduled start dates. In a production environment, you might want to schedule this request on a regular interval.
In a paperless environment, the functions of both the Dispatch List and the Discrete Job Routing Sheet are provided online, on the Discrete Workstation, discussed later in this chapter.
Move Transactions
The Move Transactions form, shown in Figure 16-10, lets you record movement between or within operations on the routing of a job or repetitive schedule. Move transactions can optionally charge resources, either automatically or manually. You can also view status information that you have assigned to an intra-operation step and can optionally complete the quantity into inventory, given the proper setup. And, like other WIP transactions, the same form lets you reverse prior transactions.

FIGURE 16-10. Use the Move Transactions form to record shop floor moves
To perform a move transaction, identify the job or schedule (assembly/line) you want to transact. Select a transaction type of Move, and identify the From and To operation and step for the move. In the Transaction region of the form, the Available field will show you the available quantity at the From step; enter the quantity you want to transact, and save your entry. The To operation defaults based on routing (as reflected in the WIP Operations); the next operation identified as a count point is the default To operation. You can override this if necessary to move to another step within the same operation, to reverse a previous transaction, or to move through multiple operations at once.
![]() NOTE
NOTE
“Skipping” an operation in a move transaction normally implies completing the skipped operation. This is determined by the operation’s Autocharge flag; if you “skip” an operation designated as an autocharge operation, you implicitly complete that operation for the move quantity, appropriate material is backflushed, and resources are charged. In actuality, you can skip an operation only if it is not designated as an autocharge operation.
Some types of processes might not produce exactly the quantity expected; for example, stamping multiple small parts from a coil of stock can often yield more or less than expected, due to minor variations in the coil size. You can always record less than the operation quantity, but you can overcomplete (i.e., move more than the quantity that exists at the From operation and step) only if you specified an overcompletion tolerance (either a percent or amount) for the item or WIP parameter. To record an overcompletion with a move transaction, check the Overcompletion check box and enter a quantity greater than the available quantity, but within the item’s Overcompletion tolerance.
The check box Manual Resources Exist indicates that the operations you are completing include resources that you have designated to be charged manually. You can enter these resource charges during the move by clicking the Resources button to access the Resource Transactions form, or you can enter the resource charges separately. Resource charging is discussed in the “Resource Management” section, later in this chapter.
The Move transaction also lets you enter a predefined reason code and reference for any transaction and optionally charge scrap to a scrap account, by specifying either an account alias or account when you move a quantity to a scrap intra-operation step. (A scrap account or alias can be required, based on the WIP parameter Require Scrap Account.)
You can reverse previous moves by simply moving backward; you reverse manual resource transactions by entering a negative quantity on an additional resource transaction.
Discrete Workstation
The Discrete Workstation offers a graphical dispatch list; a graphical, drag-and-drop interface to perform shop floor moves; the ability to charge resources to a job by entering a start and stop time (vs. entering the elapsed time); and links to the material, move, and resource transactions, if more options are needed.
The Discrete Workstation is intended as an operator’s tool, more visually intuitive than the standard desktop forms. You open the workstation by specifying the department at which you are working and, optionally, the resource whose activity you are performing. The Workstation window, shown in Figure 16-11, consists of two panes. The left pane shows both an immediate dispatch list (job/operations already available to the specified department and resource) and an upstream dispatch list (job/operations at the previous operation). Each job shows the components and resources needed at that operation. You can change the view of the left pane using the buttons on the toolbar—the default is the vertical display shown in Figure 16-11, but you can also select an Interleaved style or Org-chart style. The Refresh button on the toolbar lets you refresh the display as the status changes on the shop floor.

FIGURE 16-11. The Discrete Workstation provides a graphical interface to shop floor activity
The right pane of the Discrete Workstation shows information based on what you select in the left pane and lets you perform transactions. If you have selected a job/operation on the left pane, the right pane displays four tabbed regions:
![]() Assembly Moves Provides drag-and-drop movement. The window shows the quantities available at each intra-operation step. To move a quantity, drag it from one icon (e.g., Queue) to the step you want. A window will open asking you to enter the quantity of the move. To move to the queue of the next operation, drag the quantity to the Complete Operation icon. This tab is only available for job/operations in the current dispatch list.
Assembly Moves Provides drag-and-drop movement. The window shows the quantities available at each intra-operation step. To move a quantity, drag it from one icon (e.g., Queue) to the step you want. A window will open asking you to enter the quantity of the move. To move to the queue of the next operation, drag the quantity to the Complete Operation icon. This tab is only available for job/operations in the current dispatch list.
![]() Component Shortages Displays any component shortages for the selected job/operation.
Component Shortages Displays any component shortages for the selected job/operation.
![]() Time Charges Lets you enter resource charges by entering the start and stop times (instead of the elapsed time, as on the Resource Transactions form). This tab is only available for job/operations in the current dispatch list.
Time Charges Lets you enter resource charges by entering the start and stop times (instead of the elapsed time, as on the Resource Transactions form). This tab is only available for job/operations in the current dispatch list.
![]() Properties Displays detailed properties for the job/operation, including assembly and operation descriptions, scheduled start and stop times, project and task information, and minimum transfer quantities.
Properties Displays detailed properties for the job/operation, including assembly and operation descriptions, scheduled start and stop times, project and task information, and minimum transfer quantities.
Buttons at the top of the window let you access the standard desktop transaction forms, if you need the extra capabilities that those forms provide:
![]() Issue Components Opens the WIP Material Transactions form, shown in Figure 16-9. Use this form to issue material to the job, including additional or substitute material, if needed.
Issue Components Opens the WIP Material Transactions form, shown in Figure 16-9. Use this form to issue material to the job, including additional or substitute material, if needed.
![]() Move Assemblies Opens the Move Transactions form, shown in Figure 16-10. Use this form if you need capabilities not provided in the Discrete Workstation, such as the ability to “skip” operations, move to a prior operation, or enter reason codes for the transaction.
Move Assemblies Opens the Move Transactions form, shown in Figure 16-10. Use this form if you need capabilities not provided in the Discrete Workstation, such as the ability to “skip” operations, move to a prior operation, or enter reason codes for the transaction.
![]() Charge Resources Opens the Resource Transactions form, shown later in Figure 16-17. This form lets you charge resources to the job by entering the elapsed time instead of the start and stop times on the Discrete Workstation. You can also reverse resource charges (by entering negative quantities) and include reason codes on the transactions.
Charge Resources Opens the Resource Transactions form, shown later in Figure 16-17. This form lets you charge resources to the job by entering the elapsed time instead of the start and stop times on the Discrete Workstation. You can also reverse resource charges (by entering negative quantities) and include reason codes on the transactions.
The View Instructions button shows any attachments for the job.
If you have selected the Components node on the left pane, the right pane displays the component requirements for that operation of the job. If you have selected the Resources node, the right pane displays detailed information about the resources required at that operation.
To see multiple windows of information, use the Pin Tab icon on the toolbar—click the pin icon to place the contents of the current right pane into a separate window, drag the window to the position you want, and open another window by selecting another node in the left pane. Figure 16-12 shows the result—the Assembly Moves, Component Shortages, and Time Charges windows are all visible.

FIGURE 16-12. Display multiple windows on the Discrete Workstation
Open Move Transaction Interface
You use the Move Transaction Interface to import move transactions from an external source; for example, you might want to perform shop floor moves based on input from a time and attendance system.
To use the interface, you must insert the appropriate data into the WIP_MOVE_ TXN_INTERFACE table; if you are using average costing and performing WIP completion or return transactions, you must insert data into the CST_COMP_SNAP_ INTERFACE table to calculate completion cost.
![]() NOTE
NOTE
You cannot create new WIP operations with this interface, regardless of the setting of the WIP parameter Allow Creation of New Operations.
The WIP Move Transaction Manager concurrent program, submitted from the Inventory Interface Managers form, processes data in the interface table. If you are using this interface regularly, you can schedule this program to run on a regular interval.
![]() NOTE
NOTE
Outside processing uses this interface to perform move transactions on receipt and delivery of purchase orders for outside processing; if you are using outside processing, you might also want to have this interface program running on a regular schedule.
You can review pending and failed transactions using the Pending Move Transactions form. You can correct failed transactions on this form and mark them for resubmission.
Move transactions processed through the open interface will autocharge appropriate resources, just like any move transaction. To perform manual resource transactions, see the description of the Open Resource Transaction Interface, described in the “Resource Management” section later in this chapter.
Using Shop Floor Statuses
Shop floor status codes, described earlier, can identify the state of a particular intraoperation step. For example, you might have a status called Awaiting inspection to simply indicate that material at the To Move step of a particular operation is awaiting formal inspection. In addition, shop floor statuses can optionally restrict movement out of or past that intra-operation step. If the Awaiting inspection status prohibits moves, you cannot move material out of the step until the status is removed. This can effectively put an operation “on hold” without holding the entire job or schedule; other activities on the job can continue, but the specific step of the operation is held until you remove the status code.
You attach status codes to operations using the Assign Shop Floor Statuses form; by restricting access to this form, you can control who can apply and remove status codes. Shop floor statuses also are used to prevent unwanted move transactions in conjunction with outside processing, as discussed in the next section.
Outside Processing
Outside processing is used when an external company does part or all of the work on a product. It is often employed for specialized activities, such as plating or conformal coating, that you do not have the capability or expertise to perform within your facilities or to outsource production during times of peak demand. Outside Processing (OSP), sometimes called subcontracting, relies on the integration of Work in Process and Purchasing—Work in Process drives the process using a standard discrete job, and Purchasing creates requisitions and purchase orders to procure the services of your supplier.
Outside Processing Setup
Setting up outside processing involves defining items and resources that represent the services you buy from the outside supplier and routings that utilize those resources. You might want to set up one or more departments to represent your outside suppliers, and you might want to define a shop floor status to prevent moves from an outside operation. You should also consider at what point in time you want to create the requisition for the outside services.
You must define one or more items to represent the services you will purchase from your suppliers. Although purchasing allows the creation of requisitions and purchase orders without a defined item, outside processing requires an item number—it provides a description of the service, unit of measure, and pricing information needed to support the automated creation of the OSP requisition and purchase order. The key item attributes for such an item are found on the Purchasing tab of the Master Items form:
![]() Outside Processing Item Check this box to identify this as an outside processing item.
Outside Processing Item Check this box to identify this as an outside processing item.
![]() Unit Type Select either Assembly or Resource to indicate how the quantity of the OSP requisition and purchase order will be calculated—Assembly will create a requisition for the quantity of assemblies on the job, whereas Resource will create a requisition for the quantity of the resource on the job’s routing. To make this decision, consider how you will specify the requested quantity to your supplier. For example, if you order assembly of circuit boards that you send to your supplier, then Assembly is probably the correct choice—you want a purchase order to request assembly of 50 circuit boards. However, if you are purchasing test time, you might want the quantity determined by the resource on the routing; choose Resource for this case.
Unit Type Select either Assembly or Resource to indicate how the quantity of the OSP requisition and purchase order will be calculated—Assembly will create a requisition for the quantity of assemblies on the job, whereas Resource will create a requisition for the quantity of the resource on the job’s routing. To make this decision, consider how you will specify the requested quantity to your supplier. For example, if you order assembly of circuit boards that you send to your supplier, then Assembly is probably the correct choice—you want a purchase order to request assembly of 50 circuit boards. However, if you are purchasing test time, you might want the quantity determined by the resource on the routing; choose Resource for this case.
If the OSP items simply represent the services you purchase, you don’t have to define them as stockable inventory items. However, you can use the assembly itself as the OSP item; in this case, all the appropriate inventory attributes must be set. This case might be appropriate if your supplier does all the manufacturing of a product and you simply provide parts.
Next, you must define one or more resources to represent the outside processing in your routings and WIP. OSP resources have these unique characteristics:
![]() Charge Type A charge type of PO Move or PO Receipt identifies a resource as an OSP Resource. The “PO” designation indicates that this is an outside service for which you will create a purchase order. The Move or Receipt portion of the charge type determines what will happen when the processed material is received back from the supplier. A charge type of PO Move will perform a move (through the open interface tables) to the next operation of a routing when the purchase order for the outside services is received; a charge type of PO Receipt will not perform a move when the PO is received. For this reason, you can have no more than one PO Move resource at any routing operation; if this were allowed, the receipt would attempt to move multiples of the quantity at the routing step. You can have as many PO Receipt resources as you need. For example, if you’re ordering circuit board stuffing, you might pay the supplier a one-time setup charge, in addition to a per-unit price. You can reflect this with two separate resources (and two separate OSP items), but only one can initiate the move.
Charge Type A charge type of PO Move or PO Receipt identifies a resource as an OSP Resource. The “PO” designation indicates that this is an outside service for which you will create a purchase order. The Move or Receipt portion of the charge type determines what will happen when the processed material is received back from the supplier. A charge type of PO Move will perform a move (through the open interface tables) to the next operation of a routing when the purchase order for the outside services is received; a charge type of PO Receipt will not perform a move when the PO is received. For this reason, you can have no more than one PO Move resource at any routing operation; if this were allowed, the receipt would attempt to move multiples of the quantity at the routing step. You can have as many PO Receipt resources as you need. For example, if you’re ordering circuit board stuffing, you might pay the supplier a one-time setup charge, in addition to a per-unit price. You can reflect this with two separate resources (and two separate OSP items), but only one can initiate the move.
![]() Outside Processing Enabled and Item Check either box to enable the resource for outside processing, and enter the outside processing item.
Outside Processing Enabled and Item Check either box to enable the resource for outside processing, and enter the outside processing item.
![]() Basis Type The basis type (Item or Lot) has the same meaning as for internal resources. A one-time setup charge might have a Lot basis, whereas a per-unit service would have an Item basis.
Basis Type The basis type (Item or Lot) has the same meaning as for internal resources. A one-time setup charge might have a Lot basis, whereas a per-unit service would have an Item basis.
When you use outside processing, you must consider one attribute of your Department definition: its Location code. This is an optional field for internal departments, but is required for outside processing. It is used to provide the Deliver-to location on the OSP requisition and purchase order, and the department to which the received material will be delivered depends on the resource’s charge type. A PO Move resource will perform a move to the next operation in the routing. In this case, it is the department of the next operation that will be used as a deliver-to; that department must have a Location code. For a PO Receipt resource, it is the department that owns the OSP resource that must have a Location code.
![]() TIP
TIP
It doesn’t hurt to define a location for all departments, whether they are used in Outside Processing or not. If you have a generic location code for your manufacturing organization, you might want to use it initially on all your departments; you can later change this to a more specific location code if you choose.
You might want to define one or more separate departments to represent your suppliers, to help track material that has been sent out for processing, but this is not necessary.
If you are using PO Move resources, you must ensure that you do not inadvertently perform a manual move transaction outside the processing operation; if you do, the automatically generated move transaction will fail when you receive the OSP material. You can do this with a Shop Floor status. As described earlier, the WIP parameter Shop Floor Status for PO Move resources will apply a status to operations that use PO Move resources to prevent moves from the operation.
Another WIP parameter, Requisition Creation Time, controls the point at which the requisition is created for the outside processing service. You can choose from three values: At Operation, At Job/Schedule Release, or Manual.
Outside Processing Execution
Execution of outside processing activity is driven by WIP. You create and release a discrete job or repetitive schedule as you normally would. If you have identified a status code to be applied to OSP operations, based on your WIP parameters, it will be applied to the Queue step of the OSP operation when the job is released. The WIP parameter Requisition Creation Time controls the creation of the requisition for the outside processing services; unless you have chosen to create OSP requisitions manually, they will be created when you release the job, or when you move a quantity into the queue step of the operation that uses OSP resources.
![]() NOTE
NOTE
Requisition creation happens only when you perform a forward move into the Queue intra-operation step; a backward move or a move past the Queue step will not create a requisition. If you are creating purchase requisitions at the outside operation, the material status described earlier can also prevent inadvertent moves past the operation, which would bypass the requisitions creation process.
At this point, you can handle the creation of the purchase order for outside processing through any of the tools available in Oracle Purchasing—for example, you can automatically generate a release against an approved blanket order for the OSP item, or you can create the purchase order using the autocreate process.
![]() NOTE
NOTE
WIP loads the Requisition Import interface table to create the OSP requisition; you must ensure that the Requisition Import program is run, perhaps by scheduling it to run on a regular interval.
The move into an outside processing operation is meant to model the shipment of material to your supplier; however, no shipping documentation is produced.
When the supplier has provided their services and returned the material to you, receive the purchase order as you would any purchase order. You can perform a direct receipt, include inspection, or even incorporate a quality collection plan if you desire.
As noted earlier, if a resource with a PO Move charge type is used at the OSP operation, the receipt will move a quantity corresponding to the quantity of the receipt on to the queue of the next operation in the routing; if the OSP operation is the last operation, it will move to the To Move step of the current operation or complete the WIP job into stock if you have defined the appropriate defaults (discussed in the “Completions” section, later in this chapter).
![]() NOTE
NOTE
The move performed utilizes the Move Transaction interface. The receipt loads the interface table (WIP_ MOVE_TXN_INTERFACE), but you must run (or schedule) the WIP Move Transaction Manager to actually execute the move from the interface data. You can view pending or failed move transactions on the Pending Move Transactions form.
Rework Production
Manufacturing operations offer frequent proofs of Murphy’s Law—in spite of the best intentions and quality programs, there are still things that can and do go wrong in the production process. Sometimes you can correct the resulting problems by reworking the defective product; sometimes it must be scrapped. These activities—rework and scrap—are the subject of this and the next section.
If you discover a defect in the product during the production process, your first action might be to move the appropriate quantity to the Reject intra-operation step. This is optional, but it can indicate that the quantity does not meet quality standards. But note that, as discussed earlier, the quantity remains visible to the planning applications; the assumption is that rejected material will be fixed. You might also choose to use a shop floor status to further qualify the reason for rejection and possibly control who has authority to disposition the rejected quantity. (See the discussion of shop floor statuses, earlier in this chapter.)
In some cases, you might be able to fix a defect while the job is still in process. There are many options:
![]() Simply charge more time and/or material to the job.
Simply charge more time and/or material to the job.
![]() Add one or more routing steps to record rework activity.
Add one or more routing steps to record rework activity.
![]() If you have anticipated such rework, you can use a “rework” step that you have already included in the product’s routing.
If you have anticipated such rework, you can use a “rework” step that you have already included in the product’s routing.
![]() Choose to receive the product into stock; then rework it with a separate non-standard job.
Choose to receive the product into stock; then rework it with a separate non-standard job.
The technique you choose will vary with the value of the product, the complexity of the repair, and the level of detail you need for current visibility and later reporting.
The simplest technique is to charge more time or material to the job or schedule to correct the problem. Charge material using the WIP Material Transaction, described earlier. Be sure to use the “individual component” transaction type, so that you can specify the extra components you are using. You can charge extra labor (or other resource time) to the job using the Resource Transactions, discussed later. Reason codes can be helpful to document the extra material issues, for later analysis.
Adding extra rework operations to the job can provide additional visibility to in-process rework—someone looking at the job can see that extra work is needed and track quantities queued or completed at the rework operation. You can add an extra operation with the Operations form and specify the necessary details, including the resources you expect to use. If some rework happens regularly in your operation (e.g., circuit board touch-up), you might find it helpful to define a standard operation to use as a template and either copy it (allowing modifications) or simply reference it as is. (See Chapter 4 for a discussion of standard operations.)
Based on the setting of the WIP parameter Allow Creation of New Operations, you might permit adding a rework operation on the fly. This technique is appropriate if your shop floor operators have authority to request rework. In this case, the operator simply performs a move transaction to a nonexistent operation sequence; this will dynamically create the new operation for the job or schedule. (If you use this approach, discipline is very important to prevent creation of bogus operations.) Note that operations created in this manner have no details; you must still use the Operations form to add the department, description, and resources. Also, keep in mind the completion criteria for the current operation—if you move a quantity to a new operation with a higher sequence than the current operation, you are effectively completing the current operation and incurring any designated material and resource charges; moving to a lower operation sequence does not complete the current operation.
If a given rework operation is simply a “fact of life,” you might choose to include it in the standard routing for the product; in this case, it will always be available for use during production. However, consider the cost implications of such an approach—if you use the routing for a cost rollup, you include the entire cost of the operation in the product’s cost. This might not be desirable if only a small percentage of items require rework.
In any case, rework operations are typically not identified as Autocharge operations. This means that “skipping” over the operation will indeed bypass the operation; it will not complete the operation, nor incur resource charges or initiate any backflushing at that operation.
Flow routings enable you to model rework loops. Such loops let you specify the anticipated percentage of their usage and are needed for accurate flow calculations. The planned percentage of rework will also affect standard cost calculations, as will the planned usage of alternate operations.
Another approach to rework is to complete the job into inventory and then rework using a non-standard job. This enables segregation of all rework charges. When you receive the defective product, use a non-reservable subinventory to ensure that the product is not accidentally shipped to a customer. And consider using a non-nettable subinventory if you want to “hide” the defective quantity from planning until it is repaired. However, this technique does imply the completion of the product at its standard cost, so it is most appropriate for products that are fully or nearly complete before they are reworked.
Assembly Scrap
When all else fails, it might be necessary to scrap the product. You can scrap an assembly by moving it to the Scrap intra-operation step at any operation in the routing, or you can complete the quantity into inventory and use a miscellaneous issue transaction to scrap it at a later time.
Scrapping material at an intra-operation step enables you to enter a scrap account; entering a scrap account (or alias) credits the job for the accumulated cost to that point and charges the scrap account. If you do not enter a scrap account, the accumulated cost remains in the job or schedule and normally generates an unfavorable efficiency variance in a standard cost environment—if the quantity remains in the scrap step, you will complete less material than originally planned, and thus less than the value of the material and resources expended. In an average cost environment, such a procedure will typically increase the average cost.
Completing a job to inventory and scrapping it from there is basically an inventory transaction. You will complete the job or schedule to inventory (typically a non-nettable, non-reservable subinventory) at standard cost. A scrap transaction (in the form of a miscellaneous issue to a scrap account or alias) will credit inventory at the standard (or average) cost and debit the scrap account.
Manufacturing Scheduling
Oracle Manufacturing Scheduling provides constraint-based scheduling and a graphical, drag-and-drop interface for rescheduling existing discrete jobs. For enabled organizations, the scheduling engine is invoked when you create jobs and can be used to reschedule individual operations, individual jobs, unscheduled (pending) jobs, or all jobs on the shop floor.
Configuring Oracle Manufacturing Scheduling
Manufacturing Scheduling requires little additional setup besides the normal WIP, BOM, and Routing definition. There is one set of WIP parameters you must consider and one profile that deserves special attention. In addition, you should understand the implications of resource scheduling in your routings. When you create jobs, you have the opportunity to enter a numeric scheduling priority and a requested due date (which might be different from the due date calculated by the scheduling process).
Manufacturing Scheduling WIP Parameters
The Scheduling tab of the WIP Parameters form (Figure 16-13) contains four fields that control Manufacturing Scheduling:

FIGURE 16-13. Enable Manufacturing Scheduling on the Scheduling tab of the WIP Parameters form
![]() Use Constraint Based Scheduler This check box enables Oracle Manufacturing Scheduling for the organization.
Use Constraint Based Scheduler This check box enables Oracle Manufacturing Scheduling for the organization.
![]() Constraints The Constraints field enables you to choose the constraints you will recognize; you can select Resource Only (the default) or Resource and Material.
Constraints The Constraints field enables you to choose the constraints you will recognize; you can select Resource Only (the default) or Resource and Material.
![]() Horizon The Horizon field defines the number of shop days for which you will use the scheduler. If you are using Advanced Supply Chain Planning, you can perform detailed scheduling as part of the planning process, and you should select a short scheduling horizon to avoid overriding the schedule planned by ASCP. You might also consider using ASCP for daily scheduling and perform detailed scheduling exclusively with Manufacturing Scheduling. Without ASCP, however, you should set a horizon at least as long as your longest lead time and allow extra time to consider future material receipts.
Horizon The Horizon field defines the number of shop days for which you will use the scheduler. If you are using Advanced Supply Chain Planning, you can perform detailed scheduling as part of the planning process, and you should select a short scheduling horizon to avoid overriding the schedule planned by ASCP. You might also consider using ASCP for daily scheduling and perform detailed scheduling exclusively with Manufacturing Scheduling. Without ASCP, however, you should set a horizon at least as long as your longest lead time and allow extra time to consider future material receipts.
![]() Simulation Set Entering a simulation set here enables you to adjust resource capacity in Manufacturing Scheduling. Simulation sets are defined in Oracle Bills of Material and are used to define capacity changes for resources within a department; simulation sets designated to Use in Scheduling will be used when scheduling jobs. (See Chapter 4 for more details.)
Simulation Set Entering a simulation set here enables you to adjust resource capacity in Manufacturing Scheduling. Simulation sets are defined in Oracle Bills of Material and are used to define capacity changes for resources within a department; simulation sets designated to Use in Scheduling will be used when scheduling jobs. (See Chapter 4 for more details.)
Scheduling Profile Option
The WIP:Define Discrete Jobs Form profile option deserves special attention when using Manufacturing Scheduling. You can set this profile to Interactive Definition (the default) or Concurrent Definition.
Interactive Definition creates the material requirements and WIP operations interactively; your terminal is locked while these operations are proceeding. With manufacturing scheduling enabled, the status of the job is set to Pending Scheduling while waiting for the scheduling engine to run in the background. If scheduling is successful, the job is scheduled and the status is changed to Released. If scheduling is unable to schedule the job, you must determine the cause; see the “Scheduling Exceptions” section later in this chapter.
Concurrent Definition creates the requirements and WIP operations through a concurrent program, as well as running the scheduling engine. Control returns to you almost immediately, so this method is worth considering if you typically define multiple jobs at once.
![]() NOTE
NOTE
This profile can be set at all levels—Site, Application, Responsibility, or User—so you can tailor its setting to the type of activity an individual user or responsibility is likely to perform.
Resource Scheduling Options
Resources to be scheduled must be identified in the routing with a Schedule type of Yes, Next, or Prior, as described in Chapter 4. Resources with a schedule type of No are not scheduled.
Execution Options
Organizations that use constraint-based scheduling should consider two additional fields on a discrete job, as shown in Figure 16-14. These fields are found on the Scheduling tab of the Discrete Jobs form:

FIGURE 16-14. Select Manufacturing Scheduling options for a job on the Scheduling Options tab
![]() Requested Due Date The date you would like to complete the job. The requested due date will not be changed by the system.
Requested Due Date The date you would like to complete the job. The requested due date will not be changed by the system.
![]() Scheduling Priority The priority for scheduling the job. When scheduling multiple jobs, Manufacturing Scheduling schedules the highest priority jobs first to ensure that material and resources are allocated to the most important jobs. Within priority, jobs are then scheduled by the requested due date. The result is that the scheduled completion date might not match the requested date.
Scheduling Priority The priority for scheduling the job. When scheduling multiple jobs, Manufacturing Scheduling schedules the highest priority jobs first to ensure that material and resources are allocated to the most important jobs. Within priority, jobs are then scheduled by the requested due date. The result is that the scheduled completion date might not match the requested date.
Scheduler Workbench
The Scheduler Workbench, shown in Figure 16-15, provides a graphical view of all jobs on the shop floor. On the workbench, you can see a listing of all jobs, operations, and resources; a Gantt chart illustrating the schedule; and a graph of resource load versus capacity for selected resources. The workbench window consists of four panes—the Tree Hierarchy, the Gantt Chart, the Select Resources pane, and the Resource Load Versus Capacity pane. By default, only the Tree Hierarchy and Gantt Chart panes are displayed; you can show the additional panes by selecting Show/Hide Resource Load from the toolbar or by checking the Resource Load option on the View menu.
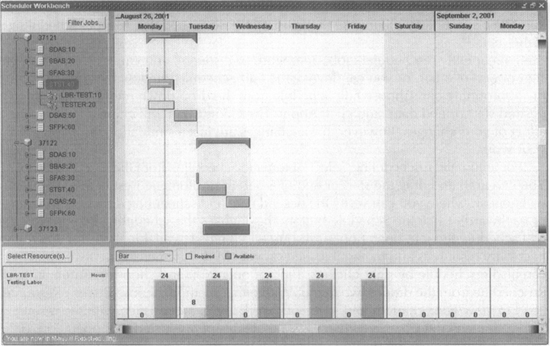
FIGURE 16-15. The Scheduler Workbench provides a graphical view of your shop floor schedule
Using the Tree Hierarchy
By default, the Tree Hierarchy pane displays unreleased, released, and jobs on hold. You can expand each job to display its operations by clicking the plus sign (+) next to the job name; similarly, you can expand each operation to its resources.
The Filter Jobs button lets you limit the display by various criteria to help deal with different types of situations. For example, in cases of resource availability problems such as a breakdown or absenteeism, you might select jobs that use a specific department or resource. In cases of quality problems with a product or part, you could select jobs for a given assembly or component. And you can select jobs by status, including completed jobs if you want.
Using the Gantt Chart
The Gantt Chart pane shows the jobs, operations, and resources selected in the Tree Hierarchy, scheduled over time. You can change the scale of the timeline to view the appropriate level of detail—right-click the timeline, and select the appropriate increment from the drop-down menu (e.g. months, weeks, or days). You will typically want to adjust the timeline so that you can see at least one complete operation in the pane. The magenta vertical line on the Gantt Chart represents the current date and time.
You can manually or automatically reschedule jobs, operations, or resources on the Gantt Chart pane. Manual rescheduling does not respect constraints, whereas automatic scheduling will invoke the constraint-based scheduler. Manual scheduling is the default.
To manually reschedule a job, operation, or resource, you can grab and drag the start or end of a bar, or you can invoke the Edit Schedule window by right-clicking the appropriate bar. Choose Edit Schedule from the drop-down menu, enter the desired start or end date, and click Apply. The Gantt Chart will change to show the effect of your changes; however, these changes are just a simulation until you save your work.
For automatic rescheduling, select Automatic Scheduling from the menu or toolbar. You can grab and drag the start or end of a bar; the Automatic Reschedule window will appear, where you can verify the desired date and scheduling direction (forward or backward). Click the Schedule button; this invokes the scheduling engine, which will schedule the job, operation, or resource in the first available time slot where the necessary resources and material (based on your WIP Parameters) are available. You can also reschedule by right-clicking a job or operation and choosing Automatic Reschedule from the drop-down menu. With either method, choose Refresh Resource Load to view your changes and save your work if you are satisfied with the results.
From the Gantt Chart, you can view the details of a selected job, operation, or resource. First, select the desired object with the mouse; then right-click the object. Select Properties from the drop-down menu. The appropriate Properties window shows the details, including the scheduled start and end dates for each object and the progress (percentage of completion) for the total job and individual operations.
Scheduling Exceptions
Oracle Manufacturing Scheduling provides a range of messages to highlight conditions that need attention. Messages are categorized by severity—an error message indicates that a job was not scheduled; an exception message identifies a problem that should be corrected (e.g., a requested start date before the current date); a warning indicates an inconsistency, even though the job was scheduled (e.g., a job scheduled to complete before the requested date).
The Scheduling Exceptions form shows the messages generated by Manufacturing Scheduling. (See Figure 16-16 for an example.) The form is similar to the Scheduling workbench, in that it consists of two panes—a tree hierarchy on the left and the display window on the right, which shows the exception for the job selected from the tree. The display also includes the operation sequence where the exception occurred, and the severity of the message. Optionally, you can mark a message to indicate that you’ve read it (or might want to return for further review). Use the Properties tab to view details of the selected job.

FIGURE 16-16. The Scheduling Exceptions form lets you view scheduling messages
You can view exceptions for a job from the Scheduler Workbench. Right-click any bar in the Gantt Chart, and select the View Exceptions option. Use the View All Exceptions form to see messages for all jobs and resources, in inquiry mode only.
Resource Management
Manufacturing involves the application of resources (usually labor) to materials to produce the finished product. Within Oracle Applications, resources can be charged automatically or manually. Resource charges might also generate overhead charges, based on your costing setup.
Auto-Charging Resources
Resources with a charge type of WIP Move are automatically charged, based on the completion of the operation where they are used. Lot-based resources are charged as soon as the first unit is completed at the operation; item-based resources are charged per the quantity completed at an operation. (See Figure 16-2 and the accompanying text for a discussion of operation completion.) Automatic item-based charges are calculated by taking the quantity completed, times the resource usage from the routing/WIP operations, times the standard (or average) cost of the resource.
Automatic charges are automatically reversed if you move a quantity when you “uncompleted” a quantity at an operation, by moving back to a previous operation or an intra-operation step such as queue or run. In this case, item-based charges are reversed per the quantity uncompleted; lot-based charges are reversed only when the last piece is uncompleted at an operation, i.e., when no completed quantity remains in the operation.
Resource Transactions
You can manually charge resources as part of a move transaction or through a separate transaction. The Move Transactions form, shown in Figure 16-10, includes a check box that indicates that one or more manual resources exist for any operation(s) that you are completing with your move. If you want to enter the resource charges at that point in time, click the Resources button, which opens the Resource Transactions window shown in Figure 16-17. This is helpful if the personnel reporting the move are responsible for entering their time as well. Alternatively, you can navigate to this window directly from the menu; this would be appropriate if time entry is a separate function or for subsequent corrections to resource charges.

FIGURE 16-17. Use the Resource Transactions form to record manual resource charges and adjustments
On the Resources form, you can enter the following information:
![]() Operation Seq The operation at which you utilized the resource.
Operation Seq The operation at which you utilized the resource.
![]() Resource Seq The resource sequence that identifies the resource within the operation. If you are charging a resource that is not required on the job or schedule, you can enter a new, unique sequence to identify the resource within the operation.
Resource Seq The resource sequence that identifies the resource within the operation. If you are charging a resource that is not required on the job or schedule, you can enter a new, unique sequence to identify the resource within the operation.
![]() Resource The resource you are charging. If you enter an existing Resource Sequence, the resource will be defaulted; if you are charging a new resource, specify it here.
Resource The resource you are charging. If you enter an existing Resource Sequence, the resource will be defaulted; if you are charging a new resource, specify it here.
![]() NOTE
NOTE
Resources charged must be assigned to the department for the designated operation.
![]() Employee The name of the employee charging time. This field is optional and is accessible only if the resource being charged is identified as a Person. If an employee is entered, WIP will search for a pay rate associated with that employee. If no rate is found, you’ll get a warning message, but if a rate is found, the actual rate will be used for valuing the transaction, as described later in this section.
Employee The name of the employee charging time. This field is optional and is accessible only if the resource being charged is identified as a Person. If an employee is entered, WIP will search for a pay rate associated with that employee. If no rate is found, you’ll get a warning message, but if a rate is found, the actual rate will be used for valuing the transaction, as described later in this section.
![]() UOM The unit of measure of the resource quantity. This defaults from the resource definition, but you can enter any unit for which a conversion exists. For example, the default UOM of a resource is typically Hours, but you can enter Minutes if you have defined the conversion factor in Oracle Inventory.
UOM The unit of measure of the resource quantity. This defaults from the resource definition, but you can enter any unit for which a conversion exists. For example, the default UOM of a resource is typically Hours, but you can enter Minutes if you have defined the conversion factor in Oracle Inventory.
![]() Quantity The quantity (e.g., the number of hours or minutes) of the resource charge.
Quantity The quantity (e.g., the number of hours or minutes) of the resource charge.
![]() Activity, Reason Code, and Reference These codes can document the transaction.
Activity, Reason Code, and Reference These codes can document the transaction.
Besides entering time for manual resources you can enter adjustments for resources that were automatically charged; for example, to charge extra time due to rework. You can reduce time charged by entering a negative quantity.
Manual resource charges can be charged at the standard rate or at the actual employee rate based on your resource definition. In order to charge at an actual rate, all of the following conditions must be true:
![]() The resource must designate charging at the actual rate; i.e., the Standard Rate box must be unchecked.
The resource must designate charging at the actual rate; i.e., the Standard Rate box must be unchecked.
![]() You must enter an employee on the resource transaction.
You must enter an employee on the resource transaction.
![]() You must have a valid rate of pay for the specified employee.
You must have a valid rate of pay for the specified employee.
If any of these conditions are false, the resource will be charged at the standard rate, times the hours entered.
If you specify an employee with a valid pay rate for a resource that is designated to be charged at its standard rate, the job or schedule will be charged with the standard rate times the hours entered; the difference between the actual amount (actual rate times hours) and the standard amount charged will be written to the rate variance account defined for the resource. (See Chapter 4 for a discussion of resource definition.)
Open Resource Transaction Interface
The Resource Transaction Interface imports resource transactions from an external source. To use the interface, you must insert the appropriate data into the WIP_ COST_TXN_INTERFACE table. The Cost Manager concurrent program, submitted from the Inventory Interface Managers form, processes data in the interface table. This is the same program that costs your inventory and WIP transactions. Within a day, this program resubmits itself (with the same concurrent request ID) at the interval you specify on the Interface Managers form in Inventory; you will want to schedule this program to run on a daily interval so that it will restart each day with a new request ID.
Like the Resource Transactions form, you can charge person-type resources at either their standard or actual rates; you can also override the actual rate by specifying the desired rate in the USAGE_RATE_OR_AMOUNT column. You can also use the interface to charge non-person resources at a specific rate, using the same USAGE_ RATE_OR_AMOUNT column; this differs from the capabilities of the Resource Transactions form.
You can review pending and failed transactions using the Pending Resource Transactions form. You can correct failed transactions on this form and mark them for resubmission.
Outside Processing Charges
Outside processing resources are charged similarly to internal resources, but there are a few key differences:
![]() Outside processing charges are incurred when the purchase order for the OSP services is received and delivered to WIP.
Outside processing charges are incurred when the purchase order for the OSP services is received and delivered to WIP.
![]() The actual rate for an OSP resource is the unit price on the purchase order. (The standard rate is defined for the resource itself, just like an internal resource.)
The actual rate for an OSP resource is the unit price on the purchase order. (The standard rate is defined for the resource itself, just like an internal resource.)
![]() The rate variance account for an OSP resource defaults to the organization’s Purchase Price Variance (PPV) account, although you can change this if you want to segregate PPV for outside processing from PPV for material.
The rate variance account for an OSP resource defaults to the organization’s Purchase Price Variance (PPV) account, although you can change this if you want to segregate PPV for outside processing from PPV for material.
Oracle Shop Floor Management System
Oracle Shop Floor Management (OSFM) provides enhanced, lot-based production capabilities, compared to the standard capabilities of Oracle Work in Process. Specifically, it furnishes support for network routings (described in Chapter 4), complex lot transactions (including lot splits, merges, translation, and bonus lots), lot genealogy, yield-based operational costing, and enhanced co-product definition. These capabilities are typically required in semiconductor fabrication, but are applicable to other business processes as well.
While WIP tracks production by job or repetitive assembly, OSFM tracks production by lots. The process is illustrated in Figure 16-18. Raw materials are issued to WIP Lot; the lot moves through a series of operations and into inventory, where it is referred to as an inventory lot. At the next level of the bill of material, the inventory lot is issued to a new WIP lot, which again undergoes a series of operations and is received into Inventory, creating a new inventory lot. This process is repeated through all the levels of the bill of material. A sector consists of a level of the bill, the primary component at that level, and the routing of that component; it is identified by a unique extension to the original lot number.
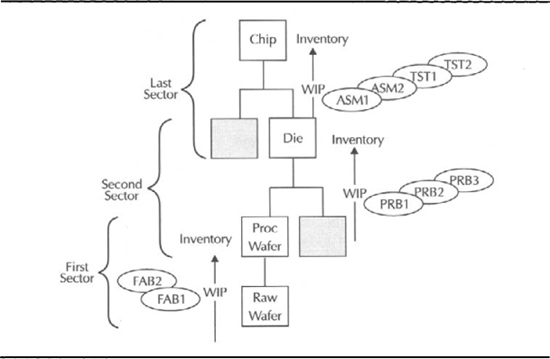
FIGURE 16-18. Lot-based production flow
Configuring OSFM
OSFM builds upon the basic functions of Oracle Inventory, Bills of Material, Cost Management, and Work in Process; you must first complete the appropriate setup steps for those modules. Then, you can complete the additional setup required for OSFM—parameters, standard operation details, lot sector extensions, and related profile options. These steps are described in the following sections.
OSFM uses network routings, built from standard operations. See Chapter 4 for a description of standard operation and network routings.
Parameters
The Shop Floor Management Parameters form provides additional parameters used by OSFM:
![]() New Lot Separator When lots are created, split, or renamed, the resulting lot consists of the original lot number, concatenated with a sequential number. The character defined as the New Lot Separator separates the segments.
New Lot Separator When lots are created, split, or renamed, the resulting lot consists of the original lot number, concatenated with a sequential number. The character defined as the New Lot Separator separates the segments.
![]() Job Completion Separator When a lot is completed, the resulting lot number consists of the original lot number, concatenated with this character and the appropriate Lot Sector Extension (described later).
Job Completion Separator When a lot is completed, the resulting lot number consists of the original lot number, concatenated with this character and the appropriate Lot Sector Extension (described later).
![]() Undo Last Move This check box lets you undo the last transaction in the Move Transactions form.
Undo Last Move This check box lets you undo the last transaction in the Move Transactions form.
![]() Co-Products Supply Default This check box enables planning to consider supply for co-products.
Co-Products Supply Default This check box enables planning to consider supply for co-products.
![]() Default Accounting Class Similar to the default WIP accounting class, this is the default used for lot-based production.
Default Accounting Class Similar to the default WIP accounting class, this is the default used for lot-based production.
![]() Miscellaneous Transaction Account This is the account you will use for miscellaneous transactions when issuing or receiving material to locations other than Inventory, Receiving, or Work in Process.
Miscellaneous Transaction Account This is the account you will use for miscellaneous transactions when issuing or receiving material to locations other than Inventory, Receiving, or Work in Process.
Standard Operation Details
The Standard Operation Details form defines additional OSFM-related details for standard operations. Navigate to this window, select a standard operation, and enter the following details:
![]() Mandatory Intraoperation Steps Check the intra-operation steps you require for this operation—Queue, Run, or To Move.
Mandatory Intraoperation Steps Check the intra-operation steps you require for this operation—Queue, Run, or To Move.
![]() Stocking Point The Subinventory (and optionally, Locator) where material from this operation is stored.
Stocking Point The Subinventory (and optionally, Locator) where material from this operation is stored.
Lot Sector Extensions
Define Lot Sector Extensions on the Sector Extensions and Item/Subinventory Associations form. These sector extensions will be used to identify the new lots resulting from a job completion.
Enter the Sector Extension Code and optional description and the Accounting Class. On the Item tab, select the items you want to assign to this lot sector; on the Subinventory tab, choose the subinventory for the items listed.
Profile Options
Two profile options are important to OSFM. The profile WSM:Allow Operation Jumps controls whether jumps (skipping of operations) can be performed in the Move Transactions form. The profile WSM:Complete Job Sector Lot Extension Level determines whether the item or subinventory lot extension is used to identify the new lot resulting from a job completion.
Lot Transactions
OSFM supports various lot transactions, including lot moves, splits and merges, update, and the creation of bonus lots (a lot that is entirely new or created from scrap).
The process typically begins with the use of the Lot Based Job form, shown in Figure 16-19, to define a job for the first sector. This form is used only if inventory lots for the raw components do not yet exist. For subsequent sectors, or if inventory lots exist for the components at the first sector, use the Lot Creation form shown in Figure 16-20.

FIGURE 16-19. The Lot Based Jobs form creates a job for the first sector of production
The Lot Based Jobs form is very similar to the Discrete Job form, shown earlier in Figure 16-4. It uses the same table (WIP_DISCRETE_JOBS), offers most of the same options, and uses the same database sequence for generating job names—if you enter a job name manually, it must not conflict with existing jobs. However, for lot-based jobs, the job type will always be Standard.
To create lots for subsequent sectors in the production process, use the Lot Creation form (Figure 16-20). Select an existing lot number and subinventory; the system displays the available quantity for that lot. If you will create multiple lots from the starting lot, check the Multiple Resulting Lots box.

FIGURE 16-20. The Lot Creation form creates subsequent sectors
The Resulting Lots region will generate lot numbers for the resulting lot(s), identified by the original lot number, the New Lot Separator character (from the OSFM parameters), and a sequential number. In this region, you can assign an Alternate Routing, Alternate Assembly, Completion Subinventory, Accounting Class, Start Date, and Completion Date.
Lot Moves
The Move Lot Based Jobs form is used to record the progress of a lot-based job or subsequent sector through its operations. It is similar to the Move Transactions form, shown in Figure 16-10, but is more restrictive. Except for scrap transactions, Move Lot Based Jobs transactions are for the entire lot quantity, and the lot-based job is automatically completed when you move to the To Move step of the last operation. When a lot-based job is completed, the lot is automatically named using the appropriate lot sector extension, as described earlier. See Figure 16-21 for an example of the Move Lot Based Jobs form.

FIGURE 16-21. The Move Lot Based Jobs form records lot activities
![]() NOTE
NOTE
To open the Move Lot Based Jobs form, you must set the profile TP:Wip Move Transaction Quantity Default to “Available Quantity.”
This transaction also enables you to “jump” operations, i.e., skip operations in the routing, or jump to any standard operation that is not included in the network routing. To perform a jump, select Tools I Toggle Jumping from the menu bar. Enter any operation sequence greater than the current operation, and select the operation code of the operation to which you want to jump. The word “Jump” appears to the left of the To operation, indicating that you are performing a jump.
Lot Splits and Merges
Throughout the production process, lots exist as either WIP lots (in process) or Inventory lots (in stock). For either type of lot, you can perform various actions.
WIP Lot Transactions
The WIP Lot Transactions form lets you perform the following tasks on WIP lots:
![]() Lot Split Divides a WIP lot into two or more lots; each lot can have different operations, resources, and material requirements. This process can potentially create other assemblies from the original lot.
Lot Split Divides a WIP lot into two or more lots; each lot can have different operations, resources, and material requirements. This process can potentially create other assemblies from the original lot.
![]() Lot Merge Combines multiple WIP lots into one lot. You can merge lots only for the same item and revision; with identical quality attributes; and at the equivalent intra-operation step at the same department, using the same resources.
Lot Merge Combines multiple WIP lots into one lot. You can merge lots only for the same item and revision; with identical quality attributes; and at the equivalent intra-operation step at the same department, using the same resources.
![]() Bonus Merges scrap quantities to create a new WIP lot or creates an entirely new WIP lot.
Bonus Merges scrap quantities to create a new WIP lot or creates an entirely new WIP lot.
![]() Update Updates the Assembly, Lot Name, Quantity, or Routing.
Update Updates the Assembly, Lot Name, Quantity, or Routing.
WIP Lot Transactions can be performed only for jobs at the intra-operation steps of Queue or To Move. The actual lot transactions are created by the WIP Lot Transaction Processor; make sure this is scheduled to run on a regular interval.
Inventory Lot Transactions
The Inventory Lot Transactions form lets you perform the following actions on lots in Inventory:
![]() Lot Split and Lot Merge Splits or merges lots, similar to the WIP Lot Transactions.
Lot Split and Lot Merge Splits or merges lots, similar to the WIP Lot Transactions.
![]() Translate Changes the item, revision, or subinventory of an existing lot; this effectively translates one product to another.
Translate Changes the item, revision, or subinventory of an existing lot; this effectively translates one product to another.
![]() Subinventory Transfer Moves a lot from one subinventory location to another.
Subinventory Transfer Moves a lot from one subinventory location to another.
Completions
Completion transactions increment inventory of the product and signal the end of production. You can complete discrete jobs or repetitive schedules with a completion or move transaction. You complete flow schedules or unscheduled production with the Work Order-less Completion form, shown in Figure 16-23.
Completing Discrete Jobs
You can complete discrete jobs or repetitive schedules with the WIP Completion Transactions shown in Figure 16-22. Alternatively, you can use the Complete option on the Move transaction to complete jobs or schedules.

FIGURE 16-22. Record completions of jobs or repetitive schedules with the WIP Completion Transaction
Completing a Job or Schedule with a Completion Transaction
For jobs with a routing, only the quantity at the To Move step of the last operation is available for completion. (Overcompletions are allowed based on the Overcompletion item attributes or WIP parameter, as discussed earlier in the “Move Transactions” section.)
Identify your job on the WIP completion transaction; the first window will display the quantity eligible for completion. Click the Continue button, and enter the transaction details. The completion subinventory and locator defaults from the job (which defaulted from the routing), but they can be overridden if necessary. If you are completing an ATO or CTO item, and you have multiple Sales Order shipments linked to the job, the receipt will be allocated to the shipments in order of earliest schedule date; you can override this default by specifying the sales order, line, and shipment if desired.
To overcomplete a job, check the Overcomplete box on the WIP completion transaction, press Continue, and enter your quantity.
When the total of the scrapped and completed quantity on a job equals (or exceeds) the quantity of the job, the status of the job is changed to Completed. This implies that no further production is expected from the job, but you can still charge material or resources to the job. When you are satisfied that there is no further activity to report for the job, you might want to change the status to Complete – No Charges. This status prohibits further charges and can be useful as a criterion for closing the jobs, as described in the section “Closing and Purging Jobs and Schedules.”
To reverse a completion transaction, change the transaction type on the Completions Transaction window to Return Assembly to WIP; click Continue, and enter the location from which you are returning the material. The quantity will be returned to the To Move step of the last operation on the job’s routing.
Completing a Job or Schedule with a Move Transaction
You can complete a job or repetitive schedule from a Move transaction, provided the following conditions are met:
![]() The job or schedule must have a default completion subinventory/locator; this normally defaults from the assembly’s routing.
The job or schedule must have a default completion subinventory/locator; this normally defaults from the assembly’s routing.
![]() If the assembly is lot controlled, the job or schedule must have a default lot number.
If the assembly is lot controlled, the job or schedule must have a default lot number.
![]() NOTE
NOTE
Serial controlled items cannot be completed to inventory with a Move transaction.
To complete an assembly into inventory with a Move transaction, identify the job or schedule on the Move Transactions form (refer to Figure 16-10). Check the Complete radio button; the “To” operation and step will default to the To Move step of the last operation of the job’s routing. Enter the operation sequence and step from which you are moving the material, and enter the quantity you are completing. The quantity will be completed into the default subinventory and locator from the job or schedule.
To reverse such a transaction, check the Return radio button on the Move Transactions form and specify the operation sequence and step to which you are returning the entered quantity.
Completing Repetitive Schedules
You complete a repetitive schedule in the same way you complete a discrete job. There are two significant differences: If you complete the entire quantity on a schedule, the system might automatically release a future schedule; and the resulting status of the completed schedule might be set to Complete – No Charges.
The WIP parameter Autorelease Days controls the automatic release of future repetitive schedules. If you complete a schedule, and there is an unreleased schedule with a first unit start date within the number of days specified in the parameter, that schedule will be automatically released. (Overcompletions will be applied against that future schedule.)
Because repetitive schedules are charged by assembly and line, if there is another released schedule for the same assembly and line (or another schedule is automatically released by the completion of a schedule), the completion of the earlier schedule will change its status to Complete – No Charges. If there is no released schedule, the status will be changed to Complete, just like a discrete job. You must change the status to Complete – No Charges if you want to prohibit additional charges to a specific schedule.
Work Order-less Completions
The Work Order-less Completion transaction, shown in Figure 16-23, enables you to perform assembly completions without first creating a discrete job or schedule. It was initially introduced by Oracle as part of its Flow Manufacturing strategy, but is included with the Discrete Manufacturing package as well, so it can be used for light assembly (or disassembly) tasks, as well as reporting flow production.

FIGURE 16-23. Complete flow schedules or unscheduled production with the Work Order-less Completions form
In keeping with the flow philosophy of simplicity, the Work Order-less Completion transaction was designed to be as simple as possible. To record a basic completion, you must enter only a few fields: Assembly, Quantity, and Completion Subinventory/Locator. The transaction backflushes all component material (except Bulk and Supplier material), based on the current primary bill, and autocharges all resources based on current primary routing. It will use the default accounting class from the WIP parameters.
![]() NOTE
NOTE
the Work Order-less Completion transaction is always processed in the background; make sure that the Material Transaction manager is scheduled to run on a regular interval.
To complete previously scheduled flow production, open the Work Order-less Completions form and click the Retrieve Schedules button. Enter the production line and any other selection criteria, as shown in Figure 16-24. The transaction defaults to the current day; you might want to limit the number of schedules you retrieve to represent the number of assemblies you normally complete at one time. For example, if you request only one record, it will show you just the first scheduled item for the line.

FIGURE 16-24. Enter selection criteria on the Work Order-less Completion form
![]() NOTE
NOTE
The version of the Work Order-less Completion transaction accessible from the Work in Process menu does not activate the Retrieve Schedules button and does not show the Scheduled check box.
Although the transaction is simple, it offers a number of options to record exceptions to ordinary activity. You can choose an alternate bill or routing or specify a different revision or date for the bill or routing. You can choose a different accounting class, identify the kanban you are replenishing, and enter reason and reference information, like all material transactions. To record component substitutions, use the Components button and enter your substitute information.
Flow Workstation
Oracle Flow Manufacturing provides a Flow Workstation, similar to the Discrete Workstation described earlier, in the “Shop Floor Control” section. It displays the open schedules for a given line operation, as well as all the assemblies that use that operation. See Figure 16-25 for an example.
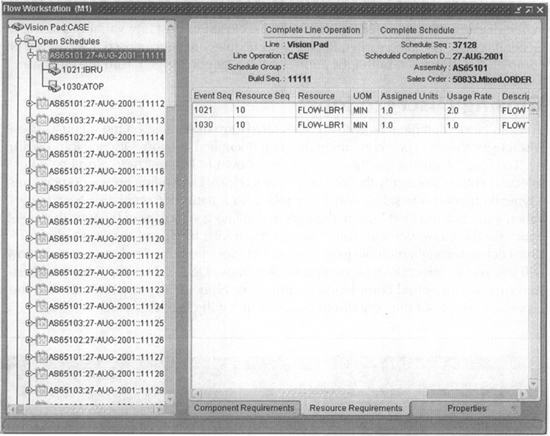
FIGURE 16-25. The Flow Workstation shows flow schedules by line operation
Open the workstation by specifying the line and line operation at which you are working. The left pane of the workbench shows open flow schedules for that line operation and the assemblies, scheduled or not, that use that line operation. Flow schedules are identified by the item number, schedule date, and build sequence created in line scheduling. If you expand a schedule or an assembly, you’ll see the events that make up that line operation.
The right pane of the workbench shows various details—component requirements, resource requirements, or detailed properties—of the object you select in the left pane. For an event, you can view any instructions (attachments) associated with that event; these are typically the operation method sheets (OMS) for the event. If you select a schedule, you can note completion of the line operation to which you have signed on; this removes the line operation from the current operation’s list of open schedules but does not generate any cost or material transactions. For either a schedule or an assembly, you can link to the Work Order-less Completion form to report scheduled or unscheduled completions.
The toolbar of the Flow Workstation includes icons to change the view from the Vertical, Interleaved, or Org-chart display format, just like the Discrete Workstation. You can also use the appropriate icon to refresh the data and use the pin tab to display multiple windows of information from the right pane. In addition, you can signal a kanban for replenishment using the Replenish Kanban icon; this links you to the Kanban Card Summary form, where you can enter selection criteria, view activity, print new cards, as well as signal the kanban for replenishment.
Closing and Purging Jobs and Schedules
When discrete jobs are finished, they must be closed to post any variances to the General Ledger. As noted earlier, Repetitive Schedules are never closed; they are simply completed. Ultimately, both jobs and schedules can be purged from the database.
Closing Discrete Jobs
You can close multiple jobs with an interactive form (identified on the menu as Close Discrete Jobs [Form]) or a concurrent program (identified as Close Discrete Jobs [SRS]).
To close jobs using the interactive form, shown in Figure 16-26, you first enter selection criteria to identify the jobs you want to close. Depending on your procedures, a typical criterion is to select only those jobs with a status of Complete – No Charges. When you click the Find button, the system displays a summary of the jobs that meet your criteria. Here, you can select one or more jobs to close—use SHIFT-click or CTRL-click to highlight multiple jobs. Then select Close from the Tools menu; a window will ask you to select the type of report—Summary, Detailed (using either planned start quantity or actual completion quantity), or None. Choose OK to confirm the process, and submit the concurrent program that will close the selected jobs.

FIGURE 16-26. The Close Discrete Jobs form initiates the close process
![]() CAUTION
CAUTION
The close process will close all selected jobs regardless of status; you can even close released jobs if you select them. Although the process will fail if there are unprocessed transactions in the Move or Material interface tables, it will not attempt to determine if you have entered all necessary transactions (e.g., material issues or resource charges).
Alternatively, from the Close Discrete Jobs Summary window, you can open an individual job to view its details. You can access the Close function from the Tools menu from the detailed view as well.
To close jobs using the concurrent program, enter the parameters to select the jobs you want to close. You can identify jobs by Class Type (Standard discrete, Asset non-standard, or Expense non-standard), a range of accounting classes, a range of jobs numbers, a range of job numbers, and a specific status. You also select the type of report to generate as part of the close process.
Purging Jobs and Schedules
When jobs or schedules are no longer needed for history, they can be permanently removed from the database with a purge program. The process is similar to the close process but is irreversible. As a safeguard, jobs or schedules can only be purged if they have been closed and the inventory accounting period is closed.
You can purge jobs using an interactive form or using a concurrent program (SRS). A separate online form is provided to purge repetitive schedules, but the same concurrent program purges both jobs and schedules. The interactive forms operate like the close form; you enter selection criteria and then select the jobs or scheduled you want to purge. Selection criteria include Assembly, start or completion dates, and accounting period. A selection criterion unique to the Purge Discrete Jobs form is the Include Configurations check box. This check box determines whether you purge jobs for configured items as well as jobs for standard items; it is checked by default, but you can uncheck if it you want to retain configured jobs for a longer period of time than jobs for standard products.
The WIP Purge concurrent program operates like the close program; you enter selection parameters, specify the report type, and submit the job to close all selected jobs and schedules.
WIP Costing
This section describes the primary costing methods for production: Standard Costing and Average Costing. It also discusses the unique characteristics of Flow and OSFM Costing and summarizes the process of transferring costs to the General Ledger. Additional details are contained in Chapter 18.
Standard Costing in WIP
For a standard cost organization, material costs are charged to WIP at their standard (Frozen) cost; resource costs can be charged at standard or actual (using either the standard rate of the resource or an actual employee rate); overhead is charged based on its definition. Material overhead in WIP is always the result of material overhead associated with components of a job or schedule; additional material overhead is earned only on the completion of a WIP job or schedule into Inventory.
Costs are relieved from WIP either by completions or scrap transactions. For a completion, the transaction relieves the standard cost for the number of assemblies completed; for scrap, the transaction (movement to the Scrap intra-operation step) relieves the standard cost that should have been incurred up to that point in the routing. (Costs are relieved by a scrap transaction only if you enter a scrap account or alias.)
![]() NOTE
NOTE
The scrap transaction will calculate the value of material and resources as defined by the requirements and WIP operations; if you have not issued the material or charged manual resources, that will not affect the value of the scrap.
WIP Transactions, like Inventory Transactions, are valued by the Cost Processor; this concurrent program should be running on a regular interval, and you must keep in mind that cost information will only be current as of the last run of the program.
The WIP Value Summary window, shown in Figure 16-27, displays a running total of the costs incurred and costs relieved from WIP.

FIGURE 16-27. The WIP Value Summary shows current job valuation
When discrete jobs are closed, any residual value in the job is written off to the variance accounts designated in the WIP Accounting Class for the job. Variances for repetitive schedules are posted only when you close the Inventory Accounting period; based on your WIP Parameters, variances might be calculated only for schedules with statuses of Complete – No Charges or Cancelled or for all repetitive schedules (even those still active on the shop floor).
Average Costing in WIP
Oracle supports Average Costing for Discrete Jobs and Flow schedules only; you cannot use Average Costing for Repetitive or lot-based (OSFM) production.
In an organization that uses Average Costing, material is charged to the job at its current average cost; resources are charged at a predefined rate, or at the actual rate, similar to the options with standard costing. When finished assemblies are completed, they are costed based on the setting of four parameters:
![]() Default Completion Cost Source Choose either User Defined or System Calculated. If you select User Defined, you must designate a cost type to be used and populate that cost type. If you select System Calculated, you must select a system option.
Default Completion Cost Source Choose either User Defined or System Calculated. If you select User Defined, you must designate a cost type to be used and populate that cost type. If you select System Calculated, you must select a system option.
![]() System Option Choose either Use Actual Resources or Use Pre-defined Resources. The option Use Actual Resources relieves actual cost from the job based on actual job charges, as each unit is completed. The option Use Pre-defined Resources relieves cost based on resource usage as specified by the job routing.
System Option Choose either Use Actual Resources or Use Pre-defined Resources. The option Use Actual Resources relieves actual cost from the job based on actual job charges, as each unit is completed. The option Use Pre-defined Resources relieves cost based on resource usage as specified by the job routing.
![]() Cost Type This identifies the cost type used with the User Defined completion cost source described earlier.
Cost Type This identifies the cost type used with the User Defined completion cost source described earlier.
![]() Rates Cost Type This identifies the cost type to be used for overhead rates and for resource rates where you do not use actual employee rates.
Rates Cost Type This identifies the cost type to be used for overhead rates and for resource rates where you do not use actual employee rates.
Set the first three parameters on the Costing tab of the Work in Process Parameters form; set the Rates Cost Type on the Costing Information tab of the Organization Parameters form.
When units are completed, the unit cost of the assembly in inventory is recalculated if it is different from the unit cost of the completion. For Average Costing, the WIP Assembly Completion window includes a Final Completion check box that controls costing of the completed assemblies. If you check this box, WIP costs the completed assemblies by spreading the current job balances evenly over the units being completed or taking them to variance; if the box is unchecked, WIP costs the assemblies according to the Completion Cost Source method. The WIP parameter Auto Compute Final Completion determines the default value of the Final Completion check box.
![]() NOTE
NOTE
Under Average Costing, you may complete assemblies only to a single subinventory with the completion transaction; i.e., you may not enter multiple transaction lines on the WIP Assembly Completion window.
Flow Manufacturing Costing
Oracle supports both standard and average costing for flow manufacturing. The process is very similar to that described earlier, but it all happens when the Work Order-less Completion is reported. This means that the costs incurred, and the costs and variances relieved, are associated with each individual transaction. The net balance for flow schedules is always zero.
OSFM Costing
Oracle Shop Floor Management uses only standard costing, but it adds operation yield costing. This enables you to use operation yields in an assembly’s cost rollup. Whereas a regular cost rollup (for a non-OSFM organization) uses the item shrinkage rate (from the item cost type), a cost rollup for an OSFM product utilizes the operation yield at each operation. Regular standard costing will simply inflate the total cost of the assembly based on the shrinkage rate; OSFM costing will inflate the cost of each operation by that operations yield factor.
OSFM costing also accounts for the lot-based transactions supported by OSFM—moves, scrap, split, merge, bonus, and update quantity. When you split a lot, the cost of the parent is reallocated to the resulting child lots in proportion to the split quantities. Merged lots inherit the cost of the component lots. The cost of a bonus lot is the standard cost of the assembly at the operation where you create the bonus lot.
You must run the Lot Based Transaction Cost manager to calculate costs in OSFM. This process also runs the Material Cost Transaction Worker, the Resource Cost Transaction Worker, the Overhead Cost Transaction Worker, and the Operation Yield Processor. In an OSFM environment, make sure this process is scheduled to run on a regular interval.
Cost Transfers
Like Inventory costs, costs from WIP transactions are transferred to the General Ledger when you perform an interim cost transfer (i.e., when you run the concurrent program Transfer Transactions to GL) or when you close the Inventory Accounting period. After you have transferred the costs from Inventory, you must run Journal Import in General Ledger. The journals will have a source of “Inventory.” Then you can review and post the transactions as normal.
Summary
This chapter described the day-to-day processes to record manufacturing activity. It discussed the overall process, the key concepts of material requirements and operation scheduling, and the various production strategies—discrete, repetitive, flow, assemble-to-order, and configure-to-order.
WIP setup requirements were described in detail—parameters, accounting classes, shop floor statuses, employee labor rates, and profiles.
This chapter detailed the basic steps in all production—the creation of jobs or schedules, material issues, shop floor control, scheduling, resource transactions, and completions—and summarized the differences for each step because of differences in production strategy. It described the treatment of outside processing, scrap, and rework. The unique characteristics of Oracle Shop Floor Management for lot-based production were also discussed.
Closing and purging of discrete jobs and repetitive schedules were discussed in this chapter. Finally, it provided a brief overview of WIP costing and the “handoff” of cost information to the financial side of the Oracle E-Business Suite.