
CHAPTER 17
Outbound Logistics
The Shipping Execution component of Oracle Order Management provides the basic transactions that deal with outbound logistics. These transactions include allocating material to sales orders; creating move orders to transfer the material from storage to one or more staging lanes; planning trips, stops, and deliveries; packing material; and confirming picking and shipping. These activities are the subject of this chapter.
Oracle Warehouse Management (OWM), described in Chapter 15, provides enhanced capabilities, including more flexible allocation rules, packing rules, task dispatching, compliance labeling, and a mobile interface.
Oracle Shipping Overview
The following section provides a brief overview of the terminology (Trips, Stops, Deliveries, Delivery Legs, and Delivery Lines) used in shipping execution. The next section summarizes the activities that the shipping process comprises: the major processes of Releasing Sales Orders for picking, Packing, and Confirming Shipments, and the discrete activities within each process.
Terminology
To understand Oracle’s view of the shipping process, it’s important to understand the following terms:
![]() Trip The route traversed by a carrier to pick up and deliver items.
Trip The route traversed by a carrier to pick up and deliver items.
![]() Stop A point along the route where material is either picked up or dropped off. A trip must consist of at least two stops (one pickup and one dropoff), but may include any number of stops.
Stop A point along the route where material is either picked up or dropped off. A trip must consist of at least two stops (one pickup and one dropoff), but may include any number of stops.
![]() Delivery A consolidation of sales order lines going from one location to the same customer location.
Delivery A consolidation of sales order lines going from one location to the same customer location.
![]() Delivery Line A shippable and booked sales order shipment line (order line detail).
Delivery Line A shippable and booked sales order shipment line (order line detail).
![]() Delivery Leg A Delivery Leg consists of two stops in which material is picked up and dropped off. Each delivery leg will typically correspond to a Bill of Lading.
Delivery Leg A Delivery Leg consists of two stops in which material is picked up and dropped off. Each delivery leg will typically correspond to a Bill of Lading.
The relationship between these entities is illustrated in Figure 17-1.

FIGURE 17-1. Shipping-entity relationships
Shipping Activities
In the Oracle E-Business Suite, the shipping process consists of a number of discrete activities, illustrated in Figure 17-2. Although most of these activities are required, if your process is simple, many of them can be automated in a single transaction. In the simplest case, all that is needed are two transactions: Pick Release and Ship Confirm. The pick release process can release orders for picking, create the staging move order, allocate material to the move order, transact the move order, automatically create trips and deliveries, and print designated picking documents. The shipment confirmation process for a trip decrements inventory, prints designated shipping documents, and updates the status of all the stops on the selected trip to Closed, indicating that all material has been picked up and delivered.

FIGURE 17-2. The shipping process
The overall process is almost infinitely flexible. Although you can automate many of the listed activities, you can also perform them separately if your business process warrants. For example, in many environments, picking is driven by a pick slip, printed as part of the picking documents. Pick slips are generated at one time, perhaps on a regular schedule; the actual physical inventory movement (transacting the move order) is performed later, by different personnel from those who generated the pick slip. In this case, it is appropriate to separate the release process from the move order transaction. As another example, if you need to plan complex trips of multiple stops, it might be appropriate to plan trips manually and later assign delivery lines, rather than combining or automating these activities.
Finally, there is no predefined sequence for many of the activities shown in Figure 17-2. You can print documentation at almost any point in the process; you can create deliveries and later assign them to trips, or you can create the trip first and then assign deliveries. The few dependencies that do exist should be apparent; for example, you cannot transact the staging move order before you’ve generated it. Typically, the process begins with releasing orders for shipment and ends with closing all the stops associated with a trip.
Configuring Oracle Shipping
In addition to setting up Oracle Inventory and Oracle Order Management, Oracle Shipping Execution requires a number of setup steps. Many of these steps are optional, based on the features you decide to use. These setup activities are described in the following sections.
Shipping Parameters
Use the Shipping Parameters window to set default shipping information for each warehouse (inventory organization). This window contains four tabs:
![]() General This tab lets you specify the unit of measure class to be used for weight and volume calculations and the basis (quantity, volume, or weight) used for percent of fill calculations.
General This tab lets you specify the unit of measure class to be used for weight and volume calculations and the basis (quantity, volume, or weight) used for percent of fill calculations.
![]() Pick Release The Pick Release tab defines defaults for the pick release process, including release sequence and pick slip grouping rules; whether to print pick slips at the end of the process or immediately; default picking document set; criteria for creating deliveries; default staging subinventory and locator; number of lines per pick slip; and whether to automatically allocate inventory as part of the release process.
Pick Release The Pick Release tab defines defaults for the pick release process, including release sequence and pick slip grouping rules; whether to print pick slips at the end of the process or immediately; default picking document set; criteria for creating deliveries; default staging subinventory and locator; number of lines per pick slip; and whether to automatically allocate inventory as part of the release process.
![]() Shipping Transaction This tab enables you to specify the default shipping document set, manual or automatic weight and volume calculation, packing controls, a default Goods Dispatched Account and category sets for freight class and commodity code.
Shipping Transaction This tab enables you to specify the default shipping document set, manual or automatic weight and volume calculation, packing controls, a default Goods Dispatched Account and category sets for freight class and commodity code.
![]() Delivery Grouping The Delivery Grouping tab lets you specify the criteria for automatic delivery creation. Ship From and Ship To Locations are required criteria; you can also include Customer, Freight Terms, FOB Code, Intermediate Ship To Location, Ship Method, and Carrier.
Delivery Grouping The Delivery Grouping tab lets you specify the criteria for automatic delivery creation. Ship From and Ship To Locations are required criteria; you can also include Customer, Freight Terms, FOB Code, Intermediate Ship To Location, Ship Method, and Carrier.
Rules
Three types of rules are used within Oracle Shipping Execution: Release Rules, Release Sequence Rules, and Pick Slip Grouping Rules. All are optional, but can be convenient, depending on your business processes.
Release Rules
Release Rules establish defaults for the pick release process. Use the Release Rules form to define these rules. The form is very similar to the Release Sales Orders for Picking form, shown in Figure 17-3. On the Release Rules form, give each rule a name and range of effective dates; then enter the values you want to use when you invoke that rule during the release process. See the “Pick Release” section for a discussion of the available options.

FIGURE 17-3. Release orders on line with the Release Sales Orders for Picking form
Release Sequence Rules
Release Sequence Rules define the priority in which order lines are considered for allocation during the release process. A Release Sequence Rule consists of a priority for the following attributes, applied in ascending or descending sequence: Order Number, Outstanding Invoice Value, Schedule Date, Departure Date, and Shipment Priority. (Order Number and Outstanding Invoice Value are mutually exclusive.)
You can define multiple rules for different business purposes. For example, you might normally ship orders in order of schedule date, with shipment priority used to prioritize orders with the same schedule date. At month end, however, you might want to give a higher priority to high value orders, i.e., those with the greatest outstanding invoice value.
Using the Release Sequence Rules form, assign each rule a name and range of effective dates. Then select a priority from 1 (highest) through 5 for one or more of the available attributes, and select whether it should be considered in ascending or descending order.
Pick Slip Grouping Rules
Pick Slip Grouping Rules control how picking lines are grouped onto pick slips. Define these rules on the Pick Slip Grouping Rules form. Give each rule a name and effectivity range; then select the grouping criteria from the following: Order Number, Subinventory, Customer, Ship To, Carrier, Trip Stop, Delivery, and Shipment Priority.
Freight Information
In the shipping process, you might want to record freight information, such as the carrier, shipment method, and freight costs. The following sections describe the necessary setup steps.
Freight Carriers
Use the Freight Carriers form to define the carriers that you use for shipments between organizations, and shipments to and from customers and suppliers. For each carrier, enter a Name, Description, and Distribution account.
You must define freight carriers separately for each warehouse where you plan to use them. When you no longer want to use a carrier at a warehouse, deactivate it using the Inactive After field.
Carrier-Ship Method Relationships
Define the relationships between carriers and shipping methods on the Carrier-Ship Method Relationships form. These relationships establish the valid carriers for different ship methods. On the form, select the Ship Method (defined on the Ship Method Lookups form in Oracle Inventory), the shipping Organization (warehouse), and the Freight Carrier; check the Enabled box.
Freight Costs
On the Freight Cost Types form, you can define suggested freight costs that you can later apply to shipments. For example, if you have a Special Handling charge for hazardous materials, you can specify the default cost and later apply it to shipments using the Freight Costs window on the Shipping Transactions form.
To define a freight cost, specify a Name, select a Type (defined as a FREIGHT_ COST_TYPE on the Oracle Shipping Lookups form), select a currency, and enter the amount of the charge. When you apply a freight cost to a shipment, you can accept the information from the freight cost type or override it.
Documents
Although Oracle does not require you to print any documentation as part of the shipping execution, most enterprises still rely on paper documentation for some part of the process. Pick slips, packing lists, bills of lading, and shipping labels are typical examples. Bills of lading and packing slips are identified by a unique number; to generate these documents, you must set up three objects: document categories, if you need to establish different numbering sequences; document sequences, to establish the numbering rules for certain documents; and sequence/category assignments, to designate the numbering sequence for each document category. You can also define document sets to predefine groups of documents you will print at pick release or ship confirm.
Document Categories
The Document Categories form lets you define multiple subdivisions of a given type of document; you will later assign these categories to document sequences, described in the next section, to determine the numbering method for a given category of document. For example, if different carriers require different bill of lading numbers or formats, you can create multiple document categories for the bill of lading document and assign a different format and sequence to each.
To define a document category, give it a name and description and select the type of document (Bill of Lading or Packing Slip) to which it applies. In the Category Includes block, indicate whether it applies to one or all shipping methods and whether it applies to one or all shipping locations. In the Sequence block, you can specify an optional prefix, suffix, and delimiter; the Default Appearance provides a preview of the format.
Document Sequences
Document Sequences are used to determine the numbering method for a wide variety of documents in many different applications; in fact, the Document Sequences form is considered part of Application Object Library. Oracle Shipping Execution uses document sequences to generate numbers for bills of lading and packing slips.
You can define multiple sequences and assign each to a given document category. To define a document sequence, give it a name, select the application to which it pertains (e.g., Oracle Shipping), and select a range of effective dates. Select the sequence type—Automatic, Manual, or Gapless—and the Initial Value (starting number) for automatic or gapless sequences. Check the Message check box to have each document display a message to the user identifying the sequence name and value.
NOTE
Gapless numbering is supported only in certain localizations of Oracle Applications. Check the documentation for your localization before choosing this method.
Category/Sequence Assignments
After you have defined document categories and document sequences, assign the desired sequences to the corresponding category; this determines the number generation for documents within the chosen category.
Use the Sequence Assignments form (also part of Application Object Library). Select the application, Category, Set of Books, and Method; on the Assignment tab, provide an effective date range and select the Sequence. In addition to using separate sequences for different document categories, you can use separate sequences for the same document category with different effectivity dates; for example, you might want to use a different sequence for your packing slips for each calendar year.
Document Sets
You can define different sets of documents to print at Pick Release or Ship Confirmation steps in the shipping process. On the Shipping Parameters form, described earlier, you can choose one document set to Default on pick release and one to default on Ship Confirm; you can override these as necessary.
Define document sets on the Shipping Document Sets form. Give each set a Name and Description, and select its usage—either Pick Release or Ship Confirm. In the Documents block, select the application and the documents you want to print when you request this set.
Transportation Calendars
You can optionally assign a calendar to each of your organizations or trading partners (suppliers, customers, or carriers) to limit valid shipping days and times. If you do not assign a calendar to a trading partner, every day is considered a valid shipping and receiving day.
First, you must define a workday calendar that identifies the desired days and times; calendar definition is discussed in Chapter 4.
After you have defined the necessary calendars, assign them to the appropriate trading partners using the Assign Calendars form. On this form, select the trading partner type (Supplier, Customer, Organization, or Carrier) and name. Select the desired calendar usage (Shipping, Receiving, or, for Carriers only, Carrier), and enter the default calendar name.
For customers or suppliers with multiple sites, you can assign a different calendar to each site. Click Show Candidates, and the Site Calendars region will show all the sites for that trading partner; override the default calendar if necessary.
Shipping Exceptions
The Define Shipping Exceptions form lets you define exceptions that might occur during the shipping process. For each exception you want to track, define an exception name and description and specify the Exception type (Picking, Delivery, or Trip), the severity of the exception, and the method for handling the exception. Exception handling options are Manual, Workflow, or No Action Required. If you choose Workflow as the exception handling method, you must enter the Workflow Item Type and check the Initiate Workflow box. If you do not want to track specific exceptions, this step is optional.
Containers and Item Relationships
You can define containers as inventory items and define the relationship between shippable items and containers. This step is optional; use it only if you explicitly record packing during the shipping process. The process has been discussed in detail in the “Cartonization” section in Chapter 15.
Containers
Containers can be cardboard cartons, pallets, or airline shipping containers. You define containers as items using the Master Items form described in Chapter 3.
The key attributes that identify an item as a container are found on the Physical Attributes tab of the Master Items form: Container check box, Container Type, Internal Volume, Maximum Load Weight, and Minimum Fill Percent.
Container-Item Relationships
The Container-Item Relationships form lets you define how many of a shippable item, called the Load Item, can be packed into a specific Container Item. Specify the container item, the load item, and the maximum quantity of the load item that can be packed in the container. Check the Preferred Flag to identify the preferred container for a given item.
Because containers can be packed within other containers (for example, you can pack cartons into airline containers), container items can also be used as load items.
Pick Release
The shipping process generally begins with the release of sales orders for shipment. This can be done with the online form shown in Figure 17-3, through a concurrent program that you can schedule to run on a regular basis, or if you have predefined the deliveries, through the Shipping Transactions form. Releasing orders will create a Move Order (identified as a Pick Wave Move Order) and can optionally initiate any of the release-associated activities shown in Figure 17-2. It can allocate inventory, create deliveries and the associated trips, print specified picking documents, and even automatically transact the move order.
Online Pick Release
To release orders using the Release Sales Orders for Picking form, optionally select the document set you want to print and enter the criteria to identify the order lines you want to release. You can default this information by entering a Release Rule in the Based on Rule field on the form.
The form contains three tabs with different types of selection criteria. The Order tab lets you select lines for release based on order information. You can select order lines based on a range of Scheduled or Requested dates; you can also specify individual Orders, Order Types, Ship Sets (for a specific order), Items, Customers, and Ship To location. In addition, the form lets you limit the selection to order lines that are previously unreleased, only backordered lines, or all order lines, using the Orders field. And you can limit selection to lines that you have previously reserved.
On the Shipping tab, you can select order lines based on predefined trips, deliveries, or shipping attributes. Available criteria include Trip, Stop, Delivery, Ship From, Ship Method, Shipment Priority, or Line/Container. It is here that you specify the Release Sequence Rule to establish the priority for allocating inventory to lines; you can also choose to Autocreate deliveries and Include Assigned lines.
The Inventory tab lets you limit the inventory that is considered in the release process. You can specify a single warehouse, subinventory, and locator to pick from and restrict selection to a project and task if you want. On this tab, you can specify a Pick Slip Grouping rule to determine how your pick slips are created. Other options are to Auto Allocate (reserve) material, Auto Pick Confirm (transact the resulting Move Order), and the staging subinventory and locator to which the material should be moved.
When you have entered all the desired selection criteria, you can release the selected orders online or via a concurrent program. Click either Online or Concurrent. Releasing orders online will perform the process immediately, but your terminal will be locked until it completes; it might be useful for the occasional rush order. Releasing the orders using the concurrent process will submit a concurrent request to run as soon as possible and will unlock your terminal so you can perform other activities. If you have selected multiple orders, the concurrent method is usually preferable.
Concurrent Pick Release
If you want to automate the release orders on a regular basis, you can use the concurrent program, Pick Selection List Generation SRS. This submits the release request through the Standard Request Submission (SRS) form, so you can schedule the job to run on a regular interval.
The only parameter this program requires is a Release Rule, which specifies all the selection criteria and options; you can optionally provide a batch prefix if you desire.
Release Through the Shipping Transactions Form
If you have predefined deliveries, you can also release sales order lines using the appropriate window on the Shipping Transactions form. For example, you can select one or more deliveries and initiate the release process for those delivery lines; if you have associated the deliveries with trips, you can select one or more trips and run the release process for the delivery lines associated with those trips. These options are discussed later, in the “Shipping Actions” section.
Move Orders
The process of releasing sales orders creates move orders, identified as Pick Wave Move Orders. A pick wave move order is a request to move material from its location in inventory to a staging location for shipping. (Other types of move orders are discussed in Chapter 15.)
If you have selected auto allocation in the pick release process, the move order will be detailed at the time of creation, or you can postpone this activity until a later time.
Transacting the move order performs a subinventory transfer that moves the material from its stocking location to the designated staging location. This process is sometimes referred to as Pick Confirm. At this time, you can report missing quantities or change the transaction line if you have picked from a different subinventory, locator, lot, or serial number than the move order requested. If your inventory accuracy is high and your process is extremely simple, you might choose to automatically transact the move order as part of the release process.
Order Cancellations
Oracle Shipping execution allows cancellation or modification of sales orders or lines even after pick release. Canceling or reducing an order quantity will automatically reduce the detailed quantities on the Move Order and update any existing reservations to reflect the new order quantities.
Shipping Transactions
You can perform most shipping activities from the Shipping Transactions form. This form consists of two main windows: the Query Manager and the Data Manager. The Query Manager lets you find shipping-related entities, such as delivery lines, deliveries, LPNs (License Plate Number, or container identifier), stops, and trips. The Data Manager window lets you maintain information about those entities and perform the activities associated with shipping. The Query Manager is described in the next section; the Data Manager is described by type of data and activity in the following sections.
Query Manager
When you open the Shipping Transactions form, the Query Manager is the first window to open, as shown in Figure 17-4. In the left pane of the window, use the navigation tree to select the type of object you want to find; in the right pane, enter the selection criteria for the type of object you are seeking. Numerous selection criteria are available; Table 17-1 summarizes the available criteria for each type of object.

FIGURE 17-4. Search for shipping entities with the Query Manager


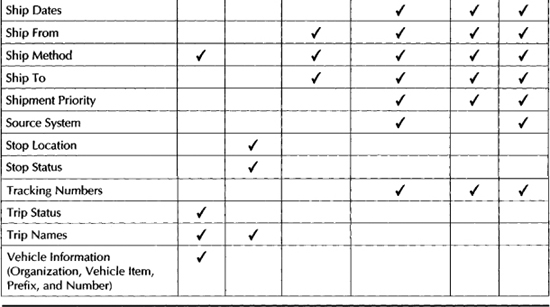
TABLE 17-1. Available Search Criteria in the Query Manager
Enter your search criteria, and click Find. This opens the Data Manager window for the objects found by your query. You can return to the Query Manager at any time by clicking the Find icon (Flashlight) on the toolbar.
If you want to save a query for repeated use, give it a name and description in the Query Manager window; check the Share a Query? box to make the query public (accessible to others). You can reuse a Personal or Public Query by selecting it from the appropriate node in the left-hand pane of the Query Manager; within a session, you can reuse a previous query by selecting it from the Temporary Query node.
Data Manager
The Data Manager enables you to enter or maintain data for the entities involved in the shipping process: Delivery Lines, Deliveries, LPNs, Stops, and Trips. You can create or modify these entities in the Data Manager and perform activities on them. For example, you can launch pick release for trips, stops, or deliveries; associate delivery lines with deliveries; pack deliveries or individual delivery lines; and build trips selecting deliveries.
The Data Manager window consists of two panes, shown in Figure 17-5. The left pane is a tree-style navigator window, organized into Data Entry, Personal Queries, Public Queries, or Temporary Queries. The right pane is a folder form with multiple tabs that display information for the objects you have selected with the Query Manager or the object for which you are entering data. The type of information displayed is identified in the Context field at the top of the pane. You can rearrange the data in the folders to suit your preferences or business practices, or you can open a detail window with the Details button on the form. Use either the summary or detail window to change basic data for the object; perform additional actions by selecting the appropriate activity from the Actions menu at the bottom of the pane. The actions are described in detail later in this chapter, in the “Shipping Actions” section.

FIGURE 17-5. The Data Manager lets you create or maintain shipping data
Shipping Entities
As noted earlier, the shipping process utilizes the following entities: Delivery Lines, Deliveries, Stops, Trips, and optionally containers or LPNs. The relationship between these entities was illustrated in Figure 17-1. The overall process is extremely flexible; you can model many different shipping processes with the tools that Oracle provides. Many activities are optional, and there are very few restrictions on the order in which you can perform the activities. The overall process flow was shown in Figure 17-2.
The following sections describe the basic data required for these entities; the “Shipping Actions” section and its subsections detail the activities you can perform for those entities.
Delivery Lines
Delivery lines are shippable Sales Order detail lines; they are created through Order Management and processed for shipment in a number of ways, as described in the “Shipping Actions” section later in this chapter.
Deliveries
A delivery is a set of sales order lines going from one location to the same customer location, on a specific date and time. You must assign deliveries to trips in order to ship them; you can optionally pack delivery lines into containers.
You can create deliveries automatically when you release sales orders for picking, as discussed earlier in the “Pick Release” section. Alternatively, you can use the Autocreate Deliveries action on the Shipping Transactions form to automatically generate deliveries for unassigned delivery lines. Finally, you can create deliveries manually and later assign delivery lines; this might be useful if you want to override the grouping defaults specified in the organization’s Shipping Parameters.
Select Delivery Data Entry on the left pane of the Data Manager to manually create a delivery. This will open the Delivery window, shown in Figure 17-6. Enter a delivery name, or one will be automatically generated based on rules your system administrator can establish. The only other required information is the Organization from which the delivery originates and the Ultimate Ship To (typically, a customer location). The other information shown in Figure 17-6 is optional; you can specify it now or as it becomes known.

FIGURE 17-6. Use the Delivery window to create and maintain delivery information
In addition, you can enter Bill of Lading (BOL) information or generate a BOL on the Legs tab and generate a packing slip for the delivery using the Packing Slip tab on the Delivery window.
Trips
A trip is a set of deliveries that is scheduled to be shipped on a specific carrier on a specific date. You can create trips manually and assign stops, deliveries, and delivery lines; or you can automatically create trips for existing deliveries, delivery lines, or LPNs.
To create a trip using the Data Manager, select Trip Data Entry on the left pane of the Data Manager. The only data required is a trip name. You can also enter the data shown in the detailed trip window in Figure 17-7.

FIGURE 17-7. Enter trip data in the Trip Details window
Stops
A stop is a point along the route where material is either picked up or dropped off. Each trip must consist of at least two stops: one pickup and one dropoff. Stops are most commonly created automatically as part of trip creation, but they can be created manually for more detailed scheduling.
Select Stop Data Entry on the Data Manager to manually create a stop. This opens the Stops window, shown in Figure 17-8. Enter the Location of the stop (either an internal or customer location), the Trip to which the stop belongs, and Planned Arrival Departure dates and times. You can also enter weight, volume, and fill information for the stop and later record actual arrival and departure dates and times.
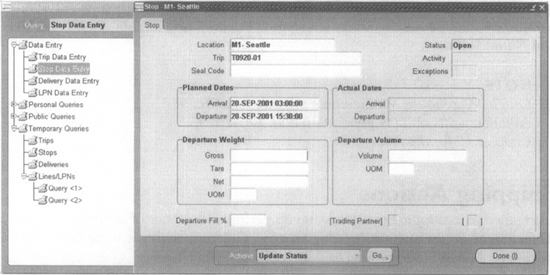
FIGURE 17-8. Enter information about a stop in the Stops window
LPNs
A License Plate Number (LPN) is an identifier assigned to a specific container used to store or ship material, for example, a carton, pallet, or trailer. In the specific context of Oracle Shipping Execution, an LPN identifies a specific instance of a predefined container item, described earlier in the section “Containers and Item Relationships.”
To define an LPN in Oracle Shipping Execution, select LPN Data Entry on the Data Manager. This opens the Create LPNs window, shown in Figure 17-9. Enter the Organization in which the LPN is located, the container Item for which you want to generate LPNs, and the Count (number) of LPNs you want. Optionally, enter the parameters to generate the identifiers: Name Prefix, Base Number, Pad to Width, and Name Suffix.

FIGURE 17-9. Generate LPNs with the Create LPNs window
NOTE
Oracle Warehouse Management provides significant enhancements on LPN generation and use; see Chapter 15 for details.
Shipping Actions
Using the basic shipping entities, you can perform a number of actions to record the actual activities of your shipping process. Different actions can be performed for different objects, as summarized in Table 17-2.

TABLE 17-2. Shipping Actions That Can Be Performed by Shipping Entity
To perform any of these actions, use the Shipping Transactions form to locate (with the Query Manager) or create the desired entity. If your query retrieves multiple rows of data, select the specific entity in the Data Manager window. When appropriate, you can select multiple rows of data on the Data Manager using SHIFT-click or CTRL-click. Then choose the desired action from the Actions menu, and click Go. Each of these actions is described in the following sections.
Assign and Modify Freight Costs
You can add or modify freight costs for any of the shipping entities—delivery lines, deliveries, LPNs, trip, or stops. Find the entity you want using the Query Manager, and select Freight Costs from the Actions menu; click Go. In the resulting Freight Costs window, enter or modify the freight Cost Type, Currency Code, Amount, and optional Conversion type.
Launch Pick Release
In addition to releasing lines for picking using the online form or the concurrent program, described earlier in the “Pick Release” section, you can release lines from the Shipping Transactions form by selecting lines or any of the entities with which the line is associated—deliveries, LPNs, Trips, or Stops. Find the entities you want using the Query Manager, and select the desired lines on the Data Manager. Choose Launch Pick Release from the actions menu, and click Go.
This process launches a concurrent request to release the selected lines, as described earlier in the section “Concurrent Pick Release.” No additional input is accepted; the release process uses the defaults established on the Pick Release tab of your organization’s Shipping Parameters form.
Split Line
You can split delivery lines so that you can ship them separately. Find the lines individually, or find the LPNs with which they are associated. Select the desired lines in the Data Manager window, and choose Split Line from the Actions menu. When you click Go, the system displays the Split Delivery Line window; enter the quantity you want to split from the original line, and click OK. This results in two separate delivery lines that you can process separately.
Auto-create Deliveries
To create a delivery for unassigned delivery lines or LPNs that are already packed, use the Query Manager to find the needed information. On the Data Manager, select the desired lines (use CTRL-click or SHIFT-click to select multiple lines) and choose Auto-create Deliveries from the Actions menu; click Go. A delivery is automatically created and attached to the selected objects.
Assign to Delivery
Another method of creating a delivery is to add or remove lines or LPNs from an existing delivery. Find the lines or LPNs you want, and choose Assign to Delivery from the Actions menu. When you click Go, choose the desired delivery from the list of values; the lines or LPNs will be assigned to the selected delivery.
To unassign lines or LPNs from a delivery, select the desired lines in the Data Manager window and choose Unassign from Delivery from the Actions menu.
AutoCreate Trip
To automatically create a trip for one or more deliveries, use the Query Manager to find the desired deliveries. This opens the Data Manager, displaying the designated deliveries; select the desired deliveries and choose the action AutoCreate Trip; click Go. Use a similar procedure to autocreate a trip for delivery lines or LPNs.
Create LPNs
In addition to creating LPNs from the LPN Data Entry node on the Data Manager, you can also create LPNs from Delivery Lines or LPN summary windows on the Data Manager. Choose Create LPNs from the Actions menu, and click Go. This opens the Create LPNs window, shown earlier in Figure 17-9. Enter the same details as noted in the “LPNs” section, and click OK.
NOTE
LPN creation from the Delivery Lines or LPN windows is provided as a convenience; the LPNs created are not associated with the selected line or LPN until you pack them.
Packing Activities
Packing is an optional activity in Oracle Shipping Execution that associates delivery lines with LPNs (containers). Oracle offers several options: the Packing Workbench, autopacking, and manual packing (and unpacking).
Packing Workbench
The Packing Workbench enables you to query multiple lines and multiple containers, compare the weight and volume of the items you want to pack with the capacity of the selected containers, and choose the mode of packing.
To access the Packing Workbench, use the Query Manager to locate both the lines you want to pack and the containers (LPNs) you want to use for packing. Select the desired combination of lines and LPNs, choose Packing Workbench from the Actions menu, and click Go. The Packing Workbench window contains two tabs. One displays the selected containers and their contents; the other displays the selected items. The left side of the packing workbench shows the available capacity of all the selected containers and the total weight and volume of the selected items.
Pack the selected lines into the designated containers by selecting the Packing Mode. You can choose either Equal packing or Full (sequential) packing. Equal splits the selected delivery lines equally across the selected containers. Full packing packs one container fully before proceeding to the next container. When you have selected the packing mode, click Pack.
Autopacking
You can automatically generate the required containers and pack them using the Autopack action. Autopacking uses the container-load relationships established in Shipping Execution or the preferred container item set up in Oracle Inventory.
To autopack, locate and select the desired lines; choose either Auto-pack or Auto-pack Master from the Actions menu, and click Go. The Auto-pack action creates and packs only the detail containers; Auto-pack Master packs the selected delivery lines into the detail container and then packs the detail container into the parent container.
Manual Packing and Unpacking
Manual packing of delivery lines verifies that the lines have been packed into containers. After you have packed a delivery line, you must unpack it to make any changes.
Verify packing by selecting the desired delivery lines (by searching for specific lines, deliveries, or LPNs). Choose Pack from the Actions menu, and click Go. To unpack a delivery line, LPN, or an entire delivery line, select the desired objects in the Data Manager window; choose Unpack from the Actions menu, and click Go.
Calculate Weight and Volume
The shipping parameter Weight/Volume Calculation specifies whether the weight and volume of various shipping entities are calculated automatically or manually. If you choose Automatic for this parameter, the weight and volume will be calculated when the delivery is packed, ship confirmed, or planned. If you choose Manual, you can calculate the weight and volume on the Shipping Transactions form.
Generate Loading Sequence
You can generate a loading sequence for lines within a delivery to support the customer’s requested production sequence. To generate a loading sequence, you must specify the customer production sequence on the sales order line (found on the Others tab), assign containers to each of the delivery lines, and calculate the weight and volume of the delivery or trip.
Then, select the desired delivery lines using the Query Manager and Data Manager. Select the Lines Loading sequence (Forward, Forward Inverted, Reverse, or Reverse Inverted) for the delivery. Choose the Generate Loading Sequence action from the Actions menu, and click Go.
Assign to Trip
To manually specify the deliveries that are associated with a predefined trip, select the desired deliveries using the Query Manager and Data Manager; choose Assign to Trip from the Actions menu, and click Go. Enter the location where the items are to be picked up and the location where they are to be dropped off.
To unassign deliveries from a trip, search for the delivery lines or the delivery containing the delivery lines. Select the desired delivery lines, choose Unassign from Trip, and click Go.
Plan
Planning a trip validates certain characteristics of the trip to help ensure a successful shipment. When you plan a trip, the system validates the sequence numbers of deliveries within the trip and checks the weight, volume, and fill percent against the maximums for the containers in each delivery. Trip planning also verifies that the minimum fill percent is met and that the planned trip date is not past due.
After you plan a trip, you cannot add or delete delivery lines unless you first unplan the trip. You can also plan a delivery to prevent further changes.
To plan a trip or delivery, use the Query Manager to find the desired entities. Select the trips or deliveries in the Data Manager window, and choose the Plan action; click Go. To unplan a trip or delivery, select Unplan from the Actions menu.
Print Document Sets
After you have defined an LPN, trip, or stop, you can print picking or shipping document sets for that entity. Find it using the Query Manager, and choose the Action Print Document Set. Click Go, and select the desired document set from the Document Sets window.
Update Status
For the most detailed control of your shipping process, you can update Close or Reopen of individual deliveries or stops within a trip. Select the desired delivery or stop, and choose the appropriate action (Close or Reopen) from the Actions menu. Click Go.
Ship Confirm
Ship Confirm is the process that records whether items on a delivery have been shipped or backordered. To ship confirm a delivery, select the desired deliveries. Choose Actions I Ship Confirm I Go.
In the Confirm Delivery window, shown in Figure 17-10, use the following Ship Options to specify the activity that has occurred:

FIGURE 17-10. Confirm Shipments using the Confirm Delivery window
![]() Ship Entered Quantities Confirms the quantities entered in the Shipped Quantity field for each delivery line.
Ship Entered Quantities Confirms the quantities entered in the Shipped Quantity field for each delivery line.
![]() Unspecified Quantities Used in conjunction with the Ship Entered Quantities option, this field determines what action to perform for unspecified (null) shipped quantities; you can Ship, Backorder, or Stage such quantities.
Unspecified Quantities Used in conjunction with the Ship Entered Quantities option, this field determines what action to perform for unspecified (null) shipped quantities; you can Ship, Backorder, or Stage such quantities.
![]() Ship All Confirms the entire quantity of each delivery line, regardless of what you enter in the Shipped Quantity field.
Ship All Confirms the entire quantity of each delivery line, regardless of what you enter in the Shipped Quantity field.
![]() Backorder All Backorders the entire quantity of each delivery line.
Backorder All Backorders the entire quantity of each delivery line.
As part of the ship confirm process, you can optionally create deliveries for staged quantities, auto-create a trip (specifying ship method and actual ship date), and print a set of documents.
UPS Integration
Currently, Oracle has an agreement with UPS and has developed APIs to provide UPS information by Delivery Line, Delivery, or LPN on the Shipping Transactions form. You can validate addresses, access rate and service information, track shipments, and view the time in transit. Oracle plans to add integration with additional carriers in the future.
Summary
This chapter described capabilities of Oracle Shipping Execution to manage outbound logistics. It described shipping terminology—trips, stops, deliveries, and delivery lines—and activities—release, move order transactions, trip creation and planning, and document printing. This chapter outlined the necessary setup steps, including shipping parameters, rules, freight information, documents, transportation calendars, exception definition, and container-item relationships.
The online and concurrent options for releasing sales orders have been described in detail. The available query options and shipping actions have been outlined. These actions include building trips, stops, and deliveries; packing; document printing; confirming shipments; and UPS integration. Additional capabilities, available with Oracle Warehouse Management, are detailed in Chapter 15.