3
WHY LAYERS?
When Photoshop was created, it did not have layers. It was an application that worked extremely well for touching up photos, frames of film, or video stills. The introduction of layers moved Photoshop from image touch-up program to robust graphic tool. The key to being fast in Photoshop is understanding the Layers palette.
Think of layers as tracks from a video timeline. The way you build and organize the show affects your end results. With proper organization, you can come back later and quickly make changes. Clear labels make it easier to move the project into After Effects or your nonlinear edit system. Mastering layers is your first step to becoming a Photoshop power user.
What Are Layers?
One view of layers is that they are like traditional animation cels. You place objects on clear pieces of acetate and begin to stack them up. These sheets typically contain a single character or element. Layers can contain photos, text, logos, shapes, and even textures. As you build your composition, the stacking order affects depth perception.
Layers can contain objects, text, effects, or image adjustments. Good naming and organization is crucial in a fast-paced production environment.

There are lots of ways to create and manage a layered document, but it all comes back to an organized design. Video folks usually find the basic interface of the Layers palette similar to most NLEs. Not taking sides on who’s copied whom, it’s safe to say that Photoshop and most popular video applications share a similar interface. Just as it’s hard to edit video with your Timeline window closed, you really should leave the Layers palette open at all times. If you need to hide it temporarily, press the Tab key.

Creating Layers
It is very easy to create a new layer. You can click the Create New Layer icon (which looks like a note pad) at the bottom of the Layers palette. Additionally you can choose Layer>New>Layer or press ![]() . Layers can also be copied or dragged from one document to another.
. Layers can also be copied or dragged from one document to another.
Duplicating Layers
Sometimes you will want to duplicate a layer to use multiple instances of an object (such as a logo). You can choose Layer> Duplicate Layer or contextual-click on a layer’s name in the Layers palette. The fastest way though is to press ![]() (think jump) to create a copy of a layer immediately above itself. Additionally if you have an active selection, only the selected part will copy to the new layer.
(think jump) to create a copy of a layer immediately above itself. Additionally if you have an active selection, only the selected part will copy to the new layer.
Under Control
 There are many controls tied to the Layers palette. This chapter will cover layer creation, navigation, blending, and organization.
Deleting Layers
If you know that a layer is definitely no longer needed, you should throw it away. This will reduce the size of your file, so it will take up less disk space and less memory. Layers can be thrown away by dragging them into the trashcan at the bottom of the Layers palette. You can also contextual-click on a layer’s name to throw it away or choose Layer>Delete>Layer.
Fill Layers
In addition to layers that you create or import (via the Copy & Paste or Place… commands), Photoshop allows for the creation of specialty Fill Layers. You access these by choosing Layer>New Fill Layer and the choosing Solid Color… Gradient… or Pattern… You can also access these by clicking the black and white half-circle on the bottom of the Layers palette.
• Solid Color. Any color can be used to create a Solid Color layer. To edit the color layer, just double-click its thumbnail in the Layers palette.
• Gradient. A gradient is a gradual blend between two or more colors. For more on gradients, be sure to read Chapter 11.
• Pattern. Photoshop can use its library of seamless patterns to create a new layer filled with a pattern.

How Layers Work: Understanding Composite Images
Layers are much more than a storage bin. They can contain text, image adjustments, special effects, and annotations about your work. After Effects users will feel right at home; Photoshop’s Layers palette is a close sibling to AE’s timeline. From the Layers palette, you can control visibility, opacity, blending modes, naming, and stacking order.
Delete Many at Once
Starting with Photoshop CS2, you don’t have to throw layers away one at a time. By using a ![]() +Click (
+Click (![]() +click on multiple layers, then delete, you can then use any of the delete methods to remove all at once.
+click on multiple layers, then delete, you can then use any of the delete methods to remove all at once.
With most NLEs offering at least partial support for Photoshop layered files, you can keep similar elements for one show, such as all the lower thirds, in a single document. By consolidating, you have fewer files to keep track of. Updates are easier too; change the color of the bar in one document, and you can quickly update in your timeline. By turning layers off and on, you can generate all of your namebars. You also won’t need to worry about small shifts in the bar or logo, a common problem with multiple versions.
I use Photoshop to complete 75% of my After Effects and DVD menu work. The superb alignment tools, text controls, and quick-rendering filters allow me to prebuild my work. I can then import layered documents into Adobe After Effects and Encore or Apple’s DVD Studio Pro. It is then easy to swap in some moving elements. It is far faster to render text and shadows in Photoshop whenever possible. I also find it far easier to do on-screen layout in Adobe Photoshop. Be sure to look at the great tutorials on the DVD about using Photoshop for Motion Graphics and DVD work.
Working with the Layers Palette
As a common starting point, open up the file Ch03_ Layered_DVD.psd from the book’s disc. This 10-layer document is a good example of using the general features of the Layers palette. To start, all layers are turned off; don’t be surprised to see an empty screen or checkerboard pattern. (The checkerboard is Photoshop’s default way of showing transparency.)

Step 1. Begin turning layers on from the bottom up, starting with Texture.
The bottommost layer is a simple pattern that adds a sense of depth to the piece. This pattern was made by painting a physical canvas with traditional media. A digital photo was taken and tinted using Photoshop. You’ll find a sample folder of textures on the book’s DVD-ROM.
Step 2. Turn on the next layer, Water, and click its name to select the layer.
At the top of the Layers palette, you should notice that the layer is set to 60% opacity. Opacity is the opposite of transparency. Something that is 60% opaque is 40% transparent.
There’s a great shortcut for changing opacity of a layer, but you must have a tool selected that does not have its own transparency settings (such as the Move or Marquee Tools). To change the opacity of a layer, type the corresponding number on the numeric keypad. For example, press the 2 key for 20%, the 5 key for 50%, and so on. If you want to be really specific, you can quickly type a number such as 23 for 23%, and Photoshop will adjust the layer accordingly. This only works when you have a tool selected without its own transparency settings.

Step 3. Turn on and select the third layer, Skyline. This introduces another layer feature: blending modes.
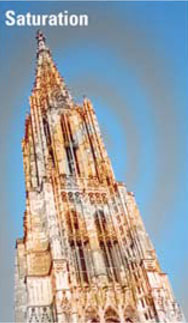
If you look in the top left corner of the Layers palette, you’ll see this layer is set to Overlay. Here I’m using a grayscale image to add a silhouette of a building. Blending modes are the most underused, least understood part of Photoshop. They are the foundation of my design work and a useful tool in digital video (see “Blending Modes” on page 65 for more info).

Step 4. Turn on and select the fourth layer, Vignette, and you’ll see a similar technique employed to add an area of focus to the image. A good technique is to try changing the blending mode before you make an opacity change. This subtle change to your working style will give you dramatic results.
Step 5. Turn on and select the fifth layer, which looks different than the rest. It is an adjustment layer.
Here I have applied a Levels adjustment to multiple layers simultaneously. A Levels adjustment affects the overall balance of lights and darks in an image. It is similar to a gamma adjustment in video. The key benefit of the adjustment layer is that it is nondestructive; the effect is “live,” in that you can alter or disable it at any time.
Now, double-click on the Levels Adjustment Layer’s circular icon, and the controls pop up. Try adjusting the middle slider and see the resulting changes.
You will likely make a Levels adjustment on every composition; it is the key to maintaining video-safe levels and attaining proper lighting and contrast. Levels adjustments are covered in greater detail in Chapter 9, “Color Correction: How to Get It Right.”

Step 6. Turn on the next layer, Bars.
These borders will be used to create an edge effect. The empty area between the bars is transparent and allows other layers to show through.
Step 7. Turn on and select the Logo layer.
This logo is a Smart Object as indicated by its special icon. Smart objects can add flexibility to the design process, as they allow for the ability to scale and transform a vector object repeatedly without losing quality. This layer also has layer effects applied to create a slight beveled edge with a drop shadow.

Step 8. Turn on the final layer, Text.
Photoshop has a robust text engine that is useful for creating screen-ready text. We will fully explore the robust text capabilities of Photoshop in Chapter 5.
| Move current layer down one spot | |
| Move current layer up one spot | |
| Move current layer to the bottom of Layers palette | |
| ove current layer to the top of Layers palette |
By employing proper use of layers, I have generated a professional-looking DVD menu that I can use as is or import the layers into another application to animate. Proper naming makes it easy to find each layer. To name a layer, double-click on the name in the Layers palette. Note that old versions of Photoshop require you to ![]() +double-click (
+double-click (![]() +double-click) on the name.
+double-click) on the name.

Layer Organization Techniques
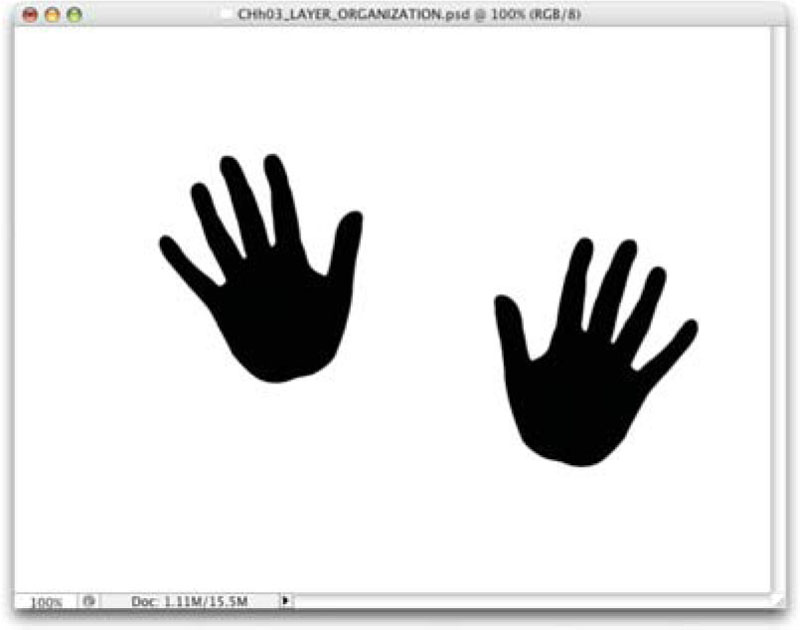
Layer organization starts with naming, but does not end there. A lot of effort has gone into developing technology for improved layer management. Intermediate steps include linking, aligning, distributing, locking, merging, and flattening layers. Advanced options include grouping, color-coding, and use of Layer Sets. For this lesson, open Ch03_Organization.psd.
Linking
Multiple layers can be linked together. Linking enables you to move multiple objects together.
Step 1. Make the Right Hand and Left Hand layers visible.
Step 2. Select the Move tool by pressing the letter V.
Step 3. Now click on one of the red layers, and ![]() click to select the second layer. Multiple layers can be selected by holding down the
click to select the second layer. Multiple layers can be selected by holding down the ![]() key to select a range of contiguous layers (adjacent). Alternately, you can select discontiguous layers by holding down the
key to select a range of contiguous layers (adjacent). Alternately, you can select discontiguous layers by holding down the ![]() key and clicking to select them.
key and clicking to select them.
Step 4. Click the Link layers button at the bottom of the Layers palette.
You can now move the two layers as one. With the Move tool selected, you can click and drag. You can also use the arrow keys to move the image one pixel. Add the ![]() key and you can super-shift 10 pixels at a time.
key and you can super-shift 10 pixels at a time.
Smart Guides Save Time
Smart Guides were first added to Photoshop CS2, but are similar to what you’ll find in Illustrator or DVD Studio Pro and Motion. When you start to drag an object, Smart Guides will highlight the edges or center to show alignment. If they aren’t visible, be sure to turn on Smart Guides under the View menu.
Align and Distribute
It is possible to have precise alignment in Photoshop. You can align or distribute objects in relationship to one another.
Step 1. Hide the Hand layers by clicking on their visibility switches.
Step 2. Now turn the green layers on. You should see the four playing card symbols randomly arranged on the screen.
Step 3. Select the heart symbol, then use the Move tool to position it where you’d like it to fall on the screen.
Step 4. The first step to aligning or distributing is to link the objects together. Link the other three symbols to the heart.
The Alignment tools are tied to the Move tool. If you have the layers linked together and the Move tool selected, you should see them at the top of the Options bar. It takes two or more objects to perform an alignment. The alignment is based upon the object you have selected.

Step 5. In this example, click the Align Bottom button in the ![]() bar. The other three will move while the heart remains stationary.
bar. The other three will move while the heart remains stationary.
The misalignment problem is solved, but things still aren’t right. The viewer’s eye expects these objects to be evenly spaced; this is called distribution. You must have at least three items to perform a distribution. In this case, four is more than enough. The second set of boxes in the Options bar is for distribution.

Step 6. Choose the second-to-last box to distribute horizontal centers. Notice how the objects snap to place perfectly.
Locking
Photoshop offers great flexibility in locking layers. It is possible to lock the transparent areas of an image, lock the pixels to avoid changing color, lock position to prevent accidental shifting, or any combination of the three. These features are enabled by highlighting the layer and then picking from the Lock icons at the top of the palette.
The Key is to Lock
Locking a layer only does so in Photoshop. This is a useful way to avoid accidental edits or movement on a layer.
This is a good way to avoid accidental changes. If you do need to make a change, unlock the layer. Take a look at the key layer; you should see a Lock icon. If you try to use the Move tool, Photoshop will warn you that the layer is locked.
Merging and Flattening Layers
Sometimes, you know that you’d like to permanently join two objects together. This is called merging; it is the Photoshop equivalent of a video mixdown or render.
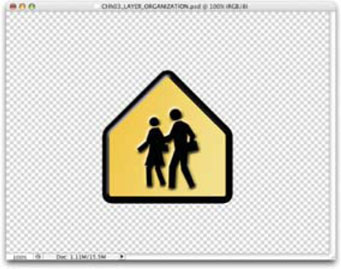
Step 1. Turn off all layers except the yellow Base and People layers.
Step 2. Highlight the Base layer and link these two layers together.
Step 3. From the Layers palette submenu (the triangle in the right corner), pick Merge Linked. The two layers are now permanently joined. This is a useful way to cut down on layers and simplify your project. For now, choose Edit>Undo.

Another technique is to merge linked layers to an empty target layer. Think of this as a selective merge. Highlight the Sign Target Layer and link the other yellow layers to it. Now hold down the ![]() key and select Merge Linked. Notice how a flattened copy appears on the new target layer, while the originals are left behind. This is a useful technique for simplifying your project while still preserving source layers.
key and select Merge Linked. Notice how a flattened copy appears on the new target layer, while the originals are left behind. This is a useful technique for simplifying your project while still preserving source layers.
There are times when you want to merge all of the visible layers in the document. Simply choose Merge Visible. One step further is to Flatten your composition. This discards all nonvisible layers and merges all visible layers into a single background layer. It is very rare that you will need to perform this step. There is a myth that you must flatten your artwork before sending it to some NLEs. This is inaccurate; you should choose Save a Copy in a format that does not support layers (such as PICT or TARGA) in order to import into some NLEs. This saves an additional flattened copy to the specified location. It does not get rid of your layers in the .psd file. Layers are key to future changes; preserve them or regret it later.

Targeted Flattening
You can merge multiple layers into one layer to make it easier to manipulate. This is also a necessary step for creating alpha channels from layer styles.
Step 1. Link the source layers to a blank target layer. Make sure that none of the layers are a locked Background layer. Otherwise, double-click on the Background layer and name it.
Step 2. Highlight the target layer.
Step 3. Hold down the ![]() key.
key.
Step 4. Choose Merged Linked from the Layers palette submenu.
This flattened copy will now import cleanly into your NLE, Compositing application, or DVD authoring application. The editable version is left as well for future changes. For more on Layer Styles, see page 141.
Clipping Mask
Using a Clipping Mask (previously called Grouping) will allow you to take one layer and apply its pixels to the opaque areas of the layer below. This is very similar to using a track matte in After Effects.
Step 1. Turn off all layers except the Cloud and Texture layers.

Step 2. To map the Texture layer, highlight and Layer> Create Clipping Mask. You should notice that the layer indents. Another way to perform the same task is ![]() -clicking (
-clicking (![]() -clicking) between two layers in the Layers palette.
-clicking) between two layers in the Layers palette.
A Clipping Mask is a great replacement for Paste Into because it takes one step instead of five.

Color-Coding
Throughout this lesson, the layers have been color-coded. This is a great way to identify items, and helps to mentally organize a complex composition. These colors only appear in the Layers palette and do not affect your final output. To assign a color to a layer, you must access the Layer Properties command. With a two-button mouse, you can right-click on the desired layer. One-button mouse users should hold down the ![]() key when clicking. Alternately. you can
key when clicking. Alternately. you can ![]() +double-click (
+double-click (![]() + double-click) the layer’s name.
+ double-click) the layer’s name.
Layer Groups
An incredibly useful feature is Layer Groups (previously called sets). Think of these as folders in a file cabinet. Instead of throwing everything in a drawer, you can make life easier and put similar things together. This makes it easier to work with layers, and is also a great way to prepare options to show the client. For example, you can prepare the same headline two different ways. Headline 1A has a serif font, while Headline 1B uses a sansserif typeface. It is easy to turn entire sets off and on as a group. Layer Groups can also have their blending modes and opacity changes as a group.

Use of Layer Groups and color-coding is an essential part of gaining speed.

There are several ways to create a set. You can click on the New Set icon and drag the layer into the set. An easier method involves linking.
Step 1. Go back to the Heart layer; and select all four symbol layers.
Step 2. Now choose New Group from Layers from the Layers palette submenu and name the set “Poker.” By employing a Layer Group, you can align a group of objects.
Step 3. Highlight the Background layer and link it to the new Layer Group Poker.
Step 4. Select the Move tool.
You now have the Align tools available and can choose to center the symbols as a single unit. Centering objects on a page is as simple as linking the layers or Layer Groups to the highlighted Background layer and using the Align tools.
Starting with Photoshop CS, Layer Groups have gotten even better. It is now possible to have up to five levels of nested groups. While five Layer Groups are likely more than you need, the flexibility is empowering. You can now drag Layer Groups inside other Groups, allowing for complex organization. Be aware that most NLEs will improperly interpret Layer Groups. Some will import the contents as a flattened layer while others will improperly try to interpret the layer data. Fortunately Adobe After Effects and Apple Motion handle Layer Groups fairly well.
Video #5 Organizing Layers
 You can see these layer organization techniques by watching the video tutorial on the DVD-ROM.
Storing Alternate Designs with Layer Comps
During the normal design process, you will often create several variations upon your design. For example when designing a lower-third graphic you might try positioning the logo in different positions as well as using a drop shadow or glow to help offset it. Instead of having a separate document for each variation, you can harness the power of Layer Comps.

Layer Comps were first introduced with Photoshop CS. When properly used, Layer Comps can significantly extend design flexibility. Essentially, a layer comp is a snapshot of your Layers palette, which allows you to memorize different combinations of layers. A layer comp can record three types of layer options:
• Layer visibility
• Layer position within the .psd file
• Layer appearance (use of Layer Styles)
How to Create Layer Comps
In order to practice with Layer Comps, open the file Ch03_ Layer_Comps.psd from the DVD-ROM. Then make sure the Layer Comp window is visible (if not, choose Window>Layer Comps).
This document already has six layer comps added to it. If you click the forward or backward triangles at the bottom of the Layer Comps palette, you can apply each Layer Comp. These six options showcase variations in color, font, and logo position. There are three additional options to create.
Step 1. Select the first Layer Comp called Orange 1 and make it active by clicking in the column next to its name.
Step 2. Disable the visibility for the Orange layer by clicking its eyeball icon. Then enable visibility for the Red layer.
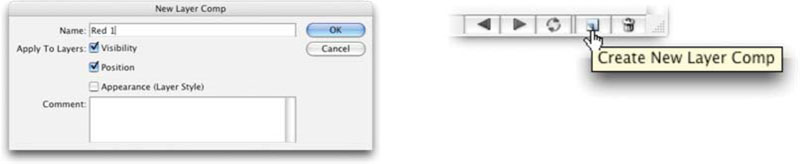
Step 3. Click the Create New Layer Comp button at the bottom of the Layer Comp palette. Name the Comp Red 1 and choose to memorize both Visibility and Position. Click OK to store the Layer Comp.

Step 4. Turn off the visibility icon for Font 1 and enable the visibility for Font 2.
Step 5. Click the Create New Layer Comp button at the bottom of the Layer Comp palette. Name the Comp Red 2 and choose to memorize both Visibility and Position. Click OK to store the Layer Comp.
Step 6. The final Layer Comp involves a position move. Since it is most similar to a previous state, select and activate Orange 3.
Step 7. Duplicate the Orange 3 state by contextual-clicking and choosing Duplicate Layer Comp.
Step 8. Disable the visibility for the Orange layer by clicking its eyeball icon. Then enable visibility for the Red layer.
Step 9. Click the Update Layer Comp button at the bottom of the Layer Comp palette.
Step 10. Double-click on the Orange 3 copy layer and rename it Red 3. Drag it to its proper position at the bottom of the Layer Comp window.
Step 11. Press ![]() to save your work.
to save your work.

How to Update Layer Comps
If you delete or merge layers, you can create an invalid state where a Layer Comp can no longer be used. You’ll be alerted by an exclamation point when this happens. At this point, you have three options:
• Choose Edit>Step Backwards or press ![]()
![]() until the warning is removed.
until the warning is removed.
• Ignore the warning and accept that some (or all) of the layers in the comp may be lost.
• Update the Layer Comp by clicking the Update Layer Comp button.

How to Use Layer Comps
You can now toggle between the comps to see the different states of the image. Layer comps can’t remember font changes to text layers or the color of pixel on a layer. If you want to change color, try using layer styles to color your layers, and not actually fill the pixels. Layer Comps have several ways that they can be used to streamline a project:
• Layer comps are useful for storing alternate designs with one document.
• Layer comps allow you to have several options ready to quickly show to your client.
• You can also save all Layer Comps out as separate PSD files by choosing File>Script>Layer Comps to Files.
• You can create a PDF file to send your client via e-mail to get feedback. Choose File>Script>Layer Comps to PDF.
Video #6 Layer Comps in Action
You’ll find a video tutorial on the DVD-ROM that will help illustrate how Layer Comps can be used.
You may find that Layer Comps are a helpful addition to your workflow… or not. Layer comps cannot store all design choices you may need, but their flexibility can prove useful. Like all features, give them a thorough workout and see what you think.
Working with Smart Objects
Adobe launched a new technology starting with Photoshop CS2 called Smart Objects. This powerful option allows you to embed raster or vector data into a layer. The layer can then be transformed indefinitely, as the embedded data remains editable and scalable (up to its original size). Additionally, you can combine one or more layers in a document into a Smart Object as well.
Export a Smart Object for Additional Use
The good news is you can also export Smart Object layers as individual files in order to work with them. Just choose Layer> Smart Object>Export Contents. Raster layers will create a Photoshop document and Vector files will create an Illustrator file.
Unlike After Effects or an NLE that may link to a source file, Photoshop will actually embed the data. A Smart Object is simply one file embedded inside another. This can be very useful as Smart Objects allow greater flexibility. You can perform most transform commands on the object, and never experience a loss in image quality (provided you do not scale a raster file larger than its original size).
Using the Place Command
One way to create a Smart Object is to use the Place command to add the file into your current Photoshop document. Placed objects remain as Smart Objects, giving you the ability to access all of the original raster data. This essentially allows you to size and resize an object repeatedly without quality loss. Let’s try Smart Objects out.
Step 1. Open the file Ch03_Background.psd from the chapter’s folder on the DVD-ROM.
Step 2. Choose File>Place… and a navigation services dialog box opens.
Step 3. Navigate to the file Ch03_see_the_difference.eps in the chapter’s folder and click Place.

Step 4. Adjust the scaling of the placed object using your mouse or the Options Bar. Hold down the ![]() key to constrain the Scale equally in all directions; hold down the
key to constrain the Scale equally in all directions; hold down the ![]() key to scale from center. Scale the object very small and position it in the lower-right corner.
key to scale from center. Scale the object very small and position it in the lower-right corner.
Step 5. Click the Apply checkbox in the Options bar or press ![]() twice. The object is rasterized and is flagged as a Smart Object in the Layers palette with a special icon.
twice. The object is rasterized and is flagged as a Smart Object in the Layers palette with a special icon.
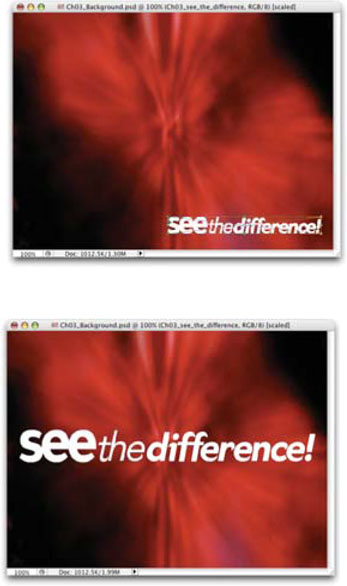
Step 6. To illustrate the scaling abilities of Smart Objects, you will now scale the object larger. Press ![]() to invoke the Free Transform Command.
to invoke the Free Transform Command.
Step 7. Hold down the ![]() key and scale the logo larger by dragging its left corner away from the logo.
key and scale the logo larger by dragging its left corner away from the logo.
Step 8. Apply the transformation and examine how the logo redraws with perfect clarity.
The primary advantage of placing files is scale and transform. Be sure to examine the Layer>Smart Object menu to explore other options. A raster object can be scaled up to its original raster size or infinitely if it was a vector object. You can also edit the original object by double-clicking the smart object thumbnail in the Layers palette. Additionally, you can replace the content of a Smart Object by selecting the Smart Object layer, and choose Layer> Smart Object>Replace Content.
Blending Modes
Photoshop’s least-used feature is also its most powerful. Nothing is as mysterious as Photoshop’s blending modes. I have read many convoluted attempts at explaining these 25 different options, but there are few absolutes when it comes to blending modes. Ask 10 knowledgeable users what they do and you’ll get at least 10 answers. When pressed for more explanation as to what blending modes actually do, the common answer is “It depends. ”

Your next logical question is likely “Depends on what? ” Simply put, the effect achieved by blending two layers varies with the contents of those two layers. A blending mode compares the content of two layers and enacts changes based on the contents of both layers. In real-world terms, you can put milk, strawberries, and vanilla ice cream in a blender and get a great milkshake. Use the same blender with other ingredients—say, tomatoes, onions, jalapeños, and cilantro—and you’ve got salsa. The same appliance gives different results depending on the ingredients.
Explore Blending Modes
Blending modes appear in virtually every tool, can be combined with every filter, and show up at every turn. Blending modes are the final exam on the Photoshop Guru test. So please, read on, and I promise to let you in on all the secrets.
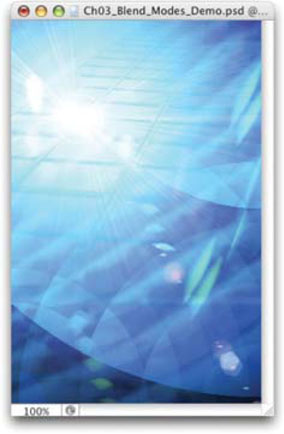
Step 1. Open the file named Ch03_Blend_Modes_Demo.psd. In this five-layered document, I have used four different blending modes. I have applied these modes for artistic effect, although there are many postproduction-oriented uses as well. Let’s dissect this document and see how modes are used.
Step 2. Turn each layer off, starting at the top, and notice how things change.
Step 3. Turn off all but the two bottommost layers in our test file. Select the layer Globes; then pick the Move tool.
Step 4. You can cycle forward using ![]() ; you can cycle backwards with
; you can cycle backwards with ![]() . This shortcut works as long as you have a tool selected that does not have its own blending modes (such as the Move or Marquee tools). Cycle through until you find a look that you like.
. This shortcut works as long as you have a tool selected that does not have its own blending modes (such as the Move or Marquee tools). Cycle through until you find a look that you like.
Step 5. Switch to the remaining layers and repeat. It is possible to generate many different looks by changing the blending modes on multiple layers.
The Secret of Blending Modes
Layer blending modes offer a lot of variety. In your quest to understand them, don’t rush to judgment.
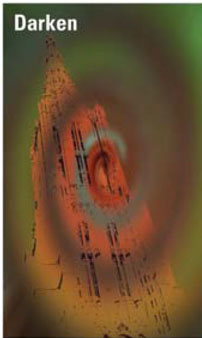
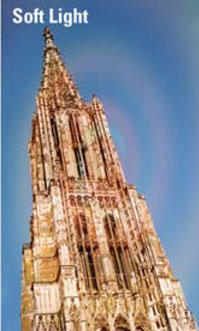
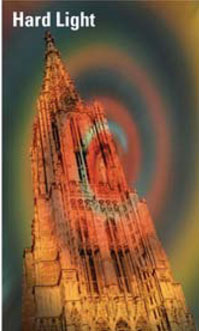
The first secret is “Don’t try to memorize what they all do. ” The good news is that they are grouped by similar traits. As you make your way through the list, you will notice a gradual progression through styles. The first group darkens your underlying image, while the second will lighten it. The third set adds contrast, while the last two generate dramatic results by comparing or mapping values. Depending on your sources, some blending modes will generate little or no results. Sound confusing? Keep reading.
The second secret is “Experiment. ” The best way to use blending modes is to try them out. Clicking through a long drop-down menu is boring. A much better alternative is to use keyboard shortcuts ![]() and
and ![]() .
.
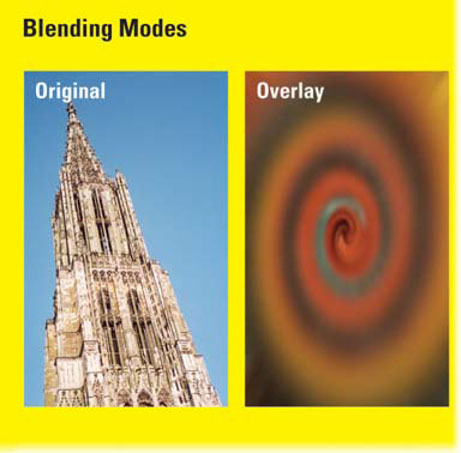
These are four of the many combinations made possible by employing blending modes. Most users never explore the flexibility offered by these great layer options.

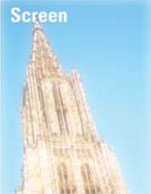
The third secret is “Exploit them. ” Need a quick visual pop? Try blending a blurred image on top of itself. Need to tint something? Place a solid or gradient on top and change to hue or color mode. Need to quickly luma key an item? Multiply knocks out whites; Screen knocks out the blacks. You’ll find blending modes in virtually every filter (choose Fade Filter from the Edit menu) and all of your brush tools. Blending modes rock, and they can be our little secret.
Blending Modes Across Applications
Many nonlinear editing applications and all motion graphics tools support blending modes. Applications vary by manufacturer and they may not have the exact number of blending modes that Photoshop has. If an application has the same modes as Photoshop, it will generally be a clean exchange across programs. If modes differ, then the transfer process may produce unexpected results. Be sure to read the documentation that comes with your editing and motion graphics tools regarding blending (or transfer) modes.
Random replacement of the pixels with the base or blend color.

Pixels lighter than blend are replaced; darker ones are not.
Similar to drawing strokes on the image with magic markers.

Evaluates each channel; darkens base by increasing contrast.

Evaluates each channel; darkens base by decreasing brightness.

Evaluates each channel; uses base or blend color (whichever is lighter).
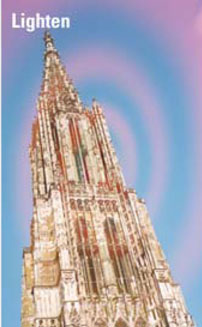
Results in a lighter color. Useful for “knocking” black out of a layer.

Evaluates color information and brightens base by decreasing contrast.

Evaluates color information and brightens base by increasing brightness.

Overlays existing pixels while preserving highlights and shadows of base

The effect is similar to shining a diffused spotlight on the image.
The effect is similar to shining a harsh spotlight on the image.
Burns or dodges by increasing or decreasing the contrast.

Burns or dodges by decreasing or increasing the brightness.

Useful for adding special effects to an image.

Enhances the contrast of the underlying layers.

Evaluates each channel and subtracts depending on greater brightness.

Similar to, but lower in contrast than the Difference mode.

Uses luminance and saturation of the base and the hue of the blend.

Creates color with luminance and hue of the base and saturation of the blend.
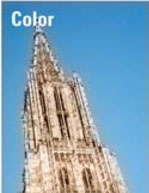
Preserves gray levels. Useful for coloring and tinting.

Inverse effect from that of the Color mode.

When blending two colors using this mode, only the lighter color will be visible.

When blending two colors using this mode, only the darker color will be visible.


Export Issues with Layers
While motion graphics applications and NLEs often recognize Photoshop layers, it’s often not a seamless exchange. The best advice is to have things clearly labeled. The default naming scheme of Layer 1, Layer 2, Layer 3 will not help you make your deadline. Use descriptive, unique names per layer. Photoshop will allow you to have identical names, but your editing application will become confused by the duplication. Here are some other points to consider.
Saving a Flattened Copy for Your NLE
It is common to need to save a flattened version for your editing system. If this is the case, do not flatten your .psd file. Choose Save As or use ![]() . Select a flat file format that your edit system recognizes. The two most common formats will be a PICT or Targa file. When you pick these formats, the Layers box will automatically gray out and the As a Copy box is checked, but grayed out. If you want to save a flattened file, Photoshop will make it easy and preserve your layers at the same time. You worked hard for those layers. Keep them.
. Select a flat file format that your edit system recognizes. The two most common formats will be a PICT or Targa file. When you pick these formats, the Layers box will automatically gray out and the As a Copy box is checked, but grayed out. If you want to save a flattened file, Photoshop will make it easy and preserve your layers at the same time. You worked hard for those layers. Keep them.

Exporting with Layers for Animation
If you want to send a layered Photoshop file to another program in order to animate your layers, you may choose to optimize the file. Depending on which application you’ll be importing the PSD file into, different steps will be needed (be sure to see Appendix C at the end of the book).
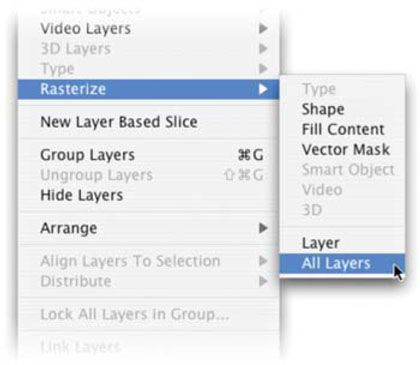
Some important general consideration to keep in mind. Be sure your layers have unique names. If a file doesn’t import cleanly, you may want to rasterize it (Layer>Rasterize>All Layers). This is a good extra precaution, but it may only be needed if you intended to import the layered file into a Nonlinear Editing System. Flattened files (such as PICT or Targa) already rasterize type and objects when you save. If you are going to rasterize, make sure to make the changes to a copy of the original. This way, you can go back and make future changes.
Blending Mode Shortcuts
by Adobe Evangelists (http://www.adobeevangelists.com)

Hands On | 03
Making Textures—with Robert Lawson
Need a little photo-realism? Photoshop excels at allowing you to incorporate photographic sources into your projects. But what happens if you need some texture, but lack the photos? Don’t worry about it.
By harnessing the power of layers and filters, photorealistic textures can be created. This tutorial shows you how to create two common textures: scratched metal and glass. You can utilize these textures for text or design elements as part of your television graphics.

You’ll find Exercise 03 on the DVD-ROM.
PROfile: Neil Rubino
Rubino has spent his entire professional career working in video. But he frequently goes beyond the editing and gets involved with all aspects of a project.
“My jobs have always required me to shoot and edit the video projects I am assigned. So I have evolved from a shooter/editor to a producer and director of my own projects. I started in the television news media as a videographer,” said Rubino. “I moved from news programming into shooting and editing cable TV programs for a number of years. I now work on corporate and educational videos that vary from two to forty minutes in length.”
Rubino quickly discovered that he needed to be confident in making his own graphics for use in video. Photoshop has filled that role nicely.
“I use Photoshop at this point to prepare almost all of the graphics for a video project, no matter what the type. Lower third ID titles and full screen titles, logo treatments, charts and graphs, newspaper clippings, site plan maps and even custom mask shapes are all created first with Photoshop and then imported into my video projects. I also use still photographs in my videos from time to time, and I prepare and perfect them first in Photoshop.”
Integrating Photoshop as a key skill has been helpful in Rubino’s career. He frequently delivers completed projects for broadcast including television commercials, public service announcements and cable programming. To meet tough deadlines, Rubino says one has to be knowledgeable about approaching production challenges.
“I think that knowing how to get a job done quickly is one measure of a power user. Knowing the shortcuts the program provides really helps in this area,” said Rubino. “But beyond the keyboard shortcuts, knowing the ways to attack a task really makes someone a Photoshop power user. Some projects can be approached in Photoshop in a number of ways. Knowing which method will deliver the desired effect with the highest quality result in the least time is the mark of a power user.”
Rubino says a thorough knowledge of Photoshop is essential for video editors these days. If you’re thinking about freelancing or changing jobs, make sure your skills are in line first.
“I think that it is extremely important for anyone in the profession of media creation for broadcast to know Photoshop,” said Rubino. “Photoshop is very helpful for video editors as well as writer/producers. So I would suggest that anyone entering the job market concentrate on learning Photoshop before embarking on a job search in television production.”
