
C H A P T E R 4
Spring MVC Architecture
In this chapter, you will dive into the internals of Spring MVC, taking a close look at the org.springframework.web.servlet.DispatcherServlet. You will begin by learning how an incoming request is handled by the servlet, as well as how to identify which components play a role in the request handling. After these components have been identified, you will go deeper into the roles and functions of the different components and the different implementations of those components. You will also learn how to configure the org.springframework.web.servlet.DispatcherServlet, in part by examining the default configuration.
DispatcherServlet Request Processing Workflow
In the previous chapter, you learned about the important role the front controller plays in a Model 2 MVC pattern. The front controller takes care of dispatching incoming requests to the correct handler and prepares the response, so that it can be rendered into something that the user would like to see. The role of front controller in Spring MVC is played by the org.springframework.web.servlet.DispatcherServlet. This servlet uses several components to fulfill its role. All these components are expressed as interfaces, for which one or more implementations are available. The next section will explore the general role these components play in the request processing workflow. Another upcoming section will cover the different implementations of the interfaces.
![]() Note We purposely used the term handler. The
Note We purposely used the term handler. The DispatcherServlet is very flexible and customizable, and it can handle more types of handlers than just org.springframework.web.servlet.mvc.Controller implementations or org.springframework.stereotype.Controller annotated classes.
The Workflow
A high-level overview of the request processing workflow is illustrated in Figure 4-1.
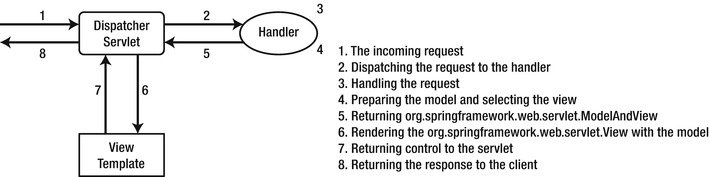
Figure 4-1. The request processing workflow
In the previous chapters, you learned about the importance of separation of concerns. Within the Spring Framework, the same rules have been applied. A lot of supporting components have been designed as interfaces with extensibility as well as separation of concerns in mind. Although the high level overview in Figure 4-1 is correct, there is more happening behind the scenes. Figure 4-2 shows a more complete view of the request processing workflow.

Figure 4-2. The request processing workflow
Figure 4-2 provides a global overview of the request processing workflow inside the DispatcherServlet. The following sections will zoom in on the different steps in this flow.
Prepare a Request
Before the DispatcherServlet will start dispatching and handling the request, it first does some preparation and preprocessing of the request. The servlet starts by determining and exposing the current java.util.Locale for the current request using the org.springframework.web.servlet.LocaleResolver. Next, it prepares and exposes the current request in org.springframework.web.context.request.RequestContextHolder. This gives the framework code easy access to the current request, instead of passing it around.
Next, the servlet will construct a so-called org.springframework.web.servlet.FlashMap. It does this by calling the org.springframework.web.servlet.FlashMapManager, which will try to resolve the input FlashMap. This map contains attributes that were explicitly stored in the previous request. In general, this is used when a redirect is made to go to the next page. This topic will be discussed in depth in Chapter 5.
Next, the incoming request is checked for whether it is a multipart HTTP request (this is used when doing file uploads). If so, the request is wrapped in an org.springframework.web.multipart.MultipartHttpServletRequest by passing it through an org.springframework.web.multipart.MultipartResolver. After this, the request is ready to be dispatched to the correct handler. Figure 4-3 shows a flow diagram of the first part of the request processing workflow.

Figure 4-3. The start of the request processing flow
Determine the HandlerExecutionChain
A couple of components are involved in dispatching the request (see Figure 4-4). When a request is ready for dispatching, the DispatcherServlet will consult one or more org.springframework.web.servlet.HandlerMapping implementations to determine which handler can handle the request. If no handler is found, an HTTP 404 response is send back to the client. The HandlerMapping returns an org.springframework.web.servlet.HandlerExecutionChain (you will learn more about this in the next section). When the handler has been determined, the servlet will attempt to find an org.springframework. web.servlet.HandlerAdapter to actually execute the found handler. If no suitable HandlerAdapter can be found, a javax.servlet.ServletException is thrown.

Figure 4-4. Dispatching the request
Execute the HandlerExecutionChain
To handle the request, the DispatcherServlet uses the HandlerExecutionChain to determine what to execute. This class holds a reference to the actual handler that needs to be invoked; however, it also (optionally) references org.springframework.web.servlet.HandlerInterceptor implementations that are executed before (preHandle method) and after (postHandle method) the execution of the handler. These interceptors can be used to apply crosscutting functionality (see Chapter 6 for more information about this topic). If the code executes successfully, the interceptors are called again; and finally, when needed, the view is rendered (see Figure 4-5).

Figure 4-5. Handling the request
The execution of the handler is delegated to the selected HandlerAdapter that was determined in the previous step. It knows how to execute the selected handler and how to translate the response into an org.springframework.web.servlet.ModelAndView. If there is no view in the returned ModelAndView, an org.springframework.web.servlet.RequestToViewNameTranslator is consulted to generate a view name based on the incoming request.
Handle Exceptions
When an exception is thrown during the handling of the request, the DispatcherServlet will consult the configured org.springframework.web.servlet.HandlerExceptionResolvers to handle the thrown exception. The resolver can translate the exception to a view to show the user. For instance, if there is an exception related to database errors, you could show a page indicating the database is down. If the exception isn’t resolved, it is rethrown and handled by the servlet container, which generally results in an HTTP 500 response code (internal server error). Figure 4-6 shows this part of the request processing workflow.

Figure 4-6. Exception handling
Render a View
If a view has been selected during the request processing workflow, the DispatcherServlet first checks whether it is a view reference (this is the case if the view is a java.lang.String). If so, the configured org.springframework.web.servlet.ViewResolvers are consulted to resolve the view reference to an actual org.springframework.web.servlet.View implementation. If there is no view and one cannot be resolved, a javax.servlet.ServletException is thrown. Figure 4-7 shows the view rendering process.

Figure 4-7. The view rendering process
Finish the Processing
Each incoming request passes through this step of the request processing flow, regardless of whether there are exceptions. If an HandlerExecutionChain is available, then the afterCompletion method of the interceptors is called. Only the interceptors where the preHandle method was successfully invoked will have their afterCompletion method called. Next, these interceptors are executed in the reverse order that their preHandle method was called. This mimics the behavior seen in servlet filters, where the first filter called is also the last one to be called.
Finally, the DispatcherServlet uses the event mechanism in the Spring Framework to fire an org.springframework.web.context.support.RequestHandledEvent (see Figure 4-8). You could create and configure an org.springframework.context.ApplicationListener to receive and log these events.
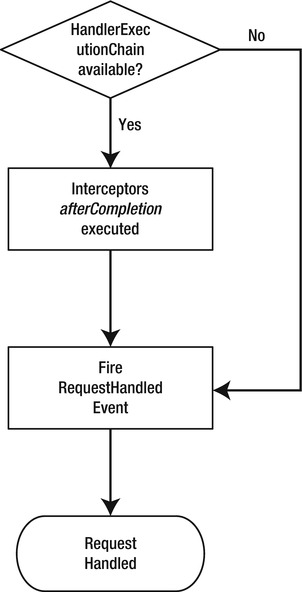
Figure 4-8. Finish the processing
The Request Processing Summary
The DispatcherServlet is a key component in processing requests with Spring MVC. It is also highly flexible and configurable. This flexibility comes from the fact that the servlet uses a lot of different components to fulfill its role, and these components are expressed as interfaces. Table 4-1 gives an overview of all the main component types involved in the request processing workflow.


In the upcoming sections, you will see how to configure the DispatcherServlet. You will also take a closer look at different implementations of the various components.
The DispatcherServlet
Like any servlet, the org.springframework.web.servlet.DispatcherServlet needs to be configured so that the web container can bootstrap and map the servlet. This way, it will be able to handle requests. Configuring the DispatcherServlet is a two-way process. First, you need to tell the container to load a servlet and map it to one or more Urlpatterns.
After bootstrapping, the servlet uses the created org.springframework.web.context.WebApplicationContext to configure itself. The servlet will try to detect the needed components from this application context and if not found, it will use some kind of default (in most cases).
Bootstrapping the DispatcherServlet
The Servlet 3.0 specification introduced several options for configuring and registering a servlet:
- Option 1: Use a
web.xml(see Listing 4-1). - Option 2: Use a
web-fragment.xml(see Listing 4-2). - Option 3: Us a
javax.servlet.ServletContainerInitializer(see Listing 4-3). - Option 4: The sample application uses Spring 3.1, so you can get a fourthoption by implementing the
org.springframework.web.WebApplicationInitializerinterface.
The dispatcher servlet needs a WebApplicationContext that should contain all the beans that enable the dispatcher servlet to configure itself. By default, the dispatcher servlet will create an org.springframework.web.context.support.XmlWebApplicationContext. All samples in the upcoming sections load the org.springframework.web.servlet.DispatcherServlet and map it to all incoming requests (/*). All these configurations lead to the same runtime setup of the servlet. Only the mechanism by which you do that is different. The remainder of the book will use Option 4 to configure the sample application.
![]() Note The
Note The org.springframework.web.context.WebApplicationContext is a specialized extension of the org.springframework.context.ApplicationContext that is needed in web environments (see Chapter 2 for more information).
The sample application that you are building throughout the book will use Option 4 as much as possible to configure the environment and application. Nevertheless, you will learn the basic setup for all four options of configuring the servlet.
Using web.xml
The web.xml file has been around since the inception of the servlet specification. It is an XML file that contains all the configuration you need to bootstrap the servlet, listeners, and/or filters. Listing 4-1 shows the minimal web.xml required to bootstrap the DispatcherServlet. The web.xml file must be in the WEB-INF directory of the web application (this is dictated by the servlet specification).
Listing 4-1. The web.xml configuration (Servlet 3.0)
<web-app version="3.0"

        xmlns="http://java.sun.com/xml/ns/javaee"

        xmlns:xsi="http://www.w3.org/2001/XMLSchema-instance"

        xsi:schemaLocation=http://java.sun.com/xml/ns/javaee

                           http://java.sun.com/xml/ns/javaee/web-app_3_0.xsd

        metadata-complete="true">


    <servlet>

        <servlet-name>bookstore</servlet-name>

        <servlet-class>

            org.springframework.web.servlet.DispatcherServlet

        </servlet-class>

        <load-on-startup>1</load-on-startup>

    </servlet>


    <servlet-mapping>

        <servlet-name>bookstore</servlet-name>

        <url-pattern>/*</url-pattern>

    </servlet-mapping>

</web-app>
![]() Note By default, the dispatcher servlet loads a file named
Note By default, the dispatcher servlet loads a file named [servletname]-servlet.xml from the WEB-INF directory.
The metadata-complete attribute in the web-app element instructs the servlet container to not scan the classpath for javax.servlet.ServletContainerInitializer implementations; neither will it scan for web-fragment.xml files. Adding this attribute to your web.xml can increase startup times considerably because it will scan the classpath, which can take quite some time in a large application.
Using web-fragment.xml
The web-fragment.xml feature has been available since the 3.0 version of the servlet specification, and it allows for a more modularized configuration of the web application. The web-fragment.xml has to be in the META-INF directory of a jar file. It isn’t detected in the META-INF of the web application; it has to be in a jar file. The web-fragment.xml can contain the same elements as the web.xml (see Listing 4-2).
The benefit of this approach is that each module, packaged as a jar files can contribute to the configuration of the web application. This can also be considered a drawback because now you have scattered your configuration over your code base, which could be troublesome in larger projects.
Listing 4-2. The web-fragment.xml configuration (Servlet 3.0)
<web-fragment version="3.0"

  xmlns="http://java.sun.com/xml/ns/javaee"

  xmlns:xsi="http://www.w3.org/2001/XMLSchema-instance"

  xsi:schemaLocation="http://java.sun.com/xml/ns/javaee

                      http://java.sun.com/xml/ns/javaee/web-fragment_3_0.xsd">


    <servlet>

        <servlet-name>bookstore</servlet-name>

        <servlet-class>

            org.springframework.web.servlet.DispatcherServlet

        </servlet-class>

        <load-on-startup>1</load-on-startup>

    </servlet>


    <servlet-mapping>

        <servlet-name>bookstore</servlet-name>

        <url-pattern>/*</url-pattern>

    </servlet-mapping>

</web-fragment>
Using ServletContainerInitializer
Another feature introduced in the 3.0 version of the servlet specification is the option to use a Java-based approach to configuring your web environment (see Listing 4-3). A Servlet 3.0-compatible container will scan the classpath for classes that implement the javax.servlet.ServletContainerInitializer interface, and it will invoke the onStartup method on those classes. By adding a javax.servlet.annotation.HandlesTypes annotation on these classes, you can also be handed classes that you need to further configure your web application (this is the mechanism that allows the fourth option to use an org.springframework.web.WebApplicationInitializer).
Like web.fragments, a ServletContainerInitializer allows for a modularized configuration of your web application, but now in a Java-based way. Using Java gives you all the added benefits of using the Java language instead of XML. At this point, you have strong typing, can influence the construction of your servlet, and have an easier way of configuring your servlets (in an XML file, this is done by adding init-param and/or context-param elements in the XML file).
Listing 4-3. A Java-based configuration
package com.apress.prospringmvc.bookstore.web;


import java.util.Set;


// javax.servlet imports omitted.


import org.springframework.web.servlet.DispatcherServlet;


public class BookstoreServletContainerInitializer

implements ServletContainerInitializer {


  @Override

  public void onStartup(Set<Class<?>> classes, ServletContext servletContext)

  throws ServletException {

      ServletRegistration.Dynamic registration;

      registration = servletContext.addServlet("dispatcher", DispatcherServlet.class);

      registration.setLoadOnStartup(1);

      registration.addMapping("/*");

  }

}
Using WebApplicationInitializer
Now it’s time to look at Option 4 for configuring your application while using Spring. Spring already provides a ServletContainerInitializer implementation, the org.springframework.web.SpringServletContainerInitializer that makes life a little easier (see Listing 4-4). The implementation provided by the Spring Framework will detect and instantiate all instances of org.springframework.web.WebApplicationInitializer and call the onStartup method of those instances.
Listing 4-4. The WebApplicationInitializer configuration
package com.apress.prospringmvc.bookstore.web;


// javax.servlet imports omitted


import org.springframework.web.WebApplicationInitializer;

import org.springframework.web.servlet.DispatcherServlet;


public class BookstoreWebApplicationInitializer implements WebApplicationInitializer {
@Override
public void onStartup(ServletContext servletContext) throws ServletException {
ServletRegistration.Dynamic registration
registration = servletContext.addServlet("dispatcher",
DispatcherServlet.class);
registration.addMapping("/*");
registration.setLoadOnStartup(1);
}
}
![]() Caution Using this feature can severely impact the startup time of your application! First, the servlet container needs to scan the classpath for all
Caution Using this feature can severely impact the startup time of your application! First, the servlet container needs to scan the classpath for all javax.servlet.ServletContainerInitializer implementations. Second, the classpath is scanned for org.springframework.web.WebApplicationInitializer implementations. This scanning can take some time in large applications.
Configuring the DispatcherServlet
Configuring the org.springframework.web.servlet.DispatcherServlet is a two step process. The first step is to configure the behavior of the servlet by setting properties directly on the dispatcher servlet (the declaration).The second step is to configure the components in the application context (initialization).
The dispatcher servlet comes with a lot of default settings for components. This saves you from doing a lot of configuration for basic behavior, and you can override and extend the configuration however you want. In addition to the default configuration for the dispatcher servlet, there is also a default for Spring @MVC, which can be enabled by using the org.springframework.web.servlet.config.annotation.EnableWebMvc annotation (see the “Enabling Features” section in Chapter 2).
Dispatcher Servlet Properties
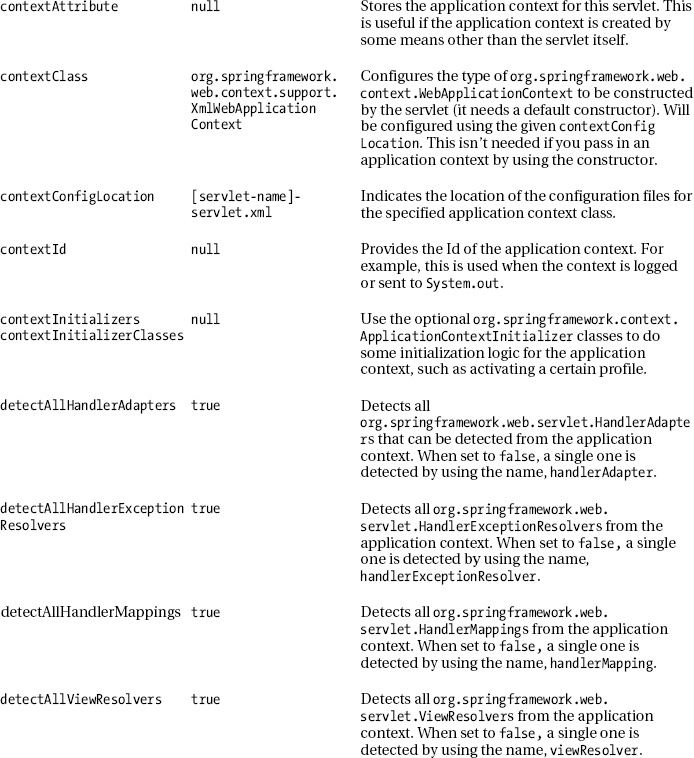
The dispatcher servlet has a number of properties that can be set. All these properties have a setter method, and all can be either set programmatically or set when using XML configuration by including a servlet initialization parameter. Table 4-2 lists and describes the properties available on the dispatcher servlet.

The Application Context
The org.springframework.web.servlet.DispatcherServlet needs an org.springframework.web.context.WebApplicationContext to configure itself with the needed components. You can either let the servlet construct one itself or use the constructor to pass an application context. In an XML-based configuration file, the first option is used (because there is no way to construct an application context). In a Java-based configuration, the second option is used.
In the sample application, the com.apress.prospringmvc.bookstore.web.BookstoreWebApplicationInitializer is the class that bootstraps the application. To enable Java-based configuration, you need to instruct the servlet to use a Java-based application context (the default is an XML-based one), as well as pass it the configuration classes. You will use the org.springframework.web.context.support.AnnotationConfigWebApplicationContext class to set up the application and to configure the servlet. The changes are highlighted in bold in Listing 4-5.
Listing 4-5. The BookstoreWebApplicationInitializer with ApplicationContext
package com.apress.prospringmvc.bookstore.web;


// javax.servlet imports omitted.


import org.springframework.web.WebApplicationInitializer;

import org.springframework.web.context.WebApplicationContext;

import org.springframework.web.context.support

       .AnnotationConfigWebApplicationContext;

import org.springframework.web.servlet.DispatcherServlet;


import com.apress.prospringmvc.bookstore.web.config.WebMvcContextConfiguration;


public class BookstoreWebApplicationInitializer

 implements WebApplicationInitializer {


  @Override

  public void onStartup(final ServletContext servletContext)

  throws ServletException {

      registerDispatcherServlet(servletContext);

    }


  private void registerDispatcherServlet(final ServletContext servletContext) {

      WebApplicationContext dispatcherContext = createContext

(WebMvcContextConfiguration.class);

      DispatcherServlet dispatcherServlet = new DispatcherServlet(dispatcherContext);

      ServletRegistration.Dynamic dispatcher;

      dispatcher = servletContext.addServlet("dispatcher", dispatcherServlet);

      dispatcher.setLoadOnStartup(1);

      dispatcher.addMapping("/");

  }


  private WebApplicationContext createContext(final Class<?>... annotatedClasses) {

      AnnotationConfigWebApplicationContext context

      context = new AnnotationConfigWebApplicationContext();

      context.register(annotatedClasses);

      return context;

  }

}
Listing 4-5 shows how to construct the org.springframework.web.servlet.DispatcherServlet and pass it an application context. This is the most basic way of configuring the servlet.
Chapter 2 covered the notion of profiles. To select a profile, you could include a servlet-initialization parameter (see Chapter 2); however, to be more dynamic, you could use a org.springframework.context.ApplicationContextInitializer. Such initializers are used to initialize an application context just before it loads all the beans.
This is useful in a web application when you want to configure or set the profile(s) you want to use (again, see Chapter 2 for more information). For instance, you might have a custom system property you need to set. Alternatively, you might detect the profile by reading a certain file on the file system or even select a profile based on the operation system. You have an almost unlimited number of options.
In Appendix A, you will learn how to deploy your application to CloudFoundry. There is also an API for CloudFoundry that contains an ApplicationContextInitializer. This implementation detects that it is running on the cloud and activates a profile named cloud (see Listing 4-6).
Listing 4-6. The CloudApplicationContextInitializer
package org.cloudfoundry.reconfiguration.spring;


// Other imports omitted


import org.cloudfoundry.runtime.env.CloudEnvironment;

import org.springframework.context.ApplicationContextInitializer;

import org.springframework.context.ConfigurableApplicationContext;

import org.springframework.core.Ordered;

import org.springframework.core.env.ConfigurableEnvironment;

import org.springframework.core.env.EnumerablePropertySource;

import org.springframework.core.env.PropertiesPropertySource;

import org.springframework.core.env.PropertySource;


public final class CloudApplicationContextInitializer

implements ApplicationContextInitializer<ConfigurableApplicationContext>,

           Ordered {


    private static final Log logger =

            LogFactory.getLog(CloudApplicationContextInitializer.class);


    private static final int DEFAULT_ORDER = 0;


    private ConfigurableEnvironment springEnvironment;

    private CloudEnvironment cloudFoundryEnvironment;


    public CloudApplicationContextInitializer() {

        cloudFoundryEnvironment = new CloudEnvironment();

    }


    @Override

    public void initialize(ConfigurableApplicationContext applicationContext) {

        if (!cloudFoundryEnvironment.isCloudFoundry()) {

            logger.info("Not running on Cloud Foundry.”)

            return;

        }

        try {

            logger.info("Initializing Spring Environment for Cloud Foundry");

            springEnvironment = applicationContext.getEnvironment();

            addPropertySource(buildPropertySource());

            addActiveProfile("cloud");

        } catch (Throwable t) {

            // be safe

            logger.error("Unexpected exception on initialization: "

                         + t.getMessage(), t);

        }

    }
// Other methods omitted
}
Component Resolution
When the servlet is configured, it will receive an initialization request from the servlet container. When the servlet initializes, it uses the logic, as depicted in Figure 4-9, to detect the components needed. Some components are detected by type, whereas others are detected by name. For the components detectable by type, you can specify (see Table 4-2) that you don’t want to do this. In this case, the component will be detected by a well-known name. Table 4-3 lists the different components involved in request processing and the bean name used to detect it. The table also indicates whether the dispatcher servlet detects multiple instances automatically (when yes can be disabled, then a single bean is detected by the name, as specified in the table).

Figure 4-9. The DispatcherServlet’s discovery of components

The Dispatcher Servlet’s Default Configuration
You might feel a bit overwhelmed by all the components involved in the handling of a request. You might even wonder if you need to configure all of them explicitly. Luckily, Spring MVC has some sensible defaults that, in a lot of cases, are enough—or at least enough to get started. As you can see in Table 4-4, the dispatcher servlet has quite a few default settings. You can find more information on the different implementations in the next section.


The Spring @MVC Defaults
Chapter 2 covered Spring’s @Enable annotations. One of those annotations is org.springframework.web.servlet.config.annotation.EnableWebMvc. This annotation enables the powerful and flexible annotation-based request handling components, and it overrides some of the defaults from the dispatcher servlet. The actual configuration can be found in the org.springframework.web.servlet.config.annotation.WebMvcConfigurationSupport class. This is the configuration that is registered when the annotation is used. Table 4-5 shows the default configuration when @MVC is enabled and highlights the differences between @MVC and the dispatcher servlet.
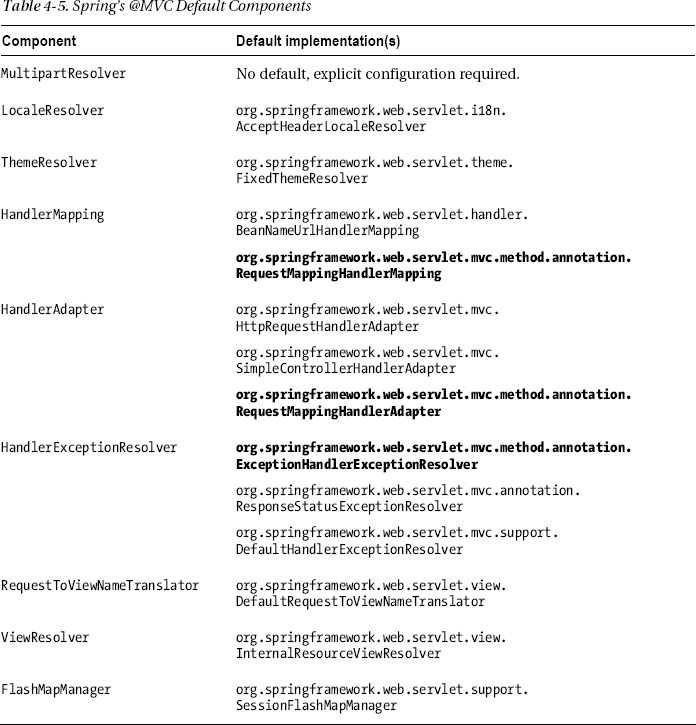
The differences might not seem that big, but the new components registered provide significantly different initial defaults compared to those provided by the dispatcher servlet. The essential difference is this: Spring’s @MVC components enable you to write more flexible request handling methods (see Chapters 5 and 6).
The Spring MVC Components
In the previous sections, you learned about the request processing workflow and the components used in it. You also learned how to configure the org.springframework.web.servlet.DispatcherServlet. In this section, you will take a closer look at all the components involved in the request processing workflow. For example, you will explore the APIs of the different components and see which implementations ship with the Spring Framework.
HandlerMapping
The HandlerMapping’s responsibility is to determine which handler to dispatch the incoming request to. A criterion that you could use to map the incoming request is the URL; however, implementations (see Figure 4-10) are free to choose what criteria to use to determine the mapping.
The API for the org.springframework.web.servlet.HandlerMapping consists of a single method (see Listing 4-7). This method is called by the DispatcherServlet to determine the org.springframework.web.servlet.HandlerExecutionChain. It is possible to have more than one handler mapping configured. The servlet will call the different handler mappings in sequence until one of them doesn’t return null.
Listing 4-7. The HandlerMapping API
package org.springframework.web.servlet;


import javax.servlet.http.HttpServletRequest;

public interface HandlerMapping {


    HandlerExecutionChain getHandler(HttpServletRequest request)

    throws Exception;


}

Figure 4-10. HandlerMapping implementations
Out of the box, Spring MVC provides six different implementations. Most of them are based on URL mappings. Two of the implementations offer a more sophisticated mapping strategy, which you’ll learn about momentarily. However before looking at the different implementations, it might help to take a closer look at a URL and which parts are important.
A request URL consists of several parts. Let’s take a look at the http://www.example.org/bookstore/app/home URL and dissect that. A URL consists for four parts (see Figure 4-11):
- The hostname of the server
- The name of the application (none, if it is the root application)
- The name of the servlet mapping (in the sample app, it is mapped to /)
- The path inside the servlet

By default, all the provided handler-mapping implementations use the path relative to the servlet context inside the servlet (the servlet context relative path) to resolve handlers. Setting the alwaysUseFullPath property to true can change this behavior. The servlet mapping is then included, which would (for the example at hand) lead to /app/home being used to resolve a request handler; otherwise, /home would be used.
A final feature shared among all implementations is that a default handler can be configured. This is done by setting the defaultHandler property. When no handler can be found for an incoming request, it will always be mapped to the default handler. This is optional, and it should be used with caution, especially when chaining multiple handler mappings. Only the last handler mapping should specify a default handler, or else the chain breaks.
BeanNameUrlHandlerMapping
The org.springframework.web.servlet.handler.BeanNameUrlHandlerMapping is one of the default strategies used by the dispatcher servlet. This implementation treats any bean with a name that starts with a / as a potential request handler. A bean can have multiple names, and names can also contain a wildcard, expressed as an *.
This implementation uses ant-style regular expressions to match the URL of the incoming request to the name of a bean. It follows this algorithm:
- Attempt exact match; if found, exit.
- Search all registered paths for a match; the most specific one will win.
- If no matches are found, return the handler mapped to /* or to the default handler (if configured).
![]() Note The
Note The name of the bean is not the same as the id. Id is defined by the XML specification, and it cannot contain special characters such as /. This means you need to use the name of the bean. You can provide the name for a bean by setting the name attribute on the org.springframework.context.annotation.Bean annotation. A bean can have multiple names, and names can be written like an ant-style regular expression.
Listing 4-8 shows how to use a bean name and map it to the /index.htm url. In the sample application, you could now use http://localhost:8080/chapter4-bookstore/index.htm to call this controller.
Listing 4-8. The BeanNameUrlHandlerMapping sample configuration
package com.apress.prospringmvc.bookstore.web.config;


import java.util.Properties;


import org.springframework.context.annotation.Bean;

import org.springframework.context.annotation.Configuration;


import com.apress.prospringmvc.bookstore.web.IndexController;


@Configuration

public class WebMvcContextConfiguration {


    @Bean(name = { "/index.htm" })

    public IndexController indexController() {

        return new IndexController();

    }

}
SimpleUrlHandlerMapping
This implementation requires explicit configuration, as opposed to the org.springframework.web.servlet.handler.BeanNameUrlHandlerMapping, and it doesn’t autodetect mappings. Listing 4-9 shows a sample configuration. Again, you map the controller to the /index.htm.
Listing 4-9. The SimpleUrlHandlerMapping sample configuration
package com.apress.prospringmvc.bookstore.web.config;


// Other imports omitted see Listing 4-8


import org.springframework.web.servlet.HandlerMapping;

import org.springframework.web.servlet.handler.SimpleUrlHandlerMapping;


@Configuration

public class WebMvcContextConfiguration {


    @Bean

    public IndexController indexController() {

        return new IndexController();

    }


    @Bean

    public HandlerMapping simpleUrlHandlerMapping() {

        SimpleUrlHandlerMapping urlMapping = new SimpleUrlHandlerMapping();

        Properties mappings = new Properties();

        mappings.put("/index.htm", "indexController");

        urlMapping.setMappings(mappings);

        return urlMapping;
}
}
You need to explicitly configure the SimpleUrlHandlerMapping and pass it the mappings (see the code in bold). You map the /index.htm URL to the controller named indexController. If you have a lot of controllers, this configuration grows considerably. The advantage of this approach is that you have all your mapping in a single location.
ControllerBeanNameHandlerMapping
This implementation works similarly to the org.springframework.web.servlet.handler.BeanNameUrlHandlerMapping, with one big difference: it doesn’t require the bean name to start with a /. This mapping detects all controllers in the application context, takes their names, and prefixes them with a /. Optionally, it can also apply a suffix to the generated URL mapping. Listing 4-10 shows how to map the controller to /index.htm using this handler mapping.
Listing 4-10. The ControllerBeanNameHandlerMapping sample configuration
package com.apress.prospringmvc.bookstore.web.config;
// Other imports omitted see Listing 4-8
import org.springframework.web.servlet.HandlerMapping;
import org.springframework.web.servlet.mvc.support.ControllerBeanNameHandlerMapping;
@Configuration
public class WebMvcContextConfiguration {
@Bean(name = "index")
public IndexController indexController() {
return new IndexController();
}
@Bean
public HandlerMapping controllerBeanNameHandlerMapping() {
ControllerBeanNameHandlerMapping mapping;
mapping = new ControllerBeanNameHandlerMapping();
mapping.setUrlSuffix(".htm");
return mapping;
    }

}
ControllerClassNameHandlerMapping
This implementation detects all controllers in the application context, and it uses the simple name of the class to create URL mappings. For the com.apress.prospringmvc.bookstore.web.IndexController, it would create a URL of /index. It takes the simple name of the class, strips the controller part, and makes the remainder lowercase (unless configured otherwise). Listing 4-11 shows a sample configuration of this implementation, and it will map the controller to the /index URL. This mapping implementation doesn’t support suffixes (e.g., .htm).
Listing 4-11. The ControllerClassNameHandlerMapping sample configuration
package com.apress.prospringmvc.bookstore.web.config;


// Other imports omitted see Listing 4-8


import org.springframework.web.servlet.HandlerMapping;

import org.springframework.web.servlet.mvc.support.ControllerClassNameHandlerMapping;


@Configuration

public class WebMvcContextConfiguration {


    @Bean

    public IndexController indexController() {

        return new IndexController();

    }


    @Bean

    public HandlerMapping controllerClassNameHandlerMapping() {

        return new ControllerClassNameHandlerMapping();

    }

}
This mapping implementation can be very convenient if you have some naming conventions in your controllers, and they are directly mapped to URLs. This approach can save a lot of configuration.
DefaultAnnotationHandlerMapping and RequestMappingHandlerMapping
The DefaultAnnotationHandlerMapping and RequestMappingHandlerMapping implementations are the more sophisticated implementations. Both are very powerful, and both use annotations to detect mappings. Also, both detect the org.springframework.web.bind.annotation.RequestMapping annotation on request-handling beans in the application context. This annotation can be on either the class and/or the method level. To map the com.apress.prospringmvc.bookstore.web.IndexController to /index.htm, you need to add the annotation. Listing 4-12 is the controller, and Listing 4-13 shows the sample configuration.
Listing 4-12. The IndexController with RequestMapping
package com.apress.prospringmvc.bookstore.web;


import org.springframework.stereotype.Controller;

import org.springframework.web.bind.annotation.RequestMapping;

import org.springframework.web.servlet.ModelAndView;


@Controller

public class IndexController {


    @RequestMapping(value = "/index.htm")

    public ModelAndView indexPage() {

        return new ModelAndView("/WEB-INF/views/index.jsp");
}
}
Listing 4-13. An annotation-based sample configuration
package com.apress.prospringmvc.bookstore.web.config;
// Other imports omitted see Listing 4-8
@Configuration
public class WebMvcContextConfiguration {
@Bean
public IndexController indexController() {
return new IndexController();
    }

}
The DefaultAnnotationHandlerMapping is one of the default mappings registered by the dispatcher servlet. If you want to use the RequestMappingHandlerMapping, you need to explicitly configure it or use the org.springframework.web.servlet.config.annotation.EnableWebMvc annotation. The RequestMappingHandlerMapping implementation is more powerful and flexible than the default, registered one, and it allows for more flexible configuration and mapping methods. The extensibility and flexibility of this approach are covered in Chapter 6.
HandlerAdapter
The org.springframework.web.servlet.HandlerAdapter is the glue between the dispatcher servlet and the selected handler. It removes the actual execution logic from the dispatcher servlet, which makes the dispatcher servlet infinitely extensible. Consider this component the glue between the servlet and the actual handler implementation. Listing 4-14 shows the HandlerAdapter API.
Listing 4-14. The HandlerAdapter API
package org.springframework.web.servlet;


import javax.servlet.http.HttpServletRequest;

import javax.servlet.http.HttpServletResponse;


public interface HandlerAdapter {


    boolean supports(Object handler);


    ModelAndView handle(HttpServletRequest request,

                        HttpServletResponse response,

                        Object handler) throws Exception;


    long getLastModified(HttpServletRequest request, Object handler);


}
As Listing 4-14 shows, the API consists of several methods. The supports method is called on each handler in the context by the dispatcher servlet, and this is done to determine which HandlerAdapter can execute the selected handler. If the handler adapter can execute the handler, the handle method is called to actually execute the selected handler. The execution of the handler can lead to an org.springframework.web.servlet.ModelAndView being returned. However, some implementations always return null, indicating the response has already been sent to the client.
If the incoming request is a GET or HEAD request, the getLastModified method is called to determine the time when the underlying resource was last modified (-1 means the content is always regenerated). The result is sent back to the client as a Last-Modified request header and compared with the If-Modified-Since request header. If there was a modification, the content will be regenerated and resent to the client; otherwise, an HTTP Response Code 304 (Not Modified) will be sent back to the client. This is particularly useful when the dispatcher servlet serves static resources, which will save bandwidth.
Out of the box, Spring MVC provides five implementations of the HandlerAdapter (see Figure 4-12).

Figure 4-12. HandlerAdapter implementations
HttpRequestHandlerAdapter
The org.springframework.web.servlet.mvc.HttpRequestHandlerAdapter knows how to execute org.springframework.web.HttpRequestHandler instances. This handler adapter is mostly used by Spring Remoting to support some of the HTTP remoting options. However, there are two implementations of the org.springframework.web.HttpRequestHandler interface that you will also use. One serves static resources, and the other forwards incoming requests to the default servlet of the servlet container (see Chapter 5 for more information on this implementation).
SimpleControllerHandlerAdapter
The org.springframework.web.servlet.mvc.SimpleControllerHandlerAdapter knows how to execute org.springframework.web.servlet.mvc.Controller implementations. It returns the org.springframework.web.servlet.ModelAndView returned from the handleRequest method of the controller instance.
SimpleServletHandlerAdapter
It can be convenient to configure javax.servlet.Servlet instances in the application context and put them behind the dispatcher servlet. To be able to execute those servlets, you need the org.springframework.web.servlet.handler.SimpleServletHandlerAdapter. It knows how to execute the javax.servlet.Servlet, and it always return null because it expects the servlet to handle the response itself.
AnnotationMethodHandlerAdapter
The org.springframework.web.servlet.mvc.annotation.AnnotationMethodHandlerAdapter is used to execute methods annotated with org.springframework.web.bind.annotation.RequestMapping. It converts method arguments and gives easy access to the request parameters. The return value of the method is converted or added to the org.springframework.web.servlet.ModelAndView internally created by this handler adapter. This whole mapping and converting process is quite rigid; however, there are some extension points that enable customizing or adding your own type handling.
RequestMappingHandlerAdapter
The org.springframework.web.servlet.mvc.method.annotation.RequestMappingHandlerAdapter is used to execute methods annotated with org.springframework.web.bind.annotation.RequestMapping. It will convert method arguments and give easy access to the request parameters. The return value of the method is converted or added to the org.springframework.web.servlet.ModelAndView internally created by this handler adapter. The whole binding and converting process is quite configurable and flexible. A lot of the lessons learned from the org.springframework.web.servlet.mvc.annotation.AnnotationMethodHandlerAdapter have been incorporated in here; the possibilities are explained in Chapters 5 and 6.
MultipartResolver
The org.springframework.web.multipart.MultipartResolver strategy interface is used to determine whether an incoming request is a multipart file request (used for file uploads); and if so, it wraps the incoming request in an org.springframework.web.multipart.MultipartHttpServletRequest. The wrapped request can then be used to get easy access to the underlying multipart files from the form. File uploading is explained in Chapter 7. Listing 4-15 shows MultipartResolver API.
Listing 4-15. The MultipartResolver API
package org.springframework.web.multipart;


import javax.servlet.http.HttpServletRequest;


public interface MultipartResolver {


    boolean isMultipart(HttpServletRequest request);


    MultipartHttpServletRequest resolveMultipart(HttpServletRequest request)

    throws MultipartException;
void cleanupMultipart(MultipartHttpServletRequest request);
}
The three methods of the org.springframework.web.multipart.MultipartResolver are called during the preparation and cleanup of the request. The isMultipart method is invoked to determine whether an incoming request is actually a multipart request. If it is, then the resolveMultipart method is called, and this wraps the original request in a MultipartHttpServletRequest. Finally, when the request has been handled, the cleanupMultipart method is invoked to clean up any used resources. Figure 4-13 shows the two out-of-the-box implementations of the MultipartResolver.

Figure 4-13. The MultipartResolver implementations
CommonsMultipartResolver
The org.springframework.web.multipart.commons.CommonsMultipartResolver uses the Commons fileupload library1 to handle multipart files. It enables easy configuration of several aspects of the Commons fileupload library.
StandardServletMultipartResolver
The Servlet 3.0 specification introduced a standard way of handling multipart forms. The org.springframework.web.multipart.support.StandardServletMultipartResolver merely serves as a wrapper around this standard approach, so that it is exposed in a transparent way.
LocaleResolver
The org.springframework.web.servlet.LocaleResolver strategy interface is used to determine which java.util.Locale to use to render the page. In most cases, this is used to resolve validation messages or labels in the application. The different implementations are shown in Figure 4-14 and described in the following subsections.
____________

Figure 4-14. LocaleResolver implementations
Listing 4-16 shows the API for the org.springframework.web.servlet.LocaleResolver.
Listing 4-16. The LocaleResolver API
package org.springframework.web.servlet;


import java.util.Locale;


import javax.servlet.http.HttpServletRequest;

import javax.servlet.http.HttpServletResponse;


public interface LocaleResolver {


    Locale resolveLocale(HttpServletRequest request);

    void setLocale(HttpServletRequest request,

                   HttpServletResponse response,

                   Locale locale);


}
The API consists of two methods that each play a role in storing and retrieving the current java.util.Locale. The setLocale method is called when you want to change the current locale. If the implementation doesn’t support this, a java.lang.UnsupportedOperationException is thrown. The resolveLocale method is used by the Spring Framework—usually internally—to resolve the current locale.
AcceptHeaderLocaleResolver
The org.springframework.web.servlet.i18n.AcceptHeaderLocaleResolver simply delegates to the getLocale method of the current javax.servlet.HttpServletRequest. It uses the Accept-Language HTTP Header to determine the language. The client sets this header value; this resolver doesn’t support changing the locale.
CookieLocaleResolver
As its name implies, the org.springframework.web.servlet.i18n.CookieLocaleResolver uses a javax.servlet.http.Cookie to store the locale to use. This is particularly useful in cases where you want an application to be as stateless as possible. The actual value is stored on the client side, and it is sent to you with each request. This resolver allows the locale to be changed (you can find more information on this in Chapter 6). This resolver also allows you to configure the name of the cookie and a default locale to use. If no value can be determined for the current request (i.e., there is neither a cookie nor a default locale), then this resolver falls back to the locale of the request (see AcceptHeaderLocaleResolver).
FixedLocaleResolver
The org.springframework.web.servlet.i18n.FixedLocaleResolver is the most basic implementation of an org.springframework.web.servlet.LocaleResolver. It allows you to configure a locale to use throughout the whole application. This configuration is fixed; as such, it cannot be changed.
SessionLocaleResolver
The org.springframework.web.servlet.i18n.SessionLocaleResolver implementation uses the javax.servlet.http.HttpSession to store the value of the locale. The name of the attribute, as well as a default locale, can be configured. If no value can be determined for the current request (i.e., there is neither a value stored in the session nor a default locale), then it falls back to the locale of the request (see AcceptHeaderLocaleResolver). This resolver also lets you change the locale (see Chapter 6 for more information).
ThemeResolver
The org.springframework.web.servlet.ThemeResolver strategy interface is used to determine which theme to use to render the page. There are several implementations; these are shown in Figure 4-15 and explained in the following subsections. How to apply theming is explained in Chapter 8. If no theme name can be resolved, then this resolver uses the hardcoded default theme.
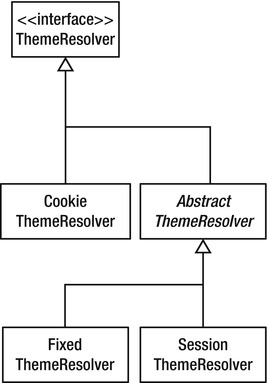
Figure 4-15. ThemeResolver implementations
Listing 4-17 shows the API for the org.springframework.web.servlet.ThemeResolver, which is quite similar to the org.springframework.web.servlet.LocaleResolver API.
Listing 4-17. The ThemeResolver API
package org.springframework.web.servlet;


import javax.servlet.http.HttpServletRequest;

import javax.servlet.http.HttpServletResponse;


public interface ThemeResolver {

    String resolveThemeName(HttpServletRequest request);


    void setThemeName(HttpServletRequest request,

                      HttpServletResponse response,

                      String themeName);


}
You call the setThemeName method when you want to change the current theme. If changing theme is not supported, it throws a java.lang.UnsupportedOperationException. The Spring Framework invokes the resolveThemeName method when it needs to resolve the current theme. This is mainly done by using the theme jsp tag.
CookieThemeResolver
As its name implies, the org.springframework.web.servlet.theme.CookieThemeResolver uses a javax.servlet.http.Cookie to store the theme to use. This is particularly useful where you want your application to be as stateless as possible. The actual value is stored on the client side and will be sent to you with each request. This resolver allows the theme to be changed; you can find more information on this in Chapters 6 and 8. This resolver also allows you to configure the name of the cookie and a theme locale to use.
FixedThemeResolver
The org.springframework.web.servlet.theme.FixedThemeResolver is the most basic implementation of an org.springframework.web.servlet.ThemeResolver. It allows you to configure a theme to use throughout the whole application. This configuration is fixed; as such, it cannot be changed.
SessionThemeResolver
The org.springframework.web.servlet.theme.SessionThemeResolver uses the javax.servlet.http.HttpSession to store the value of the theme. The name of the attribute, as well as a default theme, can be configured.
HandlerExceptionResolver
In most cases, you want to control how you handle an exception that occurs during the handling of a request. You can use a HandlerExceptionResolver for this. The API (see Listing 4-18) consists of a single method that is called on the org.springframework.web.servlet.HandlerExceptionResolvers detected by the dispatcher servlet. The resolver can choose to handle the exception itself or to return an org.springframework.web.servlet.ModelAndView that contains a view to render and a model (generally containing the exception thrown).
Listing 4-18. The HandlerExceptionResolver API
package org.springframework.web.servlet;


import javax.servlet.http.HttpServletRequest;

import javax.servlet.http.HttpServletResponse;


public interface HandlerExceptionResolver {


    ModelAndView resolveException(HttpServletRequest request,

                                  HttpServletResponse response,

                                  Object handler,

                                  Exception ex);


}
Figure 4-16 shows the different implementations provided by the Spring Framework. Each works in a slightly different way, just as each is configured differently (see Chapter 6 for more information).

Figure 4-16. The HandlerExceptionResolver implementations
The org.springframework.web.servlet.handler.HandlerExceptionResolverComposite is an implementation used internally by Spring MVC. It is used to chain several org.springframework.web.servlet.HandlerExceptionResolver implementations together. This resolver does not provide an actual implementation or added functionality; instead, it merely acts as a wrapper around multiple implementations (when multiple implementations are configured).
RequestToViewNameTranslator
When a handler returns no view implementation or view name and did not send a response itself to the client, then the org.springframework.web.servlet.RequestToViewNameTranslator tries to determine a view name from the incoming request. The default implementation (see Figure 4-17), org.springframework.web.servlet.view.DefaultRequestToViewNameTranslator, simply takes the URL, strips the suffix and context path, and then uses the remainder as the view name (i.e., http://localhost:8080/bookstore/admin/index.html becomes admin/index). You can find more information about views in Chapter 8.
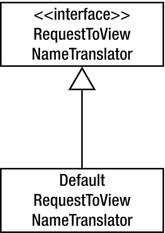
Figure 4-17. The RequstToViewNameTranslator hierarchy
The RequestToViewNameTranslator API is shown in Listing 4-19.
Listing 4-19. The RequestToViewNameTranslator API
package org.springframework.web.servlet;


import javax.servlet.http.HttpServletRequest;


public interface RequestToViewNameTranslator {


    String getViewName(HttpServletRequest request) throws Exception;


}
ViewResolver
Spring MVC provides a very flexible view resolving mechanism. It simply takes the view name returned from the handler and tries to resolve it to an actual view implementation (if no concrete org.springframework.web.servlet.View is returned). The actual implementation could be a JSP, but it could just as easily be an Excel spreadsheet or PDF file. For more information on view resolving, refer to Chapter 8.
This API (see Listing 4-20) is pretty simple and consists of a single method. This method takes the view name and currently selected locale (see also the LocaleResolver). This can be used to resolve to an actual View implementation. When there are multiple org.springframework.web.servlet.ViewResolvers configured, the dispatcher servlet calls them in turn until one of them returns a View to render.
Listing 4-20. The ViewResolver API
package org.springframework.web.servlet;


import java.util.Locale;


public interface ViewResolver {


    View resolveViewName(String viewName, Locale locale) throws Exception;
}
The ViewResolver implementations are shown in Figure 4-18. Out of the box, Spring provides several implementations (see Chapter 8 for more information).

Figure 4-18. The ViewResolver implementations
FlashMapManager
The org.springframework.web.servlet.FlashMapManager is used to enable a flash “scope” in Spring MVC applications. You can use this mechanism to put attributes in a flash map that are then retrieved after a redirect (the flash map survives a request/response cycle). The flash map is cleared after the view is rendered. Spring provides a single implementation, org.springframework.web.servlet.support.SessionFlashMapManager (see Figure 4-19).

Figure 4-19. The FlashMapManager hierarchy
Listing 4-21 shows the API of the FlashMapManager.
![]() Note The flash “scope” mentioned here has no relation to the “flashscope” used in Spring Web Flow.
Note The flash “scope” mentioned here has no relation to the “flashscope” used in Spring Web Flow.
Listing 4-21. The FlashMapManager API
package org.springframework.web.servlet;


import javax.servlet.http.HttpServletRequest;

import javax.servlet.http.HttpServletResponse;


public interface FlashMapManager {


    FlashMap retrieveAndUpdate(HttpServletRequest request,

                               HttpServletResponse response);


    void saveOutputFlashMap(FlashMap flashMap,

                            HttpServletRequest request,

                            HttpServletResponse response);

}
Summary
This chapter started by looking at the request processing workflow, identifying which components play a role in this. The DispatcherServlet can be considered the main component in Spring MVC, and it plays the most crucial role, that of the front controller. The MVC pattern in Spring MVC is quite explicit; you have a Model, a View, and also a Controller (handler). The controller processes the request, fills the model, and selects the view to render.
While processing a request, the DispatcherServlet uses a lot of different components to play its role. The most important components are the HandlerMapping and HandlerAdapter; these components are the core components used to map and handle requests, respectively. To apply crosscutting concerns, you can use an HandlerInterceptor. After handling a request, a view needs to be rendered. A handler can return an View or the name of a view to render. In the latter situation, this name is passed to an ViewResolver to resolve to an actual view implementation.
There is also basic support for flash-scoped variables. To make this possible, there is the notion of an FlashMapManager. Sometimes, the request processing doesn’t progress the way you’d like it to. For example, you might encounter exceptions. To handle those, you can use the HandlerExceptionResolver. The final components that play a role here are the LocaleResolver and ThemeResolver. Together, these enable internationalization and theming in your application.
This chapter also touched on the fact that the dispatcher servlet includes some components that are configured by default and contrasted those defaults against those of the Spring @MVC, which can be enabled by using the EnableWebMvc annotation. We also explored the different default components of the two approaches.
Upcoming chapters will explain how to build controllers to handle requests and take a closer look at how to configure Spring MVC.