
9
Solving Business Problems with Macros
WHAT'S IN THIS CHAPTER?
- Examining the capabilities of UI and data macros and understanding how to use them together
- Effectively using table events to manage and enforce business rules
- Leveraging parameter queries and aggregate queries
WROX.COM CODE DOWNLOADS FOR THIS CHAPTER
The code and sample downloads for this chapter are found at www.wiley.com/go/proaccess2013prog.com on the Download Code tab. They are in the Maid To Order Sample App download. Refer to the Readme.txt for installation instructions.
You read in Chapter 6 about the new macro designer and how Access 2013 macros are different. In intervening chapters, you've read about how you can design tables and views, and with that information you are ready to consider the crucial questions all developers ask about their tool: “Is it the right tool for this job? Am I using it the right way?” In this chapter, we discuss some practical scenarios and quickly view some edge cases not only to show you what you can accomplish with macros, but also how to accomplish it easily and smoothly.
We will start by reviewing our toolkit, and then move to a discussion on typical scenarios where an Access application will have to fulfill the customer's requirements, and finally, work through some examples step by step. We will start with simple macros to insert a record into a table and copy a record, move on to using table events to automate maintaining a history of changes, and then turn to performing bulk updates to several records. You will then get a broader survey of other macro capabilities and get some idea of what you can do to adapt and expand the content to your specific business applications.
MACRO DESIGN CONSIDERATIONS
In traditional Access applications, you probably used VBA to enforce business rules and carry out processes in a typical workflow. You will find that several functionalities you have had via VBA exist within macros. You were introduced to different types of macros in Chapter 6: UI macros, data macros, and table events. We will now consider situations when you need to select the right kind of macro or if you need them at all.
When to Use Data Macros
One key feature of Access is enabling you to quickly build an application for managing data without significant upfront investment and programming. Many common tasks pertaining to create, read, update and delete (CRUD) operations are available out of the box, without additional programming. As you saw in earlier chapters, whenever you add a table you immediately get a pair of views to perform basic CRUD operations against that table. You learned that you can make use of validation rules and calculated fields to enforce common requirements and calculations at the record level. Finally, you saw how objects such as the Related Items control and the Summary view can provide easy access to managing related records and performing calculations. We cite those examples to help you establish when you need to start thinking about solving your business problem with a data macro. Generally speaking, you would want to turn to a data macro when you need to:
- Perform CRUD operations on more than a single record in a single action
- Automate system maintenance, such as recording an audit record when a record is updated, or updating a summary table
- Perform validations for scope wider than a record, and to block invalid data from being saved in a table
- Encapsulate a multiple step operation into a single action using parameters
Direct Access to Data
One significant consideration with regard to standalone data macros, especially those performing CRUD operations, is that you cannot always ensure users have access to data only through those data macros. You can remove the capability to add, edit, or delete records from a view or not present a view at all, but if users are allowed to connect to the database via the Access client and use a datasheet or Access client form to update the data, they will be able to circumvent data macros. Therefore, it is generally a more robust design to leverage out-of-the-box functionalities and use table events to ensure that business logic will be enforced at all times, regardless of how the user edits the data. The final choice depends partly on the customer's priorities, of course.
Using Table Events with Default Values
To put it in more concrete terms, let's say that Maid to Order wants to require that an initial job is created for every new customer at the same time this customer is added. You can certainly meet this requirement by using an unbound form and a data macro that collects all of the parameters needed to create both a new customer record and a new job record. However, you can also meet the requirement by using the Insert event on the customer table to add a new job record using default values for a new job. The Insert event on the customer table would always be fired regardless of how the customer's record got added, which means you can be assured that your requirement will be enforced at all times. On the other hand, using the table's Insert event means you cannot customize the default values for the job record. You would need to work out a good way to create a default — maybe by performing calculations for dates based on today's date. You almost certainly would have to display the newly created job for the user to further customize.
Inserting Customizable Defaults with Data Macros
On the other hand, if Maid To Order is more interested in streamlining its data entry and is not concerned about enforcing the addition of a job for each new customer, then it may see value in your creating an unbound form and a standalone data macro to encapsulate the inserts into two tables. Even so, you will almost certainly be investing more time and effort in building this functionality as opposed to using out-of-the-box functionality such as a subview or a Related Items control and a popup view. This is where your experience will help guide the customer to select the simplest approach that will also be robust and work well with the overall application design.
Handling Errors
Another consideration is the ability to handle errors. Within data macros, you can raise an error and send a custom error message back to the user, making them useful for performing complex validations, whether within a table event or a freestanding data macro. However, this is an all-or-nothing deal; you cannot opt to commit some of the changes performed in the data macro and discard others. An error will undo everything. This is generally a good thing as it guarantees that your application will not end up in an inconsistent state. However, this bears pointing out explicitly, especially when you call other data macros within data macros. If there are problems, such as an invalid value for a parameter, everything will be dropped and the user will be shown an error message. Therefore, it is even more important that you ensure, especially for table events, that the macros are robust and will work with all possible scenarios or that you have mechanisms in place to handle unexpected values or results.
ForEachRecord Macro Action and Queries
LookupRecord and ForEachRecord, as you may know, operate against the equivalent of a recordset. With LookupRecord and ForEachRecord actions, you can use either tables or queries, which raises some additional thoughts. Because data macros are fundamentally procedural, where the ForEachRecord action transforms into a cursor-type operation, it's usually a good idea to ensure that you use queries as much as possible, and not just to filter down the number of records that will be iterated in the macro actions. You should also use aggregate queries to quickly give you aggregate results where needed, instead of using the ForEachRecord macro action to aggregate across the records. In Chapter 8, as well as in later sections of this chapter, there are examples of how you can apply what you learned in Chapter 5 to use queries efficiently and how you can benefit from better performance for doing so.
In short, because the ForEachRecord macro action must iterate over a recordset, whereas queries can perform aggregate operations; when you find an opportunity to use a query instead of performing calculations over several records ForEachRecord macro action, you should pick the query most of the time.
When to Use UI Macros
Scope and context are important considerations when you work with macros. UI macros have a much narrower scope compared to data macros. As you will see later in the chapter, data macros can work with several objects at once. UI macros, on the other hand, can only operate in the context of the active view and its content. A UI macro can neither access other views — popup or not — nor can it manipulate a subview. For Blank and List views, you can manipulate the following six object properties at run time:
- Enabled
- Visible
- ForeColor
- BackColor
- Caption
- Value
When creating a freestanding UI macro, the onus is on you to ensure that, when it's called, the content within the UI macro is valid. For example, suppose that you wanted to have two buttons on four different forms that should behave similarly. You need to name the two buttons identically in each form in order for those forms to be able to call the freestanding macro without causing an error.
Furthermore, UI macros cannot contain parameters within themselves. However, you can address this limitation in a couple of ways. To parameterize a UI macro, you would use a SetVariable action to set a variable to the appropriate value before invoking the UI macro. The UI macro could then refer to that variable. Another possible method for parameterizing a UI macro is to call a RunDataMacro that returns a result to the UI macro, but this costs relatively much more than setting a variable, as the web browser needs to make a roundtrip to the server to get the output.
Because of these considerations, you will likely find that most of your UI macros will be written as event handlers for the events of various controls and views, and that you have only a handful, if any, freestanding UI macros.
Functions Exclusive to UI Macros
It's important to note that there is a pair of functions that is available only in UI macros:
- UserDisplayName()
- UserEmailAddress()
The results of those functions are not available within data macros. That is expected behavior because when running a data macro, which in actuality is a SQL module, the caller executing the SQL is actually Access, not the user. Thus, functions typically used in T-SQL cannot be used to determine the logged in user because of the impersonation. Therefore, if you have any data that is user-specific, it is necessary to pass the result of the UserDisplayName() or UserEmailAddress() function as a parameter into a query or data macro.
NOTE As you learned in Chapter 8, tile-bound views cannot be based on a parameterized query. Therefore, if you have data to which you need to manage access based on the logged-in user, you must use popup views in order to pass in the result of either function.
On Start Macro
The On Start macro deserves a special mention. The On Start Macro offers immense value to you, the developer, because it gives you an opportunity to initialize local variables, ensure that your startup view is displayed, and get some information about the context.
One major use we quickly discovered for the On Start macro is to initialize variables. As mentioned earlier in this book, a variable used in UI macros has a global scope and therefore is subject to namespace pollution. For more complex applications, it can be a daunting task to track all possible variables.
Variable Declaration and Error Handling
If you refer to a variable that's not previously set via a SetVariable macro action, you will get the run time error illustrated in Figure 9-1.

FIGURE 9-1: Uninitialized variable referenced in a macro
Thus, the On Start macro provides you with an ideal place to list all variables and initialize them to good default values as the partial list of variables in Figure 9-2 illustrates.

FIGURE 9-2: On Start macro initializing common variables
No function is available to determine whether a variable was declared or not, and with no ability to create error handling within UI macros, it is essential that you have initialized all of your variables before any single action references those variables. If you establish the practice of consistently declaring all new variables and initializing them via your app's On Start macro, managing variables will also be more documented. You also have a ready reference so you can ensure you are not creating redundant variables or struggling to ensure that all variables are initialized at the right time and re-used in the expected manner.
Look at the second group of the On Start macro, where a data macro runs to get two values — one for the new line character and one for the tab character. In the On Start macro itself, you can't retrieve values directly from a table; however, you can get them with the data macro. You'll learn more about these values and how they are used later in this chapter.
As you saw in Figure 9-2, we used null as the default value for variables initialized in this On Start macro. This makes it easy for us to check elsewhere in the application whether an expected value has been supplied or not, and in the latter case, provide a friendly message to the user, as illustrated in Figure 9-3.

FIGURE 9-3: Testing whether a variable is null
The On Start macro is also a good place to manage any user defaults that may be stored in a table. Because users can leave the app at any time, the On Start macro offers you the opportunity to reset values to their original state as appropriate, our caveat regarding roundtripping notwithstanding.
USING FREESTANDING MACROS
In the next section, you will look at designing macros that are intended to be a part of a manual workflow where a user initiates the action, such as clicking a button to start off a series of operations encapsulated within one or more macros. You will start with a simple record copy workflow and escalate the process to a set of records and then into a set of tables.
Remember that because these macros are user-initiated, they can also be circumvented, and are, therefore, not appropriate for the task of enforcing validations or preventing unacceptable data from being saved in a table. It is more appropriate to approach them as tools to enable users to perform their tasks quickly and in the most efficient manner.
Cloning a Record
Maid To Order commonly has customers who ask for new jobs with the same services provided each time. While Maid To Order usually has a regular schedule with customers, there are times when customers want an extra job outside their regular schedule, perhaps to have maids come before or after a big party at their house. The only difference is the date being scheduled. Because of the trust the customers have built with the maids, it's typical that the same crew is assigned to the customer for each job, but there are times when this is not possible.
Instead of requiring the user to enter an entirely new job from scratch, you can offer the user an action button to clone a selected job for a new date, as shown in Figure 9-4.

FIGURE 9-4: Action button to clone a job
Because you do not want every field in the cloned job to be identical, you need to customize certain parts, so it is not possible to simply fire off the data macro from this action button. Instead, you open a popup view using the OpenPopup macro action. You can see that in Figure 9-5.

FIGURE 9-5: OpenPopup macro action
When the popup opens, the default value for the job to clone is the one selected in the schedule when the action button was clicked. This is accomplished in the Load event of the popup, as shown in Figure 9-6. The user can accept the default or change to a different job.

FIGURE 9-6: Load event of the Job Clone popup
Opening a popup form offers the user the opportunity to customize the commonly changed data when cloning jobs. Maid To Order has specified that users be able to customize jobs, as shown in Figure 9-7.

FIGURE 9-7: Popup form to accept input parameters for cloning a job
Note that the combo box in Figure 9-7 shows the cloned job as set in the macro that opened the popup. The main thing for us to note is that Users can select which job to copy, and enter a new date, time, and additional notes for the new job. Those three textboxes represent the customizations users may add to the cloned jobs.
However, Maid To Order doesn't stop there — they want to be able to handle other changes to customers' jobs as well. For example, the customer may have requested additional services for previous jobs and now wants those additional services to be converted to regular services on future jobs. Or you may need to reapply a discount, or assign the same listing of employees from the previous job rather than the current crew roster, which may have changed. Finally, you want users to be able to append the notes from the original job to the notes for the cloned job, making it easy to refer to notes that may be still relevant for the cloned job.
Let's look at the rowsource driving the combo box that selects the job. Although you are cloning a specific job, it's convenient for the user to see which customer's job they are cloning in the combo box. Thus, you use the Concat() function to display both the customer's name and the job's scheduled date and time in a single column. See the expanded Expression in Figure 9-8. When displaying date/time values, you have to use the Format() function to ensure they are rendered in readable format. Otherwise, dates will be shown in the format stored in SQL Server, typically yyyy-mm-dd hh:mm:nn:ss.

FIGURE 9-8: Concatenated job for display in combo box
NOTE Note that the Format() function in web apps is significantly different from the one you knew in the Access client. Unlike the client version, lettercase matters because the function is implemented in SQL Server where case matters. D and d have different meanings and, if not used correctly, may provide unexpected output.
NOTE Recall that, unlike a client combo box, you cannot have multiple columns for a combo box in your web app, so concatenating will be necessary if you need to display values from more than one column. You may consider alternative approaches to displaying your data. Furthermore, sorting is determined by the displayed field, irrespective of any sorting you may have designated in the underlying query. Finally, there is a limit of rows that can be returned. The AutoComplete control allows you to have more values, but it only works with fields and only one field can be searched. You cannot have it be bound to one field and display an expression. So, the combo box is your best choice if you want to use expressions. For this reason, you need to ensure that you have a way of filtering to a manageable number of rows that can be displayed.
Looking at the popup view, as illustrated in Figure 9-7, there are no other macros beyond those behind the Clone Job and Cancel buttons. The Cancel button is straightforward, having only the ClosePopup action. However, the Clone Job button invokes several actions, including a data macro that needs some parameters. So, before you can build the event handler for the Submit button, you need to build the data macro it will call so that you can supply the parameters that you want to pass from this popup form into that data macro. Start by creating a new data macro using the Create Parameter link to add the nine parameters, as shown in Figure 9-9.

FIGURE 9-9: Parameters for the dmJobClone data macro
NOTE In the following discussion, you'll be looking at different sections of a lengthy data macro. Fully expanded, this macro would fill multiple pages. In order to show you the relevant pieces of the macro for discussion, we've taken advantage of the fact that the macro designer allows you to expand and collapse elements within it.
Because you want to allow users to append the notes from the original job to their new notes, and because there is no means of concatenating a carriage return using a constant such as vbCrLf as you would in VBA, you need to store the carriage return in a text field. You will use tblUtility table for this purpose. As mentioned earlier in the book, the tblUtility table is meant to have only one row. It is used to supply application-level features, such as this. Let's look at the table design in Figure 9-10 to see how you would add a field to store the carriage return.

FIGURE 9-10: New field in tblUtility table
The simplest way to insert the carriage return into the tblUtility table is to save changes and switch from design to datasheet view. Now you can do a copy and paste from Notepad, for example into the field on the datasheet. Of course, you can't actually see the carriage return, which is a non-printing character, in the field, and you have to use Long Text to allow this character to be saved correctly.
Returning to the dmJobClone data macro, you can now look up the carriage return value from tblUtility, but do so only if you have added data for new notes and the user asks to append the original notes to that data. You wrap the lookup in the If/Then macro action to test both the parameter indicating whether the note is to be copied (If[pbolCopyNotes]=Yes) and whether there are any entries in the new notes (If [ptxtAdditionalNotes] Is Not Null). Figure 9-11 shows that part of the data macro.

FIGURE 9-11: Looking up the carriage return when needed
NOTE Figure 9-11 is a good example of how you can work to minimize processing. Using LookupRecord and ForEachRecord are much more expensive actions compared to evaluating a parameter or a variable. You also may find it beneficial to perform validations on parameters or variables as early as possible in the procedure to ensure that any problems are immediately detected and control is returned to the user sooner rather than later in the event of a problem with supplied values.
Also, the On Start macro can call a data macro that sets a variable to do the same thing as this macro block to make it available for use within UI macros. Within data macros, a LookUpRecord will be needed to retrieve the special characters.
That concludes the setup portion of the macro, which you'll complete before you move into the actual copying part of the operation. In order to perform the copy, you first have to identify the target job, which you do using a LookupRecord against the parameter containing the JobID from the popup. Then you start the CreateRecord step inside the data block, also shown in Figure 9-12.
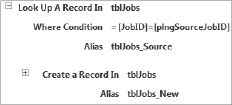
FIGURE 9-12 LookupRecord macro action
Note the use of the alias, tblJobs_Source and tblJobs_New for the data block. Because you are copying a record from tblJobs and inserting the new record into the same table, aliasing disambiguates between the source job record and the newly created job record.
NOTE Recall from Chapter 6 that certain macro actions such as LookupRecord, ForEachRecord, CreateRecord, and EditRecord form a data block that also dictates its scope. In Figure 9-12, CreateRecord is within the LookupRecord block in order to allow for referencing between the lookup record and the created record. Had CreateRecord been created outside the LookupRecord's block, data from the LookupRecord would no longer be accessible for use within CreateRecord.
Because you want to reference other fields in the lookup job record, you need to assign them to variables. Doing so makes the values available outside the scope of your LookupRecord data block. Once they are assigned to variables, you can reference the variable instead of the source field. Figure 9-13 shows two variables being set based on data in fields within the lookup record; you will see it again shortly in later steps.
Also, Figure 9-13 demonstrates the use of CreateRecord and SetField macro actions to assign either copied values or values from parameters into the newly created record. Note the use of IIf() to determine whether to use the original values or modified values supplied by parameters.

FIGURE 9-13: CreateRecord and SetField macro actions
Figure 9-13 also shows the benefit of the alias; the source values (such as [tblJobs_Source].[CustomerID]) and target values (for example, [tblJobs_New].[CustomerID]) are disambiguated to clearly reference what goes where. You will want to get comfortable with two-part qualifier naming (as in [tblJobs_Source].[CustomerID]), as shown in Figure 9-13 to generate self-documenting macros.
One of the parameters you passed in was whether the macro should duplicate a particular job's customized services or use the default services specified by the customer. This is useful in cases where maids need to clone a special job that includes services that aren't a part of regular activity. Figure 9-14 shows an If/Then block, which allows you to choose whether to loop records within txrfJobServices or txrfCustomerServices depending on the value of the pbolCopyJobServices parameter.

FIGURE 9-14: If/Then macro action
Let's expand the Create a Record action in the true part of the If/Then block from Figure 9-14 and look at what you need to do when copying services from a special job. Figure 9-15 shows the CreateRecord and associated SetField macro actions performed on the txrfJobServices in the True part of the block.

FIGURE 9-15: CreateRecord for txtfJobServices table
Look closely at the two inner If/Then blocks. For the Extra field, you are factoring in the pbolConvertExtraToPermanent parameter so the value in the Extra field for the new job service record may not be same value as the source from which it came. Sometimes customers may want you to copy a special job. Sometime it's just a special job done one more time. But when the customer decides that it should be included in a new regular job, you want to convert the job service into a regular service. The [pbolConvertExtraToPermanent]=Yes condition for the If/Then block allows you not only to set the Extra field for the new service, but also to insert a new service into the customer's list of default services to ensure that any new job created for this customer has a full set of services, including this formerly extra service. On the other hand, if the same parameter is set to No, any job services that are extra will not be added to the cloned job.
NOTE In the context of a web macro, you should use the constants Yes and No instead of the True and False constants you may be used to using in VBA or clint macros.
Similarly, sometimes you may be obliged to offer the same discount from a cloned job to a new job once again, so you want to allow for this. This is accomplished by wrapping the discount selection in an If/Then macro action. Note that there is no Else block, which is perfectly fine because it just means that the Discount and DiscountReason fields will be No and Null, respectively.
You conclude the macro with similar logic regarding assigning employees to the new jobs, again choosing whether to clone from the job directly or use the crew roster. Figure 9-16 shows the block that switches between either table based on the pbolCopyAssignedEmployees parameter's input.

FIGURE 9-16: Final If/Then macro action choosing between txrfJobEmployees or txrfCrewMembers as the source for filling in a job's assigned employees
You have now seen how you can effectively manage several records and encapsulate a complex process into a simple call via RunDataMacro macro actions by passing in parameters. Within the process, you can see how you can branch your logic to handle a variety of scenarios.
Generating a Set of Records with Variable Parameters
Next, we want to consider a scenario where the customer would like to generate a schedule of new jobs for a specified interval. The complicating factor is that customers have different service frequencies; some want daily services, others weekly, and yet others some different period. Some want to schedule jobs only on a short-term basis, such as the next three times; others would rather schedule for the next year. However you put it, the basic problem for you to solve is to perform the same action, copying a record, the number of times specified by the users at run time.
The solution to this requirement is to use the ForEachRecord macro action. ForEachRecord allows you to loop a specific number of times in a data macro. However, you cannot specify an ad hoc number of iterations; it is determined solely by the number of records returned to the ForEachRecord macro action. Therefore, one solution to enable ad hoc iterations is to create a tally table that contains a range of sequential values, which can be used to determine the number of iterations needed for each operation where it is called. The user will not use this tally table directly, but it is used within macros to provide you with a loop construct.
First, you will learn to create a tally table, and then you'll circle back to the task of creating sets of records, taking advantage of this table.
While you may not have encountered tally tables in the Access environment, the tally table is a common feature used by SQL Server developers and can be very useful even in queries. Therefore, a tally table can provide value beyond simply supporting a loop construct for your data macros. For an in-depth discussion on other uses of tally tables, search on www.sqlservercentral.com.
Creating a Tally Table
When creating a tally table you need to take a few additional steps beyond those involved in creating data or lookup tables because, in the end, you need only one column, which is the original autonumbering ID column. This column is perfect for providing sequential values. However, as you are probably aware, you can neither insert into the autonumber column nor do an empty insert. Thus, the initial table design necessitates an initial seed value column, as Figure 9-17 shows.

FIGURE 9-17: Initial tvalTally design
Because it's meant for programming purposes rather than to be used directly, name the table tvalTally using the tval prefix. You can name the seed value column tmp because, as the name implies, you will delete it later. The tmp column's only purpose is to facilitate the population of the records.
After saving the table, you need to insert values. Depending on the size and purpose of your app, you will want to insert as many as 10,000 records, as we've done; you may want less or more values in your tally tables. Even if you go as low as 100 rows, it can take quite some time to insert them one by one. If you don't want to import a source file, you could use a query using Cartesian joins, as in Figure 9-18.

FIGURE 9-18: Using a Cartesian self-join with the biggest table in your database as the source
The idea is that you select the biggest table repeatedly, leveraging the fact that a Cartesian join generates a product of records between tables. If the biggest table in the database had just 100 rows, a Cartesian self-join would yield 100 × 100 = 10,000 records. As Figure 9-18 shows, you simply assign a constant value to the tmp column. The only point in inserting anything into the tally table is to simply generate 10,000 records, which causes the autonumber field to increment. To put a cap on the number of records to insert, set Return Records to a value, as shown in Figure 9-18.
Once you've run the query and inserted the needed number of rows into the tvalTally, whether using a data macro or a client query or pasting the query's datasheet into the table's datasheet, you can delete the tmp column. At this point, tvalTally is ready for use in the data macro and elsewhere in your app.
With the tally table, you can loop for so many times and when appropriate, use an additional condition to exit the loop earlier with the ExitForEachRecord macro action. Figure 9-19 demonstrates how you could specify the number of loops. The number of loops you need is passed into the macro as the plngRecurrences parameter, in this case, 25.
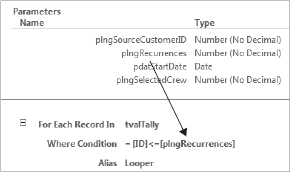
FIGURE 9-19: Example of using tvalTally to loop using a parameter (plngRecurrences)
Generating a Schedule
Now that you have your tally table present in the Maid To Order application, you can provide the requested functionality, in which customers want to schedule a specific, but variable, number of future jobs. Unlike the clone job functionality covered in the previous section, this task requires less customization; Maid To Order only wants to use the customer's requested services as the template to generate a new job; only two attributes are customized: the dates of the job, and the assigned crew, which may be different from previous jobs, to each future job.
Figure 9-20 shows the button that will open the popup to enter the parameters from frmCustomerByName view.

FIGURE 9-20: Button to generate a schedule
Like the button to clone a job shown in the previous section, this button simply performs an OpenPopup macro action. However, there's a twist — this popup form will have a recordsource, unlike the frmJobsClone shown in the previous section. In order to limit the records in that recordsource to those you want, you pass in the CustomerID as the parameter, as shown in Figure 9-21.

FIGURE 9-21: OpenPopup macro action with CustomerID parameter
You may be wondering why you would want to attach a recordsource to a popup view that is meant to take inputs. The reason is to provide default values to fill in the appropriate input controls. Figure 9-22 shows what the user would see when the user selects a customer who was last serviced on January 2, 2013 and who is on a weekly plan.

FIGURE 9-22: User's view of frmJobGenerate with default values filled in
In order to be able to display 1/9/13 as the next start date, you need to look up the last job record for this customer. The data macro does that, but you also have to open a popup form. This shows how you can combine a pair of actions — looking up a record and opening a popup view — into a single step, offering users a better experience. Had you performed an OpenPopup macro action, followed by a RunDataMacro on the popup's Load event, the user would see the form open, and then be told to wait a second or two while the data macro runs, making it look slow. Even if the time taken to open a bound popup view is the same, the user sees only the form opening and thus experiences it as a bit quicker. Such subjective differences can be very important and should be factored in your application design.
Let's look at the query that will give you the parameters you want to fill in Figure 9-23.

FIGURE 9-23: qryCustomerGetLastJob to filter form's recordsource and retrieve additional default parameters
Although getting a last job record could technically be done with a Max(ScheduleDateTime) action, you should specify that the query return one record and be sorted in descending order on ScheduleDateTime as illustrated in Figure 9-23. This allows you to select other columns from the job record. This is equivalent to doing a SELECT TOP 1 ... ORDER BY ScheduleDateTime DESC. You define a single parameter, plngSelectedCustomerID, which is assigned a value in the data macro that opens the form. With this query, you can determine when the last job date was and which crew was assigned to it.
Let's look at how you use that information to open the frmJobGenerate view, shown in design view in Figure 9-24.

FIGURE 9-24: Design view of the frmJobGenerate popup view
You should note the following three things in Figure 9-24:
- Visible fields, such as Next Job Date, where the user enters parameters, are all unbound.
- All bound fields, highlighted, are hidden.
- There is an On Current macro action
Binding the input controls in this view would be inappropriate — you don't want to have the user end up editing the last job or give the user a control that the user can't modify. You need hidden controls to receive the values so that you can pass the default values to the view for display to users.
The editable controls have a Default property, which also can be based on an expression. However, using it to look up a value from another control will not work because this occurs too early in the process and would show blank, as the bound values haven't been fetched when populating the default value. For this reason, you use the Current event to fill in the default values. Figure 9-25 shows the macro actions performed in the Current event.

FIGURE 9-25: SetProperty macro actions in the frmJobGenerate Current event
Here are the complete expressions that were truncated from Figure 9-25, the first expression:
=Choose([cboFrequency],
  DateAdd(Day,1,[txtScheduleDate]),
  DateAdd(Week,1,[txtScheduleDate]),
  DateAdd(Week,2,[txtScheduleDate]),
  DateAdd(Month,1,[txtScheduleDate])
)
=Choose([cboFrequency],
  DateAdd(Day,[txtRecurrence],[txtScheduleDate]),
  DateAdd(Week,[txtRecurrence],[txtScheduleDate]),
  DateAdd(Week,[txtRecurrence]*2,[txtScheduleDate]),
  DateAdd(Month,[txtRecurrence],[txtScheduleDate])
)
As you can see, you copy the values from hidden controls bound to the view's recordsource into unbound controls, which the user can edit. Note especially the manual addition of the equal sign in the Value expression. Without the equal sign, Access may interpret the expression as storing a string containing the name of the functions and the hidden controls into the unbound control.
Only one control does use a default value and that is the txtRecurrence, which has a value of ten stored, as shown in Figure 9-22 and repeated in design view in Figure 9-26. The Default Value property is accessible via the ![]() button.
button.

FIGURE 9-26: Default Value property of txtRecurrence Textbox control
Thus, you have provided maids with a popup form that gives starting default values, making it easy for maids to add a specific number of new jobs quickly. Whether a maid gets a request to add the next 25 job dates, or to add all job dates through the end of July next year, you need to support both. Therefore, the popup offers both a textbox that accepts an integer value representing recurrences and a textbox that accepts a date value representing an end date.
You also provide a button so that, when one of those textboxes is changed, the correct value is recalculated for the other textbox. This behavior once again provides the maid with an easy way to see how many jobs would be created in a given date range or when the last job would be for a specified number of jobs. The maid can try several options before committing the final selection by clicking the Submit button.
WHY NOT DO IT IN AN AFTER UPDATE EVENT?
Some of you may be wondering why we use a button instead of automating the recalculation completely via the After Update event of the textbox. The answer is that unlike in the client environment, modifying the value of a textbox programmatically via a macro action triggers its After Update in a web app. Therefore, attaching an After Update event to both pairs of textboxes and modifying the other textbox's value on After Update would cause the other textbox's After Update event to fire, modifying the first textbox, re-triggering its After Update event again. At that point we have a runaway recursion. The user then will be presented with an error that the maximum number of recursions (19) has been reached, leaving the textboxes with incorrect values.
As you will see later, because the data macro uses recurrences as a parameter, and the ending date is meant to help in finding a recurrence using a date, you do use the After Update event for the ending date textbox only but require manual recalculating of the end date via a button when you modify the recurrence value.
Figure 9-27 illustrates how you recalculate the ending date when the cmdCalculateLastDate is pressed to execute its Click event.
The truncated expression in Figure 9-27 is similar to the second expression from Figure 9-26, except that instead of txtScheduleDate, it uses txtStartDate.
In order to avoid several If/Then macro actions, you can use the Choose() function seen in Figure 9-26 and 9-27 to select among possible formulas to calculate the end date. Because you are performing a DateAdd() function, and you cannot pass a variable into the DatePart argument, Choose() allows you to select the correct DateAdd() expression to use, based on how frequently a customer wants their service. The frequency comes from the tvalFrequencies table, shown in Figure 9-28.

FIGURE 9-27: Macro actions behind the Click event of cmdCalculateLastDate

FIGURE 9-28: tvalFrequencies table content
DATEPART ARGUMENT
In VBA, you specify the interval in a DateAdd() expression in a string, using something like "d" to indicate you want to add a number of days. In web apps, DateAdd() is much more like SQL Server's version of DateAdd() where you pass in a constant named Day, not to be confused with the function of the same name. To get help on the names of DatePart that you want, use Expression Builder to locate the DatePart category under the Constants listing. Intellisense in the Expression Builder will assist you.
The tval prefix for this table indicates that you use it to store constants. You basically have to promise never to change the values in the table because this is what macro actions will rely on to make correct choices.
The Choose() function makes its selection based on the value of the FrequencyID from the hidden bound Frequency control, so you arrange the possible formulas in the same order they are shown in Figure 9-29 to ensure that the correct DatePart argument is matched up. The following table shows how you want the Choose() function to evaluate the output.

Note that you don't evaluate the value 5 at all. Because it's a special one-time job, it makes no sense to try to schedule a set of jobs based on that non-regular interval. If the value 5 or any other value not listed in the table is passed to the Choose() function, the output will be null, which is appropriate. However, if in the future, your client decides to add one or more new intervals to the tvalFrequencies table, you would need to insert something like null output for the fifth argument in order to get to the sixth argument and beyond. Your experience and evaluation of the client's business rules will be helpful in deciding if you want to use the Choose() function or use a series of If/Then macro actions.
If you circle back to the Click event, you also see that in the Else block of the If/Then macro action, you set the ending date to null in case the user hasn't selected a starting date from which to calculate or a number of recurrences. That should provide you with ample coverage for different possible inputs based on the specified starting date, specified frequency, and the desired number of recurrences.
The last macro action is SetVariable, which sets gbolRecalculateNeeded to No. This will become clearer once we talk about the Click event for the Submit button. For now, let's turn to the Click event behind the cmdCalculateIntervals, shown in Figure 9-29.

FIGURE 9-29: Macro actions in the cmdCalculateIntervals Click event
The expression truncated from Figure 9-29 is given:
=Choose([cboFrequency],
  DateDiff(Day,[txtStartDate],[txtLastDate]),
  DateDiff(Week,[txtStartDate],[txtLastDate]),
  DateDiff(Week,[txtStartDate],[txtLastDate])/2,
  DateDiff(Month,[txtStartDate],[txtLastDate])
)+1
The implementation is very similar to calculating an end date, except that you change around the input values and use DateDiff() to extract the integer that will represent the number job recurrences that can fit in the range instead of DateAdd(). The only thing to note is that the ending date may not actually be the date of the last job because maids can enter an arbitrary date without having to conform to the constraints of the dates available based on the customer's desired frequency. For the sake of simplicity, you can assume that the maid knows that is the case and move on.
Also, contrary to what you do in the macro behind the cmdCalculateEndDate, you set the gbolRecalculateNeeded to No. Again, we visit this when you look at the Click event for the Submit button.
Sometimes a maid needs to generate a new schedule with a different starting date, perhaps because the customer wants to start services next month instead of next week or because the customer has been inactive for a while, which means the default date for their next job is actually in the past. Changing the start date may warrant updating the ending date to enable users to see the new ending date. Figure 9-30 shows how you would fill in the After Update event for the txtStartDate.

FIGURE 9-30: txtStartDate After Update event
The expression truncated from Figure 9-30 is same as the second truncated expression used in Figure 9-25.
This is similar to the cmdCalculateLastDate; this time calculating a new ending date and after doing so, setting the gbolRecalculateNeeded variable to No. This covers all macro actions on the form, leaving you with the two button events to build.
You would, of course, add a ClosePopup macro action to the Cancel button. Next, let's look at how you would program the Submit button in Figure 9-31.

FIGURE 9-31: Macro actions in the Click event of the cmdSubmit button
Unlike the clone job functionality you made in the previous section, you need to perform validations on the various options. You should take the following into account.
First, to avoid nesting several If/Then blocks, you want to reverse conditions so that you can do an If/ElseIf/Else/End If at one level. Although it may be easier to read the condition [txtStartDate]>Today(), the total of four conditions to be met would require a four-level deep nested If/Then requiring you to handle all Else branches correctly, which would certainly not be as easy to read. Reversing the conditions is a good way to keep your macro actions readable.
You saw the gbolRecalculateNeeded variable in other event handlers. As noted earlier, you can't completely automate the calculations, but to ensure users don't enter a new ending date and forget to click the Calculate Interval button, you maintain the gbolRealculateNeeded variable at each step. Otherwise, users could get unexpected results because the dmJobGenerate data macro does not actually use the ending date at all. It only uses the starting date and recurrences as the parameters. Thus, you can see that if a user were allowed to enter a different end date but leave recurrences at the default 10, they'd end up with ten jobs when they were expecting fewer or more. By maintaining a variable, you also sidestep the problem of triggering a runaway recursion.
With two examples of input popup forms under your belt, you should be able to see how sophisticated you can make your logic in data macros, which makes it easy for users to get the necessary default values, perform validation before submitting changes, and automate the input process. You also may have noticed that different data macros repeat the expression used to evaluate either intervals and/or ending date. This is a potential place where you could further develop your macro into a freestanding UI macro and call that instead.
NAMING A FREESTANDING UI MACRO
One nice aspect about VBA modules is that you can have functions that are specific to a form or a module and be limited in scope to only that module. In UI macros, there is no such limitation and, in theory, any UI macro can be called anywhere. Were you to move the expressions used on the frmJobGenerate popup view into a freestanding UI macro, it could be hard to tell that it's meant to be used with the frmJobGenerate view only. An idea to help alleviate this problem is to consider embedding the view's name in the macro's name such as mcr_frmJobGenerate_Validate so that you can distinguish a view-specific macro from a macro that may be accessible by more than one form.
Next, let's examine the actual data macro, dmJobGenerateSchedule. To generate the schedule, you need the customer record, obtained via a LookupRecord macro action to provide you with all other relevant data about a customer as you construct a schedule. With the lookup, you can retrieve values such as the requested TimeofDay. You also need a variable to increment the current date of the job as you iterate. You initialize this variable via a SetVariable action, assigning the value of the pdatStartDate parameter passed into the data macro. And finally, your data macro enters a loop using ForEachRecord against the tvalTally table, using the plngRecurrences parameter to control the number of iterations. Figure 9-32 shows these macro actions, with the macro action, CreateRecord, collapsed for clarity.

FIGURE 9-32: dmJobGenerateSchedule and the first macro actions to be performed
In Figure 9-32, you can see that the alias Looper was assigned to the tally table, so that it can be referenced in the loop. The loop will run as long as Looper.ID is less than or equal to the value of the plngRecurrences parameter. With each iteration in the ForEachRecord action, the macro creates a new record in the tblJobs with a CreateRecord macro action, using data from the customer's default job that was passed into the data macro via the parameter tblCustomers and the vdatCurrentDate, as illustrated in Figure 9-33.

FIGURE 9-33: CreateRecord for tblJobs and its SetField actions
Unlike the dmJobClone data macro discussed in the previous section on cloning a job, there are no If/Then blocks to conditionally insert different values for the jobs in this case. Only the default values are needed for each new job; the only difference for each job is the date.
For each job created, you also insert the services to be provided in txrfCustomerServicestable and assign employees in the txrfCrewMembers table, using data from txrfCustomerServices and txrfCrewMembers to get the values, as demonstrated in Figure 9-34, which shows those sections of the data macro.

FIGURE 9-34: CreateRecords in the Job Employees table for the new job's assigned employees
This leaves you with one last step to perform in each iteration, calculating the next value of the vdatCurrentDate variable for the next iteration. This time, you use If/Then blocks primarily so that, for unexpected values, you can return a custom error message, which you can see for the value 5 and in the Else block in Figure 9-35.

FIGURE 9-35: Calculating vlngCurrentDate and RaiseError macro actions
There is an If or Else If condition for each standard frequency, starting with 1, for daily, and ending with 4, for Monthly. The data macro uses different versions of the DateAdd() function with the appropriate interval to generate the next schedule date for that option. And, when the frequency is ad hoc, or not provided, the appropriate error is raised.
WHETHER TO PRE-FIX OR TO POST-FIX, THAT IS THE QUESTION
Because the ForEachRecord macro action doesn't use a variable for incrementing, you have to perform it yourself. That leaves open the question of whether you should increment the variable as the first step inside the loop or as the last step. Your experience in looping recordsets in VBA will be helpful in determining which option would work the best in each situation. One handy way to help make the decision is to compare it to Do Until <condition> ... Loop versus Do Until ... Loop <condition>. The construction of the former expression means it may be executed zero to nth times whereas the latter construction executes one to nth times.
In this example of extending a variable schedule of jobs, you've learned additional ways to leverage data macros to enforce business rules. This concludes your introduction to the process of building and generating multiple records using arbitrary numbers. Let's now turn to another scenario where you need to populate records into different tables.
Generating Records in Different Tables
With the data macros dmJobClone and dmJobGenerateSchedule, you saw how you can clone new records from an existing record with some customization and also how you can generate a bulk amount of records using predetermined calculations to differentiate each record.
Although both operations worked with data from more than one table, let's now turn to a situation where you need to insert two records in two different tables. Maid To Order has said that, as a rule, no new customer should be added to their system without a first job being set up. To ensure users don't forget to add that job, Maid To Order wants a form that will allow the user to fill in both the new customer's data and the first job's data in one go.
To facilitate this requirement, you will use an unbound form that contains all of the controls that users fill in to set up a new customer and their first job. The values from those unbound controls will be fed to a data macro via parameters. Figure 9-36 illustrates how Maid To Order wants the form to appear in the web app.

FIGURE 9-36: frmCustomerCreate view
Unlike previously implemented functions, which necessitated popup views, this is a crucial action for Maid To Order, so you can add it as a tile-bound view to the Customer's tile using the ![]() button. Figure 9-36 illustrated the placement of the frmCustomerCreate link on the Customer tile's View Selector.
button. Figure 9-36 illustrated the placement of the frmCustomerCreate link on the Customer tile's View Selector.
Figure 9-37 shows how you have the subview reusing the fsubFilterServices you saw in Chapter 8 to allow for selection of services for the job.

FIGURE 9-37: subServices Subview control's properties
NOTE Using a Subview control on a tile-bound view is also an example of how you can add parameters on a view bound to a tile. Although the Subview control allows you to filter related records using an unbound control, you can only do so on a single field. So, while you can't have parameters in tile-bound views, you can accomplish a similar purpose by using a Subview control.
This functionality is an opportunity to illustrate how you can allow for multiple selections on a web form. You can use a filter table to store one or more services for the new job. In order to do so, of course, it is necessary to create that filter table to store the selections. You learned about creating a filter table in Chapter 8. Here you'll see how to use it.
To ensure the user always starts with an empty selection for the services to select for the customer, you need to clear the filter table of all records for the current user. You saw how to do this in Chapter 8.
One design assumption behind this approach is that you leave all validation up to the data macro invoked in the Submit button. If there is insufficient or invalid data, the data macro will fail and neither customer nor job will be added, and an error will be shown to the user, as demonstrated in Figure 9-38.

FIGURE 9-38: Error shown when the user does not fill in any values on the frmCustomerCreate
As Figure 9-38 shows, you don't necessarily have to write complex validation checks for the Submit button. There may be cases where it is actually needed which do warrant your valuable time and talent, but as you can see, the error is quite friendly in contrast to Access client databases where users get “helpful” error messages such as Type Mismatch or Invalid Use of Null.
Figure 9-39 shows the macro action behind the Click event of the Submit button with the first macro action collapsed.

FIGURE 9-39: Submit Button Click event
The Submit button copies all of the Customer values from the controls on the view and passes them as parameters to a data macro, dmCustomerCreate. Then the macro runs dmFilterServicesClear again to clear the filter table.
Note that the macro performs a ChangeView action to after running the two data macros. That allows you to place the user on the newly added customer's record for further editing. Note also that you obtain the new customer's ID via a return parameter from the dmCustomerCreate macro, which you will see how to set in the dmCustomerCreate data macro.
Let's start with the parameter list from the dmCustomer Create data macro that was previously collapsed in Figure 9-39. Figure 9-40 shows how you would build the list.
As you would expect, most parameters shown in Figure 9-40 have a one-to-one correlation to the controls from the unbound frmCustomerCreate. The only parameter that doesn't correlate directly is ptxtCurrentUserName, which will be used for retrieving the user's selections of services from the subview.

FIGURE 9-40: Parameter list for dmCustomer Create
You would add a CreateRecord action and, as before, you will need to retrieve CustomerID from the newly created record for the job. You enable this by clicking the Retrieve ID link on right side of the CreateRecord macro action. Note that the link is visible only when the CreateRecord has focus. The rest of the CreateRecord is quite straightforward, applying parameters to each control, as Figure 9-41 shows.

FIGURE 9-41: Setting a local variable for the ID and partially collapsed SetField macro actions
The new record is created in the Customer table, and then a variable is set to the ID of that new customer record. You'll need that variable in the next step. The SetField actions insert the values passed into the macro as parameters. The first two are expanded for you in Figure 9-41.
After adding the customer, you can turn to adding a job for that customer, via a second CreateRecord action. As you did for the customer record, you need to create the job and then obtain the new job ID, as shown in Figure 9-42. The macro can then add the job values from the parameters it receives.

FIGURE 9-42: CreateRecord for the job record using parameters passed to the data macro from the view
Because you pass in a CrewID parameter, you can also populate the txrfJobEmployees table using the txrfCrewMembers, as shown in Figure 9-43.

FIGURE 9-43: CreateRecord for the Job Employee record using parameters passed to the data macro from the view
You can now turn to handling the services for the first job. As you may recall, you used a filter table so users can make multiple selections. You would use a query that joins the tlkpFilterServices filter table with the tlkpServices table to provide all columns you need to build the service record, as shown in Figure 9-44.

FIGURE 9-44: qryFilterServiceDetailsSelected design
You can perform a ForEachRecord macro action against the records returned by this query and retrieve the services from it into txrfJobServices to populate the services for the first job and also populate the default requested services for the customer in txrfCustomerServices. In this way, you can describe what services will be performed in the first job while simultaneously populating the default requested services for the customer for future jobs. You can then use both vlngNewCustomerID and vlngNewJobID to populate the foreign key in each table, as illustrated in Figure 9-45.

FIGURE 9-45: Adding services to the current job and to default services
You can conclude with a ReturnVar macro action, passing the new value for CustomerID back to the calling UI macro, as shown in Figure 9-46. This enables you to perform a ChangeView to focus on the newly added customer, as you saw in Figure 9-39.

FIGURE 9-46: Return the new CustomerID
At this point, you have seen an example of how you can fulfill a customer request with an unbound form. In this case, you created a new customer record and an initial job for that customer in one function, and also populated supporting tables for that job in a single step.
Updating and/or Deleting Several Records
Thus far, the examples you've worked on dealt primarily with creating new records of some kind. Although you've had several glimpses of what kind of logic you can bring to bear upon in your data macros, let's consider an example where you can create a data macro that works on existing records.
Unfortunately, Maid To Order does have customers who drop out for some reason. It is necessary to either cancel or put on hold any future jobs scheduled for that customer. Because sometimes the customer may return after a pause in service, Maid To Order wants to have the option of retaining the job records. Other times, they may prefer to delete the records.
Thus, you would provide an action button on the frmCustomerByName view to initiate the process of either canceling or deleting the jobs, as in Figure 9-47.

FIGURE 9-47: Action button to cancel jobs on frmCustomerByName
As you would expect, the button performs an OpenPopup action, which opens the frmJobCancel view. However, before the OpenPopup is performed, you need to set the variable glngCurrentCustomerID to contain the current customer ID, as illustrated in Figure 9-48, so you can pass it as a parameter to the popup.

FIGURE 9-48: SetVariable and OpenPopup macro actions for the job cancellation macro
Figure 9-49 shows the design view for frmJobCancel.

FIGURE 9-49: Design view of frmJobCancel
There are only three controls to parameterize: the starting date, the ending date, and the option to delete or cancel jobs. If the Delete Jobs checkbox is left blank, you will simply be canceling the jobs in the date range selected, which allows for quick restoration of services should a customer want the original schedule (or what is left of it) back.
There are no additional UI macros other than those behind the Submit and Cancel buttons' Click events. As you have done before, you simply add a ClosePopup macro action to the Cancel button. Figure 9-50 shows the macro actions behind the cmdSubmit's Click event.
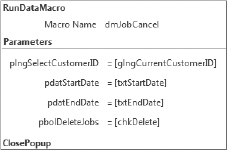
FIGURE 9-50: cmdSubmit Button Click event
The Submit button invokes dmJobCancel and passes four parameters to it. The actions in dmJobCancel are quite straightforward in contrast to previous data macros you've built so far in this chapter, so we don't need to discuss them in detail. Figure 9-51 demonstrates where you would use the If/Then block to determine whether you will be deleting records or just setting the Cancel field to Yes for particular jobs so they can be recovered later.

FIGURE 9-51: dmJobCancel data macro actions
The truncated expression for the Where Condition parameter in Figure 9-51 is given:
(
  [tblJobs].[CustomerID]=[plngSelectCustomerID]
  And
  (
    [tblJobs].[ScheduleDate]>=[pdatStartDate]
    Or
    [pdatStartDate] Is Null
  ) And (
    [tblJobs].[ScheduleDate]<[pdatEndDate]
    Or [pdatEndDate] Is Null
  )
) And [tblJobs].[Completed]=0
We opted to define the relationships between job, job services, and the job employee tables to allow cascade-deleting of related records in a job's services and assigned employees. Because of that, you don't need to explicitly loop the txrfJobServices and txrfJobEmployees tables to remove the related records, which saves you two additional ForEachRecord actions and a DeleteRecord action within each block.
BUT AREN'T CASCADE DELETES DANGEROUS?
One advice often given out within Access development has been to avoid the use of the Cascade Delete option in a foreign key constraint. This is quite understandable because there may be cases where you really don't want to delete child records but can't be sure that the existence of those records will be checked at all times, especially if someone goes directly to the table and deletes the record. If that happens, poof, everything's gone, regardless of whether you've written a nice VBA procedure to test the validity of deleting a record.
The factor that changes the rule here in the web app environment is that you now have a Delete table event to which you can attach your rules and therefore prevent unjustified deletes. Here, you are trading for speed and ease of development using Cascade Delete functionality with the understanding that, if you have a rule when a job should not be deleted, it will be checked at all times within the Delete table event and there is no way to circumvent this table event. Thus, unlike past versions, you now can “optionally” enable Cascade Delete on relationships and that can work out to your advantage. You will see this illustrated later in the chapter.
One other thing to note is the format of the Where clause in the ForEachRecord. It uses the starting and ending date and also makes either optional. The macro actions shown in Figure 9-51 are expanded in the text after the Figure so you can see it completely. This allows the user to use either date alone and thus affect all jobs before or after a given date. Lastly, there is a hard condition of Complete=0, which makes sense because you can't cancel or delete a job that has been completed.
You've now created a freestanding macro to add records to multiple tables in one controlled process. This concludes our coverage on building freestanding data macros to support functional requirements in a web app. You've seen how you can use UI macros and data macros together to form a powerful process and aid users in streamlining their workflow. The content here should go well with your experience in designing and building solutions for your customers. We'll now turn to table events.
USING TABLE EVENTS
In the following section, you learn how to use table events, which run automatically without requiring users to intervene manually. This is very useful for enforcing business rules that are not expressible in a validation rule at the field or record level. You will start with a simple validation check, move into creating a record of changes made, and conclude with gathering and maintaining metadata that does not work well in a relational model.
Performance Considerations
Because table events always fire when their respective triggering actions occur, and because the user has to wait for those events to finish processing, it becomes much more important that you design your table events to be as streamlined as possible. Three general design approaches you should undertake are:
- Whenever your events deal with certain, specific fields within the table, you want to use Update() to check if those fields were actually changed by the triggering event before invoking an action. That provides for an opportunity to skip the extra processing when it's not needed.
- Perform all validations as early as possible so that you can cancel out sooner, rather than later, to minimize the wait your users must tolerate. There is nothing more frustrating for a user than waiting a while only to be told there was an error, forcing them to start all over.
- Do not try to depend on some context, such as determining which logged-in user is initiating the action, or getting a variable. This approach, even when it can be enabled, makes for fragile designs that may be circumvented by creative users, or can even create additional issues. If you cannot evaluate all dependent variables in a table event, it may not be appropriate as a table event.
Furthermore, and above all, you should be quite judicious about the need for the table event at all, asking yourself if the action must be completed and enforced at all times. If this action needs to be done only occasionally, consider if users would be happier using a button to run a freestanding data macro instead of paying the waiting cost every time they trigger a table event.
One more thing to note is that table events operate by rows, not by sets. As you might know, when you run a query, the query affects the entire table at once in a single operation — that's a set operation. The underlying SQL Server table triggers are also set-based, not row-based. However, when macro actions are attached via events in Access, a cursor is generated within the trigger to iterate over the individual records that are affected. On one hand, this greatly simplifies the thought process required to build a table event. This can be especially helpful for non-developers who aren't used to thinking about data in sets and who would be uncomfortable with SQL.
On the other hand, the design approach means more processing is involved, especially when a bulk operation is performed via the Access client or another mechanism where more than one row is affected. Therefore, if you anticipate performing bulk operations against the SQL database outside the web application, you should plan carefully whether table events will significantly slow down such operations. To be frank, this discussion may be beyond the reach of new developers not used to thinking seriously about the more advanced facets of database design. However, we anticipate that the more seasoned developers among us will find it useful to make this an important element of their design considerations.
Preventing Deletions of Completed Records
The simplest use of table events is preventing deletion of certain records. As mentioned in the previous section, it wouldn't be appropriate at all to delete a completed job.
To attach macro actions to a Delete event, you'd open tblJobs in design view and click Delete event on the ribbon, as shown in Figure 9-52.

FIGURE 9-52: Delete event on the ribbon
Unlike data macros you've worked with so far, where you had to first perform a LookupRecord, ForEachRecord, and/or CreateRecord macro action in order to get a record to work with, a table event assumes that there is already a record to work with, and you can get started right away. Because this is a Delete event, you're going to use the Old virtual table, which would have identical structure to the active table being worked upon, which is tblJobs in this case.
You check whether Completed is Yes in the original record and, if so, you use a RaiseError macro action with description to communicate back to the user that the action can't be performed. Figure 9-53 shows the macro action behind the Delete event on the tblJobs table.

FIGURE 9-53: Macro actions in the tblJobs Delete event
If the user attempts to delete a completed job ([Old].[Completed] = Yes), the macro simply raises an error, which presents a message to the user and stops the delete. Figure 9-54 shows the error message the user will see when trying to delete a completed job.

FIGURE 9-54: Error message displayed after inappropriate delete attempt
In a situation where the user might have goofed and indicated that the wrong job was completed, the user can correct the mistake by first editing the wrong job record to make it non-complete, saving those changes. At that point, the user is once again allowed to delete the job.
Note that a similar approach can be followed to prevent editing of a record by attaching the macro actions shown in Figure 9-52 to the Update event as well. However, this may prove to be too restrictive because there are times when editing a completed record may be legitimate, such as when entering the invoice date or checking off when the job has been paid for. Thus, additional checks would be necessary for validation of the Update event to allow edits in some circumstances but not in others.
Another thing to keep in mind is, that from the viewpoint of the database architecture, a “job” is actually a collection of three related tables. To the user, however, the services and assigned employees are logically just a part of a job record and they may not understand the implications of making changes. Therefore, to prevent inappropriate deletion or editing of the services and assigned employees for completed jobs, you need to attach macro actions to their respective Delete and Update events as well. The macro actions for the Delete and Update events are basically identical so we'll look only at macro actions in the Delete event of the txrfJobServices table, and leave to you the task of building the Update event similarly. Likewise, we'll just consider the txrfJobServices table and assume the txrfJobEmployees table has the same Delete and Update events, as shown for txrfJobServices.
In the macro illustrated in Figure 9-55, you used the Old virtual table to identify the deleted record. However, when working with the txrfJobServices table, you do not have the Completed field as a part of the Old virtual table because the Old virtual table in this context represents txrfJobServices, and not tblJobs. Because your table event needs to refer to the value of the Completed field in tblJobs, it needs to examine the value of the Completed field in that table before validating the delete action. Therefore, you first have to perform a LookupRecord into the jobs table, using Old.JobID to select the correct job, as demonstrated in Figure 9-55.

FIGURE 9-55: Delete event for txrfJobServices
Once the tblJobs record is looked up, the actions are quite similar to what you saw for tblJobs: raising an error when Completed=Yes, stopping the delete action. As noted earlier, you will implement a similar Delete event for the Employees assigned to a completed job.
Unlike edits at the job level, it is not appropriate to edit services or assigned employees for a completed job. Thus, you can attach the same macro actions shown in Figure 9-54 to the Update events as well. Note that the Old virtual table is also available in the Update event, representing a copy of the record prior to editing the record that triggered the event.
Acquiring Default Values from Other Tables
As you saw in Chapter 2, you can supply a default value and provide a validation rule for a field in a table design. However, both are typically limited in their scope. You need to consider a situation where you want to acquire a default value from another table for use in a different table. Maid To Order maintains a list of default fees to charge for services in the tlkpServices table. Sometimes, a user may need to enter a specific fee that's different from the default fee. However, in all cases, Maid To Order does not want users to forget to enter some value for fees; they would rather have a default fee put into the record rather than none at all. The DefaultFee field in the txrfCustomerServices table is required; its Required property is set to Yes. But how does the user recall the current default fee that's stored in tlkpServices without having to look it up manually? While you certainly can provide the default via macro actions on the view (or via VBA in client forms), we're more interested in ensuring that you always supply a default fee in all possible situations, regardless of how the user enters the data. Remember from our earlier discussion that we are aware of, and want to guard against, problems arising from the possibility that users may connect to the database from a local Access database and enter records directly into tables. One possible approach is to make a convention that, where a fee of $0 is entered in any txrfCustomerServices record, you replace it with the current default fee from the tlkpServices for the same service. You can do this with a table event using the Insert event of the table.
You only need to enforce this convention when you insert a new service requested by a customer so you'll use the Insert event on txrfCustomerServices, as illustrated in Figure 9-56.

FIGURE 9-56: Macro actions in the Insert event for txrfCustomerServices
Because the default fee for a service is in tlkpServices, it's necessary to do a lookup into that table for the current service. In order to get the correct ServiceID, you need to refer to the newly inserted record in txrfCustomerServices.
In the following discussion, pay careful attention to the use, or rather non-use, of aliases, which you've seen in previous macros. Also pay careful attention to the scope in which various actions are performed. This can be a critical part of making your macros work as intended.
Unlike in previously discussed macros, where you added an alias to the CreateRecord macro block, you cannot provide an alias for the record in this situation. The syntax for referencing a new record being inserted in the table is in the form of table name.field name. LookupRecord, therefore, uses the expression ServiceID = [txrfCustomerServices].[ServiceID] in order to refer to the new record.
Within the LookupRecord data macro action, the macro reads the tlkpServices.DefaultFee value from the corresponding record looked up by its ServiceID, and then assigns that value to a vcurDefaultFee variable. Then, outside the LookupRecord action, the macro performs an EditRecord action.
Note that the alias for EditRecord is not given, and the macro changes the value of txrfCustomerServices.DefaultFee for the new record, using the variable vcurDefaultFee, which was previously set. The EditRecord had to be outside the LookupRecord to ensure it will refer to the record in the current table, which is the subject of the Insert event.
You can now see that unlike the Delete event where you had an Old virtual table to refer to the previous copy of the affected record, you need to use the table's name to refer to the current copy of the affected record. It's also useful to point out that the Old virtual table is not available at all in an Insert event, which is expected because there's no old anything to refer to.
Maintaining a History of Change
In some applications, it is desirable to have a complete history of all changes that have been made to the data. Some applications may go so far as to completely audit all kinds of changes in all tables. Because you can drive those audits from table events, you can ensure that complete records will be kept without any manual intervention.
Maid To Order has a limited audit requirement. They need to maintain a complete record of what services a customer has asked for in the past and when any changes to that list of services were made. This enables maids to answer customers' questions about services being rendered now or in the past, and also to make it easy for customers to ask to restore a service that was cancelled without requiring the maid to locate the last job where this service was rendered. Thus, a complete history is needed on the txrfCustomerServices table. You learn how to create an audit table in a web app later in this section of the chapter.
Audit Table Strategies
There are different ways to design an audit table; some applications may use a single audit table for the whole database and store each table's fields as a record so that the audit table can be used with any table, irrespective of the table's actual structure. Other applications may have one or more audit tables that are more or less a mirror of the original data tables.
Because Maid To Order is interested only in maintaining the history of customer services and changes to them, if any, you will use the latter approach. In addition to replicating the columns in the txrfCustomerServices table, you need additional columns to capture the date when the change was made and what kind of change occurred (for example, adding a new service, updating a service, or deleting a service no longer wanted) along with the ID of the service that was changed. Figure 9-57 illustrates the new audit table, txrfCustomerServicesHistory.

FIGURE 9-57: txrfCustomerServicesHistory table design
With the table in place, the next step is to attach macros to each table event on the txrfCustomerServices table to place audit values into it, as needed. In this case, you need all three table events to record all possible changes. You'll start with the Insert event illustrated in Figure 9-58, starting after the first If/Then block, which we already covered.

FIGURE 9-58: The txrfCustomerServices Insert event after the initial If/Then block
The process is quite straightforward — you acquire a timestamp and place it into a variable, using the Now() function to get the current date and time for the change, and then create a new record in txrfCustomerServices and copy all fields from the current record, supplying the timestamp and indicating that it's an insertion event in the field called Action. Let's compare that action with the Update event, which is needed to capture current and changed values. Figure 9-59 shows the macro actions.

FIGURE 9-59: Update event for txrfCustomerServices
You can see clearly that because an Update event needs to save both a copy of the previous values and a copy of the modified values, and you have both the Old virtual table and the current record available to you, you can create the audit records using the same reference syntax you used for the Insert event. You also can see why you want to store the timestamp in a variable before creating the records. That way you can have a single time value in both records being created in txrfCustomerServicesHistory. Note also that you disambiguate between two paired records via txrfCustomerServicesHistory's Action field: Update (Old Values) and Update (New Values).
Figure 9-60 shows the Delete event for the txrfCustomerServices table, which is very similar to what you saw in Figure 9-58 for Insert, except that instead of referencing txrfCustomerServices, you reference the Old virtual table and record Delete as the action value.

FIGURE 9-60: Delete event for txrfCustomerServices
With all three events covered, you now have a complete auditing process for changes to services in the txrfCustomerServices table. Best yet, this is all being done no matter how the users access the table — whether via the web views or via client Access forms, or even directly in tables in datasheet view.
SUMMARY
In Chapter 6, you learned about the basic workings of macros. Throughout this chapter, you have had opportunities to augment that knowledge with practical examples and discussion of the considerations that go into choosing one approach or another. You saw various considerations behind each type of macro and the ramifications for application design.
You then learned some different practical uses for macros and how to build those macros. We hope that you can now apply these skills to your own business problems. You should be able to identify which tool or tools will best meet your needs and be aware of performance ramifications, especially with table events. You saw how the On Start macro is an important tool to reduce errors relating to uninitialized variables.
You had opportunities to build freestanding macros and connect UI macros and data macros to form a workflow that users can initiate and that will enable them to perform more with less inputs. You saw a variety of possible designs to generate, edit, and delete record(s), and you used different views to provide input for parameters.
You moved onto table events and considered the performance impact and how you can maximize the use of table events to provide additional validation and enforce business rules, especially those not expressible at a record level. You saw how you can automate operations triggered by events irrespective of how a user initiated the event. You also saw how you can deploy a solution for managing custom calculations or a set of data that are not easily expressed in a relational model and use a mix of freestanding data macros and table events to facilitate the manual management of that data.
All in all, you've been exposed to a wide variety of scenarios in which you can use macros to build a rich and responsive web application and, most important, do so with far less effort on your part in comparison to more traditional web development tools. You now should have a clear vision of what you can do with the new macro actions for your web apps and how you can create powerful solutions. In the next chapter, you will go beyond Access and look at additional tools you can use to give additional functionalities not available from macros, centering around web browser control.