
14
Deploying Access Web Apps
WHAT'S IN THIS CHAPTER?
- Deploying Access web apps
- Versioning Access web apps
- Storing an app on a SharePoint site
- Controlling distribution
- Monetizing Access web apps
WROX.COM CODE DOWNLOADS FOR THIS CHAPTER
The code and sample downloads for this chapter are found at www.wiley.com/go/proaccess2013prog.com on the Download Code tab. They are in the Chapter 14 download and individually named according to the file names listed throughout the chapter. The app packages for the web apps in this chapter are called Maid to Order and Maid to Order Customer. Refer to the ReadMe.txt file for installation instructions.
You've learned how to build a web app, and now you want to distribute it. In this chapter, you learn how to do that. You may appreciate the fact that, once it's been deployed, distributing a new version can be as easy as updating the web app. There is no file copying to do. Of course, you may also want to maintain a separate test and production environment for proper lifecycle management over your apps, releasing updates to your web apps when you are ready to do that. Thus, in this chapter, you learn how you can provide a form of version control for releasing your web apps.
You will also deal with another aspect of app management that has never been done up to now — distributing your application via a public channel such as the Office Store and possibly monetizing it in the process. You will learn how to handle some new challenges you face when you distribute and update your web apps to a large number of people who may download and/or purchase your web app. You'll also learn how you can manage the licensing.
As part of the process, you will learn more about app catalogs and how they can be used as your tool for managing the development lifecycle and how they fit with distributing via the Office store.
DEPLOYING ACCESS WEB APPS
To be shared, Access web apps need to be placed in a location where others can access them. Unlike Access client files, you can't simply copy a file from one location to another. Nor can you use an automated deployment tool, such as Tony Toews Auto FE Updater. Access web apps need to be exposed for your users in a SharePoint team site or SharePoint personal site to which potential users have access via their browser. In this chapter, you'll learn about the locations and processes by which you can deploy your web apps for others. Note that we've discussed some aspects of this deployment in previous chapters. In this chapter, we consolidate and summarize the processes that relate specifically to the deployment process.
As you read the discussions in this chapter, you'll see that much of the information pertains to SharePoint, whether it's on-premises or hosted. We're sensitive to the fact that experienced Access developers may not have had a large amount of previous SharePoint experience. Like the authors, therefore, you may find yourself thinking about some of these considerations for the first time. It's well worth the effort to gain confidence in working with SharePoint in addition to developing your web apps.
Web Apps and App Catalogs
As we alluded to earlier in the book, you can essentially create a brand new Access web app directly on a SharePoint site without going through an app catalog. Any web apps created in this manner are not a part of an app catalog and cannot be redistributed. This is a good way to design and develop a prototype of your app. However, for the purpose of lifecycle management, you will also want to create an app package from it that can be added to an app catalog. This can be true regardless of whether you will be distributing the web app for on-premises deployment, in the cloud, or for public consumption.
There are several issues to be aware of when planning for distribution or reuse of your web apps. Let's review a couple of the more important ones.
Packaging for Distribution
When you create a web app outside of an app catalog, you can always package it up and add it to an app catalog, but the original app is neither upgradable nor redistributable. Therefore, when you create a brand new Access web app that you intend to distribute, you will need to use the Save As Package function to generate an app package. You can then upload that app package into an app catalog. Your original app, of course, is retained for further development, as needed.
Your knowledge of good lifecycle management will come into play as you decide how to implement this functionality for your web apps. You'll see more on this later in the chapter.
Creating a Template of Your Apps
As you learned in Chapter 12, you may want to save an app package containing your base customizations and then use it as your template when starting a new Access web app project to ensure that all of your web apps are managed and easily redistributable. You can upload an app package easily by adding an Access web app and clicking the hyperlink, as shown in Figure 14-1.

FIGURE 14-1: Adding an Access package via Site Contents
While this is an easy way to add a new Access web app from a package, it merely creates a web app that is still not redistributable and, perhaps more importantly, not upgradable. The only way to create an upgradable web app is to actually add it to an app catalog directly. In later sections of this chapter, you learn the steps to do this.
On-Premises SharePoint Server
When your organization deploys an on-premises SharePoint server, your choice of deployment locations is essentially limited to the app catalog for your tenancy. Although tenancy is somewhat outside the scope of our discussion here, to understand deployment, you do need to know a little bit about “tenancy” as it relates to both on-premises and online SharePoint installations. In this context, tenancy refers to logical partitioning of data and properties among multiple client organizations (tenants) within a single SharePoint site.
Tenancy
Each tenancy in SharePoint can have only one app catalog, whether on-premises or in the cloud. Also, the deployment method you may choose for your web apps in an on-premises environment is related to tenancy. So let's take a very high-level look at some of the salient factors.
In SharePoint Online, a tenant consists of the site collections under one account. As noted previously, each tenant will have one app catalog. That's pretty much all you really need to know about it for your Office 365 accounts. Your tenant has an app catalog to which you deploy your web apps.
In an on-premises installation, tenancy can be a bit more involved because tenancy refers to a set of site collections, which can be all of the site collections in the SharePoint installation, a subset of them, or site collections from across different web applications on the server farm. The key point here is that there may be more than one tenancy and, therefore, more than one app catalog in the on-premises installation.
Apps deployed to an app catalog in a tenancy can have “web scope” or they can have “tenant scope”. When you upload a web app to the app catalog of a tenancy, it is immediately available to be installed on all websites within that tenancy. Apps that are installed this way are said to have web scope.
Tenant administrators, however, can limit installation of apps to a subset of websites within a tenancy. Installing apps this way gives them tenant scope. Such, “batch-installed” apps consist of a single web app, which is shared by all the host websites on which the app is installed. It is located in the site collection of the corporate app catalog, but accessible by users in all of the tenants to which it is installed. Tenant scope, therefore, can be more limited if you choose.
Now that you have a general idea of how web apps are installed in app catalogs, let's look closer at the specifics of deploying them to a given app catalog.
Using the App Catalog
We've talked about using them, so now let's see what app catalogs are. An app catalog is a SharePoint site in which an organization can place apps for use by the people in their organization. Apps in the app catalog are available to anyone in your organization who can access the catalog and find the apps in it. Adding an app to an app catalog does not constitute an installation. Rather, your users can select the app from the app catalog and add it to their own site. That's important because it means that you will install apps in the catalog only when you want those apps to be freely available across your organization. As you learned in Chapter 13, there will also be web apps that you don't want to expose to everyone. Those shouldn't be in the app catalog.
Creating the App Catalog for Enterprise Plans or On-Premises SharePoint
If you are using an Office 365 enterprise account or an on-premises SharePoint installation, the site administrator must set up the app catalog, so most Access developers in that environment won't need to be involved in that process. In the interest of completeness, however, here are the steps you would take to create an app catalog — as outlined on the Microsoft support site — should you be called on to do so:
- Sign in to the Office 365 admin center with your SharePoint Online admin username and password.
- Go to Admin
 SharePoint.
 - Click Apps on the left, and then click app catalog.
- Select Create a new app catalog site, and then click OK.
- On the Create app catalog Site Collection page, enter the required information, and then click OK.
Once the app catalog is set up, you, or other developers in your organization, can deploy apps in it for others to use. You can also install apps from it into your own site or sites.
In the future, you can then reach the app catalog, as shown in Figure 14-2, by selecting Admin, then SharePoint, and clicking the apps link in the SharePoint admin center.

FIGURE 14-2: Navigate to the App Catalog for your site.
Make a note of the URL of your app catalog; you'll need it again when you proceed with deployment later in the chapter.
Accessing an App Catalog in Small Business Plans
If you are using Office 365 small business plans, it may not be obvious where to locate your app catalog. As you saw for enterprise plans, there is an Admin page that enables you to create and manage an app catalog but this is not available in small business plans. Rather, certain small business plans have their default app catalog, which will be located at the following address:
https://your domain.sharepoint.com/sites/AppCatalog
You can enter the URL manually to reach the app catalog. Or, you can use the built-in search facility on your Sharepoint site and search for “app catalog.” If you do not find it, the particular plan may not support app catalog.
Whether you are on an enterprise plan or a small business plan, you may also want to customize your team site to add a link for easy access to the app catalog as there is no link to the app catalog out-of-the-box, necessitating manual navigation for first-time use. You will need the app catalog's URL later in the chapter.
Getting an App Ready to be Installed in the App Catalog
Let's take a closer look at how you add apps to an existing app catalog because you, the developer, will be doing that. Obviously, you need to have an app created and ready to upload to your site, so let's switch the discussion from the app catalog and learn how to do that with a test version of a web app being developed for Maid To Order customers. The Maid To Order sample app available for download will help walk you through the examples. You want to make this web app available for testing by other members of your organization while you continue development on the original.
Start Access and open your web app. Go to the backstage and select Save As, which you can see in Figure 14-3.

FIGURE 14-3: Create an app package for deployment in your app catalog
The option tells you that the app package you are about to create can be submitted to the Office Store or to an internal catalog. You'll be taking the second option for this exercise. When you are ready to distribute apps to the world, you'll create them the same way, but you'll need a vendor account to submit apps to the Office Store.
Give the App Package a Meaningful Name
Click the icon to start the packaging process. When you see the dialog box that asks you for the title of the app package, give it a short, meaningful name. Give careful consideration to the name. The web app will begin its journey to your organization's app catalogue from here, and it may be deployed in the Office Store later. It makes sense to give this app package a name that is detailed enough to make sure you remember what it's all about when you revisit it later (see Figure 14-4).

FIGURE 14-4: Name the app package
Include or Exclude Data
You'll need to make an important decision here regarding data. You can choose to save the app package with existing data or without it. Most likely, when you are deploying an app for others to use, you'll not include test data you used in the development of the web app. However, many databases include one or more lookup tables. If your web app has lookup tables, you want to include that data. Therefore, the decision about including data depends on the experience you want your users to have. Let's assume that the test data in all of the working tables was deleted, but there is still some data from the lookup tables you want to provide along with the web app.
NOTE One factor in deciding whether to include data is the storage limit of an app package, which is 100 MB. While it's unlikely that most of your Access web apps will become that large, you need to be aware of the limit and plan accordingly.
While we're on the topic of storage limits, there is a 1 GB limit on the size of your web app's database in Office 365. This is a hard limit. On-premises, this is the default limit, although it is configurable. Again, this seems like a reasonable size limit for the majority of Access web apps you're likely to build or encounter. Also, as you've already learned, each web app has its own database, and the 1 GB limit is per database. Later in this chapter, in the section on Upgrading and Maintaining Access Web Apps, we'll introduce you to some strategies for backing up the data in your web app databases outside the app package.
Click OK to save the app package. In the dialog box that opens, browse to the folder where you keep app packages. Figure 14-5 shows that folder for the Maid To Order web apps.

FIGURE 14-5: Save the app package in the proper folder.
Click OK to save the app package. It's now ready for deployment to your app catalog.
Version Control
Let's assume that this won't be the last version of this web app that you'll want to deploy. In other words, this is a test version of this app, so you'll be making further changes to it in your development copy based on feedback from your testers, and you'll want to update the deployed web app with those changes. You'll need GUIDs from the app package to do that. Here are the steps you need to follow to get to, and record, those GUIDs.
First, make a backup copy of the app package. Change the extension to .zip so you can edit it. Figure 14-6 shows this.
At this point, we're interested in only two of the files shown in Figure 14-6: the appmanifest.xml and the appdb.xml. They contain GUIDs you need to identify the app package for later versions. Figure 14-7 shows the two GUIDs you need.

FIGURE 14-6: Change the extension to .zip so the app package can be edited.

FIGURE 14-7: Record the GUIDs for this app package
From the appmanifest.xml file, record the App element's ProductID attribute. From the appdb.xml file, record the AppPartConfig element's child element named ID.
Close the zip version of the app package for now.
Now your app is ready to be uploaded to your SharePoint app catalog to be deployed for others in your organization. Let's move on to that process next.
Adding Apps to the App Catalog
Any custom app created by you or another person in your organization can be added to your app catalog. To do so, you, or other developers in your organization, will follow the steps outlined here. In this exercise, you learn how to install the test web app you just created for your testers to use.
Navigate to the App Catalog site for your account at the URL you recorded earlier.
What you see in Figure 14-8 is basically the default appearance of the app catalog site, which you can customize to suit your own needs. It has separate pages for Apps for SharePoint, Apps for Office, and requests for apps. This page can be customized. The Recent links list on the left side of the page also has links to the two catalogues for Office and SharePoint. You will use the Apps for SharePoint page to host your Access web app packages.

FIGURE 14-8: Selecting apps for Office or apps for SharePoint
You may recall Apps for Office mentioned in Chapter 1; they are small apps that can be integrated into certain Office client products such as Excel or Outlook using only HTML5 and JavaScript. Even though Access is an Office product, Access web apps are actually Apps for SharePoint, which can do much more.
At this point, there is already an app in the app catalog shown in Figure 14-8. It is identified by both a product ID and a title. The ProductID, which is a GUID, is universally unique, but SharePoint doesn't require the title for an app to be unique. We have found this to be a potential source of confusion. It is easy to end up with two or more apps with similar, or even the same, names. Knowing which is which is not simple. So, beware when adding new apps. Give them names you'll recognize later and consider whether you want to include a version number as part of the name.
Click the new app link from Figure 14-8. In the dialog box that opens, use the browse button to find your app package (see Figure 14-9). Make sure you grab the .app version, not the .zip version.
In the Add a document dialog box, add any optional comments you'd like about this version of the app, and then click OK. Figure 14-9 shows an example.

FIGURE 14-9: Add the app to the app catalog
In the properties dialog form, review or update the name for the app. You can also specify things such as a Short Description or a Description. Not all of the information listed in the properties dialog box is required to upload the app; you'll be prompted for required properties. Follow the instructions on the screen for things such as image size if you include an icon. If you have an icon you want to use for the app, you can provide a URL for that in the Icon URL field. Figure 14-10 shows some of these properties; the page has several fields and is quite tall so you may want to scroll through the page and learn about properties provided there.

FIGURE 14-10: Add app properties and save
Once the app is uploaded, you can further modify its properties. Click the edit icon to display the properties page highlighted in Figure 14-11 which then navigates to the page shown in Figure 14-12.
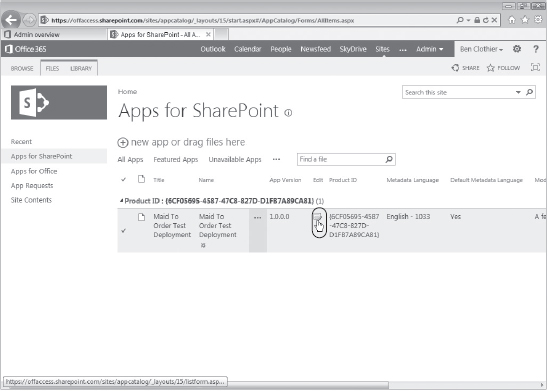
FIGURE 14-11: Edit Properties button

FIGURE 14-12: Modify properties for your web app.
The page is too long to fit in an image, so we elected to show part of it and encourage you to explore the page in full. For example, if you want to categorize the app so that it is appears under a specific category, select or specify a Category.
If there is a site or location where app users will be able to access Help for the app, you can provide a URL for that in the Support URL field. Make sure the Enabled checkbox is selected so that users will be able to add this app to sites. If you want the app to be listed in the Noteworthy content view of the app catalog, select the Featured checkbox.
In the Hosting Licenses box, specify the number of licenses you think you will need; the initial allocation for this web app is 10. Finally, Click Save. You've now added the test version of the Maid To Order Customer web app to the site catalog so your test users can install and use it, as shown in Figure 14-13.

FIGURE 14-13: New app ready to be installed by testers
You learned how to install web apps in a site in Chapter 13, so you can refer to that chapter for instructions on installing the web app from your app catalog.
Inter-Site Portability
You may have noticed that the example shows the installation of the Maid To Order Customer Test Deployment web app, which originated on the Maid To Order site, onto a totally different site. We did this partly to illustrate the portability of the app package as a deployment method across sites, should the need arise. Normally, of course, you'd be deploying an app package onto a site within your organization's or client's sites.
Versioning Web Apps
Earlier, you learned that you can open the app package for your web app and record the GUIDs from it for use later in updating the app package. Let's learn how to update the app package next.
Let's assume, for this exercise, that you've gotten feedback from your testers, used it to make updates to your web app, and are now ready to deploy the final test version. Make a new app package from your development web app as before. Refer back to Figure 14-3 if you need a refresher.
This time, however, you may not want to include the data. You're only going to update the interface elements. If you do include the data from your development version, you'll overwrite any test data. All user data will be erased from the target database and the data in your app package will be added to the database. Should you do that? It depends. If your testers need to continue working with any sample data they previously added, you should not replace it. On the other hand, if the testers need to start over, you can replace the data. Here's another place where your previous experience managing the lifecycle of your Access databases can pay off.
As before, create a copy of the app package for safety. This time, you're going to convert the master copy to a .zip file so you can edit it. In order to update the contents of the app package, you'll first need to extract them from the Zip file into another folder where you can edit it. Within the folder, you can edit and save the appmanifest.xml and appdb.xml files.
Double-click the appdb.xml file to open it. Change its GUID to the one you recorded in the original app package. Figure 14-14 shows the updated GUID replacing the one saved in the app package.
Save and close the appdb.xml file. Next, open the appmanifest.xml file. You'll need to make two changes in it, as identified in Figure 14-14.
As indicated, update the GUID to the one previously recorded for the original version. Also, give this version a new version number. Save and close the appmanifest.xml file. Next, you'll need to move the updated files back into the .zip file from which they came. Rename it back to the .app extension so you can upload it to your site. Give the app package the same name as the original if you want it to appear in the list of apps with the same name. Keep the new version name if that is more appropriate for your situation. If you keep the same app package name and leave the Add as new version to existing files checkbox shown in Figure 14-10 checked, it will replace the original package as the new version. Attempting to overwrite a file without the checkbox checked will result in an error. You will learn more about versions shortly. If you give it a new name, it will be added as a separate package. In this example, you want this version to show up as a new version of the original. As you can see in Figure 14-15, the version name (from inside the app package) is new and the app version has increased. If we had uploaded it with a different name, it would appear as a separate package under same product ID, as in the bottom portion of Figure 14-15.

FIGURE 14-14: Edits to XML files to upgrade the new app package

FIGURE 14-15: Version two of the test web app replacing the web app of the same name
Note that when you choose to use the same name for your app package and replace the original version, you still can review the history and thus extract the previous version via this dialog. You can access it via the ribbon button shown in Figure 14-16, which then displays a version history dialog box illustrated in Figure 14-17.

FIGURE 14-16: View Version on the File tab

FIGURE 14-17: Version History dialog box
You do not need to be concerned with overwriting the original version that is selected by default when you add a new app package, as shown in Figure 14-10. If you clear the checkbox and try to upload an app package of same name, you will get an error preventing the overwriting because the app catalog enforces versioning at all times. You do need to be concerned about how you name your app packages, however, to ensure that the versioning will be correct for your app packages.
For app catalogs, this option defaults to being true if you use different methods of adding app packages such as dragging the files into the web browser.
With a new version of the web app available, you can inform your users that they should go to your app catalog and update it from the new version. They also will be notified about updates in the Site Contents page. You can see that in Figure 14-18.

FIGURE 14-18: New version of the web app available to update
Cautions When Updating an Existing Web App
You need to be aware of a couple of cautions regarding updating web apps with a new app package.
First, renaming a field or table in your app will result in a delete/create action on that field or table upon upgrade. You may lose data as a result. App versioning, therefore, should be done only when the table architecture is frozen, or in conjunction with a process to back up and restore the data as a separate, coordinated step. You will consider this later in the chapter.
Views and queries in the updated app package will overwrite any views or queries in the target application on upgrade. If users are allowed to make changes and have customized their copy of the app, those customizations will be lost during the upgrade. On one hand, this is no different from traditional deployment when replacing the front-end .accdb file. On the other hand, when you intend to distribute your app to the public via the Office Store, you must carefully consider whether those customizations need to be preserved and communicate your intentions to your users.
In the preceding section you've learned how to deploy your web apps into app catalogs for your users. In the following sections, you learn how to control distribution to groups and users you choose.
Office 365
In the Office 365 location, you can publish your apps to three places; directly on a site, to the publicly available app catalog, or to the personal site which is usually private. The options allow you to share your web apps with an audience of your choosing. You've already seen the option to publish your app to the team site and from there to the app catalog. Let's take a look at the personal site option next. Start Access and select the option to create a new web app. Note the wording in the dialog box in Figure 14-19. It doesn't actually refer to your personal site, but to Personal Apps, on your Office 365 site.

FIGURE 14-19: Select Personal Apps to publish to your personal site
Click OK to create the web app and proceed to build it. When it is ready, you can find it in your personal site. Note the -my suffix to your domain which indicates that you are on your personal site. You would use the Sites link on the Office 365 bar to get there. However, finding the Site Contents link is not necessarily very obvious. Consider Figure 14-20.

FIGURE 14-20: Locate web apps in your site's site contents
Clicking Site contents takes you to the page listing all of the web apps installed in your personal site. See Figure 14-21, which shows the web app we just created.
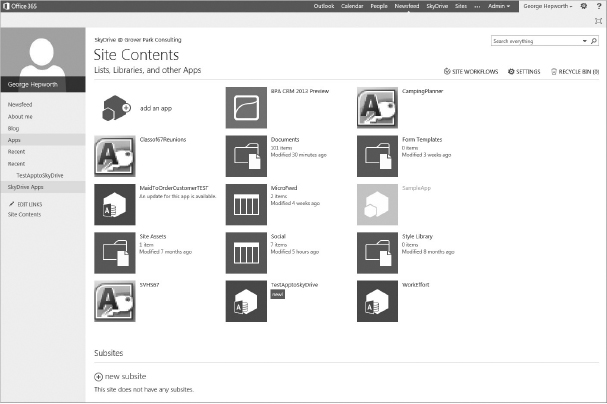
FIGURE 14-21: Web apps available in the personal site location
Note that you still can share your web apps off your personal site. A major difference is that nobody has rights to your web apps by default; you must give them permission by sharing. Publishing a web app directly to a SharePoint site, such as a team site, means users have same level of permissions to the web app as they have to the SharePoint site. As you saw in Chapter 13, anyone who is a member of the site has member-level rights, and others who are merely visitors can only read.
When you add to an app catalog, you are no longer installing an app but rather provisioning it for distribution, even if it's going to be consumed by only one site. Only via the app catalog can you control the updating and licensing.
Controlling Distribution
As you've learned, SharePoint makes it relatively easy to install and update web apps in your app catalog. Let's look at how you can control that distribution. When you publish a web app, following the steps you learned in the previous chapter, one of the options you can set is whether to expose the web app to others. You saw a part of the property page in Figure 14-12; Figure 14-22 is a close-up of the relevant section of that page, where you can adjust how exposed the web app should be.
Uncheck the option to expose the web app to end users. You can still invite specific users to install the web app, using the sharing options you learned about in the previous chapter. Invited users would otherwise not be aware of an app for which this option is disabled.

FIGURE 14-22: Disable the option to expose the app to users
Making Web Apps Publicly Available
In addition to the members of your own organizations, you can make your web apps available to the public by submitting them to the Office Store. Let's see how the Office Store works.
Office Store
Access developers who want to monetize a web app can do so by submitting it to the Office Store. Microsoft's Office Store is a place where developers can offer their products to a worldwide audience. Although most aspects of the Office Store are currently settled, other elements are still developing at the time of this writing. The following description represents our best understanding of the Office Store at this time. Please check the Microsoft store site at http://office.microsoft.com/en-us/store/dashboard.aspx?AssetId=PN102957641 for examples of web apps available for you to install. The offerings will grow rapidly, so checking back frequently is a good idea.
The Office Store accepts apps submitted by developers who have completed an application and been approved as a seller. Once you've signed up to be part of the Office Store, you can begin submitting your Access web apps for distribution to the public. As noted previously, the program may still be evolving in the near future so the following guidelines should be taken as general guidance. Look for current information at the websites noted in the material that follows.
To add your own apps, you'll need to apply to be a provider. Here's an outline of the process as it currently works. These guidelines, as well as the links that follow, are subject to evolution as the Office Store matures.
We recommend you start at http://office.microsoft.com/en-us/downloads/list-your-products-or-services-through-office-com-search-HA102846640.aspx?CTT=5&origin=HA001047828. You'll get the most current information on listing your products on Office.com. Also, read the overview at http://office365.pinpoint.microsoft.com/en-US/Guidelines for guidance on how to create a viable Profile for yourself as a seller.
Once you're ready to go, you apply to be a seller through the Office Store. The process of signing up involves multiple steps. We won't try to guide you through the entire process; we'll point you to the starting point for creating a seller account: https://sellerdashboard.microsoft.com/Registration. As noted before, we can't provide specifics, which are not only beyond the scope of our discussion here, but which may also evolve between the time of this writing and when you read this chapter. However, if you do anticipate selling or distributing your apps through the store, you might as well set up a seller account now.
In addition to creating an account, you'll provide payment information so you can get paid for apps which the Office Store sells on your behalf. Even if you only intend to offer apps free, you'll need to provide your tax information. You may choose to have payments deposited into a checking or savings account, or you can use PayPal. In either case, of course, you'll need to provide account information. You also provide tax information, as appropriate.
A Paid Developer Site is Required
One additional requirement applies to publishing apps. You need a paid Office 365 subscription that includes a Developer Site collection. This can be an individual Developer Subscription, or an enterprise Office 365 account. You must sign up for that separately from your seller account.
You'll be able to start adding apps as soon as your seller account is approved by Microsoft. But because apps must pass Microsoft certifications to be approved, we recommend that you don't start adding apps prematurely. Submit apps only when you are confident they'll be accepted.
Once your seller account has been approved — a process that may take up to three days — you're ready to start submitting apps. As noted previously, this step involves having Microsoft review and certify the app, so it's a good idea to do so only when you're sure your app is ready.
Requirements for Posting an App to Office Store
As of the time this was written, the following requirement applies to apps submitted to the Office Store to be offered as SharePoint apps: Your application must be compatible with an Office 2010 or Office 2013 component.
In addition to the basic compatibility requirement, apps submitted to the Office Store will be reviewed for compliance with a series of verification checks to ensure your app adheres to the app content and behavior guidelines. For example, Microsoft checks whether the app manifest is valid and complete. It checks to be sure that items included in the app do not contain elements that aren't allowed for SharePoint. It checks that SharePoint Features don't have a scope that is broader than Web scope. The package is also inspected for objectionable content, although that term is not specifically defined. If the app package passes all tests, it's wrapped into a file and signed by Microsoft.
We touch on licensing in the next section.
Supported Licensing Model
SharePoint and the Office Store do not specify license terms, nor do they enforce license terms you implement in your app. That's up to you, the developer. However, the Office Store does provide a framework for licensing so that you can include code logic in your app to enforce whatever licensing restrictions you need. This licensing framework applies only to apps obtained through the Office Store, or from an app catalog hosted on Office 365. It doesn't reach apps you deploy on other locations, such as an on-premises app catalog.
The Office and SharePoint 2013 app license framework includes the following features and functions:
- The Office Store handles payments and issues licenses for apps that are sold on your behalf. As previously noted in our discussion of creating a seller account, you specify the payment mechanism for your account, which can include PayPal.
- It handles storage of licenses and renewal of app license tokens for your apps. Your responsibility is primarily in setting up licensing and monitoring activities in your seller account.
- The Office Store provides APIs you can use to get license information for an app. It also supports a web service you can use to verify whether a license is valid.
- SharePoint 2013 provides an administration user interface for app license management. In this way, the purchaser of an app can assign the license to themselves or another user, or delegate management of licenses to other users.
All of these license management features are available to you as a seller in the Office Store. You decide how to implement them for each app you submit.
You specify the attributes of the license you want to offer users who download it, such as whether you are offering your app for free, on a trial basis with the option to purchase, or for purchase. You also specify whether your app can be acquired on a per-user or site basis.
With the Office Store, you can freely monetize apps you have produced. Or you can use the Office Store as a way of putting your apps in front of many potential clients as marketing tools for your other products and services. Partnering with the Microsoft Office Store allows you to reach many more potential customers with a limited investment, other than the investment in developing the original web app.
Upgrading and Maintaining Access Web Apps
In wrapping up our discussion of deployment, we're going to revisit the task of upgrading and maintaining your Access web apps. Previously in this chapter, we discussed the process of installing and updating an Access web app. You learned how to open the app package and update it to maintain the version history of your app.
From a planning point of view, the primary considerations reflect the need to account for the version control over the interface as well as back up for the data. You will also find that you need a different approach for managing updates between apps that are deployed in-house, where you have control, versus publicly distributed apps, where customers may choose to perform updates on their own time and on their site. The latter holds many more consequences so we will go through both scenarios.
Updating the Interface
Upgrading a production web app means that you must solicit and track feedback from users regarding features and functions in the web app. You would then judiciously apply changes to the development copy of the app which you maintain in your developer site. As you reach stability on a new version of the web app, you can create the app package for that version and, following the steps outlined earlier in this chapter, upgrade the deployed web app for your users and notify them to install the update. It is, of course, important that such changes do not include data from your developer version. The current mechanism for this task is still a bit raw, requiring editing of the XML files in the app package as you learned to do earlier. Nonetheless, it is a viable way to implement upgrades and even bug fixes in a production web app.
Obtaining Data Backups
Although there is no out of the box method of backing up only the data from your production database, it is possible to manage backups of your data in a few different ways, some primarily manual, the others possibly more automated.
First, as you just learned, you can create an app package that includes data. The process is manual and it requires that the manager of the web app perform the task on a regular schedule, so it's not ideal. In addition, this type of backup can only be done from the Access client. Nonetheless, it is a viable way to keep backups.
In addition, you can also create a client .accdb, which connects to the SQL Server or SQL Azure database behind your web app. From that client, you can implement custom backup methods by which a copy of the data can be saved locally. A series of queries can be used to differentially back up each table. A VBA module can be set up to run those queries. If you or your customer wants regular data-only backups, you can create a Windows scheduled task setup to open the Access database and run the backup function on an overnight schedule.
Alternatively, you can install a free SQL Server Express Edition and then create a linked server, as demonstrated in Chapter 12. You can then create a SQL script to be executed via a sqlcmd command client line using Windows task scheduler. If your app is running on a local SQL Server or you have a licensed edition of SQL Server, you can implement a SQL Server Agent Job to execute a backup command. Experienced Access developers will have experience with one or more of these approaches, so we'll limit the discussion to one simple example of how you can collect the data for local backup by using the built-in stored procedure sp_tables_ex to gather information about table structures from the linked server. Refer to Chapter 12 for a refresher on creating a linked server and querying against it. The code is available in the file named Chapter 14 - Generate Local Copies.sql.
DECLARE @sql nvarchar(MAX);

CREATE TABLE #tmp (
  TABLE_CAT nvarchar(255),
  TABLE_SCHEM nvarchar(255),
  TABLE_NAME nvarchar(255),
  TABLE_TYPE nvarchar(255),
  REMARKS nvarchar(255)
);

INSERT INTO #tmp (TABLE_CAT, TABLE_SCHEM, TABLE_NAME, TABLE_TYPE, REMARKS)
EXEC sp_tables_ex
  @table_server='Maid_To_Order_Web_App',
  @table_type='TABLE',
  @table_schema='Access';

SET @sql = (
  SELECT CONCAT(
    'IF EXISTS(SELECT NULL
            FROM sys.objects
            WHERE objects.name = ''' + TABLE_NAME + '''
              AND objects.schema_id = SCHEMA_ID(''tmp''))
        DROP TABLE tmp.',
    QUOTENAME(TABLE_NAME),
'; SELECT * INTO tmp.'
    ,QUOTENAME(TABLE_NAME),
    ' FROM ',
    QUOTENAME(TABLE_CAT),
    '.',
    QUOTENAME(TABLE_SCHEM),
    '.',
    QUOTENAME(TABLE_NAME),
    ';'
  )
  FROM #tmp
  FOR XML PATH (")
);

EXEC sp_executesql @sql;

DROP TABLE #tmp;
The script illustrates how you can gather data from all tables within a web app's database and copy it to a local SQL Server database. You definitely would want to expand on this prototype, perhaps adding additional columns to copy only new data added since the last copy or select only certain tables for copying. You can also save this as a .sql file, which can be then executed via sqlcmd if you cannot create a SQL Server job.
You also can see that you can reverse the process and write from local copy back to the web app's database. This approach gives you an option for managing destructive changes to the data such as renaming columns where data may be lost. The general process you would want to adopt for processing an upgrade that includes schema changes would have a pattern similar to this:
- Perform a differential backup of data that will be affected by changes in schema.
- Update the app.
- Run SQL scripts to restore the backed-up data to the upgraded app's database.
At the time of this writing, there is no easy way to automate the process and thus it is necessary to perform the upgrade manually or at least automate the first and third step using either a helper .accdb file or SQL scripts. You would still have to manually perform the second step.
In scenarios where you chose to publicly distribute apps, and want to perform schema changes, you may need to consider the need to distribute the versions directly to your consumers so that you can perform the update for your consumers or provide them with the instructions. Otherwise, they may risk losing their data were they to proceed with an upgrade the next time one becomes available. More importantly, there is no simple way to warn them of the extra steps that are necessary to bring their data forward to the next version.
Admittedly, there is no “great” backup and lifecycle story for the databases behind your web apps, but we have pointed out at least a couple of ways you can perform your regular data backups and use that to help you manage the lifecycle of your web apps.
SUMMARY
In this chapter, you've learned how to package an Access web app for deployment to a SharePoint App Catalog. The process involves creating an app package containing the appmanifest and appdb XML files. You may or may not include data in that app package. The app package can then be uploaded to your SharePoint site and deployed to users. Deployment can be directly on a SharePoint site or in the app catalog, where all users have access to the app, or to your personal site if you want to restrict its use.
If you wish to restrict the web app to invitation-only sharing, you can either disable the property that makes it visible to all users or install it to your personal site. Otherwise, anyone who can get to your app catalog is free to install the web app. You also learned how an app catalog enables distribution of your apps to other people, whereas an app that's directly installed on a SharePoint site is not redistributable unless an app package is created and added to an app catalog.
You also learned how to monetize your web apps by establishing a seller account on Microsoft's Office Store through which you can sell or give away your apps. The Office Store handles the financial transactions for your apps and provides a payment mechanism for selling licenses to your apps.
Finally, you learned some techniques, effective albeit somewhat unrefined at this point, by which you can manage versions of your apps and create regular backups of the interface and data.