
16
Programming Using VBA, APIs, and Macros
WHAT'S IN THIS CHAPTER?
- Using VBA to maximize your database solution
- Using enhanced query techniques
- Leveraging APIs from fundamentals through tips
WROX.COM CODE DOWNLOADS FOR THIS CHAPTER
The wrox.com code downloads for this chapter are found at www.wiley.com/go/proaccess2013prog.com on the Download Code tab. The code is in the Chapter 16 download and individually named according to the names listed throughout the chapter.
In this chapter, you will briefly review some VBA fundamentals before you delve into writing VBA procedures and user-defined functions to support your business rules. As you proceed, you will review how to enhance queries and how to create queries on the fly using VBA.
This chapter then provides a brief review of APIs and how you can use them to expand the reach of your Access solutions. The discussion uses a real-world example to explain the steps required to create and implement a Windows API call. It also includes valuable tips and techniques to assist developers already familiar with APIs.
Finally, the chapter reviews how data macros can offer new toolsets that can be effective for performing data validation and maintaining data integrity. You will see a few scenarios where data macros are superior to the traditional approach of using VBA in form events and validation rules.
VBA
When developing an application, you rely on events to perform actions based on user actions. Some of the commonly used events are OnLoad, Click, Enter, BeforeUpdate, AfterUpdate, Dirty, and so on. When a user clicks a control or the cursor moves into or out of a textbox, you expect the event to be triggered to run the specified code (or macro) so it is helpful to be familiar with the available events and the order in which they fire.
As you read through this chapter, you'll review some of the fundamentals of working the VBA. You'll also benefit from some tips and techniques gleaned from experienced developers on leveraging procedures, user-defined functions, and queries. With this, you will be better equipped to choose the appropriate event, and write the procedure, functions, or both as needed to satisfy the business rules.
Procedures
Procedures in Access VBA, and any other programming language, do something. They perform a task or a process in response to an event or a request.
You can use procedures to help the user navigate the database solution, move between forms, open and close forms, open reports, and so on. Additionally, you can use the procedures to process the data the user enters in the form and do something with it. You can refresh the recordset the user is viewing or trigger a query based on the criteria the users selected. You will read about queries and codes later in this chapter.
User-Defined Functions
As you just read, you use procedures to perform an action, and now you'll see how you use functions to return something. Even if you haven't been writing VBA, you have benefited from the many functions that are built-in to Access, such as Left(); Right(); InStr(); and DateDiff().
Most functions require you to pass arguments when you are using them; for example, UCase(string) and Left(string,length). Depending on the function, however, some of the arguments are optional and you can omit them when you use the function. In Table 16-1, optional arguments are indicated by brackets.

You can also have one function invoke other functions to return the value needed by the business rules: for example, UCase(Left(string,length)).
Sometimes, especially when the solution you are building is supporting complex business rules, the built-in functions are not enough. When this happens, you will want to build your own functions to accommodate the business needs. The good news is that you can. Access and other office products support the development of your own functions.
When you create your own function, it is referred to as UDF — user-defined function. The UDF can, and will need to, use system functions and, at times, other user-defined functions that are available to you. If you created the UDF as a public function, you will be able to use it throughout your database solution.
While in some cases you can, and should, consider using a formula in the query or form instead of creating a UDF, the power of the UDF is that you have the business logic in one centralized location, and you can use it anywhere in your database solution, and even in other database solutions. This way, if the business logic has changed, you will only need to make the change in the UDF.
You can create your own library with your own custom user-defined functions. When you do, other database solutions can reference that library file and have access to the function you created. To do so, you will need to convert the .accdb file to an .accde file. After the library is created, you can reference it by going through the Tools ![]() References dialog box in the VBA editor. Browse to the location of the .accde file and add it to your database solution as shown in Figure 16-1 with Doug_BI_Lib.accde.
References dialog box in the VBA editor. Browse to the location of the .accde file and add it to your database solution as shown in Figure 16-1 with Doug_BI_Lib.accde.
When you create your own library, you need to make sure that all of your functions and subroutines have tight error handling. An unhandled error will cause the code to end abruptly. You will read more about error handling later in this chapter.
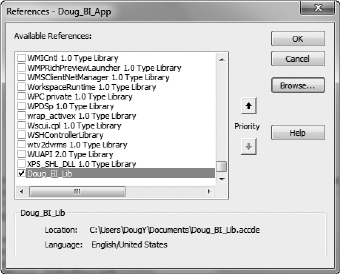
FIGURE 16-1: UDF Library Reference
Creating a UDF
When you decide to create a UDF, you will go through the following steps:
- Identify need.
- Write down business rule(s).
- Model the algorithm.
- Write the code.
After you write the code for the UDF, the standard test cycle applies, as shown in Figure 16-2.
The code that follows illustrates examples of user-defined functions and how they are used in a database solution. The first UDF was used in a reporting solution; the second, more complex example was used in a data processing solution.
The reporting solution was getting a data feed from a main billing system, and the data was de-normalized in the ETL process discussed in Chapter 15. One of the challenges was to add a custom grouping that was not available in the originating system. The baseline for the grouping was a lookup table cross-referencing the insurance to the group name. However, there were a couple of exceptions: medical specialty of the doctor and specific denial type on the record. For this scenario, all factors are available for each record, which means that there is one less thing to worry about (code file: UDF.txt Public Function pfGroup):

FIGURE 16-2: UDF development cycle
Public Function pfGroup(strDept As String, _
    strPayor As String, strDenial As String) As String

'------------------------------------------------------------------
' Function  : pfGroup
' Author    : DougY
' Date      : 4/1/2013
' Purpose   : Return the group name for the denial reports
' Arguments : strDept = Clinical department = provider specialty
              strPayor = Insurance company
              strDenial = Denial type
'------------------------------------------------------------------

    Dim strGroup As String
    strPayor = Replace(strPayor, "'", "")

    'assign payor team
    strGroup = Nz(DLookup("TeamName", "tblTeamsPayor", "PayorName = '" _
        & strPayor & "'"), "Commercial Non Contracted")

    'check the department for specialty specific group override
    strGroup = Nz(DLookup("TeamName", "tblDeptOverride", "Dept = '" _
        & strDept & "'"), strGroup)

    'check the denials for denial specific group override
    strGroup = Nz(DLookup("TeamName", "tblDenialOverride", "Denial = '" _
        & strDenial & "'"), strGroup)

    pfGroup = strGroup

End Function
The UDF was used in a query (see Figure 16-3) providing the data source for a report showing the data grouped by the values from the UDF:
SELECT Dept, Payor,Denial, pfGroup([Dept],[Payor],[Denial]) AS Team ...
The second example is from a database solution that gets data feeds from external vendor systems and needs to load them into a table for reporting. Although the files are pipe delimited text files, the challenge is that the number of fields in each record in the file will vary from 26 to 34 within the same file. Additionally, not all the data from the record is needed in the reporting solution, only selected fields.

The UDF reads, processes, and appends the text file one record at a time to the table (code file: UDF.txt Public Function ImportInvoice(strRec, strChr):
Public Function ImportInvoice(strRec, strChr)

'------------------------------------------------------------------------------
' Function  : ImportInvoice
' Author    : DougY
' Date      : 5/29/2013
' Purpose   : Return the values to be appended to the reporting table
' Arguments : strRec = A single record from the text file
              strChr = The delimiter for the record
'------------------------------------------------------------------------------

    Dim intLen As Integer
    Dim intCounter As Integer
    Dim intLoop As Integer
    Dim arrChr() As Integer
    Dim arrValues(12) As String
    Dim varValues As Variant
    Dim strSQL As String


    'get the length of record from text file
    intLen = Len(strRec)
    'reset value of counter
    intCounter = 0

    'this loop counts how many delimiters are in the record
    For intLoop = 1 To intLen
        If Mid(strRec, intLoop, 1) = strChr Then intCounter = intCounter + 1
    Next intLoop

    ReDim arrChr(1 To intCounter)

    'reset values of variables
    intLoop = 0
    intCounter = 0

    'identify the position of the delimiters in the record
    For intLoop = 1 To intLen
        If Mid(strRec, intLoop, 1) = strChr Then
            intCounter = intCounter + 1
            arrChr(intCounter) = intLoop
        End If
Next intLoop 'intLoop = 1 To intLen

'capture the values needed from the record
'we don't need to capture all the data from the text record
'based on the specifications we know what fields we want to capture
'we use the position of the delimiters to read the value we need
arrValues(1) = "'" & _
    Mid(strRec, arrChr(3) + 1, arrChr(4) - arrChr(3) - 1) & "'"
arrValues(2) = "'" & _
    Mid(strRec, arrChr(4) + 1, arrChr(5) - arrChr(4) - 1) & "'"
arrValues(3) = "'" & _
    Mid(strRec, arrChr(10) + 1, arrChr(11) - arrChr(10) - 1) & "'"
arrValues(4) = "'" & _
    Mid(strRec, arrChr(17) + 1, arrChr(18) - arrChr(17) - 1) & "'"
arrValues(5) = "'" & _
    Mid(strRec, arrChr(18) + 1, arrChr(19) - arrChr(18) - 1) & "'"
arrValues(6) = "'" & _
    Mid(strRec, arrChr(20) + 1, arrChr(21) - arrChr(20) - 1) & "'"
arrValues(7) = "'" & _
    Mid(strRec, arrChr(21) + 1, arrChr(22) - arrChr(21) - 1) & "'"
arrValues(8) = "'" & _
    Mid(strRec, arrChr(22) + 1, arrChr(23) - arrChr(22) - 1) & "'"
arrValues(9) = "'" & _
    Mid(strRec, arrChr(23) + 1, arrChr(24) - arrChr(23) - 1) & "'"

'in EDI, the record terminates if there is no data in the
  'last field(s) without delimiters
'the following code blocks test to see if there are additional fields we
 'need to capture into the table
If UBound(arrChr) = 32 Then
    arrValues(10) = "'" & _
        Mid(strRec, arrChr(31) + 1, arrChr(32) - arrChr(31) - 1) & "'"
    arrValues(11) = "'" & _
        Mid(strRec, arrChr(32) + 1) & "'"
End If 'UBound(arrChr) = 32

If UBound(arrChr) = 33 Then
    arrValues(10) = "'" & _
        Mid(strRec, arrChr(31) + 1, arrChr(32) - arrChr(31) - 1) & "'"
    arrValues(11) = "'" & _
        Mid(strRec, arrChr(32) + 1, arrChr(33) - arrChr(32) - 1) & "'"
    arrValues(12) = "'" & _
        Mid(strRec, arrChr(33) + 1) & "'"
End If 'UBound(arrChr) = 33

If UBound(arrChr) > 33 Then
    arrValues(10) = "'" & _
        Mid(strRec, arrChr(31) + 1, arrChr(32) - arrChr(31) - 1) & "'"
    arrValues(11) = "'" & _
        Mid(strRec, arrChr(32) + 1, arrChr(33) - arrChr(32) - 1) & "'"
    arrValues(12) = "'" & _
        Mid(strRec, arrChr(33) + 1, arrChr(34) - arrChr(33) - 1) & "'"
End If 'UBound(arrChr) > 33
'concatenate the values captured above into a single string for the
'append query
varValues = arrValues(1) & ", " & arrValues(2) & ", " & _
                arrValues(3) & ", " & arrValues(4) & ", " & _
                arrValues(5) & ", " & arrValues(6) & ", " & _
                arrValues(7) & ", " & arrValues(8) & ", " & arrValues(9)

'test for additional fields if thet exist
If Nz(arrValues(10), "") = "" Then      '25
    varValues = varValues & ", '', '', ''"
ElseIf Nz(arrValues(12), "") = "" Then '32
    varValues = varValues & ", " & arrValues(10) & ", " & _
        arrValues(11) & ", ''"
Else                                            '33
    varValues = varValues & ", " & arrValues(10) & ", " & _
    arrValues(11) & ", " & arrValues(12)
End If 'arrValue(#) values

'create the SQL to insert teh records to teh table
strSQL = "INSERT INTO tblInvoiceData" & _
                " (SaleDate, InvoiceDate, Company," & _
                " ClientID, ClientFirstName, ClientLastName," & _
                " SaleFromDate, SaleToDate, InvoiceAmount," & _
                " ErrorCode, ErrorMEssage, ErrorData)" & _
            " SELECT " & varValues & ";"

    CurrentDb.Execute strSQL, dbFailOnError

End Function
Although this UDF does not return a value to the user, it returns the values of the data that need to be appended to the reporting table.
As you can see from the two examples, UDF is a powerful tool you can deploy to make your solution powerful and useful for your business. Your ability to develop complex UDFs in Access to support the business rules will ensure that the solution does right by you and the users.
Error Handling
Despite your best efforts, errors will happen, whether they are due to less than optimal design, changes to programs, devices or the network, or a myriad of other factors. Whatever the reason for the error, you need to handle it properly in your code to avoid or minimize impact to the users and data.
When an error occurs in your Access database solution without an error handling routine, the user will typically get an error message similar to the one in Figure 16-3. While the error numbers and descriptions vary, the option of debugging is there, which allows the user to get to the code behind the solution (see Figures 16-4 and 16-5).

FIGURE 16-4: Un-handled error message
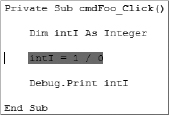
FIGURE 16-5: Highlighted error in VBA
This is an undesired result that can lead to serious consequences. Users should not be in the code of the database; they should only be interacting through the user interface that you provided.
To handle an error, you need to add an error handling routine to your code. Every procedure and every function should have the routine in it because you never know where an error can happen. Depending on the situation, routines can include several features in addition to error trapping. They can provide a message to the user, log the error, send a message to the developer or other party, move the user to a different part of the application, and in rare events, they can even be used to graciously close the program.
The error handling routine can be as simple as exiting the current code gracefully (code file: (ErrorHandling.txt Private Sub cmdFoo_Click 1):
Private Sub cmdFoo_Click()

On Error GoTo ErrorTrap

    Dim intI As Integer
    intI = 1 / 0
    Debug.Print intI

ErrorTrap:
    Exit Sub

End Sub
In the preceding sample, when an error occurs (and it will, you cannot divide by 0), the code will go to the label ErrorTrap and it will perform the code written immediately after it to exit the subroutine.
NOTE You create a label by adding a colon after the label name (for example, ErrorTrap:). The VBE will left-align the label name with the procedure header and footer.
While this error handling routine will prevent the users from seeing any error messages, it is not useful for either you, as a the developer, or the user. From the user's prospective, everything went well, but nothing happened. That will cause frustration and eventually lead to help tickets that are scanty on details yet filled with irritation. From your perspective, you do not know what error has occurred and where exactly. Without that information you cannot fix the code or modify it to support changes outside of the control of your solution.
The code snippet that follows shows a more robust error handling routine. The code for the ErrorTrap label will let the user know about the error, and it will provide instructions on what to do next. In this case, contact the support department with the information about the error. Figure 16-6 shows what the custom messagebox looks like to the user (code file: ErrorHandling.txt Private Sub cmdFoo_Click 2):
Private Sub Foo_Click()

10    On Error GoTo ErrorTrap

          Dim lngI As Long
20        lngI = 1 / 0
30        Debug.Print lngI

ExitMe:
40        Exit Sub

ErrorTrap:
50       MsgBox "An Error occurred" & vbCrLf _
         & "Please send an Email to the Support Department:" & vbCrLf _
         & "[email protected]" & vbCrLf _
         & "Include the error, the code segment, and the line number" _
         & vbCrLf _
         & vbCrLf _
         & "Error: " & Err.Number & " -- " & Err.Description & vbCrLf _
         & "Code Segment:Test - Form_frmTestMe - cmdFoo_Click" & vbCrLf _
         & "Line number: " & Erl, _
         vbOKOnly + vbInformation, "Error Information"

       60    Resume ExitMe

End Sub

FIGURE 16-6: Handled error message
NOTE No doubt you noticed the line numbers in the code. VBA is a descendant of BASIC. As such, it retained some of the features of BASIC, such as line numbering. Unlike BASIC, you are not required to number the code lines in VBA. However, it is a handy feature that will help you pinpoint where the error occurred. If you want the Erl in the code to return a value other than 0, you must use line numbers in your code. You can read more about tools that will help you with line numbering and other coding features in the section after the error handling.
Receiving e-mails from users with information about the error, helps you support the solution. However, unless you log every error you get from the users, it will be hard to analyze the database solution to see if there is a hot spot that requires extra attention.
The code sample that follows shows an error handling routine that logs the information about the error in a table. Storing the data allows you to review and analyze it to identify patterns (code file: ErrorHandling.txt Private Sub cmdFoo_Click 3):
Private Sub cmdFoo_Click()

10    On Error GoTo ErrorTrap

          Dim lngI As Long
20        lngI = 1 / 0
30        Debug.Print lngI

ExitMe:
40        Exit Sub

ErrorTrap:

          Dim strErrSQL As String
50        strErrSQL = "INSERT INTO tblErrors(ErrorNumber, " & _
                "ErrorDescription, CodeSegment, LineNumber)" & _
                " SELECT " & Err.Number & ", '" & _
                    Replace(Err.Description, "'", "") & "', '" _
                    & Me.Name & "|" & Me.ActiveControl.Name & "', " & Erl
60        CurrentDb.Execute strErrSQL, dbFailOnError

70       MsgBox "An Error occurred and had been logged" & vbCrLf _
         & "Please notify the Support Department:" & vbCrLf _
         & "[email protected]", _
         vbOKOnly + vbInformation, "Error Information"

80    Resume ExitMe

End Sub
The code stores the data in a table with the seven fields listed here. This is a basic table to log errors. You can use additional fields and values to meet your needs, such as User ID, PC Name, IP address, and so on.
- Primary key
- Error Number
- Error Description
- Code Segment
- Line Number
- Error Date — defaults to Date()
- Error Time — defaults to Time()
The code segment is a concatenation of the form name and the active control name.
You can also have an e-mail sent to you, or to the help desk, indicating that an error has occurred in the solution. This ensures that you know there is an error and that you don't have to rely on the users to notify you (code file: ErrorHandling.txt Private Sub cmdFoo_Click 4):
Private Sub cmdFoo_Click()

10    On Error GoTo ErrorTrap

          Dim lngI As Long
20        lngI = 1 / 0
30        Debug.Print lngI

ExitMe:
40        Exit Sub

ErrorTrap:

           Dim strErrSQL As String

50         strErrSQL = "INSERT INTO tblErrors(ErrorNumber, " & _
                 "ErrorDescription, CodeSegment, LineNumber)" & _
                 " SELECT " & Err.Number & ", '" & _
                     Replace(Err.Description, "'", "") & "', '" _
                     & Me.Name & "|" & Me.ActiveControl.Name & "', " & Erl
60         CurrentDb.Execute strErrSQL, dbFailOnError

70         DoCmd.SendObject acSendNoObject, "", "", _
                 "[email protected]" _
                , , , "Training Tracking - Error Alert", _
                 "Error:    " & ErrorNumber & " -- " & ErrorDescription & vbCrLf _
                & "Database: " & CurrentDb.Name & vbCrLf _
                & "Form Name: " & Me.Name & vbCrLf _
                & "Procedure Name:  " & Me.ActiveControl.Name & vbCrLf _
                & "Line number:  " & Erl, True

80     Resume ExitMe

End Sub
You should add the error handling routine after you have designed and tested your code. When you test run your solution and you encounter an error, you need to be able to debug the code, and error handling circumvents that option. If you already added the error handling, it will gracefully exit you from the subroutine without allowing you to enter a debug mode to identify the error and the solution.
Another way to handle error handling routines is to create an error handling process UDF. In your code, you will call the error handling UDF and pass the parameters you want to capture to the function. You can also include an argument to tell the process how to handle an error.
Third-Party Tools
As mentioned, you can use third-party tools to help you code faster and to access features such as line numbering that otherwise will be tedious to add. Two popular tools that can provide valuable functionality and time-saving support are MZ-Tools and FMS Inc.'s Total Access CodeTools. Both tools offer some similar features like line numbering, naming convention, and code template, which are useful for adding error handling routines and other common functions into your code and much more. A major difference is that one is freeware and the other is a commercial product. MZ-Tools is a freeware add-on you can download and install on your PC. Total Access CodeTools is a commercial product that you will need to purchase. You can read more about each product on their prospective websites:
Debugging
As you develop your database solution, you will test your code to make sure it's performing to your expectations. If it doesn't, you will go through the debugging process to identify the errors and correct them. There are a few debugging methods and tools available to you in Access VBE. This section provides a brief review to both refresh your knowledge and, we hope, to add some techniques to your repertoire.
You can write to the Immediate window in VBE as part of your code by either using the Debug.Print command or typing directly in it. When your code is in break mode, you can use ?MyVariableName to see the value of the variable. And, if you are creating a query on the fly using VBA, a good way to see and test the query script is to break the code after the SQL variable is valued. Then, print the SQL to the immediate window using ?strMySQL; you can then copy the SQL string and paste it into the QBE to see if you parsed the query correctly.
In addition to the Debug.Print, you can use the Debug.Assert command in your code. Debug.Assert conditionally suspends the execution of your code at the Debug.Assert line. Even though it's a good debugging tool, you should make sure to remove the Debug.Assert command before putting a solution into production. Debug.Assert will halt the program abruptly and without an explanation.
Breakpoints enable you to pause the code execution. They are particularly useful for checking the values of variables at a given point. While the code is paused, you can test and review what the code is doing. You can set a breakpoint on any line of code with the exception of lines with Dim statements and comments.
While in debug mode, pressing the F5 key will continue the code execution to its completion or to the next breakpoint. Pressing F8 will step through the code allowing you to review each step.
Pressing the F8 key executes the code one line at a time for executable lines. That includes any procedures or functions the current procedure calls. If you want to stay in the current routine, pressing Shift+F8 enables you to skip the steps of the called routine. If your code has one procedure calling another one or you have nested procedures, you may benefit from using the Call Stack dialog box. The Call Stack displays the list of the current active procedures while you are in break (debug) mode. This can be helpful if you are trying to determine where the (wrong) data may be originating from.
When you are dealing with a large volume of variables, stepping through the code may not be the most efficient way to debug. This is where the Locals window can be handy. The Locals window displays all the variables in a procedure along with their values. Using the Locals windows, you can see the value changes in the variable as you step through the code. The Locals window retains the values of the variables until the code has been executed.
The Watch window is also helpful when debugging. Using the Watch window enables you to keep an eye on a variable in your code routine. You can use it to automatically switch to debugging mode when there is a change to the value of the variable or when the variable is True. You can also use it to watch the expression without pausing the code, much like the Locals window, except the Watch window will only display the selected variable.
LEVERAGING QUERIES
Any database solution that you design will include queries to support collecting, displaying, and manipulating the data. Being able to effectively query the data is arguably as important as creating the proper table structure. Understanding how to improve your queries will go a long way toward being able to provide an efficient, useful solution to your users.
In this section, you will read about enhancing the query efficiency, complex query concepts, and how to let your users generate the filter to the queries using forms. You will also read about creating a query on the fly in VBA using values in the UI and system values.
Enhancing Query Techniques
You can quickly turn a relative straightforward query into a powerful, customized tool just by adding the right criteria, recordsources, and joins. The following examples show how to create and modify various types of queries to fit a variety of real-world scenarios. The discussions explain how you can modify the queries and SQL statements to fit your business rules.
Sargable Query
Sargable is an old term referring to the query efficiency. Your query is sargable if the database engine you are using can take advantage of the indexes to execute the query faster. Like a lot of terms in the computer world, sargable is a contraction, in this case contracting the words Search Argument.
Although today's computers are much more powerful than they were years ago, the concept is still applicable. When you create a query, you want the results as fast as possible. You don't want your users to have a sense of lag.
While creating a sargable query is beneficial in any database, the benefits are more noticeable with passthrough queries.
There are two general rules you should pay attention to when creating the WHERE clause:
- Avoid using NOT.
- You should put the column by itself on the left side of the operator. For example, MyDate Between #1/1/2013# and 1/31/2013#.
Here is an example of a non-sargable query even though the criteria is on the indexed field, RecordDate:
SELECT *
FROM     MyTable
WHERE    Year(RecordDate) = 2013;
When the RDBM engine executes that query, it cannot take advantage of the index on RecordDate and it will not be able to perform an indexed search. Modifying the WHERE clause slightly will return the same results much faster (code file: Queries.txt Sargable):
WHERE RecordDate Between #1/1/2013# And #12/31/2013#;
In addition to BETWEEN, other sargable operators are: =, >, <, >=, <=, and LIKE with a trailing wildcard. Non-sargable operators include <>, NOT IN, OR, and other LIKE conditions.
You can experience the difference by testing with the following examples — using your own data and field names. If you change the WHERE clause to use a sargable operator, >=, the second query will be faster (code file: Queries.txt Sargable2):
SELECT * FROM MyTable
WHERE DATEDIFF("d", RecordDate, Date()) <= 7;

SELECT * FROM MyTable
WHERE RecordDate >= DATEADD("D",-7,DATE());
While it may not always be possible to make your query sargable, you should try. Sargable conditions can be low-hanging fruit that will help you offer your users a fine-tuned solution. It is worth your time to pay attention to it as you develop the queries to your solution or when you are investigating performance issues with it. You took the time to add indexes to your table, so take the time to use them and write your queries to take advantage of them.
NOTE If you are writing queries directly in SQL Server Management Studio, you can use the Estimated Execution Plan to identify bottlenecks in the query execution.
Frustrated Join
Although “frustrated join” may not be common terminology, it is recognized as describing a join or query that has certain types of restrictive criteria, such as NOT IN. Now that we've introduced it, we will continue to use it when discussing such scenarios. There are the times when you want to report all the records from one table that do not have a matching record in another table. One way to do this is to use a query such as this one (code file: Queries.txt FrustratedJoin):
SELECT
PatientID
, PatientName
FROM
  tblPatients
WHERE
  PatientID NOT IN
 (SELECT PatientID
  FROM   tblAppointments);
It can work, and in a smaller dataset it may even perform adequately. However, run this kind of a query against a medium or larger size dataset and you will experience the slow performance consequences of using the NOT IN() clause, making it a non-sargable query. A better way to get the data is to use an outer join between the tables (code file: Queries.txt OuterJoin):
SELECT
  P.PatientID
, P.PatientName
FROM
  tblPatients P
Left Join
  tblAppointments A
ON
  P.PatientID = A.PatientID
WHERE
  A.PatientID IS NULL;
The left join indicates that you want all the records from tblPatient with or without a matching record in the tblAppointment. You “frustrate” the join by using a WHERE clause to limit the records the query is returning to those where there are no matching records in tblAppointments.
Sometimes you can get better performance by using NOT EXISTS(), as shown here (code file: Queries.txt Exists):
SELECT
  PatientID
, PatientName
FROM
  tblPatients
WHERE
  NOT EXIST
  (SELECT NULL
   FROM tblAppointments
   WHERE tblAppointment. PatientID = tblPatients.PatientID);
The NOT EXISTS() operator usually performs better than the NOT IN() operator, and it may show a slight improvement over the frustrated join. It varies by scenario, so you should test your data to see which is better suited for a given situation.
Complex Queries
Complex queries can be invaluable for collecting, compiling, and manipulating data from multiple tables. They are particularly helpful in situations where it is not possible to collect the data with just one query. You'll use them with financial reports, invoices, grouping and reporting data by region/contact/salesperson, and a myriad of other places. In some cases, they can be used in lieu of a work table. One of the common questions that a business might ask is: “What were the most widgets produced per day in each month of the last quarter?” Not a complex question, and it can be computed using an aggregate query, grouping by month or production date, and looking for the MAX() number of widgets, as shown here (code file: Queries.txt Complex1):
SELECT
  Month(ProductionDate) AS ProductionPeriod
, Max(Widgets) AS Produced
FROM
  tblWidgetProduction
WHERE
  ProductionDate >= DATEADD("q",-1,Date());
GROUP BY
  Month(ProductionDate);
What if, in addition to the highest number of widgets produced, you need to report the employee name and the date that employee produced the most widgets? This is where things become a bit trickier.
You cannot just aggregate by employee, as that will return the maximum widgets produced each month by each employee. Although that is valuable information, it is not what the user requested. Nor can you aggregate by production date; you will return a record for each date of production, which again is not what was requested.
One way to provide the information is to use the aggregate query you wrote previously and join it to the transaction data to get the detail record associated with the data the aggregate query returned, as shown in the following SQL statement. In the chapter download files, you can also see a version of this query in query design view. The graphic display makes it easy to see that this is a complex query that uses an aggregate query as part of the data source (code file: Queries.txt Complex2):
SELECT DT.*
FROM
(SELECT
  Month(P.ProductionDate) AS ProductionPeriod
, P.ProductionDate
, E.FullName
, P.Widgets AS Produced
FROM tblWidgetProduction AS P
INNER JOIN
  tblEmployees AS E
ON
  P.EmployeeID = E.EmployeeID
WHERE
  ProductionDate >= DATEADD("q",-1,Date())) AS DT
INNER JOIN
(SELECT
    Month(ProductionDate) AS ProductionPeriod
  , Max(Widgets) AS Produced
 FROM tblWidgetProduction
WHERE
  ProductionDate >= DATEADD("q",-1,Date())
 GROUP BY
    Month(ProductionDate)) AS Mx
ON  DT.ProductionPeriod = Mx.ProductionPeriod
AND DT.Widgets = Mx.Produced;
Another way to accomplish the same results is to use a query with a frustrated self-outer join. The query does not use any aggregate function but rather joins the transaction table to itself in order to identify the record to report (code file: Queries.txt Complex3):
SELECT
  Month(P.ProductionDate) AS ProductionPeriod
, P.ProductionDate
, E.FullName
, P.Widgets AS Produced
FROM
  (tblWidgetProduction AS P
INNER JOIN
  tblEmployees AS E
ON P.EmployeeID = E.EmployeeID)
LEFT JOIN
  tblWidgetProduction AS W
ON (P.Widgets < W.Widgets)
  AND (Month(P.ProductionDate) = Month(W.ProductionDate))
WHERE
  ProductionDate >= DATEADD("q",-1,Date())
AND
  W.Widgets IS NULL;
The query uses a frustrated join to itself, matching each record to all other records in the table on the same month of activity. When the periods match, the query joins the data on the number of widgets produced, looking for an inequitable value, in this case less than (<). The WHERE clause filters out all the records where the number of widgets is less than the record you are evaluating. The record with the most widgets in each month is retained and reported back.
The two methods shown can be used to report the record with the most (MAX()) or with the least (MIN()) value of widgets per the desired grouping. You can modify and incorporate this into your solutions.
Exists ( ) Subquery
You use the Exists() subquery to check for the existence of values in a resulting dataset. (See the snippet that follows.) It is a Boolean data type so it will return a value of True or False to indicate if any records contain the value (True); otherwise, it will be False. Keep in mind that it will not return data or even tell you how many records meet the criteria (code file: Queries.txt Exists1):
SELECT
  PatientID
, PatientName
FROM
  tblPatients AS P
WHERE
  EXISTS
  (SELECT
     PatientID
   FROM
     tblClaims C
   WHERE
     P.PatientID = C.PatientID);
NOTE A subquery joined to the main query, as in the preceding code, is called a correlated query.
You can reverse the Exists() Boolean by using the NOT operator in front of the Exists() subquery. If we continue with the earlier scenario, the following snippet will return a list of patients that do not have a claim in the system (code file: Queries.txt ExistsNot):
SELECT
  PatientID
, PatientName
FROM
  tblPatients AS P
WHERE
  NOT EXISTS
  (SELECT
     PatientID
   FROM
     tblClaims C
   WHERE
     P.PatientID = C.PatientID);
The Cartesian Product
The Cartesian product join can be used with a Select query to return all possible combinations of all rows in all tables in the query. For example, if you query the two tables, tabPatients and tblClaims, without any WHERE clause qualification or any join between the tables, the result (all patient records combined with all claim records) will be a Cartesian product. The SQL example is shown here; if viewed in query design grid (QBE), you will notice that there is no join line between the two tables (code file: Queries.txt Cartesian):
SELECT
  P.PatientID
, P.PatientName
, C.ClaimDate
, C.ClaimAmount
FROM
tblPatients AS P
tblClaims AS C;
There are several scenarios where it is beneficial to generate a Cartesian product. If you are testing, you can create a large volume of test data in an expedited manner or stress test your database solution. In production or sales, a Cartesian join can be used to list each product with each color, size, or other feature. However, as a rule, it is not a good thing and is more often inadvertent than by intent. The resulting dataset can overwhelm the system and the user. Even with intentional use, it is important to always properly qualify both the joins and filtering criteria. A Cartesian join on two tables, each with one thousand records, will return one million rows.
Upsert Operation
The Upsert operation updates records in a table based on a defined WHERE clause, or inserts new records if the WHERE clause is not met using a single SQL statement.
You can use an outer join query to perform an Upsert operation against the outer table. This operation is handy when you want to synchronize records between two tables while also inserting new rows because it essentially handles both processes simultaneously.
NOTE As you can see from the word UPSERT, the operation's name is a combination of UPDATE and INSERT, referring to the dual action performed by the query.
One of the preferred approaches for using the Upsert operation is to test for the existence of the records before updating them. If the records do not exist, you will insert the data (code file: Queries.txt Upsert 1):
If DCount("*", "tblAppointments", "PatientID = 41") = 0 Then
    CurrentDB.Execute "SQL for Insert Query", dbFailOnError
Else
    CurrentDB.Execute "SQL for Update Query", dbFailOnError
End If
With the Upsert operation, you can perform the two steps in one query by using a left join between the two tables, as shown in the following snippet using tblPatients and tblAppointments (code file: Queries.txt Upsert 2):
UPDATE
  tblPatients
LEFT JOIN
  tblAppointments
ON
tblPatients.PatientID = tblAppointments.PatientID
SET
  tblAppointments.AppointmentDate = #5/29/2013#
, tblAppointments.PatientID = [tblPatients].[PatientID]
WHERE (((tblPatients.PatientID) In (17,41,42,105)));
If patients have an appointment date, the query will update the date. If the patient does not have an appointment, the appropriate records will be added with the appointment date.
The Upsert query will work only if you are using Access tables. You cannot run it against linked SQL Server tables. However, if you are writing T-SQL queries and you are using SQL Server 2008 or higher, you can use the MERGE command, as shown in the snippet that follows, to have essentially the same functionality as the Access Upsert operation (code file: Queries.txt Upsert3):
USE [MyDatabase]
GO
MERGE INTO tblAppointments as Target
USING tblPatients as Source
ON Target.PatientID = Source.PatientID
WHEN MATCHED THEN
UPDATE SET Target.AppointmentDate = '2013-05-29'
WHEN NOT MATCHED THEN
INSERT (PatientID,AppointmentDate) VALUES (Source.PatientID, '2013-05-29')
Query by Form
In most Access solutions, you do not want the users to have direct access to the structure of the database: tables and queries. That's why you create intuitive forms and reports to allow users to navigate through the data. You can further empower the user by giving them tools to query and filter the data to meet their needs. A query that is managed via a form is called, not surprisingly, Query by Form, also known as QBF. In addition to allowing users to select the values they want to filter on, the QBF also allows you to control and validate the data the users enter.
The user interface controls for the Query by Form can be any control that allows the user to either enter or select a value. This can be a textbox, a list box, combo boxes, checkboxes, or radio buttons. If you'd like, you can also use a toggle.
When creating the QBF, it is a good practice to show users the available data values for them to filter or select from. This ensures that there will be records in the returned dataset after they submit the query. This in turn alleviates frustrations and the perception that the database is not working just because no data is returned.
List boxes and combo boxes are two of the best controls for allowing users to view and select data filters. You can further manage the data displayed by tailoring the query used for the Row Source of the control. Depending on the scenario, you can show additional fields to help with the user selection, adjust the sort order, show or hide active/inactive records, or whatever meets your needs. Of course, this is another place to leverage the benefits of foreign keys; you can show the users the description from the lookup table while passing the actual ID value to the query.
Both types of controls work well with the cascading controls concept. You will usually hear the term “cascading combo boxes,” but the concept applies equally to the List box control, as well as other control types. And you can also use a combination of control types in the cascading chain. Essentially, after you select the value, or values, in the first control, the data returned from the row-source of the second control is cascaded to show only values based on what is selected in the first control.
This is accomplished by creating the rowsource of the second control on the fly using the value from the first combo box. As you can see in Figures 16-7 and 16-8, selecting the value in the Filter/Search By combo box will show the available Document Type values in the Select A Filter Val combo box.

FIGURE 16-7: Cascading combo boxes — before selecting Filter/Search By value
The basic code for cascading controls is shown here. It uses tblColors and tblCars. tblCars has an FK field with ColorID. The code will filter the values available in the cboCars based on the value of the color chosen from cboColors (code file: Querie.txt CascadeBoxes):

FIGURE 16-8: Cascading combo boxes — available Document Type values
Private Sub cboColors_AfterUpdate()

    Dim strRS As String

    strRS = "SELECT [CarID], [CarName] " & _
        "FROM tblCars WHERE [tblCars].[fkColorID] = " & _
        Me.cboColors.Column(0) & " ORDER BY [CarName];"

    Me.cboCars.RowSource = strRS
    Me.cboCars.Requery

End Sub
Another benefit of QBF is that you can use the UI to communicate to the users about the data they are selecting, thereby allowing users to quickly preview and modify their search criteria. Figure 16-9 shows a form that allows users to select data for their report by choosing between current data, records up to one year old, and archived data. Because users typically want to see reports on current data, there is no need to query several years of records every time. This method eliminates performance issues by allowing the user to limit the records retrieved to just the current year.

FIGURE 16-9: Filtering the dataset
You can further enhance the QBF by indicating the minimum or maximum of what is available — such as the latest sales week, the oldest month, and so on. For example, if the user needs to select the date range for a report, you can inform them of the earliest date available, as shown in Figure 16-10. The date is displayed in the upper-right corner, and appears in red font in the actual solution.
Although you cannot always use cascading controls, you can use other methods to allow users to display, filter, and select data. One way to reduce user anxiety is to let users know when the values they selected will not return any records. The list boxes in Figure 16-10 show all possible values the users can filter on, but that does not guarantee that their criteria will result in having anything to report. In that case, the solution will return a messagebox informing the user that no records were found.

FIGURE 16-10: Filtering the dataset
The following snippet shows how to do this by testing for the number of records, using the domain aggregate DCount(). If the result is 0, it will generate a messagebox telling the user that no records were found (code file: Queries.txt_CascadeBoxes 2):
Private Sub cboColors_AfterUpdate()

    Dim strRS As String

    strRS = "SELECT [CarID], [CarName] " & _
        "FROM tblCars WHERE [tblCars].[fkColorID] = " & _
        Me.cboColors.Column(0) & " ORDER BY [CarName];"

    If DCount("[CarID]", "tblCars", "fkColorID = " & _
        Me.cboColors.Column(0)) = 0 Then
        MsgBox "No Records Found. Please select another color"
        Exit Sub
    End If

    Me.cboCars.RowSource = strRS
    Me.cboCars.Requery

End Sub
As you can see, QBF is a powerful tool that you can use, customize, and apply to a myriad of scenarios. When you provide the users with QBF and filtering options, it makes their interaction with the data effective and productive. The more the user can do, the more opportunities they will see. It is amazing what you can accomplish by incorporating various tools and techniques as you enhance the database and the user experience.
Creating a Query On the Fly Using VBA
Sometimes you will want or need to construct a query on the fly based on the data the user enters in the forms or on system event information, such as from an error handling routine. When constructing the query SQL, you will need to write the framework for the script and fill it with the variables you want to capture and use.
If you look at the snippet that follows from the last error handling example, you will notice that the code is creating a query to append the error data into a table for future analysis:
<...snip>
          Dim strErrSQL As String

50        trErrSQL = "INSERT INTO tblErrors(ErrorNumber, " & _
                "ErrorDescription, CodeSegment, LineNumber)" & _
                " SELECT" & Err.Number & ", '" & _
                  Replace(Err.Description, "'", "") & "', '" _
                  & Me.Name & "|" & Me.ActiveControl.Name & "', " & Erl
60        CurrentDb.Execute strErrSQL, dbFailOnError
<...snip>
As you see in the following code snippet, the framework of the query includes literal text values in the double quotes:
"INSERT INTO tblErrors(ErrorNumber, " & _
"ErrorDescription, CodeSegment, LineNumber)" & _
" SELECT "
This is the actual text you are typing to create this query. The literal test will not change when you execute the routine unless you go back to the VBA code and change it.
The second part of constructing the query is to add the variables to the SQL you are creating (code file: Queries.txt QueriesOnTheFly):
& Err.Number & ", '" & Replace(Err.Description, "'", "") & _
"', '" & Me.Name & "|" & Me.ActiveControl.Name & "', " & Erl
Each of those variables can hold a different value for the different errors that occur on different forms and from different lines of code. You will add the variable to the SQL script along with concatenating the appropriate delimiters for the data type to each variable.
Each data type requires a specific delimiter to indicate the data type to the RDBMS engine. In VBA, you need to use the delimiters in Table 16-2.
TABLE 16-2: Data Delimiters in VBA
| DATA TYPE | DELIMITER |
| String | ' |
| Date | # |
| Number (any) | None |
NOTE Although Access QBE uses doubles quotes in the WHERE clause to indicate a text value, it will accept single quotes. In VBA, double quotes are reserved to indicate to the system that you are passing a literal value. Additionally, in VBA you use a single quote in the beginning of a sentence to indicate a comment.
Looking at the preceding example of the error handling code, you will see that the Err.Number and Erl variables are not surrounded by delimiters, while Err.Description, Me.Name, and Me.AdctiveControl.Name are surrounded by single quote delimiters.
When the error handling routine for the sample procedure is executed by the error (division by zero), the SQL string your code creates will look like this:
INSERT INTO tblErrors(ErrorNumber, ErrorDescription, CodeSegment, LineNumber)
SELECT 11, 'Division by zero', 'frmTestMe|cmdFoo', 20
You can use these methods to construct different queries to support error trapping. The second UDF is another good example to use as a model. You can modify the function to our scenario and identify the values that you need to append to a table and concatenate them into a single variable. When the values are set, you can use the variable with the query framework to execute the append query.
One of the best ways to learn, experiment, and see what is happening is to use the QBE. With query design view, you can quickly add tables, adjust joins, set criteria, and preview the results. Then, you can view the SQL view. When you have things set, you can copy and paste the SQL into the code. This gives you a jump start, and will get you to where you need to parse the literal text and insert the variables you want to use to collect and pass the values to the final query.
You will also find examples using QBF in Chapters 17 and 18 on Forms and Reports, respectively. Each chapter includes a different technique that leverages QBF to allow the user to select and customize reports. These examples demonstrate how powerful QBF and a little code can be.
API
Application Programming Interfaces (APIs) allow you to extend VBA code by using external libraries that are not part of native VBA. The term “API” can be used to refer to nearly any library or framework. The Windows operating system APIs, the Google Maps API, ESPN's API for gathering sports information, and the entire .NET framework are all examples; the .NET framework in and of itself can be considered an API or as sets of APIs. APIs come in a few different flavors, such as those provided as COM components and used through ActiveX controls or other object types, those that are used via HTTP Requests, and those that reside in DLL, EXE, and LIB files and require a special syntax to declare and run from your VBA code.
The power of the API is that it provides nearly endless opportunities to extend the reach of your Access solution. The Windows APIs allow you to manipulate windows, controls, devices, and system parameters. Using APIs, in addition to controlling window properties such as size and position, you can even control the transparency of an Access form by combining several API functions. Driver software for printers must use Windows API functions to interact with the system for print jobs, so by extension, you have this and other low-level functionalities available to you as well. Other APIs provided by companies such as Google, Yahoo, Weather Underground, or VideoLAN may allow you to manage maps, documents, profiles, weather data, or playback and recording of media. You can even write your own powerful code in languages such as C++ and expose that code as an API, which you can then call from VBA.
This section walks you through the style of API programming that calls external functions from library files such as DLLs. In the context of Access development, these types of function calls are typically APIs provided by Windows, but the information can be applied to any properly created DLL, LIB, or EXE files. By working through the following examples, you will gain the experience of creating and implementing a few real-world API calls. With that foundation, you can leverage other resources to experiment, build confidence, and have another technique in your developer toolset.
You will learn where to find detailed documentation on Windows functions, how to declare external functions from VBA, and how to map data types from one language to another. You will also learn some common constructs and techniques required for leveraging external library functions. As you work through the examples, you will build a module that can be used to open a window in Windows Explorer, programmatically find and reference that window, retrieve system information about that window, and finally specify the size and location of that window. These examples expose a very small portion of functionality that can be obtained through the API, but they give you the foundation to delve deep into the Windows OS functions and other library file–related functions.
Before working with the examples, you need some background concepts to apply. You can start by learning how to find documentation, how to map data types from one language to another, and how VBA's user-defined types and C-style structs work together; you then move on to a discussion about pointers and handles. After these conceptual overviews, you will be prepared to start declaring and using API functions.
Obtaining Documentation for API Functions
Documentation of API functions varies by the provider of the functions. For the following examples, you can use the Microsoft Developer Network (MSDN) documentation. All Windows API functions are fully documented in the MSDN and provide the function syntax, return type, parameter information, and usage remarks, as well as the library and function name that must be called.
An easy way to find documentation for a Windows function is to use Google or Bing and type the function name. The official MSDN documentation will usually be the first or second result listed.
Mapping Data Types
In many cases, APIs are written in a different language than VBA. Because of this, the data types used by the API must be correctly mapped to VBA data types. Most Windows API functions are written in C or C++, so you need to start by determining the target data type required by the API. You can then identify which VBA data type correctly maps to it. The MSDN documentation will prove an invaluable tool for that. One feature of the C++ language is that custom data types can be created based on the core C++ types. Windows defines many custom data types, which, like other custom data types, must be mapped to a C++ type before mapping to the appropriate VBA type.
NOTE The term “mapping data types” means that you will examine the type and range of two separate data types — usually from different languages — and determine which data type from one language has the same range and base type as the other. For example, the VBA Long data type is defined as a 32-bit signed integer, and the C++ int data type is also defined as a 32-bit signed integer. Thus, the two types map to each other.
You can find a complete list of Windows data types with their descriptions and C++ mappings:
http://msdn.microsoft.com/en-us/library/windows/desktop/aa383751(v=vs.85)
.aspx
The next link provides information on the core C++ types:
http://msdn.microsoft.com/en-us/library/s3f49ktz(v=vs.110).aspx
For example, you often work with the Windows BOOL type as it is a common return type for Windows API functions. By examining the MSDN documentation for BOOL, you can determine that the type is defined as the C++ int data type. Looking at the C++ types, you can then determine that the C++ int type is a 32-bit signed integer ranging from −2,147,483,648 to 2,147,483,647. You may recognize this as VBA's Long type, which is the correct mapping to use in this case.
It is important to note the variances in data types between languages. You may know that a Boolean data type is, generally speaking, a 0 or 1, but in order for your API calls to work correctly with the Windows BOOL type, the mapping needs to be precise, so you must use VBA's Long data type.
VBA User-Defined Types and C-Style Structs
When reviewing MSDN documentation for a function, you'll often find that one or more of the parameters require a struct. A struct is the C/C++ equivalent of a VBA user-defined type (UDT). To make API calls for functions requiring a struct, the equivalent UDT must be defined in VBA. The name of the UDT and its members do not matter, but the member data types must be correctly mapped and they must appear in the same order within the UDT as they appear in the MSDN documentation for the struct. The Windows API relies on those sizes and positions to determine where each value starts and ends; thus, correct mapping and order is of utmost importance.
NOTE The MSDN documentation is arguably the most important resource for API programming. It is the only reliable reference that provides complete information on all API functions. Indeed, many developers will have the MSDN documentation open as they create and modify API calls.
Many API structs require that a member of the struct represent the overall size of the struct. To determine the size of a UDT before sending it to the API, use Len(YourUDTVariable). As you work through the examples later in the chapter, you will make use of three different structs required by the API, one of which requires the size to be set before calling the API.
Pointers and Handles
Many C++ functions rely heavily on pointers and handles, so in order to be proficient with APIs, you must have a conceptual understanding of them. Although a detailed discussion of pointers is beyond the scope of this book, you will learn the basics here and can easily find additional information on the Internet.
A pointer is an address to a block of memory. When you declare a VBA object type, VBA allocates a block of memory large enough to represent the object and assigns your variable an address at the start of that block of memory. This address points to the object in memory, ergo the term “pointer.” As you may be aware, assigning the value of one object variable to another object variable does not duplicate the object, but instead it creates two separate references to the same object. The pointer to the object is copied to a new variable, but a new memory block is not allocated as it would be for an entirely new object. Understanding the concept of pointers will be a tremendous help as you work with the Windows API.
Handles are similar to a pointer in that they use the same data types. For example, you would use the LongPtr data type to declare a window handle parameter. However, pointers are used to identify a memory address, whereas handles are used as a unique identifier to an object such as a window, file, or some other system resource.
It is especially important to understand how pointers are used by 32-bit and 64-bit systems. In 32-bit applications, a pointer is a 32-bit memory address, allowing just over 4.29 billion possible values. In 64-bit applications, a pointer is a 64-bit memory address, providing double the space and exponentially more possible values than its 32-bit counterpart.
To deal with the transition from 32-bit architectures to 64-bit and the requirement to mix both together between applications and OS, VBA7 provides two special keywords: PtrSafe and LongPtr. PtrSafe simply asserts that the API declaration is suitable for use in 64-bit Office. The LongPtr data type is converted at run time to a Long data type in 32-bit Office or a LongLong (64-bit integer) for 64-bit Office. By using PtrSafe and LongPtr, your code will be usable by both 32-bit and 64-bit installations of VBA7. However, if you are using VBA6 in versions up to and including Office 2007, you must omit the PtrSafe keyword and use the Long type to represent a pointer. The issues with 32- and 64-bit platforms are discussed in more detail in the next section.
32-Bit vs. 64-Bit
The Microsoft Office 2013 system, including Access 2013, is available in both 32-bit and 64-bit versions. The 64-bit version of Office enables you to work more efficiently with much larger sets of data; especially when analyzing large datasets using Excel.
If you need to use Access 2013 64-bit to design solutions, you must update the existing Declare statements in the Windows Application Programming Interface, API. Additionally, you will need to update the display window handles and the address pointers in the statements. You will encounter two major issues when you use the 64-bit version to run existing 32-bit solutions:
- The Office native 64-bit processes cannot load 32-bit binaries. You can expect to run into that issue if you have existing Microsoft ActiveX controls and existing add-ins.
- 32-bit VBA does not have a Pointer data type and because of this, developers used 32-bit variables to store pointers and handles. These variables now truncate 64-bit values returned by API calls when using Declare statements.
While there are some benefits in installing the Office 2013 64-bit version, at this time they are not related to Access, so you will not currently shortchange yourself by installing the 32-bit version. Using the 32-bit version of Access enables you to use database solutions built in previous versions without needing to modify the code.
Along with the 64-bit version of Access, Microsoft released a new version of VBA Code Base, VBA 7, to work with both 32-bit and 64-bit applications. The code base provides two conditional compilation constants: VBA7 and Win64. The Win64 constant is used to test what version you are using — 32-bit or as 64-bit. The VBA7 constant tests the version of VBA in your solution, VBA 7 or an earlier version of VBA.
One of the main challenges you will have with 64-bit solutions is that they are not compatible with existing 32-bit Active-X controls regardless of whether they are supplied by Microsoft or by a third party vendor. The possible solutions for this problem are:
- If it's your control, or you have the source code, you can create your own Active-X for 64-bit.
- Check with the vendor about updated versions.
- Search for alternative controls, or work-around solutions.
NOTE The Win32API.txt provided by Microsoft is for 32-bit only. If you want to use it in a 64-bit solution, you need to update it using the Win32API_PtrSafe.txt file. The file is available at http://www.microsoft.com/en-us/download/details.aspx?id=9970.
As mentioned, you can use two new conditional compilation constants: VBA7 and Win64. In most cases, you will use the VBA7 constant to ensure backward compatibility with previous versions of Access and other Office products. You use it to prevent code specific to 64-bit from running in a 32-bit solution. You will use the Win64 constant to handle code that is different between the two versions. One of the examples is the math API. In the 64-bit version, it uses the LongLong data type and in 32-bit it uses Long. Here is an example of using the Win64 constant (code file: API32-64.txt Private Sub VBA7):
#If Win64 Then
   Declare PtrSafe Function MyMathFunc Lib "User32" _
    (ByVal N As LongLong) As LongLong
#Else
   Declare Function MyMathFunc Lib "User32" (ByVal N As Long) As Long
#End If
To ensure the code you wrote in VBA7 will run on previous versions of VBA, you will use the VBA7 constant:
#if VBA7 then
   Declare PtrSafe Sub MessageBeep Lib "User32" (ByVal N AS Long)
#else
   Declare Sub MessageBeep Lib "User32" (ByVal N AS Long)
#end if
If you are unsure about needing a 64-bit Access, chances are high you don't need it. So go ahead and install Access 32-bit. However, if you do proceed to use Access 64-bit and you want your code to be used in a previous version of Access, you will need to use the two new constants, VBA7 and Win64.
Putting It All Together: Create and Manage an Explorer Window
It is time to implement what you've been learning by working through a real-world scenario. The task is to create and reference an Explorer window, then specify size and position. You'll create the Explorer instance by using the built-in Shell function. Because the Shell function does not provide a handle to the window that is created, you'll first check all open windows and record any existing Explorer window handles. After the new Explorer window is created, you will identify it by checking all open windows again to determine which Explorer window handle was added.
After identifying the target Explorer window, you will instruct the API to provide a set of the window's system properties. Next, you will modify those properties to specify the new size and position. Finally, you will call another API function that passes the complete set of properties — all of the original ones with a few modifications — for the system to reposition and resize as indicated.
The block of code presented and discussed in this section represents the entire process (code file: API.txt Create and Manage an Explorer Window). The steps are enumerated in the comments so that you can easily refer to the specific block as you review the explanation and work through the detailed instructions that follow.
Note that the code example has been organized to help with the flow of instructions while maintaining its integrity as usable code. Even so, the steps may be out of order. Although the organization may not adhere to your conventions, it will, we hope, provide a valuable reference tool. And, as you know from working with VBA, the placement of certain code entities, such as those in the declarations section of the module, or the order of procedures is largely a developer preference. For your convenience, you can find this version of the function (APIExamples) as well as a more conventional layout (APIExamplesFormatted) in the Chapter 16 download files.
The following process will open Windows Explorer and get its handle (Task 1), and then place the Explorer window (Task 2). As mentioned above, each tasks requires numerous steps, which are enumerated here to make it easier for you to follow along.
Task 1 — Steps 1 through 10: Open Explorer and get its Handle. After step 10, you should stop and test your code.
- Get the Desktop Window Handle. Use this to check all of its children and determine which might be an instance of Windows Explorer.
- Declare the Sleep API to allow your code to pause while Explorer fully opens.
- Declare the EnumChildWindows, the API that will be used to instruct the system to enumerate all desktop windows.
- Declare the EnumChildProc callback. The system will call that one time for each window it finds.
- Declare the GetClassName API. You'll use this to determine if the window is an Explorer instance by checking if the class name is either CabinetWClass or ExploreWClass, the two class names assigned to Windows Explorer.
- Define the GetClassName wrapper. This is a user-defined function to handle the string buffering and return from the GetClassName API.
- Define the module-level constants and variables. The constants direct the EnumChildProc, and the variables store static information between calls to EnumChildProc.
- Fill the EnumChildProc with logic required to examine the windows.
- Create the main OpenAndPlaceExplorer procedure.
- Stop and test your code.
After you have tested your code and resolved all issues, you are ready to proceed with Task 2. This takes the Explorer window that you just opened and makes it the size and position that you speficified.
Task 2 — Steps 11 through 14: Place the Explorer window.
- Define the UDTs required by GetWindowPlacement and SetWindowPlacement.
- Declare the GetWindowPlacement and SetWindowPlacement APIs.
- Create the PlaceWindow procedure. This uses GetWindowPlacement and SetWindowPlacement to read window information and allow you to specify size and location of the new window.
- In OpenAndPlaceExplorer, add the call to PlaceWindow. Once you clean up the module-level variables, you're done.
Now that you've reviewed the steps in quasi-code, it will be easier for you to understand the actual code that makes it all happen. Each of the numbered steps above correlates directly to the step numbers that are commented in the following code:
Option Compare Database
Option Explicit
'Task 1 - Steps 1 through 10 - Open Explorer and get its Handle
'Task 2 - Steps 11 through 14 - Place the Explorer window
'The steps are not in numerical order but are numbered to facilitate
'working through the process.


'Step 1: Get the Desktop Window Handle
Private Declare PtrSafe Function apiGetDesktopWindow _
  Lib "User32" Alias "GetDesktopWindow" () As LongPtr

'Step 2: Declare the Sleep API
Private Declare PtrSafe Sub Sleep Lib "Kernel32" (ByVal ms As Long)

'Step 3: Declare the EnumChildWindows API
Private Declare PtrSafe Function apiEnumChildWindows _
  Lib "User32" Alias "EnumChildWindows" _
  (ByVal hWndParent As LongPtr, ByVal lpEnumFunc As Long, _
   ByVal lParam As Long) As Long

'Step 5: Declare the GetClassName API
Private Declare PtrSafe Function apiGetClassName Lib "User32" _
      Alias "GetClassNameA" _
  (ByVal hWnd As LongPtr, ByVal lpClassName As String, _
   ByVal nMaxCount As Long) As Long

'Step 7: Define the module-level Contsants and Variables
Const ECP_GETEXISTING = 1
Const ECP_GETNEW = 2
Private m_ExistingExplorers As String
Private m_NewExplorer As LongPtr

'Task 2 - Steps 11 through 14 - Place the Explorer window

'Step 11: Define the UDTs required by the WindowPlacement API
'This step immediately follows testing your code.

Public Type apiPOINT
  X As Long
  Y As Long
End Type

Public Type apiRECT
  Left As Long
  Top As Long
  Right As Long
  Bottom As Long
End Type

Public Type apiWINDOWPLACEMENT
  length As Long
  flags As Long
ShowCmd As Long
  ptMinPosition As apiPOINT
  ptMaxPosition As apiPOINT
  rcNormalPostion As apiRECT
End Type

'Step 12: Declare the GetWindowPlacement and SetWindowPlacement APIs
Private Declare PtrSafe Function apiGetWindowPlacement _
  Lib "User32" Alias "GetWindowPlacement" _
  (ByVal hWnd As LongPtr, lpwndpl As apiWINDOWPLACEMENT) As Long

Private Declare PtrSafe Function apiSetWindowPlacement _
  Lib "User32" Alias "SetWindowPlacement" _
  (ByVal hWnd As LongPtr, lpwndpl As apiWINDOWPLACEMENT) As Long

'Step 13: Create the PlaceWindow procedure
Private Sub PlaceWindow( _
    hWnd As LongPtr, Top As Long, Left As Long, Bottom As Long, Right As Long)
  Dim wp As apiWINDOWPLACEMENT
  wp.length = Len(wp)
  apiGetWindowPlacement hWnd, wp
  With wp
    .rcNormalPostion.Top = Top
    .rcNormalPostion.Left = Left
    .rcNormalPostion.Bottom = Bottom
    .rcNormalPostion.Right = Right
  End With
  apiSetWindowPlacement hWnd, wp
End Sub

'Step 4: Declare the EnumChildProc callback
Public Function ECPGetExplorer( _
    ByVal hWnd As LongPtr, ByVal lParam As Long) As Long

 'Step 8: Fill the EnumChildProc callback with logic
  Dim ret As Long
  ret = -1
  If lParam = ECP_GETEXISTING Then

If (Classname(hWnd) = "CabinetWClass") Or _
    (Classname(hWnd) = "ExploreWClass") Then
      m_ExistingExplorers = m_ExistingExplorers & ";" & CStr(hWnd) & ";"
    End If
  ElseIf lParam = ECP_GETNEW Then
    If (Classname(hWnd) = "CabinetWClass") Or _
        (Classname(hWnd) = "ExploreWClass") Then

      If InStr(1, ";" & Classname(hWnd) & ";", m_ExistingExplorers & ";") = 0 Then
        m_NewExplorer = hWnd
        ret = 0
      End If
    End If
  End If
  ECPGetExplorer = ret
End Function
'Step 6: Write the GetClassName Wrapper
Private Function Classname(hWnd As LongPtr) As String
  Dim s As String
  s = String(255, 0)
  apiGetClassName hWnd, s, 255
  Classname = Replace(s, Chr(0), "")
End Function

'Step 9: Create the main OpenAndPlaceExplorer procedure
Public Sub OpenAndPlaceExplorer()
  Dim hWndDesktop As LongPtr

  hWndDesktop = apiGetDesktopWindow()
  apiEnumChildWindows hWndDesktop, AddressOf ECPGetExplorer, ECP_GETEXISTING

  Shell "Explorer.exe", vbNormalFocus
  Sleep 500
  apiEnumChildWindows hWndDesktop, AddressOf ECPGetExplorer, ECP_GETNEW

  'Step 10: Stop and test your code
  Debug.Print "Existing Explorer Handles: " & m_ExistingExplorers
  Debug.Print "New Explorer Handle: " & m_NewExplorer

  'Step 14:  Add the call from OpenAndPlaceExplorer to PlaceWindow and
  '          clean up the module-level variables
  PlaceWindow m_NewExplorer, 200, 200, 800, 800

  m_ExistingExplorers = ""
  m_NewExplorer = 0

End Sub
The first task is to get a list of all windows currently open and identify the Explorer windows. These windows are children of the Desktop window and will be enumerated using the EnumChildWindows API function. By reading the MSDN documentation about the function, you can determine that they require a handle to the desktop window and a callback function used for the enumeration. You begin by declaring the GetDesktopWindow API function in your VBA project. This will provide a handle to the desktop window, which the EnumChildWindows function will use for enumeration.
API Declaration
Declaring API functions requires a special syntax in VBA. All API declarations must be placed in the declarations portion of the module. They also have a few required sections that are not seen elsewhere in VBA. Step 1 in the code sample demonstrates a standard API declaration, as shown here:
Private Declare PtrSafe Function apiGetDesktopWindow _
  Lib "User32" Alias "GetDesktopWindow" () As LongPtr
The function can be declared as Public or Private. The VBA name of the function, apiGetDesktopWindow, follows the Private Declare PtrSafe Function portion of the declaration. You will also use this name to call the API. The VBA name can be whatever you wish as long as it does not interfere with the rest of the project's naming. These examples prefix API functions with “api” so that they are easily identifiable and you avoid name conflicts.
The Lib portion of the statement is required as it tells the API which library to use. In some cases, you may be required to use the extension as well as the library name (i.e., – Lib "User32.dll"). Most libraries are registered and are located in the system or system32 directory. If a library is not registered, the Lib portion will need to include the full path to the file.
The Alias portion is only required when the VBA function name you declare is different than the function name declared by the DLL. In this case, the Windows function name is GetDesktopWindow. Because the VBA declaration is apiGetdesktopWindow, the Alias is required in order to tell the system what function to find.
Following the Alias is a list of parameters — or a set of empty parentheses to indicate that there are no parameters. The declaration line is ended with the API return data type — in this case, LongPtr.
Another API that you will use in this example is the Sleep API, as shown in Step 2. This will pause the execution of code for a specified amount of time so that you can ensure that the new Explorer window instance is fully opened before proceeding. The Sleep API subprocedure, is one of the rare instances that an API is used as a sub rather than a function. The declaration is still similar in both uses.
Note that this does not have a return type because this is a sub and not a function, and subs do not return data (as noted by the VOID return within the MSDN documentation). Also note the lack of an alias. As you'll recall, if the VBA declared name is the same as the API declared name, an alias is not required.
One thing that you may find when working with text-based API functions such as the GetClassName function later in the examples is that the MSDN will list both an ANSI and Unicode version of the function name at the bottom of the documentation. The ANSI version will end with an A and the Unicode version with a W. When using text-based functions from VBA, you will use the ANSI version of the function. You'll notice this later when you declare GetClassName and see GetClassNameA as the Alias.
Declaring the Enumeration Function
After the GetDesktopWindow function is declared, you will declare the EnumChildWindows function (Step 3 in the preceding code). The declaration syntax is the same as GetDesktopWindow. This instance has some additional parameters as required per the MSDN documentation.
NOTE Determining when to use ByVal or ByRef in API declarations can be tricky, especially because using the wrong one will crash your application. See the “Using ByRef and ByVal” discussion in the “Tips and Techniques” section later in the chapter.
Declaring the Callback Function
The EnumChildWindows function requires a callback function that will be called one time for each window found. A callback function is a public function that the API will invoke as many times as it needs to, passing information as parameters. Per the MSDN documentation for EnumChildWindows, your project will require the EnumChildProc callback. Because you will pass a pointer to the callback when calling the API, the name you give the callback does not matter except in the context of your project. What is important is that the function signature matches the specification and the parameter data types are mapped correctly. A Callback function must be declared as Public and reside in a standard module. When you call the EnumChildWindows function, you will use the VBA statement AddressOf to pass the pointer of your function to the EnumChildProc callback.
NOTE A procedure's signature is the line that defines the input and outputs for a procedure, such as the type of procedure, the type of the return, and the argument list and their respective types. With API programming, the names given to these signature definitions seldom matter, but the signature itself must correlate to the required API signature. The return type and the argument list order and types must all match.
Each time the callback is invoked, the system will pass the handle to the next window in the hWnd argument, and the lParam argument will contain what you specify when calling the EnumChildWindows lParam parameter. With the lParam argument, you can create a logical flow of code based on how the function was called.
The next step is to create the callback function, as shown in Step 4. The name in the example is ECPGetExplorer to signify that it is an EnumChildProc whose purpose is to obtain Explorer instances. You will leave this function blank for now. In a few more steps, you will fill it with the required logic.
Determining the Class Name of a Window
The next API required is GetClassName. This function accepts a handle to a window and returns the Windows class name. From your callback function, check the class name of the current window to find one of two possible Windows Explorer class names: CabinetWClass or ExploreWClass. If the window is determined to be an Explorer window, the window's handle will be added to a module-level variable for later comparison. You are building a list of existing Explorer window handles so that you can determine the handle of the new instance of Explorer when it is added.
In Step 5, you declare the GetClassName API function in your module declarations. After the API function is declared, you will need a small utility function to convert the returned class name from the API's C-style buffered string into something more easily used with VBA. The user-defined function from Step 6 will provide a wrapper for your apiGetClassName function.
With that completed, you have declared API functions to get all child windows of the desktop and have the tools to determine which are Explorer windows. Next, you'll start filling in some native VBA code for handling the tracking.
Preparing the EnumChildProc for Two Different Uses
Because you will enumerate the desktop windows twice — once before and once after opening the new Explorer window — you will need a way to tell the EnumChildProc what to look for. This is accomplished by passing a value through the EnumChildWindows call, which is then forwarded by the API to the EnumChildProc as the lParam argument. You also need to declare two module-level constants to indicate the before and after routines. The callback will read the values and act accordingly.
Next, you will need two module-level variables for tracking explorer instances. The first will be a string of delimited Explorer handles for existing instances, and the second will be a LongPtr to indicate the handle of the new instance. Step 7 demonstrates the creation of the two constants and variables.
Now you have sufficient definitions to make use of the EnumChildWindows and its EnumChildProc callback. Refer to Step 8 (“Fill the EnumChildproc callback with Logic”) in the example code and add that code to the body of the ECPGetExplorer callback function.
Note that the callback function returns a −1 by default (True), and a 0 if a new instance is found. In many cases, enumeration callbacks can be halted by returning False and instructed to continue by returning True. You should consult the function's documentation for details.
Creating the Main Procedure
You now have enough API code and supporting procedures to create the main sub. Although this is only the first task — determining the Explorer windows — it is an opportune time to stop and debug your work. Once everything works as expected, it is time to proceed with creating the procedure.
You need to create a public sub to use as the main entry point to the task, as described in Step 9. At present, you will only fill it with the first half of the logic — determining the Explorer instances. You can view the handles for the existing and new Explorer windows by using the immediate window and the Debug.Print statements, as shown in Step 10. (Note that you should omit the code for Step 14 at this point.)
At this point, you should compile, save, exit, and back up your database. Then re-open it and run the OpenAndPlaceExplorer sub and examine the printed values. Pointers typically look like large random numbers, and a pointer value of 0 typically indicates that a window was not found. You will find additional information on this topic in the “Tips and Techniques” section.
NOTE Debugging and handling errors in API programming are different than in native VBA. See the “Error Handling” and “Preparing for Crashes” topics in the “Tips and Techniques” sections for more information.
Retrieving Window Information
Now that you have a handle for the newly created Explorer instance, it's time to retrieve the current window information, modify the placement, and feed the modifications back into the system. This requires two more API function declarations, and they both require some user-defined type (UDT) declarations. The GetWindowPlacement and SetWindowPlacement APIs make use of the WINDOWPLACEMENT struct as noted in the MSDN documentation. Additionally, three members of the WINDOWPLACEMENT struct (ptMinPosition, ptMaxPosition, and ptNormalPosition) require two additional structs: the POINT struct and the RECT struct. First you need to define the required UDTs to map to the structs. Then, you will make the declarations for the two API functions.
To declare the UDTs, you need to map the VBA data types to the struct data types using the same methods that you used in previous examples to map API parameters and return values. This is shown in the declarations section, Step 11, in the example module. When you complete the UDT declarations, you can proceed with Step 12 to declare the GetWindowPlacement and SetWindowPlacement API functions.
In the process, you will create an empty apiWINDOWPLACEMENT variable to pass to the GetWindowPlacement API. The API will fill your apiWINDOWPLACEMENT type with the current settings for the Explorer window. You will then adjust the rcNormalPosition members to represent the screen position and size that you want the window to show. After making those adjustments, you need to call the SetWindowPlacement API, and pass the entire apiWINDOWPLACEMENT struct to it. The API will read all of the settings defined in the struct and make any necessary adjustments to the settings that you defined.
As a good practice, you will want to create a private sub to handle the logic for these API calls so that they do not clutter the main entry sub. This is demonstrated in Step 13, where you create and implement the PlaceWindow procedure. Note that per the MSDN documentation, the length member of the UDT must be set before calling the API.
The final step is to add a call to the PlaceWindow sub in your main OpenAndPlaceExplorer sub. The call should be placed after the last enumeration added to the procedure. You can see this at the end of the code sample in Step 14. Additionally, you need to clear the two member-level variables so that they do not interfere the next time the example runs.
Of course, you should replace the hard-coded size and position values with whatever you like by setting them up as arguments of the procedure and letting the database or users supply the parameter information.
Tips and Techniques
As you've experienced in other areas of development, it is great to be able to work through basic processes and to be able to create and customize functions and routines. But there is a lot more to it if you want to master an area, especially in today's dynamically changing environment. The following tips and techniques are based on lessons learned over the years by several developers. You can benefit from their experiences as you refer to and integrate these techniques into your solutions.
You can find all of the code snippets in the download text file for this chapter (code file: 850832_ch16_CodeSnippets.txt).
Passing Nulls
Null values in API calls are different than VBA Nulls. The C/C++ languages generally define Nulls as either 0 or a character whose value is 0, whereas in VBA, a Null value is an unknown and is most commonly seen before a field has data entered. In most cases, a Null can be passed to the API by passing the value of 0 in the correctly mapped type, using either a variable or a type-declaration character such as this (code file: API.txt Tip_Nulls),
EnumChildWindows hWndDesktop, AddressOf MyCallback, 0&
or this:
Dim lptr As LongPtr
lptr = 0
EnumChildWindows lptr, AddressOf MyCallback, 0&
Note that the vbNullChar constant provides a character whose value is 0, and the vbNullString constant provides a Null pointer — that is, a pointer that has no value (it doesn't point anywhere) as opposed to a pointer that has a value but points to a Null address.
Preparing for Crashes
Unless you happen to be an API programming prodigy, you will crash your application during testing. Before running any code, you should save your project, close it, and back it up. In many cases, the crash will cause a loss of work from the last time the database was opened, despite the project being saved in the interim.
Error Handling
Debugging and error handling for APIs often require a different approach than with conventional VBA. In many circumstances, it will not be possible to step through the code. Often, attempts to step through the code will result in the application crashing. An alternative recommendation is the liberal use of Debug.Print statements.
Most Windows API functions will return a value that indicates the success of the call. The value varies depending on the function. You should consult the MSDN documentation for details of function returns.
The Windows API defines a GetLastError function, which can be used to get error information. Regretfully, is isn't necessarily intelligible and getting a human readable message may not be very straightforward. Here again, you can refer to the MSDN documentation on the function for details:
http://msdn.microsoft.com/en-us/library/windows/desktop/ms679360(v=vs.85).aspx
The VBA Err object provides a LastDLLError property, which can be used to determine the last DLL error that was encountered for DLL functions called from VBA. Refer to the MSDN documentation on the LastDLLError property for more information:
http://msdn.microsoft.com/en-us/library/office/gg278794.aspx
For some API functions, the MSDN documentation will direct you to make use of the GetLastError API function, and for others you may find better results with VBA's Err.LastDLLError property.
String Buffers
In most cases that the Windows API returns textual data, it will expect a buffered string of null characters passed to it, which it will then fill and return. This is typically filled to a maximum amount of characters — usually 255 or 256 characters — with each character having a value of 0 (vbNullChar). When the API returns, you will most often look for the first null character and trim the string to that point. This type of string is called a null-terminated string.
APIs may also require that a null-terminated string be passed to the function. In this case, add the null character vbNullChar to the end of your string before sending it to the API. For multiple returns, such as multiple files selected with GetOpenFileName API, the list will be delimited by a single null character and terminated by a double-null character.
Using ByRef and ByVal
It can be confusing to determine when to use ByRef or ByVal for API declarations. The frustration can quickly be compounded because using the wrong one will result in a crash of the application. This confusion is mainly due to the fact that VBA handles data types differently behind the scenes, using pointers that you do not have access to on the surface. For example, when a string is handled by VBA, there is an underlying pointer that indicates the start address of the string. Even though you may require ByRef-like use of the string for the API call, the API declaration must be declared as ByVal because it is the ByVal pointer that actually gets passed into the API.
Generally speaking, most API parameters will be declared as ByVal except when passing UDT variables, which must always be passed ByRef.
Avoiding Expressions as Parameters (Using Sustainable Pointers)
When you call directly upon the API function, the best practice is to avoid any use of expressions to send the parameter to the API, especially in the case of strings. Look at the following example, which intends to write a formatted date to an ini file using the API:
WritePrivateProfileString "MyApp", "MyKey", _
    Format(Date(), "yyyymmdd"), strIniFilePath
Any expression used to pass a value to an API call risks causing an error. This will result in an error because the Format() function is used to create the value string, as it does in the last line of the API call above. Instead, the value should be assigned to a variable and then passed to the API, as you'll see next.
The API expects an LPCSTR (long pointer to a constant string), and VBA will provide the pointer on your behalf. However, because the pointer that will be passed is the result of an expression, VBA disposes of the pointer as soon as the expression is evaluated, thinking that it's no longer required. By putting the string into a variable before sending it to the API, the pointer is sustained throughout the API call because the variable does not go out of scope until the calling procedure is complete. The following snippet shows the correct method of calling the function (code file: API.txt Tip_SustainablePointer):
Dim strFormattedDate As String, strIniFilePath As String
strIniFilePath = "C:MyProjectmyapp.ini"
strFormattedDate = Format(Date(), "yyyymmdd")
WritePrivateProfileString "MyApp", "MyKey", strFormattedDate, strIniFilePath
Working with Flags
Many API functions make use of flag values. Flags are bitwise values that are put into a single integer type variable (typically a Long) where each bit represents one setting (with a Long, 32 bits are available to set). A familiar example of a flag value in VBA is the VbMsgBoxStyle constants used with MsgBox(). The values of the constants are 1, 2, 4, 8, 16, 32, and so on, and can be added or subtracted to set the desired flags. Use the bitwise AND and OR operators when working with API flags to determine and assign bitwise values to flag variables. You can find some additional information about the AND and OR operators in the VBA Help file. Another good resource, for this and many other support topics is the Utter Access wiki, http://www.utteraccess.com/wiki/index.php/Category:Access_Wiki_Index.
Avoiding “Any”
VBA provides a type that can be used for API declarations called Any. This does not mean that the API will accept any type of data, only that VBA will not perform type-checking before it passes the value to the API. You should avoid using Any unless there is specific reason to use it.
INTRODUCTION TO DATA MACROS
Introduced in Access 2010, data macros offer you a new set of tools that you may find quite effective for performing data validation and maintaining data integrity. In this section, you see a few scenarios where data macros are superior to the traditional approach of using VBA in form events and validation rules. Data macros were originally built to offer additional functionalities in Access web databases for Access 2010. For compatibility purposes, they were also made available to the client. Even though Access web databases are now replaced by Access web apps, data macros continue to be supported in the client, affectively making Access the only desktop file-based database product to have triggers and stored procedures. On the other hand, Access web apps have a different set of macro actions from client data macros. Access web apps also store macros differently, so what you learned about data macros in the web section of this book does not necessarily apply in the context of the client's data macros. However, the design surface for data macros will be largely the same. We examine the differences in the macro actions and functionality made available in the client data macros next.
Why Use Data Macros?
Traditionally, whenever you needed to perform data validation or some kind of additional data processing, you would use VBA attached to events in a module behind a form, primarily the form's BeforeUpdate or AfterUpdate events. One downside to that approach was that if multiple forms used the same table, perhaps to provide a different view for different processes, it was necessary to use the same VBA code, either by copying the code to the other form or by calling a common routine. Either way, it was extra maintenance, which also meant that you had to remember to include the code in every new form added to the project. In a large project, it is too easy to forget that validation and data processing routines must be performed in all of the appropriate places and the proper code implemented.
Validation Rules and Check Constraints
Validation rules are a partial solution because you can set them at the table level and have them enforced in all forms bound to that table. However, at most, the scope of a validation rule is at the record level; you cannot look up other tables, which limits the usefulness of a validation rule. Access also supports check constraints, but they were never surfaced in the UI. That was problematic because there was no facility to trap for check constraint violations and accurately diagnose the error in order to provide a friendly and helpful error message. Users were stuck with highly technical error messages about a check-constraint violation, which were utterly meaningless to them. Although data macros aren't meant to have any UI components either, they do have a mechanism for raising a descriptive error message, which Access will then happily display as a messagebox. In other contexts, data macros errors may not be displayed but will be logged.
Application Independence
This brings us to another reason data macros can be quite useful. If an Access database can be used by different applications, data macros on the tables in that database can uniformly enforce validation and data processing regardless of which application is using the data. For example, if there is a .NET service that accesses and updates the Access database, data macros will fire even in this context. This will happen even though the service may not even open the Access application itself and instead use OLEDB to connect directly to the database engine. In other words, data macros are truly application-independent processes that you can leverage to enforce business logic at all times, in all places.
Differences in Client and Web Data Macros
When Access 2010 came out, both the client and the web counterpart had an identical working set of macro actions available in data macros. Because Access 2013 web apps are provisioned on a SQL Server, Microsoft had to revise the set of data macro actions to work with SQL Server's underpinning; as a consequence, the web app's data macro catalog is not identical to the client's counterpart. If you've used data macros in 2010, you will find they remain compatible with the Access 2013 client. That said, let's quickly list key differences between client data macros and Access web app data macros:
- Client data macros are associated with a table, whereas web data macros are standalone.
- Client data macros can be based on five table events: Before Delete, Before Change, After Insert, After Update, and After Delete. Web data macros have only three table events.
- In client data macros, only the set of Before* table events can be cancelled. In web data macros, all table events can be cancelled.
- Errors with data macros in the client are logged to the USysApplicationLog system table, whereas web data macros errors are not recorded, although they can be traced in a trace table.
Also, if you did not work with data macros in 2010, there are a few important restrictions to keep in mind. These limitations still apply to client data macros in 2013:
- You cannot perform a CreateRecord macro action within a ForEachRecord block.
- You can only do EditRecord or DeleteRecord on the record from the outermost ForEachRecord block.
- You cannot recursively run a data macro or a set of data macros more than 19 times.
One thing that may trip up unwary users is running a data macro that does a ForEachRecord block and within that block, calling another data macro that performs a ForEachRecord within the called data macro. If the called data macro performed an EditRecord, it would appear to comply with the rules because EditRecord is associated with the outermost ForEachRecord block for this data macro. But that's not strictly true because it is being called within the first data macro's ForEachRecord. That means the EditRecord action fails. Thus, it is a good habit to treat a RunDataMacro action as if it was simply an expansion of the content inside the calling data macro rather than a separate stack.
Use Cases for Data Macros
As alluded to earlier, there are two distinct uses for data macros:
- Perform validation that cannot be done within the scope of one record.
- Perform additional data processing.
The validation part is fairly straightforward; it's something you might have run into before. You might have a scenario where you needed data from another table to make a decision about whether an action on the first table is permissible. A common example of that sort of validation is prohibiting deletion of an order that has been shipped in parts. When shipping has already started, and one or more shipments are already recorded in the separate shipping table, you can't delete the order record. In order to know about any shipments, you need to look at the shipments table to see if any part of the order was included in any shipments already sent. Should this be the case, you cannot delete the order because some of the goods in the order are already on their way and must be marked as a loss or recorded for recall.
As you can see, the ability to run a data macro that checks data from other tables helps protect against changes that would leave you with inconsistencies such as a quantity of a product that is missing because products have already shipped based on a non-existent order.
Data processing, on the other hand, is not as straightforward. Although it can be tempting to use code to enable certain processes in which data is manipulated in several steps, it is usually the case that those processes should be resolved by normalization instead. Nonetheless, there are three situations where it does make sense to perform additional actions with data macros:
- Improving Query Performance
- Maintaining Audit Trails
- Creating Supplemental Records
We'll consider each in the following sections.
Query Performance Considerations
The first possible use is to improve query performance where you use calculated values as the criteria in the query. Consider the scenario where a company wants to know which orders had sales of $10,000 or more in a given time period, perhaps in order to allocate bonuses, or to identify its best customers. In a properly normalized database, you would have an order table and an order detail table. You can use an aggregate query to sum up the total from order details to get the order total, and you shouldn't have to store the order total as well. In a large enough dataset, however, the cost of calculating all order details and summing them up for each order can become very expensive, slowing the query's performance. In the past, some Access developers may have chosen to denormalize and store the order totals in the Order tables so that the total field could be indexed for better performance. That also eliminates the need to run an aggregate query over the order details table and filter out the aggregated values less than $10,000 to get the result. However, this approach creates a maintenance problem, especially with a form where users can potentially interrupt the query or leave the calculation incomplete. Ultimately, you might need to manually recalculate the totals every so often, particularly before running the query to search for orders totaling $10,000 or more, so that it will be correct.
Calculated Values
Data macros can substitute for the traditional summing of values in an aggregate query. Although Access 2010 also introduced calculated data types, calculated fields cannot be indexed unlike in 2013 web apps. So, there is very little benefit in using calculated data types for this task. Moreover, the calculated field cannot calculate outside the scope of the current record. Thus, a data macro is an excellent fit. You will see two examples of storing a calculated value later in the chapter.
Audit Trails
The second scenario pertains to audit trailing, where a copy of a record is made in a separate audit table. Auditing is a special case as the purpose of auditing typically is to record changes in data, rather than storing facts about data. Audit trailing is most useful in scenarios where you have the ability to identify what changes were made to data, when the change occurred, and who made it. One example that comes to mind is a series of financial transactions where accountability is required. Data macros can be implemented to ensure the audit trail is maintained regardless of how changes to the data occur, as you learned in the introduction to this section.
Potential for Misuse
While some may be tempted to use a similar approach with data tables, this may cause more problems than it solves. Consider the scenario where you need to update a customer's address. Suppose that a data macro copies the customer's old address to a history table. On the surface, that might look like a neat solution because you don't have to complicate your queries by joining your customer table with the address table and deciding which address you should use. However, if you call up a past invoice, it now appears that it was sent to the customer's new address when in actuality, it was sent to the old address. You've lost the record of the change, which would have enabled you to resolve the discrepency. Using an address table and indicating a current address from the customer table enables you to avoid this problem without involving data macros at all.
Creating Supplemental Records
Our third example is probably the most esoteric use: creating a new record based on an event. Later in the chapter, you will see an example of creating a new receiving batch to represent the quantity that was returned to the warehouse. The creation is done indirectly via increasing the quantity on hand for this product. This is done in reaction to a retroactive correction and depends on specific business rules, which do not generalize well. However, the ability to edit or create new records can be useful, provided you implement it in a way that does not deviate from the normalization, introducing far more maintenance problems than it solves.
CREATING DATA MACROS
In this section, we'll show you how to create and use data macros to address the objectives previously outlined. In the first two examples, you'll be using data macros and aggregate queries. First up is a data macro to address performance issues by creating a calculated field that can be indexed.
Maintaining Calculated Values to Support Indexing
For this section, you'll be using an inventory and ordering database. The relationship diagram is shown in Figure 16-11.

FIGURE 16-11: Inventory and Ordering Database relationship diagram
The first example demonstrates how to maintain an order total by storing the calculated value in a field in the order table every time an order's details are edited. Recall that the goal of storing the calculated value is to improve query performance when determining which orders have $10,000 or more in sales without requiring an aggregation over the details table.
You'll need a query that will sum the details for a particular order and give out the total. Build a new query and name it qryOrderTotals, as shown in Figure 16-12.

FIGURE 16-12: qryOrderTotals definition
USING QUERIES AS THE RECORDSOURCE FOR A FOREACHRECORD BLOCK
If you've been developing Access solutions for a long time, you've probably been advised to use queries instead of looping over a recordset in VBA. This advice still applies to data macros. Although it is possible to do a ForEachRecord over the entire order detail table and sum up the totals this way, it is much more expensive. Even using a ForEachRecord on an aggregate query would be superior to doing a ForEachRecord on a table. Thus, if there is an opportunity to use a query to do some aggregating, filtering, or sorting, take advantage of it and use the query as the source instead of the table.
As you might recall, client data macros must be associated with a table. In order to create a new data macro, you must open a table in design view. Open the tblOrders table in design mode and, on the ribbon, select Create Named Macro as illustrated in Figure 16-13.

FIGURE 16-13: Create Named Macro
Within the data macro, you'll create a parameter, plngOrderID, to pass in the order for which you need to get the total; perform a LookupRecord macro action on the qryOrderTotals query to get the total; and then assign that value into the OrderTotal field on tblOrder, as shown on Figure 16-14. Save and name it dmUpdateOrderTotals.

FIGURE 16-14: dmUpdateOrderTotal definition
The next step is to call this named data macro from the three After* events on the tblOrderDetails table. Each table event will have a single action, RunDataMacro, which passes in the current OrderID of the edited order detail. Figure 16-15 shows how you can set the action for each After table event.

FIGURE 16-15: RunDataMacro in a table After event
Note that you need to add the same data macro to the other two After* events.
Timing of the actions is important in understanding how the data macro works. The data macro runs in any one of three After table events, after the edit in the tblOrderDetails is already saved. This means the sum returned from the query, qryOrderTotals, will be correct when it is recorded into the associated order's record. Regardless of how the order details were edited — whether via a form, a query or even by another application — you can count on the OrderTotal field being current. All of this is done to enable indexing of the OrderTotal field, as shown in Figure 16-16.

FIGURE 16-16: Indexing the OrderTotal field
Thus, any queries that filter or sort by the total sales on an order will be much improved because they can use the indexed OrderTotal field instead of calculating on the fly.
Maintaining Quantity On Hand to Support Business Logic
The next example involves maintaining quantity on hand for inventory items. The objective is to ensure that you only fill orders for an inventory item when there is enough quantity for that item in the warehouse to do so.
As you saw in Figure 16-11, you need a Receiving table and an Order Details (aka shipping) table, both related to the Product table. The Product table has a QtyOnHand field while the Receiving table has QtyReceived and QtyConsumed fields. The Order Detail table simply has a Qty field to indicate the quantity needed to fill this order for a given product. The business logic here is that an order cannot be fulfilled if there isn't sufficient QtyOnHand in the product table. Furthermore, the quantity on hand can be spread across multiple received batches. For example, you can have three received batches of 50 units, 75 units, and 100 units, respectively. Assuming nothing has been used for other orders, that would add up to a quantity on hand of 225 units. The first order that requires 75 units should consume 50 units from the first batch and then 25 from the second batch. The second order that needs 100 should then consume the 50 from the second batch and 50 from the third batch, leaving the quantity on hand at 75.
With the specifications for the on-hand calculation defined, you'll want to start adding the quantity whenever a new batch arrives. You will now create a data macro to make that happen. Open the tblProducts table in design view and create a new named macro on that table. Just to be clear, a Named macro must be attached to the table, but not to one of the events on that table. Within the macro, the process is fairly straightforward; each time an event occurs that impacts quantities of a product, your macro needs to look up the product in the tblProducts table and update the QtyOnHand column with that quantity. The steps are illustrated in Figure 16-17. You might name this macro dmProductChangeQtyOnHand.
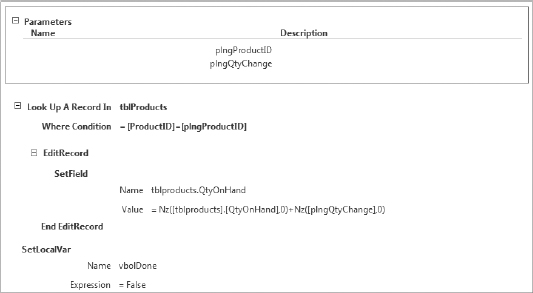
FIGURE 16-17: Definition of dmProductChangeQtyOnHand
Note the usage of two parameters, plngProductID and plngQtyChange, to pass in the ProductID and the change quantity. You can see this in Figure 16-17. As you see, the calculation is set up so that you can pass both increasing and decreasing quantities simply by passing in either a positive or negative number, respectively.
Next, you wire this data macro up to all three of the After table events on tblReceiving, similar to what is shown in Figure 16-18.

FIGURE 16-18: tblReceiving's After table event definition
This should set you up for receiving new quantity into the product's on-hand field.
Next you need to set up a macro for quantity shipped. However, before you can create the macro you need to define the queries it will use. You'll be working with batches in this step, so you need queries to present quantities in those batches. When the queries are ready, you can return to the design view of tblProducts and create another named macro called dmProductChangeConsumedQty.
NOTE If you're familiar with standard accounting, what you're about to do with this data macro is often referred to as the FIFO — or First In, First Out — method of inventory accounting.
Unlike the previous data macro, where you can simply add and subtract from the on-hand quantity, you have multiple batches of received quantities to consider. When taking away from the quantity on hand, you want to work from the oldest batch until the order is fulfilled. On the other hand, for the sake of simplicity when you have quantities returned, you add those to a new batch rather than trying to track which batch they originally came from.
Name the first query qryAvailableQtys. The objective is to get a listing of batches of product that have available quantities that you can consume, sorted from the oldest batch to the newest batch. In order to match up to the order to be shipped, you need to work only on products that are contained in the order details. Because an order may have multiple products associated with it, it is necessary to use a ForEachRecord block so you can iterate for every product included in the order.
When you factor in the restriction that only the outermost ForEachRecord block can be edited, which precludes even doing a LookupRecord macro action inside a ForEachRecord block to edit the looked up individual record, it is necessary to ensure that you can get only products used by this order without impacting the query's updatability. If you joined the tblReceiving table with the tblOrderDetails table, you would have a non-updatable query and thus couldn't do an EditRecord macro action within the ForEachRecord block.
With this understanding, qryAvailableQtys should have only one data source: the tblReceiving table. Add a parameter, named plngOrderID, of Long Integer data type. Figure 16-19 shows the table and parameter dialog box. Note that plngOrderID is also selected and the last column is too long to fit and will be explained in the following text.

FIGURE 16-19: qryAvailableQtys with parameter dialog box
In addition to selecting the plngOrderID parameter, you should select all fields from the tblReceiving table. Add a criteria of <[QtyReceived] for the QtyConsumed column. This ensures that you do not select any batches that have been used up already. Add a sort on ProductID and then ReceivingDate, descending from oldest batch to newest.
You're probably wondering how you are going to filter out the products that aren't used in the orders. The answer is to add one more column, which was shown partially in Figure 16-19, that will perform an Exists() check. Enter the expression:
Exists (
  SELECT Null
  FROM [tblOrderDetails]
  WHERE [tblOrderDetails].ProductID = [tblReceiving].[ProductID]
    AND d.OrderID = [plngOrderID]
)
Note how the function uses the parameter plngOrderID to filter the order details table based on a certain order, and then consider how you also link the order details table back to the receiving table on the ProductID. This affectively gives you a way to filter the tblReceiving table down to only products that relate to an order. Most important of all, you do not lose the query's updatability.
NOTE If you're unfamiliar with the Exists() function, you might be wondering why the subquery is selecting nulls. Unlike the In() function, which you might have used before to return a list of possible values from another table, Exists() returns only a boolean value; true if there is a matching record anywhere in the table; or false if there is no matching record even once in the table. Thus, what you select is completely irrelevant and, because the function returns just a boolean value, it's more performant than an In(), which returns a table that must be evaluated separately. An easy way to demonstrate this is to do a SELECT 1 FROM aTable WHERE EXISTS (SELECT 1/0 FROM aTable); and note that you do not get a division by zero error when running the query.
Save qryAvailableQtys and create another one, named qryConsumedQtys. This one is more straightforward because in this case, you're creating a brand new receiving record for each returned quantity so you only need to get enough details to create a new receiving record. For this query, use tblOrderDetails and tblProducts as the source with the columns selected as shown in Figure 16-20.

FIGURE 16-20: qryConsumedQtys definition
Save the query and close it. You need to make a third and final supporting query that you should name qryOrderProductTotalQtys. As the name implies, it should sum the quantity grouped by product and by orders, as illustrated in Figure 16-21.
Save and close the query and return to tblProducts design view. Create another named macro called dmProductChangeConsumedQty. As you saw, you have two queries designed to handle both consumption and restoration of quantity. For this reason, you need to split the parts with an If/Then block to determine whether the process will be consuming the quantity or restoring the previously consumed quantity, as shown in Figure 16-22.

FIGURE 16-21: qryOrderProductTotals definition
The outer If/Then Block, as you can see, branches processing depending on whether pbolConsumeQty is true (the If branch) or false (the Else branch). As you can also see in Figure 16-22, you need two parameters for this data macro: one to indicate which order you need to work on and the other to indicate whether you are consuming quantity on hand or restoring it. The latter parameter is used to determine which branch of the If/Then block should be executed. Let's examine the steps to be performed when you consume the quantity.

FIGURE 16-22: Outer If/Then block
Within the true part of the If/Then block, you'll loop over the qryAvailableQtys query, passing in plngOrderID to its parameter. Because the query will return all available batches for a product and you don't necessarily want to consume all the available quantities, you need a system of taking only as much quantity as needed, from the right product. Recall that you sorted the query on ProductID and then ReceivingDate, assuring all products are grouped together when you iterate over a given product. You update only the batches where there are quantities that need to be consumed and once this is fulfilled, skip the rest of the records in that group until the next product group comes up. To achieve this goal, you need two If/Then blocks within the ForEachRecord block, as illustrated in Figure 16-23.

FIGURE 16-23: Expanded ForEachRecord block with two collapsed If/Then Blocks
The first If/Then block should be executed whenever you enter a new group of batches of that product, which will also always happen on the very first iteration of the ForEachRecord. You will use this block to reset variables to maintain the amount of quantities consumed so far between each iteration for a given product. You also need to know the quantity you need to satisfy the order's product quantity, which you do with a LookupRecord against qryOrderProductTotals. Set up the block as shown in Figure 16-24.

FIGURE 16-24: First If/Then block
Note the vlngProductID being set; you will refer to the vlngProductID in the outer If/Then block to help track whether you are on a record of another batch for the same product or a batch belonging to another product.
In each iteration for the same product's batch, you need to check how many items you've consumed so far, check how much quantity is still available to consume in this batch, and consume accordingly. When you've consumed all quantities that you need for this product, you can skip the rest of the batches belonging to the same product. Using variables you set in the previous If/Then block, you inspect the data in the current record and update the variables, as demonstrated in Figure 16-25.

FIGURE 16-25: Second If/Then block
As you see, the EditRecord block may either set the field QtyConsumed to the value of QtyReceived, consuming it completely, or increase QtyConsumed to the quantity that is needed to fulfill the order. When you have exhausted all quantities needed to satisfy the order, the vbolDone variable is set to true. That allows you to skip the remaining batches belonging to the same product without editing them.
This concludes your introduction of setting up a process to consume quantities when shipping the order. Next you need to deal with a scenario in which an order is returned. This example assumes that whenever an order is returned, the quantities can always be restored to inventory, and do not have to be disposed of otherwise. With returns, however, the process is easier because you only need to create a new receiving batch to receive the returned quantities, which will also restore the on-hand quantity. Within the outermost If/Then block's Else branch, loop over the qryConsumedQtys and write values into the QtyReturned field. If you recall from earlier in the chapter, a CreateRecord action cannot be executed inside a ForEachRecord block. However, you can circumvent this restriction by doing an EditRecord action inside the ForEachRecord and attaching an After Update table event to perform a CreateRecord action. Figure 16-26 shows how you would program the ForEachRecord block.

FIGURE 16-26: ForEachRecord block
NOTE Keeping tables open while running data macros so you can inspect the results of data macros gives you immediate feedback on edited records; however, you need to close and reopen tables to see newly created records.
Note that you update the QtyReturned field in tblProducts. Use tblProduct's After Update event to do so only when the QtyReturned field was the field that was updated; the Updated()expression tells you that. Perform a CreateRecord in the tblReceiving table. Because you need to use variables from tblProducts' fields, you need to perform a SetLocalVar action before entering the CreateRecord, which loses the current record's scope. The actions would be arranged similar to what you see in Figure 16-27.

FIGURE 16-27: After Update event for tblProducts
NOTE The LogEvent macro action can be very helpful in tracing the progress of your data macro and reporting values to validate that those variables are getting expected values.
Let's recap what you just built. The requirement was to maintain an accurate quantity on hand for any given product when handling returns. You adjust the on-hand quantity whenever a new receiving batch is added in the tblReceiving table, using its After table event. New records, increases to the QtyReceived field, and decreases to the QtyConsumed field all add more to the current on-hand quantity. Likewise, deletion of records, decreases to QtyReceived, and increases to QtyConsumed fields reduce the on-hand quantity.
You then ship the order by filling in the OrderShippedDate field, which increases the QtyConsumed fields of receiving batches, starting with the oldest batch first until as many as needed to fulfill the order. In the next section, you'll create the macro to do this.
A change to the QtyConsumed field in turn decreases the on-hand quantity of the product. When the order is returned, you update the QtyReturned field in tblProducts, which in turns creates a new record in tblReceiving to represent a new batch, which subsequently increases the on hand quantity.
Creating Validation Checks
As you can see, you can build a complete system to automate the tracking process, which can be very useful, especially when the dataset is either too large or changes so rapidly that using frequent aggregate queries becomes a problem. However, there is one other major factor to account for. You certainly do not want to kick off the process of consuming quantities only to find that you do not have enough to fulfill the order. Thus, it is prudent to check inventory levels before you start the process. In the next section, you will learn about building validations using Before table events.
Once again, you'll use a query as a recordsource to help you validate whether the action should be allowed. Create a new query named qryCheckQtys, using tblOrderDetails and qryOrderProductTotalQtys as the source. To filter the records, you need to select OrderID and ProductID. Finally, you'll need an expression to indicate whether there are sufficient quantities on hand to cover the total quantity requested in this order: [TotalQty]-[QtyOnHand]. The expression should be filtered to return only records with nonzero quantities. The query would look similar to what is depicted in Figure 16-28.

FIGURE 16-28: Query definition for qryCheckQtys
This query simply needs to check whether there are any records where the expression is positive, indicating a shortage that prevents a new order from being fulfilled. This means you simply look up whether there are any records or not, in a similar fashion to how the Exists() function was used previously. The Before Change table event for the tblOrders simply needs to check this query whenever the OrderShippedDate field is updated and use the RaiseError action to cancel the operation inside the LookupRecord, as demonstrated in Figure 16-29, if there is a shortage.
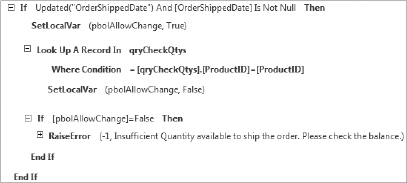
FIGURE 16-29: tblOrders' Before Change table event
The qryCheckQtys query checks for all products used by a given order so you can immediately decide if the order can be shipped. This also fits within the constraint placed on the Before table events where you cannot use the ForEachRecord block at all because LookupRecord is the only block available to you in this context.
Another example of using the Before Change table event is to ensure that nobody edits an order that has already shipped. While it's easy enough to check for and prevent edits to the order record itself as the shipping date is recorded on this record, there is no record of the shipping date on the order details level. Because you can perform a LookupRecord action in the Before Change table event, you can use that to check the order table and determine whether the order was shipped before allowing the change to the order details. The macro is quite straightforward; you just need a LookupRecord action with a RaiseError action, as shown in Figure 16-30.
FIGURE 16-30: tblOrderDetails Before Change table event
As you may remember, you can simply press Ctrl+A and then Ctrl+C to select all and copy the macro actions. You can then create a new Before Delete table event and use Ctrl+V to paste the actions to enforce the same rule within the Before Delete table event.
As you can see, Before table events offer you a new level of flexibility in managing validation in your web apps; with the LookupRecord action combined with a query, you can check for complex conditions all at the table level without being concerned about how the data is modified. In conjunction with After table events to initiate additional data processing, maintenance is more consistent where you have found a need to denormalize some data, such as storing calculated values. Obviously, these techniques can be misused to enable solutions that fall short of best practices in database design. That's where your experience will be valuable in guiding you toward a reasonable balance.
Data Macros and VBA
Because data macros were originally designed to be compatible with web databases in Access 2010, and because they are meant to be application-independent, there is no direct support for using VBA within data macros. However, you can choose to use VBA with the caveat that doing so means the tables can be used only when your Access application is running with the same VBA project loaded. Any other programs would be unable to modify the data within the tables You should take precautions to ensure that the VBA does not perform data access or modification. Strictly speaking, while there are no restrictions against VBA doing either data access or modification when called from a data macro, you cannot assume that such actions will be done in a predictable manner given that this method is outside the original design scope of the data macros. With that caveat in mind, let's look at how you can access VBA from a data macro. You have two possible routes available to you: via a query using Expression Services and in SetField macro actions.
Calling VBA Expressions in a Query
As you probably know, you can use VBA expressions within a query. To get a value from a VBA function into a data macro, you can create a query containing SQL such as SELECT MyVBAFunction(); and save the query. You can reference the value from the query in a LookupRecord macro action and assign the content to a local variable.
Calling VBA Expressions in a Macro Action
Whenever you create a new record or edit an existing record with CreateRecord or EditRecord, respectively, you can set the value of the SetField macro action to an expression that evaluates to a VBA function because the expression also uses Expression Services to reach into the VBA project and access the function. You saw an example of this method in the audit trail section covered in Chapter 20.
As you can see from the preceding discussions, additional options are available to you in situations where you cannot adequately express your needs using only macro actions and when you are willing to forego the application independence that data macros can offer. Using VBA indirectly via Expression Services enables you to create even more powerful solutions using data macros. Because it was not part of the original scope of the tool, it is prudent to carefully and thoroughly test any solution you create. Prepare for unexpected results, especially as concurrency becomes important.
SUMMARY
This chapter provided the opportunity for you to refresh and update your skills in several key areas for working with VBA. The examples are based on real-world scenarios so that they will be applicable and extendable to a wide variety of industries and needs.
Keeping in mind that you may be proficient in one area, but may not have encountered or worked with several others, the chapter is designed to provide value to developers with a variety of experiences and areas of expertise.
The discussion on user-defined functions armed you with several examples along with explanations of how and why to create and modify them to implement business rules. From the review of error handling, you have several examples with features that include custom message boxes, e-mail notifications and error logging. The functions are provided in the companion documentation so that you can easily copy, paste, and modify them to enhance your solutions.
As you worked through the query examples, you learned about several powerful query techniques and saw how effective they can be for collecting, updating, and compiling data. This is particularly true with the query by form techniques. You completed that section by seeing ways to create queries on the fly.
The chapter then moved to leveraging Windows API calls. In this section, you found some valuable tips, along with coverage of the fundamentals and cautions about potential conflicts and issues due to varying versions of Windows and programs. The discussion centered on a demonstration of how to create and manage a Windows Explorer window. Having completed the example, you should feel confident that you can not only understand API calls, but that you're also able to incorporate them into your solutions.
In the Macros section you learned how to use macros, especially data macros and table events, to perform different validation and data management tasks. Because table events are triggered by changes at the table level, you are assured that they are fired regardless of how the data get updated. That allows you to use macros to help support query performance by maintaining calculated values which can be indexed, maintain an audit history in which crucial values are saved regardless of how changes are made, and create supplemental records in related tables.
Now that you've refreshed and augmented your programming skills, you are in a good position to see how some of the techniques can be incorporated into your solutions. The next two chapters are about Access forms and reports. You'll be working with a contacts database based on a real-world scenario. The focus is on giving you some techniques and tools that add some professional touches to your solutions.