
8
Designing the User Interface
WHAT'S IN THIS CHAPTER?
- Organizing tiles and links, emphasizing discoverability and accessibility
- Understanding how different types of Views can be used and maximizing their advantages
- Identifying techniques for building user-driven filtering, using either built-in tools and/or supplementing with macros
- Recognizing which control best fits the requirement
- Describing how queries can be used to expand the form's capabilities
WROX.COM CODE DOWNLOADS FOR THIS CHAPTER
The code and sample downloads for this chapter are found at www.wiley.com/go/proaccess2013prog.com on the Download Code tab. They are in the Maid To Order Sample App download. Refer to the Readme.txt file also located there for installation instructions.
One of the challenges to productivity in building web components for your Access web applications is learning how to work with the new programming model to create functions like those you've come to rely on in your client databases. If you've been building Access databases for long, you have doubtless developed several techniques to solve common problems such as enabling user-driven filtering and pulling additional information from related sources to provide users with information pertinent to the process. However, with the new user interface for web apps, you have to approach many tasks differently. This chapter equips you with new tools that work well in the web environment, enabling you to build Access web apps just as productively as you've done for Access desktop databases.
NAMING CONVENTION FOR WEB APPS
In this chapter, you will be implementing the techniques learned from earlier chapters as well as the utility table and tally table previously discussed, you will need to follow a more formal naming convention. As you will see, the authors chose to extend the tried and true Reddick VBA convention for use throughout later chapters. Let's review the extensions.
First, scoping is more important in web apps; it can be easy to lose track of which variables are local or global. The authors chose to prefix a single letter to indicate the scope of a variable:
- v—Local variable scoped to current macro
- p—Parameters passed in from a calling macro block or to a referencing query
- g—Global variable (Note that all UI macro variables are global)
The next difficulty is that there are no data typing at all within UI macros, while data macros have data typing. Following the original convention rigidly, it would be correct to use the var prefix to indicate that the variable is a variant. However, the authors found that doing so made it hard to identify the intended data type. For this reason, all variables, regardless of whether they are strongly typed or not, will have a prefix using the conventional Reddick convention. One advantage of this approach is demonstrated by this:
glngEmployeeCode = "abc"
Because it's prefixed with lng, it is apparent that we are assigning a string to a variable that is meant to take integers, which helps in preventing data type mismatch errors.
You may have already noticed that the authors chose to use frm prefix for views. Here is a list of prefixes the author made up for the new controls and objects.
- acm—AutoComplete control
- mtx—Multiline Textbox control
- tab—Related Items control's tab
- web—Web Browser control
- lnk—Hyperlink control
- dm—Data Macro
We encourage you to give your naming convention careful thought and be consistent. It is much more important in web apps and will make development much easier.
PLANNING THE USER INTERFACE
The following discussion is based on the premise that the client has indicated they want the following forms — views in the new environment — in their web app:
- For managers to track progress for today's workload from each crew
- For managers and employees to report on performance, hours accumulated, and duties performed
- For employees to submit work reports at the completion of the job
You've already built the queries needed to support those views so we will focus on construction of web app views, along with macros that don't need to be standalone. In Chapter 4, you saw how the design surface and construction for web apps are different. This chapter focuses on identifying effective methods to use those new tools.
Before we wade in, we want to discuss one technique that will help greatly in simplifying the development. As you learned in Chapter 4, there is no functionality to copy and paste individual controls, which makes it hard to re-use some functionality you may have already built somewhere. You also know that once a view is created, its type cannot be changed. However, instead of having to choose whether you want a List view or a Blank view, you can use Subview controls to re-use a view.
REUSING CREATE, READ, UPDATE, AND DELETE VIEWS
If you find yourself creating a complex Create, Read, Update, Delete (CRUD) view that may have a number of macro actions to validate or manage the data entry operations, it would be a shame to have to do them all again just because you needed a different configuration for a list pane, or because it needs to use a different recordsource. One way to avoid this difficulty is to only use Blank views to accept the data entry or modification, based on the underlying view. The key concept is that this Blank view will then be used in a Subview control as a source object to other views.
You can then use any other List views or Blank views that are based on any query that contains the primary key of the table that is used by the Blank view. You can use that as the linking field for the Subview control. You can then create many different List views or Blank views with different recordsources and reuse only a single CRUD view. In this way you can achieve a consistent experience for your users while enabling a greater variety of ways to present the data. You will see this used when we discuss query-by-form techniques. Furthermore, you could also use it as a popup view for Summary view and certain controls such as Related Items control or AutoComplete control. This would then mean you could use Datasheet view for quick browse while providing the CRUD operations in the popup view.
EFFECTIVE NAVIGATION DESIGN
First, you will examine how web view design is different from traditional form design. You need to identify situations where methods used in traditional form design won't apply in a web context, or which require modifications. We will review traditional techniques so you can see where you need to change your mind-set when you approach web design.
Because filtering also plays a large part in an effective navigation design, you will also consider how to design effective filtering mechanisms to make it easy for users to find relevant data with minimum effort. We strongly believe that once you design an app that's easy to navigate and find things, the rest of the application design will come more easily.
Traditional Navigation Patterns
Let's review three common techniques that you may already have used in previous databases:
- A switchboard
- An index form
- A query by form
You may have different names for one or more of these methods and you may have implemented a few differences from what you see here, but you'll find our descriptions are conceptually similar. You will then learn how to create analogues to switchboards, index forms, and query by form navigation in the web environment.
Traditional Switchboards
Let's start our comparison of navigation patterns with what is arguably the most common form in Access databases, the switchboard. The switchboard in Figure 8-1 is from the Northwind database.

FIGURE 8-1: A typical switchboard form
The switchboard has been an Access feature since its inception and is probably the most familiar navigation pattern to seasoned Access developers, even if they do not use it in their own work. The layout of a switchboard is straightforward; an unbound form populated with command buttons provides a starting point to perform major tasks or start workflows. Users select buttons on the switchboard representing what they want to do and the switchboard takes them to that section of the database.

FIGURE 8-2: Web app's analogue of a switchboard
In a certain sense, the basic functionality of switchboards still exists in web apps. In the web environment, however, the buttons are replaced by tiles. Consider Figure 8-2, which illustrates how this functionality is implemented in web apps.
Tiles in a web app are presented to the user in a vertical column on the left side of the screen and can't be removed or relocated (although individual tiles can be hidden). And, of course, there is no separate, standalone form, as is the case with a switchboard. Navigation tiles are fixed in size and position on the screen. You'll learn more about the specific features of tile navigation later in this chapter.
In more complicated switchboards, it was common to change menu listings when certain buttons were clicked. This also continues to some extent in web apps. A number of links can be associated with each tile and can be used to navigate to a view, as shown in Figure 8-3.

FIGURE 8-3: Links that can be clicked to change views
This layout presents us with an advantage over the traditional switchboard design — there is no need to use a Back button to return to the main menu; tiles are always visible and submenus (Links) are always visible on their parent view. This visibility allows for easy switching from one workflow to another.
Furthermore, the web app layout means that only one view can be active at all times, which plays right into the goal of keeping our app simple and avoiding issues that arise from processing different workflows from different points. Later in the chapter, you learn more about how you can maximize the power of tiles and links to make it easy for your users to get around.
Index Forms for Navigation
Many Access developers have created index forms for their applications in order to present users with a two-level, or summary-detail, view of the data. First, you have a form that presents only important, or summary, details of a record for users to quickly peruse. You may add filtering, either static or user-driven, but typically, an index form is read-only. Most often, these forms are implemented as continuous or datasheet views so that the user can select one of several records displayed. Clicking a record in the index form drills through to the related view with all the details for that record. The drill-through can be a separate form, or a subform on the same form, as in Figure 8-4, which is from the Northwind database.

FIGURE 8-4: A typical index form
The full list of orders for each company is displayed in the datasheet in the upper half of the form. Clicking an order updates the datasheet in the lower half of the form to display details for that order. In other implementations, the details would be in a separate, editable, popup form, filtered to just those details.
An index form is also a good way to provide your users with a quick way to browse features in a web app. Microsoft now makes it very easy to implement this, providing a detail view, which as you saw in Chapter 4, provides an index on the left side, as shown in Figure 8-5. Selecting a name from the list enables you to navigate to the details for that employee.

FIGURE 8-5: A web app index form
Although the mechanics of setting up the form and navigating the records are somewhat different in a web app index view, the concept and methods should be familiar to you. You'll learn more about creating index forms, or views, for your web apps later in this chapter.
Query by Form
Sometimes, an index form isn't appropriate, maybe because network resources are too critical or because users need more control over how they filter records for selection and editing. This is where you can use the query by form technique. Query by form, as you probably know, presents the user with a number of unbound controls that support different types of filtering, as illustrated in Figure 8-6, based on the Northwind database.

FIGURE 8-6: Query By Form in Access client
Users select options from drop-downs, or fill in the appropriate textboxes, and click an Apply Filter or Submit button. Code behind the Submit button either presents filtered results in a fashion similar to an index form, as illustrated in Figure 8-6, or presents a different, filtered, form with all the details for that selection. This technique works very well, especially for applications with remote servers because the number of records returned in a filtered recordset is generally the smallest possible for the current operation, minimizing network traffic.
Query by form is also one of the techniques you can continue to use effectively in web apps. Because web apps use views, not forms, we will use the term query by view to discuss designing views based on the same techniques you are familiar with for query by forms. For situations where you can't just filter or browse on a single column, you will want to use query by view, which you can implement in a web app, as in Figure 8-7.

FIGURE 8-7: Query By view in a web app
The major change from your previous practice will be the coding process because query by form in a client database would typically be heavy in VBA and would probably use dynamic SQL to build the Where clause. On the web, you will need to adapt your query by form techniques to the fact that dynamic SQL can't be used in web apps. Again, you learn the specifics of using query by view techniques later in this chapter.
As you move to the details of designing views for web app navigation, let's start by reviewing the goals of web design and how the three navigation techniques you've seen can support those goals.
Web Design Principles
One of the goals of web design is to keep everything accessible and discoverable. A commonly repeated rule in web design is the “three-click rule,” which posits that users should be able to do what they want to do within three mouse clicks. Although some may argue that this exact number of mouse clicks is not always practical, the underlying principle is sound. You want to lay out your site so that everything is easy to find with the fewest possible mouse clicks.
Organizing the Navigation List
You will probably want to organize your website according to the major tasks your users need to accomplish. The tiles on the Navigation list should be designed to present those tasks to your users in a logical sequence, the highest priority, or most frequently used, tasks at or near the top. That's highlighted in Figure 8-8.

FIGURE 8-8: Organizing the navigation list
As you've learned in previous chapters, tiles are always bound to tables and to views on those tables. By default, when a web app launches, it will load the first view for the first tile at the top of the list. That can be convenient in getting users started quickly, especially if the view loaded represents the most common workflow users want to perform, as shown in Figure 8-8, for example, where managing jobs is the first selection.
Hiding Non-Working Tiles
Because each table in a web app has its own tile, which can't be deleted without deleting the table, you will need to hide tiles that don't fit into the overall navigation scheme for the app. For example, your apps will typically contain one or more lookup tables. The tiles for them should be hidden. Tiles for child tables that are edited only through subviews on a parent view should also be hidden.
Meaningful, User-Friendly Tile Names
You should also rename Tiles which are displayed using names that are more friendly and relevant to your users; we revisit renaming in more detail later in the chapter. You also want to group workflows that apply to an entity under Tiles. The individual workflow can then be a link associated with each tile. This gives you two clicks to get to a workflow you want to provide to your users.
Creating a Navigation List from the Tiles in a Web App
Let's take a closer look now at creating and organizing the tiles in a simple navigation list. Refer to Figure 8-9 to visualize how tiles and links will be organized.

FIGURE 8-9: Click a tile to navigate to that view
In Figure 8-9, you can see that the logical groupings for the Maid To Order app are:
- Tasks that involve scheduled jobs
- Tasks that involve customers
- Tasks that involve individual employees
- Tasks that involve crews
Underneath those general categories, you'll find more specific tasks, reached by links on the views that belong to each task. This navigation list is organized around the major tasks the app is designed to support.
Clicking one of the other tiles navigates to the view associated with that function. You can see how that looks in Figure 8-9. Note that links on the view navigate to tasks within the category, allowing you to view current and past employees.
As you can see, the tile named “Employees” has been clicked and the app has navigated to the related view, in which tasks related to Employees are managed. This view supports managing active employees separately from past employees. Figure 8-9 shows the View Current Employees List view, which is presented by default because it is in the first position. Clicking the View Past Employees link navigates to the second view, which shows only past employees.
The view in Figure 8-9 also demonstrates use of static filters, which are more common in the web environment. Each view has a filter built into its recordsource so that only selected employees are shown in each view. You can reach either view in only two clicks. This approach works quite well for a small set of records where additional filtering is not typically needed.
Navigation Design Logic
Here's where your prior experience with Access client databases will be of significant value. As you saw in Chapter 3, the mechanics of designing the navigation list of tiles are pretty straightforward. The logic behind the structure of the list you create, on the other hand, depends on your understanding of the business rules and work functions on which the web app depends.
As previously noted, you should hide tiles linked to tables you don't want to expose in the web browser — things such as lookup tables or child tables that you edit only within a subview.
Grouping and Naming Tiles and Linked Views
You should group like functions in the list, and organize them from top to bottom in a priority order as the user is going to use them, either sequentially or by frequency of use. Within a group, use different views, linked on the main view, to show the user different elements of that task. For example, links to View Rosters and Assign Job are available on the Crews tile.
We also want to mention that tiles should be named with nouns that provide users with a context for using them. You should then use action phrases such as “View Schedule” for the links on that view. This noun-verb motif is crucial in making the navigation intuitive and accessible to users.
As you have just learned, creating the top-level navigation list in a web app is not entirely different, conceptually, from what you've always done with switchboards. Clicking a tile (or a button) navigates to the appropriate view where the user's work will be done. Of course, as you've also seen, the techniques you will use to construct the navigation list and the tiles themselves are quite different from client applications.
It's also worth noting that the primary navigation flow in a web app is different from switchboards in that the navigation list and the page layout remain static. The internal work surface in the page changes to the current task. Contrast that to the switchboard approach where one form closes and another replaces it on-screen. The user can easily lose his or her place in that environment, as screens come and go, or popups layer on top of other popups. We are convinced the navigation strategy in web apps will make users more confident in that regard.
Mapping Links
Now that you've seen how the navigation list works in the web app, let's take a look at the design surface in Access. Consider Figure 8-10, which illustrates what happens when you add a new table.

FIGURE 8-10: Default links on a new tile
By default, when you add a table to an Access web app, it auto-creates two views, a List view and a Datasheet view. The tile for that table will have two links to those views. This may be helpful in some cases, where you're prototyping a quick web app, for example. Because we have a particular design in mind for our client, however, we will create our views from scratch. So let's remove the clutter in the navigation pane by getting rid of the default views (see Figure 8-11).
- If the navigation pane isn't shown already, click Navigation Pane on the ribbon's Home tab to bring it in focus.
- Select the topmost form listed under the Forms group, and holding down the Shift key, select the bottommost form to select all forms.
- Press delete or right-click the selection and select Delete; Then click Yes to the prompt that appears.
Now you have a blank slate and can start mapping custom views to your tables. At this point, you need to plan out the individual workflows you need to expose to the client. You'll also need to identify which workflow will be attached to which tile, and finally, you will need to decide what type of view is best for each workflow.
Planning for Navigation
The importance of that last point cannot be overstated: you can duplicate a view and reassign the duplicate to a different table or make it popup, but there is no way to change an existing List view to a Datasheet view or vice versa. Factor in the fact that you have no copy/paste facility to copy controls between views and you can see that prior analysis is crucial in planning out the correct type of view for each tile in advance.

FIGURE 8-11: Delete a group of views
Types of Views Available
Let's review the four types of views available to you.
- Blank view — Provides the most flexible layout option but no built-in filtering capability, ideal for unbound views.
- List view — Provides filtering on one column and is rich and flexible.
- Datasheet view — Has several more filtering options and can be applied to multiple columns, but layout is not as rich or flexible.
- Summary view — Provides summary and drill-through information, which can be filtered but is very limited in layout design.
You will need to plan the ideal layout with your client before you begin creating the views. One thing to remember is that the user already has clicked a tile to reach a view, so links to other views will be the second click. The most common workflow for a tile should not require additional, explicit clicks. So ordering the links on a view is also important.
Tile-Bound View and Popup Views
One design principle you need to remember when working with web apps is that you can work with only one active view at a time in the browser context. Generally, you should not expect to be able to reference other views. Variables in apps that are set via the SetVariable macro action do have a global scope and can be used to pass information between views. However, views have no Close or Deactivate events that get fired when you change a tile-bound view or open or close a popup view. Because of the lack of Close and Deactivate events, you have no way to definitively act when a view unloads or loses focus.
A major ramification of this lack of events on views is that you cannot reliably refresh a form automatically when returning from a popup. Therefore, if you want to be sure users do not need to remember to manually refresh data frequently, you may want to consider designing your layout using tile-bound views and the ChangeView macro action to navigate between them. This approach will implicitly force a Load event or open a popup view to allow editing of a subset of the data that's not already shown on the calling form.
Do not be tempted to create a button to close a popup view so you can add actions to it (as you might have done with a client database); in the web environment, all popup views always have the X button in the upper-right corner to close the popup, and you can't remove it. Clicking it circumvents any macro actions you may have added to a button's Click event. Again, there is neither unloading nor change of focus events for you to trap the user's action on the popup.
You can open another popup from an already open popup view. Even so, we recommend that you don't rely on the OpenPopup feature in a popup view. The user must dismiss each popup opened in this manner and this can be frustrating, not to mention confusing if the user is more than two popups deep. As previously noted, in fact, this confusion has been one of the main drawbacks to the switchboard in client databases. Furthermore, deep popups are not as discoverable as links on the main surface, which leads to questions from users about where they need to go to perform their tasks.
Controlling Access to Views
A tile-bound view cannot be hidden, so if you need to control access to a view, you should use a popup view so you can check the user's access level before opening that view. A tile can be hidden via the design surface but it cannot be hidden or unhidden at run time.
To reach a view associated with a hidden tile, you can use the ChangeView macro action. However, when you navigate to the hidden tile, you get all of the links to each view bound to that tile.
CREATING A SPLASH SCREEN
By default, web apps drop the user onto the first view that happens to be associated with the topmost tile. As you saw earlier, designing the navigation list of tiles allows you to control that starting point just by positioning the tiles. That is adequate for some scenarios where you want the user to start right away, especially if they are going to perform the same task each time they log into the site. You can select a default view and place it in the priority position on the navigation list. However, most applications are available to a diverse user base, members of which don't always perform the same set of tasks. For this scenario, having a splash screen may be helpful. You've probably used splash screens in many of your client applications.
In this section, you learn the steps to create a splash screen for your web app.
To get started:
- If you don't already have a table called tblUtility, create one. Click the Table icon in the ribbon to begin.
- Click the link to create a new blank table, as highlighted in Figure 8-12. Add an image field to the table for the logo you want to display on the splash screen. Name it LogoImage.

- Add a second field to the table so you can add a record to it. You'll add other fields later.
- Open the table in Datasheet view and add a single record, leaving the image field blank. You will load the image via the web browser. Save the record and close the table.
- Click the tblUtility tile that was created when you created the table.
- Click the
 button, as shown in Figure 8-13, and provide the following parameters:

FIGURE 8-13: Add a view for the splash screen.
- View name: frmSplash
- View type: Blank
- Recordsource: tblUtility
- Click Add New View to save the new view.
- Open the new view for Edit, illustrated in Figure 8-14.

- Click the image field on the ribbon to add it to the form, as shown in Figure 8-15. You'll upload an image into the field from the web app later.
- Click the label control from the ribbon, position it, and then select the Formatting
 button in the popout buttons.
 - Enter Maid To Order as the caption for the label and resize as needed.
- Center the label under the image.
- Click the
 , choose Rename, and put in a space to make the link invisible.
 - Save the form, naming it frmSplash, then close it.
- Delete the default List and Datasheet views.
- Hide the tile for the utility table.
- On the ribbon's Home tab, click the Advanced menu and select On Start Macro.
- Add a ChangeView action and enter the name of the utility table and the splash form.
- Save the form and launch the app in the browser.
- The initial view will load and be replaced by your new splash view.
- From the web page, you can edit the image control to add the logo. Remember to click the edit button (the action button with the pencil icon).
- Once the logo image is added, return to design view and set the form as Read-Only to prevent further editing. Do this by hiding the splash view's Action Bar, which will prevent editing in the browser, effectively making the view read-only.

NOTE Although Blank views, such as the one we used for the splash form, don't have a read-only property, you can take advantage of the fact that most views, by default, can't be edited unless you explicitly click the edit Action button. Removing the Action bar from the view effectively makes it read-only since the user has no way to enter the edit mode.
DESIGNING AN INDEX FORM
If you've traditionally used an index form to browse records (see Figure 8-4), this is the place where you will need to make a more significant change in your approach. Actually, in a web app, List Views have built-in support for searching, which includes “contains” searching. Furthermore, these views are already optimized to load records only as needed, without requiring users to explicitly request a record or a set of records. In that sense, then, web app views are already very close to our traditional concept of an index form. As you'd expect, however, there are some differences.
We will consider three different kinds of index forms, which you can adapt to your web apps, listed here from simplest to most complex in terms of implementation:
- List view
- Summary view
- Datasheet view
We will look at the functionality they offer without requiring coding on your part and what you can add to each one.
List View: Searching on a field
In a List view, search is based on the field you designate for that purpose. In other words, in a List view for employees, the Search field would be the appropriate key field for employees presented in that view. Figure 8-16 repeats the List view you first saw in Figure 8-3. Notice that the employee name is the Search field for this form. For workflows pertaining to employees, searching on the employee's name is typically all you need to get to the right record and get going on needed operations. As mentioned, the Search box uses “contains” matching, which makes it very flexible and does not require you to code anything beyond assigning the appropriate field in the view. You learned about the List pane and Search box Chapter 3.
For workflows where you perform some kind of browsing or searching, design the form around the most crucial column. The column you choose should reflect the kind of searching your users most often need to do, such as the name of a person or a date of service. With only a single search field available, it's important to consider the choice carefully.
Let's use the Crew Roster view to learn about the relevant components of a form in List view, which make it very suitable for use as an index form.
Start by selecting the Crews tile, as illustrated in Figure 8-17.

FIGURE 8-16: Web App view functioning as an index form

FIGURE 8-17: Select view for editing
The views available for crews include View Roster and Assign Jobs. Clicking the View Roster control reveals the ![]() popup. Clicking it reveals the shortcut menu from which you will select the Edit option. As you can see in Figure 8-18, the form is loaded into the design surface for editing. The Field List sheet for the table to which the form is linked may also appear.
popup. Clicking it reveals the shortcut menu from which you will select the Edit option. As you can see in Figure 8-18, the form is loaded into the design surface for editing. The Field List sheet for the table to which the form is linked may also appear.

FIGURE 8-18: frmCrews ready for editing with Field List displayed
Because fields in the linked table are added to the view by default, you probably don't need the Field List, so you can dismiss it. Also, if you've previously added fields to the view for editing and are done with that step, you can dismiss the Field List when returning to make further edits.
Access Default Versus Human Intelligence
Access will make its best guess as to which field to use as the Primary Search field in the Search box. Much of the time, you can accept that default, but you should review Access's suggestions to be sure they meet your needs. Compare, for example, the selections in the existing Crew Roster form, called frmCrews (see Figure 8-19), with the selections offered in a new view for the same table (see Figure 8-20).

FIGURE 8-19: Search fields selected

FIGURE 8-20: Search fields suggested
You can see that Access picked CrewName for the Search field. If you built the table similar to the way the customer table was built in Chapter 7, you might have defined the Display column as part of Lookup, which could be the CrewName. If the Lookup field had CrewLeader as the display name instead, Access would default to CrewLeader for the search field. You can always change the default field to get the results you need.
Also, you can see that you have the option of providing a Secondary Search field, in this case CrewLeader, to provide a more complete search experience. This illustrates once again how your experience as a developer is a crucial part of designing an intuitive, useful interface. Although Access does a great deal of plumbing work behind the scenes, it is still a piece of software without the level of intelligence needed to get the job completely done right.
Designing the Search Field
As you can see in Figure 8-19, the search field in a List view has several components that make it a perfect tool for an index form.
First, it uses a Primary field from the linked table to search existing records. Optionally it can also use a Secondary field from the table to refine the search; in this case, it presents a list of crews and the assigned crew leader. In this situation, having both the crew and the crew leader visible makes it a little easier for users to pick the crew they want to work with.
Second, it allows you to select both a field on which to sort the list and the sort order, ascending or descending.
The search field also supports the inclusion of icons, or images, along with the text name. Our sample application, Maid To Order, doesn't need such images, but Figure 8-21 has a screenshot of a web app that does use them.
FIGURE 8-21: Icons supporting search terms
Summary View: Searching on an Aggregated Value
Occasionally, you need to find records that are based on some kind of total or a calculation. For example, you might want to identify your most popular products, which task has the highest rate of success, who sold the most items, and so forth. This is where a summary view is useful. While other view types can be based on queries that contain totals, Summary views allow you to view both the summary values and the individual records that contribute to the aggregated output. Furthermore, you can also add a popup view to enable detailed drill-throughs of the individual records, providing your users with a very easy way to assess the components that make up a given total.
The process of building the search list for a Summary view is very much like the process of building the List view so the same design considerations we discussed for List view apply. We will focus on additional considerations that come with choosing the right grouping and calculations.
For Maid To Order, a good use of a Summary view is to look at employees' off hours balance. Every year, Maid To Order allocates a fixed amount of hours for vacation and personal time to employees. To facilitate employees asking for time off, the app provides a view for employees to use when requesting time off, as shown in Figure 8-22.

Managers, therefore, need to be able to quickly see the total hours an employee has requested since their last anniversary date. Having that information is crucial for managers to be able to manage employees' availability.
A new Summary view would provide limited options for its recordsource, as Figure 8-23 indicates.

FIGURE 8-23: Available options for a new Summary view's recordsource
Two factors contribute to the limited choices. First, we chose to create a view bound to the Employee tile, which is based on the tblEmployees table. Therefore, the recordsource for the Summary view needs to be associated with that table in some way. Second, only queries that include the tblEmployees table are listed. However, the table we actually want for this view's recordsource is tblTimeRequests. Therefore, we need to create a new query that will join tblEmployees to tblTimeRequests. Even if we opted to create the Summary view on the tile bound to tblTimeRequests, we would need a query to filter the hours to only those within the current year because managers are interested in seeing how many hours have been accrued in a given year.
The query, shown in Figure 8-24, joins all of the information you will need for your new Summary view.

FIGURE 8-24: Query joining tblEmployees and tblTimeRequests and selecting needed columns
The query shown in Figure 8-24 contains a lot of detail that is hard to read, so let's look closer at the criteria you need to add to the query. As mentioned, the query only needs to include time requests within the current year, but Maid To Order is not considering a calendar year. The query must be based on the year from one anniversary date to the next for each employee, and that is based on the employee's hire date. Each employee could have a different anniversary date and, therefore, their time requests could be included or excluded on different dates. Because an anniversary date could fall anywhere in the calendar year, you need to check whether the filter needs to be based on the current year's anniversary date or the previous year's date, depending on whether you've already passed an employee's anniversary date in the current year. In other words, if today is the 12th of August and the employee's anniversary date is August 1, the filter is based on the current year going forward because the anniversary date has passed. If the employee's anniversary date is August 30, the filter is based on the previous year going back because the anniversary date has not yet passed.
Figure 8-25 shows how you can build the expression via the builder to describe this complex criteria.

FIGURE 8-25: Expression Builder with criteria checking employees' anniversary dates
Here's the full expression so you can read it more easily:
     [tblTimeRequests].[StartOffDateTime] >= IIf(
       DateFromParts(
         DatePart(Year,Today()),
         DatePart(Month,[HireDate]),
         DatePart(Day,[HireDate])
       )>Today(), DateFromParts(
         DatePart(Year,Today())-1,
         DatePart(Month,[HireDate]),
         DatePart(Day,[HireDate])
       ), DateFromParts(
         DatePart(Year,Today()),
         DatePart(Month,[HireDate]),
         DatePart(Day,[HireDate])
       )
) Or [tblTimeRequests].[StartOffDateTime] Is Null
You may notice the expression shown in Figure 8-25 is not necessarily the most optimized expression possible because we're doing calculations on a field that is not sargable. As you probably know, nonsargable queries can degrade performance. In this case, the number of employees and time requests are relatively small, so that may not be a concern. In a table with many more records, such as tblJobs, you may want to consider alternatives that can be optimized.
One possible performance enhancement you can add is a hard filter of tblTimeRequests.StartDateTimeOff >= DateAdd(Year, -1, Today()) to restrict all time requests only to a one year period from today because no anniversary date can be more than a year away. Because that expression resolves to a static date, both the SQL Server and Access database engines are able to evaluate the filter using the static date first, and then scan the remainder using the original anniversary expression. This is relatively better than requiring it to scan the whole tblTimeRequests and testing if StartOffDateTime is later than the last anniversary date.
Another option is to add a calculated column to tblEmployees that provides the current anniversary date and index on it, simplifying the query. This is another area where your past Access experience will be an asset in designing good queries.
Save the query as qryEmployeeTimeOff. Once the appropriate query is built and saved, you can then return to the parent tile and add a new Summary view using the new query, as in Figure 8-26.

FIGURE 8-26: Creating a Summary view with a query
As with a List view, Access will attempt to guess what you want for your list pane and display. As you saw in Chapter 4, a Summary view looks somewhat similar to a Related Item control and you cannot add controls directly to it; you can only tell Access which fields you want displayed in the main area. Figures 8-27 and 8-28 show how Access set up the list pane and the main body, respectively.

FIGURE 8-27: Access default for the summary list plane

FIGURE 8-28: Access default for Summary view main area
As discussed in Chapter 4, on List views, this is also where you may want to revise the view to better suit the goals for the app. Because the goal here is to report on employees' accrued off hours since their last anniversary date, you'll use the employee's name as the grouping column and their accrued hours will be the calculated field using Sum as the expression. Figure 8-29 shows how you will set up the summary list pane to get the results you want.

FIGURE 8-29: Selected fields for the Summary view list pane
Summary view allows only four fields in the main area, but also provide a facility to open a popup view just like the related item control. Therefore, you will want to select the four most important columns for the main area, and leave the rest to the popup view if you need to provide users a way to drill through for more details on a record.
You also need to be sure not to repeat the employee's name on the detail since it's already shown on the List pane. However, you might want to include off hours because the main area reports individual records whereas the List pane shows only the total.
Figure 8-30 shows a possible selection for display on the main area in the design surface.
Figure 8-31 shows this view as it displays in the browser. The four fields are numbered for your reference.
The last piece of the Summary view you'll learn about is the popup view. It is important to note that popup view selection is also restricted to views that are bound to equivalent recordsources in their parent view, as you can see in Figure 8-32.
Generally speaking, it's simplest to have the popup view use the same recordsource as its parent view so you would probably create a new blank view based on the same query, add the remainder of the fields missing from the Summary view, and provide a caption, as Figure 8-33 illustrates.
Do not expect to be able to edit the records even in a popup view. It's best to think of a Summary view and its popup view as an interactive report and use a separate view to edit the records. Even so, the capability to drill through is new to Access and we feel that this is very useful for many situations where users will ask, “Okay, what is this total made of?”

FIGURE 8-30: Four selected fields for Summary view main area

FIGURE 8-31: Summary view main area displayed

FIGURE 8-32: Selection for popup views

FIGURE 8-33: Popup view for Time Request details
Datasheet: Filtering Cumulatively
If you find that a single field, aggregated or not, is not adequate for comprehensive browsing in a particular situation, you may want to consider using the Datasheet view. Like their client counterparts, Datasheet views come with several filtering and sorting options built-in, as demonstrated in Figure 8-34. The list is about to be filtered on Organization name.

FIGURE 8-34: Schedule datasheet with right-click menu displayed
As shown in Figure 8-35, you can add more filtering by selecting additional columns and selecting other filter criteria — the Crew assigned to the job — which adds to the previously set criteria.

FIGURE 8-35: Adding second criteria to the datasheet with a filter already applied
This approach provides a very easy way to give users more complex filter criteria. Note, however, that all filter criteria can only be exact matches; there is no facility for wildcard matching on multiple columns. Furthermore, Figure 8-35 shows where an excessive number of possible values, such as the dates and times for scheduled jobs, may be problematic for filtering on the datasheet.
You can increase flexibility by adding custom action buttons on the schedule view to provide some common filtering options. For example, recognizing the difficulty of filtering by date and time for jobs, you could provide employees with an action button to filter the list to show only today's jobs. With that much smaller list, employees can more easily apply their own additional filtering. As Figure 8-36 shows, we provided an action button that will apply a static filter of tblJobs.ScheduleDate=Today() to the schedule List view.
Even though the filter itself is hard-coded, the results will change day-to-day, which makes it very well-suited as a custom Action Bar button.
Filtered Lists in Drop-Downs
Be aware, however, that filtering via action bars does not reduce the number of values available on any of the datasheet's filter drop-downs. Look at the date and time list in the filtered datasheet view in Figure 8-37. The list has been filtered to today's date, but all other dates are still available to be selected.
Thus, a datasheet provides you with a quick way to give your users a wide range of filtering choices with little or no coding on your part. However, when the range of choices is large and users need more than just exact matches, it's a good time to start looking at the query by view approach.

FIGURE 8-36: Additional filter under a custom action button

FIGURE 8-37: Full list of choices available in the Filter drop-down
Handling Filter Limitations on Datasheet Views
To put the query by view approach in context in web apps in perspective, let's look at some considerations you must take into account when designing Datasheet views, notably the difference in controls and programmability that are available on a Datasheet view. You will see what controls and techniques cannot be used in a Datasheet view and how to select appropriate columns.
The following controls are not available on a Datasheet view:
- Label
- Web browser
- Image
- Hyperlink
- Subview
- Related item
Note that you can work around the exclusion of labels and hyperlinks by using textboxes or buttons, formatted appropriately. We think that for the most part you would expect these controls to be excluded for the datasheet layout anyway.
On the other hand, you can use a popup view, which could contain the excluded controls. You can open the popup via a button on the datasheet, or use the ChangeView macro action to switch to a List or Blank view and filter it to the current row in the datasheet.
With those limitations and options of the Datasheet view in mind, we need to consider the difference in programmability between the different views.
First, on a Datasheet view, the After Update event is not available on any controls, which would have that event in any other kind of view. Thus, certain controls such as checkboxes and combo boxes will have no events to which you can attach a macro. Buttons and textboxes support the Click event, which you can continue to use in a datasheet view.
Next, the SetProperty macro action will generally not work for any kind of controls on a datasheet, with the exception of setting the value of Textbox controls. In effect, the layout of a Datasheet view is totally static. If you need to be able to toggle the visibility of a control, change formatting and so forth at run time, then you need to use a different view, such as the List view.
Let's look at how you can build the Schedule datasheet. You'll follow two previously discussed design principles: providing custom action buttons to provide additional filtering options and creating an Edit button to provide an easy way to get to the detail, which then can be edited.
Because you need some data from other tables, you need to base the Schedule datasheet on a query. Figure 8-38 shows the query, qryJobsScheduled, which is the recordsource for the Schedule datasheet.

FIGURE 8-38: Query for Schedule datasheet's recordsource
In the Schedule datasheet view, you need to include the JobID field in order to enable the Edit button's functionality. However, the user doesn't need to see the JobID field. Thus, you will add the JobID field to the query and then hide it in the view, as shown in Figure 8-39.

FIGURE 8-39: Hiding JobID field
Because this is meant to be an index form, which is typically read-only, you would tick the Read Only checkbox shown in the Figure 8-40.

FIGURE 8-40: Making the view read-only
NOTE As you previously learned, most views don't have a read-only property, but the Datasheet view does. That's because values in Datasheet views can otherwise be edited without using an edit Action button. So, the view itself has the read-only property available.
Next, let's look at managing the Action Bar. Because you made the form read-only, you no longer need the two default action buttons for adding and deleting records. Delete them, and then add a custom set of action buttons. Figures 8-41 and 8-42 show how default action buttons can be deleted and custom buttons added.

FIGURE 8-41: Deleting default action buttons

FIGURE 8-42: Adding custom action buttons
WARNING Modifying the default action buttons on the action bar is a one-way street. Once removed, they can't be added back. The only way to restore default action buttons is to delete the view and recreate a new view with a new action bar.
Click the ![]() menu beside the action bar to open the action button menu, as shown in Figure 8-42.
menu beside the action bar to open the action button menu, as shown in Figure 8-42.
When the action button menu opens, you can rename the action button, select an appropriate icon from the palette, and add the macro action for the action button's On Click event.
You can use Action Bar buttons to filter records, each with different criteria, so the macro content of each Action Bar's Click event is very similar. Let's look at the Click event handler for the Today action button shown in Figure 8-43.

FIGURE 8-43: Today action button click event handler
As you may expect, the only macro action needed is RequeryRecords, which provides an input of [qryJobsScheduled].[ScheduleDate]=Today() to the Where clause.
Assuming that you've already applied the appropriate filters for the rest of your custom action buttons, you can move onto the Edit button. Figure 8-44 shows the Edit button in the web app.
Again, the event handler behind the Edit button is quite straightforward, as you can see in Figure 8-45.

FIGURE 8-44: Edit action button in web app

FIGURE 8-45: Edit button click event handler
For this situation, we used the ChangeView action to move to a detail view and filter it to the same JobID, which is made available via the hidden control (refer back to Figure 8-39). Note that although we chose to use ChangeView here, you may have a scenario where the OpenPopup macro action would be a preferred solution. We chose ChangeView to guarantee that no requery on the original view will be needed after closing the popup view.
CREATING A QUERY BY VIEW
So far, we've reviewed the built-in options and simple approaches that provide your users a wide variety of navigation and filtering. We expect that for the bulk of your applications, these will be time-saving tools on your tool belt. However, just as a toolbox will never be complete if it's missing a hammer, we need to revisit our good old mainstay of Access programming — the query by form technique.
We will start with a review of the changes to SQL construction in web apps and then discuss how you can use macros and parameters to transmit complex filter criteria. We will then wrap up with a discussion of more advanced topics such as filtering on a related table and using tables to store filter results.
SQL Construction
Even though you only have macros to work with in web apps, you will be pleasantly surprised to find that you can build powerful query by views once you understand a few key points in your design. Let's start with SQL. As mentioned earlier in our discussion, a typical Access query by form would usually employ dynamic SQL, which was just a string assembled in VBA and submitted to the database engine (which may not necessarily be the Access database engine) to collect the matches, as demonstrated in Figure 8-46, taken from the Northwinds database.

FIGURE 8-46: Dynamic SQL built in VBA
Partially because the Access database engine cannot execute multiple SQL statements and partially because an Access application is relatively isolated in comparison to a web application, this practice is far more common in Access databases, but in the context of web development, this practice is eschewed. The threat of SQL injection is ever present and you must guard against it, especially now that Access web apps are on a website. Consequently, Microsoft has designed various macro actions that contain Where clauses and Order By clauses to parameterize the SQL you will use. Refer back to the Where clause in Figure 8-45, where you see no dynamic strings at all.
SQL injection is a common threat against some big iron databases. Malicious users can issue arbitrary SQL commands by breaking out of the string concatenation that application code performs. It is arguably the number one reason why you should not concatenate SQL strings but use parameters instead. Access database engines cannot execute multiple statements so the usual approach of terminating a string and then appending an additional SQL statement to insert arbitrary SQL commands, followed by comments, will not work against Access. Even so, it is not immune to variants where a string is terminated and an expression inserted. Because Access web apps use SQL Server and are available online, this is a very important issue for you to understand and to account for.
It may be more useful to look at Figure 8-45 in very much the same way as you should look at what is typical in a SQL Server stored procedure. By using parameters as inputs to a stored procedure, you do not need to concatenate a number of strings together to form a SQL statement; you just write the SQL directly using the parameters. Figure 8-47 illustrates how SQL Server embeds the parameter in the stored procedure definition and expects calling code to pass a value as a parameter.
Some of you may be also familiar with the way Access allows parameters in queries, as shown in Figure 8-48; the parameter opens a small dialog box when the query runs. For various reasons, ranging from lack of ease of use to inconsistent performance, most seasoned Access developers have largely shunned this approach.

FIGURE 8-47: A typical SQL Server stored procedure with parameters
PARAMETERS
  [Beginning Date] DateTime,
  [Ending Date] DateTime
;
SELECT DISTINCTROW
  Employees.Country,
  Employees.LastName,
  Employees.FirstName,
  Orders.ShippedDate,
  Orders.OrderID,
  [Order Subtotals].Subtotal AS SaleAmount
FROM Employees
INNER JOIN (
    Orders
    INNER JOIN [Order Subtotals]
      ON Orders.OrderID = [Order Subtotals].OrderID
) ON Employees.EmployeeID = Orders.EmployeeID
WHERE Orders.ShippedDate Between [Beginning Date] And [Ending Date];

FIGURE 8-48: A typical Access query with parameters
Both Access queries with parameters and parameters passed to SQL Server stored procedures are conceptually similar to how you should treat the input in a macro action in a web app where SQL code is expected. Attempting to pass in a string representing a SQL snippet to a web macro, as in Figure 8-49, will fail because the string is not treated as a SQL statement, but rather as an input to a parameter.

FIGURE 8-49: Passing in a string variable to a macro Where Clause results in errors
Therefore, you will need to modify your usual approach of writing dynamic SQL as a string and get used to writing SQL using parameters. You'll get used to using parameters liberally all over your applications. In doing so, you gain the advantages of being able to strong-type your input values and move away from complications arising from handling strings within strings, delimiting literals, and so forth.
Parameterized queries continue to exist in Access web apps and, as Figures 8-50 and 8-51 show, you can add parameters to a query.

FIGURE 8-50: A parameterized query in an Access web app query

FIGURE 8-51: A parameter dialog box for an Access web app query
This provides you with additional options that may not be practical for those cases where you need to pass parameters via a Where clause argument in a macro action. For example, Where clauses are typically restricted to only 255 characters. No such restriction exists inside the query itself. Therefore, you could pass in a large number of parameters to a query that would far exceed the 255-character limitation for a Where clause.
However, as we alluded to earlier in this book, you are limited in how you can use a parameterized view. A tile-bound view cannot have a parameterized query as its recordsource because there is no means for passing the parameters to a view's recordsource.
However, you certainly can pass in parameters to a popup view via an OpenPopup action, as Figure 8-52 demonstrates.

FIGURE 8-52: An OpenPopup macro action with parameters
At this point, you've covered the first steps toward building your own query by view in an Access web app. Because you will want to leverage parameters in web apps, let's go over techniques that will help you get the most out of parameters.
Techniques for Filtering
Because you will need to use parameters rather than build a dynamic SQL statement for your query by views, we'll review what techniques you would use to support a specific filtering requirement. You will then see those techniques applied in the query by view. But first we want to examine the technique in isolation so that you can see how it should be incorporated into your work.
Making a Parameter Optional
Often, seasoned Access developers would simply test a given control on the filtering form to determine if there is data in it and if so, add the new criteria to the SQL string being assembled. In web apps, parameters must be hard-coded and present at all times, whether you want to use them or not. This is similar to the difficulties that seasoned Access developers faced with the traditional parameter queries in the Access client. However, because the queries are executed against SQL Server and SQL Server has a much more developed query optimizer, it is able to make better choices than what we'd have seen with Access' parameterized queries and thus optimize parameterized queries.
You would probably want to use an expression similar to this:
([TableName].[FieldName] = [pvarParameter] OR [pvarParameter] IS NULL)
Whenever you do not want to supply a value for a given parameter, simply pass in a null value which will cause the condition to evaluate true based on the second predicate of pvarParameter IS NULL. This would return all rows. This technique can enable you to re-use a single query without having to create a copy of that query just to have different parameters.
Enabling/Disabling a Parameter With Another Parameter
For scenarios where you need to allow for filtering on nulls or use parameters with Yes/No data types, you cannot use the above technique. The alternative is to use two parameters; one to signal whether the filtering is requested and another to actually filter. Here is an example of how you can achieve this for a Yes/No field:
([TableName].[YesNoFieldName]=[pvarParameter] OR [pvarParameterExcluded]=Yes)
Note that both pvarParameter and pvarParameterExcluded parameters are of Yes/No data type. Similar to the previous technique, instead of checking whether the parameter is null, we can check if the second parameter signaling request to filter is No which then requires the first predicate to evaluate to true to return this row, effectively filtering those rows. This technique is also useful for when you want to filter on nulls:
(
  [TableName].[NullableFieldName] = [pvarParameter] AND
  [pvarParameterIsNull] = No
) OR (
  [TableName].[NullableFieldName] IS NULL AND [pvarParameterIsNull] = Yes
)
As you can see, pvarParameterIsNull determines whether the first outermost predicate or second outermost predicate should be used to evaluate the row. When pvarParameterIsNull is set to Yes, the second predicate will search for nulls in the field irrespective of whether pvarParameter has any values or not. Likewise, when it is No, only non-null values will be evaluated and, if it matches the pvarParameter, the row will be returned.
It is important to note that the given expression assumes you only want either null values or non-null values, in effect making this parameter required. If you want to support an optional parameter that also supports searching for nulls, you must provide additional predicates. You can do so by wrapping the original example and adding one more predicate:
(
  Same expression from above example
) OR (
  [pvarParameter] IS NULL AND [pvarParameterIsNull] = No
)
Optional Joins
Sometimes you need to filter based on values contained in another table but don't want to join the table if the filtering isn't requested. One approach you can employ is to use an outer join between tables with criteria on the outer table as shown in the following predicate:
(
  [OuterTableName].[FieldName] = [pvarParameter] AND
  [pvarFilterOnOuterTable] = Yes
) OR (
  [pvarFilterOnOuterTable] = No
)
Whenever a filter is applied on an outer table, the outer join effectively becomes an inner join and thus you get the filtering you need. When you don't want the filter on the outer table, setting the pvarFilterOnOuterTable to No will switch to the second predicate and allow all rows to be matched.
One complication you do have to deal with is that sometimes the joins can lead to duplicating of the inner table's row, which may not always be desirable. This typically will necessitate you solve the duplicating, possibly by either making the query result return distinct rows or using an aggregate query to roll up the multiple rows from the outer table into a single row so that there is a one-to-one ratio between the inner table's row to the outer query's rows and thus no unwanted duplicates. The particulars will determine which option is more appropriate for restricting unwanted duplicates.
Cascading Parameters
Sometimes, you may find that you need to apply a filter at different points and not all at once. When you have a query that needs to join to another parameterized query, you easily solve the need by passing along the parameters through the top-level query just as you could do in the Access client. To illustrate, consider the query shown in Figure 8-53 which joins an aggregate query to a customer table.
Now suppose that you wanted to be able to count jobs performed for a customer within a certain date range. Had you filtered the same query shown in Figure 8-53, you may end up eliminating customers who did not have any jobs within a date range, a result which may be undesirable. Thus, to ensure that no customers are filtered out, you would make the aggregate query a parameterized query, with the criteria illustrated in Figure 8-54.

FIGURE 8-53: qryCustomersStatistics Query

FIGURE 8-54: Parameterizing qryCustomerCountJobs query
However, since we won't open qryCustomerCountJobs directly, we need a means of supplying values to the parameters defined in the qryCustomerCountJobs. To do this, we add parameters of the same name and data types to the qryCustomerStatistics query. Even though the parameters are not used anywhere in the qryCustomerStatistics, we need to marshal the parameters forward into the qryCustomerCountJobs and thus achieve the counting of jobs only within a certain date range without eliminating any customers.
Naming Parameters
The naming of parameters is crucial to success. When you supply the parameter to the second query via an appropriate macro action, Access will also pass it forward to the underlying query without requiring you to reference it directly.
This technique opens up the potential for building more complex queries that can be initiated by a single OpenPopup macro action (or equivalent macro action). The view or data macros need to reference only the top-level query.
Filter Tables
In some situations, it's likely to be easier to create a special table to cache the matched rows. A filter table would typically have the following two fields in addition to the AutoNumber:
- Lookup field to the primary key of table to filter upon
- Session identifier, could be the user's name, user's e-mail address, or maybe some generated numeric code that is known to only one user, to prevent users from seeing results of other users' filtering
There may be a few reasons for wanting to create a filter table. Three possible reasons are:
- Allowing you to use a popup view that can be updatable and thus enable users to edit records returned by filtering
- Allowing users to cache the filters for quick reuse
- Enable filtering on a many-many relationship
Should you choose to use a filter table, you will typically need a data macro(s) to clear and populate the table filter for each user requesting a new filter and a query that will perform the actual filtering. The query usually only needs to simply insert the primary key of the table to be filtered on into the filter table with the identifier supplied by data macro. Recall from Chapter 5 that UserEmailAddress() and UserDisplayName() are available in UI macros only and you must pass the results of those two functions into a data macro via a parameter. Even if you opted instead to use a numbering scheme to uniquely identify each user — or more likely, the session they are in — you'd still need to come up with a system of generating those numbers for each user's session. You could either generate them in a UI macro and pass them into the data macro, or you could generate them inside a data macro, which you should then return to the view invoking the data macro.
When you are ready to display the matched records, you can do so by using a query that joins the table with the filter table and matching on the filter table's session identifier. Due to the need for identifying the matched records from one user's filter to another user's filter, you will need to parameterize the query for the view. Thus, you will likely find that popup views are a good way to display the results specific to each user.
Handling Large Numbers of Parameters
Sometimes you may have a complex requirement and need more than just a few parameters. As you learned earlier, the Where Condition parameters in macro actions are limited to 255 characters, and you don't have SQL view to design in. If you need your queries to be available in a web browser, using a parameterized query will often involve large numbers of parameters. However, you will want to learn how to manage the query effectively. Due to the nature of the Query Designer, a criteria row is created for each possible filtering. To illustrate, compare the following T-SQL snippet with Figure 8-55 and see how Query Designer will expand those criteria into several rows:
WHERE (
  [tblCustomers].[Firstname] = @ptxtFirstName
  OR
@ptxtFirstName IS NULL
) AND (
  [tblCustomers].[LastName] = QptxtLastName
  OR
  @ptxtLastName IS NULL
) AND (
  [tblCustomers].[ActivationDate] = @pdatActivationDate
  OR
  @pdatActivationDate IS NULL
)

FIGURE 8-55: Excessive number of criteria rows
As you can imagine, a more complex query with several parameters can result in expansion of numerous criteria rows, far too many to manage manually; that's especially true when using techniques discussed above to allow for optional parameters similar to what is seen in Figure 8-55.
We want to reassure you that though the large amount of criteria rows appears inefficient, the underlying SQL is quite reasonable. You can prove that to yourself by viewing the SQL definition of the underlying table-valued function in SSMS connected to the web app's database. You will learn how to connect to the database from SSMS in Chapter 11.
One way to facilitate managing these queries is to save the SQL Where clause externally for easy reference. For example, when you need to build such queries so that the functionality is available on the web, you can save the SQL Where clause in a text document. Whenever you need to edit the query, simply delete all columns that are used for the parameters and replace them from your template. Refer to the section in Chapter 5 on manually copying queries for a refresher on selecting the columns. Keeping in the mind that each criterion cell has a limit of 1,024 characters, you can paste in the SQL snippet into the criterion cells for as many columns as you need. What you select for the column in the first row should actually be irrelevant because instead of using typical shorthand expressions such as =[pvarParameter] in the criterion cells, you'll be writing the complete predicate such as [TableName].[FieldName] = [pvarParameter]. When the predicate is complete, the Query Designer is intelligent enough not to apply this criteria to whatever column is selected and treats it independently. This is demonstrated in Figure 8-56.
Note how you do not start with an operator, such as =<some value> as you typically do in the Query Designer. You can see in Figure 8-56 that the expression must have a left-hand expression such as [tblJobs].[CustomerID]. The parameter is then assigned from the right hand of the expression. This should enable you to manage complex queries and make them available in web browsers.

FIGURE 8-56: Complete predicates pasted into qryFilterJobs query
At this point, you've learned how to create the parameterized queries you'll incorporate into your query by views. Next, you'll apply that knowledge to some design requirements in a practical example of a query by view.
Design Requirements
To put the conceptual discussions in focus, we will go through an example and apply all the techniques discussed into a single query by form. As you can imagine, building a query by form can be a complex task, so to help facilitate the discussion, we've made available a sample that you can download that demonstrates all the capability discussed in this section. The materials are also available in the sample app, Maid To Order, available for download. To view the sample, you will need to provision the .app package to your SharePoint site. The instructions for provisioning an .app package can be found in Chapter 14.
For Maid To Order's jobs, the following criteria need to be filtered:
- Range of job's scheduled date and time
- Range of job's invoice date
- Exact matching on customer's full name
- Fuzzy matching on customer's first name
- Fuzzy matching on customer's last name
- Searching on customer's organization via a list
- Showing active versus inactive customers
- Displaying only jobs that are completed, paid, not paid, or either
- Listing jobs that took a specified range of minutes to complete
- Listing jobs that have specified services provided

FIGURE 8-57: Layout of the query by form
Here's the layout of the query by view that supports all 10 filter criteria illustrated in Figure 8-57.
Let's think about what we need to have to support the required functionality. As you can see in Figure 8-57, we need two views to collect the inputs to the filters requested by the user. Like the traditional query by form, the main view is unbound, but the Filter By Service subview is bound to a filter table based on the tblServices table. The filter table for services is named tlkpFilterServices.
We need a query that will accept all the inputs from the main view and join to the tlkpFilterServices table. Because of the number of joins and complex criteria, the query will be non-updatable and since we want to enable editing of the matched records, we will insert the result of the query into a filter table for the jobs, called tlkpFilterJobs. In order to perform the inserts, we need a data macro to gather the parameters from the main form and run the query, then add the results into the tlkpFilterJob table.
Once this is finished, we can display the results in a new popup view. Figure 8-58 demonstrates how the popup view should render the matched records and enable users to navigate through the records and perform any edits if desired.

FIGURE 8-58: frmJobsFiltered popup view
So to recap, we need the following objects:
- Filter table for services (tlkpFilterServices)
- Filter table for jobs (tlkpFilterJobs)
- Query by View (frmFilterJobs)
- Filter by services view (fsubFilterServices)
- Filtering query for services by user (qryFilterServicesSelected)
- Filtering query for jobs (qryFilterJobs)
- Data macro to collect inputs, run the query and populate tlkpFilterJobs table (dmFilterJobs)
- Query for popup view's recordsource (qryJobsFiltered)
- Popup view to display matched records (frmJobsFiltered)
We will walk through each step necessary to build the query and we will point out to you when we use the techniques discussed in the previous section at each step and why we use them. This can seem like a big task but the intent is to demonstrate how far you can stretch the capability of web apps and give you a wide range of examples within a single context. With this background, let's get started.
Creating Filter Tables
Because we want to support both filtering on a many-many relationship, namely finding jobs based on what services are provided at the given job, and allow for editing of matched job records, we need two filter tables that correspond to the jobs and services table. They are structurally similar; the only differences being that the Lookup fields reference their respective tables and the field names are “Job” and “Service” respectively. Figure 8-59 illustrates the design of the tlkpFilterJobs table.

FIGURE 8-59: tlkpFilterJobs table design
The goal is to populate the UserName field with UserEmailAddress() supplied by a UI macro to identify which filter records belong to which users. You will see this in use when we build the frmFilterJobs view.
Creating Data Macro to Clear Selections
With a filter table, it is necessary to be able to clear the previous selections. Because filter tables may contain results from more than one user, we only want to clear all records associated with that user. You'd probably create a macro similar to dmFilterServicesClear which has the steps illustrated in Figure 8-60.

FIGURE 8-60: dmFilterServicesClear data macro definition
As you might expect, it's fairly straightforward; doing a ForEachRecord macro block, deleting each record matching the UserName field. Because UserEmailAddress() is only available in UI macro, it needs to be passed in as a parameter. We will pass that in the query by views.
Creating Query By View
We'll start with fsubFilterServices first and then see how it is used in frmFilterJobs's subview and how it fits together with its parent view.
fsubFilterServices is a Datasheet view with tlkpFilterServices as the recordsource. The user can add new records to indicate they want a job that has one of those services indicated. The view should always start out empty. In order to achieve this, we need to run the dmFilterServicesClear data macro to delete any existing filter records on tlkpFilterServices for this user then filter the recordsource to an impossible criteria. Because the UserName field on tlkpFilterServices table is required, the Load event of the fsubFilterServices view will perform a RequeryRecords with the criteria [tlkpFilterServices].[UserName] Is Null. Both steps in the Load event are demonstrated in Figure 8-61.

FIGURE 8-61: fsubFilterServices view's Load event
The sole Action Bar button (abbClearAll) also provides a way for users to quickly clear all selections using the dmFilterServicesClear data macro. The macro actions behind abbClearAll's click event are identical to the actions in the fsubFilterServices view's load event.
The fsubFilterServices has an AutoComplete control (acmServiceID) and a pair of textboxes (txtFiltered and txtUserName). The user would typically only need to interact with acmServiceID to select the service they want to filter the jobs on.
txtFiltered textbox is a non-editable textbox formatted as a hyperlink, which you can achieve by underlining the font and selecting blue as the font color from the ribbon as illustrated in Figure 8-62.

FIGURE 8-62: Underlining and coloring the fonts of a textbox
The calculation for the txtFiltered textbox is given as:
=IIf([acmServiceID] Is Null,"No","Yes")
The primary purpose of the txtFiltered textbox is to provide visual feedback to the user whether the selection the user made was actually saved or not. Recall from Chapter 4 that Datasheet view does not have a mechanism to force saving records or perform actions after updating. Generally, the user just needs to make the selection and the record is saved right away but it is possible to leave the edit in limbo by moving focus to one of the other controls outside the fsubFilterServices view. Though we could use a checkbox, the checkbox does not have a Click event. The button control does have a Click event but its caption cannot be set to a calculation. Thus representing a textbox as a hyperlink gives you the most flexibility in generating dynamic content that can be clicked to perform additional actions. The Click event can be used to either force a save of the unsaved selection or delete a saved record. The actions are listed in Figure 8-63.

FIGURE 8-63: Macro actions behind txtFiltered textbox's Click event
The UserName textbox (txtUserName) is hidden from view and is there in order to allow us to supply a default value by reading the UserEmailAddress() into the textbox function whenever a new record is created, thus associating this service filter with the current user.
With this, we are ready to build the frmFilterJobs and then add fsubFilterServices as a source object for frmFilterJobs' subview control.
frmFilterJobs view is a Blank view with no recordsource. Figure 8-64 illustrates the layout in the design view.

FIGURE 8-64: frmFilterJobs view in design view
The Format property needs to be changed so that textbox controls that accept date or time will have the appropriate date/time format. The textboxes accepting first name and last name need no special formatting.
There are two AutoComplete controls; one for the customer's full name (acmCustomerFullName) and another for the customer's organization (acmCustomerOrganizationName). Note that the acmCustomerFullName has its Bound Field property set to CustomerID though it will display the customer's full name for the user to select from. In contrast, acmCustomerOrganizationName's Bound Field property is same as the Display Name property. This reflects the fact that the OrganizationName field on the tblCustomers table is a text field, not a Lookup field, and we want to search on the text of the organization name which may match a number of customers. Had it used CustomerID as the acmCustomerFullName did, it would only match a single customer, which is not how the acmCustomerOrganizationName should work.
The Completed combo box (cboJobComplete) and Paid combo box (cboJobPaid) both use the same value list which contains 3 options; “Either”, “No”, and “Yes”. Both will have “Either” as the default. The combo box is used instead of a checkbox because it is more intuitive than a tri-state checkbox, which isn't available in the web app anyway.
The Time Elapsed combo box (cboJobTimeElapsed) is also a value list but has the following entries:
Furthermore, there is no default for this control.
The txtCurrentUserName textbox on upper-right corner of the view is a hidden control with default value set to =UserEmailAddress() and will be used to provide the return value of UserEmailAddress() to be passed into the data macro for filtering by this user.
The subview control (subFilterServices) is not linked to the parent form. Though it is possible to link the subview to the txtCurrentUserName to filter the service selection by current user, at the time of writing, an error is raised if a new record is inserted in the subview when the subview control is linked. You already saw earlier that fsubFilterServices will automatically populate the UserName field with the return value of the UserEmailAddress() function.
Filtering Query
Before we can add macro actions to frmFilterJobs' Apply Filter button, we need to build the filtering query and the data macro to process the inputs from users and populate the tlkpFilterJobs filter table. The main filtering query will need a subquery, so we'll create the subquery, qryFilterServicesSelected. It takes a single parameter, ptxtCurrentUserName, which should be returned by UserEmailAddress(). Figure 8-65 shows how it should look in the Query Designer.
We then need to create the qryFilterJobs query that will use three tables and the qryFilterServicesSelected query. Because a job must have a customer, the join between tblCustomers and tblJobs can be an inner join. However, a job may not always have services selected already, so we'll left-join the tblJobs into txrfJobServices. This table is then joined to the qryFilterServicesSelected. You can see how it relates in Figure 8-66.

FIGURE 8-65: qryFilterServicesSelected query definition

FIGURE 8-66: qryFilterJobs query's data sources
Next, because the query has potential to return duplicate records of jobs due to joining the txrfJobServices table, we'll use Unique Values to eliminate duplicate records. This works since we only need data from a single table, tblJobs. To ensure that the filter will have consistent results, we need also to apply ordering to the qryFilterJobs query, using the tblJobs.ScheduleDateTime and tblCustomers.FullName fields. Though we only need JobID field, we have to show both ScheduleDateTime and FullName because we chose to show unique values, requiring that the columns in the ORDER BY clause also appear in the SELECT clause. Furthermore, we want to ensure a maximum limit of rows is returned to ensure that users don't request more rows than they can intelligently browse. One hundred rows are entered in the Return textbox. Figure 8-67 shows how the query is configured for distinct and the maximum number of rows to return.

FIGURE 8-67: qryFilterJobs configuration
Note that when a query has a limit on how many rows may be returned, it becomes essential that the query itself be ordered to ensure that the results returned are consistent even when the number of matched rows exceeds the maximum value allowed. Applying order on the popup view would be too late because the popup view would display what is returned by the filtering query.
The qryFilterJobs query will need the following parameters to support all the criteria offered on the frmFilterJobs view:
- plngCustomerID - Number (No Decimal)
- pdatScheduleDateFrom - Date
- pdatScheduleDateTo - Date
- ptimScheduleTimeStarts - Time
- ptimScheduleTimeEnds - Time
- pdatInvoiceDateFrom - Date
- pdatInvoiceDateTo - Date
- pbolComplete - Yes/No
- pbolCompleteExcluded - Yes/No
- pbolPaid - Yes/No
- pbolPaidExcluded - Yes/No
- ptxtFirstNameContains - Short Text
- ptxtLastNameContains - Short Text
- ptxtOrganizationName - Short Text
- pbolCustomerActive - Yes/No
- plngTimeSpentMin - Number (No Decimal)
- plngTimeSpentMax - Number (No Decimal)
- ptxtCurrentUserName - Short Text
- pbolFilterServices - Yes/No
You may notice that some parameters are dependent on other parameters and when you build the UI macros to ultimately run the qryFilterJobs query, you will add actions to set the related parameters value accordingly. Some parameters should be self-explanatory to you.
First, plngCustomerID parameter filters on the tblCustomers' CustomerID field which is the primary key. This is useful when you also filter on a job's data such as schedule date ranges for only a single customer. This is mutually exclusive from the groups of parameters filtering on customers such as ptxtFirstNameContains, ptxtLastNameContains, and ptxtOrganizationName. It's a straightforward optional parameter; the snippet is:
([tblJobs].[CustomerID]=[plngCustomerID] Or [plngCustomerID] Is Null)
pdatScheduleDate* parameters enable us to search on a date range. Because there is a start and end parameter, we need to handle them together. If you have a similar requirement, you will find it much easier to use the >= and < operators instead of the BETWEEN ... AND ... operator because for the last day, we want to include the whole time during that last day. By advancing the last day to the next date, users will see results that have times other than midnight of the last day. For example, if the user specifies an end date of April 15th, 2013, the UI macro should increment it to April 16th, 2013 and use the < operator, ensuring that records containing data like April 15th 1:30 pm will be included in the results. Here is the snippet to set up the date range for schedule date:
(
  (
    [tblJobs].[ScheduleDate]>=[pdatScheduleDateFrom]
    OR
    [pdatScheduleDateFrom] IS NULL
  ) AND (
    [tblJobs].[ScheduleDate]<[pdatScheduleDateTo]
    OR
    [pdatScheduleDateTo] IS NULL
  )
)
Note that the outermost parentheses are needed to ensure that the date range will be evaluated as a single predicate separate from any other predicates. The syntax also allows the user to enter only one parameter and leave the other parameter blank, enabling search on date range with only a start date or with only an end date. Both the ptimScheduleTime* and pdatInvoiceDate* parameters are quite similar so we'll list the snippets:
(
  (
    [tblJobs].[ScheduleTime]>=[ptimScheduleTimeStarts]
    OR
    [ptimScheduleTimeStarts] IS NULL
) AND (
    [tblJobs].[ScheduleTime]<[ptimScheduleTimeEnds]
    OR
    [ptimScheduleTimeEnds] IS NULL
  )
) AND (
  (
    [tblJobs].[InvoiceDate]>=[pdatInvoiceDateFrom]
    OR
    [pdatInvoiceDateFrom] IS NULL
  ) AND (
    [tblJobs].[InvoiceDate]<[pdatInvoiceDateTo]
    OR
    [pdatInvoiceDateTo] IS NULL
  )
)
You also can see how you would link together multiple parameters; for each optional parameter snippet, you need to wrap the snippet in a pair of parentheses and link them with AND operator. You can opt to use the OR operator if you don't want the filters to be cumulative. However, this is a decision that requires hard-coding so it is not something you can switch between in run time unless you are willing to maintain two versions of queries.
The next set of parameters use the technique of enabling/disabling filters based on other parameters. Both the Paid and Completed fields on the tblJobs table are a Yes/No field, and the parameters are Yes/No. Because none of those may be null, we need to use an extra parameter to signal whether we desire to filter on a Yes/No field:
(
  [tblJobs].[Completed]=[pbolComplete]
  OR
  [pbolCompleteExcluded]=Yes
) AND (
  [tblJobs].[Paid]=[pbolPaid]
  OR
  [pbolPaidExcluded]=Yes
)
Note how the values contained in pbolCompleted and pbolPaid are irrelevant if the pbolCompletedExcluded and pbolPaidExcluded parameters, respectively are set to Yes. Because the predicates are linked with an OR operator and there is only a single value for the pbol*Excluded parameter, the predicate will evaluate to true for all rows if those parameters are set to Yes. Only when the pbol*Excluded is set to No, does the row have to pass the more stringent test in the first predicate to be matched.
The next set of parameters demonstrates using the LIKE operator with wildcards. This is basically a variant of the optional parameter technique, with the difference being that instead of using the = operator, we wrap the parameter in wildcard metacharacters and evaluate it using the LIKE operator:
(
  [tblCustomers].[FirstName] LIKE Concat("%",[ptxtFirstNameContains],"%")
  OR
  [ptxtFirstNameContains] IS NULL
) AND (
  [tblCustomers].[LastName] LIKE Concat("%",[ptxtLastNameContains],"%")
  OR
  [ptxtLastNameContains] IS NULL
)
Note the use of SQL Server's metacharacters rather than Access' metacharacters, such as % instead of *. Also, as you can imagine, you could perform the concatenating within the UI macro if you want to support a wider variety of possible wildcard matches.
The Organization Name parameter is a straightforward optional parameter so we'll note that and move on:
(
  [tblCustomers].[OrganizationName]=[ptxtOrganizationName]
  OR
  [ptxtOrganizationName] IS NULL
)
The parameter for matching active or inactive customers is effectively a required parameter and cannot be omitted. To reflect this, different syntax is used:
(
  (
    [tblCustomers].[Inactive]=No
    AND
    [pbolCustomerActive]=Yes
  ) OR (
    [tblCustomers].[Inactive]=Yes
    AND
    [pbolCustomerActive]=No
  )
)
Instead of matching up the parameter, hard-coded criteria are used to evaluate each predicate; allowing only either active or inactive customers but not both.
The parameters for time spent on a job will also encompass a range, except that instead of dates or times, the range is numeric, however, the principle is similar:
(
  tblJobs.ElapsedTime >= [plngTimeSpentMin]
  OR
  [plngTimeSpentMin] IS NULL
) AND (
  tblJobs.ElapsedTime <= [plngTimeSpentMax]
  OR
  [plngTimeSpentMax] IS NULL
)
Though we could use BETWEEN ... AND, the more verbose syntax of >= and <= allows us to choose whether we will use only one start or end point or both together.
This brings us to the last parameter used in the query, pbolFilterServices which allows us to optionally join in the results of the tlkpFilterServices table:
(
  (
    qryFilterServicesSelected.ServiceID IS NOT NULL
    AND
    [pbolFilterServices] = Yes
  ) OR
  [pbolFilterServices] = No
)
The pbolFitlerServices parameter will be evaluated within the data macro and you will see it later on. Note how we convert the outer join into an inner join by forcing the field from the qryFilterServicesSelected query to be non-null when the pbolFilterServices parameter is set to Yes. Otherwise, the result of the query is simply ignored and all rows from tblJobs will be returned.
As discussed before, the ptxtCurrentUserName parameter exists to accept the return value of UserEmailAddress() executed in a UI macro and though it is not used anywhere in qryFilteriobs, it will be useful to the qryFilterServicesSelected where you need to be able to identify services selected by the user, if any.
To put it all together, each predicate needs to be wrapped in parentheses and linked with an AND operator in between. Because each criterion cell has a limit of 1,024 characters, you need to break up the whole expression into 3 parts that can be pasted into each criterion cell. Figure 8-56 demonstrated how you would paste the snippets into each cell. Recall from the discussion about 8-56 that when a predicate has a field reference on the left hand of the expression, the Query Designer knows that it doesn't relate to the field specified in the same column.
It's important to note that ordering will be helpful in a filtering query, even if the only purpose is to return keys to match the field. You may find it necessary to limit the number of rows.
This completes the construction of your filtering query for the query by view. In your own web apps, you may not need to build a query as complex as this, but you should be able to cherry-pick from the many techniques demonstrated in this discussion to build your own filtering query to meet your particular requirements.
Building Data Macros to Populate Filter Tables
Though in principle, you could open a view based on the filtering query, and thus avoid the need for a data macro and a filter table, we have found that using a filter table helps avoid problems with using a filtering query directly as a recordsource. That is due to data type mismatches between the unbound controls on the query by view, which may be passed directly into the query's parameters as text. Furthermore, this facilitates creating views that are updatable. Should you choose to simply use the filtering query as the recordsource, you could skip this section.
With that said, the logical design of the data macro, to be named dmFilterJobs, is like this:
- Set up variables to track the number of rows processed.
- Clear any previous filter set by the same user.
- Check whether the user has requested filtering by services.
- Execute the filtering query (qryFilterJobs), and for each returned row:
- Add the row into tlkpFilterJobs with the current user's identity.
- Increment the numbers of processed rows.
- Check if the maximum number of rows to process has been reached and if so, stop processing any further rows.
- Return the numbers of rows processed to the calling macro.
The data macro will need these parameters, which are mostly similar to what is needed for the qryFilterJobs query.
- plngCustomerID - Number (No Decimal)
- pdatScheduleDateFrom - Date
- pdatScheduleDateTo - Date
- ptimScheduleTimeStarts - Short Text
- ptimScheduleTimeEnds - Short Text
- pdatInvoiceDateFrom - Date
- pdatInvoiceDateTo - Date
- pbolComplete - Yes/No
- pbolCompleteExcluded - Yes/No
- pbolPaid - Yes/No
- pbolPaidExcluded - Yes/No
- ptxtFirstNameContains - Short Text
- ptxtLastNameContains - Short Text
- ptxtOrganizationName - Short Text
- pbolCustomerActive - Yes/No
- plngTimeSpentMin - Number (No Decimal)
- plngTimeSpentMax - Number (No Decimal)
- ptxtCurrentUserName - Short Text
Note that the data macro will supply the pbolFilterServices parameter required by the qryFilterJobs query.
NOTE At the time of this writing, parameters of Time data types are problematic in passing from unbound controls on a view to a query even when correctly formatted. Thus, a workaround is to pass it to the data macro as a Short Text parameter. Within the data macro, it can be then passed into a Time parameter for query with no problem. You also can use TimeFromParts() function to help support passing around Time parameters between UI macros and data macros.
There is really no benefit in returning more than 100 records to the users for browsing—most of the time users will find it hard to review that many. It's usually best that users be as specific as possible and adjust the filter if they find the initial result set too broad. Though we are already limiting the number of rows within the filtering query it is also useful to be able to return the count of rows. Because we are already looping in order to insert a new record, there is not much to gain by using a Count query so we'll use a local variable to track the number of inserts to be returned to the calling macro. You may also find it useful to have the limit also applied in the data macro to guard against situations where a coding error causes more insertions than you expected. Figure 8-68 illustrates the setup for the three variables, vlngCurrentRecord, vlngMaxResults, and vbolFilterServices. You'll see the first two used in the ForEachRecord macro block later and the last one used in a LookupRecord action.

FIGURE 8-68: Setting up local variables in dmFilterJobs data macro
Before populating the new filter results into the filter table for the user, you need to ensure that any previous results are removed from the filter table. We can use a ForEachRecord macro block to delete the records found in the table, matching on the UserEmailAddress()'s result. This is shown in Figure 8-69.

FIGURE 8-69: Removing user's previous results from tlkpFilterJobs table
Because we have an optional join with tlkpFilterServices to allow users to filter for any particular services, we need to determine if we want to enable the join or not and populate the qryFilterJobs' pbolFilterServices parameter accordingly. To make that determination, we would create a Count query that counts the records found in tlkpFilterServices, filtered to the user and use a LookupRecord macro block to get the result of the count to pass into the qryFilterJobs query via vbolFilterServices variable. Figure 8-70 shows how the qryFilterServicesCountByUser is designed, and Figure 8-71 shows how we use the LookupRecord macro action. Note the parameter used in the query.

FIGURE 8-70: qryFilterServicesCountByUser query design

FIGURE 8-71: LookupRecord macro block in dmFilterJobs data macro
We now come to the centerpiece of the dmFilterJobs data macro; looping over the matched rows from the qryFilterJobs query and adding the row to the tlkpFilterJobs, along with the username. Note that for each iteration, we increment the vlngCurrentRecord variable. If it is 100 or greater, we use an ExitForEachRecord macro action to leave the loop early. Study Figure 8-72 to see how this pieces together.

FIGURE 8-72: Body of ForEachRecord macro action iterating over the results of qryFilterJobs query
The last step in the dmFilterJobs is to return the number of rows matched. We will see this used in the UI macro that will call the dmFilterJobs data macro. You can see how SetReturnVar macro action is used in Figure 8-73.
![]()
FIGURE 8-73: SetReturnVar macro action
This completes the construction of dmFilterJobs. Before we can return to the query by view and add macro actions behind the frmFilterJobs' Apply Filter button, we need to create the popup view that will display the results.
Building a Popup View to Display the Filter Results
We'll need a List view, named frmJobsFiltered, to navigate through the matched records returned by the filter. We will assume that there is already a CRUD view that has all controls we want to use for editing a job so the List view only needs a single Subview control to display the CRUD view. The layout of the List view is illustrated in Figure 8-74.

FIGURE 8-74: Layout of frmJobsFiltered view
The view will need to display the result of matches, filtered to the username. Because it will be a popup view, we can use a parameter query to supply the username. Figure 8-75 illustrates how we can design the qryJobsFiltered query which also contains sufficient information to sort and display jobs in the list pane in addition to providing the JobID primary key to join for the Subview control.

FIGURE 8-75: qryJobsFiltered query design
Figure 8-76 shows how you would fill in the Subview control's properties to link on JobID field between the frmJobsFiltered and fsubJobs views which is available via the ![]() button.
button.

FIGURE 8-76: Data properties of the Subview control
We will assume the fsubJobs view is already built. You can look in the sample web app to examine how the fsubJobs view is designed. You've now built the component parts you need for the query by view, so we can move on to the last step—building the event handler that will start off the whole chain of filtering and displaying the results.
Building a Click Event Handler
The last piece to connect all the pieces we've built so far is the Click event for the Apply Filter button on frmFilterJobs view. The macro will perform some conversions and reformat the inputs from the view. As you may recall, there are additional parameters that the user may not necessarily input directly so we need to handle those parameters in order to run the data macro as expected.
Because there are Time parameters, we want to perform an explicit cast of Time using TimeFromParts(), one of the few conversion functions available in UI macros, which enables us to validate that inputs for time before proceeding with the data macro. Figure 8-77 illustrates how the gtimScheduleTime* variables are populated from the textboxes via TimeFromParts() and DatePart() functions.
In Figure 8-77, you can only see part of the second SetVariable macro action, the one where gtimScheduleTimeStarts is set. Here's the part that you can't see:
TimeFromParts(
  DatePart(Hour,[txtScheduleTimeStarts]),
  DatePart(Minute,[txtScheduleTimeStarts]),
  DatePart(Second,[txtScheduleTimeStarts])
)

FIGURE 8-77: Populating Time parameters
The other expression not visible in Figure 8-77, where gtimScheduleTimeEnds is set, is similar, except that it acts on [txtScheduleTimeEnds] instead. The next part is to handle the Yes/No parameters, which also include an extra *Excluded parameter that should be populated. Because we are using a combo box, we need to evaluate the value of the combo box and set the parameter value accordingly. The process is shown in Figure 8-78.
The last part before running the data macro is setting the elapsed time parameter. This demonstrates how you can use a combo box to provide users with a list of common choices and populate the parameters within the UI macros. Only a part of the populating process is demonstrated in Figure 8-79; you can refer to the download sample web app for a complete example.
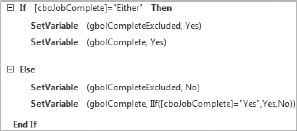
FIGURE 8-78: Setting Yes/No parameters

FIGURE 8-79: Setting Elapsed Time parameters
You can simply pass most parameters directly from the controls into the data macro parameters, using only variables that we populated from previous steps. You can see how we invoke the data macros and fill in the parameters in Figure 8-80.
Note that we get back the value of matched records from the data macro. This brings us to the last part of the event handler. We need to determine whether we had any matches and if so, open the popup view to display the filtered results and pass in the current username. In case there are no matches; we simply display the messagebox for the user to try a different filter. You can see how you'd build this in Figure 8-81.

FIGURE 8-80: Invoking dmFilterJobs data macro

FIGURE 8-81: Evaluating the result of dmFilterJobs and acting upon it
With this last event handler in place, you have completed the link among several objects you created in previous steps to support a complex filtering requirement. As you can see, you have a great amount of power by combining various techniques we discussed for using parameters effectively. This is definitely a great improvement over previous Access 2010 web databases where even if you were to do something similar, it would have been far too slow and cumbersome to use. You now can provide your users with an option of using filters within their web browser. For Maid To Order, this enables maids to quickly answer various questions and make necessary adjustments out in the field about their jobs without having to be at a desktop computer or call someone at the office to get and update the information.
SUMMARY
In Chapter 4, you learned about many new tools made available in Access web apps and what they can do. In this chapter, we took this base knowledge and explored effective techniques you can employ with various design patterns to create rich, powerful web apps. You saw how you can translate traditional client design patterns such as switchboards, index forms, and query by views into the equivalent representations in Access web apps.
You studied the differences behind traditional form design and navigation controls and learned how the new tiles and links provide a convenient noun-verb motif to make navigation easy and accessible. You also considered the principles behind the web design and what it means in terms of minimizing clicks required to reach the desired workflow, empowering the user to do things without having to hunt for the right context.
You started a simple splash form, which also included consideration of the need to hide some tiles and expose the views associated with the hidden tiles.
You then took an in-depth look at how you can build an index form and three different approaches behind the design pattern. You saw that you can use a List view, a Summary view, or Datasheet view to provide the index form functionality, and you saw how they differ so you should be able to identify which is the best view for your particular workflow.
You took a deep dive into the query by view method, covering many changes required to design one effectively in the new environment. You saw how you should adapt your approach to SQL construction and leverage parameters to your advantage for controlling filtering. You then pieced together the building blocks for a simple query by view, a blank view for inputting criteria and a popup view for displaying the matched results.
You also saw how you can incorporate additional techniques, such as passing parameters into nested queries via the top-level queries and creating a filter table to enable optional joining.
Together with the information you will acquire in Chapter 9 you are well-equipped to come up with solid designs to support your users' workflows and enable them to do their work effectively. You will now turn to studying new capabilities you can add to your web apps by leveraging the power of macros.