
11
Connecting to Your Web App
WHAT'S IN THIS CHAPTER?
- Discovering and acquiring connection details
- Creating a connected Access desktop database
- Managing connections
- Using Excel to connect to the database
- Using SQL Server Management Studio to connect to the database
WROX.COM DOWNLOADS FOR THIS CHAPTER
The code and sample downloads for this chapter are found at www.wiley.com/go/proaccess2013prog.com on the Download Code tab. They are in the Chapter 11 download and individually named according to the filenames listed throughout the chapter. The app packages for the web apps in this chapter are called Maid to Order and Maid to Order Customer.
In this chapter, you learn about using other tools to enrich the web app you've developed. In preceding chapters, you've seen how the new approach to web app design enables you to build a rich and beautiful CRUD application, but you know that Access applications are not always simply CRUD applications. Microsoft recognizes the need to work with data beyond simple CRUD and has incorporated a built-in mechanism in web apps to allow you to not only use traditional Access desktop databases against the web app's database but also to use Excel, SQL Server Management Studio, and any other tool where ODBC connections are supported.
You start by learning how to get all the connection details you need to complete an ODBC connection string, after which you will learn how to use that string to connect to different ODBC clients.
After that, you will look at the familiar method of linking an Access desktop database to a remote database. You will learn how to apply best practices, accounting for differences in how you can manage objects within either an Access desktop database or SQL Server objects created by web apps.
You will then see how you can use Excel to provide a live view of the data using Office Data Connection (ODC, not to be confused with ODBC). This will provide you with an easy way to create charts and pivot tables for reporting. You will learn about keeping data refreshed in those workbooks and consider trust and sharing issues associated with using an Excel spreadsheet with an ODC connection.
You will finish your introduction by using the connection string in SQL Server Management Studio, creating a linked server object to make querying against the database easier. That enables you to integrate your existing SQL Server database with the web app's database objects.
NOTE A list of some of the potential issues you may encounter while working with Access web apps is available in the “What You Need to Use this Book” section of the Introduction.
INFO BACKSTAGE
One of the new features in Access web apps is the addition of connection information for your web app as shown in Figure 11-1.

FIGURE 11-1: Connection Information for the web app database
The Info Backstage displays the name of your web app, the name of the server where it is located, and the name of the database itself. Take note that the database name is a long string of random characters, a GUID with a prefix.
There are two important actions you can take here. First, you can create a reporting version — an .accdb file — of your web app. Let's examine that now.
The result of clicking Report on My Data is an .accdb file, as shown in Figure 11-2. The resulting client database will be connected directly to your web app's tables. You can generate reports using the powerful Access reporting engine. However, your UserID and Password will be saved in the connection string, which may not be desirable. As you can see in Figure 11-2, including the configured MSysConf table in your database prevents saving the connection information. If you have the MSysConf table, or if a policy in your organization prohibits storing passwords, you will see a log in dialog, as shown in Figure 11-2. You'll learn more about the MSysConf table in Chapter 13.

FIGURE 11-2: Reporting .accdb ready for connection to the web app database
You'll learn more about the MSysConf table in Chapter 13.
At this point, you may supply the login ID and password to complete the connection, if needed, and begin using the reporting database, so let's step back to the web app's Info Backstage, as shown in Figure 11-1, and learn how to manage that.
CONNECTIONS
When you first create the web app, external connections are not enabled. You enable them by clicking the other button, Manage Connections, in the Info backstage. That opens the connections page, as shown in Figure 11-3.
Here you manage connections to the web app database from external applications, such as Excel, Access, and SSMS. Note that you can allow connections either from only your current location or from any location. You choose an option depending on how the database will be used — by a single person or multiple persons at multiple locations.

FIGURE 11-3: Connections page for web apps
Next, you have the option of allowing read-only connections, read-write connections, or both. Both types of connections have their own user ID and password so you can enable both and select which one to provide to different users according to how they will use the database.
In the next sections, we discuss enabling and using this connection information to connect to the web app database from an .accdb file, such as the reporting database.
Enable/Disable Connection
In order to connect to your web app database, you need to enable a connection to it. You do that by selecting the type of permissions you want to give, and then enabling one or both of the read-only or read-write options. Refer back to Figure 11-2. The pale pink rectangles around “From any Location,” “Enable Read-Only Connection,” and “Enable Read-Write Connection” indicate those options have been selected.
WARNING Each time you toggle one of the Enable Connections buttons, you reset the password associated with that option. For example, when you toggle the Enable Read-Only Connection on, the web app generates a password for the ExternalReader login. Toggling the Enable Read-Only Connection off, and then back on again, generates a new password for the ExternalReader.
This seems like logical behavior. However, it can have unintended and negative consequences. If you have created an .accdb file for reporting purposes, and created a relinking method that depends on the original password, merely toggling the Enable Read-Only Connection off and on creates a different password that the reporting database won't have available. Your users would not be able to connect to the web app database, and may not have any idea what went wrong. Exercise caution and plan ahead to avoid problems like this.
Getting Connection Details
Figure 11-4 shows the connection information for the read-write user, called ExternalWriter (as opposed to ExternalReader). As you saw in Figure 11-3, you get this information by clicking the appropriate link for either the Read-Only user or the Read-Write user.

FIGURE 11-4: Connection Information for the MTO database
You might want to copy the connection information for your web app database into a text file so you can refer to it more easily when working with other external files, such as Access, Excel, or SSMS. You can always get to it through the Info Backstage page, but that takes several steps. Just be sure to treat that text file with appropriate caution. It contains everything anyone needs to connect directly to your web app database.
Reset Passwords
As noted, initially setting passwords is a matter of enabling the appropriate user. In addition, you can manually reset passwords by clicking the appropriate Reset buttons, as Figure 11-3 shows. You can also see that the Reset Password buttons include an explanation of the consequences of resetting a password, which applies to the silent reset caused by toggling the enabled status of the connection.
Now that you've seen how the web app supports external connections, you'll work through a couple of examples of using them, starting with the Access client.
USING THE ACCESS CLIENT
In this section, you learn how to connect to and use the database to which your web app connects from an Access client database. You just learned how to obtain the necessary connection information from the Info Backstage. This is one place you'll use that connection information. In this case, you'll create a small .accdb file for reporting. You'll use the Maid To Order database and create a report showing revenues generated by each crew during a given time period.
You can connect to your web app database from Access 2003, 2007, 2010, or 2013. Whichever Access version you use, however, you need to use the SQL Native Client 11.0 driver. The 11.0 driver is not supported on Windows XP. Using older SQL Server Native Client drivers may be possible but is not optimal. If you don't have SQL Server 2012 installed on your computer, you can download just the Native Client from the Microsoft SQL Server 2012 Feature Pack, which is located at http://www.microsoft.com/en-us/download/details.aspx?id=29065 at the time of this writing.
The download page links to many other SQL Server tools, and to both 32-bit and 64-bit versions of those tools. Make sure you select the proper version for your OS: use the X86 Package (sqlncli.msi) for 32-bit operating systems, or the X64 Package (sqlncli.msi) for 64-bit operating systems. Download and install the SQL Native Client 11.0 driver you need from the download page for this exercise. A common mistake is to download the 32-bit driver for a 64-bit operating system on the assumption that you would only be running 32-bit Access. In fact, the 64-bit driver includes the 32-bit driver needed for 32-bit programs, including Access, to run on a 64-bit operating system.
Start by creating an .accdb file. You can do this from within the web app, the results of which are illustrated in Figure 11-2, or you can create a new .accdb file from scratch. The advantage of using the internal option, Create Reports, is that it inserts the links to the tables for you, although you still need to provide the connection string to use them.
You'll link this Access file to the web app database. In this demo, you'll start by creating a DSN to make the initial connection from a new empty .accdb. file Later, you learn how to convert the connection to a DSN-less connection for improved security.
If you have already installed the SQL Native Client 11.0 driver, you can either create the DSN using the ODBC Data Sources tool from the Windows control panel, or create the DSN within Access. You'll create this demo from within Access, using the 2013 version, even though in testing we have successfully created connections from within Access 2003, 2007, 2010, and 2013, and on both 32-bit and 64-bit versions of Windows 7, and Windows 8.
Use the ODBC Link icon in the Import & Link section of the ribbon as you would to connect to any remote database. In fact, except for the connection information, the process is already familiar to you. Let's pick up the process at the first place you may need to diverge from previous practice. We have found that trying to create a File DSN doesn't work. You'll need to create the DSN as a Machine Data Source, as in Figure 11-5.
There are some differences in behavior at this point, depending on whether you are using Access 2013 or Access 2010. If you start Access under Run as Administrator credentials, you will have the choice between User and System Data Sources. Under Access 2013, if you don't have Administrator privileges, you can create the System DSN, but it may not actually connect, although the User DSN will connect. Under Access 2010 and earlier you can create only a User Data Source for yourself.
Next, select the SQL Native Client 11.0, as shown in Figure 11-6.

FIGURE 11-5: Create a System Data Source

FIGURE 11-6: Select SQL Server Native Client 11.0
Clicking Next moves you to the next step in the wizard, where you'll start entering the connection information you previously obtained and saved from the connections section of the Info Backstage (see Figure 11-7).

FIGURE 11-7: Enter a name and select the server.
Of course, you'll select SQL Authentication and enter the user login and password for the web app database (see Figure 11-8).

FIGURE 11-8: Login ID and password for the web app database
The next step is to select the web app database (see Figure 11-9).

FIGURE 11-9: Enter the name of the web app database
The next step, again, is much like you've done before, but there is one extra detail to pay attention to. As shown in Figure 11-10, it's important to use strong encryption for data. Make sure you select the checkbox.

FIGURE 11-10: Use strong encryption for data
Clicking Finish completes the setup. You can verify the connection is complete by testing the connection, as shown in Figure 11-11.
At this point, your connection is complete and you can select tables from the web app database to link into your Access application. We assume you've had previous experience connecting to SQL Server from Access, so let's concentrate on the connection information. Select the DSN you just created, as shown in Figure 11-12.
The next step is to enter the appropriate password. In this case, you want to use the ExternalWriter Login, so you select the ExternalWriter password, as shown in Figure 11-13.


FIGURE 11-12: Select the web app DSN

FIGURE 11-13: Enter the appropriate password
From here, you select all of the tables you need to create a local reporting tool for your web app. Proceed as you do with other SQL Server links. Figure 11-14 shows a couple of things that may not be familiar to you. First, the schema from which you'll link the tables is the Access schema, not the more common dbo schema with which you may be familiar.

FIGURE 11-14: Tables exposed in the Access schema
Also, note that you do not link any of the queries (or views) from the web app database for our purposes here; they're designed for the web app. You could, if you wanted, go back to the web app and create additional queries to support reporting. These queries would be created as views on the web app database. You could then connect to those specific views for the reporting database. For better performance, you might wish to do that in some cases. Once again, your experience as an Access developer will guide your decision.
With the tables linked from your web app database, you can create as many reports as you need. In the next section you'll build a small example. The form shown in Figure 11-15 is typical of report launcher forms found in simple Access databases.
Clicking Show Report launches the report shown in Figure 11-16.

FIGURE 11-15: Report launch form in the Access reporting database

FIGURE 11-16: Local Access Report using data from the web app database
Although the form and report shown in Figures 11-15 and 11-16 are very basic, they should serve as an illustration of how you can extend the reach of your web app databases to provide full-featured reporting in the familiar Access client database environment.
In the next section, you take a closer look at managing the linking of your Access reporting database in different ways.
Adding VBA Code to Relink
When you use the Create Reports feature, a nice thing about the client file it creates is that it uses a DSN-less connection string. However, it uses the ExternalReader user. If you had used that option to create a client .accdb instead of following the steps discussed in the previous section, you may find it necessary to switch the user to the ExternalWriter to enable update capability in the Access client — you can't use the Linked Table Manager because it works only with DSN connections. Even if you followed the previous steps to create your file from scratch, you need to be able to update the connection string easily in case there's a server move or a password reset.
There are many different ways to solve the problem of successfully connecting to the database behind the web app, some more complex than others. However, we want you to pay special attention to the elements required to implement a DSN-less option to the process you saw in the previous section.
We'll start out using one of the more commonly known solutions posted on the Internet by Access MVP Doug J. Steele for relinking tables using DSN-less connections.
NOTE The complete code sample for Doug's DSN-less connection string can be found at http://www.accessmvp.com/djsteele/DSNLessLinks.html.
Also check out the DSN stripping utility written by Paul Litwin at http://access.mvps.org/access/modules/mdl0064.htm.
Additionally, you can download the complete code samples in the file ch11_mdlODBCConnection.bas at www.wiley.com/go/proaccess2013prog.com.
WARNING As Doug notes, this code assumes that all linked tables are still available in the source database. If a table is not found in the source database when the re-link is attempted, it will drop that tabledef from the local database. Therefore, it is important that you pass in valid server, database, user ID, and password values to avoid unintentionally deleting a link.
In response to feedback from others, Steele added the ability to update passthrough queries in addition to linked tables to his code so that all tables and queries would function correctly when the connection string needs to be changed. This will be helpful when you have a number of passthrough queries.
The SQL Server ODBC driver was used as the driver in the original code sample:
strConnectionString = "ODBC;DRIVER={sql server};" & _
        "DATABASE=" & DatabaseName & ";" & _
        "SERVER=" & ServerName & ";" & _
        "UID=" & UID & ";" & _
        "PWD=" & PWD & ";"
Generally speaking, this is a good thing because the older SQL Server ODBC driver is already installed and widely available on different versions of Windows. However, for this scenario, you must use the newer SQL Server Native Client 11.0. Therefore, update the code to use the Native Client driver and pass in additional options. The code is also included in the MTOClient.accdb file available for download.
strConnectionString = "ODBC;DRIVER=SQL Server Native Client 11.0;" & _
  "SERVER=" & ServerName & ";" & _
  "DATABASE=" & DatabaseName & ";" & _
  "Trusted_Connection=No;" & _
  "Encrypted=yes;" & _
  "UID=" & UID & ";" & _
  "PWD=" & PWD & ";"
You can also see the additional argument to create an encrypted connection. The other change you need to make is to comment out the following line:
tdfCurrent.Attributes = typNewTables(intLoop).Attributes
Those two changes are all you need to apply to Doug's DSN-less connection string. You may find it necessary to further adapt the rest of the routine if you need to use a trusted connection with a different SQL Server, but we will not get into that alternative here.
You may be wondering why you should comment out the Attributes line and thus not save the password. The answer is that you want to have the user supply the password as a part of the application's startup. Access can cache the connection string so it is not necessary to store full details in the connection strings for all linked objects. Whenever possible, Access will try to reuse an existing connection that has similar parameters, such as driver, server, and database. This is true regardless of whether you're talking about a linked table or a passthrough query.
Therefore, you will execute VBA code as part of the application's startup to establish the initial connection, using the complete details. This code would be called either by the AutoExec macro or by the startup form's module, according to your preferences. The code simply needs to create a temporary querydef to make the initial connection; once its job is done, that querydef is discarded at the end of the procedure. The following function in the MTOClient.accdb shows how to do that:
Public Function InitConnect( _
  ServerName As String, _
  DatabaseName As String, _
  UserName As String, _
  Password As String, _
  FixConnectionsFlag As Boolean _
) As Boolean
' Description:  Should be called in the application's startup
'               to ensure that Access has a cached connection
'               for all other ODBC objects' use.
On Error GoTo ErrHandler
  Dim strConnectionString As String
  Dim dbCurrent As DAO.Database
  Dim qdf As DAO.QueryDef
  Dim rst As DAO.Recordset

  strConnectionString = "ODBC;DRIVER=SQL Server Native Client 11.0;" & _
    "SERVER=" & ServerName & ";" & _
    "DATABASE=" & DatabaseName & ";" & _
    "Trusted_Connection=No;" & _
    "Encrypted=yes;" & _
    "UID=" & UserName & ";" & _
    "PWD=" & Password & ";"

  Set dbCurrent = CurrentDb
  Set qdf = dbCurrent.CreateQueryDef("")

  With qdf
    .Connect = strConnectionString
    .SQL = "SELECT @@OPTIONS;"
    Set rst = .OpenRecordset(dbOpenSnapshot, dbFailOnError Or dbSQLPassThrough)
  End With

  If FixConnectionsFlag Then
    FixConnections ServerName, DatabaseName, UserName, Password
  End If
  InitConnect = True

ExitProcedure:
  On Error Resume Next
    Set rst = Nothing
    Set qdf = Nothing
    Set dbCurrent = Nothing
  Exit Function
ErrHandler:
InitConnect = False
  MsgBox Err.Description & " (" & Err.Number & ") encountered", _
    vbOKOnly + vbCritical, "InitConnect"
  Resume ExitProcedure
  Resume
End Function
When the linked tables already have correct connection strings, there is no need to fix the connection, so during startup you may determine that there is no change to the connection string and thus pass in False to FixConnectionsFlag to simply establish a connection. Regardless of whether InitConnect invokes the FixConnections procedure, no passwords are actually saved in the process, and at the end of InitConnect, there is no password to be discovered. Note that the connection string used in the InitConnect procedure mirrors the one that is used in the revised FixConnections procedure, with the addition of a user ID and password. Access is able to match the connection strings in linked tables and passthrough queries with the cached connection opened via the InitConnect procedure.
Of course, you still have to consider how you can safely store the username and password. We address this in Chapter 13 when we talk about security.
Best Practices
We want to list a few rules of thumb that will help ensure that your client applications function effectively in most scenarios.
Binding Reports to Passthrough Queries
Reports typically are quite complex, requiring multiple tables, and almost always need different ways to facilitate different user-specified filters. Access is smart enough to try and marshal as much of that work back to the server as it can, but sometimes you ask Access to do something that cannot be resolved into standard SQL and thus end up forcing Access to perform additional work when it could have been processed on the server.
Passthrough queries are your best bet for guaranteeing server-side processing. Because reports are read-only by definition, there is no problem with using a passthrough query, which as you know, is read-only. As discussed earlier, using a revised version of Steele's FixConnections procedure takes care of maintaining the passthrough queries' connection strings. Using passthrough queries also means you are free to use T-SQL's specific constructs, enabling you to leverage more functionality for your reporting than what you'd have to build yourself in Access.
Often, you will want to parameterize your passthrough queries. There is no built-in support for using parameters in passthrough queries; you must construct a SQL string with the literal values representing your parameterization for a specific invocation of the report. You may want to use tools such as J Street Tech's SQL Tools or FMS's Visual CodeTools to help with manipulating the SQL string.
NOTE You can get SQL Tools at www.jstreettech.com/downloads and buy FMS's Visual CodeTools at www.fmsinc.com/microsoft access/VBACodingTools.html.
Binding Only One Data Source Per Form
When working with bound forms, which is Access's forté after all, it is good practice to link them to a single table, or a query based on a single table. Among the reasons for this, as you know, is to help ensure that the recordset in the form is updateable. Another consideration is the ability to limit records returned in a recordset to the smallest possible number to minimize performance hits. If you do need to populate a form with a more complex query with multiple joins, or with in-line functions, it is best to create a query specifically for that purpose in your web app, even though it won't be used by the web app itself. This allows you to link to this query in your client database, which should provide the best performance results.
Adding a Web Browser Control to Forms and Access Web Views
Introduced in Access 2010, the web browser control is another powerful tool to bring web pages directly into your Access database. In Chapter 4, you learned how to use the web browser control to enrich your web apps. You can also use them in your Access database. We want to identify this as one way to eliminate the need to switch back and forth from the web to the local database while you are working with the database. While creating reports in your Access database, you can keep a form open with the web app running for ready reference, rather than switch over to the browser. Consider Figure 11-17, where the Maid To Order web app is running in a web browser control embedded in a form.

FIGURE 11-17: Web browser control in an Access form

FIGURE 11-18: Static URL for a web browser control
It's very simple to create a web browser control like this. Open the form in design view. Select the web browser control on the ribbon and draw the web browser control on the form. A static URL, like the one shown Figure 11-18, can be entered directly into the property sheet for the web browser.
Note that you don't have to bother with sizing the web browser. Simply set the Horizontal Anchor and Vertical Anchor properties shown in Figure 11-19 to allow it to resize automatically to fill up the form's space.

FIGURE 11-19: Property Sheet with anchoring properties
Furthermore, you can provide additional instructions, directing the web browser to load a specific view, and you can do this easily by taking note of the URL when you visit a view. For example, if you're on a view for Customers, the web browser's URL will show the following:
https://maidtoorder-7ba36e408b03ec.sharepoint.com/MaidToOrder/default.aspx#Tile=tbl
Customers&View=frmCustomersByName
In Chapter 4, you learned about query string parameters. There are two that are relevant: the Tile and the View, which represent the selected tile and view, respectively. You can supply the name of the tile and view as a parameter for your web browser by clicking the build button for the Control Source property, as shown in Figure 11-20, and the built-in HyperLink Builder helps make it easy. You could assign other Access controls or use VBA to change parameters at run time.

FIGURE 11-20: Parameterizing a web browser
While the focus in this chapter is on connecting to your web app from other applications, you can see that web browser control can be of substantial value even in a client database and not just for viewing web objects. That offers the same possibilities, such as a dynamic Bing map for customers' addresses. Refer back to Chapter 4 for a refresher.
USING EXCEL
Since Office 2007, Excel has had the capability to connect to various data sources and provide a live view of the data, which is a huge advantage when you need the output to be current and when you don't want to have to rebuild charts every time they are run. The code-less approach with Excel's ODC connection makes it very easy and timesaving to maintain complex charts and numeric-centric reports. You will start learning about creating an ODC connection and then see how it can be used for a variety of objects within an Excel spreadsheet for easy reporting.
Creating an ODC Connection
To get started, open Excel and use a blank worksheet. On the ribbon in Excel, select Data tab and choose Get External Data to get to the Data Connection Wizard, as shown in Figure 11-21.
WARNING Don't choose SQL Server. As shown in Figure 11-21, you need to use the connection wizard because you need to access advanced properties for the connection to succeed.

FIGURE 11-21: Excel Get External Data
The Data Connection Wizard will provide you with a list of providers. You want to choose Other/Advanced, as in Figure 11-22, and proceed to the next page. Although other options, including ODBC DSN, are listed, we are focusing on creating the ODC connection for this example.

FIGURE 11-22: Data Connection Wizard dialog box
Next, select SQL Server Native Client 11.0; you may need to scroll down to locate it, as shown in Figure 11-23.
Clicking the Next button will take you to the Connection tab. There, provide the server name, specify SQL Server authentication, and supply the username and password. You should also input the database name. Figure 11-24 shows how it would look after you fill in the needed data.
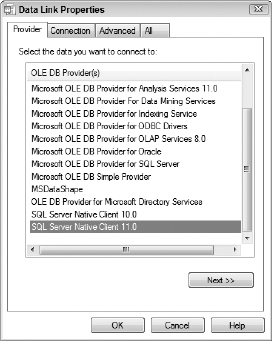
FIGURE 11-23: Selecting SQL Server Native Client 11.0

FIGURE 11-24: Filling in connection data
NOTE By default, Blank Password in Figure 11-24 is checked. Clear the check-box to enable the Password field.
Once you're done filling in the connection data, you can optionally test the connection using the Test Connection button shown in Figure 11-24. Finally, click OK to finish the process. The SQL Server client may then present a dialog box. If you do get the dialog box shown in Figure 11-25, simply clear Use Trusted Connection, provide the appropriate username and password if not already supplied, and click OK.
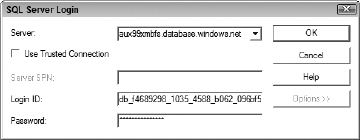
FIGURE 11-25: SQL Server client login
You will be presented with a list of tables to select from. However, you want to reuse the connection so you avoid selecting specific tables by clearing the Connect to a specific table checkbox, as in Figure 11-26.
Clicking Next takes you to the last page where you describe how the file should be named and other descriptive properties. Those are optional but it's usually a good idea to provide a meaningful name — one you'll remember, or at least recognize — and description to aid in reusing the ODC file. Figure 11-27 shows you how it may be filled out.

FIGURE 11-26: Select Database and Table pane

FIGURE 11-27: Data file properties
When you click OK, the ODC file will be created in the specified location and you will be presented with another dialog box to select tables. This is different from the one shown in Figure 11-26. Here, you have two checkboxes: one to enable selection of multiple tables and another to import relationships. You also have a button to select all related tables. You can see those in Figure 11-28. For now, check the Enable selection of multiple tables checkbox, so that you can use the same connection for other uses later in the chapter, and select tblJobs table.

FIGURE 11-28: Select Table dialog box
At this point, you are ready to start creating tables, PivotCharts, and PivotTables in Excel. You will continue with the steps you've seen so far to create your first table.
Creating an Excel Table
In the context of Excel, a table is analogous to what you might think of as an Access datasheet view. It does not refer to an actual relational table at all, but it does provide an easy way to view and filter data.
Continuing from Figure 11-28, you only need to select a single table. Click OK, which takes you to the last dialog box. Ensure that Table is selected, as shown in Figure 11-29, and designate that it be placed on the existing worksheet at cell A1.
This returns the result shown in Figure 11-30.

FIGURE 11-29: Import Data dialog box

FIGURE 11-30: Excel Table based on tblJobs from the Maid To Order web app
As you can see, the Excel table has many features that are similar to an Access datasheet. Because it appears in a spreadsheet, though, it can be used in conjunction with other Excel tools such as formulas.
Creating an Excel PivotChart
Obviously, a simple table does not always make a report, and more graphics may be needed. Because you already created a connection that allows multiple tables for the workbook, you can reuse it. Create a new sheet on the current workbook and select PivotChart via the Insert on Excel ribbon, as in Figure 11-31.

FIGURE 11-31: Insert PivotChart
You will be presented with a dialog box. Select “Use an external data source” and ensure that Existing Worksheet is selected and the address is the A1 cell, as illustrated in Figure 11-32.
Before you click OK, click Choose Connection; make sure you select the external ODC file you previously created, listed under Connections on this Computer section. You may be required to log in and, if so, refer to Figure 11-25 for the details you'll need to supply. You will get the same dialog box you saw earlier in Figure 11-28. This time, however, you want to select three tables — tblCustomers, tblJobs, and txrfJobServices — the first two of which are shown in Figure 11-33.

FIGURE 11-32: Create PivotChart dialog box

FIGURE 11-33: Selecting multiple tables
NOTE If you are unable to select multiple tables, it may be that the connection is set to use only a specific table. Verify that the connection isn't restricted to a single table and that you didn't forget to clear the Connect to a specific table checkbox as shown in Figure 11-26.
WARNING If you select connections under the Connections in this Workbook section, you will not be able to select additional tables or change the selected table.
Ensure that the Import relationships between selected tables checkbox is selected, as shown in Figure 11-33 and click OK to continue. You are then presented with a blank chart area and a pane to populate the fields, as shown in Figure 11-34.
The specifics of customizing PivotCharts are beyond the scope of this book, but we want to point out one gotcha you may encounter in building the chart. Consider Figure 11-35 where the chart returns the same output for all customers and note the yellow box in the pane indicating a relationship is needed.

FIGURE 11-34: Blank chart and pane

Click the Create button to bring up the Create Relationship dialog box. Fill in the same relationships that describe the three tables that you selected. You will need to repeat the process twice to designate the relationships between three tables, as shown in Figures 11-36 and 11-37.

FIGURE 11-36: Create Relationship diagram

FIGURE 11-37: Second relationship to create
Once you describe all relationships, the yellow bar will disappear and the PivotChart will now have varying output as desired, which is shown in Figure 11-38.

FIGURE 11-38: PivotChart with varying output
This leaves you with only one problem — you don't really want a chart of total revenue collected ever per customer. You want to filter down to a specific time period, such as a month. While you can use the Filter area, there is an easier way to manipulate filtering. On the Excel ribbon, select the Analyze tab under the PivotChart Tools contextual tab and click Insert Slicer, as shown in Figure 11-39.
A dialog box will be presented for you to select fields you want to slice on. Select the ScheduleDate field under tblJobs, as in Figure 11-40.


FIGURE 11-40: Selecting fields to slice on
A Slicer pop up will display. Assume you want to see revenues by customers for the month of January 2013. To do so, select the first January 2013 date and locate the last January 2013 date, hold down the Shift key, and click the selection to highlight all January 2013 dates, as in Figure 11-41.

FIGURE 11-41: Sliced PivotChart showing only one month
Obviously, there are many other tools and approaches available to you in customizing and outputting the data in a chart but the discussion so far should give you grounds to effectively work with data from your web app databases and easily create beautiful Excel charts without writing a line of code.
NOTE Check out the TimeLine feature, shown in Figure 11-39, along with Slicer, which makes it easy to group dates for PivotCharts and PivotTables where you want to be able to report by months, quarters, or years.
Creating an Excel PivotTable
As you saw in Figure 11-29, you can also use PivotTables as another method for displaying and reporting on your data. You will quickly look at the steps required to create a new PivotTable. Another thing you want to note is how to reuse data that you used for the example in the previous section, Creating an Excel PivotChart, for the PivotTable.
To get started, create a new sheet in the same workbook and use the Insert tab to insert a new PivotTable, as in Figure 11-42.

FIGURE 11-42: Insert PivotTable
This step is similar to what you did for PivotCharts and, as before, click Choose Connection. Note the difference in what connections are listed compared to the last time you saw that dialog box; this time, you will use the connection under Connections in this Workbook section, rather than the connection under Connections files on this computer section. So instead of using Maid To Order ODC, you can just reuse the existing workbook connection, as selected in Figure 11-43. As noted before, when you do that you cannot change table selections, but in this case you can save a step since the PivotTable can be based on the same selection as the PivotChart example.
This is all you need to get started building a PivotTable. As with the PivotChart, the particulars of building PivotTables are beyond the scope of this book, but one example of reporting that can be achieved with a PivotTable is shown in Figure 11-44.

FIGURE 11-43: Selecting an existing workbook connection

FIGURE 11-44: Finished PivotTable
External Data Considerations
Now that you've seen various ways Excel ODC can be used to aid in generating powerful reports, let's turn our attention to considerations behind managing those connections. We want to look at the issues surrounding the storage of passwords, trusting the external data, using it in an Excel web app context, and controlling frequency of data refresh.
Because you are using SQL Server authentication, it may not always be desirable to save the password inside either an ODC file or inside the workbook directly. For those who choose to do so, and who are willing to deal with the security ramifications, there are a few places to store the passwords. You may have noticed in your walkthrough that there are two places where connection data is stored: within the ODC file and directly inside the Excel spreadsheet.
Understand that regardless of whether you choose to store passwords within the Excel workbook or the ODC file, either approach will store passwords unencrypted. You could mitigate the risk by using the ExternalReader connection properties but that will not help when you have confidential data where reading data is simply unacceptable. In this situation, you need to secure access to the files.
So, realistically, the choice of using ODC versus embedding the connection data in the Excel workbook boils down to whether you find it more expedient to centralize your connection data so that changes made to connection data can be easily propagated to multiple Excel workbooks simply by changing the shared ODC file.
You can ensure that your Excel workbooks always use the ODC file. To do this, start with connection properties by checking the Data tab option shown on the ribbon, as in Figure 11-45. Click the Connections icon to see connection properties for all connections.
This will open up the dialog box; select the connection and click the Properties button as illustrated in Figure 11-46.

FIGURE 11-45: Connection properties
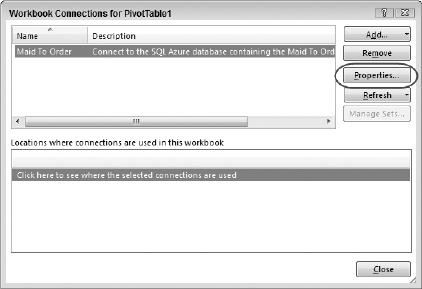
FIGURE 11-46: Workbook Connections dialog box
On the Connection Properties dialog box shown in Figure 11-47, choose the Definition tab and select the Always use connection file checkbox.
Note that this is also the same place where you can select Save password to embed the password as part of the Excel workbook. Furthermore, note that if you modify the connection string so that it no longer matches the ODC file, it will disassociate the workbook from the ODC and embed the connection string without any dependency on the ODC file, for better or worse.
The next consideration is the trust required for the document that contains connections. The next time you open an Excel workbook with those connections, you may get a yellow alert bar similar to Figure 11-48.
To enable the connections without having to manually trust the document is very similar to the process you've seen with trusting VBA code and certain macro actions for an Access database; you can either make it a Trusted Document or place it in a Trusted Location. In addition, Excel's Trust Center has a setting for External Content, as shown in Figure 11-49.

FIGURE 11-47: Connection Properties dialog box
![]()
FIGURE 11-48: Security Warning bar
When the document is trusted, the data connections will be automatically made without prompting the users.
As you may know, SharePoint allows users to view Excel workbooks in a web browser. There are two editions: Excel Web Apps and Excel Services. Excel Services offer additional features beyond Excel Web Apps and is generally available only on SharePoint with enterprise licenses. You can use either option to upload your workbook to a SharePoint document for easy viewing in a web browser, similar to Figure 11-50.
Note that when you are using Excel Web Apps and not Excel Services, you can view the data that was current as of when it was last opened and refreshed in the Excel client. However, you cannot refresh it in the web browser.
The ability to connect and get live data inside the web browser requires that you use Excel Services, which may not be available on all Office 365 plans or SharePoint installations. If you look at Figure 11-50, you can see the yellow bar cautioning that External Data and BI features are not supported.

FIGURE 11-49: Excel Trust Center for External Data

NOTE It can be hard to tell whether you have Excel Services or only Excel Web Apps because both will display Excel Web App when starting up. One way of finding out is to look at the URL used when you open Excel workbook in a web browser. If you see xlviewer.aspx in the middle of your URL, then it's using Excel Services. If you see WopiFrame2.aspx in the middle, then it's using Excel Web Apps.
Sharing Excel Workbooks on the Web
One thing you almost certainly will want to do is share reports with other people in an accessible manner. It may not always be practical to simply drop your Excel workbooks in a shared network folder. Even when you use Office 365 to host your Access web apps, your Office 365 or SharePoint account allows you to upload your Excel workbook and store it in a document library. You will look at two parts: uploading your ODC file and the Excel workbook.
As discussed previously in the External Data Considerations section, depending on your particular Office 365 subscription plan or your SharePoint server configuration, you also may be able to refresh the external data directly inside a web browser. Even if this is not supported by your specific environment, you can always use the document library as a convenient place to grab the latest workbook and the connection data and refresh it using the Excel client to get the current snapshot.
When you actually attempt to refresh an external data connection in Excel web app where it is not supported, you will get an error. Even in this case, however, the data from the last refresh is still available for viewing inside the web browser.
Should you choose to use an ODC file rather than embedding the connection in the workbook, you will almost certainly need your ODC file to be accessible, and this typically necessitates storing your ODC file in a document library. While there are different ways to accomplish it, we will show you one way, assuming you have a team site already set up on your Office 365 or SharePoint site. On your team site's Site Contents page, where you add an app, select Add an app and select Data Connection Library, as shown in Figure 11-51.

FIGURE 11-51: Data Connection Library
In the prompt, provide a name for your new Data Connection Library similar to Figure 11-52.

FIGURE 11-52: Naming a Data Connection Library
Click Create and the name will be added to your Site Contents. Click the new library in Figure 11-53 to open it.

FIGURE 11-53: Data Connections Library added
On the library's page, click the Add new item link in Figure 11-54.
In the prompt shown in Figure 11-55, provide the ODC file location either by typing it in or browsing for it. Then click OK.
SharePoint customarily shows another popup (see Figure 11-56) where you can further customize an uploaded document's properties, some of which are specific to the library. For now, accept the default and click Save.

FIGURE 11-54: Adding a new file

FIGURE 11-55: Adding a document popup

FIGURE 11-56: Document properties popup
When the ODC file is uploaded, you'll see it listed, as in Figure 11-57.
At this point, you have an ODC file that can easily be accessed by anyone who has access to the library you used. Note that you can further secure that library by making it read-only to simplify the administration of the ODC files.

FIGURE 11-57: ODC file added to library
However, it is necessary to ensure that the Excel workbook will reference the uploaded ODC file rather than the local ODC file before you upload your Excel workbook for others' consumption. To do that, you need to open the Excel workbook in the Excel client and return to the Workbook Connections dialog box that you saw in Figure 11-46 and use the Add button, which will open the Existing Connections dialog box you saw from Figure 11-43. On Existing Connections dialog box, use the Browse button provided on that dialog box. By default, you get File Picker opening to one of your local directories. Enter the URL pointing to your new Data Connection Library, as demonstrated in Figures 11-58 and 11-59.

FIGURE 11-58: Navigating to the Data Connections Library

FIGURE 11-59: Selecting the ODC file stored in the Data Connections Library
NOTE When browsing to a website address where you enter the URL by hand rather from a saved location, it may take a while for Windows Explorer to list contents, so you may need to allow a bit more time when navigating to such locations. Once saved, the navigation is usually faster because Windows Explorer already has the needed metadata to effectively navigate.
Save the changes to your workbook. You can now upload an Excel file to a document library, typically on your team site, using the same process you used to upload the ODC file to the data connections library, as shown in Figure 11-60.

FIGURE 11-60: Uploading a modified Excel workbook to a document library
At this point, it's a simple matter of providing the URL for the workbook to people who have access to the document library. They can then open it in Excel Web App or Excel Services, and also download it to open in their Excel client. Because the ODC file is accessible, users can easily refresh data in the workbook from anywhere. If you want to get the URL, you can click the build button to the right of the file in the document library, as illustrated in Figure 11-61.

FIGURE 11-61: Getting a file's URL
NOTE Don't forget to also share the libraries with the users if they are not already a member of the site.
With those steps completed, you now can see how you may be able to leverage Excel Web Apps as an easy way to distribute your reports. Because you can design your workbooks using a live connection, you don't have to worry about saving multiple versions to take snapshots of data every so often. With many new reporting and business intelligence features added to Excel, you will come to appreciate the new potentials you can reach by joining Access with Excel.
USING SSMS
Because web apps use SQL Server, it should naturally follow that you can use SQL Server Management Studio to connect to the web app's database. In this section, you will look at two approaches: connecting to the database directly or creating a linked server to access the database.
Generally speaking, when you want to perform primarily administrative tasks, it usually suffices to connect to the database directly. However, if you have an existing SQL Server database, and you want to work with data from both that local SQL Server database and your web app's database, you will appreciate the benefits a linked server has to offer you.
Connecting to a Web App Database
If you've used SSMS before, then the process of connecting to your web app database should be quite familiar to you. When you open up SSMS, you are prompted with a login screen to connect to a server, usually the one used most recently by default. As you may expect from earlier chapters, you fill in the server name, select SQL Authentication, and provide the username and password, as in Figure 11-62.
If you went ahead with only those details, you may get an error similar to the one shown in Figure 11-63, especially when you are using Office 365.
Unlike local SQL Server instances, SQL Azure has additional security requirements, which require additional configuration beyond simply pointing at a server and giving it a username and a password. In this case, you should click the Options >> button shown in Figure 11-62. This will expand the dialog box similar to what you see in Figure 11-64.

FIGURE 11-62: Login dialog box

FIGURE 11-63: Error displayed after default login

FIGURE 11-64: Expanded Login dialog box
You click Connection Properties, identified in Figure 11-64, and then you need to provide the database name and select the Encrypt connection checkbox, as demonstrated in Figure 11-65.
As you can see, connecting to a SQL Azure database will always require that connections be encrypted, and you must connect to a specific database for which you have permissions. Once you've made the changes, you can complete the login; the database will be made available in Object Explorer. As you can see in Figure 11-66, you can browse SQL objects created by the web app in your web app database.
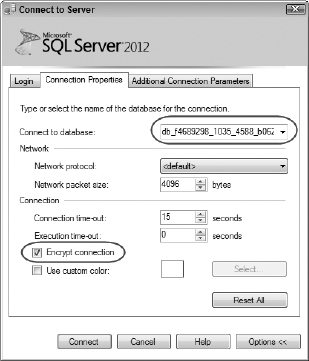
FIGURE 11-65: Configuring connection properties

As we alluded to earlier in the book, all objects you create via a web app are stored in the Access schema. Those are the objects you should be interested in primarily. If you use the ExternalWriter user to connect to the web app database, you are also allowed to read data from objects contained in AccessSystem and read and write data to the AccessRuntime schema. However, generally speaking, you wouldn't really want to use AccessRuntime, which is used primarily for design-time experience and is usually a modified view of a pre-existing object in the Access schema. It's best to ignore the AccessRuntime schema. ExernalWriter users will not have permission to write to AccessSystem; some of its data may be changed as a part of manipulating the Access UI when designing a web app.
Because the ExernalWriter user has full read and write permissions to any base tables within the Access schema, you can write T-SQL queries to read and modify data from SSMS.
Adding a Linked Server on the Web App Database
Sometimes it's not enough to be able to use SSMS and do administrative work. If you have existing SQL Server databases and you want to make it easy to work with data from both a local SQL Server database and a web app's database, then you will surely appreciate the linked server feature. Although the linked server feature is not new, the web app makes it much more relevant for you in your development work.
NOTE We recommend that you use SQL Server Management Studio 2012 to leverage the linked server approach discussed in this section.
You will learn how to create a linked server graphically, and then get a T-SQL script to simplify the automation during your work. To get started, locate the Linked Servers folder under Server Objects, as shown in Figure 11-67, and right-click to bring up the context menu.
Selecting New Linked Server will provide you with this dialog box. Similar to the login issue you learned at the start of the section, you cannot simply use the SQL Server option to short-circuit the process. You want to provide a descriptive name for the new linked server and select SQL Server Native Client 11.0 as the provider, as illustrated in Figure 11-68.
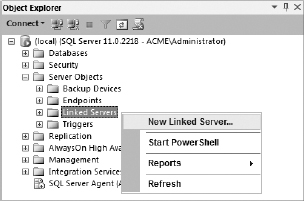
FIGURE 11-67: Queries to reference objects in the Linked Servers folder and context menu
NOTE Note that the dialog box forces the linked server name to be in uppercase. If you don't want the name in all caps, use a T-SQL script, as described later, instead.
Two more properties you need to fill in on this page are the Data Source, which needs to be the server name, and the Catalog, which is the name of the web app's database, as illustrated in Figure 11-69.

FIGURE 11-68: Providing name and provider for a linked server

FIGURE 11-69: Filling in linked server properties
The next step is to add an authorized remote user to use for credentials when connecting to the linked server. For simplicity, you will embed the remote user credential and make it available to anyone who wants to access the linked server. To do so, click the Security pane, choose Be made using this security context, and provide the username and password, as in Figure 11-70.

FIGURE 11-70: Creating a remote user
WARNING This configuration is not necessarily secure and should not be used indiscriminately in production. You learn more about security in Chapter 13. For now, keep in mind that you can restrict access by mapping only certain local users to authorize them to login using the ExternalWriter credentials.
You've filled in the minimum details needed to successfully create a linked server. You can click OK to finish creating the linked server. However, if you anticipate a need to repeat the steps, you may find it convenient to create a T-SQL script that you can customize for repeated use. As with most SSMS dialog boxes, you can easily script out the changes via the Script menu, as in Figure 11-71.
The script creates several T-SQL statements, which you can incorporate, especially if you want to change the default setting, but at the minimum, you need only two T-SQL statements:
USE [master]
GO
EXEC master.dbo.sp_addlinkedserver
  @server = N'Maid_To_Order_Web_App',
  @srvproduct=N'',
  @provider=N'SQLNCLI11',
  @datasrc=N'aux99xmbfs.database.windows.net',
  @catalog=N'db_f4689298_1035_4588_b062_096bf56eed7e'
;
EXEC master.dbo.sp_addlinkedsrvlogin
  @rmtsrvname = N'Maid_To_Order_Web_App',
  @locallogin = NULL,
  @useself = N'False',
  @rmtuser = N'db_f4689298_1035_4588_b062_096bf56eed7e_ExternalWriter',
  @rmtpassword = N'DM&5qe#BoAjKZzx'
;
GO

Note that the @rmtsrvname parameter was modified from the all caps name shown in Figure 11-68. Once you either click OK or execute the T-SQL script, you can browse the linked server in a somewhat similar but limited fashion to a regular SQL Server instance, as Figure 11-72 demonstrates.
There are a few differences between what is listed in a linked server and when you connect to the same server directly. First, a linked server lists only tables and views. Any other objects, such as stored procedures or functions, are not directly browsable via the linked server drop-down. Next, you cannot navigate to a more granular level beyond object level and therefore cannot get a list of columns and their data types as you would via the tables.
Now that you have a linked server, you will look at how you can use it as part of T-SQL queries.

FIGURE 11-72: Browsing a linked server
Querying Data in a Linked Server
By far the easiest way to write a T-SQL query against a linked server is to take advantage of the scripting functionality in SSMS. To do that, right-click a table or view in a linked server and choose Script Table As, select the desired action such as SELECT, and finish by selecting the desired output. Figure 11-73 shows the scripting of a SELECT SQL statement that will be output into a new query window.

FIGURE 11-73: Scripting on a linked server object
Selecting this option provides you with the following T-SQL output:
SELECT [JobID]
,[CustomerID]
,[ScheduleDate]
,[ScheduleTime]
,[WorkDate]
,[StartTime]
,[EndTime]
,[ScheduleDateTime]
,[ElapsedTime]
,[Completed]
,[Paid]
,[InvoiceDate]
,[Notes]
,[CrewID]
,[Cancel]
FROM
[Maid_To_Order_Web_App].[db_f4689298_1035_4588_b062_096bf56eed7e].[Access] ![]() .[tblJobs]
GO
.[tblJobs]
GO
Consider the FROM clause. If you've worked with SQL Server, you may be familiar with how you can use two-part qualified names or three-part qualified names to disambiguate objects that may come from different places but might have the same names. When you use a linked server object, you must always use four-part qualified names representing:
<linked server name>.<catalog name>.<schema name>.<object name>
Omitting any part of the four-part qualified name will cause SQL Server to assume that the object is a local object. As you can see, the requirement to use a four-part qualified name can get quite unwieldy very fast and especially when you need to work with multiple objects.
NOTE When linking to another SQL Server instance, you can presume that catalog is equivalent to a database. Note that when you link to a different type of data source, the syntax may be different. For example, if you link to an Access database, which does not use either catalog or schema, the syntax becomes [Northwinds]...[Employees] to select the Employees table from a Northwind Access database file.
One simple option available for use within SSMS and certain environments is to use synonyms. You can create a synonym using T-SQL:
CREATE SYNONYM dbo.tblEmployees FOR
[Maid_To_Order_Web_App].[db_f4689298_1035_4588_b062_096bf56eed7e].[Access] ![]() .[tblEmployees];
.[tblEmployees];
You can then use the synonym, dbo.tblEmployees, as if it were an actual table, performing SELECT on it or any modifications such as INSERTing or UPDATEing into the table. Unfortunately, synonyms do not work for all scenarios; for example, Access cannot list the synonyms to be linked in a Link Table operation. However, synonyms are listed when you use Excel to connect to SQL Server.
Perhaps your scenario requires that you be able to easily work with both linked server objects and local server objects within and outside the SSMS. For example, you may have an Access client that links to both a local SQL Server instance and the instance for your web app. Let's also say that this Access client needs to do some heterogeneous operations. In another scenario, you might want to control access to the web apps and you might need more granular access than the ExternalWriter user provides. You will learn more about security in Chapter 13, but for now note that permissions for synonyms cannot differ from the base objects on which they depend, so you may want to create a view on one or more linked server objects in order to gain granular security control over the underlying web app objects. If you prefer to use views rather than linking directly to tables in the web app and pay for the extra overhead, you can execute a T-SQL script to generate scripts for the view definitions. You can use the following T-SQL script to gather the needed metadata to help you build the views. You will need to adjust the two SELECT INTO statements to refer to the correct four-part qualified name from your own linked server:
DECLARE @PL nvarchar(3) = N']@[',
@NL nvarchar(2) = CHAR(13) + NCHAR(10),
@CreationSQL nvarchar(MAX) = N'',
@LinkPath nvarchar(MAX) =
N'[Maid_To_Order_Web_App].[db_f4689298_1035_4588_b062_096bf56eed7e] ![]() .[Access].',
@SchemaName nvarchar(20) = N'web';
SELECT t.*
INTO #tmpTables
FROM
Maid_To_Order_Web_App.[db_f4689298_1035_4588_b062_096bf56eed7e]
.[Access].',
@SchemaName nvarchar(20) = N'web';
SELECT t.*
INTO #tmpTables
FROM
Maid_To_Order_Web_App.[db_f4689298_1035_4588_b062_096bf56eed7e] ![]() .INFORMATION_SCHEMA.TABLES AS t
WHERE t.TABLE_TYPE IN ('BASE TABLE', 'VIEW')
AND t.TABLE_SCHEMA = 'Access';
SELECT c.*
INTO #tmpColumns
FROM
Maid_To_Order_Web_App.[db_f4689298_1035_4588_b062_096bf56eed7e]
.INFORMATION_SCHEMA.TABLES AS t
WHERE t.TABLE_TYPE IN ('BASE TABLE', 'VIEW')
AND t.TABLE_SCHEMA = 'Access';
SELECT c.*
INTO #tmpColumns
FROM
Maid_To_Order_Web_App.[db_f4689298_1035_4588_b062_096bf56eed7e] ![]() .INFORMATION_SCHEMA.COLUMNS AS c
INNER JOIN #tmpTables AS t
ON c.TABLE_CATALOG = t.TABLE_CATALOG
AND c.TABLE_SCHEMA = t.TABLE_SCHEMA
AND c.TABLE_NAME = t.TABLE_NAME;
SELECT @CreationSQL =
N'BEGIN TRANSACTION;' + @NL +
N'--COMMIT;' + @NL +
N'--ROLLBACK;' + @NL +
@NL +
N'GO' + @NL +
@NL + 'CREATE SCHEMA ' + QUOTENAME(@SchemaName) + N' AUTHORIZATION dbo;' + @NL +
@NL +
N'GO' + @NL +
@NL + REPLACE(STUFF((SELECT @PL + REPLACE(
N'CREATE VIEW [web].' + QUOTENAME(t.TABLE_NAME) + N' AS' + @PL +
N'SELECT' + @PL + N' ' +
.INFORMATION_SCHEMA.COLUMNS AS c
INNER JOIN #tmpTables AS t
ON c.TABLE_CATALOG = t.TABLE_CATALOG
AND c.TABLE_SCHEMA = t.TABLE_SCHEMA
AND c.TABLE_NAME = t.TABLE_NAME;
SELECT @CreationSQL =
N'BEGIN TRANSACTION;' + @NL +
N'--COMMIT;' + @NL +
N'--ROLLBACK;' + @NL +
@NL +
N'GO' + @NL +
@NL + 'CREATE SCHEMA ' + QUOTENAME(@SchemaName) + N' AUTHORIZATION dbo;' + @NL +
@NL +
N'GO' + @NL +
@NL + REPLACE(STUFF((SELECT @PL + REPLACE(
N'CREATE VIEW [web].' + QUOTENAME(t.TABLE_NAME) + N' AS' + @PL +
N'SELECT' + @PL + N' ' +
REPLACE(STUFF((SELECT N',' + QUOTENAME(c.COLUMN_NAME) + @PL
    FROM #tmpColumns AS c
    WHERE c.TABLE_CATALOG = t.TABLE_CATALOG
      AND c.TABLE_SCHEMA = t.TABLE_SCHEMA
      AND c.TABLE_NAME = t.TABLE_NAME
    ORDER BY c.ORDINAL_POSITION
    FOR XML PATH(N'')),1,1, N' '),@PL,@PL + N'   ') + @PL +
  N'FROM ' + @LinkPath +
    QUOTENAME(t.TABLE_NAME) + N';',@PL + N'   ' + @PL,@PL) + @PL +
  @PL +
  'GO' + @PL
  FROM #tmpTables AS t
  ORDER BY t.TABLE_NAME
  FOR XML PATH(N'')),1,3,N''),@PL,@NL);

SELECT @CreationSQL;

DROP TABLE #tmpTables;
DROP TABLE #tmpColumns;
The script performs the following tasks:
- Acquires metadata on tables and queries and their columns
- Inserts that metadata into temporary tables
- Concatenates all columns for a specific table or view into a formatted SELECT list
- Concatenates each table into a formatted CREATE VIEW statement, receiving the column list from step 3
- Concatenates all CREATE VIEW statements together
- Outputs the final T-SQL
When you execute the script, you get the T-SQL output as a single column, which you can then right-click to copy the content, as in Figure 11-74.

FIGURE 11-74: Copying the output
You then paste the content in a new query window and examine the output to your satisfaction. Note the first three lines generated the following:
The script runs in a transaction but will not actually end the transaction, which offers you an opportunity to evaluate the results and decide to finalize the result by highlighting either COMMIT or ROLLBACK and executing those commands, taking care to not also highlight the -- comment delimiter.
WARNING Don't forget to actually commit or roll back the open transaction! Forgetting means other users may be locked out if they try to query affected objects and must wait for the lock to be released.
This provides you with an easy way to populate your local SQL Server database with a mirror object of the web app's database objects. Those local objects are generally more accessible and provide you with the detailed metadata and some level of access control. The script also creates all objects within a new schema named web to keep it separate from other schemas in your local database server. Of course, you may want to modify the @SchemaName parameter if you want to name it something other than web.
In cases where you need to re-synchronize or delete all objects generated in this script, the easiest way to accomplish the task is to drop all created views and then drop the schema. You can execute the following T-SQL script to generate the DROP statements:
DECLARE @PL nvarchar(3) = N']@[',
    @NL nvarchar(2) = NCHAR(13) + NCHAR(10),
    @SchemaName nvarchar(20) = N'web';

SELECT
  N'BEGIN TRANSACTION;' + @NL +
  N'--COMMIT;' + @NL +
  N'--ROLLBACK;' + @NL +
  @NL +
  N'GO' + @NL +
  REPLACE((
  SELECT N'DROP VIEW ' + QUOTENAME(@SchemaName) + N'.' +
    QUOTENAME(v.TABLE_NAME) + N';' + @PL + N'GO' + @PL
  FROM INFORMATION_SCHEMA.VIEWS AS v
  WHERE v.TABLE_SCHEMA = @SchemaName
  ORDER BY v.TABLE_NAME
  FOR XML PATH(N'')),@PL,@NL) +
  N'DROP SCHEMA ' + QUOTENAME(@SchemaName) + N';'
;
You can use the same steps shown in Figure 11-74 to copy the output into a new query window. As before, the script has a transaction that is left open to provide you with the opportunity to review and make a decision based on the result of running the script.
With those two scripts, you now have an easy process for automating creation and removal of mirrored objects from your web app database into a local SQL Server database. You can then use the views to present the web app database objects as if they originated from the same local SQL Server and simplify your other T-SQL scripting when working with objects from the web database. In Chapter 13, you will circle back to the discussion about securing web app objects for client consumption and options.
Using Linked Server Programmability Objects
So far, you saw how you can query data, but you may be wondering about how to reuse all that hard work you've invested in building data macros and parameterized queries, which are represented as stored procedures and table-valued functions in your web app database. Before you can get started, there are additional configuration steps you need to perform. Return to the Linked Server dialog box by right-clicking the linked server and selecting properties (see Figure 11-75).

FIGURE 11-75: Linked server properties
Select the Server Options pane and make two changes to RPC and RPC Out, setting both to True, as shown in Figure 11-76.

FIGURE 11-76: Modifying RPC and RPC Out options
Take note of the Enable Promotion of Distributed Transaction option, which defaults to True. You will see it again when we talk about using temporary tables later in this section. With those changes, you are now ready to use a linked server's stored procedures and functions.
As you saw in Figure 11-72, you can only browse tables and views, but you can actually also execute programmatic objects such as stored procedures via a linked server. If you have a scenario where you would want to invoke such objects on the web app's database, the best method for doing so is to use EXEC ... AT.
To avoid problems with writing dynamic SQL and potential SQL injections, we strongly recommend that you parameterize the EXEC statement. Let us suppose that you want to add a new customer to the web app's database and there's already a data macro that performs the job — you saw the dmCustomerCreate data macro in Chapter 9. You can invoke the data macro as a stored procedure. A T-SQL script to create the customer may look like this:
DECLARE
  @NewCustomerID Int = NULL,
  @FirstName NVarChar(4000) = 'Billy',
  @MiddleInitial NVarChar(4000) = 'T',
  @LastName NVarChar(4000) = 'Goat',
  @OrganizationName NVarChar(4000) = 'Pixar',
  @FrequencyID Int = 1,
  @WeekdayID Int = 2,
  @StreetAddress NVarChar(4000) = '100 A Street',
  @Unit NVarChar(4000) = NULL,
  @City NVarChar(4000) = 'Hollywood',
  @State NVarChar(4000) = 'CA',
  @Zip NVarChar(4000) = '91601',
  @ZipFour NVarChar(4000) = NULL,
  @PhoneNumber NVarChar(4000) = '1301234567',
  @MobileNumber NVarChar(4000) = NULL,
  @Email NVarChar(4000) = '[email protected]',
  @CrewID Int = 1,
  @ScheduleDate Date = '2013-03-04',
  @ScheduleTime DateTime2(3) = '13:00',
  @JobNotes NVarChar(Max) = NULL,
  @CurrentUserName NVarChar(4000) = '[email protected]';

EXEC('EXEC Access.dmCustomerCreate
  @NewCustomerID = ? OUTPUT,
  @FirstName = ?,
  @MiddleInitial = ?,
  @LastName = ?,
  @OrganizationName = ?,
  @FrequencyID = ?,
  @WeekdayID = ?,
  @StreetAddress = ?,
  @Unit = ?,
  @City = ?,
  @State = ?,
@Zip = ?,
  @ZipFour = ?,
  @PhoneNumber = ?,
  @MobileNumber = ?,
  @Email = ?,
  @CrewID = ?,
  @ScheduleDate = ?,
  @ScheduleTime = ?,
  @JobNotes = ?,
  @CurrentUserName = ?',
  @NewCustomerID OUTPUT,
  @FirstName,
  @MiddleInitial,
  @LastName,
  @OrganizationName,
  @FrequencyID,
  @WeekdayID,
  @StreetAddress,
  @Unit,
  @City,
  @State,
  @Zip,
  @ZipFour,
  @PhoneNumber,
  @MobileNumber,
  @Email,
  @CrewID,
  @ScheduleDate,
  @ScheduleTime,
  @JobNotes,
  @CurrentUserName
) AT [Maid_To_Order_Web_App];
SELECT @NewCustomerID;
Note the AT [Maid_To_Order_Web_App] predicate, which instructs the SQL Server to marshal the statement to the linked server as opposed to simply executing it locally. You can see that you don't have to insert the parameters into the SQL string. However, you must provide the parameters in the same order they should appear within the SQL string because there are no named parameters. That means the position of parameters matters. Also note that @NewCustomerID needs to have OUTPUT in two places: within the SQL string itself and as a part of the EXEC ... AT statement to ensure that the output values all make their way back from the linked server to you.
NOTE For programmatic objects with many parameters such as dmCustomer Create, you may want to connect to the web app's server directly and use scripting, as shown in Figure 11-73, to quickly list the parameters you need to work with for your T-SQL scripting within the local SQL Server database.
A web app database may contain other programmatic objects: table-valued functions, which can be accessed via an EXEC ... AT statement as well.
DECLARE @SelectedCustomerID int = 700;
EXEC ('SELECT * FROM [Access].[qryCustomerGetLastJob](?)',
  @SelectedCustomerID
) AT [Maid_To_Order_Web_App];
Note that unlike stored procedures, you cannot pass a named parameter to a table-valued function, which also makes the requirement to have correct position for each single parameter much more important.
For ad-hoc querying and to allow heterogeneous joins, you could use OPENQUERY as shown here:
SELECT * FROM OPENQUERY(
[Maid_To_Order_Web_App],
'SELECT * FROM [Access].[qryCustomerGetLastJob](700);'
);
However, OPENQUERY, along with its sibling functions OPENROWSERT and OPENDATASOURCE, cannot accept parameters, which makes them ill-suited for managing objects that require parameters. For this reason, we recommend that if you need to perform heterogeneous operations, you should consider alternatives such as inserting the output of EXEC ... AT into a temporary table, as demonstrated in this script:
CREATE TABLE #tmpCustomers (
  CustomerID int,
  CrewID int,
  ScheduleDate date,
  ScheduleTime time,
  FrequencyID int
);
DECLARE @SelectedCustomerID int = 700;
INSERT INTO #tmpCustomers
EXEC ('SELECT * FROM [Access].[qryCustomerGetLastJob](?)',
  @SelectedCustomerID
) AT [Maid_To_Order_Web_App];
SELECT * FROM #tmpCustomers;
DROP TABLE #tmpCustomers;
DISTRIBUTED QUERY TRANSACTION
The script provided requires a distributed transaction because it inserts data from a remote source. You may get an error similar to this:
OLE DB provider "SQLNCLI11" for linked server
"Maid_To_Order_Web_App" returned message
"The partner transaction manager has disabled
its support for remote/network transactions.".
Msg 7391, Level 16, State 2, Line 9
The operation could not be performed because
OLE DB provider "SQLNCLI11" for linked server
"Maid_To_Order_Web_App" was unable to begin a
distributed transaction.
This can happen when the remote server will not allow distributed transactions. If you are not concerned about enforcing integrity across servers, you can disable the default option of promoting to a distributed transaction using the following T-SQL script:
USE [master]
GO
EXEC master.dbo.sp_serveroption
  @server=N'Maid_To_Order_Web_App',
  @optname=N'remote proc transaction promotion',
  @optvalue=N'false'
Alternatively, you could use DAO transactions to execute heterogeneous queries which simplify the process of distributing a transaction among servers but with less assurance than a true distributed transaction.
Generally speaking, we feel that it's usually best to use temporary tables when you need to perform joins to ensure you do not consume excessive network bandwidth in processing the data.
All in all, you've learned a new array of tools available to you to make it easy to work with your web app database and manage it effectively along with your existing SQL Server databases.
The significance of being able to do this should not be lost on Access developers. To those who have questioned the limitations of web apps as a viable tool for Line-Of-Business apps, it should be clear that the ability to use standard SQL Server tools enables you to work with your web app's database effectively. In fact, you can easily see that the accessibility of the web app database means you can program against it with any number of existing programming languages. At this early stage, the process is still a bit rough around the edges. Nonetheless, there is a clear path forward for Access developers who are willing to adopt a more versatile approach toward development.
NOTE If you want to script out mirroring objects for stored procedures and functions similar to what you saw earlier in the section, “Querying Data in a Linked Server,” you can use INFORMATION_SCHEMA.ROUTINES and INFORMATION_SCHEMA.PARAMETERS to provide you with the needed metadata on the objects.
SUMMARY
You've learned about a lot of new opportunities that epitomize what Access is all about: making data accessible. Although the data is now in the cloud, it is still easy to access the data, and Microsoft has provided you with tools to make a client file quickly and simply with options for you to dig deeper.
You learned about effectively managing your connections, both within the web app and within the client. The code provided illustrates one possible method out of several to make it easy to maintain the client's link to the database behind the web app with minimum effort. You will learn more about some of these aspects in Chapter 13 when we delve into security in more detail.
You've now seen examples of how you can use the new tools in Excel to provide reporting options for your web apps. In the last sections of this chapter, you looked at how you can manage your web database in SSMS. You saw how you can support scenarios where you have a pre-existing local SQL Server to facilitate cross database querying using linked servers and scripting creation to provide an easy interface to the linked servers. All in all, you now have more tools available to you for delivering a professional solution to your consumers that combines the power of your familiar Access client tools with the ability to deploy web apps using the same database. You will see more possibilities when you consider enterprise solutions in Chapter 12.