
7
Designing the Table Structure
WHAT'S IN THIS CHAPTER?
- New and changed data types
- Using validation rules
- Leveraging calculated fields
WROX.COM CODE DOWNLOADS FOR THIS CHAPTER
The code and sample downloads for this chapter are found at www.wiley.com/go/proaccess2013prog.com on the Download Code tab. They are in the Maid To Order Sample App download. Refer to the Readme.txt file also located there for installation instructions.
Tables and the fields in them are the basic building blocks of all databases, of course. Table structures and field data types in Access have been quite stable over time, with the exception of Unicode compression, which was introduced in Microsoft Access 2000. In Chapter 2, you learned the basics of table creation in the web app environment. However, the 2013 version of Access also includes changes in data types that you'll find useful, particularly when creating web apps. In this chapter, we concentrate on those changes and how you can use them to optimize your table designs.
Also, although normalization is at the center of all good table structures, we think it's safe to assume that your experience as a developer will guide you in that area; good relational table schema hasn't changed. Instead, we direct your attention to the new and changed elements you'll be using in fields in tables in 2013 to implement your table designs. You learn how to define relationships between tables with the lookup field mechanism, which was first used for that purpose in version 2010, and which has been improved for use in web apps.
In this chapter, we also introduce you to some special tables you'll find very useful in the web app environment. We show you how to create a tally table and a utility table. These tables, like lookup tables, may already be familiar to you, but their importance in web apps makes it worthwhile to explore them in some detail.
Before we get to relationships between tables, let's examine the new and changed data types in those tables.
NEW DATA TYPES
Data type changes for 2013 include the following:
- Text fields — Web apps and client apps
- Number — Web apps
- Date/Time — Web apps
- Currency — Web apps
- Yes/No — Web apps
- Hyperlink — Web apps
- Image — Web apps (OLE Objects in client apps)
- Calculated — Web and client apps (each has a different set of functions allowed in the expression)
- Lookup — Web apps
As the list indicates, however, most of the changes apply to fields in tables in web apps. In the client, only text fields are significantly different from previous versions. Note that in the case of calculated and lookup fields, both versions have their own data types that work similarly, but which are not identical.
Short and Long Text Fields
One of the more interesting changes to data types is the replacement of the text and memo data types with two variations of text fields: Short Text and Long Text. The relabeling partly reflects the fact that text columns are based on SQL Server's text field in the web app environment, where memo doesn't exist as a data type.
In the web app environment, Short and Long Text also have different characteristics from the client side. Let's start by reviewing the client versions. Then you'll see how the new data types better support web apps.
Behavior of Short and Long Text Fields in Client Forms
The default behavior of Short differs from that of Long Text fields in forms in the client environment. When pressing the Enter key in a Short Text field, the default behavior is to advance the cursor to the next control in the form's tab sequence. Pressing the Enter key in a Long Text field, on the other hand, creates a return at that point in the text. The cursor remains in the control for further text entry.
In both types of Text field, this behavior is controlled by the Enter Key Behavior property of the textbox, which toggles between the two options. Changing this property setting swaps the Enter key behavior from the default to the opposite behavior. Regardless of the property setting, however, you can paste a string of text containing more than one line into either type of text field. That could be confusing, especially when the Enter Key Behavior is set to a value of Default and a textbox control bound to the field is only a line tall; it would appear to the user that there is only one line in the field, when in fact there's more than one line, accessible only by using arrow keys to move the cursor around.
Short Versus Long Text Character Limits in a Client Table
In a client table, Short Text fields can hold up to 255 characters, just as with text fields in previous versions of Access. You can, of course, set the limit to any number from 1 to 255. Other than the name change, Short Text fields are the same as the previous text field data type.
Long Text fields, which take the place of Memo fields, are not limited to a specific number of characters, just as Memo fields were not. Long Text is basically a name change for the memo field in client tables. Contents of Long Text fields are Unicode text, which can be formatted as either plain text or rich text.
So, while you may find the name changes slightly confusing at first, you'll quickly get used to the behavior and properties of Short and Long Text fields in client tables. That's not true, though, for tables in web apps, as you'll see next.
Short Versus Long Text in a Web App Table
The first thing to remember about web apps is that all tables are SQL Server tables, either SQL Azure in Office 365 or SQL Server in an on-premises installation. In the rest of this discussion we mean both versions when referring to SQL Server, unless a distinction is needed. That makes for several differences, including the way Short Text and Long Text data types are implemented in the table. The data types available to us in our web app tables are those provided by SQL Server — nvarchar(xxxx), as explained in the discussion that follows. Text fields are exposed as Access data types in the design interface, but you must keep in mind that you are actually working with SQL Server fields. The following discussion is based on that fact.
Under the covers (i.e., in SQL Server tables) the actual data type for text fields is nvarchar(xxxx), where xxxx is the number of characters — such as 2 or 255 or 4,000 — or nvarChar(MAX), which stores up to 2,147,483,647 characters. So, while “Short” and “Long” are relative terms, and while client table Short Text fields hold a maximum of 255 characters, the rules are different for our web tables. Let's dive into the details.
The properties available for Long Text fields in a web table are illustrated in Figure 7-1.
Both Short and Long Text fields have a Limit Length property, which defaults to No for Long Text fields, as you can see in Figure 7-1. Unlimited Long Text fields are implemented as the nvarchar(MAX) data type in SQL Server tables, which means they are not really “unlimited.” However, the amount of text they can hold is large enough to be considered unlimited in a practical sense for most situations you are likely to encounter.
Contrast that to what happens when you change the Limit Length property to Yes, as shown in Figure 7-2.
When Limit Length is set to Yes, the default for Long Text fields is 220 characters, as you can see in Figure 7-2. In case you are wondering, yes, there is a reason that it's 220 and not 255: Access 2013 allows indexing on a maximum of 220 characters on a text field. However, you can enter any value you want, up to 4,000 characters.
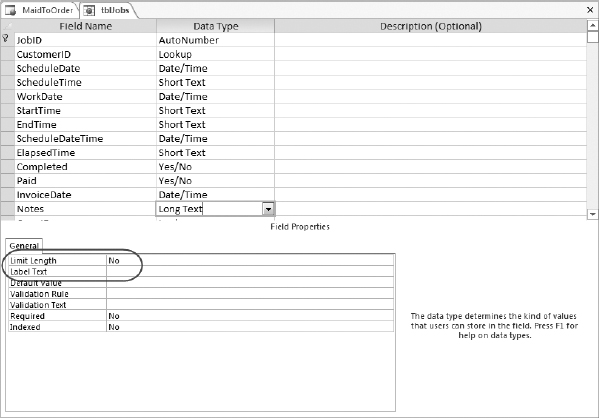
FIGURE 7-1: Long Text Field Limit Length set to No

FIGURE 7-2: Limit Length for Long Text field set to Yes

FIGURE 7-3: Short Text Field Limit Length set to Yes
As you can see in Figure 7-3, Short Text fields are really not that different from Long Text fields. They have a Limit Length property, which defaults to 220 characters, but which can be set to allow up to 4,000 characters, exactly like Long Text fields.
Now, compare this to Figure 7-4, where we've set the Limit Length property to No for the Short Text field. In terms of implementation, then, there's no practical difference between Long and Short Text in the web app environment, other than the default properties when they are first created.

FIGURE 7-4: Short Text Field Limit Length property set to No
The SQL Server Management Studio view of the table, pictured in Figure 7-5, shows how that field looks in SQL Azure, where it is implemented as an nvarchar(MAX) field.

FIGURE 7-5: Short Text field implemented as nvarchar(MAX)
Interface Behavior of Short and Long Text Fields in Web Forms
In the web interface, pressing the Enter key in a Short Text field doesn't advance the cursor to the next field; nor does it insert a return line. Pressing the Enter key in a Long Text field inserts a return line. This behavior can't be toggled for either type of field as it can in client forms. It is enforced whether you use a single-line Textbox control or a Multiline Textbox control for either text field.
When you add it all up, in web apps Short and Long Text fields differ primarily in their default behavior in the interface, which is fairly counterintuitive in contrast to traditional Access development where interface behavior was mainly determined by the controls being used and the properties set for them, rather than the data type of the bound field and its properties. You will definitely want to keep that in mind and keep the difference between the web and client clear.
Number Fields
In client tables, Number fields are the same as in previous versions: for example, Double and Single, Integer and Long Integer, Byte, Decimal, and Replication ID. With Access 2013 web apps, Microsoft adopted the simplifying strategy that three numeric data types, in addition to the Currency data type, are sufficient.
In web tables, the data type for number fields also partially reflects their underlying implementation as SQL Server fields. In a web table, numbers can be one of three data types, as you can see in Figure 7-6:
- Whole numbers, which are implemented as integers in SQL Server
- Floating point numbers with variable decimal places
- Fixed-point numbers with six decimal places

FIGURE 7-6: Number data types in a web app
Whole Numbers
SQL Server Integers (actually referred to as int) correspond to Long Integers in Access, as you may already know. They are identified as Whole Numbers in Access web apps. You'll use them in any situation where integers are appropriate.
One place where you could use Whole Numbers is in an order detail table where you need to record the quantity of an item sold. Unlike previous versions, however, where you might give consideration to whether a 16-bit integer or 32-bit Long Integer data type is the best choice, web apps only gives you the choice of Whole Numbers, which are always 32-bit.
Floating-Point and Fixed-Point Numbers
Floating-point numbers correspond to the Single and Double data types with which you should be familiar. Floating-point numbers are implemented as the float data type in the web app database, which is equivalent to Double data type. Floating-point and fixed-point numbers differ in that there will always be six decimal places in the fixed-point numbers, with 0s padding out the number, when needed, to the full six places. Fixed-point numbers are implemented as the decimal data type.
With the reduced set of choices and your experience as an Access developer, you should be able to select the most appropriate one for your application.
Number Field Formats in Web Tables
In addition to the data types you can assign to numbers, you have four formatting options for numbers:
- General numbers
- Fixed
- Standard
- Percent
These formats are similar to those you are familiar with in previous versions (see Figure 7-7). Again, some simplifying assumptions were made about the range of formats needed in this environment.

FIGURE 7-7: Number Formats web app
Note that there is an additional property, Display Decimal Places, that is displayed when you choose Fixed, Standard, or Percent format. This property may be useful for enforcing the display of the same number of decimal places globally for a particular field.
Also, keep in mind that the format property of a number field affects only how values are displayed, not how values are stored. You can apply other formatting options via the interface if the four basic selections don't meet your needs.
One final thing to mention concerning number fields is that, as in previous versions of Access, you can also set a property to control the number of decimal places. As there isn't anything new there, we'll leave exploration of that property to you.
Date/Time Fields
For Date/Time fields you can choose between Date, Time, and Date with Time as subtypes (see Figure 7-8).

FIGURE 7-8: Date Formats in web apps
The good news for long-time Access developers is that SQL Server supports all three data types directly. You've probably gotten used to working around the fact that Access stored all date fields with both the date and time components, which could lead to complications in trying to filter date ranges, for example. Consider the actual date and time fields stored in SQL Server, as shown in Figures 7-9 and 7-10.

FIGURE 7-9: Date field and time(3) field in a SQL Azure table design view

FIGURE 7-10: Date field and time(3) field in a SQL Azure table datasheet view
Dates are stored in SQL Server defaulting to ISO format as YYYY-MM-DD. Likewise, times are stored in a 24-hour format, also known as military time. You'll also see in Figure 7-10 that you can specify the number of digits for the fractional part of the seconds; it's 3 in the ScheduleTime field used in our example web app. This can be an integer from 0 to 7, but within a web app, it is always 3 and you cannot change the precision.
Formatting Dates and Times for Display
As you can see in Figure 7-10, dates and times are stored internally in a format that you probably don't want to show to your users, who are used to seeing them in the format specific to their location — for example, 12/29/2012 in the United States, or 29/12/2012 in many other countries. Therefore, you have the ability to specify the display formats for your date and time fields, as shown in Figure 7-11.

FIGURE 7-11: Short and Long Date display formats
Regional date formats are controlled by server settings. Those shown in Figure 7-11 are for the United States. Figure 7-12 shows format options for time fields.

FIGURE 7-12: Time Display formats
You can display times with seconds (Long Time) or without seconds (Short Time). Time formats are more standard around the world, so you'll find the time options a bit more straightforward in practice than dates. However, in both cases, you can apply other formats using the Format() function. You can see examples of this in Figure 7-13.
To create the “special date” for this example, we used the Format() function with arguments Format([ScheduleDate],"yy/MM/dd").

FIGURE 7-13: Query in Design view with special formatting applied to date and time fields
Figure 7-13 actually illustrates two important points about formatting in web apps. First, you can specify any sequence you need in order to create the display format; this one is two-digit year, two-digit month, and two-digit day:
SpecialDate: Format([ScheduleDate],"yy/MM/dd")
This format could support sorting dates by newest to oldest, for example.
Second, as you can see, the two-digit month literal is capitalized, whereas the year and day are not. As we've pointed out before, your web app tables are SQL Server tables. That means you must specify formatting that obeys rules for SQL Server, where date literals are case-sensitive. This is quite different from the Access client, where you can enter date literals as either lowercase or uppercase for the most part. You may also have realized that Access will convert date literals entered either way to the appropriate case, depending on context. In addition, Access will also respond to context and convert "hh:mm:ss" to "hh:nn:ss" where n is the proper literal for minutes while mm is the literal for months. Your Access web apps won't do that for you so you'll have to be much more careful about typing in the right date literals so the results are returned in the format you require (see Figure 7-14).
SQL server supports a wide range of options for formatting dates and times, which you should familiarize yourself with because, as you just learned, Access is not going to help with context-sensitive conversions. In fact, things can get fairly complicated quite quickly with dates and times. Rather than get sidetracked into a lengthy discussion, however, we'll show you the basic set of date literals you'll need to use and offer some suggestions on usage. Take a look at the SQL Statement in Figure 7-15, which illustrates several different Format() results.

FIGURE 7-14: Query in Datasheet view with special formatting applied to date and time fields

FIGURE 7-15: SQL with alternate formatting applied to date and time fields
The most important thing to note in Figure 7-15 is that date/time literals are case-sensitive in SQL Server, as previously stated. SQL Server returns the invalidly cased literal as the letter itself, as you can see for format(scheduledate, 'YYYY/MM/DD'). The month value is returned correctly in that format because MM is the proper literal, while the year and day are not because they are improperly cased. You can also see that format(scheduledate, 'yyyy/mm/dd'), also improperly cased, returns 00s because mm is the valid literal for minutes.
As you can see, properly formatting dates in your web apps will require caution and a good knowledge of date and time literals in SQL Server. Table 7-1 is a selected list of some of the more commonly used format specifications for dates. Note that examples in this table are U.S. regional formats. The full list of date and time formats is available at http://msdn.microsoft.com/en-us/library/office/jj737650.aspx.
TABLE 7-1: Format Specifications
WARNING The Format() function behaves differently from the way it does in the Access client. Whereas you can format strings in the client, such as Format([PhoneNumber],”(@@@) @@@-@@@@”), Format() only works on dates and numbers in a web app. You will need to devise another approach to formatting strings, perhaps using a combination of Left(), Mid() and Right() within Concat(). Or, cast the strings that look like numbers into numeric data types with Cast() function.
Currency
The main difference with the currency data type in the Access interface in web apps is that you have a wide choice of currency symbols for displaying currency values, as you can see in Figure 7-16.
The important difference in the database, however, is that the values are stored as decimals. You can see this in Figure 7-17.
Figure 7-18 shows how it looks in a query on SQL Server.
There are three important things to remember about the currency data type. First, the fact that currency values are stored with six digit precision means that any math involving currency will reflect that level of precision, not the four digit precision you are used to in the Access client. Second, unlike for the client side of Access, currency is not a viable option for situations where you want to have a specific accuracy that isn't supported by double or single floating-point data types and want to avoid problems that come with the Decimal data type as implemented in the client. That's because in the web app, the display option for Currency will always include a currency symbol. This may make it difficult, if not impossible, to use this data type as a substitute for Decimal data type in your web apps. And finally, the data type stored for Currency is no different from numbers stored as fixed-point numbers. Currency fields are formatted to display the currency symbol and two decimals. Otherwise, there is no difference as far as the database is concerned.

FIGURE 7-16: Currency symbol choices

FIGURE 7-17: Decimal data type for values defined as currency in the web app design surface

FIGURE 7-18: Decimal data type for values defined as currency in the web app design surface
Therefore, if you habitually used Currency data types in your client applications to work around the Access database engine's weak support for the Decimal data type or VBA's lack of a Decimal data type, which required you to use the Variant data type, you need to move away from that approach when moving into web apps.
Yes/No
As you would expect by now, Yes/No fields are different in web apps because they are stored in a SQL Server table as a data type found in SQL. In SQL Server, that data type is bit. Yes/No fields store values of 0 for No and 1 for Yes, and they don't support Nulls. In the Access web app itself, all values are displayed as Yes or No, and you'll use those terms in macro expressions, not True and False as you might be used to doing in Access client databases. In queries, 0 and 1 work as filters on Yes/No fields.
Hyperlink
The primary difference in hyperlink fields is the way users interact with hyperlinks in the browser. Look at Figure 7-19, which shows the popup view opened to edit or add a hyperlink to a hyperlink field in the view.
Clicking the Add or Edit button displays the Edit Hyperlink icon, which, when clicked, opens the Hyperlink editing popup. You can copy/paste a URL or type it in directly.
In the Access client, editing Hyperlink forms hasn't changed. You learn a lot more about Hyperlink fields in Chapter 17.

FIGURE 7-19: Popup to edit a hyperlink
Image
In Access web apps, the image data type has replaced the OLE Object data type for storing images. As you would probably expect by now, the actual data type in the SQL Server table is different; these fields are stored as varbinary(MAX) (see Figure 7-20).

FIGURE 7-20: Image stored as varbinary(MAX) data type
A full discussion of the varbinary(MAX) data type in SQL Server is beyond our scope here, and knowing about it in depth is not critical to understanding how to use Image data types in web apps. Just be aware that the Image data type you see in your web app is stored in a modern data type in the underlying table. For those aware of other uses for varbinary(MAX) data type, note that in Access web apps, the data type can be used only with images; storage of anything else, although supported at the SQL Server level, is not supported in the Access web app.
You will also interact with the Image field differently from the way you have done in previous versions. You can add images through the run time environment only, not in the design surface. Figures 7-21 and 7-22 show you how to do this.

NOTE Note that Figure 7-21 shows the Action Bar for this page. We enabled it to illustrate how you would add or change an image in an Image field. In the actual web app, you would hide the Action Bar because you don't want users changing your app's logo!
As shown in Figure 7-21, click the Add Image link to open the Change Image popup. From here, you can navigate to the image you want to display in the view.

You can upload the image file from your local hard drive, for example, or from a location on your SharePoint Server from which the image is accessible. In either case, the binary for the image ends up in the SQL Server table to which the image control is bound.
Calculated Fields
Calculated, or computed, fields were introduced in version 2010, but they have been around in SQL Server for a while. Because your web app tables are also SQL Server tables, you have access to them in your web apps. They are very helpful in many situations, such as when you want to display the “full name” for a person, instead of the component fields. Traditionally, we've done this with a calculated field in a query. However, doing it in a calculated field in the table is a “once and done” process that exposes the calculated value whenever you need it. These fields are recalculated on the fly when any one of their components is modified. Note that the calculated fields are also stored the same as if they were regular fields. Unlike 2010, however, you can index the result of a calculation, which can be a performance advantage when you need to refer to calculated results for your filtering needs.
There are some limitations, which you'd expect. Calculated fields can only concatenate or calculate fields from within a single record on a table, i.e. FullName from FirstName and LastName in a person table, or SalesPrice from Quantity * UnitPrice * Discount, where all three are fields in a sales detail table.
Second, as you would expect by now, expressions used in creating calculated fields are based on SQL Server functions, which may differ from those you are used to. Consider, for example, the Concat() function illustrated in Figure 7-23.

FIGURE 7-23: Concat() function in a Calculated field
Figure 7-24 illustrates a more familiar expression. It uses the IIf() function to calculate the completed status value for jobs, based on whether there are dates and times in the relevant fields. As noted previously, the calculation is redone any time one of the underlying fields is modified, so the value displayed will always represent the current status of any job.

FIGURE 7-24: IIf() function to calculate Completed status
You'll learn a bit more about leveraging Calculated fields in your web apps in a later section, after you learn about the final field type that has changed in Access web apps.
Lookup Fields
Many Access developers have held a negative opinion of Lookup fields in tables; admittedly, we used to agree. However, the Access web app environment is quite different from traditional client databases. We all need to take a fresh look at Lookup fields because they are now an integral part of how you will work with web apps, replacing completely the relationship window provided in client databases.
Lookup fields are the mechanism through which you define relationships between tables. There is no longer a relationship window. If you have worked with Access 2010 web databases, you'll be familiar with the basic Lookup field mechanism. However, in Access web apps, the process has been greatly improved.
The idea behind Lookup fields is that you define a relationship between two tables by creating a lookup field in the child table. In this lookup field, you store the foreign key from the parent table (where it is, of course, the primary key), which allows Access to define and enforce the foreign key constraint in the SQL Server tables.
Figure 7-25 illustrates several important points. Let's examine each in turn, starting with the option to create a lookup between tables, or to use a value list. That's the top section of the Lookup Wizard.

FIGURE 7-25: Defining a lookup field to enforce a Foreign Key constraint
You will use the same data type for lookups that use a value list as you do for lookups to a related table. Value lists are useful when you have a short, highly stable list of options that do not necessarily call for a Lookup table. Days of the week, or months of the year come to mind. Value Lists may also be a way to avoid a separate call to the server to fetch data for the lookup values, which could be a benefit in the web app. Otherwise, if the domain of possible values for the field is at all dynamic, you'll want to create a lookup table. Because you're defining a relationship between tables with this lookup field in Figure 7-25, the value list option is not relevant.
A side note on lookup tables is in order here. We assume you've used lookup tables many times. As you have seen previously, all tables in a web app have an ID field, defined as an Autonumber, which is implemented as an Identity field in the SQL Server table. Therefore, any lookup table you create follows this design as well. If you've been in the practice of creating lookup tables with value fields only, you'll quickly adapt to the new rules for web apps.
In the middle section of the Lookup Field Wizard, you'll define how values are displayed in the table and in views bound to it. Referring to the Lookup Field Wizard in Figure 7-25, you can see that you select both the table to which the relationship refers and a field from that table to display. It is not necessary to display a value field from the lookup table; if it makes you more comfortable, you can choose to display the ID or key field only. However, the web app environment may be better suited to displaying a value field because it can help make interface design simpler. This is another way in which you'll need to reconsider your approach to application design.
The bottom section of the Lookup Field Wizard, where you establish rules for referential integrity, is much improved over previous versions in Access. You can clearly see your options for enforcing Referential Integrity. The Lookup Field Wizard doesn't use that term, but you can easily see that's what you are doing here. As you'd expect, your options are:
- Prevent deletion of a parent record when child records exist for it.
- Delete child records when the parent record is deleted.
- Allow parent records to be deleted, potentially leaving orphans in the child table.
As is always the case, your experience will guide you and your clients to the appropriate choice.
Finally, as you can clearly see, although the process by which you define relationships is different from the relationship windows you are accustomed to in previous versions of Access, and even in SQL Server, the concepts of relationships and referential integrity are very much the same.
In the rest of the chapter, you'll be introduced to some additional considerations about using calculated fields and some configuration tables that you will find useful in the web app environment.
VALIDATION RULES AND TEXT
One significant change you will want to account for in your table design, and more generally in your application design, is the fact that there is no BeforeUpdate event in web app views. If, like many Access developers, you've used the client form's BeforeUpdate event to validate data, you'll need to adapt your approach in two different ways:
- Using validation rules
- Using table events
Because table events are based on macro actions, you'll learn more about using table events in Chapter 9. Even so, you should note that inserting a new record and updating an existing record trigger two different table events. If you need a business rule enforced at all times, you may find it necessary to use the same macro for both table events. However, writing macros for table events may be more work than setting a validation rule. For simple business rules contained in only a single field or a single record, you may want to consider using validation rules instead of using table events and associated data macros.
We'll go over the field-level validation rule and then turn our attention to the record-level validation rule and look at design considerations when creating and maintaining validation rules.
Field Level Validation
Suppose that Maid To Order has dictated that no customers can be activated using a future date. We can use a field-level validation rule to enforce this rule. Validation rules should be familiar to you as they are the same as in the Access client, although they will play a larger role now. Open the tblCustomers table in design view and select the ActivationDate field. Enter the expression [ActivationDate]<=Today() in the Validation Rule property and specify a message in the Validation Text property, as shown in Figure 7-26.
As you'd expect, whenever a user enters a future date for an activation date, that user gets a message from Access displaying the message you provide via the Validation Text property, as shown in Figure 7-27.

FIGURE 7-26: Validation Rule and Message for the ActivationDate field

FIGURE 7-27: Error message displayed after a validation rule violation
As in the Access client, if you don't supply a validation message, users will get a fairly ugly message, as shown in Figure 7-28.
Therefore, when specifying validation rules, you will always want to provide a message.

FIGURE 7-28: Default validation message displayed
WARNING Note that it is possible for you to enter a totally unrelated field level validation rule into a field. Doing so will not appear as a record level validation rule and will obfuscate the table design. Ensure that when using field level validation rules, you are entering the rules for the field it should act upon and not any other fields, or use record level validation when multiple fields are involved.
Record Level Validation
Sometimes the rule isn't about a single piece of data. Maid To Order says that the customer must specify a weekday whenever he or she requests weekly, biweekly, or monthly services but not if it's a daily or one-time service. This rule involves two fields, WeekdayID and FrequencyID. Therefore, you'll need to use the Validation Rule button from the ribbon, shown in Figure 7-29.

FIGURE 7-29: Validation buttons on the Table Design tab
Click the Validation Rule to open the Expression Builder and enter the following expression:
([FrequencyID] Is Not Null And [WeekdayID] Is Not Null) Or ([FrequencyID] In
(1,5) And [WeekdayID] Is Null)
Once you save the expression, you can see that the validation rule button lights up on the ribbon, indicating that it is in effect. This gives you a slight advantage over the field-level validation rule, for which you'd have to inspect each single field to discover the rules.
Editing Validation Rules with Existing Data
When you edit or add a new validation rule to a table that has existing data, you would be presented with a messagebox asking if you'd like to enforce the rule for existing data, as in Figure 7-30.

FIGURE 7-30: Messagebox asking to verify existing data
If you want to enforce the validation rule only for new data and ignore the existing data, which may be in violation, you can click No in the messagebox. However, there is one important consideration that didn't exist in the Access client. Clicking No prevents SQL Server from being able to consider the validation rules during its query optimization. This means that your queries may run slower than if you enforced the new validation rule on the existing data because SQL Server cannot trust a constraint that hasn't been validated against the entire data set and therefore is not able to discover optimizations that constraints may offer.
Generally speaking, you should avoid clicking No when presented with the choice and, if necessary, reconcile your data prior to implementing the new rules.
Validation Rules Design Consideration
One design issue to note is that once a user receives an error message after a validation rule violation, the focus may not fall on the offending control. Therefore, it is important that your validation message is clear in identifying which field was violated so the user can identify the offending control and correct the data.
In addition, validation rules are evaluated one by one. Therefore, for a table with more than one validation rule, data entry can become a frustrating experience for the users because they will see only one validation rule violation at a time, correct it, and then try to save again only to be told there's another violation. In this situation, you may want to consider either using record-level validation rules and providing a generic catchall validation message detailing all data requirements, or using data macros and table events so that you can perform all validation at once. This usually works well for a small set of strongly related fields but for more than 3 fields, it can be very difficult for the users to track down where they made the mistake and you should consider alternatives.
Finally, if you have any table events, those will not be invoked until all validation rules on a table have been satisfied. Because of the precedence, we don't recommend implementing checks on business rules in both validation rules and in table events. The recommendation is mainly to avoid situations where one version of a business rule is enforced as a validation rule and another version of the same business rule is enforced in a table event, each producing different results, again creating a frustrating user experience.
WHY NOT USE UI MACROS TO VALIDATE DATA?
If you're wondering why you can't attach validation checks to UI macros — perhaps by creating your custom Save button or using After Update events of each field — there are a few considerations. First, UI macros have a tendency to work only for single views, which can be a problem if you plan to present multiple views on the same data or if you allow connections to the SQL database via the Access client or other programs.
Furthermore, while Blank and List views require you to explicitly start editing a record and explicitly save, that is not true for datasheet view, meaning you cannot hope to enforce business rules in a datasheet view, which means that you either need to make all your Datasheet views read-only or eschew use of Datasheet views altogether.
LEVERAGING CALCULATED FIELDS
One of the more significant changes you will find in designing web apps as opposed to client databases is that your toolkit is both different and somewhat limited in some ways. While you can create queries with calculated fields, you may find that reusing queries with different views is not always as straightforward as it can be in the client. Therefore, the power and usefulness of calculated fields in tables is a more significant advantage. We showed you the example of the e-mail field in Figure 7-23. As you can see, defining it once, as a field in the employee table, makes that value available anywhere else in the web app where we need it, without our having to re-create the concatenation each time. As the calculation becomes more complicated, as in Figure 7-24 where there are nested IIfs to contend with, the benefits of a single calculated field are more obvious. It's “once and done.”
Creating Concatenated Fields
Let's look at a couple of examples of concatenation that greatly simplify your life as a developer. This expression uses two standard name fields to calculate a field called Fullname. The Concat() expression creates a string from the arguments supplied, which are delimited by commas:
Concat([FirstName],' ',[LastName])
You could add additional arguments, as appropriate, to create other variations, such as FileAs, in which the person's last name is first, to support sorting by last name in lists:
Concat([LastName],', ',[ FirstLastName])
Including a comma within the single quotes in the middle argument results in strings such as, “Nix, Stevie” or “Bocelli, Andrea”.
More complex situations may call for other approaches. Suppose, for example, that your data might be incomplete, where the first names of some people are missing. The preceding expression would result in a slightly irregular appearance, as you can see in Figure 7-31. Note the space in front of the FullName field in the third record.

FIGURE 7-31 Missing value in a concatenated field
An even more obvious problem is the FileAs field, where the name appears with the comma but no first name. That's because Concat() puts all arguments specified for it into the string, including the comma and space, whether the argument in front of it or behind it is null or not. This may not be what you want.
If you need a more sophisticated concatenation, you can use the IIf() function. In the case of names, where either a first or last name could be missing, you'd construct the IIf() to include or exclude spaces and commas to generate consistent results. Of course, making sure your data is complete is an even better solution. Sometimes, however, you have to work with the data available.
Let's look at a different example of an expression using IIf() to display the completed status of jobs. You saw this expression in Figure 7-24. Here's a closer look:
IIf([WorkDate] Is Null,No,
  IIf([StartTime] Is Null,No,
    IIf([EndTime] Is Null,No,Yes)
  )
)
The logic encapsulated here is that, if there is no WorkDate entered for a job, that means it has not been started, so the Completed Status is No. If the WorkDate has been entered, but there is no StartTime, that means the job is on the schedule for that date, but not yet started, so the Completed Status is again No. If the StartTime has been entered, but there is no EndTime, the job is underway but not completed. Only if there are values in all three component fields can you say that the Completed Status is Yes. The field in the table, and therefore a control on a view bound to that field, will always display the Completed Status of all jobs because the field recalculates each time a value is added or modified in one of the component fields.
Codeless Maintenance of Values
You may have realized that using calculated fields in this way means you do not have to create code to update those fields. It all happens within the table.
And as a final example, here's a concatenation of date and time components to provide a display value. The components are separate in the table because you want to be able to search for a range of dates or for jobs occurring at a particular time of day. However, when searching across a midnight boundary, having a concatenated expression is easier.
DateWithTimeFromParts(
  DatePart(Year,[ScheduleDate]),
  DatePart(Month,[ScheduleDate]),
  DatePart(Day,[ScheduleDate]),
  DatePart(Hour,[ScheduleTime]),
  DatePart(Minute,[ScheduleTime]),
  DatePart(Second,[ScheduleTime])
)
DateWithTimeFromParts() is, as the name suggests, a way to create exactly the sort of calculated field you want. It takes six arguments — year, month, day, hour, minute, and second — and returns a date and time variable like:
9/30/2012 3:30:00 PM.
Rather than calculating this value in different queries or views, you need to create it only once in the table. When one of the underlying components is changed, it also updates the calculated field to display the new values.
A second way to use calculated fields is to display math calculations such as the following, which applies a discount from the Discount field to the Base Fee from the FeeBase field to return the calculated Discounted Fee:
[FeeBase]-([FeeBase]*[Discount])
A slightly more complicated calculation is the calculation to compute a line item price by multiplying unit quantity by unit price and applying a sales tax amount:
([UnitQuantity]*[UnitPrice])+ ([UnitQuantity]*[UnitPrice])* [SalesTax]
In all such calculations, you are taking advantage of the fact that calculated fields are always updated at the table level when one or more components are updated.
In the last section of this chapter, you'll be introduced to a couple of configuration tables, which you should find useful in supporting your web apps. You'll learn more about creating these specific tables when you actually need to use them in creating the sample app for this book, in Chapter 9.
Configuration Tables
Keeping in mind that the web app environment is somewhat more limited than the client database side, you should be open to using these tables, and others that you may design, in specific situations in your own database work. We will show you a tally table and a utility table here.
Tally Table
Because we do not have action queries in the web app environment, all actions that affect more than one record must be processed in a ForEachRecord action that processes each record in turn. The problem is that you need a way to tell Access how many times to repeat that action. The solution is a tally table. A tally table is a common concept among SQL Server developers. A tally table contains a range of sequential values that can be used to determine the number of iterations needed for each operation where it is called. Users do not use tally tables directly. You, the developer, use them within macros to provide a loop construct. For our purposes in this book, you'll learn how to construct a tally table with values from 1 to 10,000, as shown in Figure 7-32.

FIGURE 7-32: The first 25 rows in a tally table
You'll learn how to create tally tables in Chapter 9. For now, just note that tally tables have a single field, sequentially numbered, which you can create with an AutoNumber field.
Utility Table
The other configuration table you'll want to incorporate into your web apps is what we have chosen to call a Utility table. You may have created similar tables and used different naming conventions for them, such as usysConfig. In an Access Client database, the prefix “usys” indicates that it is a user-defined configuration table, a type of table which Access does not display in the Navigation Pane by default. Because that is not a factor in web apps — users never see the Navigation Pane — we chose a friendlier name for this table in our web app. Figure 7-33 shows our utility table, which contains only four fields for this web app.

There is only a single row in this table at all times. Each of the values found in the fields in that record are needed to manage processing tasks that can't be done in the web app interface or, as with the application logo, to supply application-wide values. As you can see in Figure 7-33, we need a way to insert the carriage return character and the tab character in certain text fields. Because there is no way to do that within a macro action, we supply the needed values from the utility table and reference them when needed within a macro. You'll also learn how to build, populate, and use the fields in the utility table in Chapter 9.
SUMMARY
In this chapter, you've learned about the new or modified data types for tables in Access 2013. You learned that the majority of changes are on the web app side, and that there are minimal changes in the client side, with the exception of the text data types.
You learned that text and memo fields have been replaced by Long Text and Short Text fields. In the client, the main difference is in the naming and Enter Key Behavior in a control bound to one of these fields. In the web app, Short and Long Text fields are essentially the same, except for the default properties set when they are first created.
You learned that the set of data types for numbers in a web app have been simplified, and are limited to Whole Numbers, Fixed Point numbers, and Floating Point number subtypes. You can format each data type for display, again using a simplified set of options. Although the options have been reduced, you should find that all, or nearly all, of your requirements will be adequately met.
You also learned about the changes to currency fields in web apps, which are stored as decimals but displayed with one of many possible currency symbols in the interface.
In addition, you saw the changes to Yes/No fields, stored as bytes and displayed as Yes or No. You saw the changes to image fields, stored as varbinary(MAX) in the SQL Server table. Image fields, as you learned, must be populated through the web interface. You learned that hyperlink fields are easily edited through the web interface.
Then, we turned your attention to the Lookup field mechanism with which you define relationships between tables in the web app environment. You saw that the improvements to the Lookup Field Wizard make it much easier to correctly define relationships and select appropriate options for enforcing referential integrity.
And finally, you got a brief introduction to the use of configuration tables in web apps and two of the tables created for the sample web app on which this book is based: tally tables and utility tables.
You are now ready to move into the tasks of creating your own application, beginning with the use of macros to solve typical business problems.