
Client-Side Web Development
When you talk about client-side development you are talking about writing JavaScript code that runs in the user's browser. Client-side Web development uses neither Visual Basic nor .NET (i.e., the focus of this book), but the topic is too important to ignore altogether. While the use of server-side technologies to build Web applications is still very popular, the amount of development being done for the client-side has been growing rapidly and will most likely continue to grow in the foreseeable future.
Just like you did with the server-side technologies, you'll get an overview of the client-side technologies so you can decide if you want to investigate them further.
Web Development with HTML and JavaScript
You are going to build a sample application using only HTML and JavaScript. As mentioned a moment ago, most developers using Visual Studio to build Web applications are using some server-side technology, so it would be rare to see an application built this way, but doing so gives us the greatest opportunity to explore the topic of this section.
REST Services and the Web API
Client-side code relies heavily on Web services to communicate with the server to get and update data. While you can call SOAP services from JavaScript, it's much easier to work with REST services. Instead of having to construct an XML document to make a service call as you do with SOAP, you just make a Web request with specific information in the URL in REST. Instead of getting an XML document as a response from a SOAP service call, most REST services will return JSON (native JavaScript objects).
So before you start building your HTML and JavaScript sample application, you'll build a Web service that it can use to communicate with the Northwind database. The operations in the Web service will just be wrappers around the methods in the Northwind.Services data-access layer.
To build the Web service you'll use a new technology called the ASP.NET Web API. Built on top of ASP.NET MVC, the Web API makes it easy to build the kind of RESTful services described above.
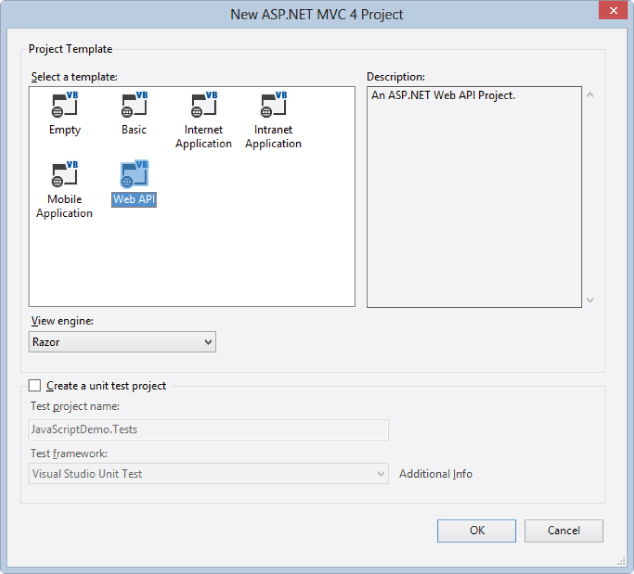
Open Visual Studio and create a new ASP.NET MVC 4 Web Application named JavaScriptDemo. Choose the Web API template and click OK (see Figure 14.47).
Figure 14.47 Creating a new Web API project
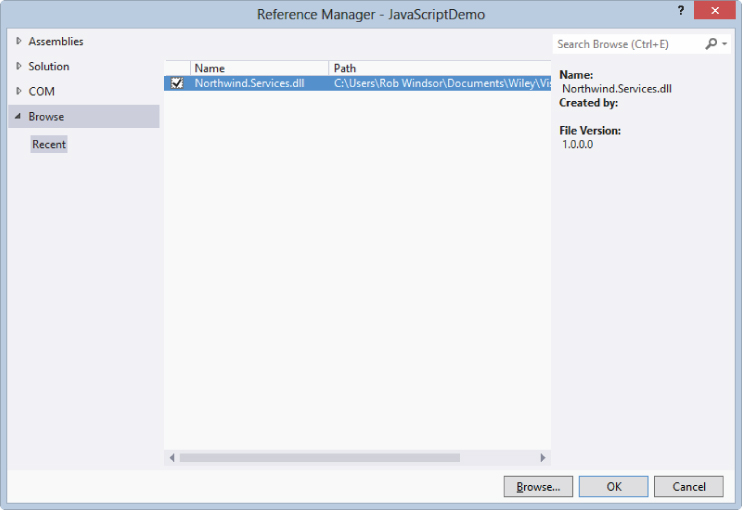
Now you'll create service operations that map one-to-one with the methods in the CategoryService and ProductService in the Northwind.Services assembly. Add a reference to this assembly by right-clicking on the project in the Solution Explorer and selecting Add Reference. The assembly should show in the Recent category–check it and click OK. If it isn't there, click the Browse button (at the bottom), navigate to the Northwind.Services.dll, click the Add button, and then click the OK button (see Figure 14.48).
Figure 14.48 Adding a reference to the Northwind.Services assembly
In the Solution Explorer, right-click on the Controllers folder and select Add ⇒ Controller. Set the name to CategoriesController, set the Template drop-down to Empty API Controller, and click the Add button (see Figure 14.49).
Figure 14.49 Adding the CategoriesController

The Web API will use two pieces of information to route HTTP GET requests made to api/categories to the GetValue method. The Web API is based on MVC, so it uses routing to determine which controller to call and what parameters to pass based the structure of the URL. The default route is /api/{controller}/{id}. Unlike what you've seen earlier, the Web API does not use attributes to map different HTTP verbs to different methods. Instead it uses a convention where the HTTP verb used in the request maps to the beginning of the method name. So the names of methods implemented in a controller in the Web API will all start with “Get,” “Put,” “Post,” or “Delete.”
In this controller and the next you want to add operations that wrap the methods in the two services in the Northwind.Services assembly. Replace the generated code in the CategoriesController with the following (code file: ControllersCategoriesController.vb):
Imports System.Net
Imports System.Web.Http
Imports Northwind.Services

Public Class CategoriesController
    Inherits ApiController

    Private _service As New CategoryService()

    ' GET api/categories
    Public Function GetValue() As IEnumerable(Of CategoryDto)
        Return _service.GetCategoryList()
    End Function
End Class
Now add another controller named ProductsController.vb (also using the Empty API Controller template) and replace the generated code with the following (code file: ControllersProductsController.vb):
Imports System.Net
Imports System.Web.Http
Imports Northwind.Services

Public Class ProductsController
    Inherits ApiController

    Private _service As New ProductService()

    ' GET api/products
    Public Function GetValue() As IEnumerable(Of ProductDto)
        Return _service.GetProducts()
    End Function

    ' GET api/products?catid=5
    Public Function GetByCategory(ByVal catid As Integer) As _
        IEnumerable(Of ProductDto)
        Return _service.GetProducts(catid)
    End Function

    ' GET api/products/5
    Public Function GetValue(ByVal id As Integer) As ProductDto
        Return _service.GetProduct(id)
    End Function

    ' PUT api/products/5
    Public Sub PutValue(ByVal id As Integer, ByVal product As ProductDto)
        _service.UpdateProduct(product)
    End Sub

End Class
IIS Express is not configured to handle PUT or DELETE verbs by default. To enable these verbs you need to update the configuration for IIS Express. The process is documented in the IIS Express FAQ at http: learn.iis.net/page.aspx/901/iis-express-faq/. Look for the question “How do I enable verbs like PUT/DELETE for my web application?”
Testing REST Services
There are several tools you could use to test the REST service you built; one of the most popular of these is Fiddler. You can download Fiddler for free from www.Fiddler2.com. Once you've downloaded and installed Fiddler, go back to Visual Studio and press F5 to start your Web API application in debug mode. It doesn't matter what page opens in the browser; you just need IIS Express to be listening for requests. Note the host address, as you'll need it for testing. You can also find the host address by selecting the project in the Solution Explorer and looking at the URL property in the Properties Window.
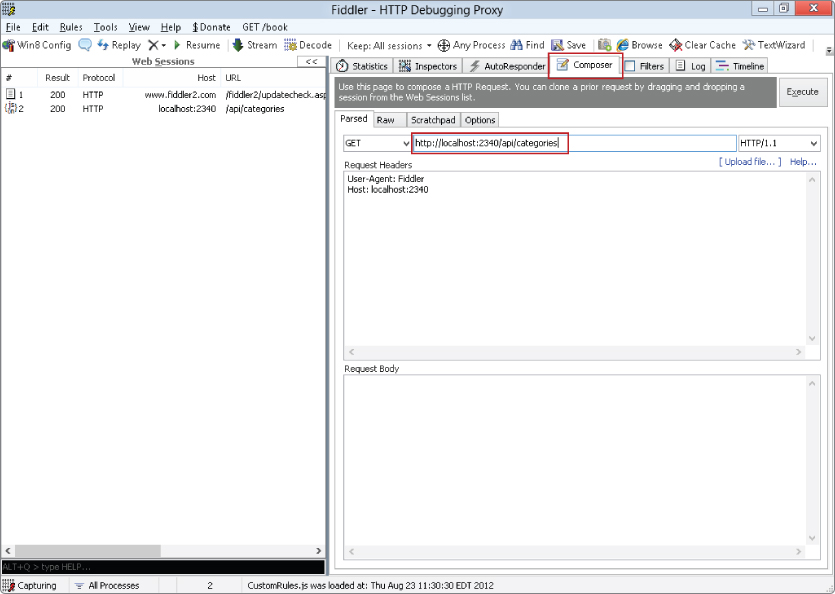
With the Visual Studio project still running, start Fiddler and open the Composer tab on the right. Enter the host address from the Web API application plus /api/categories and press the Execute button (see Figure 14.50).
Figure 14.50 Sending a request to a REST service using Fiddler
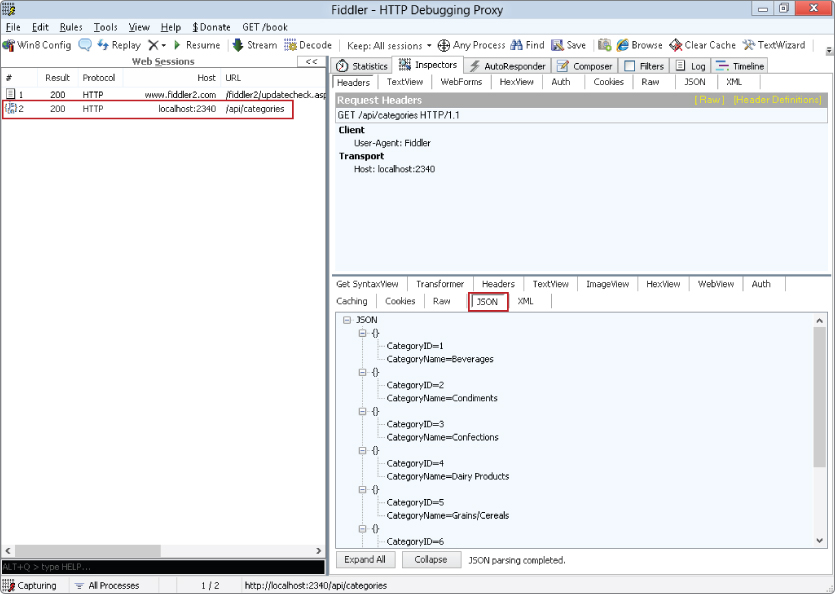
You should see a new entry in the list on the left with the host address in the Host column and /api/categories in the URL column. You should also see 200 in the Result column; this indicates that the service call completed successfully. Click on this item in the list and then click on the JSON tab in the bottom section on the right. You should see category information shown in the text box below the tab (see Figure 14.51).
Figure 14.51 Examining the response from the service call in Fiddler
If you have errors you can set breakpoints in Visual Studio to debug the Web service code and use Fiddler to see information about the calls made to the service.
Building the Website
Now that you have the REST service you can move on to building the site itself. You could do this in a separate Visual Studio project, but keep things simple by continuing to use the same one.
Right-click on the project in the Solution Explorer and select Add ⇒ New Item. In the Add New Item dialog select the HTML Page template, set the Name to ProductList.html, and click the Add button. In the body of the page add a <select> element (i.e., a drop-down) to show the categories, a <ul> element to show the products in the selected category, and a <h2> element that will serve as the title for the list of products. When you are done the body of the page should look similar to the following (code file: ProductList-Step01.html):
<body>
    <select id="category-select">
        <option value="0">All categories</option>
    </select>
    <br />
    <br />
    <h2 id="product-list-title"></h2>
    <ul id="product-list">
    </ul>
</body>
jQuery
jQuery is an extremely popular JavaScript library. So popular, in fact, that the term jQuery has become synonymous with client-side Web development. From the jQuery website: “jQuery is a fast and concise JavaScript Library that simplifies HTML document traversing, event handling, animating, and Ajax interactions for rapid web development. jQuery is designed to change the way that you write JavaScript.” You are going to use jQuery for three things: selectors, event handlers, and calling web services.
Version 1.7.1 of the library (jquery-1.7.1.js) is included in the project template in the Scripts folder, so you'll start by adding a script reference to the file. With the reference added, you can start using the jQuery object. The short form for the name of the jQuery object is the dollar sign, but you use the full name if you want. That is, $() is equivalent to jQuery().
Next you'll use jQuery's $(document).ready() to detect when the page has loaded and is ready to use. You'll call this the ready function. Think of it as the conceptual equivalent of Page_Load in a Web Forms page.
Inside the ready function you'll use a jQuery selector to get a reference to the category drop-down (i.e., the <select> element.) To do this you'll pass the parameter “#category-select” to the jQuery object. This tells jQuery to find the element with the id set to “category-select.” Had you passed in “.foo” to the jQuery object it would have found all the elements with the class set to “foo.” The selector syntax used by jQuery is very similar to that used in CSS. Once you have a reference to the categories drop-down, you'll call getCategories to populate it.
In getCategories you'll use jQuery's ajax function to call the REST service you created earlier to get the categories. This call will be made asynchronously, so you won't get the results back immediately. When the results do come back, jQuery will call the done method on the object created by the ajax method.
Inside the done method, you'll loop through the array of JSON objects returned by the service call and create a new <option> element for each one and add it to the drop-down.
With all of this done the head for the page should look like the following (code file: ProductList-Step01.html):
<head>
    <title>Product List</title>

    <!-- jQuery script reference -->
    <script type="text/javascript" src="Scripts/jquery-1.7.1.js"></script>

    <script type="text/javascript">
        // Ready function
        $(document).ready(function () {
            // Get a reference to the categories drop-down
            var select = $("#category-select");

            // Populate the categories drop-down
            getCategories(select);
        });

        function getCategories(select) {
            // Initiate web service call to get categories
            var call = $.ajax("api/categories");

            // Callback when web service call completes
            call.done(function (data) {
                $.each(data, function (i, obj) {
                    // Create a new item to go in categories drop-down
                    var option = $("<option></option>");

                    // Set the value attribute to Category ID
                    option.attr("value", obj.CategoryID);

                    // Set the text of the item
                    option.text(obj.CategoryName);

                    // Add the item to the drop-down
                    select.append(option);
                });
            });
        }
    </script>
</head>
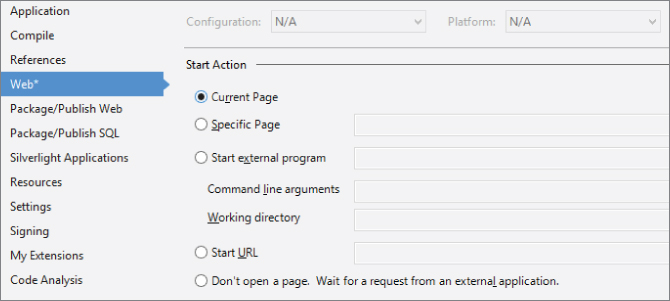
To make debugging easier you'll configure the project to open the page that has focus when you run. Open the project properties and select the Web tab. Change the Start Action to Current Page and save (see Figure 14.52).
Figure 14.52 Changing the Start Action for the project
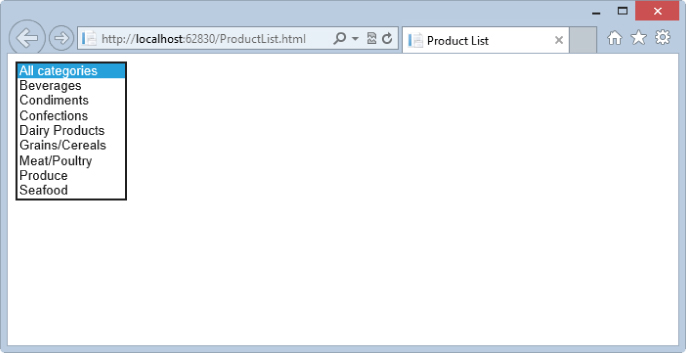
Now select ProductList.html in the Solution Explorer and press F5. You may have to wait a moment for the drop-down to be populated, as your client-side code isn't executing until after the page has been loaded. After waiting, you should see a page that looks like the one in Figure 14.53.
Figure 14.53 Product list page with the category drop-down populated
Handling Events
You have the code to populate the categories drop-down. Now you need to write the code that will run when the user selects an item. Inside the ready function you already have a jQuery object that represents the drop-down. You can use the change method on this object to attach an event handler. This will be a new method named getProducts.
Inside getProducts you need to find the selected item in the categories drop-down. You can do this using “#category-select option:selected” selector. Once you have a reference to this <option> element, you can find the ID and the name of the category that has been selected. Then you can call the REST service to get the products in that category and populate the products list. Each item in the list should show the product name as a link to ProductDetails.html (which you will create next) with the product ID added as a query string parameter.
One final step is to add a call to getProducts after you've retrieved the categories to populate the drop-down (near the end of getCategories).
Add the code shown in bold below to implement the functionality described above (code file: ProductList-Step02.html).
$(document).ready(function () {
    var select = $("#category-select");
    getCategories(select);
    select.change(getProducts);
});

function getCategories(select) {
    var call = $.ajax("api/categories");
    call.done(function (data) {
        $.each(data, function (i, obj) {
            var option = $("<option></option>");
            option.attr("value", obj.CategoryID);
            option.text(obj.CategoryName);
            select.append(option);
        });
        getProducts();
    });
}

function getProducts() {
    var selectedItem = $("#category-select option:selected");
    var selectedID = selectedItem.attr("value");
    var selectedText = selectedItem.text();

    var call = $.ajax("api/products?catid=" + selectedID);
    call.done(function (data) {
        var header = $("#product-list-title");
        header.text(selectedText);
        var list = $("#product-list");
        list.empty();
        $.each(data, function (i, obj) {
            var item = $("<li></li>");
            var link = $("<a></a>");
            link.attr("href", "productdetails.html?id=" + obj.ProductID);
            link.text(obj.ProductName);
            item.append(link);
            list.append(item);
        });
    });
}
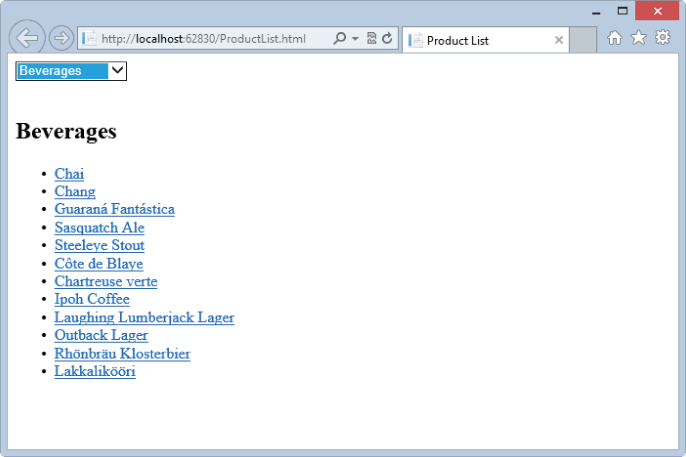
Press F5 to run the page. Now when you select a category from the drop-down you should see the products in that category (see Figure 14.54).
Figure 14.54 Product list page with product data showing
Working with Forms
Keeping with the pattern, you'll implement a form to edit products in two parts. Add a new HTML Page named ProductDetails.html to the project. In the body of the page add a form that can be used to view and edit a product. This form will be almost identical to the one you used in the Web Pages example application. The form should look like the one shown below (code file: ProductDetails-Step01.html):
<body>
<div>
<form id="product-form">
<input id="ProductID" type="hidden" />
<fieldset>
<legend>Product</legend>
<div>
<label>Name</label>
<input id="ProductName" type="text" />
</div>
<div>
<label>Quantity per Unit</label>
<input id="QuantityPerUnit" type="text" />
</div>
<div>
<label>Unit Price</label>
<input id="UnitPrice" type="text" />
</div>
<div>
<label>Units in Stock</label>
<input id="UnitsInStock" type="text" />
</div>
<div>
<label>Units on Order</label>
<input id="UnitsOnOrder" type="text" />
</div>
<div>
<label> </label>
<input type="submit" value="Save" />
</div>
</fieldset>
</form>
</div>
</body>
In the ready function you need to get the “id” parameter from the query string. If it isn't there redirect to the Product List page; if it is then call getProduct to get the product data and show it in the form. Update the head for the page with the code shown below (code file: ProductDetails-Step01.html):
<head>
    <title>Product List</title>

    <script type="text/javascript" src="Scripts/jquery-1.7.1.js"></script>
    <script type="text/javascript">
        $(document).ready(function () {
            var qs = parseQueryString();
            var id= qs["id"];
            if (typeof id=== "undefined") {
                top.location.href = "productlist.html";
                return;
            }

            getProduct(id);
        });

        function parseQueryString() {
            var nvpair = {};
            var qs = window.location.search.replace('?', ''),
            var pairs = qs.split('&'),
            $.each(pairs, function (i, v) {
                var pair = v.split('='),
                nvpair[pair[0]] = pair[1];
            });
            return nvpair;
        }

        function getProduct(id) {
            var call = $.ajax("api/products/" + id);
            call.done(function (data) {
                $("#ProductID").val(data.ProductID);
                $("#ProductName").val(data.ProductName);
                $("#QuantityPerUnit").val(data.QuantityPerUnit);
                $("#UnitPrice").val(data.UnitPrice);
                $("#UnitsInStock").val(data.UnitsInStock);
                $("#UnitsOnOrder").val(data.UnitsOnOrder);
            });
        }

    </script>
</head>
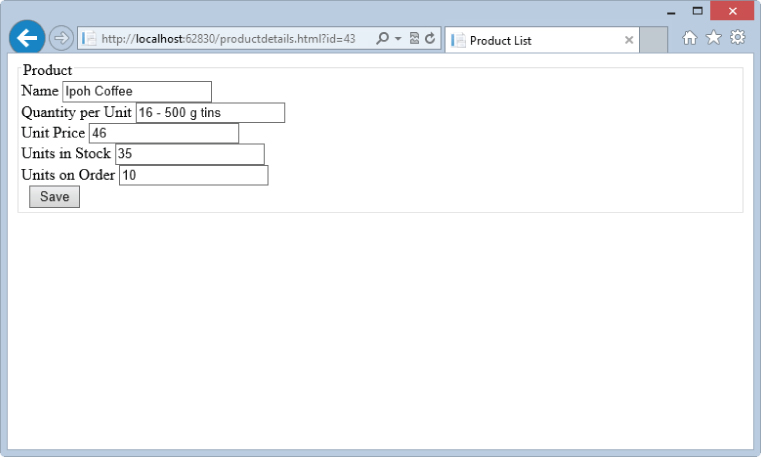
Select ProductList.html in the Solution Explorer and press F5 to run the page. Select Beverages from the categories in the drop-down and then click the link for Ipoh Coffee. You should be redirected to a page that looks like the one shown in Figure 14.55.
Figure 14.55 Product details page running in the browser
Handling User Input
In your previous examples you've always had to worry about posting the page back to the server to perform the update. You don't have to worry about that here because all the code is running in the browser.
In the ready function you'll get a reference to the form and then attach the saveProduct as the event handler for submit. Inside saveProduct you'll construct a new JSON object to represent the product data and then include that information in the body of a HTTP PUT request back to the server. When the request hits the server, the JSON will be de-serialized into a .NET ProductDto object, which will then get saved to the database.
Add the code shown bold below to the page head to implement the functionality described above (code file: ProductDetails-Step02.html).
<head>
    <title>Product List</title>

    <script type="text/javascript" src="Scripts/jquery-1.7.1.js"></script>
    <script type="text/javascript">
        $(document).ready(function () {
            var qs = parseQueryString();
            var id= qs["id"];
            if (typeof id=== "undefined") {
                top.location.href = "productlist.html";
                return;
            }

            var form = $("#product-form");
            form.submit(saveProduct);

            getProduct(id);
        });

        function parseQueryString() {
            // removed for brevity
        }

        function getProduct(id) {
            // removed for brevity
        }

        function saveProduct() {
            var product = {
                "ProductID": $("#ProductID").val(),
                "ProductName": $("#ProductName").val(),
                "QuantityPerUnit": $("#QuantityPerUnit").val(),
                "UnitPrice": $("#UnitPrice").val(),
                "UnitsInStock": $("#UnitsInStock").val(),
                "UnitsOnOrder": $("#UnitsOnOrder").val()
            }
            var productString = JSON.stringify(product);

            var call = $.ajax({
                url: "api/products/" + product.ProductID,
                cache: false,
                type: "PUT",
                data: productString,
                contentType: 'application/json; charset=utf-8'
            });
            call.done(function () {
                top.location.href = "productlist.html";
            });
        }
    </script>
</head>
Now when you run the application, you should be able to update and save the product data.
If you are using an older browser you may get an error on the call to JSON.stringify. This means the browser you are using does not have native JSON processing support. A common alternative is to use json2.js, written by Douglas Crockford. This library is available at http:github.com/douglascrockford/JSON-js.
Validation
You may have noticed that there is no validation being done in the form you created, so if you enter invalid data you'll get exceptions. Validation could be added using jQuery's validation plugin (http:docs.jquery.com/Plugins/Validation). Doing so is left as an exercise for the reader.