
12 Automation
ONE OF THE GREAT ADVANTAGES OF TODAY’S RECORDING TECHNOLOGY FOR ANY STUDIO, virtual or hardware, is the capability to automate your mix. Automation refers to the capability to automatically control equipment by recording its movements. A good example of automation is a hardware mixer with motorized faders that are programmed to move automatically with the mix (also known as flying faders). Reason’s automation can record the movements of nearly any device parameter, and those movements recur as you play back the song. In this chapter, you learn to automate Reason’s parameters. It’s easy and fun!
Simply put, Reason is one of the easiest programs to automate. Nearly any parameter in the Rack screen can be automated just by creating a device and making sure that it is armed to automate. You can then choose one of two ways to create your automation data:
![]() Live automation. Live automation involves using an external MIDI controller that is capable of sending out controller data that’s read by the Reason sequencer and recorded as automation data, or using your mouse to move the controls on the Reason devices in real time. In either case, you are recording the same data in real time.
Live automation. Live automation involves using an external MIDI controller that is capable of sending out controller data that’s read by the Reason sequencer and recorded as automation data, or using your mouse to move the controls on the Reason devices in real time. In either case, you are recording the same data in real time.
![]() Drawn automation. This method involves using the Pencil tool to draw automation information directly into clips in the sequencer. You might recall that you did this back in Chapter 4, “The Reason Sequencer: Close-Up.” However, in this chapter, you look at automation with the Pattern lane.
Drawn automation. This method involves using the Pencil tool to draw automation information directly into clips in the sequencer. You might recall that you did this back in Chapter 4, “The Reason Sequencer: Close-Up.” However, in this chapter, you look at automation with the Pattern lane.
Let’s look at both of these methods in detail.
Live Automation
Live automation is generally the first choice of most Reason users because it gives you a real-time, hands-on approach to channeling your creativity. There are two ways to automate live in Reason:
![]() Using your mouse
Using your mouse
![]() Using an external MIDI controller
Using an external MIDI controller
Using the Mouse to Automate
If you do not have an external controller, you can use your mouse as a means of automating your Reason parameters. In this tutorial, you automate a couple of the Reason mixer’s faders and knobs. Before beginning, start with an empty rack and create a couple of audio tracks. Ready? Follow these steps:
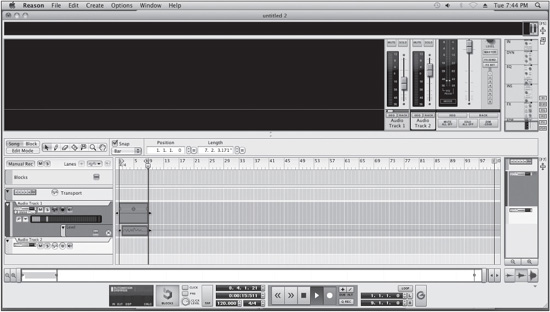
1. Click the Record button on the Transport panel to start recording.
2. As soon as the sequencer begins to record, select a mixer channel fader to automate and make volume changes to it by clicking and dragging up and down with your mouse (see Figure 12.1). Notice that the Automation Override indicator lights up to show that automation has been recorded and that a new part is being created on the audio track.
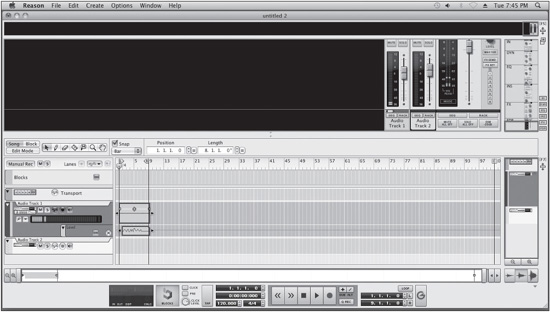
3. Press the space bar to stop recording and click the Stop button to return the song position pointer to bar 1. Notice the new data that has been written into the sequencer track and that a neon green framed box has been drawn around the mixer channel (see Figure 12.2).
At this point, you can begin to automate any additional mixer parameters.
© Propellerhead Software AB.
© Propellerhead Software AB.
TIP: At some point, you might decide that you want to clear the automation from a particular parameter and start over. You can do this by right-clicking (Windows) or Control-clicking (Mac) on any automated parameter and choosing Clear Automation from the pop-up menu (see Figure 12.3). When you select this option, the neon green box disappears, the newly created automation part on the sequencer track is gone, and you can now record new automation data.

© Propellerhead Software AB.
Using an External Controller to Automate
The use of an external controller is a great solution if you find using a mouse to automate Reason parameters a bit cumbersome. An external controller can send MIDI controller data to any of the Reason devices, making it perfect for creating volume changes or synth parameter changes as well as for operating the transport controls.
Reason includes control-surface templates for most of the popular controllers on the market today, so chances are if your controller has MIDI-assignable knobs and/or faders, they will already be pre-assigned to control some of the most common device parameters in Reason.
This tutorial shows you how to automate a mixer channel using the Novation Impulse 49, which has several knobs, sliders, and pads that send out MIDI controller information (see Figure 12.4). No need to start a new song; just keep using the same one from the previous example.

© Propellerhead Software AB.
Additionally, make sure you have set up your external controller as a MIDI input device by choosing it from the Control Surfaces screen in the Preferences window (see Figure 12.5). Note that you may need to consult your manufacturer’s manual to figure out how to properly map the knobs and slider to the Reason mixer or other devices.
1. Click the Record button on the Main Transport. This makes the sequencer start recording.
2. As soon as the sequencer starts to record, make volume changes to channel 1 by using the external controller’s slider. This controls the level of Audio Track 1. (See Figure 12.6.)
3. Press the space bar to stop recording. The automation data is written on the Audio Track “Level” automation lane, and a neon green framed box appears around the channel 1 fader (see Figure 12.7).
It’s pretty nifty how Reason already has presets that work great with several of the most popular controllers. But what if your controller has no corresponding preset in Reason? Or what if Reason does have preset controller assignments for your controller, but you want to make different assignments to suit your individual needs? Good news—Reason makes this custom assignment easy!
Once again, make sure you have set up your external controller as a MIDI input device by choosing it from the Control Surfaces screen in the Preferences window. Then do the following:
1. Start a new song with an empty rack and create an instance of Malström. The Malström sequencer track should be armed to receive MIDI input.
2. Right-click (Windows) or Control-click (Mac) on the Filter Env A fader and choose Edit Remote Override Mapping from the pop-up menu.

© Propellerhead Software AB.

© Propellerhead Software AB.

© Propellerhead Software AB.
3. In the Edit Remote Override Mapping window, select the Learn From Control Surface Input check box. Move the fader or knob on your control surface with which you would like to control Filter Env A, and you should see the Control Surface Activity display flash. Now click OK.
4. Move that same knob or fader on your control surface, and you will see that the Filter Env A fader also moves. How easy was that?!
Surface Locking
Surface locking allows you to specify that a MIDI control surface will always control parameters of a Reason device, even if that device is not set to receive MIDI input in the Track List. When a MIDI control surface is locked to a device, it can control the parameters of the device, but it cannot be used to play the device. Therefore, the master keyboard cannot be locked to a device because it would no longer be able to play any devices. If you want to lock your master keyboard to a device, you must first choose Use No Master Keyboard from the Control Surfaces screen in the Reason Preferences window.
Locking a MIDI control surface to a device is quite easy. Simply right-click (Windows) or Control-click (Mac) on the device you want to control and select Lock To [Your Control Surface Name] from the pop-up menu. If you do not see this option, either you have no MIDI control surfaces connected to Reason or you have only one control surface connected and it has been designated as the master keyboard. Note that you can lock several control surfaces to a single device if you want.
To unlock a device, right-click (Windows) or Control-click (Mac) on the device and deselect the Lock To item by selecting it in the popup menu.
NOTE: After reading this tutorial, you might find yourself wanting to get an external controller for your studio. You’ll be happy to know that there are many affordable solutions at your local music-instrument shop. To select the right controller, you should first decide whether you want to purchase a controller with knobs, faders, or both. They can all be used to automate Reason’s device parameters, but you might find controlling the mixer faders with controller knobs a little confusing. My advice is to purchase an external controller that has both knobs and faders. There are, of course, many external controllers to choose from, but it comes down to how much money you are willing to part with. Visit your local music-instrument shop for more information, or try some online resources such as Harmony Central (www.harmony-central.com). I would also like to mention that not all controllers are created equal. Companies like Livid Instruments (lividinstruments.com) and Nektar (nektartech.com) put in an exceptional amount of time to ensure the compatibility of their products with Reason, and have really excellent support. The main thing: Do your homework!
Automation Override
Once you have written in your live automation data, you might want to add more automation data to the same parameter or redo it entirely. There are two ideal ways to do this. One way is to switch to Edit mode and use the editing tools in the Sequencer screen’s toolbar to redraw and erase automated parameters. This method is covered later in this chapter. The other way is to use the Automation Override function, located in the Sequencer screen’s Transport panel (see Figure 12.8).

© Propellerhead Software AB.
The Automation Override function makes it possible to replace an entire automation movement or simply add to an existing one. You can see for yourself how to use the Automation Override function by performing the following exercise. Get ready by starting a new Reason song and creating an instance of SubTractor.
1. Record a quick automation of the SubTractor’s modulation wheel with either your mouse or a MIDI controller. Use the previous tutorials as examples if you are unsure how to do this.
2. When the automation data has been recorded, click Stop twice, and you should see the automation data in the SubTractor sequencer track (see Figure 12.9). Click Play to view the automation data play back.

© Propellerhead Software AB.
3. Click Stop twice to go back to the beginning of your sequence. Click Record to begin recording a new automation.
4. Record a new automation performance of the modulation wheel. Notice that the Automation Override indicator is lit up, which means that new automation data is being recorded and is replacing the previously recorded automation.
5. About halfway through the automated sequence, click the Automation Override button. Notice that new automation data is no longer being recorded and that the previously recorded automation has become active again and is controlling the modulation wheel.
6. Click Stop. You should see your new and old automation data displayed in the sequencer track. Click Play to verify.
That pretty much covers live automation. The next section looks at drawn automation.
Drawn Automation
Another way of automating Reason’s parameters is by manually drawing the automation into the Reason sequencer. This process can appear to be a little tedious at first, but it is very helpful for correcting or modifying any previously written automation data. You may even find it to be easier for some automation functions.
Drawing Automation in the Controller Lane
In this tutorial, you automate the individual parameters of the SubTractor by drawing in automation via the Reason sequencer. Before you begin, start a new Reason song and then create an instance of the SubTractor. It’s also a good idea to quickly write in a sequence so you can hear the changes as they are being written.
1. Press Ctrl+E (Windows) or Command+E (Mac) to enter the Sequencer screen.
2. Click the Maximize Sequencer Window button. You can stretch and shrink the Note and Velocity lanes to your liking.
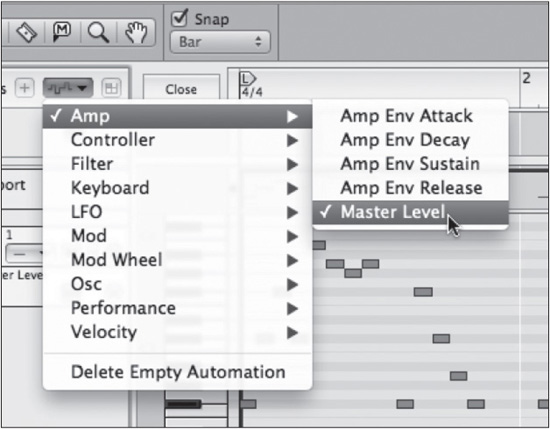
3. Click on the Track Parameter Automation button. This displays a pop-up menu of almost every controller that can be displayed and automated (see Figure 12.10).
© Propellerhead Software AB.
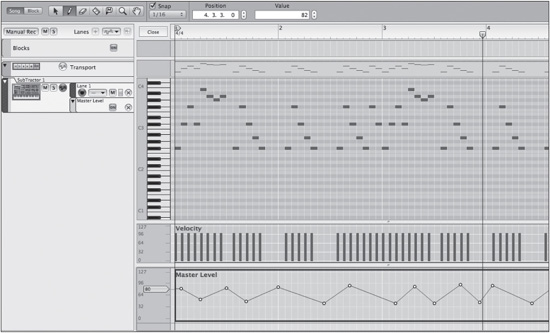
4. Choose Master Level. The sequencer displays the Master Level controller (see Figure 12.11).

© Propellerhead Software AB.
5. Select the Pencil tool and draw in a part by clicking and dragging as long as you want the automation to occur. Then draw in some automation data (see Figure 12.12).
© Propellerhead Software AB.
6. Press the F6 and F7 button simultaneously to display the Sequencer and Rack screen at the same time.
7. The SubTractor Master Level slider has a neon green framed box around it. Click Play on your sequencer, and you will see the slider move up and down to match the movements of the automation you drew in. You’ll also see a new lane on the SubTractor sequencer track.
TIP: After your automation is recorded or drawn in, you may find it looks a little messy from all the automation points. This is where the Automation Cleanup function found in the Sequencer Tools tab of the Tool Window can come in handy. Simply select the automation data you want to tidy up and then select the Automation Cleanup function. Set your desired amount of cleanup, click on the Apply button, and that’s that.
Automating the Pattern Lane
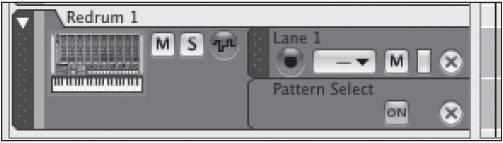
The Pattern lane is used to write in automation data for the Pattern section of the Matrix and Redrum, which are pattern-driven devices (see Figure 12.13). It is also used for automating loop selection for Dr. Octo Rex.
© Propellerhead Software AB.
This tutorial shows you how to draw in pattern data to automate the Pattern section of Redrum. This can be done from either Song view or Edit mode, so I’ll keep it in the Song view for this example. Before beginning, take a minute to start a new Reason song and create an instance of Redrum. Although it’s not necessary, you might also want to load up a Redrum kit and create a few patterns.
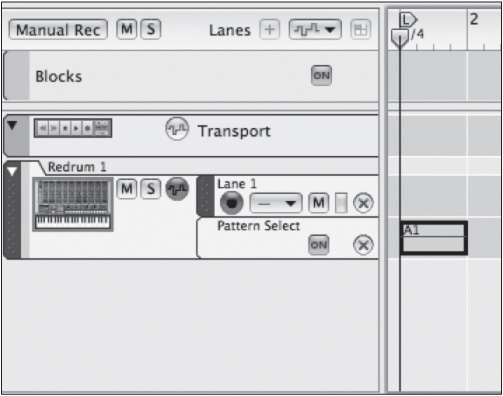
1. Right-click on the Redrum sequencer track and select Create Pattern/Loop Lane from the pop-up menu. This creates a separate lane just below the note lane.
2. Set the Snap menu to Bar. This will allow you to write in automation that is one bar in length at a time.
3. Select the Pencil tool. Notice that the Pattern/Loop menu appears near the Inspector to the right of the Sequencer screen’s toolbar. Also notice that Pattern A1 appears by default. Draw in a pattern in the pattern lane at bar 1 (see Figure 12.14).
© Propellerhead Software AB.
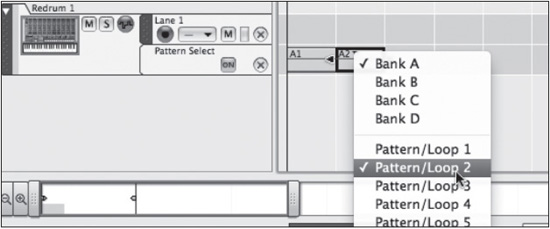
4. Click on the Pattern/Loop menu located in the Inspector to the right of the Sequencer screen’s toolbar and choose A2 (see Figure 12.15).
© Propellerhead Software AB.
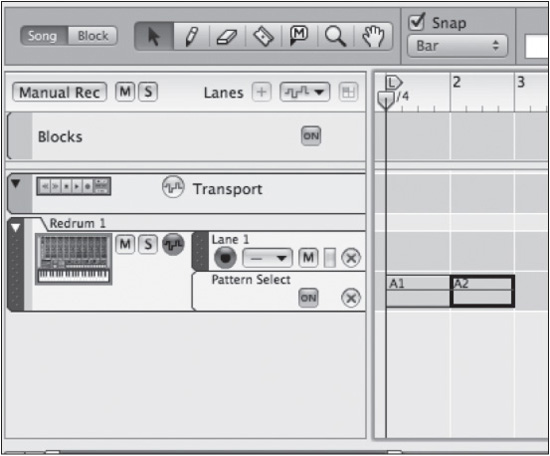
5. Navigate to bar 2 in the Pattern lane and click to write in a bar of pattern A2 (see Figure 12.16).
Automating Live Pattern Changes
As you know, nearly any parameter in any Reason device can be automated live, and this definitely includes the Pattern section of the Matrix and Redrum. Try the following exercise:
1. Using setup from the the previous tutorial, clear the automation from the Pattern section of Redrum. To do this, simply delete the A2 clip.
2. Select the Selection tool and click the Record button to start recording pattern changes. Pattern A1 should already be playing.
3. While recording, click on Redrum’s Pattern A2 button on the downbeat of bar 2. As Pattern A2 begins to play at bar 2, the sequencer track should now reflect that it has recorded a pattern change.
4. Stop the sequencer.
© Propellerhead Software AB.
Once the pattern changes are recorded, you can keep them as is. You can also redo them by drawing them into the pattern lane.
TIP: Select a pattern in the pattern lane of the sequencer, and you’ll see a little pull-down menu next to the name of the pattern. Click on this menu to switch the selected pattern to another one (see Figure 12.17).

© Propellerhead Software AB.
Conclusion
In this chapter, you learned just about all there is to know about automation in Reason. If you are a seasoned DAW user, you’ll probably agree that automating in Reason is much easier than it is with almost any other program out there.
This brings us to the end of our journey together through the amazing, virtual studio that is Reason. I hope that you found the exercises and information in this book helpful and that it has helped you create the music that you’ve always dreamed of making. I would encourage you to check out the Propellerhead website (www.propellerheads.se), as it has several of its own tutorials. Also, make sure that you sign up with the Reason community. This is a great place to ask questions of other users, as well as share things that you’ve been working on and more.
Also, don’t forget that there are more Reason Rack Extensions being added every day. Keep an eye on the Propellerhead store (www.propellerheads.se/shop/). The synthesizer or effect of your dreams may be just around the corner!