
In the days before the X Window System made things a little more soft and cuddly, Unix was labeled the most userunfriendly operating system known to humanity.
There was the cold, forbidding command-line interface (CLI) with seemingly millions of obscure commands to learn. Today both Unix and Linux have an assortment of terrific graphical interfaces to give you point-and-click ease for your computing tasks, but even if you use them all the time, it is good to have access to and an understanding of that command line (usually called the shell or console). When you want something done quickly, or want to understand what’s going on under the hood when you ask Linux to do something, the shell is the place to go.
In this chapter, you will learn the basics of interacting with SUSE Linux, from logging in to understanding the file system to dealing with file permissions.
You’ll pick out the best shell for your working style and play with some text editors, too. By the end of the chapter, you’ll be able to handle the power of being the Root user and know when and how to wield that power.
Read this chapter in particular if you are transitioning from a proprietary OS (even more so if that OS was Windows 98 or earlier, which had no conception of logging in multiple users and dealing with security via file permissions). Read this chapter whether you are the administrator (Root user) of your system, have some administrative privileges (via sudo), or are just an ordinary user in an office with an IT staff. If you are more experienced using Unix or another Linux distribution, you may still find some new tricks, or just get a refresher on the basics.
After you have installed SUSE Linux and created at least one user (yourself) on the system, you must log in. The standard login is pretty straightforward. By default, SUSE Linux boots to a KDE-based graphical login screen, known as the display manager. You enter your username (or click the icon representing you) and password and identify whether you want to start KDE, GNOME, some other X Window manager or a shell/command line (what appears in this drop-down menu is set by the Root user, so your options may differ). Press Enter to finish booting.
What about those times when you don’t need to load graphics just to log in, get a piece of information, and shut down? Or what if X has a problem loading? The text login is a simple process. SUSE Linux boots to a login shell. Type your username and press Enter to get the password prompt. Enter your password and you have full access to your system (or at least as much access as you have with the graphical interface).
Note
In this book, you will see some terms for the Linux command-line interface used somewhat interchangeably.
Most often, you’ll see shell or command line to refer to this interface. When you read about a command to run at the shell prompt, you can run that command whether or not you have a graphical interface loaded.
Occasionally, you will see a reference to a console, or X Terminal (xterm, for short). These refer to graphical shells within an X environment. Some consoles have additional tricks they can do that a standard shell can’t. When you see these terms, understand that the instructions apply only to the graphical shell.
As the Internet has just a few specific but well-known top-level domains (.com, .net, .org, .edu, and the like), so are Linux files organized in a particular hierarchy, with specific directories that hold specific types of files.
Virtually all Linux distributions have the same structure, and this is likely to become more entrenched with the Linux Standard Base specifications becoming more universal. The Linux Standard Base (www.linuxbase.org) is an effort to make all Linux distributions more compatible with each other, and with most applications. SUSE is a longtime supporter of this effort, and has been compliant with LSB standards since LSB v1.0. In addition, the Filesystem Hierarchy Standard seeks specifically to standardize the contents of the top-level Unix/Linux directories. This structure is beautiful for software developers because they can know what directories will be present on each user’s machine and can install programs into the appropriate directory. It also enables programmers to build more modular programs, which depend on other standard libraries. It helps packaging systems—such as the Red Hat Package Manager (RPM) that SUSE uses—check and confirm that a file on which a package depends is present on a user’s system. Testing goes easier, too, because fewer things can go wrong.
We went over that structure briefly in Chapter 2, “Preparing to Install SUSE Linux.” To have another look and get your first lesson in using a shell, open the KDE Konsole and type ls /. You should see the following:
bin    dev    home    media    opt    root    srv    usr    windows
boot    etc    lib    mnt    proc    sbin    tmp    var
For a more detailed view of the file system from the shell, use the tree command. This program might not be installed by default, but it is on the CD-ROM. The results displayed by this program include all the top-level directories listed in “How to Partition Your Drive(s)” in Chapter 2, along with a few levels of subdirectories.
Note
When you’re typing into the KDE Konsole, you’re using the bash shell in an X Terminal (or Xterm). You’ll learn more about shells and terminals, including how to change the defaults, later in the chapter.
In Windows, you have the capability to create, delete, and rename as many top-level directories and subdirectories as you want, and very few bad things can happen to you as a result. Renaming the Program files or Windows directories would cause problems, but the system won’t come to a halt if you installed a program to a directory outside of Program files. Although you have the same technical ability to manipulate the directory structure in SUSE Linux, at least if you have Root privileges, don’t!
The sole exception to this otherwise ironclad rule is in your home directory. As a user, you can and should organize your documents and other data any way you see fit. You will see several recommendations in this book to put particular files and programs in your home directory because it can be the best place for them. If you find it useful, put every file you create in its own directory (although that might be a little extreme).
This recommendation extends to putting files of your own creation into one of the system directories. Say you create a text file that has a collection of tips and tricks you’ve learned about the bash shell over the years, called BashTips. Because you know that man pages and other documentation for bash goes in the /usr/share/doc/bash directory, you might be tempted to store the file there. No problem—unless somewhere down the road one of the developers or documentation writers adds a BashTips file to the bash package. When that file gets installed, your file is replaced with no questions asked, never to be recovered. No program will ever try to copy a file in your home directory, so put things that are yours there.
Tip
If you ever find the need to have files in two places at once, use symbolic links, usually called symlinks. In the preceding example, keep the file in /home/documents/bash. Then open a shell and type ln -s /documents/bash/BashTips /usr/share/doc/bash/MyBashTips. Now if you look for MyBashTips in this directory, it will open your file. More about this later.
The /bin (short for binary)directory holds your shell applications and many essential shell commands you need when running and booting Linux. The /sbin (or system binary)directory contains the various installed file systems, YaST, the SUSE Firewall, and other commands needed at boot or for the Root user to solve systemwide problems. On the average system, each directory will have 5–8MB worth of files in them, with /sbin a little bit bigger than /bin. Many, if not all, of these commands are statically linked, not dependent on other software libraries located in other directories (mostly /lib and /usr/lib). Nearly every other application on your system relies on one or more of these external (or shared) libraries to run. These dynamically linked applications create a software ecosystem that ties an application to its operating system. Statically linked applications and commands, along with the kernel, represent the operating system itself.
The /boot directory contains a compressed version of the Linux kernel that loads at boot (earlier versions of the startup script delivered a message that the kernel was “exploding,” which undoubtedly unnerved more than a few novices in those days). When you rebuild or install a new kernel, the new kernel and related files go first into this directory (see Chapter 24, “Kernel and Module Management,” for more information on updating your kernel).
Linux device files are located in the /dev directory. As noted earlier, nearly everything in Linux is represented as a file. No further proof is needed than a peek into this directory. There you will find about 7,500 files representing devices that are or may some day be attached (or not) to your system. The more commonly used devices include the following:
IDE and SCSI hard drives, represented as
hdaandsda, respectively.CD-ROM, CD-R, and CD-RW drives (and their DVD counterparts), some of which are IDE; others are viewed by the system as SCSI.
Serial ports, marked
tty.Pointing devices, such as
/dev/input/mouse.Universal Serial Bus (USB) devices, in the
dev/usbdirectory.Printers, marked
lp.
If you’re running short of disk space, you might think cleaning out some of these files would help you. Closer inspection reveals that they are all 0byte files. Leave them alone.
One of the beauties of Linux applications is the way you can make software your own. Whether it’s changing the behavior of a command, adding a keyboard shortcut, or changing the color of the application title bar, there are lots of ways to make the applications you use work the way you want them to. Often, you don’t even have to open the application you want to modify to make the changes you want. Most applications store their configurations in a simple text file located in the /etc directory. Scroll through the directory to see exactly what is there. Check to see which user owns a file before trying to edit it—if Root owns the configuration file, you’ll have to log in as the SuperUser to make changes.
Some of the more important system-related configuration files in this directory are
fstab. —This file system table lists each mountable storage device on your computer. These include hard drives, floppy drives, CD and DVD drives, and removable drives. The file displays each device’s mount point, its location on the partition table, instructions on whether it should mount automatically on boot, and a few other options. See the section “Mounting a File System” in Chapter 18, “Managing Files, Volumes, and Drives,” for more information on/etc/fstab.inittab. —The system initialization table defines the different runlevels that the system uses at boot to start your computer. Changes to this file (which can be made manually, but also in YaST’ssuseconfigeditor) can determine whether you boot to a graphical or text login screen, as well as whether someone can log in to the machine remotely with a dial-up modem. You will learn more about the boot process and runlevels in Chapter 22, “Managing the Boot Process and Other Services.”modprobe.confandmodprobe.conf.local. —The mainmodprobe.conffile contains directions and options used when loading kernel modules to operate various pieces of hardware, such as sound cards, USB devices, network cards, and the like. The contents of this file are used during boot. SUSE engineers update this file from time to time and recommend that if you want to do your own editing, you usemodprobe.conf.localto keep those changes from being overwritten. You will learn more aboutmodprobe.confin Chapter 24, “Kernel and Module Management.”passwdandshadow. —Thepasswdfile and its more secure counterpart,shadow, contain the list of all users on the system, along with their account information. It’s often said in Unix circles that a user doesn’t exist until she has a password. This is one of the reasons why. You will learn more about users and passwords in Chapter 19, “Managing Users, Managing Security.”
Ultimately, the most important data on any computer belongs in this directory—the files you create for yourself. Every “real” (in contrast to a system) user on a Linux system gets a /home directory labeled with their username. That user has complete control over folders and files created in this directory and control over all access to those files except for the Root user.
In an effort to be helpful, SUSE Linux adds a few subdirectories to the /home directory by default:
/bincan hold binary (program) files, but is usually empty to begin with./Desktopholds your KDE desktop icons. GNOME users tend to have a cleaner look, but the subdirectory is there if you want it.Documentsis a lovely place to store word processing files and other, well... documents./public_htmlis a place to store your website. If you have a web server, such as Apache, installed, this directory links directly to yourlocalhostURL. Read more about building websites in Chapter 14, “Creating Basic Websites,” and Chapter 31, “Programming Dynamic Websites.” Learn more about the Apache web server in Chapter 26, “Managing Your Apache Web Server.”
You can work with these subdirectories, create more, delete some—your /home is your playground. But remember, back up your /home directory regularly. It’s designed for that.
The Filesystem Hierarchy Standard (FHS) says, “The /opt/ directory provides storage for large, static application software packages.” In practice, this seems to mean applications oriented to the desktop. Confined within /opt are all the built-in KDE and GNOME applications, Mozilla and its Firefox progeny, Softmaker Office files, and the Zope web application server. Depending on what you have installed, your mileage may vary.
The /usr directory is somewhat surprising when you look at it, because it has a parallel structure to the main (/) directory. This is why some folks give /usr its own mount point (that is, in DOS/Windows it would have its own drive letter). This directory is usually quite large (in the multigigabyte range, depending on how many applications you install) and contains many shared files and applications. It also houses the X Window System for graphical and remote computing. This directory is the place to start when looking for a particular application on your system, to handle troubleshooting, desktop icon placing, and everything in between.
The /var directory holds subdirectories used by various system services for spooling and logging. Some of the files in this directory are temporary, like a printer queue spooler file. System and kernel logs keep much longer and so are renamed and rotated through periodically. Incoming local email is usually directed to /var/spool/mail as well.
Linux also uses /var for other system services. YaST keeps backup boot sectors and YaST Online Update files, among other things, in /var/lib/YaST2. The RPM package database is also stored in /var/lib/rpm.
Unix was born in a multiuser environment at Bell Labs and was widely used in university computer science labs with a bunch of students floating in and out using whatever terminal was available. Defining users in a system was a necessity in the early days of Unix. As more users came on to systems with the advent of the PC, requiring users to log in was the touchstone of security measures. Today, because of viruses, worms, and assorted evildoers trying to break into networks almost constantly, named users and passwords are essential elements in any secure computing environment.
The Root user, who is responsible for all administrative tasks on the system, creates an account for each user. This involves assigning a username and creating an initial password for that user. You created the first user account for your system during the installation in Chapter 3, “Installing SUSE Linux.”
The Root user can delegate responsibilities to a single user or a group of users by sharing the Root password. Those users can then run the SuperUser program (su) to act as the Root user. You will learn more about SuperUsers in Chapter 19.
Individual users cannot change their usernames. System administrators of large user communities like to have some consistency in usernames, especially considering that a username is a central element of that user’s email address. Users can, however, change the information associated with their name and contained with your other login information in /etc/passwd and in your public “finger” file. This is generally phone-directory information that may need to be public, but that otherwise may be an artifact of a bygone era.
Finger was a program developed to help Unix users find each other, both electronically and physically. Typing finger <username> delivered whatever was in that user’s finger file. To see what’s in yours, type chfn (change finger information) at the shell prompt. By default, SUSE Linux does not create additional user information with new users, but it is easily configured by Root. You’ll see something like this:
Name:
Office:
Office Phone:
Home Phone:
You’re led through a series of prompts to enter new or updated information. Feel free to leave items blank (or change them appropriately).
The shell is perhaps the most underappreciated feature of a modern Linux system. New users try to avoid it, preferring the GUI tools that they are used to. Old-timers are wedded to the shell they learned at school. There’s no real reason to give the shell a second thought, is there? Of course there is!
By default, SUSE Linux (and pretty much all the other Linux distributions) installs the bash (Bourne Again SHell) shell as the standard command-line interface. There’s certainly no reason not to take this fine choice and run with it. But this is Linux, and there’s absolutely no reason not to explore some or all of the alternatives to bash included in SUSE Linux. This section will introduce you to these options, tell you how to change shells temporarily and permanently, and then offer pointers on how to use a shell productively.
Note
Learn even more about using shells, including writing shell scripts to automate tasks, in Chapter 8, “Shaking Hands with Your Shell.”
The shell is not just a keyboard-based program launcher. It is a powerful tool you can use to get lots of things done quickly—if you know how to use it. Some shells are designed for running scripts to automate tasks, and others work best interacting with its favorite user—you! Following are some of the things that all shells have in common:
Command history—The shell stores every command you enter (up to a limit, which is configurable). This feature lets you easily access and repeat commands from the history. Press the up-arrow key to see the last command and keep pressing to view each previous command. Pressing the down-arrow key moves forward in time, as it were, returning you back to an empty prompt. To reuse a command, locate it and press Enter to run the command.
This works over sessions, too. Even if you run the shell only once a month (or once a decade), the command history stays current.
Filename completion—Another terrific tool for lazy typists. Start typing a filename and press the Tab key.
The shell checks the path for files that start with the keys you typed, and a suggestion appears.
This is especially helpful when performing actions on files with long names, or deep in a directory. Some shells will also complete commands. See the sections on running
tcshandzshlater in the chapter.Command-line editing—Did you mistype a letter in a command and get an error? Don’t retype the whole thing; use the command history and left- and right-arrow keys to get to the error, or change the options.
Many utilities to work with—Tools such as
sedandawkcan help with commands and scripts.Aliasing—Another typing shortcut, similar to a symlink. One command (or set of letters) stands in for another. This is set up in the shell configuration file. Among other things, aliasing allows bash to run when you type
shand thetcshshell to run when you callcsh.Background processing—If one command is taking a long time to complete, you can move it to the background and run another command.
Multiple sessions—You can have more than one shell (and multiple instances of the same shell) open at the same time, even without a graphical interface, and switch back and forth.
Programmable everything—The shell is a programming environment with languages on par with any other programming language.
These are just some of the advantages of most all shells. But how does one shell differ from another? We will look at the three most popular shells—bash, tcsh, and zsh—in some detail, and then look at Midnight Commander (mc), a specialized shell for managing files and directories. Finally, there is a very brief introduction to the Korn (ksh) and the Almquist (ash) shells.
Just about every Linux user has used bash at least once. As one of the original GNU projects, it has been in development since 1987. Version 3.0 was released in July 2004 and is included in SUSE Linux Professional 9.2. As you might guess from the name, bash (Bourne Again Shell) is the logical successor to the venerable Unix shell (sh) written by Steve Bourne. This is a shell best adapted for running scripts to automate tasks.
You can tweak bash’s performance by editing the .bashrc configuration file. Root can edit the systemwide .bashrc, and each user on the system may have his or her own configuration file, although a user cannot override the system configuration.
Looking at a configuration file provides both a sample of the kinds of things you can do with a shell and offers a glimpse at the syntax each shell uses to perform its tasks. The default system configuration in SUSE Linux, bash.bashrc, is located, like other configuration files, in the /etc directory. Let’s look at some of the settings defined here.
This section lets you display directory listings in different colors.
The colors are set in another file, DIR_COLORS. In this setting, bash looks for DIR_COLORS first in the home directory, then in /etc.
#
# Colored file listings
#
if test -x /usr/bin/dircolors ; then
    #
    # set up the color-ls environment variables:
    #
    if test -f $HOME/.dir_colors ; then
    eval `dircolors -b $HOME/.dir_colors`
    elif test -f /etc/DIR_COLORS ; then
    eval 'dircolors -b /etc/DIR_COLORS'
    fi
fi
Note the hash mark (#) in front of some of the lines. This indicates a comment line. The line is not processed by the shell, but usually describes what the next batch of code is supposed to do.
This next section defines some aliases. As mentioned before, aliases are command-line shortcuts that allow you to substitute one command for another.
#
# Set some generic aliases
#

alias rd=rmdir
alias md='mkdir -p'
alias which='type -p'
alias rehash='hash -r'
alias you='yast2 online_update'
This alias is a nice one. If you often mistype a command, you can specify a little reminder. You may think that the opposite of the mount command to display a drive or partition is unmount, but really it’s umount (no N). This alias tells bash to remind you of the right command every time you add the extra N. Sure, you could just have unmount replace umount on your system, but what if you are working on someone else’s system that does not have this alias? You may just forget the real command.
With this method, you might train your fingers to type the right thing after a few gentle nudges.
alias unmount='echo "Error: Try the command: umount" 1>&2; false'
test -s $HOME/.alias && . $HOME/.alias
fi
This section modifies how the command history is handled, by making sure the History file doesn’t get too big with many duplicate listings of the same file.
    # Do not save dupes and lines starting by space in the bash history file
    HISTCONTROL=ignoreboth
    if test "$is" = "ksh" ; then
    # Use a ksh specific history file and enable
        # emacs line editor
        HISTFILE=$HOME/.kshrc_history
        VISUAL=emacs
    fi
    ;;
esac
SUSE recommends not editing this default system file, because it can be overwritten in a system update. With this bit of code, bash checks for a local configuration file edited by the system administrator, saved as /etc/bash.bashrc.local.
if test "$is" != "ash" ; then
    #
    # And now let's see if there is a local bash.bashrc
    # (for options defined by your sysadmin, not SuSE Linux)
    #
    test -s /etc/bash.bashrc.local && . /etc/bash.bashrc.local
fi
As noted at the beginning of this section, bash is a shell environment for scripting. Other shells are designed to be more interactive. Let’s look at the leading example: the C shell.
Bill Joy (later to become a founder of Sun Microsystems) wrote the original C shell in college. He aimed to provide a more interactive work environment, with a syntax more like the C programming language.
Interactive shells are focused on directly processing commands you type in, rather than running scripts or files. Script-oriented shells such as bash can be used interactively, but it is rarely a good idea to make a C shell run scripts.
The version of the C shell included in SUSE Linux is called tcsh, a tribute to the TENEX mainframe operating system. It has programmable command completion and a referable command history.
The best thing about tcsh, though, is its command spell checker.
If you type frotune at a tcsh prompt, it will ask if you mean fortune. A yes answer gives you a fortune cookie.
The Z shell strives to be the best of both worlds, enabling you to safely write scripts or use it interactively. It is based on the Korn shell (ksh) written by David Korn, with tons of extra features. Many folks love zsh to bits for its power and flexibility, but with great power comes great complexity. This shell’s Info file has 21,530 lines of documentation in 11 subnodes. We won’t cover all of that here.
zsh has virtually all the neat features previously listed and works quite well with the default configuration file (etc/zshrc).
Some features, such as command spell check, are not set by default, but it is a fairly easy task to edit them.
This shell also checks your default text editor, and if it is emacs or vim, it will adopt that editor’s key bindings (aka keyboard shortcuts) in addition to its own.
Whatever shell you choose for your everyday use, you may find the Midnight Commander a handy in-between tool for moving files around. In between? Suppose you don’t need to load a full GUI desktop to move a batch of files, but even all the wildcards and completion shortcuts offered by your shell won’t let you easily copy a set of files from different directories into one other directory. You need something else—something that will display two directories side by side and let you drag or move things from one place to another. You need Midnight Commander!
To open Midnight Commander, type mc at the shell prompt. Figure 5.1 shows the initial default display of your home directory on both sides of the screen. Use the arrow keys to navigate in the left pane. Use the Tab key to move from one side to the other, and then move around. Select a file or folder and press Enter to open that item. Mouse support is excellent; click any menu at the top to see your choices. Along the bottom are the F-key bindings: pressing F1 brings up the Help file, F2 displays a context-sensitive menu of choices for the selected file or directory, and so on.

To copy a set of documents with the .sxw extension from ~/documents to a directory on a remote server called /backup/mikemc, follow these steps:
In the left pane, use the arrow keys to navigate to the
/Documentsdirectory. Press Enter to open this directory.Tab to the right pane. At the bottom of the Midnight Commander, you will see a flashing cursor. This is a shell prompt. Type
cd /backup/mikemcto navigate to this directory. You could use the parent folders, marked .., to find the directory, but this is faster.Tab back to the left pane. Press
Alt-+to open the Select Group dialog. Type*.sxwand press Enter to select all files with the.sxwextension.Press F5 to open the Copy dialog box. Confirm that the correct files are going to the correct directory. Select any options you want by navigating with the Tab key and selecting with the spacebar. Press Enter to complete the operation.
Midnight Commander is a program ripe for exploration. The first few times you work with it, play around a little. Go to a menu, or press an F key to see what a command does.
The help files are indeed helpful! This is a full-featured file manager: View hidden files if you like, access FTP sites, and upload or download files (at the same time, if you want to), run executables, and change permissions (if you can) and owners with the ChMod and ChOwn commands. In short, just about everything you can do with a file in a shell, you can do with Midnight Commander. It even has a command history.
The other shell choices may be less popular, but are still valid. Here’s a quick overview:
Korn shell (
ksh)—This shell, written by David Korn, was the first popular shell to try to combine the scripting features of the Bourne shell and the interactive features of the C shell. AT&T tried to turnkshinto a commercial product, with limited success. There are two versions of the “pure” Korn shell:ksh88andksh93. The version included with SUSE Linux is the public domainpd-ksh. It has reproduced most of the features ofksh88, with a few new ones of its own.The Z shell is also one of the Korn shell descendants, and if you know
kshwell, you should be able to function well withzsh.Almquist shell (
ash)—This lightweight Bourne-like shell has but 17 built-in commands, so as a shell it’s perfect for embedded and other tight spaces and login shells. In fact, it is the SUSE login shell.
You now know a little bit about each shell. How do you decide which to use? The easiest thing is, of course, to stick with what you know. If you have used a shell before, there should be some compelling reason to switch. Similarly, if you don’t ever intend to do anything fancy with your shell, you might as well stick with bash. You can certainly do very fancy things with bash, but why change from the default?
Bash is also a great tool to learn scripting from. Resources abound on the Net to help you do that, and you’ll learn more about that in Chapter 8 as well. If you don’t want to write scripts, use an interactive shell such as tcsh, pd-ksh, or zsh.
If you are a lousy typist, you should certainly consider one of the shells with a spell checker. tcsh spell checks by default; zsh spell checks with a very quick configuration file edit. The fancier you want to get with file and command completion, the more you’ll probably want zsh.
As recommended at the beginning of this section, try out all the shells, at least once. All you have to do is type the name of the shell at any other shell prompt. When you’re done and want to return to bash, type exit. Look over the documentation. All the shells have extensive man or info pages. After you’ve settled on a shell, run the Change Shell (chsh) program to identify your choice. Then take some time to read those docs thoroughly.
Now that you’ve settled one of the interminable Linux wars to your satisfaction, you can choose a text editor.
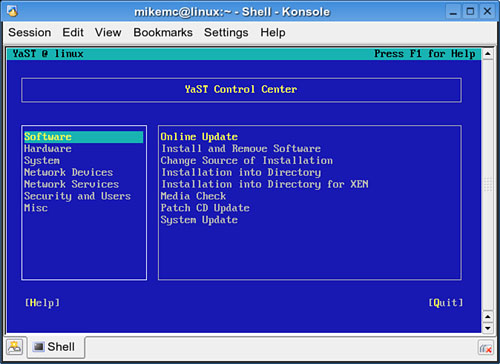
Running YaST from the Shell
YaST is a tool older than most GUI desktop environments, and it runs beautifully from any shell. Log in as the SuperUser with the su command, and then type yast at the prompt. Figure 5.2 shows the opening screen in a KDE Konsole.
This is especially useful in an emergency, when the system won’t boot to the GUI login screen. To restore your system from a previous backup (see Chapter 20, “Managing Data: Backup, Restoring, and Recovery,” for more information on backing up and restoring your system), follow these steps:
Run YaST by typing
yastat the rescue prompt.Use the arrow key to select System from the listing on the left.
Tab to the module section on the right, and then arrow down to Restore System.
Follow the instructions on the page or view details in the “Using System Restore” section of Chapter 20.
To maneuver around the menus and choices, use the accelerator keys highlighted on each screen. Press the Alt key with the highlighted letter to move to the item you want. For example, in any screen, press Alt+H to get Help on that screen. When finished, press Alt+Q to Quit and return to the shell prompt.
All YaST modules that are in the GUI version work in the command-line version as well, although Online Update (YOU) is dependent on the state of your Internet connection.
Because Unix and Linux are rooted in the hacker/geek/programmer culture, where coding was (and is) the most important function of any computer, having robust shells and editors were essential parts of the experience. It is no accident that Bill Joy wrote both the C shell and the vi editor, nor that Richard Stallman created the GNU Project and the emacs editor (and that each has completely different views about how to create and license software).
Of course, that was in the bygone early days of Unix. Why does it matter what text editor you should use now? And why do you need one, anyway? Consider this: Word processors are wonderful things, but often they are the very essence of overkill. One of the beauties of Linux is that nearly all the configuration and customization options for applications are contained in simple text files. This is true whether the program has a GUI or not. So making changes in the way a program works doesn’t necessarily have to require opening the program; just open the config file in a text editor!
There’s one other reason to be at least somewhat comfortable with at least one nongraphical editor. One of the truly cool things about Linux is the capability to access many different computers regardless of where you happen to physically be located at a given moment.
Remote access to other servers and workstations is another beauty of Linux, but most times, those remote machines (especially the servers) don’t even have X installed. To get any work done, you need a text editor.
SUSE Linux offers no fewer than 22 text editors through YaST, as shown in Table 5.1. Don’t be overwhelmed by the number of choices, though. Basically, text editors fall into one of two major camps: editors that behave like vi and editors that behave like emacs. This list also has a few line editors that work directly in the shell.
Table 5.1. Types of Editors in SUSE Linux
Vi-type | Emacs-type | Other |
|---|---|---|
Vim | Emacs | Ed |
Gvim | Xemacs | Joe |
Nvi | TeXmacs | Pico |
Kvim | Uemacs | E3 |
Zile | FTE | |
Qemacs | Mined | |
THE (the Hessling Editor) | ||
JEdit |
The next few sections will help you work with these various editors.
They say that vi is hard to learn, but once you get there, you can do amazing things with it. That hard-to-learn part is evident from the first time you use it (unless you have a vi user nearby). When you first open the vi editor (and these days, typing vi actually opens its “improved” version, vim), you cannot type anything. By default, vi opens in its command/viewing mode. You can maneuver around a file, provided you know that commands in vi begin with a colon (:). To edit a file, you must press the Insert key (or Esc-i) first.
After you know this secret handshake, vim can be very useful and, with practice, very powerful. It also comes with extensive documentation. The documentation page at the Vim.org site says it best: “The most useful software is sometimes rendered useless by poor or altogether missing documentation. Vim refuses to succumb to death by underdocumentation.”
To quickly get up to speed in vim, you don’t have to run the editor. Run vimtutor from the shell prompt to get a brief tutorial, estimated to take about 30 minutes to complete.
Following are a few commands that will help you get started with vim:
Simple navigation: Your arrow keys work fine, but these characters also move the cursor: | ||
| left | |
| right | |
| up | |
| down | |
Delete character |
| |
Delete line |
| |
Save |
| |
Find text in file |
| |
Changing mode from Insert to Command |
| |
Quit |
| |
Quit without saving |
| |
Gvim and Kvim both offer GUIs for the basic editor. They were written for GNOME and KDE, respectively, but you can use either one in either environment. The primary development team for Kvim has moved on to produce another GUI-based vi clone called Yzis.
Nvi is a slightly different version of vi from the University of California at Berkeley.
GNU emacs is the infinitely customizable, everything-but-the-kitchen-sink editor/work environment. It was the first product of the GNU Project, and so is beloved by many free-software purists.
It is the text editor that keeps your hands busy over the keyboard with seemingly odd multiple keybindings (Ctrl+X to begin a command and another combination to complete it). Learning emacs is a supremely geeky thing to do.
If vim has everything an editor should have in one pretty, if sometimes impenetrable, package, emacs is a modular monster. Emacs reads email and Usenet newsgroups, browses the web and composes web pages in HTML, XHTML, XML, and sundry other formats as well. It offers a development environment for practically every extant programming language. You can even see a sublimely odd conversation between Zippy the Pinhead and a psychoanalyst. But to do all this, you must have the proper mode installed. Emacs is a big program (taking up to 30MB), but it does not include every mode that has been written. Sometimes you have to go hunting for the thing you need.
Emacs is easy to start up (type emacs <filename> from the shell prompt), and navigation can be pretty easy.
Unlike vim, Emacs has its own interface (vim just shows up in the shell) with menus and mouse support, although not quite as pretty as under X. Unless you include a mode command when you launch it, emacs assumes you want to write text and loads in text fill mode. If you don’t want words to wrap at the end of a line, go to the Options menu or type Alt+X+auto-f[TAB] to change the mode.
Emacs also has a tutorial that will walk you through the basic commands and navigation tools. In emacs, use Ctrl+H, and then press “T” to get to it.
Most of the other clones of emacs (aficionados use the plural emacsen) are subsets of the original designed for specific uses. XE began as a GUI version, but has a separate group of developers that have done some things differently from its parent. Generally speaking, XEmacs is faster to add new features and does not require packagers to assign copyright to the Free Software Foundation (that administers the GNU Project).
You don’t need to follow the crowd when choosing an editor. Choices are not limited to the big two. Take these for a spin:
ed—The first Unix line editor. It opens by default in viewing/command mode and is the reasonvidoes the same.You could put it in the
vi-clones category, if it didn’t predatevi. If you need a shell script to edit or perform commands on some text,edis the editor to invoke. It’s fast and functional for basic line editing.Joe—You say you can’t decide whetheremacsorviis cooler? Do you still remember all those WordStar commands and macros? You just might love Joe’s Own Editor.Joeis a flexible beast that wants to work the way you want it to. It can emulate any of the previously mentioned editors with a simple command switch. You can open and edit multiple files at once and provide different environments for each one. Likeemacs, it can read email and news, too. Help is extensive and can put a command template right on your screen so you don’t have to think about how to save a file (Ctrl+K, and then D, if you must know).JEdit—This is a Java-based graphical editor that many folks swear by. Although powerful by itself, it also has a plug-in architecture that can bulk it up even more. The nice thing is that it is incredibly easy to add and update any plug-in you have with the built-in plug-in manager. The commands are relatively easy to learn, and the user’s guide is helpful.The Hessling Editor (
the)—This is a specialized editor for people used to working in VMS/CMS and another example of how niches get served in an open-source environment. There may not be millions of VMS veterans with wallet in hand transitioning to Linux, but it takes only one person with some programming skills to write that editor and make it available to the rest of us.
If there’s one thing that is important to know about Linux, it is that everything on your computer exists as a file. Your printer, sound card, hard-drive partitions, monitor, directories—a file on your system represents that item. And each file has rules about who can access it and in what manner.
In this section, you will get an introduction to permissions. This is covered in more depth in Chapter 19. No matter what your skill level is, you should read the “User Accounts and Permissions” section of that chapter.
Linux is a multiuser operating system, with a minimum of two users on any machine: the Root user and a “generic user.
Note
The Root user is also the SuperUser when logged in as such, and other users can become the SuperUser with the Root password.
Each file (again, that means everything on your system) has an owner and is assigned to a group when it is created. Read, write, and execute permissions are set for three types of user: Owner, group, and the rest of the world.
The ls -l (long format) directory listing command displays the permissions for each file. To see the system default permissions for a file, use the touch command to create an empty file and then run ls -l, like this:
touch file
mikemc@linux:~> ls -l file
-rw-r--r--    1 mikemc   users           0 2004-12-08 09:43 file
Looking at this listing, you see a 10-character block of dashes and letters (-rw-r--r--). These characters identify the permissions for this file.
The first character in the block indicates whether it is a special file in some way (d identifies it as a directory, c is for a character device, and b is for a block device, such as a hard drive). We know this is a plain data file because there is a dash, noting it is not any of these special types.
The default permissions for this file show us that the Owner of the file can Read and Write it (rw-); it is Read-Only (r--)for both the Group and Others (the rest of the world). If this was supposed to be an executable program file, a problem would exist, because no one has permission to execute it.
The next columns tell us other important things about this file:
The number next to the permissions block shows the number of hard links to a file.
You may better understand this as the number of copies of this file that exist on the system. Files almost always have just one link/copy. Directories nearly always have at least two because it is linked in its parent directory.
After the link counter, you see the Owner of the file. Because we created the file logged in as user
mikemc,mikemcis the owner. In this case, this user is the only person who can edit this file (that is, make changes to and write back to the hard drive). The owner can be changed by either the current owner or by Root using thechowncommand.After the Owner is identified, you see the group (users) assigned to this file. This means that all users on the system can read the file, but cannot write (save changes) to it. As with any read-only file, other users can save changes in a different location or with a different filename. The group assignment can be changed by the owner or by Root using the
chgrpcommand.The file size and creation date are defined in the last columns. This file is empty, but the size is defined in bytes.
When you are the owner of a file (or the SuperUser), you have the right to make that file more (or less) accessible by adjusting its permissions. You do that with judicious use of the chown (Change Owner), chgrp (Change Group) and chmod (Change Mode) commands.
Note
You can make these changes in any of the GUI file managers (Konqueror, Nautilus, and so on) by opening the Properties dialog box of a file (or group of files). See Chapter 18.
To make user2 the owner of the file we created in the last section, type the following:
chown user2 file
Caution
If your system administrator has imposed disk quotas for users, only Root can change owners. This prevents you from exceeding your quota by fobbing off your excess files on another user. Disk quotas are covered in Chapter 18.
This works for multiple files, too. Name each file or use wildcards to specify similar files. For example, if you have a bunch of files in this directory that begin with “file” and you want to change ownership of them, modify the previous command to
chown user2 file*
As with many Linux commands, when you run this command the shell prompt will reappear unless there is a problem or error.
Our file allows only the owner to make changes (write) to the file. If you want anyone in the writers group to be able to edit it directly, you should change the group assigned to this file from users (which are all system users) to writers (a previously defined select group of users):
chgrp writers file
Caution
chgrp works only if you are both the Owner of a file and a member of the group you’re changing to. If you want to change permissions to a different group, you may be able to use the newgrp command to temporarily join that group, if you know the group password. Otherwise, Root must make the change.
But we’re not done; the group permission is still set for Read-Only. We complete the task here:
chmod g+w file
As noted in the previous section, permissions are defined as Read, Write, and eXecute--rwx. With the g+w switch, we’ve told chmod to add (+) Write (w) privileges to the group (g).
The choices for chmod include the following:
u—user
g—group
o—others
a—all users
Plus sign (+)—add a Read, Write, or eXecute permission
Minus sign (-)—remove a Read, Write, or eXecute permission
Some people prefer using octal (base 8) numbers when using chmod. This way, instead of adding or subtracting individual permissions, you can specify exactly what you want them to be when you complete the command. Using octals to make the same change we made previously, the command looks like this:
chmod 664 file
Why these numbers? Each digit represents one set of permissions: Owner Group Others. Each number represents the rights each entity has
4 = Read permission
2 = Write permission
1 = Execute permission
Add each permission number to signify the permission level the file should have. So, as shown, the Owner and Group has Read and Write (4+2=6); Others just has Read.
Directories also have permissions assigned to them. Use ls -dl (d for Directory, l for Long version) to see the permissions of your current directory (most likely, the home directory). You should see something like this:
drwxr-xr-x 64 mikemc users 4056 2004-12-09 15:02
The distinguishing mark here is the leading d in the permissions block. This tells you that you are looking at a directory. Looking carefully, you can see that the Owner (mikemc) can do everything (rwx), whereas the Users group and Others can read a list of the directory’s contents. You have to have execute rights (r-x) to view directory contents. Looking at this octally, permissions are set at 755.
You can perform the same permission changes on directories as with files, using the same tools, provided you have the rights to do so.
Permissions, more importantly the lack of them, mean a lot on a Linux (or Unix) system, especially if you’re “just a user.” Permissions are all about security—keeping the system safe from harm. In this case, harm can come from many directions. When you think about computer security, the vision that comes to your head is mostly likely that of the evil hacker who attempts to steal your passwords, credit card numbers, critical data, or even your identity. Security on the Internet is certainly an important consideration, and protecting your networks and systems against that type of criminal activity is essential.
Tip
If you spend any time hanging around the Linux community, you will probably get a lecture about the hacker previously described. Don’t be put off; Unix and Linux were both forged out of the more noble “hacker culture” devoted to making better technology, not to busting into other people’s machines.
In Linux and Unix, however, security and permissions also keep you from the more mundane harm and the bad things that can happen to any user at any time, such as the time you accidentally deleted an entire folder of documents relating to your company’s latest merger from your machine, and it took the IT staff a week to reconstruct it from backups.
As Root, you have inestimable power at your fingertips. You can keep the system humming, or you can bring it down with a few keystrokes. All you have to do to destroy a system is type this command (Don’t try this at home!):
rm -fr /
This command removes (rm) all files and directories recursively from the root of the tree. If you’re dual-booting with a mounted Windows partition, that partition will be gone, too. If you happen to be logged in to some remote machine somewhere that is now part of your system, it’s best to get on the phone now. The remote files are disappearing, too.
Tip
This scenario is another reason to not mount your Windows partition(s) automatically at boot time.
So don’t take chances. Even if you are the all-powerful Root on your machine, always log in as the humble user unless you have system work to do. Even though you can add the Root user to your SUSE Linux graphical Login screen, don’t. Save it for emergencies.
Now that you’re properly terrified, let me tell you that there are essential tasks that must be performed by the Root user. You can do these things safely, too. We will go into detail about many of these things in Parts 3 and 4, but for now here is a small list:
Install and update most software
Run YaST
Set the clock
Turn the firewall on and off
Add and delete users
Kill some services
The best way to perform all these tasks is to use the su (SuperUser) command and type the Root password. You can do whatever tasks you need to, then return to the shell prompt, and type Exit to return to your user prompt.
Note
When you run YaST and some other graphical programs that need Root access, they will offer to remember the Root password for you. If there is any chance that some day you will forget the Root password when you need it the most, don’t take them up on this offer. Just keep typing it in.
For more tips on passwords, see Chapter 19.
As Root, you can allow specific users to perform specific tasks using the sudo command. This is described in detail in Chapter 19.
A user is not a user until he or she has a password. All user passwords (and occasionally some other information) are stored in the /etc/passwd file. You can create new users in SUSE Linux in two ways—through YaST or through the shell.
When you first installed SUSE Linux, you created your first user—you. If different people use the computer, giving them their own accounts is essential. If you happen to be the only one planning to use Linux, why would you need to create another? Think about the different roles you play when you’re at your computer. You might want to create different users to play those roles, without distraction.
In YaST, managing users and groups comes under the Security tab. To add a user, go to Manage Users and click Add. You’ll be asked to supply a username and an initial password. You’ll also be asked if you want to set an expiration date for that password. Changing passwords regularly is a good idea, especially on networked computers, including ones that access the Internet.
From the shell, adding users is a two-step process. After logging in with su, use the useradd command to quickly create a user:
useradd drone77
You must now create an initial password (remember: no password, no user) by running passwd:
passwd drone77
Changing password for user drone77
New password:
Retype new password:
passed: all authentication tokens updated successfully.
Enter the new password twice. If you don’t do this, drone77 will not be able to log in. The first time drone77 logs in, she will be given the opportunity to create her own password.
Type useradd -D to confirm the new user’s default settings. You will see the Group ID, home directory, account and password policy, default shell, and the directory holding the configuration file for that shell.
As you might expect, if useradd adds users, userdel will delete users from your system. It is best to delete the user’s home directory when you remove the user from the passwd file as well. Do this using the -r (recursive) switch:
userdel -r drone77
This also removes the user from the mail queue.
By default, only Root can shut down the system. This is especially important when the system is a server, but it is also good for any networked device where people may depend on a file being available.
Root can allow users to perform this function, which is a good idea when you are using your computer as a desktop or a dual-boot system. This is done in YaST.
To shut down the system from the shell, log in as su and run the shutdown command. The fastest way to do this is with the -h (halt) switch:
shutdown -h now
or
shutdown -h 0
If you are on a network, you may want to specify a time for shutdown, and send the other users a message:
shutdown -h 18:30 "System is going down for maintenance this evening"
The message will go out 15 minutes before shutdown (in this case, at 6:15 p.m.).
To reboot a system, you use the same shutdown command, this time with the -r (reboot) switch. Set the time as you did previously.
If this system is a server, make sure you don’t shut it down while something else is happening (such as a backup). Again, with awesome power comes awesome responsibility.
This chapter covered a lot of ground. The references will help you go into more depth on the Linux file system, shells, editors, and permissions. When choosing a shell or an editor, I highly recommend reviewing their man (or info) pages, as well as their websites.
http://www.pathname.com/fhs—Probably more than you want to know about the new Linux Filesystem Hierarchy Standard.
http://www.linuxbase.org—The Linux Standard Base page.
http://standards.ieee.org/regauth/posix—The IEEE POSIX information page.
http://cnswww.cns.cwru.edu/~chet/bash/bashtop.html—Chet Ramey’s bash page. He is the current maintainer of the bash project.
http://www.tldp.org/LDP/Bash-Beginners-Guide/html/—The Bash Beginners Guide as a web page. If you visit you can get this in other formats, along with other excellent Linux resources.
http://web.cs.mun.ca/~michael/pdksh/—The Public Domain Korn Shell home page.
http://www.tcsh.org/Welcome—The tcsh Wiki. Learn more and contribute your own knowledge about this C Shell.
http://www.zsh.org/—Home of the Z Shell. Select a nearby mirror.
http://www-106.ibm.com/developerworks/linux/library/l-z.html—Good introduction to the Z shell from IBM.
http://www.ibiblio.org/mc/—Home of the Midnight Commander. Screen shots, FAQs, and a TODO list for the developers.
http://www.dotfiles.com/—Explore contributed configuration files for various shells, editors, and other tools.
http://www.shelldorado.com/—Heiner’s Shelldorado. Much scripting information for all shells, but a good introduction, too.
http://www.gnu.org/software/emacs/emacs.html—The GNU/Emacs home page.
http://www.dotemacs.de/—The “very unofficial dotemacs home.” Explore the many ways to configure your emacs.
http://www.emacswiki.org—Find new modules and helpful people here.
http://www.vim.org/—The Vim home page.
http://vimdoc.sourceforge.net/—Where to find documentation of all sorts for Vim.
http://www.yzis.org/—The new project from the developers of Kvim for the K Desktop Environment.
http://sourceforge.net/projects/joe-editor/—The home for Joe’s Own Editor.
http://jedit.org/—The Java-based editor.
http://linux.about.com/od/embedded/l/blnewbie_toc.htm—The Linux Newbie Administrator Guide. A basic overview.
http://www.gratisoft.us/sudo/—The sudo main page. Downloads, documentation, and resources for this command.