
IN THIS CHAPTER
When you normally log in to SUSE Linux, you use a graphical login screen. That screen, a display manager, is your first taste of the X Window System, more often called X11R6, X11, or just plain X. X has a much longer history than Microsoft Windows, but it is similar in many ways. It has also gone through more than a few changes along the way. The most recent change is a revival of development from the X.org Foundation, the official owners of X. Earlier versions of SUSE Linux included an open-source version of X for the Intel platform called XFree86; SUSE Linux 9.3 uses X.org version X11R6.8.2.
X uses a client/server model in its architecture, but it’s a little different from what you may think. Normally, you are working with a client on your PC that makes requests on your server, which is remote. With X, the server is installed on your machine. It accepts requests from any number of clients, which can also be on your machine, or connected from a remote location (like a Telnet session). X Servers supply the graphics drawing protocols and much of the network communication to support clients’ libraries.
Most SUSE Linux users boot to an X-based graphical desktop environment. By default, that has always been the K Desktop Environment (KDE). SUSE developers have long worked on KDE, and continue to do so. But in recent years, many users have gravitated toward the GNU Network Object Model Environment (GNOME, pronounced with a hard G sound). Among those were Miguel De Icaza, Nat Friedman, and their Ximian development team. Novell purchased Ximian shortly before acquiring SuSE, Inc., and has been working to promote compatibility between the two desktops and their applications. The Novell Linux Desktop (NLD) seeks the best of both worlds, and SUSE Linux offers you the choice to install either or both desktop environments.
This chapter covers the basics of the X Window System and how it works in SUSE Linux. You’ll learn about the primary desktop environments—KDE and GNOME—and get a brief introduction to some other X Window managers, if you don’t need all that overhead.
The X Window System represents two primary concepts. The X Window System was created to keep the UNIX kernel and GUI code separate. It was also designed for distributed processing based on the client/server model. That is, with X you don’t need to have a computer with massive amounts of hard drive space and RAM to run graphical applications. A thin client with a connection to an X server is all you need. Nonetheless, if you have the aforementioned massive hard drive and hundreds of megabytes of RAM, you can host both the X server and many clients on your own machine.
The X server’s primary job is to create and manage windows, dialog boxes, buttons, and other graphical elements on a screen. That screen can be located practically anywhere in the world, and perhaps even on a laptop on the International Space Station. X is extremely portable, too. After you have configured X the way you (or your system administrators) want it, you can take that configuration file with you and copy it into any other X-capable machine and it will run the same way.
Dozens of applications have been developed to manage windows for X, and hundreds of X client programs exist to help users work in the graphical environment X provides. It all begins, however, with the fundamental question: What do you want your window decorations to look like?
SaX (also referred to as SaX) is the X configuration tool for SUSE Linux. It runs for the first time during the initial SUSE Linux installation, where it identifies your graphics card, installs the graphics drivers, and sets up X to its default configuration. The settings are stored in the /etc/X11/XF86Config file. You can edit this file manually, but that would be unnecessary risky behavior.
To open SaX after the initial installation, go to YaST, Hardware, Graphics Card and Monitor. A second window will open with your initial monitor and card listed, along with the resolution and whether the card supports 3D acceleration. Click Change to open SaX and configure X.
Caution
SaX usually does a terrific job of identifying your video card and setting up the X environment. It can make mistakes, but before you hand edit XF86Config, try choosing the Reprobe button in SaX. With the wrong Monitor Frequency settings, it is possible (if quite rare) to blow out your monitor.
When you open SaX, you can see that it manages much more than your desktop settings (see Figure 6.1). The Multihead section will configure a multiple monitor setup; Input Devices include keyboard, mouse, touchscreen, and graphics tablet; and Access Control covers Virtual Network Client (VNC) access and XAccess, a tool for controlling your mouse with the keypad (especially useful for people who can’t see the screen).

If SaX has incorrectly identified either your monitor or graphics card, click the appropriate link and then click Properties. You will get a list of manufacturers and models to select from. Select the correct one; if you have a Linux driver disk for the item, click the Manufacturer’s Disk button to install the new drivers. You can read and make changes to the frequency range and other settings in the Frequencies and Expert tabs, but don’t do this unless you are absolutely sure you know what you’re doing. Click OK and Finish to confirm your choices.
Note
As you make changes in each SaX component, be aware that nothing is written into the configuration file until you click Finalize and test the new setup.
There’s not much to do in the Color and Resolution section. SaX detects the maximum color depth and all the resolutions your card will support and sets both defaults to the highest possible. Unless you have a fairly ancient machine, the color depth will be set at 16-bit True Color. This is the only thing you can change.
If you see some black edges on your screen and want to adjust this, go to the Geometry section. SaX puts up a window (see Figure 6.2) that will help.
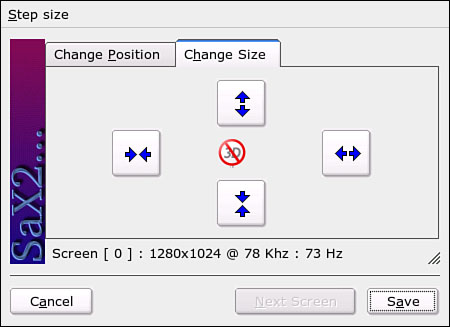
Change the position if the desktop is large enough in width and height, but you are seeing empty space on one side. Change the size if you’re seeing empty space on both sides. Keep pushing the appropriate arrow buttons until it looks right; then click Save.
When you’re finished changing settings, click Finalize on the main SaX screen. You’ll be asked to test the new configuration, which is always a good idea. If everything looks good, click Save; if the desktop image fails, click Ctrl+Alt+Esc to kill the X server and review your selections.
Tip
In most cases, you’ll be using a display manager to log in and start X, but there may come a time when something breaks and you can’t get into the display manager. Don’t panic! You may still be able to get into X.
If this happens at boot, you will get a text-based login prompt. Log in as user, and you should be sitting in your home directory (type pwd to make sure). Look for the .xinitrc file: ls -a .xinitrc.
SUSE Linux puts a default file in Home called .xinitrc.template. Make a copy of this file to activate it:cp .xinitrc.template .xinitrc
Now, type the magic word: startx
This should get you in and may help you solve the original problem.
With Windows and the Macintosh, the desktop is just that—the desktop. Linux is all about choices, and so is X. We’ll talk about your choices in more lightweight window managers later, but chances are you are going to spend a good chunk of your computing time in one or another of these two desktop environments: KDE or GNOME.
One of the cool things is that you can remain indecisive your whole life: You can choose what desktop to load every time you log in. Of course, you don’t have to choose that often either; SUSE Linux will load whatever desktop you loaded last time by default (and the initial default, assuming you installed it, is KDE).
When you first install SUSE Linux, YaST will recommend installing just the KDE desktop. You can choose to install GNOME instead, or install both if you have enough disk space.
With very few exceptions, all software designed for one desktop will happily run on the other, and will even show up in the other’s Start menu. A trivial example is that SUSE installs identical default wallpaper for both desktops. You might find that one application designed for GNOME runs a little slower on KDE (or vice versa), but these types of issues are rarely catastrophic. All the Linux products not designed with either desktop (like OpenOffice.org and the Mozilla family) will also run beautifully in both.
Another key similarity is the capability to display multiple virtual desktops. If you regularly run one of those other operating systems and if you’re a busy person, the desktop can get awfully crowded with a web browser, email client, word processor, and project manager all up at the same time. You can wind up Alt+Tabbing between apps, resizing and minimizing windows, or heavily working the taskbar to keep up. Wouldn’t it be nice to have each application in its own desktop, away from the others? By default, GNOME and KDE offer you two virtual desktops (GNOME calls them workspaces). You can have up to 16 in KDE and 36 in GNOME. You can switch between them by pressing the Ctrl key along with the F key corresponding to the desktop number (that is, to switch to Desktop 2, press Ctrl+F2; for Desktop 3, press Ctrl+F3, and so on). For the incurable customizers, you can use descriptive names for each desktop, and even have different wallpaper on each one! You can have some applications (such as your schedule or time tracker) appear on all desktops, and choose whether you want to see the applications on other desktops in the taskbar. The taskbar will always show you your desktop lineup, with representations of the windows, as shown in Figure 6.3.

Figure 6.3. One busy desktop displayed as four busy desktops. This diagram shows active applications in virtual desktops 1–4, with one small window in all six. Click any of the images to work on that desktop.
In this section and the next, you will learn more about each desktop environment and the tools specifically designed for it. This should guide you in selecting the right desktop for you. Try them both, though. As with most things, choosing a desktop is largely a matter of personal preference.
KDE is older, more stable, and has more applications designed for it. Its technological underpinnings come from the commercial Qt libraries from Trolltech, and for a long time Qt’s licensing scheme was not open source.
GNOME is the relative newcomer and has only recently become a stable system. Its technological underpinnings come from the first Linux killer app: The GNU Image Manipulation Program (The GIMP) (see the section “Editing Images with The GIMP” in Chapter 10, “Sights, Sounds, and Other Fun Things”). It began as an open-source rebellion, but has the support of many leading Linux-oriented corporations.
GNOME was the first desktop project to put usability at the top of its concerns, producing a truly admirable Human Interface Guidelines (HIG) document that has been a model for later efforts (including KDE’s forthcoming HIG project). It has ambitions beyond the desktop as well. Many of its most partisan developers believe it provides a model framework for all software development.
Tip
One more common function for both desktop environments is a very handy application launcher. Press Alt+F2 to bring up a dialog box. Enter the name of an application to launch it. If you enter a URL, the default browser (Konqueror in KDE, Epiphany in GNOME) opens on that site. This way, you save time browsing through menus or opening new shells.
The KDE project began in 1996 and has been the default desktop environment for SUSE Linux for nearly all that time. SUSE Linux 9.2 includes KDE 3.3. SUSE Linux also uses the KDE Display Manager to provide a graphical login screen after it has booted.
When you first log in to KDE, it will take a few seconds to load, but when it’s finished you will see the basic elements of the desktop, looking much like Figure 6.4. Windows users should feel pretty comfortable with this opening experience—a few icons on the desktop, a taskbar (called the Kicker in KDE parlance) along the bottom, with assorted applications ready for quick access and a clock in the right corner (optionally configured to show the seconds passing by).
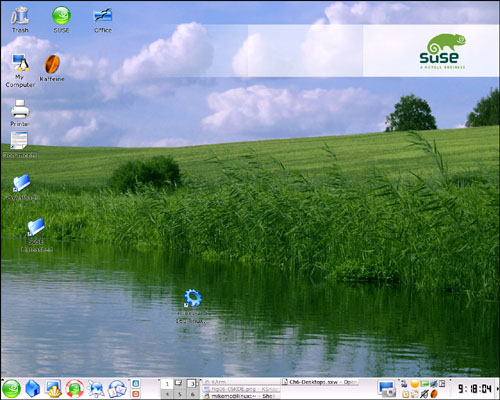
Figure 6.4. The SUSE default KDE desktop. Along the bottom are the standard application icons, virtual desktops, and applications that run at startup.
By default, KDE loads any applications that were running when your last session ended, so you can pick up where you left off. The SUSE icon in the left corner of the Kicker opens the application menus. To its right, the icons on the left side give you access to your home directory (via the Konqueror file manager), the Konsole Xterminal shell, the SUSE Help Center, the Konqueror web browser, and the Kontact personal information manager (the Outlook-style combined email, address book, and calendar program).
You will notice that KDE developers have a fetish for naming their programs with a K in front. This can be kreative, or just a little too kute, but it is a handy way of identifying what applications are K-specific. The Kicker panel is highly customizable; right-click anywhere to add or remove icons from the panel. The Configure Panel screen also lets you put the panel on a different side of the screen and set several other options.
In the right corner of the Kicker, next to the clock, are more application icons that always run. Mouse over each to see what they are. The smaller SUSE icon is the SUSEWatcher application, which checks the YaST Online Update (YOU) servers regularly to see if updates are available. These fix security problems and occasionally give you new versions of installed applications. Watch for an exclamation mark on this icon to get new updates. See Chapter 21, “Keeping Your System Current: Package Management,” for more information on YOU.
The Klipper clipboard utility offers much more than its Windows counterpart. Among other things, Klipper stores your last seven cut/copy actions by default, so you can paste several items in sequence if you choose. Klipper will remember your clipboard actions over sessions, too.
So many applications have been written for KDE that the YaST initial installation menu separates out some from the default KDE installation. It’s all there if you want it, though. KDE includes a complete office suite (KOffice, see Chapter 9, “Being Productive: Office Suites and Other Tools”), a programming integrated development environment (KDevelop, see Chapter 28, “Using the GNU Compiler Collection and Other Programming Tools”), a CD/DVD burning utility (K3b, see Chapter 10, “Sights, Sounds, and Other Fun Things”), and an outstanding printer support tool (KPrint, see Chapter 7, “Printing with SUSE Linux”). The Konqueror file manager is also a web browser with its own interface. All these tools are covered in greater depth in their relevant chapters.
When you open GNOME for the first time, you may notice two differences between it and KDE: The look is a lot less cluttered, and the taskbar is at the top of the screen. You might even miss it the first time you look.
The GNOME panels are highly configurable with a curious collection of applications that you have much more control over than in KDE. Displaying many of the same characteristics and applications by default as KDE, the whole look is a bit cleaner with the much smaller icons. See Figure 6.5 for a look.
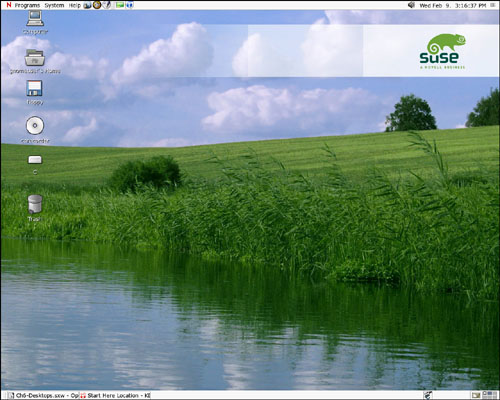
Figure 6.5. The default GNOME desktop is much cleaner than KDE, with a smaller and more configurable set of panels.
The Programs menu was built for SUSE (indicated by the Novell icon attached to it) and is identical to the default Kicker menu in KDE, but there is a separate menu for quick access to System tools, including YaST, the file finder, and the logout button. The left side default applications include the Epiphany web browser, the Evolution groupware/personal information manager tool, and OpenOffice.org Writer, along with SUSEWatcher and SUSEPlugger. On the right, in addition to the clock, is the volume control and the list of all open applications.
In the bottom panel is your task/workspace switcher (right-click it to change the number of workspaces/desktops) and a window hiding tool to show just the desktop. Active applications and documents also appear in the bottom panel.
To add an icon to either panel, right-click exactly in the spot where you want the item to appear and choose Add to Panel. You can then select your item from the menu. Among the choices is a weather report with the current temperature and conditions for many global cities. Select your own location—or the place you want to be.
Sooner or later, you will need to move or copy files from one directory (or device) to another. Chances are, at one time or another you have used Windows Explorer (and/or its slightly less useful companion, My Computer) to perform this task. Perhaps you’ve thought that there has to be a better way to do this than Microsoft’s way. Thus, even in the Windows world, there are third-party file managers that reinvent that task in several ways.
Both Linux desktop environments have file managers that seek to ease this task. In this section, we’ll look at both of them, plus a third KDE-based file manager included in SUSE Linux, Krusader.
KDE’s Konqueror takes an Explorer-like approach (to the point of being a web browser as well), with mount points (drives) and directories in the left pane and the contents of the selected directory displayed as large icons with the file or subdirectory name on the right, with a toolbar across the top. If you’re comfortable working in the Windows file manager, you should find Konqueror easy to work with, but it won’t take long for you to see that Konqueror has more to offer than Explorer. You will also see that Konqueror can be configured to work in whatever style you want.
There are several ways to launch Konqueror:
To see the contents of your
/homedirectory, click the House icon on the left end of the KDE Kicker taskbar.Clicking the My Computer icon runs Konqueror in the
/mediadirectory. You should see the contents of your hard drive(s) and floppy drive in this view.Press Alt+F2 and type in a path to a directory. Konqueror will open in that directory (typing a web address will open Konqueror in browser mode).
From the Kicker menu, go to System, File Manager. You should see Home and Computer, as listed previously. You should also see File Manager—Super User Mode in this menu. This mode is especially helpful when you’re troubleshooting permissions problems, if you are the SuperUser.
The first time you open your home directory, you’ll see something similar to Figure 6.6.
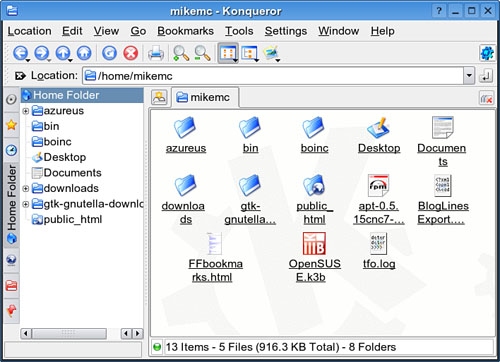
This is Konqueror’s default File Management profile, in Icon view. On the left side is the familiar directory tree, focused on the /home directory, with the files and folders in that directory displayed with icons on the right. To see more details on your files, click the Tree View icon in the toolbar, or go to the View menu at the top, select View Mode, Tree (or Detailed List) View. On the far left of the Konqueror screen, you can also change what you see in the left pane of the window. Click each icon to display various system services, the Root (/) folder, your network (including FTP sites configured by Konqueror’s own team or added manually), or your current Konqueror web browser history and bookmarks. What’s nice about this is that changing the display in the left pane does not automatically change the display in the right File pane—until you click something in the new left pane. This makes dragging and dropping files just a bit easier when you have quick access to nearly every place you’d want to send a file to.
Konqueror takes another cue from modern web browsers by enabling tabbed navigation even on your file system. To open a new, empty tab, press Ctrl+Shift+N (for New), or right-click in the tab area and select New Tab from the context menu. You can then use the Location bar to type in a destination, or use one of the left-pane options to open a folder in the new tab. Should you desire, you can detach the tab and put it in its own window. Unfortunately, you cannot drag files from one tab to another, but there’s a way around that. Go to the Window menu, select Split View Top Bottom, and then select another location. You’ll see something like Figure 6.7.

Now you can drag from one pane to another. Should you happen to have something in the other tab to send to the bottom folder (in this case, a USB “keychain” drive), you can drag that down as well. By default, Konqueror always asks you what to do (copy, move, or create a link) when you drop something, so you are always in control of what happens.
When you get Konqueror configured the way you like it (or at least one of the ways you like it), go to Settings, Save View Profile. By default, the current profile name comes up in the Profiles screen (see Figure 6.8). Unless you want your new setup to become the default File Management settings, change the name as shown.

When you look at a power user’s file manager, such as Midnight Commander and others like it, one thing that makes it stand out is this notion of double panes. When you’re moving files from one place to another, it is comforting to be able to see both the original location and the target at the same time. This way, you know that things worked out as you intended. This is Krusader’s mantra.
When you open Krusader (see Figure 6.9), it will certainly remind you of the Midnight Commander interface. Krusader does dual panes by default—in fact, you can’t get rid of them. It has the mc-like F-key command menu on the bottom, along with the standard GUI menus and toolbars on top. But that’s only the beginning of this very feature-full file manager.
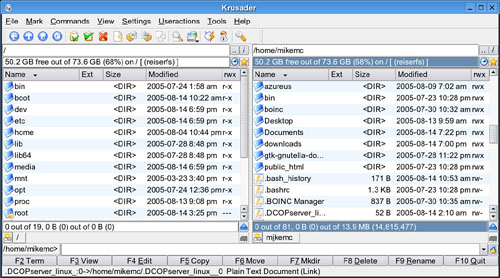
Figure 6.9. Krusader gives you a dual-pane interface and will synchronize the files in each pane if you want it to.
Although it will not browse the Web for you, it will do just about everything else Konqueror does, and more:
Compare and synchronize two directories.
Create compressed archives in one of several formats (including standard tarballs, gzip, and bzip).
Mount a drive.
Open and edit a file as Root (if you have the rights to do that).
Split one file into smaller pieces (to fit on a portable drive), or combine several files into one.
Krusader also has a fairly fast search engine that will locate files and directories using a specified pattern. For example, in Konqueror, you can search your entire computer or individual directories, but not selected multiple directories. In Krusader, you can specify multiple directories to look in or directories to not search in (such as /proc or /var). You’ll learn more about finding files in Chapter 18, “Managing Files, Volumes, and Drives.”
You can be quite productive with Krusader if you are busy with files all the time. You might even find Krusader fun to use, even if it won’t burn a new CD for you.
Once upon a time at the turn of the millennium, a group of former Apple developers were converted to the open source cause. They founded a company called Eazel and announced their determination to make Linux as easy to use for the ordinary person as the MacOS. Their plan was to begin with a simple file manager and work from there. But the economy turned bad, and venture capital was no longer throwing money at even promising startups. Just 16 months after announcing their big plans, Eazel was dead, but not before their file manager, Nautilus, was born. Through the miracle of open-source licensing, Nautilus lives on as the default file manager for the GNOME desktop.
Nautilus seems to operate from the principle that if two windows make file management easier, more windows are even better. Each time you double-click a directory in Nautilus, the directory opens in what Nautilus calls an object window. This has, by default, a set of icons representing files and folders and a small menu bar. After you have all the windows open that you need, you can then arrange them to your satisfaction and drag and drop to your heart’s content. Figure 6.10 shows the Nautilus List view, which you can access by choosing View as List from the View menu. You can choose a third view, called Browser View, by right-clicking a folder and selecting Browse Folder from the context menu. Whatever your view, you’ll see that directory hierarchies are downplayed somewhat in Nautilus, with parent directories accessible only in the drop-down menu in the lower-left corner.

Drag-and-drop can be tricky if you are not careful. Dragging a file from one directory to another only moves the file. If you want to copy files, you must first select your files, right-click, and choose Copy Files from the menu. Then open the destination folder and right-click again to Paste.
The Places menu points to several common starting points (Computer, Home, Trash) and will also open the GNOME CD Creator for easy CD burning.
You can choose to customize your experience with both desktops as much as you like. KDE has a simple and comprehensive Control Center where this happens. GNOME gives you a choice in how and where to customize. Following is a brief guide to some of the highlights.
When you open the KDE Control Center, you get a quick summary of your system information: versions for KDE and the Linux kernel release, the machine name, and your username. Down the left side are the configuration categories.
In Appearance and Themes, you can set the wallpaper (called Background here), the screensaver, window colors, and other look-and-feel items. Each can be set individually, or themes can do this all at once. Go to the Theme Manager and click Get New Themes to visit http://www.kde-look.org for downloadable themes, wallpaper, and screensavers. The Background and Screen Saver pages show you what each option looks like in a test screen, so you don’t have to commit before seeing it.
The Desktop area lets you set up the number of virtual desktops you want and sets various options for the Kicker panels and taskbar. Choose the Device Icons tab under Behavior to include links to devices and directories on your desktop.
The Internet and Network area lets you configure Konqueror’s web-browsing functions, share your desktop with other KDE users on the network, and set up your Samba client configuration for accessing Windows shares on your network (SuperUsers can also configure a Samba server). If you’re on a laptop with Bluetooth capabilities, you can add and manage your Bluetooth services here as well.
In KDE Components you can set default applications for mail, Konqueror’s embedded text editor (for viewing text files in the file manager), instant messaging, and Xterminal. You can also change the default web browser from Konqueror so that Internet links open in your browser of choice. The Session Manager also sets the behavior for shutdown and startup.
Peripherals sets mouse, keyboard, and joystick behaviors. The Power Control settings, which turn off the screensaver and monitor when not in use, are located under Display (and laptop power controls are in Power Control). Regional and Accessibility settings define your keyboard layout and how times, dates, and money are displayed depending on the norm for your country. Set keyboard shortcuts for various KDE functions in the Keyboard Shortcuts section and define other keyboard shortcuts and mouse gestures in KHotKeys, a new addition. Figure 6.11 shows the Keyboard Shortcuts screen.
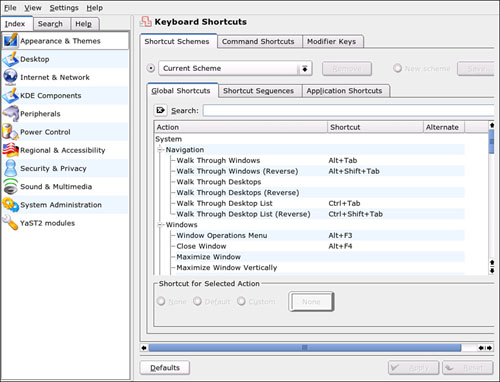
Figure 6.11. Define keyboard shortcuts for several KDE applications in the Control Center Regional and Accessibility area.
Security and Privacy lets you take some security measures for yourself. The KDE Wallet function will remember website passwords and other private information if you choose. This is kept in a password-protected file that only you have access to.
Don’t like the startup music that KDE plays? Head over to Sound & Multimedia, System Notifications. You can turn off or replace many automatic sounds associated with various actions—and not only sounds. You can assign a log file to an action, display a message, or specify any combination of notifications for any action.
Most of the System Administration tools and all the YaST tools require SuperUser (su) access to manipulate, but the Administrator Mode button is a handy way to make that happen.
If you are dual booting Windows and SUSE Linux, the Font Installer lets you include all your Windows fonts in Linux. Click Add Fonts and then navigate to /windows/c/Windows/Fonts. Select all (or only the ones you want) and click Open.
When making changes in the Control Center, you must click Apply before moving away from that window. If you forget, you’ll get a message asking if you want to apply the changes you made. With a few exceptions, all changes take place immediately.
Making the desktop work the best way for you is one of the stated goals of the GNOME project. If something doesn’t look or work right, right-click it, and you should see a way to fix it. In the panels, you can add or remove items and panels easily enough, and you can set the size, color, and autohide capability in the Properties screen. Want to use a 24-hour clock instead of the AM/PM variety? Right-click the clock and you can make those changes.
The centralized Settings customization tool is in the System menu in the top panel (see Figure 6.12). Double-click any of the Settings icons to open the relevant screen.

The first section deals in the Personal, or so the menu says. The Accessibility and Assistive Technology Support pages confirm the GNOME project’s commitment to usability. Some of the tools here can even help people with ordinary abilities and without physical disabilities get more done.
The Menus screen can be confusing. It opens a series of Nautilus file manager windows, where you can add or remove menu items. The shortcuts screen is much like the KDE screen shown in Figure 6.11. It’s easy to create a new shortcut (highlight the action on the screen and then press the key[s] you want to use as the shortcut), but there’s only one option. In KDE, you can choose an alternative.
The Appearance section covers the usual window decorations and such. GNOME is famed for its dashing GTK-based Themes, which are really more about color schemes than wallpaper and screensavers. Some themes come with suggestions for these elements as well. As with KDE, you can select screen fonts, wallpaper (Desktop Background), and screensavers separately. The Window preferences let you select a window just by passing the mouse cursor over it.
In the Hardware section, you are dealing with keyboard, mouse, and screen resolution issues. The keyboard settings here are the same as in the Accessibility area (and there’s a link to those preferences, too), but one tab is of note to those of us who don’t want to be disabled: GNOME will enforce a three-minute typing break every hour (by default, this is configurable, of course) to keep you away from repetitive stress syndrome. You can postpone the break, but I don’t recommend that you do. Screen resolution should generally not be changed.
The System section covers Sound events, applications associated with file types, and whether you’re using a proxy server to access the Internet. The Sessions page lets you define what applications should run at startup. It shows you the currently active programs and gives you the option to save that configuration for your next session start. You can also add applications manually to the startup.
Full-blown desktops for X did not come around until the mid-1990s. Before their arrival, there were window managers. From the humble Tabbed Window Manager (twm) that is about as basic as you can get to the very ambitious nearly complete desktops WindowMaker and fvwm, there are X window managers to fit every taste. Most of the widely used window managers are still in active development, and some work on top of the desktop environments as well as with just plain X.
Window managers are essential to any X installation, because without them, while X draws the window, it relies on window managers to move, resize, minimize, or maximize the window.
This section covers some of the window managers included in SUSE Linux and describes how they work. Like the desktop environments, window managers can be quite customizable and offer several goodies on their own.
Following are a few reasons to know at least one window manager, even if you normally run a full desktop environment.
Window managers are generally lightweight; they don’t take a long time to load and don’t suck up memory.
If you just need X to connect to a remote machine and move some files, you don’t need to load all the libraries for all the KDE utilities.
If you ever have to connect to a remote X server halfway around the world on a phone line that transfers data at 33Kbps on a good day, knowing how to navigate in a window manager can save time and your sanity.
Window managers tend to focus on performance at the expense of eye candy.
OpenOffice.org, your favorite text editor, and your graphical browser work just as well under a window manager as they do in a desktop.
When you install a window manager with YaST, another entry is put into the display manager’s boot menu. When you log in, click the Options button, go to Session Type, and choose your window manager.
This window manager, which started life as the Feeble Virtual Window Manager, but is no longer an acronym, is a favorite of more than a few alpha geeks. Gushing quotes from such Linux stars as Eric Raymond, Alan Cox, and Linus Torvalds himself appear on FVWM’s website.
The default FVWM desktop (Figure 6.13) is somewhat plain, but clearly you can get some work done on it.

The FVWM menu bar at the top displays the multiple workspaces FVWM supports; it loads an analog clock and the playful “Eyes” toy that follows your mouse around while you’re working. FVWM loads an Xterm by default for command-line work, but the SUSE menu gives you access to most of the same applications that run on the meatier desktops, including OpenOffice.org. The Graphics menu will run The GIMP (which took the screenshot), and the Tools menu runs Mozilla.
Tip
Right-clicking anywhere in an FVWM workspace brings up the SUSE Applications menu for easy program launching.
When you launch a program in FVWM, a shadow window attaches to your cursor so you can place it exactly where you want it on your screen (or in another workspace). Clicking the mouse draws the application window at the spot you select.
FVWM is a modular program. To view the currently available modules, click Modules from the FVWM menu. The Config module helps you customize your .fvwm2rc configuration file. You can also edit it manually, from /etc/X11/fvwm2 (for a systemwide configuration). If you want your own, copy the systemwide file to your home directory and edit it.
WindowMaker’s roots are deep in the alternative-OS world. It is an attempt to re-create the look of NeXTSTEP, the operating system for the NeXT Cube. NeXT was the second big idea from Apple Computer founder Steve Jobs. It may not have been great from a marketing standpoint, but it certainly has its fans.
WindowMaker (you’ll find that the team of developers has not yet fully resolved whether the application is one word or two) takes a little getting used to, but is a fast and powerful system.
When you load WindowMaker for the first time, the main thing you’ll notice is that you don’t have to wait. Log in and before you blink your eyes, it’s up and ready for work. This may depend somewhat on your processor and RAM, but it should be quick. WindowMaker, by default, loads just two things on the desktop: on the left is the Workspaces Clip, on the right, the Applications Dock (see Figure 6.14).

Figure 6.14. The Applications Dock (right corner) and Workspaces Clip make WindowMaker distinctive. Customize your WindowMaker in the separate WmakerPrefs package.
The Dock is a place to quickly launch applications, although there is not much there to start with. The Clip manages workspaces and applications. To create a new workspace, right-click anywhere on the desktop and choose Workspaces, Create New from the context menu. The context menu is also where you will see the familiar SUSE Applications menu from which to launch apps.
When you launch an application in WindowMaker, an icon square will appear in the lower-left corner of the screen; it may have the application’s real icon or just a generic one. Drag that application icon to the Dock to add it to the Dock for this session. To put it on the Dock permanently, right-click and go to Workspaces, Save Session. You also get that opportunity when you exit WindowMaker.
Use the Clip to navigate between workspaces and applications, or use Alt plus number keys; that is, Alt+2 moves you to Workspace 2, Alt+3 to Workspace 3, and so on. The Clip will tell you what workspace you’re in.
Customize WindowMaker with the Wprefs utility that installs separately from the main WindowMaker package; download the wmakerprefs package. Wprefs is fairly easy to understand and gives you no fewer than 13 categories of settings. Novices should activate the button help located in the last (Expert) category. This category is also where you can set WindowMaker to always save the session at shutdown. You can also customize the context menu in the Applications Menu Editor.
IceWM is another straightforward window manager that SUSE does not dress up too much in its incarnation. The SUSE menu is there, of course, and the multilingual Welcome wallpaper used in the KDM login screen is used instead of something more scenic.
Otherwise, IceWM behaves like the others. It’s effective without being flashy. It is highly configurable, but don’t use the GUI iceprefs package included in SUSE Linux. For some reason, an ancient package that relies on an ancient version of Python is still included in this distribution.
This is another open source success story. When David Mortenson, the original developer of iceprefs, stopped updating the program without formally relinquishing control of the project, the program lay dormant for three years. As Erica Andrews explains on the project website: “I love IceWM and IcePref...and IcePref needed a SERIOUS upgrade—so I did it, as everybody else seemed too lazy to do it.”
IcePref2 is now a component of the IceWM Control Center, a series of utilities for this still-active window manager. Download the RPM from the project website (http://icesoundmanager.sourceforge.net) and install it using YaST (see Chapter 21 for more information). You may get a complaint about a missing file (pygtk), but if you have the Python-GTK package installed, you have this.
Log in to IceWM and you’ll get that nice clean screen. Open an Xterminal and type icepref at the prompt. You’ll see the endlessly customizable IcePref dialog boxes (see Figure 6.15).

Figure 6.15. Use IcePref to customize just about anything you want in IceWM, including keyboard shortcuts.
A look along the row of tabs shows you the types of changes you can make. Some options will be confusing to novices, but window managers are for the more sophisticated users.
http://www.x.org—The X.org Foundation, the hub of X Window System development activity.
http://freedesktop.org—The effort to produce minimum standards for free desktop software. Not a formal standards body, but a “collaboration zone” where projects are hosted and KDE and GNOME developers can discuss concerns.
http://www.kde.org—The home of the K Desktop Environment. A well-organized site, with links to nearly everything relevant to KDE.
http://dot.kde.org—The KDE News site, with links to online articles about KDE and its applications, along with press releases and the like.
http://www.gnome.org—The GNOME home.
http://www.gnomedesktop.org—“Footnotes,” the GNOME News site.
http://www.novell.com/linux/ximian.html—The Ximian area of Novell.com. Information about Evolution, Mono, and the Ximian Desktop.
http://konqueror.kde.org/—The Konqueror site, covering both the file-management and web-browsing functions of this versatile tool.
http://krusader.sourceforge.net/—The Krusader dual-pane file manager for KDE.
http://www.gnome.org/projects/nautilus/—Nautilus, the GNOME file manager.
http://xwinman.org—An Internet hub for learning about and trying Window Managers for X.
http://sawmill.sourceforge.net—Sawfish.
http://www.windowmaker.org—WindowMaker.
http://www.icewm.org—IceWM.
http://icesoundmanager.sourceforge.net/IcePref2—IceWM configuration tool.
http://www.fvwm.org—FVWM.
http://blackboxwm.sourceforge.net—BlackBox wiki.
http://icculus.org/openbox/2—OpenBox.
http://enlightenment.org—Enlightenment.
http://www.xfce.org—Xfce.