
Using and Creating Tables

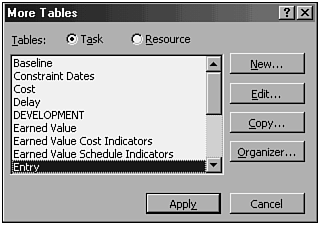
To change the display of a table, select View, Table and choose More Tables. The More Tables dialog box appears onscreen, with the currently displayed table highlighted (see Figure 21.7).
Figure 21.7. The More Tables dialog box offers choices for customizing tables.
You use this dialog box to perform the following procedures:
-
Display a table that is not included on the main Table cascading menu. (Several task and resource tables are available only from this dialog box.)
-
Create new tables, which can be based on existing tables.
-
Change the features of any of the tables in the list box.
-
Delete existing tables (through the Organizer).
The names of either task tables or resource tables appear in the list box in the More Tables dialog box, depending on the view that was active when you chose the More Tables command. To switch between task tables and resource tables, choose one of the options, Task or Resource, at the top of the dialog box.
To apply a table to the current view, choose the desired table from the list and click the Apply button. Note, however, that if the current view is a task view, you cannot display a resource table on this view.
To edit an existing table, choose the table from the list box and click the Edit button. If you want to create a new table that is similar to an existing table, select the original table from the list and click the Copy button. To create a new table from scratch, click the New button.
Whenever you click the New button, the Copy button, or the Edit button, the Table Definition dialog box appears. If you click New, the fields in the Table Definition dialog box are empty. If you click either Edit or Copy, the fields in the Table Definition dialog box contain the values for the table you selected from the list box. Figure 21.8 illustrates a dialog box for a copy of the Entry table. The explanations that follow also apply to editing and creating new tables.
Figure 21.8. A copied table makes a good starting point for the Table Definition dialog box.

Entering a Table Name
When you create a new table or edit a copy of another table, you should supply a new name for the table. If the table name is to appear on the Table menu, use an ampersand (& ) before any character in the name to indicate that this character is the hotkey used to select the table from the View, Table menu.
Adding and Changing the Columns in the Table
If you are creating a new table, click on a space in the Field Name column and access the drop-down list at the right side of the column, as shown in Figure 21.9. Choose a field by scrolling through the list and selecting the one you want.
Figure 21.9. You can choose from the list of Project database field names to display columns in a table.

If you want to add more fields, move the cursor down to the next blank row, using the scrollbar on the right side of the dialog box if necessary. To insert a field between the existing fields, select the row where you want to place the new field and click the Insert Row button to insert a blank row.
To remove a field from the table, select any item (for example, Field Name, Width) in the row that contains the field to be deleted and click the Delete Row button. To replace a field with a new field, select the Field Name entry for the old field and select the new field from the drop-down list. This removes the old field completely and replaces it with the new choice.
To rearrange the columns in the table, select the one you want to move and click the Cut Row button. Select the row where you want the cut row to be moved and then click the Paste Row button. You don’t need to insert a blank row first. The pasted row will be inserted, with the existing row and all the rows beneath it moved down.
When you choose a name from the Field Name list, the default data Alignment (Right), field Width (10 characters), and Title Alignment (Center) for the field are supplied automatically. However, you can change the alignment to Left, Center, or Right by typing this specification or by selecting the alignment from the drop-down list. You can type a different value in the Width field if you want a width other than the default. Use the Title column to supply a column name if you want one that is different from the field name. Leave the Title column blank if you want to use the field name as the displayed column title. You can align the title of a column differently from the data displayed in the column; for example, you might want to center the title of a field over numeric data that is right aligned.


Completing the Definition of the Table
At the top of the Table Definition dialog box, the Show in Menu check box must be selected if you want the table to appear on the View, Table cascading menu (rather than just on the More Tables dialog box). If more table names are to be listed than can be shown on the cascading menu, the menu adds a scrolling feature at the bottom of the cascading list.
You should select the check box labeled Lock First Column if you want the first column of the table to remain onscreen at all times. As you scroll to the right in the table, the first column does not scroll out of view if this box is checked. However, the column cannot be edited when it is locked. In the standard sheet views, the first column is the task or resource ID. If the first column is locked, it displays on a gray background, as is typical with the ID column.
You can use the Date Format area of the Table Definition dialog box to specify the format for date fields in the table. If you leave the default entry in place, the date format selected through the Tools, Options command is used. You can select the drop-down list to display the other date format options you can elect to use. A change in the date format on a table does not change your default or the date format used in other views.
The normal row height in a sheet view is 1, which means that one row of text is displayed for each task or resource row in the table. If the row height is greater than 1, long text entries in any column of the table automatically wrap if the width of the column is insufficient to display them on one line. To change the number of text lines to be displayed for each task, choose Row Height and enter the appropriate number. This row height is an initial setting only and can be changed graphically onscreen.
Note that all rows start out the same height and that additional lines in cells take up space, even if they are blank. You can set individual rows to varying heights onscreen by dragging the row dividers up and down. To reset all rows to a consistent height, click the Select All button on the top left of the sheet before dragging a single row ID divider to the desired height.
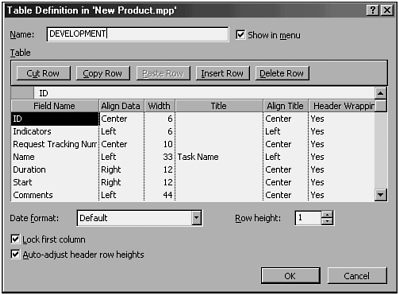
Figure 21.10 shows the definition for a new table named Development, which displays tasks with ID, Indicators, Request Tracking Number (a custom text field), Name, Duration, and Start fields, as well as a custom text field with the title Comments. Note that the titles for several of the fields have been changed from the default field names.
Figure 21.10. This table definition for parameters for the custom Development table.
TIP
If you intend to use descriptive text in the title of one of the custom fields (for example, Text1-30, Number1-20), you can assign that title to the field permanently so that anywhere you display the custom field, the assigned title, instead of the field name, is displayed. See the section “Naming Custom Fields,” later in this chapter, for more information.
Figure 21.11 shows the Development table (as defined in Figure 21.10) applied to the Task Sheet view.
Figure 21.11. The Development table can be applied to the Task Sheet view.

TIP
A useful yet simple table is a table with only one field: the task ID. You can use this table in conjunction with a Gantt chart that has the task names placed next to the taskbars for a completely graphical view.
Changing Table Features from the View Screen
You can change most of the features you define in the Table Definition dialog box on the screen, without having to go through the View, Table command. You can access the Column Definition dialog box to insert, delete, or edit the definitions of columns directly in the table.
To change the definition of a column from the view screen, double-click the title of the column. The Column Definition dialog box appears, as shown in Figure 21.12, with the current column settings displayed in the selection fields.
Figure 21.12. You can double-click on a column title to display the Column Definition dialog box.

To redefine a column, you can change the selections in any of the following entry fields:
Choose Field Name to view the list of field names. Selecting a field from the list replaces the current column with the new field.
Type a title if you want a text title, instead of the field name, to appear at the head of the column.
Choose Align Title to change the alignment for the column title and Align Data to change the alignment for the data in the column.
Allow long column titles to word wrap by selecting the Header Text Wrapping option.
Choose Width if you want to set the width of the column manually. Enter the width in a number of characters. You also can click the Best Fit button to set the width to the widest entry in the column.
Complete the new definition of the column by clicking either OK or Best Fit. Click OK if you want to apply the new column definition, including the Width setting. Click Best Fit if you want Microsoft Project to calculate the width needed to fully display both the title and the longest data value that initially goes into the column. Clicking the Best Fit button closes the dialog box and applies the new definition, but with the calculated column width.
CAUTION
Even if column header wrapping is on and the text is currently displayed on multiple lines, applying the best fit to the column causes the tile to be displayed on one long line. You then need to make the column more narrow to force the wrapping once again.
To insert a new column in the table, follow these steps:
1. |
Select the entire column that is currently located where the new column should be placed. (You Select a column by clicking on the column title.) |
2. |
The new column is inserted in front of the column that was selected. The selected column and all columns to its right are moved right one position in the table.
There are several methods for hiding columns:
Right-click a column title and choose Hide Column from the shortcut menu.
Select the entire column by clicking the title, and then choose Edit, Hide Column, or simply press the Delete key.
Click the right divider line in the column heading and drag it to the left until it meets the left divider line.
Open the table definition (that is, View, Table, More Tables) and delete the row that defines the column you want to remove.
All methods actually modify the underlying table definition. Hiding or deleting a column removes it from the table completely; dragging the column closed sets the column’s width to zero.
How you retrieve a hidden column depends on the method used to remove it:
If the Hide Column shortcut or Edit, Hide Column were used, you must re-insert the column into the table.
Columns hidden by dragging with the mouse can also be opened by dragging. Move the mouse slowly from right to left, toward the title divider where the column is hidden. As soon as the mouse pointer changes to a vertical line with horizontal arrows, click and drag back to the right.
NOTE
Project gives no indication that a column is hidden. You must remember which column, with what field data, is hidden and where.
Open the table definition dialog box and reinsert a row for the removed column, or increase its width if it was hidden by dragging.
NOTE
You cannot mix some hide and insert methods. That is, a column removed by using Hide Column can’t be opened by dragging—because that column was removed from the table definition. You need to use Hide with Insert.
You can also change row heights onscreen by using the mouse. To change the row height, point to the bottom gridline in the first column (usually the ID column). When the mouse pointer changes to a double-headed arrow, drag up or down. This action adjusts the height for a single row or for multiple rows that are selected. To adjust all row heights at the same time, click the Select All area above the first column before adjusting the row height.
CAUTION
Be aware that changing row heights on a displayed table also changes the row heights in all other tables. Unlike column widths, unique row height settings aren’t saved with the table definition.
The modified table is displayed whenever you select the same view, until you apply another table.