
Using Enterprise Outline Codes and Custom Fields
When you want to apply a code to a task or resource, you use outline codes.
When you want to apply a code to a project, task, or resource and you want to apply the code consistently across all projects in the enterprise, you use enterprise outline codes.
Project provides 30 enterprise outline codes for use with projects, tasks, and resources. These are named Enterprise Project Outline Code 1, 2, 3,and so on; Enterprise Task Outline Code 1, 2, 3, and so on; and Enterprise Resource Outline Code 1, 2, 3,…29.
In addition, enterprise resources have a predefined outline code called the Resource Breakdown Structure (RBS) code. The RBS code can be any code that differentiates resources, but it should be reserved for the code value that is the most important, or most often used, throughout an organization. This is because the RBS code is built in to the Team Builder, the Resource Substitution Wizard, and the Assign Resources dialog tools when filtering and selecting resources. For example, the RBS code could contain a resource’s location (as in the case of Elkhart Software) or the organization structure and level that the resource works in.
→ The custom fields in Microsoft Project Standard 2002 enable you to store customized data in your schedule. For more information, see Chapter 21, “Customizing Views, Tables, Fields, Filters, and Groups,” p. 835.
When you want to apply a custom field consistently across all projects, resources, or tasks in the enterprise, you use enterprise custom fields. The only difference between custom fields and enterprise custom fields is that enterprise custom fields are established for the entire enterprise, whereas custom fields are established for the local project only.
Portfolio managers define and create enterprise outline codes and custom fields, thus keeping their use consistent across the enterprise.
Creating Enterprise Outline Codes

To configure and use enterprise outline codes, you need to log in to the Project Server from both Microsoft Project Professional and Web Access, with administrator privileges.
→ For information on setting up a Microsoft Project Server Account see “Logging in to the Project Server Using Microsoft Project Professional,” p. 1017.
→ For information on how to add a user to the Administrator group, see “Defining Users and Groups in the chapter “Customizing and Administering Project Server Access” at www.quepublishing.com.
NOTE
You must be working in the Enterprise Global in order for your enterprise outline codes to be permanently added to the Microsoft Project Server 2002 repository. If you aren’t able to add enterprise outline codes because the data entry fields are disabled, then you don’t have the Enterprise Global open.
To create a custom enterprise outline code, follow these steps:
1. |
Select Tools, Enterprise Options, Open Enterprise Global. |
2. |
Choose Tools, Customize, Enterprise Fields to display the dialog box shown in Figure 25.6. Figure 25.6. In this example all resource skills are defined in one enterprise resource outline code field, which has been named Skills 1.
|
3. |
Select the Custom Outline Codes tab. |
4. |
Select the category of Outline Code you want to create (task, resource, or project). |
5. |
Select the outline code field that you want to use (1 through 30, or in the case of enterprise resource outline codes, 1 through 29 plus RBS). |
6. |
Click the Rename button to establish a new name for the code, and the dialog box shown in Figure 25.7 appears. Click OK after you enter the desired outline code name. Figure 25.7. You can rename your enterprise resource outline codes.
|
7. |
Click the Define Code Mask button to display the Outline Code Definition dialog box shown in Figure 25.8. Remember to define a code mask for each level of outline code you define. Figure 25.8. If you are defining the RBS outline code to describe location with Level 1 as state and Level 2 as city, there must be two levels of code mask defined, as shown.
|
8. |
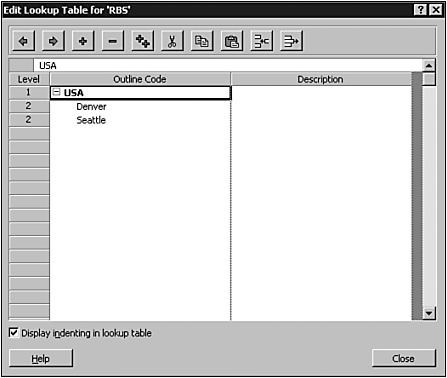
Click the Edit Lookup Table button to display the Edit Lookup Table dialog box shown in Figure 25.9, and enter your outline codes. For example, if you are defining a location outline code for state and city, your Level 1 code might be Colorado, and your Level 2 codes underneath Colorado might be Denver, Colorado Springs, and Boulder. Use the Indent and Outdent buttons to make codes subordinate to one another. Click Close to save the lookup table entries you have defined. Figure 25.9. You use the icons at the top of the dialog box to manipulate the lookup table items that you’ve entered; hover over each icon to find out what it does.
|
9. |
Select the Share Another Code’s Lookup Table checkbox and click the Choose Outline Code button if you want to have two outline codes share the same lookup table, as shown in Figure 25.10. You are then prompted to select the other outline code’s field type and field name from pull-down lists. When outline codes are shared, changing the shared code’s lookup table automatically changes the lookup table of the outline code that is referring to the shared code. You can click OK after you choose the outline code lookup table to share. Figure 25.10. The RBS code is being shared with the location project outline code.
|
10. |
Select the Only Allow Selection of Codes with No Subordinate Values check box, as shown in Figure 25.11, if you want to force users to select the lowest level of detail in the outline code that you have defined. For example, if you have entered location codes with Denver and Seattle within the United States, then selecting this check box requires users to always select one of the cities (since the lowest level, the city, has no subordinate values). Figure 25.11. You can force users to select the lowest level of detail in the outline code.
|
11. |
Select the Make This a Required Code check box if you want to have Microsoft Project 2002 require a valid value before allowing the schedule to be saved or published to the Microsoft Project Server. |
12. | |
13. |
When you are done building custom outline codes, click Close. You are returned to the Custom Enterprise Fields Dialog. Click OK. |
14. |


NOTE
You will need to exit and restart Microsoft Project to see any modifications to custom outline codes.
Enabling Proficiency Levels per Skill

To enabling proficiency levels per skill, you need to set up your skill codes with the proficiency level as the lowest level of definition, as shown in Figure 25.12.
Figure 25.12. You can define your skill codes to have proficiency levels.
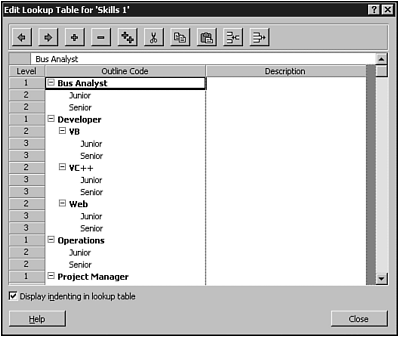
Microsoft Project Professional treats a resource that is assigned a skill code as having all levels of skill above and including the skill level assigned to. For example, if a generic resource is assigned the skill Developer.VB, the Resource Substitution Wizard will find any resource that matches either Developer.VB, Developer.VB.Senior, or Developer.VB.Junior. Likewise, if the generic resource is assigned the skill Developer, the wizard will find any resource that matches either Developer, Developer.VB, Developer.VB Senior, or Developer.VB.Junior.
NOTE
Make sure that the Only Allow Selection of Codes with no Subordinate Values check box in the Customize Enterprise Fields dialog box is not checked if you want to assign skill codes other than at their lowest level.
Enabling Multiple Skills per Resource

For example, to enable enterprise resources to have up to three skills defined, you can define a total of three skill code fields. When the three enterprise resource skill code fields are defined, you can associate them with resources, as appropriate.
To enable multiple skills per resource, follow these steps:
1. |
Set up an initial skill code in one of the enterprise resource outline codes. Figure 25.12 provides an example of what the skill codes might look like. Notice in this skill code lookup table that multiple skills are defined in enterprise resource outline code 1 (Skill 1) and that skill proficiencies have also been defined. |
2. |
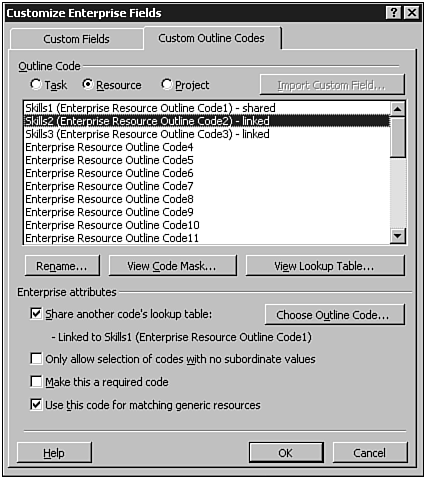
After you have your initial skill code defined, create one or more additional skill codes and link each of them to the first skill code (refer to Figure 25.13). Figure 25.13. The initial skill code’s settings are required to get the Resource Substitution Wizard, the Team Builder, and the Team Assign dialog box to work correctly.
|
3. |
Make sure you have each defined skill code’s enterprise attributes set correctly. Figure 25.13 shows the attributes associated with the initial skill code, and Figure 25.14 shows the attributes associated with subsequent skill codes. Figure 25.14. Subsequent skill codes’ settings are required to get the Resource Substitution Wizard, the Team Builder, and the Team Assign dialog box to work correctly.
|
4. |

→ For more information see “Applying Outline Codes and Custom Fields to Resources,” p. xxx. (later in this chapter)
NOTE
Multiple skills and skill proficiencies are not mutually exclusive. That is, you can define skill codes with both features at the same time.
Creating Enterprise Custom Fields

You create and change enterprise custom fields in the Customize Enterprise Fields dialog box in the Enterprise Global template. To create an enterprise custom field, follow these steps:
1. |
Select Tools, Enterprise Options, Open Enterprise Global. |
2. |
Choose Tools, Customize, Enterprise Fields to display the Customize Enterprise Fields dialog box shown in Figure 25.15. Figure 25.15. You need be logged in as the administrator to see this screen.
|
3. |
Select the Custom Fields tab. |
4. |
Select the category of custom field you want to create (task, resource, or project), and select the type (such as Text). |
5. |
Select the custom field that you want to use. |
6. |
Click the Rename button to establish a new name for the code, enter the new name for the custom field, and then click OK. |
7. |
Select the custom attributes you want to associate with the field. You can select None, Value List, or Formula. |
8. |
To create a formula for the field, click Formula to display the Formula dialog box, which is shown in Figure 25.16. Type the value name in the Value column, and type identifying text for that value in the Description column. You can add as many values as necessary. Select other options that are available in the dialog box as necessary to define the code. Click OK when you are done. Figure 25.16. All users can see the results of this formula by displaying the Enterprise Project Text1 field column in their schedules.
|
9. |
Build an enterprise custom field the same way you would a standard custom field. The only differences between enterprise custom fields and standard custom fields are the Required field and the fact that enterprise custom fields are available to all Enterprise Project users. → For more detailed instructions about creating custom fields and using the various custom field options, see “Customizing Fields,” p. 848. |
10. | |
11. |

