
Working with Enterprise Resources
 | In Microsoft Project Professional 2002, enterprise resources are the people, equipment, and materials that a project manager can assign to schedules in order to get work done. |
→ For more detailed information about the different types of resources available in Microsoft Project, see “Defining Resources and Costs,” p. 285.
Microsoft Project Professional provides a variety of capabilities that enable the management of resources across an enterprise. The following is an overview of the key resource management elements in Microsoft Project Professional, each of which is described in more detail later in this chapter:
The enterprise resource pool— All enterprise resources are stored in a repository on a Microsoft Project server called the enterprise resource pool. Portfolio or resource managers enter enterprise resources into the enterprise resource pool, and project managers can take them from the resource pool to add them to schedules. Each resource has skills, attributes, and availability that determine his or her appropriateness for specific project assignments.
Generic and actual resources— Generic resources are useful for doing preliminary planning and for skill-based resource substitution. Actual resources represent each individual in an organization who can be assigned to work.
Local and enterprise resources— Enterprise resources are available for assignment to any project in the enterprise by any project manager. In addition, project managers have the option of defining local resources, which are visible only to their own projects.
The Enterprise Resource Pool Wizard— This wizard allows the user to add new resources to the enterprise resource pool from external sources quickly and easily.
Enterprise resource outline codes and custom fields— Resources can be tagged with enterprise (project) outline codes that describe key attributes of the particular resource. These enterprise outline codes can be used later to provide a variety of reports on resource availability and utilization, or to assign resources to projects based on skills and availability. Enterprise custom fields are an extension of the custom fields capability provided in earlier releases of Microsoft Project; they provide for standardized category definitions for grouping and reporting purposes.
The Enterprise Team Builder— The Enterprise Team Builder allows a project manager to add resources to his or her project schedule quickly and easily. The project manager then has the option of assigning those resources to tasks manually or using the Resource Substitution Wizard to assign them to tasks automatically. Only resources assigned to a project are listed on the project’s Resource Sheet view. You can run the Enterprise Team Builder as many times as you need to, in order to add resources to or remove them from a project schedule.
→ For information on the Enterprise Team Builder, see “Using the Team Builder,” p. 1041.
The Resource Substitution Wizard— Resources can be automatically assigned to schedule templates based on matching enterprise outline codes between each generic resource’s (in a schedule template) and actual resource’s (in the enterprise resource pool) skills.
→ For details about the Resource Substitution Wizard, see “Using the Resource Substitution Wizard,” p. 1048.
Working with the Enterprise Resource Pool

Whereas enterprise resource information is stored in the enterprise resource pool, enterprise, company, and departmentwide standard project information such as the enterprise outline codes are stored in the enterprise global.
NOTE
The Enterprise Global template contains enterprise-level project and resource custom fields and view settings. The enterprise resource pool contains all other resource data.
After the enterprise outline codes and custom fields have been stored in the enterprise global template, you can associate them with enterprise resources by opening the enterprise resource pool and editing each resource’s information sheet.
→ For more information on outline codes, see “Using Enterprise Outline Codes and Custom Fields,” p. 1021.
Using Generic and Actual Resources

An actual resource in Microsoft Project Professional is a person in the company who can actually be put into a role on a project and complete assigned tasks. In the Elkhart Software example, when Brad, a Windows NT system administrator in the Denver office, is put into the role of system administrator on your project, the actual resource Brad replaces the generic resource System Administrator.NT.
Using Enterprise Generic Resources
Generic resources, like actual resources, can be stored in the enterprise resource pool (where they are available for assignment in other projects) or to a project locally (where they are available to that project only). Storing generic resources in the enterprise resource pool ensures that the generic resources assigned to projects always have the same attributes and skills when assigned across multiple projects.
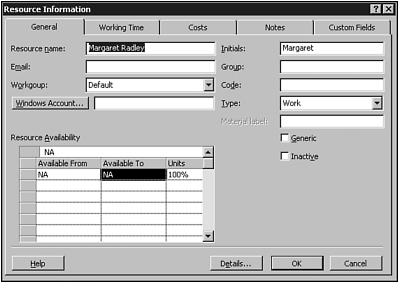
The Generic check box has been added to the General tab of the Resource Information dialog box for each resource defined in the enterprise resource pool. If the Generic check box is checked, the resource is generic, as shown in Figure 25.17.
Figure 25.17. You can select the Generic check box to define a generic resource.

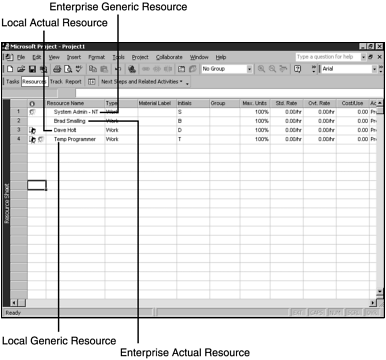
As shown in Figure 25.18, icons in the Indicators field in the Resources view specify whether a resource is local and/or generic.
Figure 25.18. Note the different combinations of icons for local, local generic, enterprise and enterprise generic resources.
→ Generic resources need to be assigned enterprise resource outline codes to support skills-based resource replacement via the Resource Substitution Wizard, and to support the viewing of enterprise resource data by resource and skill. For more information about replacing generic resources with actual resources based on skill codes see “Using the Resource Substitution Wizard,” p. 1048.
→ For more information about generating views of enterprise project and resource data based on skill codes, see “Viewing Enterprise Resources in the Resource Center,” p. 1084.
Generic resources are often used in project templates or in preliminary project planning before the actual resources that will be assigned to the project are known.
Generic resources are handled much like actual resources, except you cannot create a Microsoft Project Server account for generic resources or send them assignments via Microsoft Project Server. When you have enterprise generic resources defined, you can assign them to projects as you would any other enterprise resources.
Using Local Generic Resources
Local generic resources are similar to generic resources, but they are available only to the project plan in which they are defined. Typically, local generic resources are used as placeholders until named resources are assigned. You can use the Resource Substitution Wizard to replace local generic resources.
NOTE
A local resource has a head icon with a page behind it in the Indicators column. Don’t confuse this icon with the two-heads icon in the Indicator column that indicates a generic resource.
Using Enterprise Actual Resources
Enterprise actual resources should be defined and created during an initial resource planning phase, after which the resources are available for assignment to projects across the enterprise. As with generic resource planning, creating a set of criteria for all enterprise resources ensures consistency and integrity with all enterprise resource allocation.
Using Local Actual Resources
Local actual resources are resources that represent actual human beings and that are defined in a single Microsoft Project schedule only. These resources are available to the project schedule in which they are defined, but to no others.
In an enterprise setting it isn’t recommended that a project manager use local actual resources because they defeat the purpose of being able to gather and analyze resource utilization and availability information at the enterprise level.
NOTE
For most organizations it is recommended that there be a process defined whereby project managers can request that new actual and generic enterprise resources be added to the enterprise resource pool or changed as necessary.
Creating a New Enterprise Resource
You enter resources into Project so you can assign them to tasks in a project plan. You use the same procedure to create both generic and actual resources, the only difference is the selection of the Generic box in the Resource Details dialog box.
You can create resources from scratch or import them from a variety of sources, such as old projects or a Microsoft Outlook Contacts file. The following steps are necessary for adding a new resource to the enterprise resource pool:
1. |
Launch Microsoft Project. |
2. |
Make sure you have the appropriate permissions. With Microsoft Project Professional’s default group permissions, only the administrator, portfolio manager, and resource manager can add new resources. |
3. |
Choose Tools, Enterprise Options, Open Enterprise Resource Pool. The Open Enterprise Resources dialog box, shown in Figure 25.19, appears. It lists all the enterprise resources that are currently in the Server database. Select the resources that you want to edit and click the Open/Add button. Click the Open/Add button without selecting any resources to enter just new resources. Figure 25.19. You can select the enterprise resources that you want to edit and then click the Open/Add button.
|
4. |
To modify a resource, right-click a resource’s cell and select Resource Information from the pull-down menu. Use the dialog box shown in Figure 25.20 to modify the resource’s details. Figure 25.20. You enter new or changed resource information in the Resource Details dialog box.
|
5. | |
6. |
Select a collaboration method from the Workgroup drop-down list. The Default selection allows you to collaborate with this resource via the default method that has been set up by the system administrator. The Project Server selection allows collaboration to happen via the Project Server only. The E-mail Only selection permits collaboration information to only be sent in email messages. The None selection means that you do not want to collaborate with this resource. |
7. |
Select the Custom Fields tab and assign the appropriate selections for each defined enterprise outline code and custom field, as show in Figure 25.21. Figure 25.21. The * at the end of the Skills1 (Enterprise Resource Outline Code1)* indicates that it is a required field.
|
8. |


TIP
To make multiple resources generic, select more than one resource in the table, click the Task Information icon, select the Generic check box, and click OK.
Applying Outline Codes and Custom Fields to Resources
After enterprise outline codes and custom fields have been entered into the Enterprise Global template and resources have been entered into the enterprise resource pool, the resources in the enterprise resource pool need to have the enterprise outline codes and custom fields assigned to them.
To apply enterprise outline codes to enterprise resources, follow these steps:
1. |
Select Tools, Enterprise Options, Open Enterprise Resource Pool. |
2. |
Click the Select/Deselect All button to choose all the resources in the resource pool, then click the Open/Add button to open the selected enterprise resources in a Resource Sheet view (as shown in Figure 25.19). |
3. |
Assign the enterprise resource outline codes to the enterprise resources. TIP One quick and easy way to assign outline codes to resources is to create a new Outline Codes view and table in the Enterprise Global template, where the columns in your new view include the enterprise resource outline codes. This way you can easily assign and maintain outline code information for every resource. |
4. |
NOTE
If you find that you cannot select enterprise resources to open in the enterprise resource pool, those enterprise resources might already be checked out. You can make sure that all enterprise resources are checked in by selecting Admin, Enterprise Options, and checking the enterprise resources in Web Access.
NOTE
After enterprise resource outline codes and custom fields contents are established, you can edit them by selecting a resource and clicking Edit Resource Details in the Resource Center of Web Access.