
Chapter 12
Troubleshooting Your iPad

To keep your iPad running well, you should learn essential troubleshooting moves to use on the iPad itself and in iTunes. You can also update your iPad software and track the device if it goes missing.
Close an App That Has Stopped Responding
Update the Software on Your iPad
Extend Your iPad’s Runtime on the Battery
Back Up and Restore Your iPad Using iTunes
Back Up and Restore Your iPad Using iCloud
Restore the Operating System Using iTunes
Restore Your iPad to Factory Settings
Close an App That Has Stopped Responding
Normally, the apps on your iPad run without problems, but if an app stops responding, you can force it to close. Usually, you can easily tell when an app has stopped responding, because the screen does not change and your taps and gestures on the screen get no reaction. But if you are not certain that an app has stopped responding, allow the app a few seconds to recover before you force it to close.
Close an App That Has Stopped Responding

![]() When an app stops responding, press Home twice in quick succession. The app in this example is Safari.
When an app stops responding, press Home twice in quick succession. The app in this example is Safari.
Note: You can display the app-switching screen by swiping up from the bottom of the screen.

The app-switching screen appears, showing a thumbnail for each running app.
![]() The latest app — the app that has stopped responding — appears as the upper-right thumbnail.
The latest app — the app that has stopped responding — appears as the upper-right thumbnail.
![]() Swipe up on the thumbnail for the app that has stopped responding.
Swipe up on the thumbnail for the app that has stopped responding.
iOS closes the app.

The app disappears from the list.
![]() If you want to switch to another running app, tap its thumbnail.
If you want to switch to another running app, tap its thumbnail.
![]() Press Home.
Press Home.
![]() You can also tap open space to display the Home screen.
You can also tap open space to display the Home screen.
![]() If the Dock contains an icon for the app you closed, you can tap the icon to open the app again.
If the Dock contains an icon for the app you closed, you can tap the icon to open the app again.

The Home screen appears.
![]() Tap the icon of the app that you closed.
Tap the icon of the app that you closed.
Note: You may need to display another Home screen to reach the app’s icon.
The app launches again, and you can resume using it.
Update the Software on Your iPad
Apple periodically releases new versions of iOS for the iPad to fix problems, improve performance, and add new features. To keep your iPad running quickly and smoothly, and to add any new features, update the device’s software when a new version becomes available.
Your iPad notifies you automatically when a new version of the iPad software is available; if you sync your iPad with a computer, iTunes notifies you, too. You can also check manually for new software versions.
Update the Software on Your iPad

![]() Press Home.
Press Home.
The Home screen appears.
![]() The badge on the Settings icon indicates that an update is available.
The badge on the Settings icon indicates that an update is available.
![]() Tap Settings (
Tap Settings (![]() ).
).

The Settings screen appears.
![]() Tap General (
Tap General (![]() ).
).
The General screen appears.
![]() Tap Software Update.
Tap Software Update.

The Software Update screen appears.
![]() Tap Install Now.
Tap Install Now.
Note: If the iPad has already requested the software update, the Update Requested button appears in place of the Install Now button. If the iPad is already downloading the update, the Downloading button appears. In either case, allow the download to complete, and then tap Install Now.

The Enter Passcode dialog opens.
![]() Type your passcode.
Type your passcode.
The Terms and Conditions screen appears.
![]() Tap Agree.
Tap Agree.
The Terms and Conditions dialog opens.
![]() Tap Agree in the dialog.
Tap Agree in the dialog.
The installation procedure begins.
Your iPad restarts, and you can resume using it.
Extend Your iPad’s Runtime on the Battery
You can extend the runtime of your iPad on its battery by reducing the demands on the battery. You can dim the screen so that it consumes less power. You can set your iPad to go to sleep quickly. You can turn off Wi-Fi and Bluetooth when you do not need them, and you can turn off the power-hungry GPS feature on a cellular iPad when you do not need it for navigation or other purposes.
Extend Your iPad’s Runtime on the Battery

Dim the Screen
![]() Press Home.
Press Home.
The Home screen appears.
![]() Tap Settings (
Tap Settings (![]() ).
).
The Settings screen appears.
![]() Tap Display & Brightness (
Tap Display & Brightness (![]() ).
).
The Display & Brightness screen appears.
![]() Tap the Brightness slider and drag it to the left to dim the screen.
Tap the Brightness slider and drag it to the left to dim the screen.
![]() Set the Auto-Brightness switch to On (
Set the Auto-Brightness switch to On (![]() ) if you want the iPad to adjust the brightness automatically to suit the ambient light conditions.
) if you want the iPad to adjust the brightness automatically to suit the ambient light conditions.

Turn Off Wi-Fi and Bluetooth
![]() On the Settings screen, tap Wi-Fi (
On the Settings screen, tap Wi-Fi (![]() ).
).
The Wi-Fi screen appears.
![]() Set the Wi-Fi switch to Off (
Set the Wi-Fi switch to Off (![]() ).
).
![]() Tap Bluetooth (
Tap Bluetooth (![]() ).
).
Note: If you have a cellular iPad, turning off Wi-Fi may cause data transfer over the cellular connection instead of over Wi-Fi.

The Bluetooth screen appears.
![]() Set the Bluetooth switch to Off (
Set the Bluetooth switch to Off (![]() ).
).
Note: You can enable or disable Wi-Fi and Bluetooth quickly from Control Center. You can also adjust the display brightness, but you cannot control Auto-Brightness.
Note: For a cellular iPad, you can save power by turning off cellular data either from Control Center or from the Cellular Data screen in the Settings app.

Turn Off the GPS Feature
![]() On the Settings screen, tap Privacy (
On the Settings screen, tap Privacy (![]() ).
).
The Privacy screen appears.
![]() Tap Location Services (
Tap Location Services (![]() ).
).
The Location Services screen appears.
![]() Set the Location Services switch to Off (
Set the Location Services switch to Off (![]() ).
).
The Location Services dialog opens.
![]() Tap Turn Off.
Tap Turn Off.
![]() Tap Privacy (
Tap Privacy (![]() ).
).
The Privacy screen appears.
Back Up and Restore Your iPad Using iTunes
You can back up your iPad either to your computer or to iCloud. Backing up your iPad to your computer using iTunes creates a full backup of the iPad on your computer, enabling you to restore your data and settings to the iPad — or to a new iOS device — if your iPad becomes corrupted or damaged. If you encrypt the backup, iTunes saves your passwords, enabling you to restore them as well.
Back Up and Restore Your iPad Using iTunes

Back Up Your iPad Using iTunes
![]() Connect your iPad to your computer via the USB cable.
Connect your iPad to your computer via the USB cable.
![]() Click iPad (
Click iPad (![]() ) on the navigation bar in iTunes.
) on the navigation bar in iTunes.
The iPad-management screen appears.
![]() Click Summary.
Click Summary.
The Summary screen appears.
![]() Click This computer (
Click This computer (![]() changes to
changes to ![]() ).
).
![]() Click Back Up Now.
Click Back Up Now.
![]() The Latest Backup readout shows the date and time of your most recent backup.
The Latest Backup readout shows the date and time of your most recent backup.

Restore Your iPad Using iTunes
![]() Click Restore Backup.
Click Restore Backup.
Note: If a message appears saying Find My iPad must be turned off before iPad can be restored, tap Settings (![]() ) on the iPad, tap Apple ID, and then tap iCloud (
) on the iPad, tap Apple ID, and then tap iCloud (![]() ). Tap Find My iPad (
). Tap Find My iPad (![]() ), and then set the Find My iPad switch to Off (
), and then set the Find My iPad switch to Off (![]() changes to
changes to ![]() ).
).
![]() In the Restore From Backup dialog, click the pop-up menu (
In the Restore From Backup dialog, click the pop-up menu (![]() ), and then click the backup to use.
), and then click the backup to use.
![]() Click Restore.
Click Restore.

![]() iTunes restores the data from the backup, showing a progress readout as it does so.
iTunes restores the data from the backup, showing a progress readout as it does so.
Note: Do not disconnect the iPad during the restore process. Doing so can leave the iPad in an unusable state.

iTunes displays a message saying that the settings for your iPad have been restored.
![]() Click OK or wait for the countdown timer to close the dialog automatically.
Click OK or wait for the countdown timer to close the dialog automatically.
Your iPad restarts.
iTunes automatically syncs your iPad.
![]() After the sync completes, disconnect the iPad from your computer.
After the sync completes, disconnect the iPad from your computer.
Back Up and Restore Your iPad Using iCloud
Instead of backing up your iPad to your computer, you can back it up to iCloud. If your iPad suffers a software or hardware failure, you can restore the data and settings that you have backed up. You can choose which items to back up to iCloud.
iCloud Backup is less comprehensive than iTunes’ backup: It does not back up apps, media files, or games you have bought from the iTunes Store, because you can download them again. iCloud Backup also does not back up your app data or your passwords.
Back Up and Restore Your iPad Using iCloud

![]() Press Home.
Press Home.
The Home screen appears.
![]() Tap Settings (
Tap Settings (![]() ).
).
The Settings screen appears.
![]() Tap Apple ID, the button bearing your Apple ID name.
Tap Apple ID, the button bearing your Apple ID name.
![]() Tap iCloud (
Tap iCloud (![]() ).
).

The iCloud screen appears.
![]() Look at the Storage readout to verify that you have storage space available.
Look at the Storage readout to verify that you have storage space available.
![]() If you need more space, tap Manage Storage to display the iCloud Storage screen, tap Upgrade, and then follow the prompts.
If you need more space, tap Manage Storage to display the iCloud Storage screen, tap Upgrade, and then follow the prompts.
![]() In the Apps Using iCloud list, choose which apps can store data in iCloud. See the section “Set Up and Configure iCloud” in Chapter 2 for more details.
In the Apps Using iCloud list, choose which apps can store data in iCloud. See the section “Set Up and Configure iCloud” in Chapter 2 for more details.
![]() Swipe up to scroll down the screen.
Swipe up to scroll down the screen.

The lower part of the iCloud screen appears.
![]() Set the iCloud Drive switch to On (
Set the iCloud Drive switch to On (![]() ) if you want to store files on iCloud Drive.
) if you want to store files on iCloud Drive.
![]() Tap iCloud Backup (
Tap iCloud Backup (![]() ).
).

The Backup screen appears.
![]() Set the iCloud Backup switch to On (
Set the iCloud Backup switch to On (![]() ).
).
![]() The Last Successful Backup readout shows when you last backed up your iPad to iCloud.
The Last Successful Backup readout shows when you last backed up your iPad to iCloud.
![]() Tap Back Up Now.
Tap Back Up Now.
Your iPad starts performing a backup to iCloud.
Restore the Operating System Using iTunes
If your iPad’s operating system becomes corrupted, you can restore it by connecting the iPad to your computer and using iTunes. Restoring the iPad erases all its contents, so use this troubleshooting move only after other moves have failed.
When restoring the iPad, iTunes checks for an updated version of its software. If a new version is available, iTunes downloads and installs it automatically. The download may take minutes or hours, depending on the speed of your Internet connection.
Restore the Operating System Using iTunes

![]() Connect your iPad to your computer via the USB cable.
Connect your iPad to your computer via the USB cable.
![]() Click iPad (
Click iPad (![]() ) on the navigation bar.
) on the navigation bar.
The iPad-management screen appears.
![]() Click Summary.
Click Summary.
The Summary screen appears.
![]() Click Restore iPad.
Click Restore iPad.
Note: If a message appears saying Find My iPad must be turned off before iPad can be restored, tap Settings (![]() ) on your iPad, tap iCloud (
) on your iPad, tap iCloud (![]() ), tap Find My iPad (
), tap Find My iPad (![]() ), and set the Find My iPad switch to Off (
), and set the Find My iPad switch to Off (![]() ).
).

iTunes displays a message prompting you to back up the settings for the iPad before restoring.
![]() Click Back Up.
Click Back Up.
Note: If you have backed up the iPad very recently, you may prefer to click Don’t Back Up.
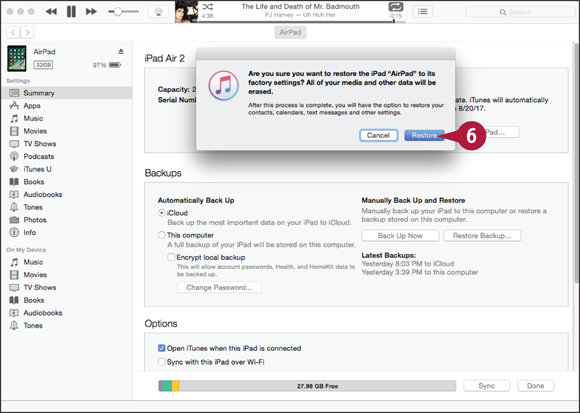
iTunes displays a message confirming that you want to restore the iPad to its factory settings.
![]() Click Restore.
Click Restore.
iTunes backs up the iPad if you chose to do so.
iTunes restores the iPad software.
Your iPad restarts and completes the restoration.

The Welcome to Your New iPad screen appears.
![]() Click Restore from this backup (
Click Restore from this backup (![]() changes to changes to
changes to changes to ![]() ).
).
![]() Click the pop-up menu (
Click the pop-up menu (![]() ) and choose the iPad backup to restore.
) and choose the iPad backup to restore.
![]() Click Continue.
Click Continue.
iTunes restores the data in the backup to your iPad.
Restore Your iPad to Factory Settings
If your iPad starts malfunctioning and iTunes will not recognize it, you can restore the iPad to its factory settings. Restoring the iPad to factory settings deletes all the media and data the tablet contains and returns all the settings to their default values, wiping out your accounts and customizations.
Normally, you restore your iPad to factory settings only when it is suffering severe problems that you cannot resolve otherwise or before you sell or give away your iPad.
Restore Your iPad to Factory Settings

![]() Press Home.
Press Home.
The Home screen appears.
![]() Tap Settings (
Tap Settings (![]() ).
).
The Settings screen appears.
Note: If your iPad is not responding to the Home button or your taps, press and hold Sleep/Wake and Home for about 15 seconds to reset the iPad.
Note: If you are restoring factory settings in preparation for selling or giving away your iPad, tap Apple ID, tap iCloud (![]() ), tap Find My iPad (
), tap Find My iPad (![]() ), and then set the Find My iPad switch to Off (
), and then set the Find My iPad switch to Off (![]() changes to
changes to ![]() ). You must do this to enable the new owner to register the iPad and to set up a new cellular service account for a cellular iPad.
). You must do this to enable the new owner to register the iPad and to set up a new cellular service account for a cellular iPad.
![]() Tap General (
Tap General (![]() ).
).
The General screen appears.
![]() Tap Reset.
Tap Reset.

The Reset screen appears.
![]() Tap Erase All Content and Settings.
Tap Erase All Content and Settings.
The first Erase iPad dialog opens.
Note: If you have secured your iPad with Touch ID or a passcode, you must type the passcode after tapping Erase All Content and Settings.
![]() Tap Erase.
Tap Erase.

The second Erase iPad dialog opens, double-checking you are sure you want to erase all settings.
![]() Tap Erase.
Tap Erase.

The Apple ID Password dialog opens.
![]() Type your Apple ID password.
Type your Apple ID password.
![]() Tap Erase.
Tap Erase.
The iPad erases all your content and settings and restores itself to the factory settings. This takes several minutes.
When the operation is complete, the Hello screen appears, and you can set up your iPad as explained in Chapter 1.
Troubleshoot Wi-Fi Connections
Normally, your iPad automatically reconnects to Wi-Fi networks to which you have previously connected it, and maintains those connections without problems. But you may sometimes need to request the network address for your iPad again, a process called renewing the lease on the IP address. You may also need to tell your iPad to forget a network and then rejoin the network manually, providing the password again.
Troubleshoot Wi-Fi Connections

Renew the Lease on the IP Address of Your iPad
![]() Press Home.
Press Home.
The Home screen appears.
![]() Tap Settings (
Tap Settings (![]() ).
).
The Settings screen appears.
![]() Tap Wi-Fi (
Tap Wi-Fi (![]() ).
).
The Wi-Fi screen appears.
![]() Tap Information (
Tap Information (![]() ) to the right of the network for which you want to renew the lease.
) to the right of the network for which you want to renew the lease.

The network’s screen appears.
![]() Tap Renew Lease.
Tap Renew Lease.
The Renew Lease pop-up button appears.
![]() Tap Renew Lease.
Tap Renew Lease.
![]() Tap Wi-Fi (
Tap Wi-Fi (![]() ).
).
The Wi-Fi screen appears.
Note: If the IP Address readout shows an IP address starting with 169, your router may be misconfigured. 169 at the start indicates the device has a self-assigned IP address, which usually means it cannot get an address from the router.

Forget a Network and Then Rejoin It
![]() On the Wi-Fi screen, tap Information (
On the Wi-Fi screen, tap Information (![]() ) to the right of the network.
) to the right of the network.
Note: Forgetting a network on your iPad causes other devices that use the same iCloud keychain to forget the network too.

The network’s screen appears.
![]() Tap Forget This Network.
Tap Forget This Network.
The Forget Wi-Fi Network dialog opens.
![]() Tap Forget.
Tap Forget.
The iPad removes the network’s details.
The Wi-Fi screen appears again.
![]() Tap the network’s name.
Tap the network’s name.
The Enter Password dialog opens.
![]() Type the password for the network.
Type the password for the network.
![]() Tap Join.
Tap Join.
The iPad joins the network.
Locate Your iPad with Find My iPad
You can use the Find My iPad feature in iCloud to locate your iPad when it has been lost or stolen. You can also display a message on the iPad or remotely erase the data on the iPad. To use Find My iPad, you must first set up your iCloud account on your iPad and enable the Find My iPad feature.
On a computer, you can use Find My iPad in a web browser to locate your iPad. On iOS, use the Find My iPhone app instead. You cannot use an Android device.
Locate Your iPad with Find My iPad

Turn On the Find My iPad Feature
![]() Set up your iCloud account on your iPad as discussed in the section “Set Up and Configure iCloud” in Chapter 2.
Set up your iCloud account on your iPad as discussed in the section “Set Up and Configure iCloud” in Chapter 2.
![]() Press Home.
Press Home.
The Home screen appears.
![]() Tap Settings (
Tap Settings (![]() ).
).
The Settings screen appears.
![]() Tap Apple ID, the button that shows your Apple ID name.
Tap Apple ID, the button that shows your Apple ID name.
The Apple ID screen appears.
![]() Tap iCloud (
Tap iCloud (![]() ).
).
The iCloud screen appears.
![]() Tap Find My iPad (
Tap Find My iPad (![]() ).
).

The Find My iPad screen appears.
![]() Set the Find My iPad switch to On (
Set the Find My iPad switch to On (![]() ).
).
Note: If a confirmation dialog appears, tap Allow.
iCloud turns on the Find My iPad feature.
![]() Set the Send Last Location switch to On (
Set the Send Last Location switch to On (![]() ) if you want your iPad to send its location to Apple when the battery runs critically low. Sending the location is usually helpful.
) if you want your iPad to send its location to Apple when the battery runs critically low. Sending the location is usually helpful.

Locate Your iPad Using Find My iPad
![]() On a computer, open a web browser, such as Chrome, Firefox, Internet Explorer, Microsoft Edge, or Safari.
On a computer, open a web browser, such as Chrome, Firefox, Internet Explorer, Microsoft Edge, or Safari.
![]() Click the Address box.
Click the Address box.
![]() Type
Type www.icloud.com and press ![]() in Windows or
in Windows or ![]() on a Mac.
on a Mac.
The Sign in to iCloud web page appears.
![]() Type your username.
Type your username.
![]() Type your password.
Type your password.
![]() Click Sign In (
Click Sign In (![]() ).
).

Note: If you have set up two-factor authentication on your Apple ID, the Two-Factor Authentication screen may appear. Click the device to use for verification, and then enter the code sent to the device on the Enter Verification Code screen. In the Trust This Browser? dialog that opens, click Trust or Don’t Trust, as appropriate.
The iCloud apps screen appears.
Note: If iCloud displays the page you last used, click iCloud to display the iCloud apps screen.
![]() Click Find iPhone.
Click Find iPhone.
Note: If iCloud prompts you to sign in again to use Find My iPhone, type your password and click Sign In.
If Find My iPad reveals that someone has taken your iPad, you can turn on Lost Mode to lock it remotely and turn on tracking. You can also wipe the iPad’s contents to prevent whoever has taken it from hacking into your data. Understand, though, that wiping your iPad prevents you from locating the iPad again — ever — except by chance. Wipe your iPad only when you have lost it, you have no hope of recovering it, and you must destroy the data on it.

The iCloud Find My iPhone screen appears.
![]() Click All Devices.
Click All Devices.
The All Devices list appears.
![]() Click your iPad.
Click your iPad.

![]() Your iPad’s location appears.
Your iPad’s location appears.
The Info dialog appears.
![]() If you want to play a sound on the iPad, click Play Sound (
If you want to play a sound on the iPad, click Play Sound (![]() ). This feature is helpful for locating your iPad if you have mislaid it somewhere nearby.
). This feature is helpful for locating your iPad if you have mislaid it somewhere nearby.
![]() A message indicates that the iPad has played the sound.
A message indicates that the iPad has played the sound.
Use Lost Mode
![]() Click Lost Mode (
Click Lost Mode (![]() ) in the Info dialog.
) in the Info dialog.

The Lost Mode dialog appears, prompting you to enter a phone number where you can be reached.
![]() Optionally, click Number and type the number.
Optionally, click Number and type the number.
![]() Click Next.
Click Next.
The Lost Mode dialog prompts you to enter a message.
![]() Type a message to whoever finds your iPad.
Type a message to whoever finds your iPad.
![]() Click Done.
Click Done.
iCloud sends the Lost Mode command to the iPad, which displays the phone number and message.

Remotely Erase the iPad
![]() Click Erase iPad (
Click Erase iPad (![]() ) in the Info dialog.
) in the Info dialog.
The Erase This iPad? dialog opens.
![]() Click Erase.
Click Erase.
The Enter Your Apple ID Password dialog appears.
![]() Type your password.
Type your password.
![]() Click Erase.
Click Erase.
iCloud sends the erase command to the iPad, which erases its data.