Chapter 18
The Case of the Broken Window
IN THIS CHAPTER
![]() Enjoying the magic fixes in Windows
Enjoying the magic fixes in Windows
![]() Toning down Windows permission screens
Toning down Windows permission screens
![]() Reviving deleted files and folders and their older versions
Reviving deleted files and folders and their older versions
![]() Retrieving a forgotten password
Retrieving a forgotten password
![]() Fixing stuck menus and frozen screens
Fixing stuck menus and frozen screens
Sometimes you just have a vague sense that something’s wrong. Your computer displays an odd screen that you’ve never seen before, or Windows starts running more slowly than Congress.
Other times, something’s obviously gone haywire. Programs freeze, menus keep shooting at you, or Windows constantly nags you with an incomprehensible error message every time you turn on your computer.
Many of the biggest-looking problems are solved by the smallest-looking solutions. This chapter points you to the right one.
The Magic Fixes in Windows
For years, System Restore was the Windows go-to fix when your computer began running roughly. System Restore lives on in Windows 11, as I describe in this chapter’s later sidebar, “Restoring from a restore point.” But Windows offers several other powerful tools that bring an ailing computer back to health.
The following sections explain each tool, when to reach for it, and how best to make it work its magic.
Resetting your computer
When dealing with a particularly sick computer, sometimes reinstalling Windows is the only cure. In the past, reinstalling Windows took lots of time and effort. And after reinstalling Windows, you still needed to copy your files and programs back onto your computer. It could take hours — even if you had up-to-date backups.
Windows aims to solve that problem. By pushing a few buttons, you can tell Windows to reinstall itself onto your computer. And while installing a fresh copy of itself, Windows preserves everybody’s user accounts and personal files. For Microsoft account holders, Windows preserves any apps they’ve downloaded from the Microsoft Store, as well as some of their most important computer settings.
 Performing a reset saves settings from your wireless network connections as well as from your cellular connection, if you have one. The Reset tool also remembers any BitLocker and BitLocker-To-Go settings, drive letter assignments, and personalization settings, including your lock screen background and desktop wallpaper.
When your computer wakes up feeling refreshed with its new copy of Windows, you only need to reinstall your desktop programs. (The program politely leaves a handy list of those programs on your desktop, complete with website links, if available, so you know exactly what to reinstall.) Missing apps can easily be installed from the Microsoft Store: Open the Microsoft Store app from the Start menu, and click the Library icon from the app’s left edge. A list of your previously downloaded apps appears, with an Install button next to them.
 The Reset tool can go one step further, if you like, by wiping your computer completely clean of everything: user accounts, data, and personal files. Then Windows reinstalls itself, just as if it were on a new PC. That lets you either start from scratch or simply give away or sell your computer without worrying about leaking your personal information.
To reset your ailing PC, follow these steps:
 Click the Start button, choose the Settings icon from the Start menu, and click the System category.
The Settings app opens to the System page.
From the System page, click the Recovery setting from the right pane, and then click Reset PC.
Windows displays the Reset This PC window shown in Figure 18-1, offering two ways to reset your computer:
- Keep My Files: The choice used by nearly everyone, this reinstalls Windows, but preserves everybody’s user accounts and files. The only things you lose are desktop programs, which must be reinstalled from their original discs or installation files. If you choose this option, jump to Step 4.
- Remove Everything: Choose this only when you want to wipe everything away from your computer, including everybody’s user accounts and files, and reinstall Windows. Then you can start from scratch or safely sell or give your computer to others. If you choose this, move to Step 3.

FIGURE 18-1: Unless you have a very good reason, choose Keep My Files.
Choose whether to just remove your files or to remove files and clean the drive.
Windows offers you several choices:
- Just Remove My Files: Select this option only when your computer will stay within your family. Although this option is relatively secure, somebody with the right tools may be able to extract some previously erased information. (If your computer contains more than one drive, Windows asks whether you want to remove the files from both drives or just the drive where Windows is installed.)
- Remove Files and Fully Clean the Drive: Select this option when you intend to sell or donate your computer to strangers. This more time-consuming option removes your data and scrubs the hard drive extra clean. That keeps out everybody but the most dedicated specialists who own expensive data recovery equipment.
- Which Drive: A third option appears to people who have spread Windows across two disk drives, perhaps by storing their File History backups on a second drive. Choose All Drives to fully clean both drives; choose Only the Drive Where Windows Is Installed to preserve your File History backup.
When you click an option and click the Reset button, Windows removes everything from your computer, fully cleaning the drive, if requested, and then reinstalls itself to leave your computer with a “like new” copy of Windows. At that point, you’re finished, and your computer’s ready to start afresh or be given away safely.
Take note of what desktop programs (and, possibly, drivers) need to be reinstalled, click Next, and then click the Reset button.
Windows asks how you’d like to reinstall Windows.
Choose how to reinstall Windows.
Windows offers two ways to reinstall:
- Cloud Download: Built for people with a fast broadband connection, this reloads Windows directly from Microsoft’s own computers. It’s a handy option if you don’t have a backup copy of Windows or if the other option fails.
- Local Reinstall: Try this option first to save time. Windows looks for a backup copy of itself, either stashed in secret on your hard drive or stored on a flash drive or DVD.
When you choose your option, Windows asks for final approval and then carries out your bidding.
Windows reinstalls itself on your computer, which takes anywhere from 15 minutes to an hour. When your computer wakes up, it should feel refreshed and ready to work again. Expect any or all of the following things to take place when resetting your computer:
- When your computer wakes up and you sign in, you find a shortcut called Removed Apps waiting on your desktop. Click it, and your web browser displays a page with links to any available removed desktop programs and drivers that you need to reinstall — if you decide you miss them, that is. (And if you do miss them, you need the program’s installation discs to reinstall them.)
- Shortly after Windows wakes up, it visits Windows Update to download and install oodles of security patches, as well as updated copies of its bundled apps. Grab a good novel.
- After resetting your computer, reinstall your desktop programs one by one, restarting your computer after each new install. That gives you the best chance to weed out any misbehaving programs that may have caused the problems that messed things up.
- If you’re connected to a network, you may need to tell Windows whether you’re on a private (home) network or a public network. I describe that process in Chapter 15.
 If you inserted a Windows DVD into your computer in Step 5, be careful when your computer restarts. As it restarts, your computer may ask you to “Press any key to boot from disc.” Don’t press any key; instead, wait a few seconds until the message disappears. Then Windows loads itself from your computer’s newly refreshed hard drive rather than the Windows installation DVD.
- If you’ve wiped your hard drive completely clean, you can use a File History backup, described in the next section, to restore the files that once lived in your
Documents,Music,Pictures, andVideosfolders.
Restoring backups with File History
The Windows backup program, File History, saves the files that you've created. It doesn’t back up your apps and programs. After all, apps and programs can always be reinstalled. But many of the moments that inspired so many of your photos, videos, and documents can never be re-created.
To keep your files safe, File History automatically makes a copy of every file in your Documents, Music, Photos, and Videos folders. It copies all the files on your desktop as well. And File History automatically makes those copies every hour.
File History makes your backups easy to see and restore, letting you flip through different versions of your files and folders, comparing them with your current versions. Should you find a better version, a press of a button brings that older version back to life.
 File History doesn't work until you turn it on, a process I describe in Chapter 13. Please, please flip back a few chapters and turn it on now. The earlier you turn it on, the more backups you’ll have to choose from when you need them. Your portable hard drive also needs to be plugged into your PC in order for your PC to access the files.
To browse through your backed-up files and folders, restoring the ones you want, follow these steps:
 Click the taskbar’s Search button, type File History, and press Enter.
The age-old Control Panel appears, open to the File History section.
Click the Restore Personal Files link from the section’s left side.
The File History program appears, shown in Figure 18-2. The program looks much like a plain old folder, but it’s actually showing the folders you’ve backed up: your main folders, your desktop, your contacts, your favorite websites, as well as your
Music,Documents,VideosandMusicfolders, among others.Feel free to open the folders inside the File History window. You can also peek inside the files you find there to see their contents.
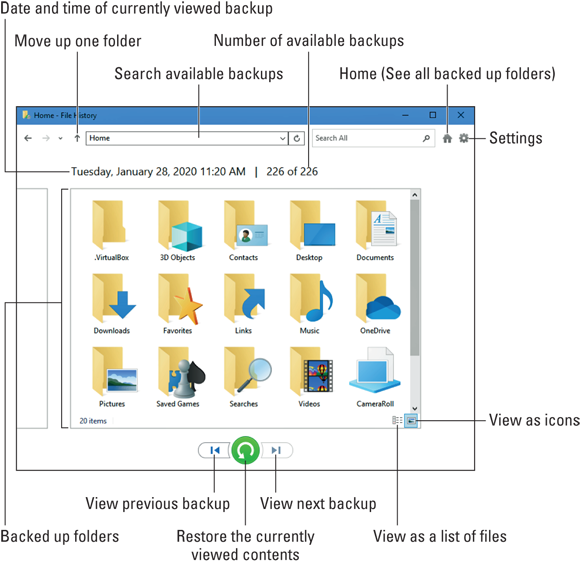
FIGURE 18-2: The File History program lets you restore backups from any of your main folders.
Choose what you'd like to restore.
Point and click your way through the libraries, folders, and files until you spot the item or items you’d like to restore:
- Folder: To restore an entire folder, open it so you’re viewing its contents.
- Files: To restore a group of files, open the folder containing them, so the files’ icons are onscreen.
- One file: To restore an earlier version of a file, open that file from inside the File History window. File History displays that file’s contents.
When you’ve found the file or folder you want to restore, move to the next step.
Move forward or backward in time to find the version you’d like to restore.
To browse through different versions of what you’re currently viewing, choose the left-pointing arrow along the bottom, as shown in Figure 18-3. To see a newer version, choose the right-pointing arrow.
As you move forward and backward through time, feel free to click open folders or individual files, peeking inside them until you’re looking at the version that you want to retrieve.
Not sure whether a folder contains your sought-after item? Type a word or two from your document into the Search box in File History’s upper-right corner.
FIGURE 18-3: Click the left or right arrow along the bottom to see newer and older versions of the file.
Click the Restore button to restore your desired version.
 Whether you’re looking at an individual file, a folder, or an entire library’s contents, clicking the Restore button (shown in the margin) places that item back in the place where it used to live.
That brings up a potential problem, however: What happens if you try to restore an older file named Notes into a place that already contains a file named Notes? Windows warns you of the problem with the window in Figure 18-4, which brings you to Step 6.

FIGURE 18-4: Choose whether to replace the existing file, skip the file, or which file to keep.
Choose how to handle the conflict.
If Windows notices a naming conflict with the item you’re trying to restore, File History offers you three ways to handle the situation, as shown in Figure 18-4.
- Replace the File in the Destination. Click this option only when you’re sure that the older file is better than your current file.
- Skip This File. Click this if you don’t want to restore the file or folder. This option returns you to File History, where you can browse other files.
- Compare Info for Both Files. Often the best choice, this option lets you compare the files’ sizes and dates before choosing which one to keep, the replacement file or the currently existing file. Or, if you want, this choice also lets you keep both files: Windows simply adds a number after the name of the incoming file, naming it Notes (1), for example.
Exit File History by closing the window.
You close the File History window just as you close any other window: Click the X in its upper-right corner.
Want to know more about File History? Read on:
- In addition to backing up everything in your main folders and on your desktop, File History stores a list of your favorite websites, listed earlier in Figure 18-2 as Favorites.
- I explain how to use File History to move an old computer’s files to a new computer in Chapter 20.
- Don’t become too dependent on the File History program. Microsoft is phasing it out as it pushes everybody toward storing their backups on OneDrive, its rental storage service on the internet. You may want to invest in a third-party backup program to take File History’s place.
Windows Keeps Asking Me for Permission
Like earlier Windows versions before it, Windows 11 offers both Administrator and Standard user accounts. The Administrator account, meant for the computer’s owner, holds all the power. Holders of mere Standard accounts, by contrast, aren’t allowed to do things that might change the computer or its settings.
But no matter which of the two accounts you hold, you’ll occasionally brush up against the Windows version of a barbed-wire fence. When a program tries to change something on your computer, Windows pokes you with a message like the one shown in Figure 18-5.
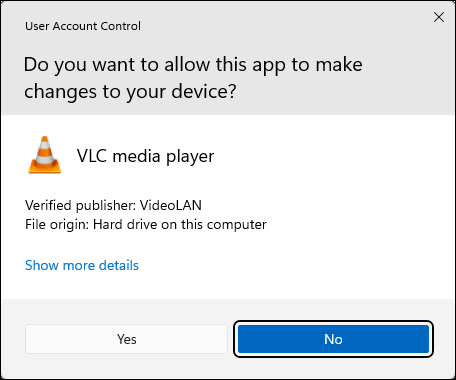
FIGURE 18-5: The Windows permission screen pops up when a program tries to change something on your PC.
Standard account holders see a slightly different message that commands them to fetch an Administrator account holder to type a password.
Of course, when screens like this one pop up too often, most people simply ignore them and give their approval — even if that means they’ve just allowed a virus to settle comfortably inside their PC.
So when Windows sends you a permission screen, ask yourself this question: “Is Windows asking permission for something I did or requested?” If your answer is yes, give your approval so Windows can carry out your bidding. But if Windows sends you a permission screen out of the blue when you haven’t done anything, click No or Cancel. That helps keeps potential nasties from invading your PC.
If you don’t have time for this bothersome security layer, and you’re willing to suffer the consequences, you can find out how to turn off user account permissions by reading Chapter 11.
I Need to Retrieve Deleted Files
Everybody who’s worked on a computer knows the agony of seeing hours of work go down the drain: You mistakenly delete a file.
The Windows File History backup program, described earlier in this chapter, is a lifesaver here. But if you never turned on File History — an easy task I explain in Chapter 13 — Windows offers another way to retrieve your deleted files: the Recycle Bin.
![]() The Recycle Bin works because Windows doesn’t really destroy your deleted files. Instead, Windows slips those files into your Recycle Bin (shown in the margin), which lives on your desktop.
The Recycle Bin works because Windows doesn’t really destroy your deleted files. Instead, Windows slips those files into your Recycle Bin (shown in the margin), which lives on your desktop.
Open the Recycle Bin with a double-click, and you find every file or folder you’ve deleted within the past few weeks. I cover the Recycle Bin in Chapter 3, but here’s a tip: To restore a file or folder from the Recycle Bin, right-click the file and choose Restore. The deleted item magically reappears in its former home.
I Need to Fix Broken Apps
Windows makes it fairly easy to repair apps, which are almost always downloaded from the Microsoft Store. If an app no longer seems in good health and you’d like to reset it and start from scratch, follow these steps:
- Click the Start button, and choose the Settings icon from the Start menu.
The Settings app appears, open to the System page.
 From the right pane of the System app, click the Apps icon (shown in the margin). When the Apps window appears, click the Apps and Features section from the window’s right edge.
The Apps and Features page appears, listing your apps alphabetically along the bottom.
 Click the More button (shown in the margin) next to the malfunctioning app’s name, and, when the menu drops down, click Advanced Options.
When the Advanced Options settings appear, click the Repair button.
This tells Windows to repair the app, if possible, preserving your settings and data.
- If Repair doesn’t fix the problem, click the adjacent Reset button.
When you choose Reset, Windows deletes and reinstalls the app from scratch, taking any of your preference settings and sign-in details along with it. This isn’t a big deal with, say, the Calculator app. But more elaborate apps like Mail and Calendar may take some time to bring back up to speed with the right settings.
My Settings Are Messed Up
Sometimes you want to return to the way things were before you started messing around with them. Your salvation lies in the Restore Default button, which awaits your command in strategically placed areas throughout Windows. A click of that button returns the settings to the way Windows originally set them up.
Here are a few Restore Default buttons you may find useful:
- Apps: Windows includes a Repair and a Reset button that restores malfunctioning apps back to their original working condition. I describe how in the previous section, “I Need to Fix Broken Apps.”
- Firewall: If you suspect foul play within Windows Firewall, bring back its original settings and start over. (Some of your programs may need to be reinstalled.) Click the Start button, and type firewall and network protection in the Search box. When the Windows Security window appears, choose Firewall and Network protection from the left pane. In the right pane, click Restore Firewalls to Default. (Be careful with this one, as you may need to reinstall some apps and programs.)
- Media Player: When the age-old Media Player Library contains mistakes, tell it to delete its index and start over. In Media Player, right-click the Forward or Backward arrows in the top menu, click Tools, choose Advanced from the pop-out menu, and choose Restore Media Library. (Or if you’ve accidentally removed items from the Media Player Library, choose Restore Deleted Library Items instead.)
- Colors: Windows lets you tweak your desktop’s colors and sounds, sometimes into a disturbing mess. To return to the default colors and sounds, right-click the Start button and choose Settings. Open the Personalization category, choose Themes from the right pane, and choose the Windows them from the Current Theme section.
- Fonts: Have you tweaked your fonts beyond recognition? Return them to normal by clicking the Start menu, typing Control Panel into the Search box and pressing Enter. When the Control Panel appears, click Appearance and Personalization, and then clicking Fonts. In the left pane, click Font Settings and then click the Restore Default Font Settings button.
- Libraries: In Windows 11, libraries are hidden by default. (I explain how to turn them on in Chapter 5.) When turned on, libraries appear in every folder’s Navigation pane. But if one of your libraries is missing (say, the Music library), you can put it back. From within File Explorer, right-click the word
Librariesalong the right side of any folder, choose More Options from the pop-up menu, and choose Restore Default Libraries. Your default libraries — Documents, Music, Pictures, and Videos — all reappear. - Network adapters: This one-click solution removes and reinstalls your network adapters and switches your network to its original settings. To reset your network, click the Start button, choose Settings, and choose the Network and Internet category from the left pane. From the right pane, click the Advanced Network Settings section, and then click the Network Reset option. Finally, click the Reset Now button. To restore your network to working order when this process finishes, you’ll need to complete the steps I describe in Chapter 15 that show how to share files with your networked computers.
 Folders: Windows hides a slew of switches relating to folders, their Navigation panes, the items they show, how they behave, and how they search for items. To mull over their options or return them to their default settings, open any folder and click the More icon shown in the margin. When the drop-down list appears, choose Options. The Folder Options window appears, which lists a Restore Defaults button on each of its tabs: General, View, and Search. (Click Apply after each change to make it stick.)
Finally, don’t forget the Reset option in Windows, described at the beginning of this chapter. Although it’s overkill for many problems, it resets most of your settings to the default.
I Forgot My Password
When Windows won’t accept your password at the Sign In screen, you may not be hopelessly locked out of your own computer. Check all these things before letting loose with a scream:
- Check your Caps Lock key. Windows passwords are case-sensitive, meaning that Windows considers OpenSesame and opensesame to be different passwords. If your keyboard’s Caps Lock light is on, press your Caps Lock key again to turn it off. Then try entering your password again.
- Use your Password Reset Disk. I explain how to create a Password Reset Disk for a Local account holder in Chapter 14. (The disk doesn’t work for Microsoft account holders.) When you’ve forgotten the password to your Local account, insert that disk to use as a key. Windows lets you back into your account, where you can promptly create an easier-to-remember password. (Flip to Chapter 14 and create a Password Reset Disk now if you haven’t yet.)
- Let another user reset your password. Anybody with an Administrator account on your computer can reset your password. Have that person head for the desktop’s Control Panel (see Chapter 12), click User Accounts, and then click User Accounts again. There, they can click the Manage Another Account link to see a list of every account. They can click your account name and click the Change the Password link to create a password you can remember more easily.
Note: If you’ve forgotten the password to your Microsoft account, none of the preceding suggestions will work. Instead, open any web browser and visit www.live.com. Enter your Microsoft account email, and click the Forgot Password? link. The site then leads you through the steps to reset your password.
If none of these options works, you're in sad shape, unfortunately. Compare the value of your password-protected data against the cost of hiring a password recovery specialist. You can find a specialist by searching for recover windows password on Google (www.google.com). Look for one with good reviews and who’s been in business for a few years.
My Computer Is Frozen Solid
Every once in a while, Windows just drops the ball and wanders off somewhere to sit under a tree. You’re left looking at a computer that just looks back. None of the computer’s lights blink. Panicked clicks don’t do anything. Randomly tapping the keyboard does nothing, or worse yet, the computer starts to beep at every key press.
When nothing onscreen moves (except, perhaps the mouse pointer), the computer is frozen up solid. Try the following approaches, in the following order, to correct the problem:
- Approach 1: Press Esc twice.
- This action rarely works, but it’s a quick first salvo that can’t hurt anything.
- Approach 2: Press the Ctrl, Alt, and Delete keys simultaneously, and choose Start Task Manager from the menu that appears.
- If you’re lucky, the Task Manager appears with the message that it discovered an unresponsive application. The Task Manager lists the names of currently running programs, including the one that’s not responding. On the Processes tab, click the name of the program that’s causing the mess and then click the End Task button. You lose any unsaved work in that program, of course, but you should be used to that. (If you somehow stumbled onto the Ctrl+Alt+Delete combination by accident, press Esc to quit Task Manager and return to Windows.)
 If that still doesn’t do the trick, press Ctrl+Alt+Delete again and click the Power icon (shown in the margin) in the screen’s lower-right corner. Choose Restart from the pop-up menu, and your computer shuts down and restarts, hopefully returning in a better mood.
- Approach 3: If the preceding approaches don’t work, turn off the computer by pressing its power button. (If that merely brings up the Turn Off the Computer menu, choose Restart, and your computer should restart.)
- Approach 4: If you keep holding down your computer’s power button long enough (usually about 4 to 5 seconds), it eventually stops resisting and turns off.