
Creating the Front Page of Your Web Site
For the most part, when you visit a blog powered by WordPress, the blog appears on the main page. Lisa's personal blog at http://lisasabin-wilson.com, powered by WordPress (of course), shows her latest blog posts on the front page, along with links to the post archives (by month or by category). This setup is typical of a site run by WordPress (see Figure 2-1).
But the front page of Lisa's business site at http://ewebscapes.com, also powered by WordPress, contains no blog and displays no blog posts (see Figure 2-2). Instead, it displays the contents of a static page that Lisa created in the WordPress Dashboard. This static page serves as a portal to her design blog, her portfolio, and other sections of her business site. The site includes a blog, but also serves as a full-blown business Web site, with all the sections Lisa needs to provide her clients the information they want.
Both of Lisa's sites are powered by the self-hosted version of WordPress.org, so how can they differ so much in what they display on the front page? The answer lies in the templates in the WordPress Dashboard.
You use static pages in WordPress to create content that you don't want to appear as part of your blog but do want to appear as part of your overall site (such as a bio page, a page of services, and so on).
Figure 2-1: Lisa's personal blog, set up like a typical site powered by WordPress.

Figure 2-2: Lisa's business site, set up as a business Web site, rather than a blog.

Creating a front page is a three-step process: Create a static page, designate that static page as the front page of your site, and tweak the page to look like a Web site, rather than a blog.
![]() By using this method, you can create unlimited numbers of static pages to build an entire Web site. You don't even need to have a blog on this site, unless you want one.
By using this method, you can create unlimited numbers of static pages to build an entire Web site. You don't even need to have a blog on this site, unless you want one.
Creating the static page
To have a static page appear on the front page of your site, you need to create that page. Follow these steps:
- Click Add New in the Pages drop-down list.
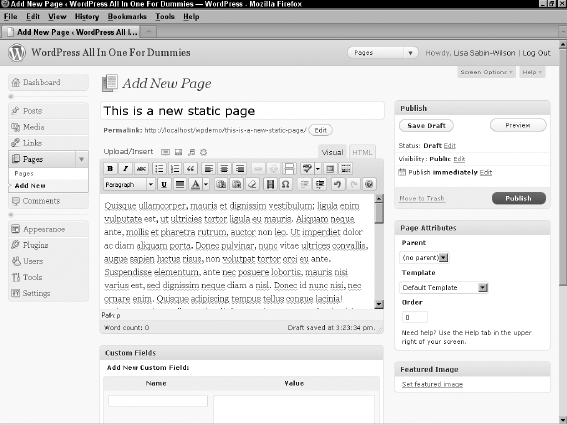
The Add New Page page opens, where you can write a new page for your WordPress blog, as shown in Figure 2-3.
- In the Title text box, type a title for the page.
- Type the content of your page in the large text box.
- Set the options for this page.
We explain the options on this page in the following section.
- Click the Publish button.
The page is saved to your database and published to your WordPress site with its own, individual URL (or permalink). The URL for the static page consists of your blog URL and the title of the page. For example, if you titled your page About Me, then the URL of the page is http://yourdomain.com/about-me. (See Book III, Chapter 3 for more information about permalinks.)
 The Page Template option is set to Default Template. This setting tells WordPress that you want to use the default page template (page.php in your theme template files) to format the page you're creating. The default page template is the default setting for all pages you create; you can assign a different page template to pages you create, if your theme has made different page templates available for use. In Book VI, Chapter 6, you can find extensive information on advanced WordPress themes, including information on page templates and how to create and use them on your site.
Setting page options
Before you publish a new page to your site, you can change options to use different features available in WordPress. These features are similar to the ones available for publishing posts, which you can read about in Book IV, Chapter 1:
- Custom Fields: Custom fields add extra data to your page, and you can fully configure them. You can read more about the Custom Fields feature in WordPress in Book IV, Chapter 5.
- Discussion: Decide whether to let readers submit comments through the comment system by selecting or deselecting the Allow Comments text box. By default, the box is checked; uncheck it to disallow comments on this page.
 Typically, you don't see a lot of static pages that have the Comments feature enabled because pages offer static content that doesn't generally lend itself to a great deal of discussion. There are exceptions, however, such as a Contact page, which might use the Comments feature as a way for readers to get in touch with the site owner through that specific page. Of course, the choice is yours to make based on the specific needs of your Web site.
 - Author: If you're running a multi-author site, you can select the name of the author you want to be attributed to this page. By default, your own author name appears selected here.
- Publish: The publishing and privacy options for your post, which we cover in Book IV, Chapter 1.
- Page Attributes: Select a parent for the page you're publishing. In Book III, Chapter 7, we cover the different archiving options, including the ability to have a hierarchical structure for pages that create a navigation of main pages and subpages (called parent and child pages).
- Page Template: Mentioned in the section “Creating the Front Page of Your Web Site,” earlier in this chapter. You can assign the page template if you're using a template other than the default one (Book VI, Chapter 7 contains more information about themes and templates, including using page templates on your site).
- Page Order: By default, this option is set to 0 (zero). You can enter in a number, however, if you want this page to appear in a certain spot on the page menu of your site. (If you're using the built-in menu feature in WordPress, you can use this option; but you don't have to use it because you can define the order of pages and how they appear in your menu by assigning a number to the page order — for example, a page with the page order of 1 will appear first in your navigation menu, where a page with the page order of 2 will appear second, and so on. Book VI, Chapter 1 covers the Menu feature in greater detail.)
- Featured Image: Some WordPress themes are configured to use an image (photo) to represent each post that you have on your blog. The image can appear on the home/front page, blog page, archives, or anywhere within the content display on your Web site. If you're using a theme that has this option, you can easily define a post's thumbnail by clicking the Set Featured Image link below the Featured Image module on the Add New Post page. Then you can assign an image that you've uploaded to your site as the featured image for a particular post.
Figure 2-3: Create the static page that you want to use as your front page.
Assigning a static page as the front page
After you create the page you want to use for the front page of your web site, tell WordPress that you want the static page to serve as the front page of your site. Follow these steps:
- Click Reading in the Settings drop-down list to display the Reading Settings page.
- In the Front Page Displays section, select the A Static Page radio button.
- From the Front Page drop-down list, select the static page that you want to serve as your front page.
In Figure 2-4, we chose to display a static page, and the Welcome page is the one we want to appear on the front page of the Web site.
- Click the Save Changes button at the bottom of the Reading Settings page.
WordPress displays the page you selected in Step 4 as the front page of your site. Figure 2-5 shows Lisa's site displaying the page she created as her front page.
Figure 2-4: Choosing which page to display as the front page.

Figure 2-5: WordPress displays the page you selected as your front page.
