
Adding Support for Custom Taxonomies
Similar to how having posts and pages as content options can be limiting, sometimes categories and tags just aren't enough. The example of a movie review custom post type might need a variety of new taxonomies or grouping options. Organizing movie reviews by director, movie star, review rating, film genre, and MPAA rating allows visitors to the site to view different groupings of reviews that might interest them. Like the custom post type example, this example creates a very simple taxonomy to test custom taxonomy-specific templates. For this example, a new post taxonomy called Sample Taxonomy is created.
To register this new taxonomy, you use the register_taxonomy function. Adding the following code to the bottom of your theme's functions.php file registers the new sample taxonomy custom taxonomy specifically for WordPress built-in posts, adds a new Posts![]() Sample Taxonomy admin menu entry to manage the Sample Taxonomy entries, and adds sample taxonomy options to the editor for posts.
Sample Taxonomy admin menu entry to manage the Sample Taxonomy entries, and adds sample taxonomy options to the editor for posts.
register_taxonomy( 'sample-taxonomy', 'post', array( 'label' => 'Sample Taxonomy' ) );
This function call gives the new custom taxonomy an internal name of sample-taxonomy, assigns the new taxonomy to Posts, and gives the taxonomy a human-readable name of Sample Taxonomy.
After adding this code to your theme, you can create and assign Sample Taxonomies when creating a new post or editing an existing post. For this example, you could add a new sample taxonomy with a name of Testing to an existing post and update the post.
With the Testing taxonomy added, you can now visit example.com/sample-taxonomy/testing to get the archive page for the new sample taxonomy.
![]() If you get a Not Found page or don't get an archive listing when you try to go to a specific sample taxonomy entry's archive, resave your permalink settings. Choose Settings
If you get a Not Found page or don't get an archive listing when you try to go to a specific sample taxonomy entry's archive, resave your permalink settings. Choose Settings![]() Permalinks on the WordPress Dashboard and then click Save Changes. This forces WordPress to reset the permalinks, which adds the new custom taxonomy link formats in the process.
Permalinks on the WordPress Dashboard and then click Save Changes. This forces WordPress to reset the permalinks, which adds the new custom taxonomy link formats in the process.
Adding a new template file called taxonomy-sample-taxonomy.php allows for adding a template specific to this new custom taxonomy. Like you can with categories and tags, you can add a template that is specific to a single custom taxonomy entry. Therefore, a template specific to a sample taxonomy with a slug of testing would have a filename of taxonomy-sample-taxonomy-testing.php.
![]() Custom Taxonomies is a feature that will appeal to only a specific type of site that deals, mainly, in niche areas of content. Sites that want to really drill down navigation and grouping options for their content. You can find more about custom taxonomies in the WordPress Codex at http://codex.wordpress.org/Function_Reference/register_taxonomy.
Custom Taxonomies is a feature that will appeal to only a specific type of site that deals, mainly, in niche areas of content. Sites that want to really drill down navigation and grouping options for their content. You can find more about custom taxonomies in the WordPress Codex at http://codex.wordpress.org/Function_Reference/register_taxonomy.
Adding support for post formats
Introduced in version 3.1 of WordPress, the Post Formats feature allows you to designate a different content display and style for certain types of designated posts. Unlike custom post types, you aren't able to create different post formats because WordPress has already assigned them for you — it's up to you what post format, if any, you want to use in your theme.
Here are the nine types of WordPress post formats:
- Aside: A very short post that shares a random thought or idea. Typically, an aside is shared without a post title or any category/tag designations; it's simply a random, one-off thought — not a full post — shared on your blog.
- Audio: A post that shares audio files or podcasts. Usually, audio posts have very little text and include a built-in audio player so visitors can click and listen.
- Chat: A transcript of an online conversation that can be formatted to look like a chat (or Instant Message) window.
- Gallery: A gallery of clickable images, where clicking an image opens a larger version of the photo. Often, galleries do not contain text (but may have a title) and are used for only the display of a gallery.
- Image: A post that shares a single image. The image may, or may not, have text or a caption to go with the post.
- Link: A post that provides a link you find useful and want to share with your readers. These post formats often contain a title and, sometimes, a short bit of text that describes the link.
- Quote: A post that displays a quotation on your blog. Often, users will include a byline, or the quote's source.
- Status: A short status update, usually limited to 140 characters or less (think Twitter!).
- Video: A post that displays a video, usually embedded within a video player (say YouTube) so your readers can play the video without leaving your site.
This list of post format types is all there is; you only have nine designated post formats. You can use one or all of them in your theme, depending on your specific needs.
A good, real-world example of post formats is found at Lisa's Web site (http://lisasabin-wilson.com). Lisa's site, shown in Figure 6-5, cleanly separates the formats in the menu navigation and in the individual post styling and icons that he uses to designate the formats.
Figure 6-5: Post formats at brian gardner.com.

![]() If you find that your site needs a different type of post format that is not currently available, consider adding it as a custom post type.
If you find that your site needs a different type of post format that is not currently available, consider adding it as a custom post type.
In the default Twenty Ten theme, examine the code for the loop.php template. About ¾ the way in, you see a line of code that looks like this:
<div id="post-<?php the_ID(); ?>" <?php post_class(); ?>>
The cool part of that template tag is the post_class() section. This template tag tells WordPress to insert specific HTML markup in your template that allows you to use CSS to make custom styles for sticky posts, categories, tags, and post formats.
For example, a post has the following options set:
- Stick this post to the front page
- Filed in a category called WordPress
- Tagged with News
By having the post_class() tag in the template, WordPress inserts HTML markup that allows the use of CSS to style sticky posts, or posts assigned to specific tags, categories, or post formats, differently. WordPress inserts the following HTML markup for the post:
<div class="post sticky category-wordpress tag-news">
Likewise, for post formats, if a post is published using the Images post format, the post_class() tag in the template contains the following HTML markup indicating that this post should be formatted for an image display:
<div class="post type-post format-image">
Add this information to the CSS and HTML information provided to you in Chapter 3 of this minibook, and you see how you can use CSS along with the post_class(); tag to provide custom styles for each post type on your site and unique styles for the different categories and tags you use in your posts.
Core post format function
To add support for post formats in your theme, you need to add the core function call to your Theme Functions template file (functions.php). After you follow these few steps to make it happen, You'll see the magic that occurs on the Add New Post page in your WordPress Dashboard! Here's how to add post formats support in your theme:
- Choose Appearance
 Editor on your Dashboard.
The Edit Themes page appears.
- Open the Themes Function file in the text editor.
The link for the Theme Functions template file is on the right side of the Edit Themes page. Clicking this link opens the Theme Functions template file (functions.php) in the text editor on the left side of the Edit Themes page.
- Add the following function on a new line:
add_theme_support( 'post-formats', array( 'aside', 'chat', 'gallery', 'image', 'link', 'quote', 'status', 'video', 'audio' ) );
- Click the Update File button to save the changes made to the functions.php file.
![]() In Step 3, the code sample adds all nine post formats to the theme. You don't have to use all nine; you can include only the formats that you think you will use in your theme and leave the rest.
In Step 3, the code sample adds all nine post formats to the theme. You don't have to use all nine; you can include only the formats that you think you will use in your theme and leave the rest.
You won't notice an immediate change to your site when you save your new Theme Functions template file with the Post Formats support added. To see what WordPress added to your site, you need to visit the Add New Post page (Posts![]() Add New).
Add New).
The change is subtle, but if you follow the steps to add post format support, you see a Format item in the Publish module on the right side of the page, as shown in Figure 6-6. Click the Edit link to the right of Format to designate a format for your post. In Figure 6-6, see all nine post format options listed. You also see a tenth format option, Standard (or Default), which is used when you don't select a specific format for your post.
Figure 6-6: Adding post format support to your theme gives you a Format option on the Add New Post page.

Template tags for post formats
Adding Post Format support to your theme isn't enough. If you're going to add post format support, you really should provide some unique styling for each type of format; otherwise, your post formats will look like your blog posts and the point of adding them to your theme will be lost.
You can display your post format two ways:
- Content: For each format, you can designate what content you want to display. For example, if you don't want to display a title for your Asides format, you leave out the template tag that calls it, but leave the tag in for your Video post format.
- Style: Utilizing the HTML markup that is provided by the post_class(); tag, your formats each have a CSS class assigned to them. Use those CSS classes to provide unique styles for fonts, colors, backgrounds, and borders to each of your post formats. The nearby “Post class defined” sidebar discusses how to use HTML and CSS to create custom styles in your template.
Adding unique styles for your post formats starts with creating the content designations you want to display for each format. Earlier in this section is a list of nine post formats and some ideas on what you can do to display them on your site. The possibilities are endless and it's really up to you. Refer to Chapter 3 of this minibook for more information on the content-related template tags you can use in these areas. The following steps take you through the creation of a very simple, stripped-down Main Index file (index.php):
- Open your favorite text editor, such as Notepad (for PC) or TextMate (for Mac).
- Type <?php get_header(); ?>.
This function includes all the code from your theme's header.php file.
- Type the following two lines:
<?php if (have_posts()) : ?>
<?php while (have_posts()) : the_post(); ?>
These two lines of code indicate the beginning of The Loop (discussed in Chapter 3 of this minibook).
- Type <div id=“post-<?php the_ID(); ?>” <?php post_class(); ?>>.
This line provides HTML and CSS markup, using the post_class(); function that provides you with unique CSS classes for each of your post formats (see the “Post class defined” sidebar).
- Type <?php.
This initiates the start of a PHP function.
- Type the following lines to provide content for the Asides post format:
if ( has_post_format( 'aside' )) { echo the_content(); } - Type the following lines to provide content for the Gallery post format:
elseif ( has_post_format( 'gallery' )) { echo '<h3>'; echo the_title(); echo '</h3>'; echo the_content(); } - Type the following lines to provide content for the Image post format:
elseif ( has_post_format( 'image' )) { echo '<h3>'; echo the_title(); echo '</h3>'; echo the_post_thumbnail('image-format'), echo the_content(); } - Type the following lines to provide content for the Link post format:
elseif ( has_post_format( 'link' )) { echo '<h3>'; echo the_title(); echo '</h3>'; echo the_content(); } - Type the following lines to provide content for the Quote post format:
elseif ( has_post_format( 'quote' )) { echo the_content(); } - Type the following lines to provide content for the Status post format:
elseif ( has_post_format( 'status' )) { echo the_content(); } - Type the following lines to provide content for the Video post format:
elseif ( has_post_format( 'video' )) { echo '<h3>'; echo the_title(); echo '</h3>'; echo the_content(); } - Type the following lines to provide content for the Audio post format:
elseif ( has_post_format( 'audio' )) { echo '<h3>'; echo the_title(); echo '</h3>'; echo the_content(); } - Type the following lines to provide content for all other (Default) posts:
else { echo '<h3>'; echo the_title(); echo '</h3>'; echo the_content(); } - Type ?>.
This line ends the PHP function.
- Type </div>.
This closes the HTML div tag opened in Step 4.
- Type <?php endwhile; else: ?> <?php endif; ?>.
This closes the endwhile and if statements that were opened in Step 3.
- Type <?php get_sidebar(); ?>.
This function calls in the code included in the sidebar.php file of your theme.
- Type <?php get_footer(); ?>.
This function calls in the code included in the footer.php file of your theme.
- Save your file as index.php.
Upload it into your theme folder, replacing your existing index.php file.
Listing 6-3 displays the full code for your new index.php file.
Listing 6-3: A Simple Post Formats Template
<?php get_header(); ?>
<?php if (have_posts()) : ?>
<?php while (have_posts()) : the_post(); ?>
<div id="post-<?php the_ID(); ?>" <?php post_class(); ?>>
<?php

if ( has_post_format( 'aside' )) {
....echo the_content();
}

elseif ( has_post_format( 'gallery' )) {
....echo '<h3>';
....echo the_title();
....echo '</h3>';
....echo the_content();
}
elseif ( has_post_format( 'gallery' )) {
....echo '<h3>';
....echo the_title();
....echo '</h3>';
....echo the_content();
}

elseif ( has_post_format( 'image' )) {
....echo '<h3>';
....echo the_title();
....echo '</h3>';
....echo the_post_thumbnail('image-format'),
....echo the_content();
}

elseif ( has_post_format( 'link' )) {
....echo '<h3>';
....echo the_title();
....echo '</h3>';
....echo the_content();
}

elseif ( has_post_format( 'quote' )) {
....echo the_content();
}

elseif ( has_post_format( 'status' )) {
....echo the_content();
}

elseif ( has_post_format( 'video' )) {
....echo '<h3>';
....echo the_title();
....echo '</h3>';
....echo the_content();
}

elseif ( has_post_format( 'audio' )) {
....echo '<h3>';
....echo the_title();
....echo '</h3>';
....echo the_content();
}

else {
....echo '<h3>';
....echo the_title();
....echo '</h3>';
....echo the_content();
}
?>
</div>
<?php endwhile; else: ?>
<?php endif; ?>
<?php get_sidebar(); ?>
<?php get_footer(); ?>
The example in Listing 6-3 is a very simple one and doesn't include a whole lot of HTML markup or CSS classes. Therefore, you can focus on the code bits that are required to designate and define different content displays for your post formats. You can see, in Listing 6-3, that some of the formats contain the template tag to display the title: the_title(); and others do not — but they all contain the template tag to display the content of the post: the_content();. As mentioned previously, you can play with different content types and markup that you want to add to your post formats.
By coupling your template additions for post formats with the post_class(); tag that adds special CSS classes and markup for each post format type, you can customize the display of each post format to your heart's content.
Adding support for post thumbnails
The WordPress feature called Post Thumbnails (also known as Featured Images) takes a lot of the work out of associating an image with a post and using the correct size each time. A popular way to display content in WordPress themes includes a thumbnail image with a short snippet (excerpt) of text — the thumbnail images are consistent in size and placement within your theme. Prior to the inclusion of post thumbnails in WordPress, users would have to open their image in an image-editing program (such as Photoshop) and crop and resize their image to the desired size; or use fancy scripts that would resize images on the fly, which tend to be resource intensive on Web servers, so it wasn't an optimal solution. How about a content management system that will crop and resize your images for you to the exact dimensions that you specify? Yep, WordPress does that for you, with just a few adjustments.
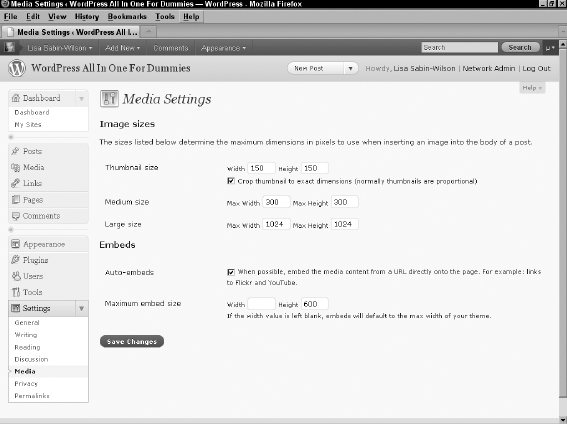
By default, when you upload an image, WordPress creates three versions of your image based on dimensions that are set in your Dashboard (choose Settings![]() Media):
Media):
- Thumbnail size: Default dimensions are 150px x 150px
- Medium size: Default dimensions are 300px x 300px
- Large size: Default dimensions are 1024px x 1024px
Therefore, when you upload an image, you actually end up with four sizes of that image stored on your Web server: thumbnail, medium, large, and the original image. Images are cropped and resized proportionally and, typically, when you use them in your posts, you can designate which size you would like to use in the image options of the uploader. (See Book IV, Chapter 4 for a refresher on uploading images in WordPress.)
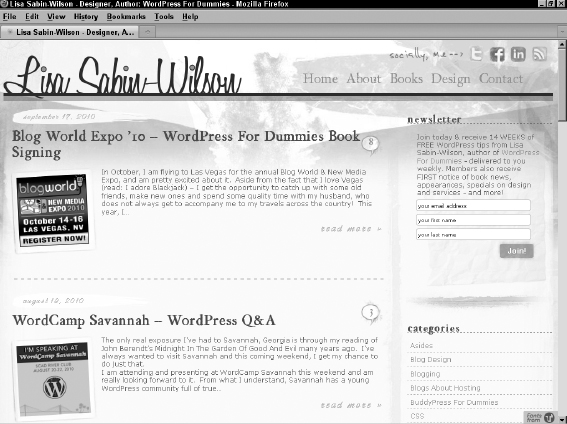
Within the WordPress image uploader, you can designate a particular image as the featured image of the post, and then, using the Featured Images function that you add to your theme, you can include template tags to display your chosen featured image with your post. This is helpful for creating magazine- or news-style themes that are popular with WordPress sites. Figure 6-7 displays Lisa's personal blog (http://lisasabin-wilson.com) where she uses post thumbnails and featured images to display a thumbnail associated with each post excerpt on her home page.
Figure 6-7: Post thumbnails in use at lisasabin-wilson.com.
Also covered in this section is adding support for different image sizes, other than the default image sizes that are set on the Media Settings page in your Dashboard. This is helpful when you have sections of your site where you want to display a much smaller thumbnail, or a larger version of the medium-sized thumbnail that's not as big as the large size.
Core post thumbnails function and template tag
Adding support for post thumbnails includes one line of code added to your Theme Functions template file (functions.php):
add_theme_support( 'post-thumbnails' );
After you add this line of code to your Theme Functions template file, you can use the Featured Image feature for your posts. You can designate featured images by using the function in the WordPress image uploader. The function is also an option on the Add New Post page, where you write and publish your posts.
After you add featured images to your posts, make sure that you add the correct tag in your template(s) so the featured images display on your site in the area you want them to display. Open your index.php template, for example, and include the following line of code to include the default thumbnail-size version of your chosen featured image in your posts:
The first part of that line of code checks whether a featured image is associated with the post; if there is, the image displays; if a featured image doesn't exist for the post, the code returns nothing. You can also include the other default image sizes (set in your Media Settings page in the Dashboard, as shown in Figure 6-8) for medium-, large-, and full-sized images by using these tags:
<?php if ( has_post_thumbnail() ) { the_post_thumbnail('medium'), ?>
<?php if ( has_post_thumbnail() ) { the_post_thumbnail('large'), ?>
<?php if ( has_post_thumbnail() ) { the_post_thumbnail('full'), ?>
Figure 6-8: The Media Settings page in the Dashboard.
Adding custom image sizes for post thumbnails
If the predefined, default image sizes in WordPress (thumbnail, medium, large, and full) don't satisfy you, and there's an area on your site that you want to display images with dimensions that vary from the default, WordPress makes it relatively easy to add custom image sizes in your Theme Functions template file. You then use the the_post_thumbnail function to display it in your theme.
You are not limited on what sizes you can add for your images, and this example shows you how to add a new image size of 600px x 300px. Add this line to your Theme Functions template file (functions.php) beneath the add_theme_support(‘post-thumbnails’) function you added:
add_image_size( 'custom', 600, 300, true);
This code tells WordPress that it needs to create an additional version of the images you upload, and to crop and resize it to the dimensions of 600px x 300px. Notice the four parameters in the add_image_size function:
- Name ( $name ): Gives the image size a unique name that you can use in your template tag. For example, the image size in the example above uses the name ‘custom’.
- Width ( $width ): Gives the image size a width dimension in numbers. In our example, the width is defined as ‘600’.
- Height ( $height ): Gives the image size a height dimension in numbers. In our example, the height is defined as ‘300’.
- Crop ( $crop ): This parameter is optional and tells WordPress whether it should crop the image to exact dimensions or do a soft proportional resizing of the image. In our example, the parameter is set to ‘true’ (accepted arguments: true or false).
Adding the custom image size to your template to display the featured image is the same as adding default image sizes. The only difference is the name of the image set in the parentheses of the template tag. The custom image size in our example uses the following tag:
<?php if ( has_post_thumbnail() ) { the_post_thumbnail('custom'), ?>