
Configuring the Settings
At the very bottom of the navigation menu, you can find the Settings option. Click Settings, and a menu list opens that contains the following links, which we discuss in the sections that follow:
General
After you install the WordPress software and log in, you can put a personal stamp on your blog by giving it a title and description, setting your contact e-mail address, and identifying yourself as the author of the blog. You take care of these and other settings on the General Settings page.
To begin personalizing your blog, start with your general settings by following these steps:
- Click General link in the Settings menu list.
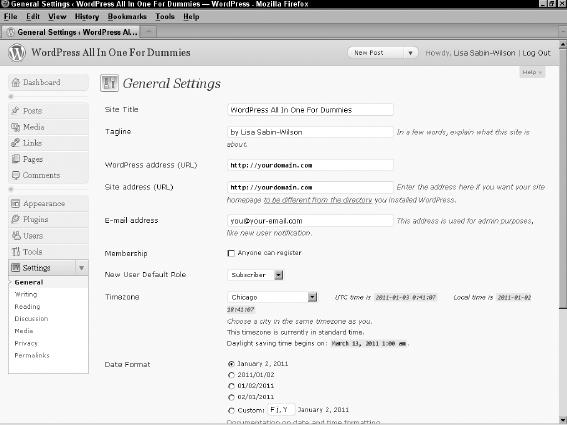
The General Settings page appears (see Figure 3-1).
Figure 3-1: Personalize the settings of your WordPress blog on the General Settings page.
- Enter the name of your blog in the Site Title text box.
The title you enter here is the one that you gave your blog to identify it as your own. In Figure 3-1, Lisa gave the new blog the title WordPress All-In-One For Dummies, which appears on the blog, as well as in the title bar of the viewer's Web browser.
 Give your blog an interesting and identifiable name. You can use Fried Green Tomatoes, for example, if you're blogging about the topic, the book, or the movie, or even anything remotely related to the lovely Southern dish.
 - In the Tagline text box, enter a five- to ten-word phrase that describes your blog.
Figure 3-1 shows that the tagline is by Lisa Sabin-Wilson. Therefore, this blog displays the blog title, followed by the tagline: WordPress All-in-One For Dummies by Lisa Sabin-Wilson.
 The general Internet-surfing public can view your blog title and tagline, which various search engines (such as Google, Yahoo!, and MSN) grab for indexing, so choose your words with this fact in mind. (You can find more information about search engine optimization, or SEO, in Book V.)
 - In the WordPress Address (URL) text box, enter the location where you installed your WordPress blog software.
Be sure to include the http:// portion of the URL and the entire path to your WordPress installation — for example, http://yourdomain.com. If you installed WordPress in a folder in your directory — in a folder called wordpress, for example — you need to make sure to include it here. If we installed WordPress in a folder called wordpress, the WordPress address would be http://yourdomain.com/wordpress (where yourdomain.com is your domain name).
- In the Site Address (URL) text box, enter the Web address where people can find your blog by using their Web browsers.
Typically, what you enter here is the same as your domain name (http://yourdomain.com). If you install WordPress in a subdirectory of your site, the WordPress installation URL is different from the blog URL. If you install WordPress at http://yourdomain.com/wordpress/ (WordPress URL), you need to tell WordPress that you want the blog to appear at http://yourdomain.com (the blog URL).
- Enter your e-mail address in the E-Mail Address text box.
WordPress sends messages about the details of your blog to this e-mail address. When a new user registers for your blog, for example, WordPress sends you an e-mail alert.
- Select a Membership option.
Select the Anyone Can Register check box if you want to keep registration on your blog open to anyone. Keep the check box unchecked if you'd rather not have open registration on your blog.
- From the New User Default Role drop-down list, select the role that you want new users to have when they register for user accounts in your blog.
You need to understand the differences among the user roles because each user role is assigned a different level of access to your blog, as follows:
- Subscriber: The default role. You may want to maintain this role as the one assigned to new users, particularly if you don't know who's registering. Subscribers have access to the Dashboard page, and they can view and change the options in their profiles on the Your Profile and Personal Options page. (They don't have access to your account settings, however — only to their own.) Each user can change his username, e-mail address, password, bio, and other descriptors in his user profile. Subscribers' profile information is stored in the WordPress database, and your blog remembers them each time they visit, so they don't have to complete the profile information each time they leave comments on your blog.
- Contributor: In addition to the access Subscribers have, Contributors can upload files and write, edit, and manage their own posts. Contributors can write posts, but they can't publish the posts; the Administrator reviews all Contributor posts and decides whether to publish them. This setting is a nice way to moderate content written by new authors.
- Author: In addition to the access Contributors have, Authors can publish and edit their own posts.
- Editor: In addition to the access Authors have, Editors can moderate comments, manage categories, manage links, edit pages, and edit other Authors' posts.
- Administrator: Administrators can edit all the options and settings in the WordPress blog.
- In the Timezone section, select your UTC time from the drop-down list.
This setting refers to the number of hours that your local time differs from Coordinated Universal Time (UTC). This setting ensures that all the blog posts and comments left on your blog are time-stamped with the correct time. If you're lucky enough, like Lisa, to live on the frozen tundra of Wisconsin, which is in the Central Standard Time (CST) Zone, you choose – from the drop-down list because that time zone is 6 hours off UTC.
If you're unsure what your UTC time is, you can find it at the Greenwich Mean Time (http://wwp.greenwichmeantime.com) Web site. GMT is essentially the same thing as UTC. WordPress also lists some major cities in the Timezone drop-down list so that you can more easily choose your time zone if you don't know it. - In the Date Format text box, enter the format in which you want the date to appear in your blog.
This setting determines the style of the date display. The default format displays time like this: January 1, 2011.
Select a different format by clicking the radio button to the left of the option you want. You can also customize the date display by selecting the Custom option and entering your preferred format in the text box provided. If you're feeling adventurous, you can find out how to customize the date format at http://codex.wordpress.org/Formatting_Date_and_Time.
- In the Time Format text box, enter the format for how you want time to display in your blog.
This setting is the style of the time display. The default format displays time like this: 12:00 a.m.
Select a different format by clicking the radio button to the left of the option you want. You can also customize the date display by selecting the Custom option and entering your preferred format in the text box provided; find out how at http://codex.wordpress.org/Formatting_Date_and_Time.
You can format the time and date in several ways. Go to http://us3.php.net/date to find potential formats at the PHP Web site. - From the Week Starts On drop-down list, select the day on which the week starts in your calendar.
Displaying the calendar in the sidebar of your blog is optional. If you choose to display the calendar, you can select the day of the week on which you want your calendar to start.
![]() Click the Save Changes button at the bottom of any page where you set new options. If you don't click Save Changes, your settings aren't saved, and WordPress reverts to the preceding options. Each time you click the Save Changes button, WordPress reloads the current page, displaying the new options that you just set.
Click the Save Changes button at the bottom of any page where you set new options. If you don't click Save Changes, your settings aren't saved, and WordPress reverts to the preceding options. Each time you click the Save Changes button, WordPress reloads the current page, displaying the new options that you just set.
Writing
Click Writing in the Settings menu list; the Writing Settings page opens (see Figure 3-2).
Figure 3-2:he Writing Settings page.
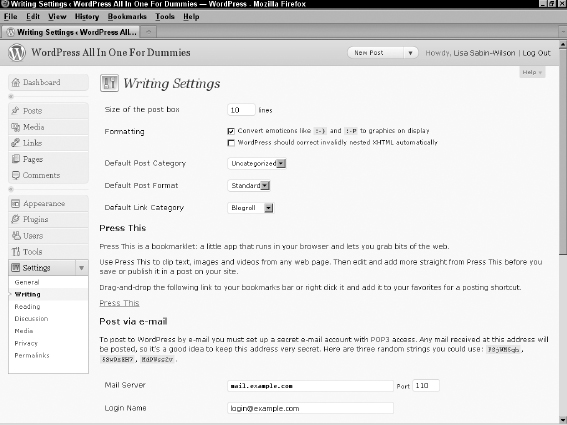
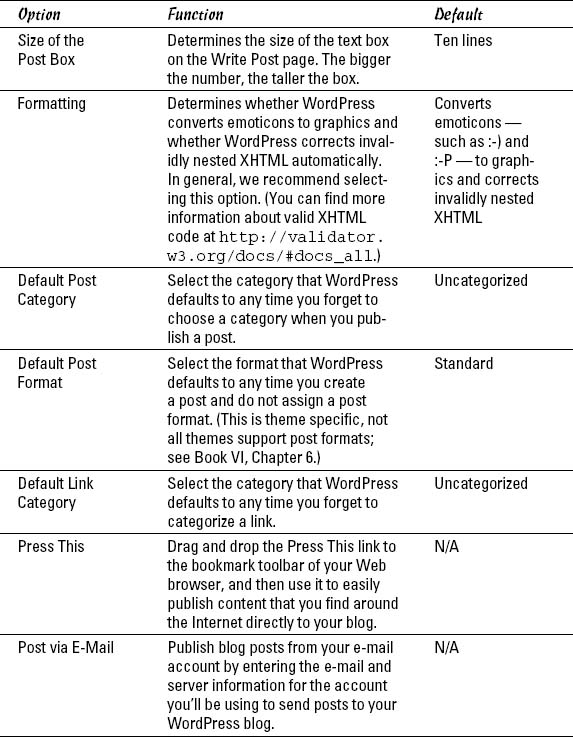
This page lets you set some basic options for writing your posts. Table 3-1 gives you some information on choosing how your posts look and how WordPress handles some specific conditions.
After you set your options, be sure to click the Save Changes button; otherwise, the changes won't take effect.
Table 3-1 Writing Settings Options
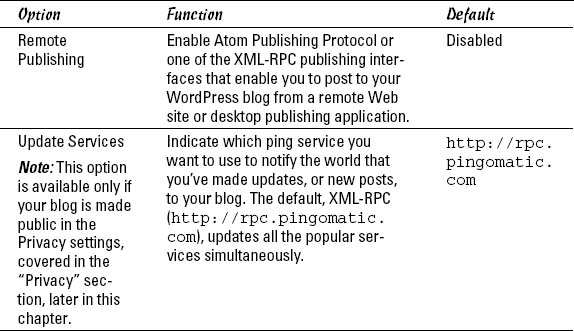
![]() Go to http://codex.wordpress.org/Update_Services for comprehensive information on update services.
Go to http://codex.wordpress.org/Update_Services for comprehensive information on update services.
Reading
The third item in the Settings drop-down list is Reading. Click the Reading link to open the Reading Settings page (see Figure 3-3).
You can set the following options in the Reading Settings page:
- Front Page Displays: Select the radio button for what you want to appear on the front page of your blog: your latest posts or a static page. You can find detailed information about using a static page for your front page in Book IV, Chapter 2, including information on how to set it up by using the drop-down menus in this section.
- Blog Pages Show at Most: In the text box, enter the maximum number of posts you want to appear on each blog page.
- Syndication Feeds Show the Most Recent: In the text box, enter the maximum number of posts that you want to appear in your RSS feed at any time.
Figure 3-3: The Reading Settings page.
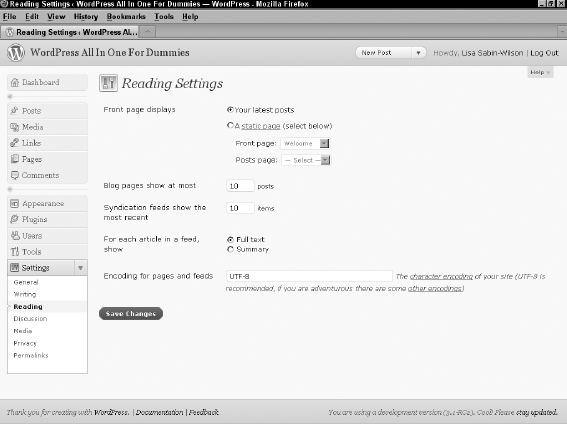
- For Each Article in a Feed, Show: Select the radio button for either Full Text or Summary. Full Text publishes the entire post to your RSS feed, whereas Summary publishes only an excerpt. (Check out Book I, Chapter 1 for more information on WordPress RSS feeds.)
- Encoding for Pages and Feeds: UTF-8 is the default, and recommended, character encoding for your blog. Character encoding is code that handles the storage and transmission of the text from your blog through the Internet connection. Your safest bet is to leave the default setting in place because UTF-8 is the most commonly accepted character encoding and supports a wide range of languages.
![]() Be sure to click the Save Changes button after you set all your options in the Reading Settings page to make the changes take effect.
Be sure to click the Save Changes button after you set all your options in the Reading Settings page to make the changes take effect.
Discussion
Discussion is the fourth item in the Settings menu list; click it to open the Discussion Settings page (see Figure 3-4). The sections on this tab let you set options for handling comments and publishing posts to your blog.
Figure 3-4: The Discussion Settings page.
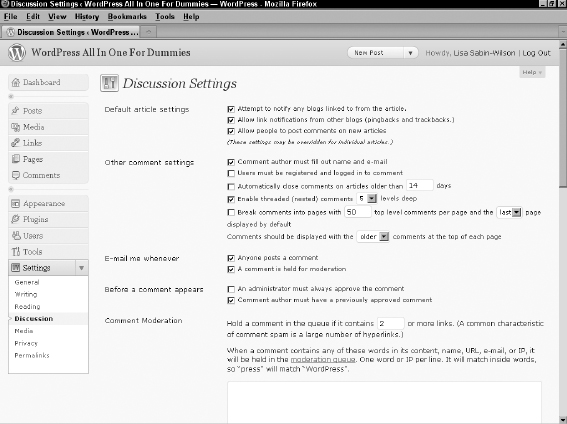
The following sections cover the options available to you in the Discussion Settings page, which deals mainly with how comments and trackbacks are handled in your blog.
Default Article Settings
With the Default Article Settings options, you can tell WordPress how to handle post notifications. Here are your options:
- Attempt to Notify Any Blogs Linked to from the Article: If you select this check box, your blog sends a notification (or ping) to any site you've linked to in your blog posts. This notification is also commonly referred to as a trackback (we discuss trackbacks in Book III, Chapter 5). Deselect this check box if you don't want these notifications sent.
- Allow Link Notifications from Other Blogs (Pingbacks and Trackbacks): By default, this check box is selected, and your blog accepts notifications via pings or trackbacks from other blogs that have linked to yours. Any trackbacks or pings sent to your blog appear on your site in the Comments section of the blog post. If you deselect this check box, your blog doesn't accept pingbacks or trackbacks from other blogs.
- Allow People to Post Comments on New Articles: By default, this check box is selected, and people can leave comments on your blog posts. If you deselect this check box, no one can leave comments on your blog. (You can override these settings for individual articles — you can find more information about this process in Book IV, Chapter 1.)
Other Comment Settings
The Other Comment Settings section tells WordPress how to handle comments:
- Comment Author Must Fill Out Their Name and E-Mail: Enabled by default, this option requires all commenters on your blog to fill in the Name and E-Mail fields when leaving comments. This option can really help you combat comment spam. (See Book III, Chapter 5 for information on comment spam.) Deselect this check box to disable this option.
- Users Must Be Registered and Logged in to Comment: Not enabled by default, this option allows you to accept comments on your blog from only people who are registered and logged in as a user on your blog. If the user isn't logged in, she sees a message that reads, “You Must Be Logged in in Order to Leave a Comment.”
- Automatically Close Comments on Articles Older Than X Days: Select the check box next to this option to tell WordPress you want comments on older articles to be automatically closed. Fill in the text box provided with the number of days you want to wait before WordPress closes comments on articles.
Many bloggers use this very effective anti-spam technique to keep the comment and trackback spam on their blog down.
- Enable Threaded (Nested) Comments X Levels Deep: From the drop-down list, you can select the level of threaded comments you want to have on your blog. The default is one; you can choose up to ten levels. Instead of all comments being displayed on your blog in chronological order (as they are by default), nesting them allows you and your readers to reply to comments within the comment itself.
- Break Comments into Pages with X Comments Per Page: Fill in the text box with the number of comments you want to appear on one page. This setting can really help blogs that receive a large number of comments. It provides you with the ability to break the long string of comments into several pages, which makes them easier to read and helps speed up the load time of your site because the page isn't loading such a large number of comments at once.
- Comments Should Be Displayed with the Older/Newer Comments at the Top of Each Page: From the drop-down list, select Older or Newer. Selecting Older displays the comments on your blog in the order of oldest to newest. Selecting Newer does the opposite: displays the comments on your blog in the order of newest to oldest.
E-Mail Me Whenever
The two options in the E-Mail Me Whenever section are enabled by default:
- Anyone Posts a Comment: Enabling this option means that you receive an e-mail notification whenever anyone leaves a comment on your blog. Deselect the check box if you don't want to be notified by e-mail about every new comment.
- A Comment Is Held for Moderation: This option lets you receive an e-mail notification whenever a comment is awaiting your approval in the comment moderation queue. (See Book III, Chapter 5 for more information about the comment moderation queue.) You need to deselect this option if you don't want to receive this notification.
Before a Comment Appears
The two options in the Before a Comment Appears section tell WordPress how you want WordPress to handle comments before they appear in your blog:
- An Administrator Must Always Approve the Comment: Disabled by default, this option keeps every single comment left on your blog in the moderation queue until you, the administrator, log in and approve it. Select this check box to enable this option.
- Comment Author Must Have a Previously Approved Comment: Enabled by default, this option requires comments posted by all first-time commenters to be sent to the comment moderation queue for approval by the administrator of the blog. After comment authors have been approved for the first time, they remain approved for every comment thereafter (this cannot be changed). WordPress stores their e-mail addresses in the database, and any future comments that match any stored e-mails are approved automatically. This feature is another measure that WordPress has built in to combat comment spam.
Comment Moderation
In the Comment Moderation section, you can set options to specify what types of comments are held in the moderation queue to await your approval.
To prevent spammers from spamming your blog with a ton of links, enter a number in the Hold a Comment in the Queue If It Contains X or More Links text box. The default number of links allowed is two. Try that setting, and if you find that you're getting a lot of spam comments that contain links, consider dropping that number down to 1, or even 0, to prevent those comments from being published on your blog. Sometimes, legitimate commenters will include a link or two in the body of their comment; after a commenter is marked as approved, she is no longer affected by this method of spam protection.
The large text box in the Comment Moderation section lets you type keywords, URLs, e-mail addresses, and IP addresses so that if they appear in comments, you want to hold those comments in the moderation queue for your approval.
Comment Blacklist
In this section, type a list of words, URLs, e-mail addresses, and/or IP addresses that you want to flat-out ban from your blog. Items placed here don't even make it into your comment moderation queue; the WordPress system filters them as spam. We'd give examples of blacklist words, but the words we've placed in our blacklists aren't family-friendly and have no place in a nice book like this one.
What are avatars, and how do they relate to WordPress?
An avatar is an online graphical representation of an individual. It's a small graphic icon that people use to visually represent themselves on the Web in areas they participate in conversations, such as discussion forums and blog comments. Gravatars are globally recognized avatars; they are avatars that you can take with you wherever you go. They appear alongside blog comments, blog posts, and discussion forums as long as the site you're interacting with is Gravatar-enabled. In October 2007, Automattic, the core group behind the WordPress platform, purchased the Gravatar service and integrated it into WordPress so that all could enjoy and benefit from the service. Gravatars are not automatic; you need to sign up for an account with Gravatar so that you can receive an avatar, via your e-mail address. Find out more about Gravatar by visiting http://gravatar.com.
Avatars
The final section of the Discussion Settings page is Avatars. (See the nearby sidebar, “What are avatars, and how do they relate to WordPress?,” for information about avatars.) In this section, you can select different settings for the use and display of avatars on your site:
- In the Avatar Display section (see Figure 3-5), decide how to display avatars on your site.
You have two options:
- Don't Show Avatars: Select this radio button if you don't want your blog to display avatars.
- Show Avatars: Select this radio button to have your blog display avatars.
- In the Maximum Rating section, select the radio button for the maximum avatar rating you want to allow for the avatars that do appear on your site.
This feature works much like the American movie-rating system. You can select G, PG, R, and X ratings for the avatars that appear on your site, as shown in Figure 3-5. If your site is family-friendly, you probably don't want it to display R- or X-rated avatars, so select G or PG.
- Select the radio button for a default avatar in the Default Avatar section (see Figure 3-5).
- Click the Save Changes button.
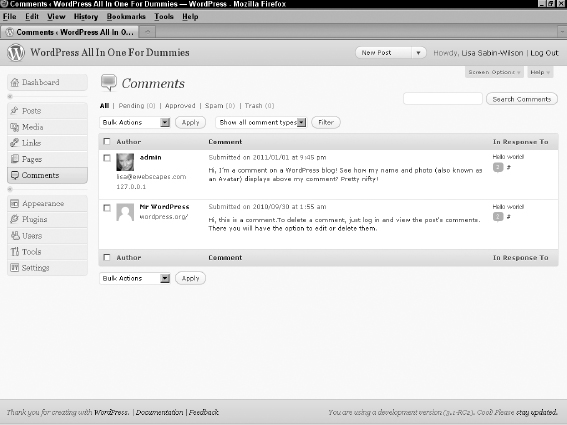
Avatars appear in a couple of places:
- The Comments page in the Dashboard: In Figure 3-6, the first two comments display either the commenter's avatar or the default avatar if the commenter hasn't created his or her own.
- The comments on individual blog posts in your blog: Figure 3-7 shows a list of comments on a blog post. If the user doesn't have an avatar assigned from http://gravatar.com, the default avatar appears.
To enable the display of avatars in comments on your blog, the Comments template (comments.php) in your active theme has to contain the code to display them. Hop on over to Book VI to find information about themes and templates, including template tags that allow you to display avatars in your comment list.
![]() Click the Save Changes button after you set all your options on the Discussion Settings page to make the changes take effect.
Click the Save Changes button after you set all your options on the Discussion Settings page to make the changes take effect.
Figure 3-5: Default avatars that you can display in your blog.
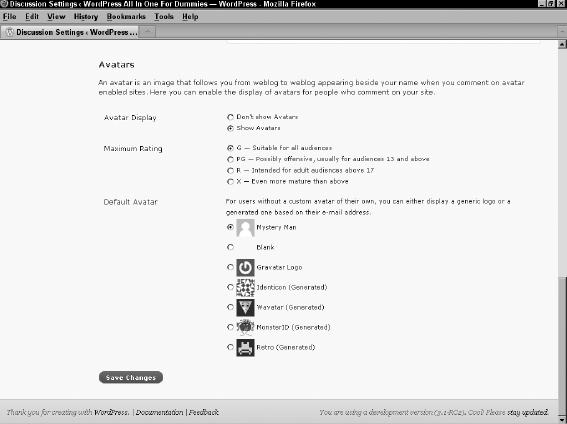
Figure 3-6: Authors' avatars appear in the Comments page in the WordPress Dashboard.
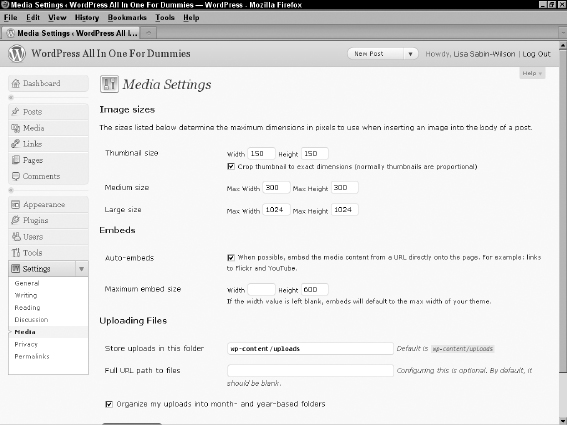
Media
The next menu item in the Settings menu list is Media; click the Media link to make the Media Settings page open (see Figure 3-7).
On the Media Settings page, you can configure the options for how your image files (graphics and photos) are resized for use in your blog.
The first set of options on the Media Settings page deals with images. WordPress automatically resizes your images for you in three different sizes. The dimensions are referenced in pixels by width, and then height. (For example, 150 x 150 means 150 pixels in width by 150 pixels in height.)
- Thumbnail Size: The default is 150 x 150; enter the width and height of your choice. Select the Crop Thumbnail to Exact Dimensions check box to resize the thumbnail exactly to the width and height you specify. Deselect this check box to make WordPress resize the image proportionally.
- Medium Size: The default is 300 x 300; enter the width and height numbers of your choice.
- Large Size: The default is 1024 x 1024; enter the width and height numbers of your choice.
Figure 3-7: The Media Settings page.
![]() In Book VI, we go into detail about WordPress themes and templates, including how you can add image sizes other than just these three. You can use these additional images sizes in and around your Web site, as well as a feature called Featured Image for your posts and articles.
In Book VI, we go into detail about WordPress themes and templates, including how you can add image sizes other than just these three. You can use these additional images sizes in and around your Web site, as well as a feature called Featured Image for your posts and articles.
The second set of options on the Media Settings page deals with embedded links and files, such as video and audio files. Select the check box that says Attempt to Automatically Embed All Plain Text URLs if you want your WordPress blog to automatically attach a hyperlink to a text-based URL that you type into your posts or pages. Activating this option means that you don't have to copy and paste the full code given to you by services such as YouTube — instead, you simply paste the hyperlink to the video, and WordPress automatically does the video embedding for you.
Next, set the width and height for the maximum size you want embedded files to be within your post and pages. Embedded items include video players and audio players that appear within your post or page.
Finally, the last set of options on the Media Settings page is the Uploading Files section. Here, you can tell WordPress where to store your uploaded media files:
- Store Uploads in This Folder: Type the server path to the folder on your Web server where you want your file uploads to be stored. The default is wp-content/uploads. You can specify any folder you want. Just be sure that the folder you specify has permissions (chmod) set to 755 so that it's writable. (See Book II, Chapter 2 for more information on setting file permissions.)
- Full URL Path to Files (Optional): You can also type the full URL path to the Uploads folder as an optional setting. (The full URL path is something like http://yourdomain.com/wp-content/uploads.)
- Organize My Files into Month and Year-Based Folders: Select this check box to have WordPress organize your uploaded files in folders by month and by year. Files you upload in September 2010, for example, would be in the following folder: /wp-content/uploads/2010/09/. Likewise, files you upload in October 2010, would be in /wp-content/uploads/2010/10/.
This check box is selected by default; uncheck it if you don't want WordPress to organize your files by month and year.
![]() Be sure to click the Save Changes button to save your configurations!
Be sure to click the Save Changes button to save your configurations!
In Book IV, Chapter 3, we detail how to insert images in your WordPress posts and pages.
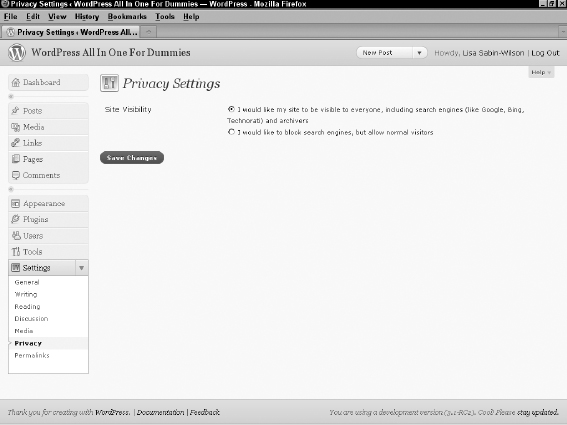
Privacy
The next Settings menu item list is Privacy; click it to display the Privacy Settings page, as shown in Figure 3-8.
This page contains only two options, both of which concern visibility on your blog:
- I Would Like My Blog to Be Visible to Everyone, Including Search Engines (Like Google, Bing, Technorati) and Archivers: This option is the default setting; you're freely allowing search engines to visit your blog and list you in their search results, and letting your site be indexed in blog archive services, such as Technorati.
- I Would Like to Block Search Engines, but Allow Normal Visitors: If you are one of those rare bloggers who doesn't want that type of exposure for your blog, but you do want to let normal visitors (read: no search engines) see your blog, select this option.
Figure 3-8: The Privacy Settings page.
![]() Generally, you want search engines to be able to find your blog. However, if you have special circumstances, you may want to enforce your privacy settings. For example, we blocked search engines for the site we're using to create the figures in this book because we don't want search engines to find it. At the top of the site, to the right of the site title, a note says Search Engines Blocked. This note exists only when you have your privacy settings set to block search engines. When you have privacy enabled, search engines and other content bots can't find your Web site.
Generally, you want search engines to be able to find your blog. However, if you have special circumstances, you may want to enforce your privacy settings. For example, we blocked search engines for the site we're using to create the figures in this book because we don't want search engines to find it. At the top of the site, to the right of the site title, a note says Search Engines Blocked. This note exists only when you have your privacy settings set to block search engines. When you have privacy enabled, search engines and other content bots can't find your Web site.
![]() Be sure to click the Save Changes button after you set all your options on the Privacy Settings page to make the changes take effect.
Be sure to click the Save Changes button after you set all your options on the Privacy Settings page to make the changes take effect.
Permalinks
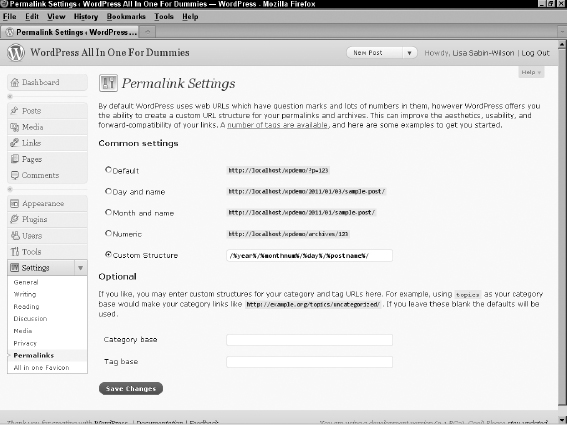
The next link on the Settings menu list is Permalinks; click the Permalinks link to view the Permalink Settings page, as shown in Figure 3-9.
Figure 3-9: The Permalink Settings page.
Each WordPress blog post is assigned its own Web page, and the address (or URL) of that page is called a permalink. Posts that you see in WordPress blogs usually have the post permalink in four typical areas:
- The title of the blog post
- The Comments link below the post
- A Permalink link that appears (in most themes) below the post
- The titles of posts appearing in a Recent Posts sidebar
Permalinks are meant to be permanent links to your blog posts (which is where the perma part of that word comes from, in case you're wondering). Other bloggers can use a post permalink to refer to that particular blog post. Ideally, the permalink of a post never changes. WordPress creates the permalink automatically when you publish a new post.
By default, a blog post permalink in WordPress looks like this:
http://yourdomain.com/?p=100/
The p stands for post, and 100 is the ID assigned to the individual post. You can leave the permalinks in this format, if you don't mind letting WordPress associate each post with an ID number.
WordPress, however, lets you take your permalinks to the beauty salon for a bit of makeover so that you can create pretty permalinks. You probably didn't know that permalinks could be pretty, did you?
Making your post links pretty
Pretty permalinks are links that are more pleasing to the eye than standard links and, ultimately, more pleasing to search-engine spiders. (See Book V for an explanation of why search engines like pretty permalinks.) Pretty permalinks look something like this:
http://yourdomain.com/2011/01/01/pretty-permalinks
Break down that URL, and you see the date when the post was made, in year/month/day format. You also see the topic of the post.
To choose how your permalinks look, click Permalinks in the Settings drop-down list. The Permalink Settings page opens (refer to Figure 3-9).
In this page, you can find several options for creating permalinks:
- Default (ugly permalinks): WordPress assigns an ID number to each blog post and creates the URL in this format: http://yourdomain.com/?p=100.
- Day and Name (pretty permalinks): For each post, WordPress generates a permalink URL that includes the year, month, day, and post slug/title: http://yourdomain.com/2008/01/01/sample-post/.
- Month and Name (also pretty permalinks): For each post, WordPress generates a permalink URL that includes the year, month, and post slug/title: http://yourdomain.com/2008/01/sample-post/.
- Numeric (not so pretty): WordPress assigns a numerical value to the permalink. The URL is created in this format: http://yourdomain.com/archives/123.
- Custom Structure: WordPress creates permalinks in the format you choose. You can create a custom permalink structure by using tags or variables, as we discuss in the following section.
To create the pretty-permalink structure, select the Day and Name radio button; then click the Save Changes button at the bottom of the page.
Customizing your permalinks
A custom permalink structure is one that lets you define which variables you want to see in your permalinks by using the tags in Table 3-2.
| Permalink Tag | Results |
| %year% | Four-digit year (such as 2007) |
| %monthnum% | Two-digit month (such as 02 for February) |
| %day% | Two-digit day (such as 30) |
| %hour% | Two-digit hour of the day (such as 15 for 3 p.m.) |
| %minute% | Two-digit minute (such as 45) |
| %second% | Two-digit second (such as 10) |
| %postname% | Text — usually, the post name — separated by hyphens (such as making-pretty-permalinks) |
| %post_id% | The unique numerical ID of the post (such as 344) |
| %category% | The text of the category name in which you filed the post (such as books-i-read) |
| %author% | The text of the post author's name (such as lisa-sabin-wilson) |
If you want your permalink to show the year, month, day, category, and post name, select the Custom Structure radio button in the Customize Permalink Structure page and type the following tags in the Custom Structure text box:
/%year%/%monthnum%/%day%/%category%/%postname%/
By using this permalink format, the link for a post made on February 1, 2011, called WordPress All in One For Dummies and filed in the Books I Read category, would look like this:
http://yourdomain.com/2011/02/01/books-i-read/wordpress-all-in-one-for-dummies/
![]() Be sure to include the slashes before tags, between tags, and at the very end of the string of tags. This format ensures that WordPress creates correct, working permalinks by using the correct re_write rules located in the .htaccess file for your site. (See the following section for more information on re_write rules and .htaccess files.)
Be sure to include the slashes before tags, between tags, and at the very end of the string of tags. This format ensures that WordPress creates correct, working permalinks by using the correct re_write rules located in the .htaccess file for your site. (See the following section for more information on re_write rules and .htaccess files.)
 Changing the structure of your permalinks in the future affects the permalinks for all the posts on your blog ... new and old. Keep this fact in mind if you ever decide to change the permalink structure. An especially important reason: Search engines (such as Google and Yahoo!) index the posts on your site by their permalinks, so changing the permalink structure makes all those indexed links obsolete.
Don't forget to click the Save Changes button at the bottom of the Customize Permalink Structure page; otherwise, your permalink changes aren't saved!
Making sure that your permalinks work with your server
After you set the format for the permalinks for your site by using any options other than the default, WordPress writes specific rules, or directives, to the .htaccess file on your Web server. The .htaccess file in turn communicates to your Web server how it should serve up the permalinks, according to the permalink structure you chose to use.
To use an .htaccess file, you need to know the answers to two questions:
- Does your Web server configuration use and give you access to the .htaccess file?
- Does your Web server run Apache with the mod_rewrite module?
If you don't know the answers, contact your hosting provider to find out.
If the answer to both questions is yes, proceed to the following section. If the answer is no, check out the “Working with servers that don't use Apache mod_rewrite” sidebar, in this chapter.
Creating .htaccess files
You and WordPress work together in glorious harmony to create the .htaccess file that lets you use a pretty permalink structure in your blog. Follow these steps to create an .htaccess file on your Web server and create a new permalink structure:
- Using a plain-text editor (such as Notepad for Windows or TextEdit for a Mac), create a blank file; name it htaccess.txt and upload it to your Web server via FTP. (See Book II, Chapter 2 for more information about FTP.)
- After the file is uploaded to your Web server, rename the file .htaccess (notice the period at the beginning), and make sure that it is writable by the server by changing permissions to either 755 or 777. (See Book II, Chapter 2 for information on changing permissions on server files.)
If .htaccess already exists, you can find it in the root of your directory on your Web server — that is, the same directory where you find your wp-config.php file. If you don't see it in the root directory, try changing the options of your FTP client to show hidden files. (Because the .htaccess file starts with a period [.], it may not be visible until you configure your FTP client to show hidden files.)
- Create the permalink structure in the Customize Permalink Structure page in your WordPress Dashboard.
- Click the Save Changes button at the bottom of the Customize Permalink Structure page.
WordPress inserts into the .htaccess file the specific rules necessary for making the permalink structure functional in your blog.
If you follow the preceding steps correctly, you have an .htaccess file on your Web server that has the correct permissions set so that WordPress can write the correct rules to it. Your pretty permalink structure works flawlessly. Kudos!
If you open the .htaccess file and look at it now, you see that it's no longer blank. It should have a set of code in it called rewrite rules, which looks something like this:
# BEGIN WordPress
<IfModule mod_rewrite.c>
RewriteEngine On
RewriteBase /
RewriteCond %{REQUEST_FILENAME} !-f
RewriteCond %{REQUEST_FILENAME} !-d
RewriteRule . /index.php [L]
</IfModule>

# END WordPress
Working with servers that don't use Apache mod_rewrite
Using permalink structures requires that your Web-hosting provider has a specific Apache module option called mod_rewrite activated on its servers. If your Web-hosting provider doesn't have this item activated on its servers, or if you're hosting your site on a Windows server, the custom permalinks work only if you type index.php in front of any custom permalink tags.
For example, create the custom permalink tags like this:
/index.php/%year%/%month%/%date%/%postname%/
This format creates a permalink like this:
http://yourdomain.com/index.php/2008/02/01/wordpress-all-in-one-for-dummies
You don't need an .htaccess file to use this permalink structure.
![]() We could delve deeply into .htaccess and all the things you can do with this file, but we're restricting this chapter to how it applies to WordPress permalink structures. If you want to unlock more mysteries about .htaccess, check out “Comprehensive Guide to .htaccess” at http://javascriptkit.com/howto/htaccess.shtml.
We could delve deeply into .htaccess and all the things you can do with this file, but we're restricting this chapter to how it applies to WordPress permalink structures. If you want to unlock more mysteries about .htaccess, check out “Comprehensive Guide to .htaccess” at http://javascriptkit.com/howto/htaccess.shtml.