Arranging the Dashboard to Your Tastes
You can arrange the order of the modules in your Dashboard to suit your tastes. WordPress places a great deal of emphasis on user experience, and a big part of that effort results in your ability to create a Dashboard that you find most useful. You can very easily change the modules to display and the order in which they display.
Follow these steps to move the Right Now module so that it appears on the right side of your Dashboard page:
- Hover your mouse on the title bar of the Right Now module.
When hovering over the title, your mouse cursor changes to the Move cursor (a cross with arrows on a PC or the hand cursor on a Mac).
- Click and hold your mouse button and drag the Right Now module to the right side of the screen.
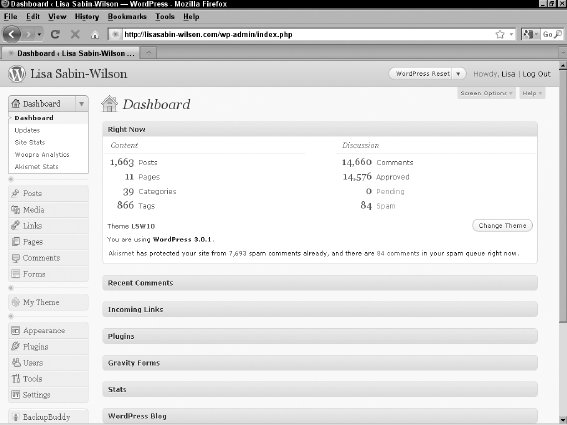
While you drag the module, a light-gray box with a dotted border appears on the right side of your screen. That gray box is a guide that shows you where you can drop the module. See Figure 2-1.
Figure 2-1: A light gray box appears as a guide when you drag and drop modules in the WordPress Dashboard.
- Release the mouse button when you have the Right Now module in place.
The Right Now module is positioned on the right side of your Dashboard page.
The other modules on the right side of the Dashboard have shifted down, and the Recent Comments Module is the module in the top left of the Dashboard page.
- (Optional) Click the title bar of the Right Now module.
The module collapses. Click the title bar again to expand the module. You can keep that module open or closed based on your own preference.
Repeat these steps with each module that you want to move on the Dashboard by dragging and dropping them so that they appear in the order you prefer.
![]() When you navigate away from the Dashboard, WordPress remembers the changes you made. When you return, you still see your customized Dashboard, and you don't need to redo these changes in the future.
When you navigate away from the Dashboard, WordPress remembers the changes you made. When you return, you still see your customized Dashboard, and you don't need to redo these changes in the future.
Removing Dashboard Modules
If you find that your Dashboard contains a few modules that you just never use, you can get rid of them altogether by following these steps:
- Click the Screen Options button at the top of the Dashboard.
The Screen Options pop-up menu opens, displaying the title of each module with a check box to the left of each title.
- Deselect the check box for the module you want to hide on your Dashboard.
The check mark disappears from the box, and the module disappears from your Dashboard.
![]() If you want a module that you hid to reappear, you can simply enable that module by selecting the module's check box in the Screen Options menu.
If you want a module that you hid to reappear, you can simply enable that module by selecting the module's check box in the Screen Options menu.
Changing the Dashboard layout
We're positive that everyone works differently, in terms of how we like our workspace laid out. Personally, Lisa likes to have one long column of items so that she can scroll through and focus on one area, in particular, without other things to the right and left of her periphery.
In the same Screen Options area where you can remove modules (as discussed in the preceding section), you can also change the format of your Dashboard by choosing to have one, two, three, or four columns displayed on your Dashboard — just follow these few steps:
- Click the Screen Options button at the top of the Dashboard.
The Screen Options pop-up menu opens.
- In the Screen Layout Options section of the menu, choose the number of columns you want displayed.
You have the choice of one, two, three, or four columns — check the radio button to the left of the number you want, and your Dashboard display changes immediately.
- Click the Screen Options button again to close the Screen Options menu.
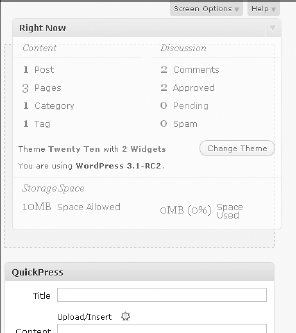
You can see that Lisa likes all her stuff in one long column, which her personal blog's Dashboard shows in Figure 2-2, where she chose to display her Dashboard in a one-column layout. In Figure 2-2, almost all of Lisa's Dashboard modules are closed — you can open and close them when you need to, based on what you need to see and do within your Dashboard at any given time.
By using the features that enable you to customize your Dashboard, you can create your own, individualized workspace that works best for you, based on how you use WordPress. With these features, everyone can customize his own WordPress experience, and no two WordPress user experiences are necessarily the same — like snowflakes!
Figure 2-2: Lisa's WordPress Dashboard displays a one-column layout.