
Inserting a Photo Gallery
You can also use the WordPress Add an Image window to insert a full photo gallery into your posts. Upload all your images; then instead of clicking the Insert into Post button, click the Save All Changes button at the bottom of the Add an Image window (refer to Figure 3-1), and then click the Gallery link at the top of the Add an Image window (the Gallery link appears only on posts that have images uploaded to it). (See Figure 3-5.) This tab displays thumbnails of all the images you uploaded for your post.
Figure 3-5: The Gallery tab of the Add an Image window.

Follow these steps to insert a photo gallery into a blog post:
- (Optional) On the Gallery tab, below the Actions column, type the order that you want the images to appear in the gallery.
Type the number of the sequence in which you want this image displayed. (If you want this image displayed first, for example, type the number 1.)
- Set options for your gallery.
You can specify the following options:
- Link Thumbnails To: Image File or Attachment Page.
- Order Images By: Menu Order, Name, or Date/Time.
- Order: Ascending or Descending.
- Gallery Columns: Select how many columns of images you want to appear in your gallery.
- Click the Save All Changes button.
All the changes you made to each individual image listed in the gallery are saved.
- Click the Insert Gallery button.
WordPress inserts into your post a piece of short code that looks like this: [gallery].
Table 3-2 shows some gallery short codes that you can use to manually specify the display settings for your photo gallery.
- (Optional) Change the order of appearance of the images in the gallery, as well as the markup (HTML tags or CSS selectors).
Use the WordPress gallery short code to change different aspects of the display of the gallery in your post, such as the caption, order of image appearance and HTML markup tags that help you control the style of the gallery within your CSS file:
- captiontag: Change the markup that surrounds the image caption by altering the gallery short code. Here are some examples: [gallery captiontag=“div”] places <div></div> tags around the image caption (the <div> tag is considered a block-level element and creates a separate container for the content — see more about div tags and CSS in Book VI, Chapter 4); to have the gallery appear on a line of its own, the [gallery captiontag=“p”] code places <p class=“gallery-caption”></p> tags around the image caption. The default markup for the captiontag option is dd.
- icontag: Defines the HTML markup around each individual thumbnail image in your gallery. Change the markup around the icontag (thumbnail icon) of the image by altering the gallery short code to something like [gallery icontag=“p”], which places <p class=“gallery-icon”></p> tags around each thumbnail icon. The default markup for icontag is dt.
- itemtag: Defines the HTML markup around each item in your gallery. Change the markup around the itemtag (each item) in the gallery by altering the gallery short code to something like [gallery itemtag=“span”], which places <span class=“gallery-item”></span> tags around each item in the gallery. The default markup for the itemtag is dl.
- captiontag: Define the HTML markup around the image caption for each image in your gallery. Change the markup around the captiontag (caption) for each image by altering the gallery short code to something like [gallery captiontag=“p”], which places <p></p> tags around the image caption. The default markup for captiontag is dd.
- orderby: Defines the order in which the images are displayed within your gallery. Change the order used to display the thumbnails in the gallery by altering the gallery short code to something like [gallery orderby=“menu_order ASC”], which displays the thumbnails in ascending menu order. Another parameter you can use is ID_order ASC, which displays the thumbnails in ascending order according to their IDs.
Table 3-2 Gallery Short Code Examples
Gallery Short Code Output [gallery columns=“4” size=“medium”] A four-column gallery containing medium-sized images [gallery columns=“10” id=“215” size=“thumbnail”] A ten-column gallery containing thumbnail images pulled from the blog post with the ID 215 [gallery captiontag=“p” icontag=“span”] A three-column (default) gallery in which each image is surrounded by <span></span> tags and the image caption is surrounded by <p></p> tags - Define the style of the <span> tags in your CSS stylesheet.
The <span> tags create an inline element. An element contained within a <span> tag stays on the same line as the element before it; there's no line break. You need a little knowledge of CSS to alter the <span> tags. Click the Design tab in your WordPress Dashboard, and then click the Theme Editor subtab to edit the stylesheet for your theme. Here's an example of what you can add to the stylesheet (style.css) for your current theme:
span.gallery-icon img {
padding: 3px;
background: white;
border: 1px solid black;
margin: 0 5px
}
Placing this bit of CSS in the stylesheet (style.css) of your active theme automatically places a 1-pixel black border around each thumbnail, with 3 pixels of padding and a white background. The left and right margins are 5 pixels wide, creating nice spacing between images in the gallery.
- Click the Update File button to save changes to your Stylesheet (style.css) template.
Here are a handful of great gallery plugins:
- NextGEN Gallery by Alex Rabe (http://wordpress.org/extend/plugins/nextgen-gallery): Creates sort-able photo galleries and more
- Organizer by Imthiaz (http://wordpress.org/extend/plugins/organizer): Organizes, renames, resizes, and manages image files
- Random Image widget by Marcel Proulx (http://wordpress.org/extend/plugins/random-image-widget): Displays images at random from your image-upload folder
- Mini-Slides by Roland Rust (http://wordpress.org/extend/plugins/mini-slides): Creates inline slide shows
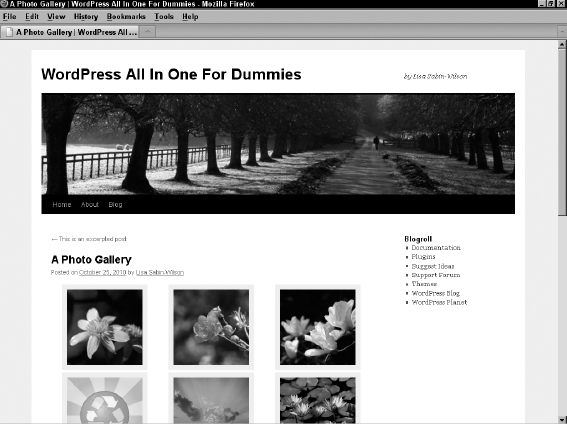
Figure 3-6 shows Lisa's post with her photo gallery displayed, using the preceding steps and CSS example in the default WordPress theme: Twenty Ten. This code is the gallery short code that she used for the gallery shown in Figure 3-6 — [gallery icontag=“span” size=“thumbnail”].
Figure 3-6: A photo gallery displayed in a post.
![]() Matt Mullenweg, cofounder of the WordPress platform, created a very extensive photo gallery by using the built-in gallery options in WordPress. Check out the fabulous photo gallery at http://ma.tt/category/gallery, as shown in Figure 3-7.
Matt Mullenweg, cofounder of the WordPress platform, created a very extensive photo gallery by using the built-in gallery options in WordPress. Check out the fabulous photo gallery at http://ma.tt/category/gallery, as shown in Figure 3-7.
Figure 3-7: A photo gallery created with WordPress by founder Matt Mullenweg.
