
Installing a Theme
After you find a WordPress theme, you can install the theme on your WordPress site via FTP or the WordPress Dashboard.
To install a theme via FTP, follow these steps:
- Download the theme file from the Theme Directory.
Typically, theme files are provided in a compressed format, or Zip file.
(I discuss how you can peruse the WordPress Free Themes Directory from your WordPress installation in the next section.)
- Unzip or extract the theme's Zip file.
You see a new folder on your desktop, typically labeled with the corresponding theme name (revisit Book II, Chapter 2 if you need to refresh yourself on how to use FTP Protocol).
- Upload the theme folder to your Web server.
Connect to your hosting server via FTP and upload the extracted theme folder into the /wp-content/themes folder on your server (see Figure 2-2).
Figure 2-2: Upload and download panels in FTP.

To install a theme via the Dashboard's theme installer, follow these steps:
- Download the theme file from the Theme Directory to your desktop.
Typically, theme files are provided in a compressed format, or Zip file. Using this method, you do not extract the Zip file because the theme installer does that for you.
- Log in to your WordPress Dashboard and choose Appearance
 Themes.
The Manage Themes panel appears.
- Click the Install Themes tab.
The Install Themes panel appears and displays a submenu of links.
- Click the Upload link.
The panel displays a utility to upload a theme in Zip format.
- Upload the Zip file you downloaded in Step 1.
Click the Browse button, and then locate and select the Zip file you stored on your computer.
- Click the Install Now button.
WordPress unpacks and installs the theme in the appropriate directory for you. Figure 2-3 shows the results of installing a theme via this method.
Figure 2-3: Installing a theme via the Dashboard's theme installer.

Browsing the free themes
Finding free themes via the Install Themes tab is extremely convenient because it lets you search the Free Themes Directory from your WordPress site. Start by choosing Appearance![]() Themes on the WordPress Dashboard and click the Install themes tab, as shown in Figure 2-4.
Themes on the WordPress Dashboard and click the Install themes tab, as shown in Figure 2-4.
Figure 2-4: The Install Themes tab, where you can search for and find free themes from your Dashboard.

After you navigate to the Install Themes tab, you see the following submenu links:
- Search: If you know the name of a free theme, you can easily search for it here by keyword, author, or tag to find the exact theme you want. You can also refine your search based on specific features within the themes, including color, layout, and subject (such as “Holiday”).
- Upload: You use this link to upload themes you downloaded from other sources.
- Featured: If you don't have a theme in mind, this page shows you some of the more popular themes out there. We recommend you install and test-drive one of these for your site's first theme.
- Newest: As the name indicates, these are themes recently added to the Free Themes Directory.
- Recently Updated: While WordPress improves, many themes need updating or new features added. This option shows you what themes were updated recently.
After you find the theme that you want, click the Install link below the theme screenshot.
Previewing and activating a theme
After you upload a theme via FTP or the theme installer, you can preview and activate your desired theme.
![]() The WordPress Theme Preview option allows you to look at your site without actually activating the theme on your site. If you have a site that's receiving traffic, it's best to preview any new theme before activating it to ensure You'll be happy with its look and functionality. If you're trying to decide between several new theme options, you can preview them before changing your live site.
The WordPress Theme Preview option allows you to look at your site without actually activating the theme on your site. If you have a site that's receiving traffic, it's best to preview any new theme before activating it to ensure You'll be happy with its look and functionality. If you're trying to decide between several new theme options, you can preview them before changing your live site.
To preview your new theme, follow these steps:
- Log in to your WordPress Dashboard and choose AppearanceThemes.
The Manage Themes page appears and displays your current (activated) theme and any themes that are installed in your /wp-content/themes directory on your Web server.
- Preview the theme you want to use.
Click the Preview link beneath the theme name; a preview of your blog using the theme appears.
- Choose whether to activate the theme.
Click Activate in the top-right corner to go live with your new theme, or close the preview by clicking the Close button in the top-left corner, as shown in Figure 2-5.
To activate a new theme without previewing, follow these steps:
- Log in to your WordPress Dashboard and choose AppearanceThemes.
The Manage Themes page appears and displays your current (activated) theme and any themes that are installed in your /wp-content/themes directory on your Web server.
- Find the theme you want to use and click the Activate link beneath the theme name.
The theme immediately becomes live on your site, as shown in Figure 2-6.
Figure 2-5: A WordPress theme preview.
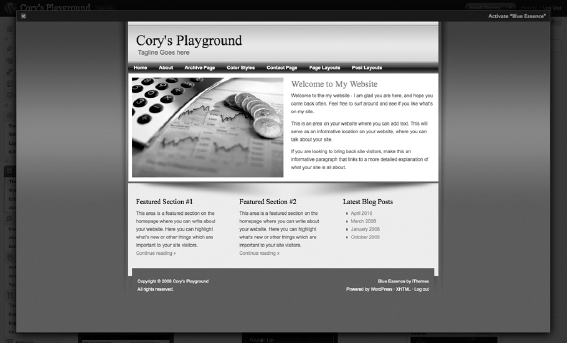
Figure 2-6: An active theme on a WordPress site.
