
Chapter 1
Becoming Familiar with Your iPad
QuickSteps to…
Welcome to your iPad! It is one of the foremost information devices ever created. Information in the form of sound, such as music and speech; images in either still photos or video; and text in books, magazines, newspapers, and other forms of media are all available to you on your iPad. It allows you to create, access, and exchange this information on the Internet; through email, notes, or documents you write; through photos or video you take; and through appointment calendars, maps, and games that you use. Your iPad even provides a built-in voice-activated assistant to help you use it and its information. In addition to what you see on the screen when you first start your iPad, there are currently over 475,000 “apps” (applications) that you can download from the App Store and run on your device.
The iPad is a tablet computer. In terms of what you can do with it, an iPad is a fully capable computer, every bit as capable as a desktop or laptop computer. The major difference is in the size and shape of the computer. The iPad is a tablet with all of its components built into a smaller, thin screen, as compared with the larger screen and keyboard of a laptop computer, or still larger screen, separate computer case, and separate keyboard of a desktop computer. While there are some limitations due to the tablet size, such as its smaller screen and less memory, this is more than made up for by its cameras, its global positioning system (GPS) in cellular models, its ability to use cellular as well as a Wi-Fi Internet connection, and its considerable portability.
How you make use of your iPad and its capability is up to you. This book will help you get started and show you how to use much of what is available, but it is up to you to try out and become familiar with the iPad. Set aside your fear and uncertainty and begin to explore the many things that you can do with the iPad. Follow the steps in this book to see how to start using the features that interest you and then challenge yourself to master these areas while using this book to explore additional areas. Set a pace for yourself by exploring a new area every day, week, or month, whatever is comfortable for you, but don’t stop until you have covered every feature in this book that you are interested in, and then use the links that are mentioned here to explore new apps and new ways to use existing apps.
In this chapter you’ll explore the external features of the iPad, see how to plug it in, charge its battery, turn it on and off, put it to sleep, and wake it up. You’ll then go through the iPad setup to get an Apple ID and activate your iPad and set up its basic services. Finally, you’ll take a look at some of the accessories that are available for the iPad.
TIP Sign up for AppleCare+ two-year extended warranty in the first 30 days and get two instances of accidental damage coverage, plus two years of telephone support versus no accidental damage coverage and 90 days phone support in the basic one-year warranty. The extended warranty currently costs $99 over the one-year basic warranty that comes with the product for no additional charge. |
EXPLORE YOUR IPAD
Take a moment to explore the physical iPad and what you got when you purchased it. Later in this chapter you’ll see how to activate your iPad, begin setting it up, and get started using it. In future chapters you’ll explore what is on the iPad screen and how to use those elements.
The contents of the attractive box that the iPad comes in depend on whether you got one for use with a cellular service or not. The iPad and the iPad Mini come with the following:
• A 12-watt Universal Serial Bus (USB) power adapter to plug into a wall socket. This is different from the smaller 5-watt USB power adapter that comes with an iPhone or iPod. The iPhone power adapter will not work with the iPad.
• A 3.5-foot USB cable with Apple’s connector to the iPad on one end and a standard flat USB connector on the other end.
• A small white folder containing a feature identification and instruction card, and a sheet with two Apple decals (the intended use of which is uncertain).
In addition, iPads with cellular service have the following:
• A cellular service subscriber identity module (SIM) card, which may be preinstalled.
• A device that looks like a paperclip, and that can be replaced with a paperclip, to open the SIM card tray. If the SIM card is preinstalled, you may not ever need to use this device.
Your iPad has several controls, sockets, and features that allow it to perform its functions. These are located on both the front and back of the device. Figure 1-1 shows the front of the iPad, which contains these components:
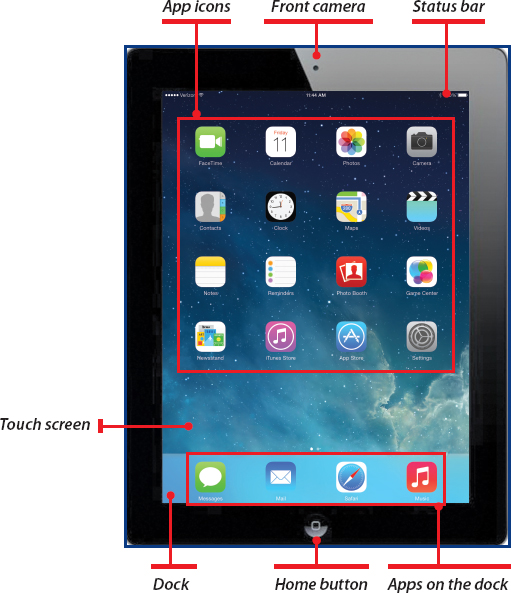
Figure 1-1: Front of the iPad 4th Generation (Courtesy of Apple Inc.)
• Touch screen, also called a “multitouch screen” or just the “screen,” comprises the majority of the front face of the iPad. It allows you to view, select, and manipulate the contents displayed there.
• App icons represent the applications available on the iPad. You start out with apps that come standard with the iPad and in a standard layout. You can add icons, and you can rearrange their layout on the screen, but you cannot delete the standard apps. (However, you can hide the standard apps by enabling Restrictions and turning off the apps you want hidden.)
• Front camera, called the “FaceTime” camera, has, on an iPad 4th Generation and iPad Mini, a 1.2MP resolution, face detection, and takes 720p high-definition (HD) video. It is used with FaceTime, the video-conferencing app that comes with the iPad, but can also be used with other apps. See Chapter 8 on how to use FaceTime.
• Status bar at the top of the screen provides information about the connectivity with both Wi-Fi and your cellular carrier, the current time of day, and the degree to which your battery is charged.
• Home button displays your Home screen from anywhere on your iPad. From the Home screen you can open or reopen any app and access the settings that control how the iPad behaves.
• Dock at the bottom of the screen provides a separate area to park your most heavily used apps so you can more easily reach them. You can move apps on and off the dock, but it is limited to 6 apps.
Figure 1-2 shows the back of the iPad. It contains these components:
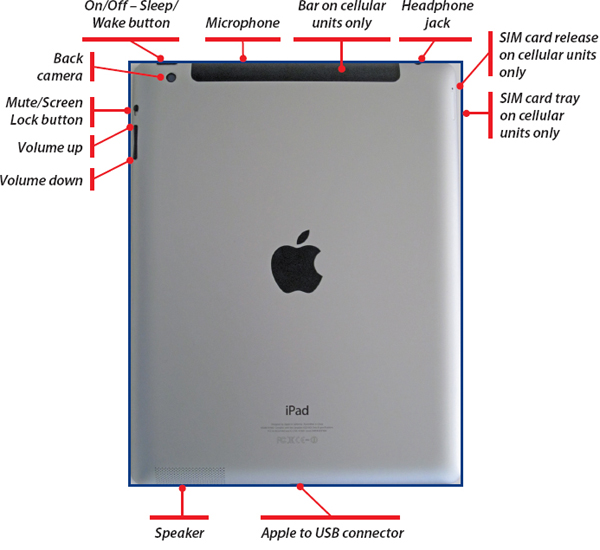
Figure 1-2: The back of the iPad 4th Generation
• On/Off – Sleep/Wake button is the primary power controller for the iPad. Pushing it quickly puts the iPad in power-saving sleep mode. Pushing it quickly again or pushing the Home button wakes the iPad from sleep. Pushing and holding this button for about three seconds begins the process of shutting the power fully off. Pushing and holding this button for about three seconds when the iPad is powered off begins the process of powering up the iPad.
• Back camera, called the “iSight” camera, has, on an iPad 4th Generation and iPad Mini, a 5MP resolution with autofocus and tap to focus, a five-element lens, face detection, and backside illumination. It can be used for either still pictures or videos with video stabilization and 1080p HD. See Chapter 8 for more information on using the camera.
• Microphone used to talk to Siri (the voice assistant) and used with Voice Memos, FaceTime, and other apps.
• Headphone jack into which you can plug headphones, earbuds, and earpods to listen to music and any other audio, including Siri, produced by your iPad. When a listening device is plugged in, the iPad’s speaker is turned off.
• SIM card release hole and tray are only on iPad models that can connect to a cellular service. The release hole is used with the paperclip-like device—poke it in the hole to open the tray. The tray holds the SIM card, which normally comes already installed, so you probably will never need to open the tray.
• Apple-USB connector is used to plug in the iPad to both charge the battery and directly communicate with another computer.
• Speaker lets you hear Siri, music that is being played, and any other sound that is produced by your iPad.
• Volume up/Volume down changes the loudness in both the speaker and whatever is plugged into the headphone jack. Press the top of the rocker switch to increase the volume or press the bottom to reduce it.
• Mute/Screen Lock button performs one of two functions based on a setting in the iPad. The default is to mute all sound when this button is on so you can see a red dot. If you’d rather, you can use this button to lock the screen display in either vertical (portrait) or horizontal (landscape) orientation. If it is not locked, the screen orientation automatically changes depending on how you are holding the iPad. Normally, you want the orientation to automatically change, but if you are lying down and reading, you may want to lock the orientation so it doesn’t change every time you move around. You can change how the switch works in iPad Settings, as explained in Chapter 2.
As you use your iPad and read this book you will want to know which model you have and what its major features are. You basically want to know three items: the model, the memory size, and whether your iPad has cellular capability. There is a label on the back of the box that has all three pieces of information. In the top line you can see if it has cellular capability, the network it works on, and the amount of memory in gigabytes (GB). (Gigabyte or GB is a billion bytes, and a byte is roughly a character. You can think of 16GB of memory as enough space to store 16 billion characters of text.) On the third line down you can see the model number, which is also on the back of the computer. If you don’t have the box, I’ll show you how to find whether your iPad has cellular capability and its amount of memory later in this chapter.
Take a moment to better understand iPad memory and cellular vs. Wi-Fi communications.
Use of iPad Memory
Memory is used to store pictures, movies, videos, TV shows, music, books and magazines, mail, contacts, documents, and apps. Apps can also temporarily use some memory when they execute. No two people will have the same mix of these items, and there is no easy way to determine what your mix will be. And not all of any one item takes the same amount of storage. Remembering that last statement, here are some rough rules of thumb for the amount of memory used by various items (a kilobyte (KB) is 1,000 bytes, 1,000KB is a megabyte (MB), and 1,000MB is a GB, and a byte remember is roughly a character):
• Full-length commercial movies and TV shows are 1 to 3GB.
• Videos, depending on their length and their format, take from 500MB (.5GB) to 1.5GB.
• Music takes about 1MB per minute, or about 50MB for a CD.
• Magazines depend on length and the number of photographs, but generally range from 150MB to 500MB.
• Pictures, depending on their size and quality, take from 50KB to 2MB.
• Apps vary greatly, from 50KB to over 1GB for some games.
• Documents, mail, and contacts take relatively little space.
As you store information on your iPad, consider your mix of movies, TV shows, music, and games. If you are around a computer where you can store these items, it is very easy to transfer items back and forth from your iPad. You can also use iCloud for this purpose. Both of these processes are discussed at length in this book.
TIP Store the bulk of your movies, videos, pictures, and music on your computer or on iCloud and only keep on your iPad what you know you will be using in the near term. |
Understand Wi-Fi vs. Cellular
Both Wi-Fi and cellular service give the iPad the ability to connect to the Internet and through it to communicate with the hundreds of millions of people, businesses, organizations, and institutions that are connected to the Internet. This communication ability is foundational to both the use of the iPad and its operation. The iPad could not do what it does without this ability, and it is therefore critical to its success.
All iPads come with the ability to use Wi-Fi, which is a standard for wireless communication among computers. The term “Wi-Fi” originally comes from “wireless fidelity,” but today it simply means wireless data exchange. If you don’t already have Wi-Fi service in your home and/or office, it is easy to get from your local telephone company, TV cable company, or an independent Internet service provider. Also, it is available for free in many public locations such as libraries, coffee shops, hotels, and airports.
Reviewing What You Need
To use your iPad, you will need or probably want the following:
• A connection to the Internet. You can do this through either a
• Wi-Fi wireless network in a public space or with a Wi-Fi access point in your home or office.
• Cellular telephone account from AT&T, Sprint, or Verizon in the United States.
• An Apple ID to register your iPad and download apps from Apple or to get iCloud or iTunes accounts. You will see how to get this later in this chapter.
• Access to another computer, either a Mac or a PC, and either a desktop or laptop that you can connect the iPad to using a USB 2.0 or later connection on the computer and the Apple-USB cable. If the computer is a Mac, it must be running OS X version 10.5.8 or later. If the computer is a PC, it must be running Windows XP (with Service Pack 3 or later) or either 32-bit or 64-bit Windows Vista, Windows 7, or Windows 8. On this computer, you’ll need to have or download for free iTunes 10.6 or later (for iOS 7 you will need iTunes 11.1 or later).
• Access to a printer with wireless printing capability, such as Apple’s AirPrint. In addition to Apple printers, HP, Epson, Cannon, Brother, Dell, and others all make wireless printers that work with the iPad. Some printers, in addition to Apple, use the iPad’s built-in AirPrint capability; others use their own downloadable app. Some printers using AirPrint cannot access all printer features such as multiple paper trays and booklet printing.
PLUG IN AND START THE IPAD
When you first get your iPad, the temptation is to turn it on and start using it. The iPads are shipped from the factory with enough charge in their battery to do this, but unless you had your iPad set up at the store where you bought it, you must go through the activation and setup process. To make sure you have enough power to do all you want when you first turn it on, I recommend that you start by plugging in and charging your iPad; it should not take more than a couple of hours. After that, you can turn it on and begin the activation and setup process.
Plugging in your iPad is not exactly rocket science, but there are two ways to do it, and there is a significant caveat with one of the ways. Here are the ways.
Plug into a Wall Socket
The simplest and surest way to plug in and charge your iPad is by using the 12-watt USB to AC adapter, plugging it into a wall socket, and plugging the Apple to USB cable into both the AC adapter and your iPad.
When you are successfully charging your iPad and have turned it on, you will see an icon in the upper-right corner of the iPad screen that looks like a battery with a lightning bolt in it as well as the percentage of charge  .
.
Plug into a Computer
You can also use the Apple to USB cable to connect your iPad to a computer through a USB socket on the computer. This primarily allows you to transfer information between your computer and your iPad, as discussed later in this chapter and in Chapter 2.
On some recent desktop and laptop computers, you can also charge the battery by plugging the Apple to USB cable into them, but on the majority of computers, when you do that you get the message “Not Charging,”  telling you that the computer is not charging the iPad. You must use the AC adapter and plug into a wall socket to charge the iPad.
It does not hurt to try to charge the iPad from your computer, so you might as well try it to be sure. If you do, make sure your iPad is completely powered off, so nothing but the battery charging is using power.
When your iPad battery is reasonably charged, it is time to turn on the iPad and begin the activation process. Begin by getting a Wi-Fi service, if you don’t already have one.
Get Wi-Fi
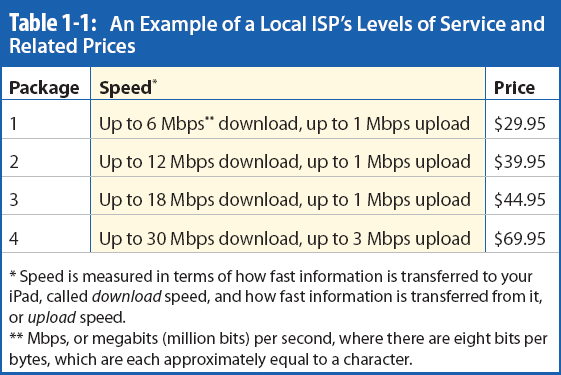
Wherever you choose to start and activate your iPad, you must at least have Wi-Fi available and you must know the password to sign on to the wireless service. You must also have the time to complete the full activation—approximately 30 minutes. The best place, of course, is your home where your time and privacy are hopefully your own. If you don’t have Wi-Fi in your home, you are probably going to want it. If you already have an Internet connection, you may already have Wi-Fi available or you may be able to easily turn it on. Call your Internet service provider (ISP) and ask them how you can get Wi-Fi if you don’t already have it. If you don’t have an Internet connection, call your local phone company or TV cable service provider (or both to compare them). Ask them if they can install Wi-Fi in your home and how much it costs per month. They may have several prices depending on the speed. For example, my local phone company offers four levels of Internet service with the prices, as of Summer 2013, shown in Table 1-1. Probably get rid of the slowest and fastest offerings and choose one in the middle. The second offering from my phone company is perfectly adequate for use with an iPad.
TIP Some Internet service providers, especially TV cable companies, offer a low introductory price for an initial number of months, only to increase it substantially after the initial months. Be sure to ask what the price is after the initial period. |
Activate Your iPad
When you have Wi-Fi available to you, use these steps to start and activate your iPad:
Hold your iPad in portrait fashion where it is taller than it is wide with the Home button at the bottom. This will orientate the iPad for the instructions here.
1. Press the Home button. The screen should come on and display the word “Hello” in a number of languages.
If the screen does not come on, press and hold the On/Off – Sleep/Wake button on the top right of the iPad for several seconds. The screen should display the Apple logo for several seconds as the iPad starts up (“boots up”). Finally, you should see the initial screen with the word “Hello,” as shown in Figure 1-3.

Figure 1-3: The first screen that your iPad displays is only used when the iPad is not activated.
2. At the bottom of the screen, use your finger to slide the words “Slide To Set Up” to the right.
3. Touch or tap the language you want to use and your country. For example, “English” and the “United States.”
4. If there are several Wi-Fi networks around you, you will see them listed. Tap the network that you want to use. If you don’t see a network, then none is available where you are. If you think you have Wi-Fi, contact your Internet provider, or ask the business or organization that you think is providing the Wi-Fi.
5. You are asked to enter the password for that network, as shown in Figure 1-4. Use the onscreen keyboard that pops up to do this (see the “Using the Onscreen Keyboard” QuickFacts later in this chapter), and tap Join.

Figure 1-4: When you are asked to enter text, an onscreen keyboard will pop up.
6. When a checkmark appears next to the network you want, tap Next.
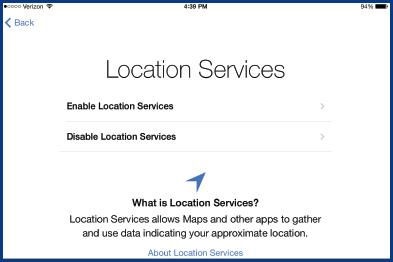
7. Determine if you want to enable Location Services. This uses the iPad’s GPS and/or Wi-Fi to determine your current location, and is valuable when you are asking Siri about the location of restaurants or with maps. It is especially valuable when you are getting driving directions. Also, Location Services must be enabled to use Find My iPad. On the other hand, apps can see where you are and use that information, which you may or may not want. I think that the benefits of Location Services outweigh the perceived loss of privacy. Based on your decision, tap either Enable Location Services or Disable Location Services and tap Next.
Set Up Your iPad
With your iPad started and connected to the Internet through Wi-Fi, you next need to connect to Apple to set up an Apple ID and register your iPad. Apple uses a common ID and password for Apple itself, the iTunes Store, the App Store, iCloud, the iBook Store, and the Mac App Store. This allows you to get accounts to download apps from Apple’s App Store, or music and videos from the iTunes Store, and accessories from the Apple Store. You’ll need to have and use an Apple ID even for free apps and other free items. Apple doesn’t charge for the ID itself, and there is no other way to work with Apple. Continue with these steps to set up your iPad:
1. If you have used an iPad in the past, you probably have a backup you can use to quickly set up a new iPad. In that case your first question is, do you want to set up as a new iPad or do you want to restore from an iCloud or iTunes backup? If you don’t have a backup, you won’t see this question. We assume you want to set up as a new iPad—we’ll talk about restoring in Chapter 10. Tap Set Up As New iPad if you have the choice of restoring.

TIP You do not have to use a credit card to set up an Apple ID. Simply select “None” when you are asked for a payment type. You, of course, will not be able to buy anything that costs something (there are many free items on both the App Store and iTunes Store). Also, you can get a very limited credit card and use that for your Apple ID and other purchases on the Internet. |
2. You are then asked to either sign in with an Apple ID or create a new one. Again, we’ll assume you need to create a new one (if you have an Apple ID, enter it and skip to Step 11). Tap Create A Free Apple ID.
3. Select your birthday by using your finger to move the three calendar elements up or down, as shown in Figure 1-5. When you are done, tap Next.

Figure 1-5: To enter your birthday, iPad gives you a set of three cylinders to spin.
4. Tap or type your first name using the keyboard at the bottom of the screen. See “Using the Onscreen Keyboard” QuickFacts later in this chapter to understand how to do that.
5. Tap Return to go to the next line and type your last name; then tap Next.
6. If you have an existing email address, accept that default, tap Next, and skip to Step 8. If you do not have an email address that you want to use, tap Get A Free iCloud Email Address, tap Next, and follow on to Step 7.
7. Type the first part of your new email address. For example, type funnyclown for an email address of [email protected], and tap Next. You are asked if you are sure you want to use that email address. If so, tap Create.
8. Enter and verify a password at least eight characters long and containing a number and both uppercase and lowercase letters. Tap Next when you are done.
9. Choose three security questions, enter their answers, and tap Next. If you wish, and if you have one, enter another email address that can be used in case all else doesn’t work. In any case, tap Next.
10. If you want email updates from Apple, leave the default ON and tap Next. If you do not want these updates, swipe (move your finger across) the ON button to turn it off, and then tap Next.
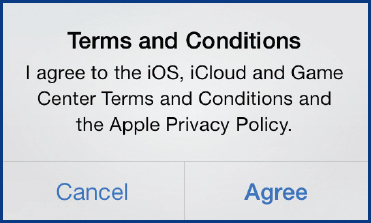
11. You are asked if you agree to Apple’s terms and conditions. You can read them on your iPad or have them sent to you by email. If you don’t agree, you will not be able to use your iPad, although if it is shortly (within 30 days) after you purchased it, Apple will allow you to return it with a full refund. When you are ready and do agree, tap Agree and then tap Agree again.
12. Next you are asked if you want to use iCloud, which is Apple’s free Internet storage service for backing up the information on your iPad. If something happens to your iPad, you can recover your information from iCloud, and if you store your iPad information on iCloud, you can access that information on your iPhone, iPad touch, or Mac. I think it is a good idea, and the first 5GB are free. If you want this, tap Use iCloud; if not, tap its alternative, and then, in either case, tap Next.
13. You can use iCloud to automatically back up your iPad daily, which I also think is a good idea. The alternative is to back up to your computer, which is probably more vulnerable. Make your choice and tap Next.
14. Tap Use Find My iPad, which would be invaluable if you lose it or it is stolen, and tap Next. Find My iPad is good insurance, and I recommend that you activate this.
15. If you have used an iPad before, you will be asked if you want to let people contact you via iMessage and FaceTime, and your phone number and email address will be displayed and selected (with a checkmark). If you don’t want to use either of those contacts, tap them to deselect them. In any case, tap Next.
16. Next you are asked if you want to create a passcode, which can be used whenever you start or wake up your iPad to protect it from unauthorized use. You don’t have to use a passcode, so there would be nothing preventing someone from using your iPad, but I recommend you do use one. If you want that, follow the instructions to set it up. The standard passcode is four numbers, like the pin you might have at your bank. Enter your passcode, and then re-enter it for confirmation.
17. Tap Use Siri and tap Next. Siri is a voice-activated assistant to which you can ask questions like “What are the Greek restaurants in Bellevue?” or “Do I have an appointment next Tuesday?” I can’t imagine someone not wanting Siri.

18. You can choose to help Apple by anonymously sending them information about how you are using your iPad, including your location. I believe that doing this helps all users, and so I recommend it. If you agree, tap Automatically Send; if not, tap Don’t Send. In either case, tap Next.
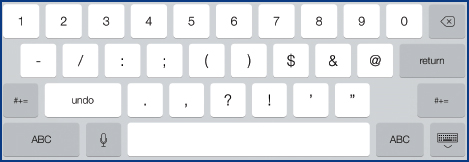
Using the Onscreen Keyboard
When you need to enter text on your iPad, an onscreen keyboard is automatically displayed, such as the one you see here. Simply tap the keys you want to use. Here is how to use the other features of the onscreen keyboard:
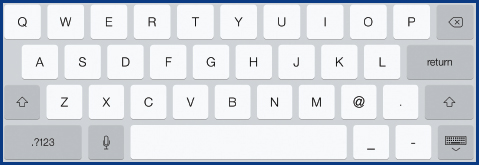
• If you don’t see a keyboard when a form or text entry box is displayed, simply tap the text box into which you want to place text.
• To make a letter uppercase, press the upward-pointing arrow or SHIFT key so the arrow itself darkens,  and then tap the letter. Uppercase will automatically be turned off after tapping the letter.
• To make a series of letters uppercase, double-tap (tap twice in rapid succession) the SHIFT key so the key, not the arrow, darkens,  and then tap the keys you want in uppercase. When you are done, tap the upward-pointing arrow again to turn it off.
• With the !, and ?. keys  , press the SHIFT key and then press the desired key to get the character on top. (There are also additional choices with these keys. If you tap and hold the, key and slide your finger up you get the ‘ and the . gives you the “.)
• To correct an error, tap the BACKSPACE key  once for each letter you want to replace. Then tap the replacement key(s).
• To complete one line of type and go to the next line, tap the RETURN key. You may also tap the new line on the screen.
• To enter numbers and some of the special characters, tap the .?123 key. If you don’t see the special characters you want, tap the #+= key for additional characters. When you are done entering numbers and/or special characters, tap the ABC key to return to the original keyboard.
• When you are done using the keyboard, tap the miniature keyboard key  in the lower-right corner of the onscreen keyboard to put the keyboard away. Often when you finish entering text and complete a form, the onscreen keyboard automatically disappears.
19. Finally, you see “Welcome to iPad.” Tap Get Started. The familiar iPad Home page is displayed, as shown in Figure 1-6.

Figure 1-6: The iPad’s Home page is the starting point for the many things you can do with it.
If you have a recent (in the last five years) computer available to you, either a Mac or a PC, you can attach your iPad to it and transfer information between the two devices. To do that, you need to install Apple’s iTunes on that computer if you haven’t already. This is a particularly good approach if you have a lot of music or videos on the computer that you want on the iPad. See the “Reviewing What You Need” QuickFacts earlier in this chapter for the specifications of the computer that you need to use.
If you have iTunes already on the computer, make sure it is up to date. On a Mac, press the Apple key and click Software Update. On a PC, Windows 7 and before, click Start, click All Programs, and click Apple Software Update. On a Windows 8 PC, on the Start Screen, start typing Apple and click Apple Software Update. You will be told if iTunes is not up to date. If so, follow the instructions to update it.
Download and Install iTunes
If you do not already have iTunes, you can download it for free from Apple and install it on your computer.
1. On your computer, open a browser, type itunes.com in the address box, and press ENTER. The Apple iTunes download page will open, as you see in Figure 1-7.
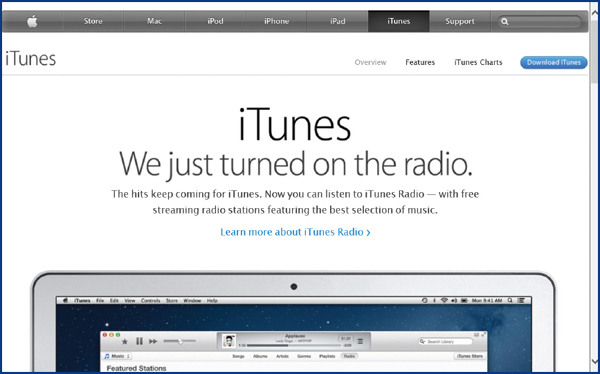
Figure 1-7: iTunes is a program to acquire, organize, and share music, movies, and TV shows. Apple also uses it to transfer information between a computer and an iPad, iPhone, or iPod.
2. Click Download iTunes, and then on the next page click Down Now (you don’t have to enter your email address, and I uncheck the two email offers) and click Run at the bottom of the screen.
3. In the Welcome To iTunes dialog box that opens, click Next. Uncheck any of the options you don’t want, and then click Install and click Yes to allow iTunes to make changes to your computer.
4. Finally, when you are told that iTunes has been installed, click Finish. iTunes will open on your desktop.
Connect Your iPad Through iTunes
Once you have iTunes installed and your iPad set up, it is time to connect the two.
1. Plug the Apple connector into your iPad and the USB connector into your computer. The iPad’s screen will come on. Swipe the Slide To Unlock arrow left to right. Enter your Passcode, if you have one, and tap Trust in the Trust This Computer? dialog box that opens.
2. If it isn’t already running on your computer, start iTunes. You should see your iPad appear in the left-hand column. If you don’t have a left-hand column or Sidebar, click the View menu and click Show Sidebar. If you don’t see a menu bar across the top, click the Select menu (the black and white rectangle) in the far upper-left corner, and click Show Menu Bar.
3. Click your iPad in the left column to open a pane on the right about your iPad, as you see in Figure 1-8.
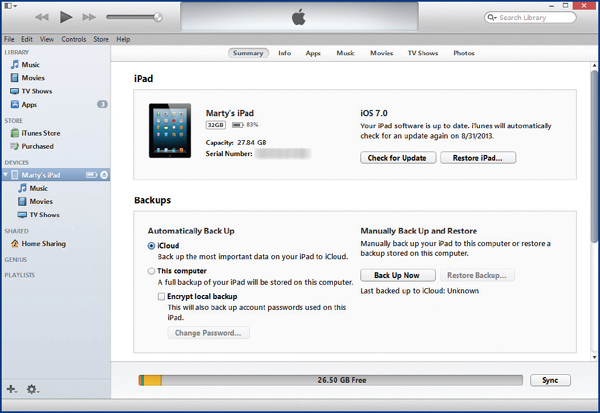
Figure 1-8: iTunes not only allows you to transfer information, but also to control some aspects of your iPad.
4. If, when you set up your iPad as described earlier in the chapter, you selected to automatically back up on iCloud, it will be selected in iTunes, as you see in Figure 1-8.
5. You may additionally, or in lieu of iCloud, back up on the computer you are connected to. If so, click that option, if desired, click Encrypt Local Backup, enter and verify a password, and click Back Up Now.
You will see a lot more about syncing music, videos, and other media between iTunes and your iPad in later chapters of this book.
NOTE Although you can back up your iPad to a computer, I recommend additionally or in lieu of the computer, backing up to iCloud. The computer can be destroyed by fire or be stolen; the iCloud cannot be. If you choose to back up both to your computer and to iCloud, I recommend that you leave the iCloud selected for automatic backup and manually back up to your computer. |
In going through the setup of your iPad, you have probably experienced the screen shutting itself off automatically after the iPad had been inactive for a period of time. This is the iPad’s sleep mode, a low-power condition that prolongs the battery life, but makes it immediately available to perform some task for you. This is one of three power modes:
• Fully powered on with the screen lit and the iPad is available at a single touch.
• In sleep mode with the screen dark, but the iPad is available by waking it.
• Fully powered off and not using any power. It must be turned on to be used.
Turn the iPad On or Off
When the iPad is fully powered off, you must start it up, or “boot it up,” to turn it on. You know it is off if you press the Home key and nothing happens (given that your battery has a charge).
• Turn off your iPad:
Press and hold the On/Off – Sleep/Wake button until the Power Off command appears, and then swipe that command from left to right.
• Turn on your iPad:
Press and hold the On/Off – Sleep/Wake button until the Apple icon appears and then, when the Slide to Unlock command appears, swipe it from left to right. Enter your Passcode if you are using one.

Put Your iPad to Sleep or Wake It
By providing the sleep mode, Apple made your battery last a lot longer. Remember that when you get tired of your iPad often being asleep. You can adjust the period of time before your iPad goes to sleep, as you will see in Chapter 2.
• Wake your iPad. You can do this in two ways:
• Press the Home button, swipe the Slide to Unlock command from left to right, and enter your passcode if you have one.
• Press the On/Off – Sleep/Wake button and swipe the Slide to Unlock command from left to right, and enter your passcode if you have one.
• Put your iPad to sleep. Normally, your iPad will automatically go to sleep, but if you want, you can do it manually:
• Press the On/Off – Sleep/Wake button.
A large number of accessories are available for your iPad from both Apple (apple.com/ipad/accessories; see Figure 1-9) and a number of retailers, including Amazon (go to amazon.com, and search for “iPad accessories”; see Figure 1-10). Here are some thoughts about a few of the accessories you can buy:

Figure 1-9: Apple offers a number of iPad accessories. Among the better offerings are cases, keyboards, and cables.

Figure 1-10: Amazon offers many more iPad accessories at significantly reduced prices, but not always of high quality.
• Cases and covers come in many styles, colors, and materials, from aluminum, to leather, to polyurethane, to hard plastic. The most important function of a cover or case is to protect your iPad from dropping, being hit, or getting scratched. It is gut-wrenching to see a shattered screen on an iPad, especially if it is yours! The most common is Apple’s Smart Cover in five colors of polyurethane and leather, currently beginning at $39.00 for polyurethane and $69.00 for leather. It folds to provide a stand for viewing. The OtterBox Defender Series case with an integral screen protector and stand provides some of the best protection, but it is a bit bulky, currently from Amazon for $59.99.
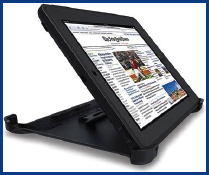
Courtesy of OtterBox
TIP The most important thing to remember in buying a case is corner protection. |
• Keyboards come as stand-alone items or integrated in a case. If you do much typing on your iPad, a separate keyboard might be handy. Apple makes a stand-alone wireless keyboard with an aluminum case that uses Bluetooth technology to connect to the iPad. It is thin and attractive, but not very portable, at $69.00 from Apple. Logitech offers the Ultrathin Keyboard Cover that can be used as a stand and has a matching aluminum back to the iPad. It also uses Bluetooth to connect to the iPad, magnetism to hold on to it, is very portable, and is currently available from Amazon at $84.47. (I have one of these and love it.)

Courtesy of Logitech
• Screen protectors are very thin plastic sheets that adhere to the iPad’s screen and protect it from scratches, abrasions, and some lighter knocks. Some users swear by them, while others swear at them. They are hard to put on without leaving bubbles under them and may show fingerprints and dust more than the actual screen. Amazon offers a number of varieties in packets of two to four protectors currently from $2.23 to $13.98.
• Cables are primarily the Apple to USB cable used to connect iPad to a computer (“docking it”) and to charge the iPad, but also include cables to connect the iPad to cameras and TVs. It is handy to have several of the Apple to USB cables so you can charge your iPad (and maybe an iPhone 5, which uses the same cable) in your car, office, and home. Apple offers a full selection of these, beginning with the Apple to USB cable in both one-meter and half-meter lengths currently for $19.00 for either one. Amazon offers many styles and lengths of the Apple to USB cable currently from $2.69 to $16.99. I have had some less-than-perfect experiences with the very inexpensive third-party cables.
• Earpods and headphones let you privately hear stereo sound in place of the single (monaural) not-too-great speaker in the iPad. Apple offers both in-the-ear earpods, with a remote mic and moderate sound quality, at currently $29.00, and in-the-ear headphones, with a remote mic and good sound quality, at currently $79.00. Amazon offers a number of earpod replacements currently beginning at $2.23, as well as Apple’s own earpods currently at $24.95. Amazon also offers a number of headphones, some wireless using Bluetooth, and some very high quality that currently go over $99.00.

NOTE Several other sellers besides Apple and Amazon offer many other iPad accessories than what has been described here. You need to spend some time on both websites and do a Google search for “iPad accessories.” |

Anne Dotson is the leader behind her school district getting iPads for all seventh and eighth graders and is the technical editor of this book.
My iPad has to be my favorite device of any I have ever had. I do everything electronic on it. I have all my recipes stored in the Dropbox app and use that every day. I have all my mail forwarded to my mail account and check my mail on it. I use Facebook, Flipboard, and Pinterest daily. I have multiple Kindle books and books in Overdrive from the public library. I use the iPad to read books to me when I am driving on long trips. I take pictures and video with it and love the fact that I can access all my pictures from my iPhone on Photo Stream on my iPad. It is really my go-to device for answering any questions that arise, from what do I substitute for wine in this recipe to how many miles is it from one place to another. I use the ability to capture the screen as I teach others how to use the iPad. I try never to be without my iPad, at church, at home, at the beach, on the road.
Anne’s Favorite Apps
Dropbox Allows me to save all my recipes and share them with my daughters and access them wherever I am. It has become my recipe book.
Pinterest Online pinboard of great ideas for almost anything imaginable. I have over 40 boards set up and spend some time each day looking at the sites that my followers are following and adding to my resources.
Flipboard A combination magazine-like approach to social media that I am involved with. A great way to catch up fast. Customizable to your own interests.
Overdrive Media Library Allows you to access library books and borrow them to read as they become available. Books are generally offered in epub, which must be read in Overdrive, or Kindle, which must be read in a Kindle app and downloaded from Amazon. However, the borrowing is done through Overdrive.
Facebook Social site that allows me to stay in touch with my family, far and wide.
Diigo Social bookmarking site that can be shared with others who are researching and saving sites of similar interest.
Maps An awesome GPS system built right in to your iPad or iPhone.
Notes Keep all your important information there that you need to access, like your kids’ addresses, phone numbers, and Wi-Fi login information.
..................Content has been hidden....................
You can't read the all page of ebook, please click here login for view all page.