
Chapter 7
Listening to and Reading on the iPad
QuickSteps to…
In the first six chapters, I’ve primarily covered how to get the most productive use out of your iPad. In this and the next two chapters, you’ll see how to relax and enjoy your iPad. In this chapter we’ll look at getting, organizing, and listening to music from several sources and then how to get, organize, and read electronic books (eBooks) and other documents, also from various sources.
LISTEN TO MUSIC
Music has always been a powerful part of human history and it remains so in this mobile digital age. People may not agree on the type of music they like, but the majority of people like to listen to some form of it, and the iPad supports that in spades. Here we’ll look at getting music from two sources (iTunes and your computer), organizing it into playlists, and then listening to it.
Apple has made a very substantial business of selling music online through iTunes, which makes available for purchase and download a significant part of popular music—over 28 million songs when this was written. iTunes is easy to use to search, open, preview, and buy music that you want to listen to.
TIP In addition to music, at the iTunes Store you can buy movies, TV shows, and audiobooks. The general discussion here on how to use iTunes applies equally to all the types of media that are available through it. We’ll talk more about videos and movies in Chapter 8. |
Set Up iTunes
iTunes comes as a standard part of the iPad, and using it requires little more than opening it. You must, of course, have an Apple ID, but you most likely have that, as described in Chapter 1. Take a brief look at the iTunes settings.
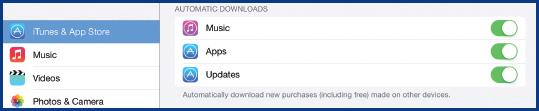
From the Home screen, tap Settings | iTunes & App Store to open those settings.
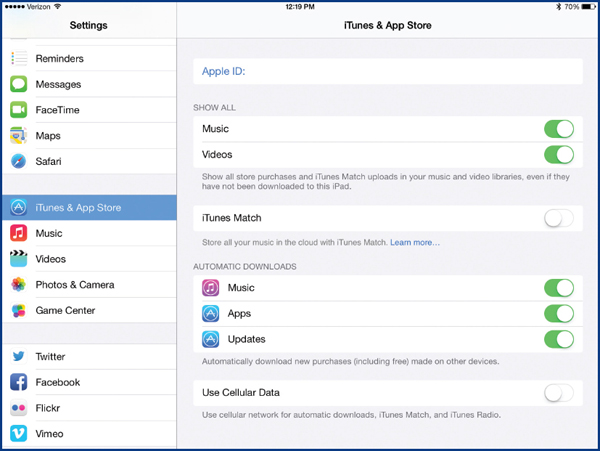
• Show All allows you to determine if you want to show in iTunes and the App Store all of your purchases and iTunes Matches (see next item) for both music and videos. The default is to show them.
• See the “Understanding iTunes Match” QuickFacts to determine how to set the iTunes Match option.
• The three Automatic Downloads options allow purchases on other devices, such as an iPhone, to be automatically downloaded to your iPad. These are on by default, and under most circumstances, you want to leave them that way.
• If you have a cellular iPad and have a limited data plan, you probably do not want to use cellular to do the automatic downloads between Apple devices and for iTunes Match. This is the default, which you probably want to leave.
Understanding iTunes Match
iTunes Match is an Apple subscription service currently costing $24.99 per year that provides a copy on iCloud of all your music, including what you have downloaded from iTunes, purchased from other sources, and copied from CDs. The music that you purchase and download from iTunes automatically goes up onto iCloud, but music from other sources does not and therefore has to be separately transferred to multiple devices. With iTunes Match, Apple replaces your music from other sources with the most recent versions and at the highest available fidelity. With all your music on iCloud, you can listen to it on any device with iCloud, including PCs.
With iTunes Match, all of your music collection is scanned and, for those items not downloaded from iTunes, Apple’s library of over 28 million songs is reviewed for a match. If it is found, the Apple copy is placed in iCloud for you to use. In the unlikely event that the song is not found, your copy is placed in iCloud. You can have up to 25,000 songs in iCloud, more if you buy them from the iTunes Store, that can be played on up to ten devices.
To use iTunes Match:
1. Open iTunes on your computer (not iPad).
2. Click Store in the menu bar and then click Turn On iTunes Match to open a page in iTunes explaining iTunes Match.
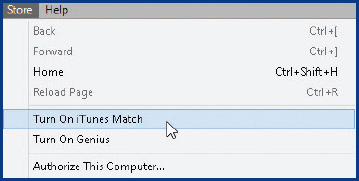
3. If you want to go ahead, click Subscribe For, currently, $24.99 Per Year, enter your Apple ID and password, and click Subscribe. Your music, either your copy or Apple’s, will be placed in your account on iCloud and you will see an iCloud icon appear next to the piece in your iTunes library.
4. On your iPad Home screen, tap Settings | iTunes & App Store | iTunes Match On/Off to turn it on if it is off.
Become Familiar with iTunes

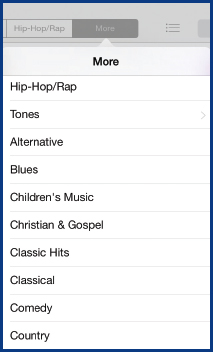
Take a quick look around iTunes and get familiar with the interface. Open it by tapping iTunes on the Home screen. The iTunes screen that opens (see Figure 7-1) has two sets of selectors. At the bottom of the screen there are the primary categories of Music, Movies, TV Shows, and Audiobooks. For each of the first four categories at the bottom there is a set of genres, or subcategories, at the top of the screen. The last three items on the bottom reverse the positions and put the major categories on top of the screen, as you can see in Figure 7-2. Top Charts provides a different way of looking at the iTunes library based on popularity. Genius provides suggestions based on what you have purchased, and finally, a list of what you have purchased.
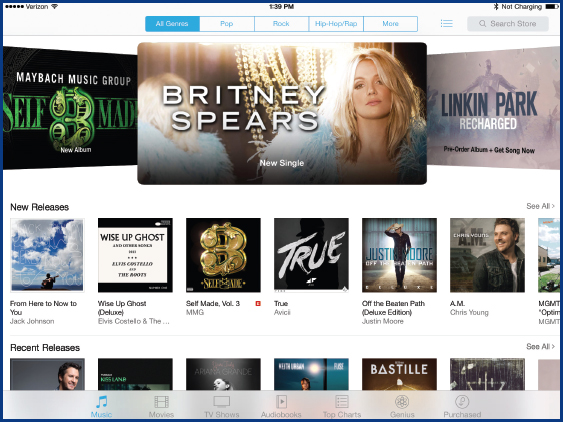
Figure 7-1: As seniors, we may not recognize much of the music that is displayed, but iTunes has our music also.
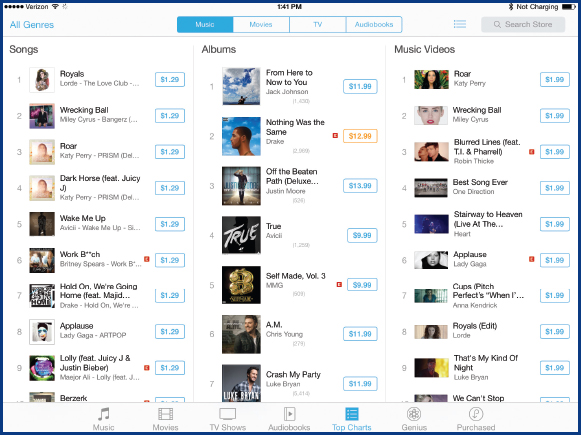
Figure 7-2: The quantity of music that is available on iTunes is mind boggling.
Search iTunes
The key hurdle in using iTunes, of course, is finding the music that you want to buy. iTunes gives you several ways of reviewing what is available.
1. When you first open iTunes, All Genres is selected in the upper selection bar. This provides a smattering of recent popular albums and songs of different types.
2. To hone in on a particular genre, tap the other buttons across the top to review their music.
3. The final button on the right provides a number of additional genres, including several such as Classic Hits and Classical, that may be of more interest to our age group.
4. On the far upper right is a search box in which you can enter album, artist, and composer names, as well as categories of music. For example, to search for the music of my youth and young adulthood, I entered “Music of the 50s and 60s” and was amazed at all that I got, as you can see in Figure 7-3.
Preview and Buy Music
Once you have found the music you may want, the next step is to preview it and make sure it is what you really want and, if so, to buy it. To preview and potentially buy an album or song that you have found:
1. From the iTunes page that you found earlier—for example, the result of my “Music of the 50s and 60s” search shown in Figure 7-3—tap an album or song you are interested in. I tapped Cruisin’ To The Hits Of The ’50s And ’60s.
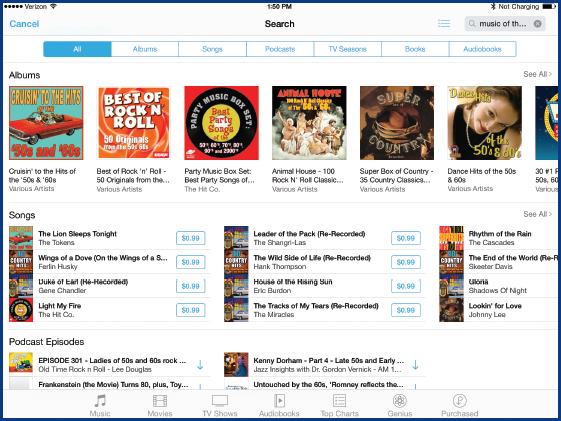
Figure 7-3: Don’t limit your searches to albums or artists, but try unique categories you might think of.
2. You get an overview, review summary, price, and list of the songs on an album or an individual song. Tap any of the songs to have a 90-second preview of the song played on your iPad.

3. When you find a song or album that you want to buy, tap the price, tap Buy Song  , enter your Apple ID password, and tap OK. You will see your song downloading, and when it is done, the word “Play”
  replaces the price. The first time you buy something from the iTunes or App Store you will be asked to agree to Apple’s Terms of Sale (a 34-page) document that you can have emailed to you).
CAUTION! Once you have purchased one song or album, you do not have to re-enter your Apple ID password during this session, making it easier and faster to make purchases—maybe not always a good thing. |
If you have had a computer for any length of time, you probably have put some music on it, either by downloading the music or by copying CDs you have to your computer (called “ripping” CDs). The major way to get music from other iTunes sources to your iPad is through your computer, and to do that you need to have iTunes installed on your computer. You may already have iTunes on your computer, but just in case, we will review that here, then look at collecting the music you have on your computer, ripping CDs to iTunes, and finally transferring and syncing your music between your computer and your iPad.
Get iTunes on Your Computer
iTunes is available for download for either a Mac or a PC from Apple.com.
1. Open the browser on your computer and type apple.com in the address box.
2. Click iTunes in the bar at the top and then click Download iTunes (see Figure 7-4) | Download Now | Run (you don’t have to enter your email address at this point).

Figure 7-4: iTunes on your computer can be your complete media (music, movies, and TV) resource.
3. When you see the Welcome To iTunes message, click Next, select the options you want (I add iTunes to my desktop, do not use it as my default player, but do automatically update it and use the default folder), and click Install | Yes | Finish to complete the installation. iTunes will appear on your computer as you see in Figure 7-5.
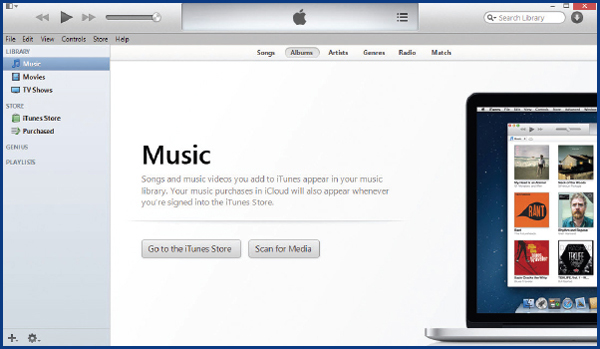
Figure 7-5: iTunes is, of course, biased to the iTunes Store, but you don’t have to use it.
Collect the Music on Your Computer
To get the music on your computer to your iPad, it must first reside in iTunes on your computer. Begin by finding the music on your computer. On recent Windows computers (Vista, 7, or 8), it is probably located within Libraries/Music/My Music, as you see in Figure 7-6. With that knowledge:

Figure 7-6: My Music is the default location for music on a PC, but it can be anywhere.
1. From iTunes, on the first time you use iTunes, click Scan For Media, as you saw in Figure 7-5. This will pick up the easily recognized music. On my computer it picked up most of the 18 albums I have.
2. Still in iTunes on your computer, click File | Add Folder To Library. Navigate to the folder that contains your music (most likely Libraries/Music/My Music).
3. Click the top album, press and hold SHIFT, click the bottom album to select them all, and click Select Folder.
4. You may be told that one or more of the songs you are adding to iTunes needs to be converted to a different format. Click Convert. The process of converting and adding your music to iTunes may take several minutes, depending on how big your library is.

Rip CDs to iTunes
To rip or add music from a CD to iTunes:
1. Place the CD in your computer’s CD drive.
2. Depending on your computer and whether iTunes is running, various messages will pop up. If iTunes is not running, you will see these messages and will need to take these steps:
• Windows 7 A single message pops up. Click Import Songs Using iTunes.
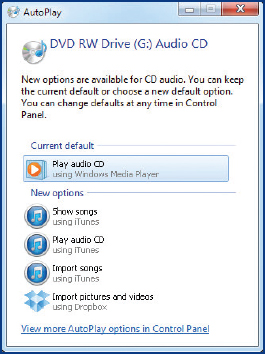
• Windows 8 Two messages appear. Tap or click the first and then tap or click Import Songs iTunes.

• iMac OS X Mountain Lion The CD will display on the desktop. Open iTunes and click Import CD.

3. If iTunes is running when you insert a CD, you will get a message asking if you want to import the CD into your iTunes library. Click Yes.
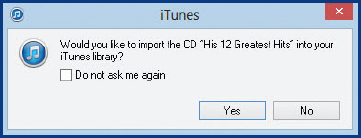
iTunes will open, displaying the CD you inserted and its songs, as shown in Figure 7-7. If iTunes wasn’t open when you inserted the CD, click Import CD on the far right.

Figure 7-7: When you insert a CD into a computer, you can play the CD or import it or individual songs.
TIP If you don’t want to import the entire CD, you can uncheck the songs you do not want to import. |
4. If you are asked about import settings, unless you have a special need, accept the default, and click OK.
5. As the CD is being imported, you’ll see the status at the top and a white checkmark in a green circle, as shown in Figure 7-8.

Figure 7-8: Music that you have imported into iTunes gives you virtually the same fidelity as playing the music directly from the CD.
6. When you are done importing, remove the CD from the computer.
Transfer and Sync to iPad
To transfer music from your computer to your iPad, plug your iPad into a Universal Serial Bus (USB) port on your computer and unlock the iPad, if necessary. If your iPad and iTunes on your computer are using the default setup, iTunes will immediately begin transferring your music on the computer to the iPad, as you can see in Figure 7-9. The process is called “syncing” because music on the computer that is not on the iPad will be transferred to the iPad, although the opposite is not true—music on the iPad but not on the computer will not be transferred to the computer, although music on the iPad will be available to play through iTunes on the computer but not physically reside on the computer.

Figure 7-9: iTunes on your computer provides the primary conduit of information between your computer and your iPad.
If the syncing did not take place automatically, in iTunes on your computer, click on the name of your iPad under Devices on the left, and then click Sync in the lower-right corner. In either case, when you are done, the music in iTunes on your computer should be the same as the music on your iPad.
Apple would like you to believe that iTunes is the be-all and end-all of music acquisition on your iPad. If you go to the App Store and search for “music players,” however, you will find over 100 apps that facilitate downloading and playing music on your iPad. These apps generally include a built-in browser that lets you search for legal, free music that you can download and then a player that will play this music. The free music is generally in the MP3 format and is from lesser-known artists and composers. I discuss getting and using such an app in the next section.
CAUTION! If you search hard enough, you can probably find top-rated artists and composers for free on sites that are probably illegally offering the music. I would not download this music for two reasons. First, you can get in legal trouble because you are violating the copyright laws. Second, if the site doesn’t care that they are violating the law in facilitating your downloading the music for free, what might they be including in the package you download that can steal information from your iPad and harm your data? I strongly recommend staying a long way away from such sites. |
Amazon provides another source of music that you pay for and either can download to your computer and then over to your iPad, or you can store it on the Amazon Cloud and then download the Amazon Cloud player for the iPad. In some cases, Amazon is cheaper than the iTunes Store (the album Cruisin’ to the Hits of the ’50 and ’60s discussed earlier in this chapter is $24.99 on iTunes and the MP3 version on Amazon is $9.49), but that is not universally true. In some cases, Amazon only offers CD versions of the music, which is more expensive than iTunes’ electronic version. We’ll briefly look at how an Amazon Cloud purchase and app works later in this chapter.
Use a Non-Apple Player
As was mentioned earlier, there are over 100 music player apps in the App Store. A few of these are shown in Figure 7-10. I will use the MP3 Music Downloader to demonstrate how a third-party iPad app downloads and plays music from the Internet. I have only looked at two such apps, and even that was only a cursory look, so my choice of the MP3 Music Downloader is not a recommendation and should not be considered even a knowledgeable choice, although from the bit that I have used it, it works well, is full featured, and doesn’t hound you to upgrade. Here is what I did:
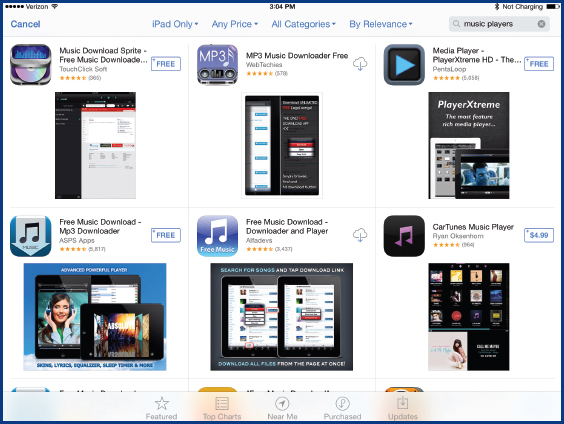
Figure 7-10: Many of the music players only give you a minimal app, and you have to upgrade at a price to get the full-featured player.
1. From the Home screen, tap App Store | Search box. If needed, clear the Search box. In the Search box, type music players, and press RETURN.
2. Select the music player you want to download, tap the price twice | Install App, enter your Apple ID password, tap OK twice | Open.
3. In most cases, a browser opens. In the Search box, type free music and press RETURN. Three sites that I believe to be safe are:
freeplaymusic.com/ (great for music that is free to use on websites)
4. Select a site and use its commands to find and then select the music you want. Some sites allow you to preview a piece and then download it when you are ready.

5. When you have selected the song you want, tap the Play button to listen to it, as you can see in Figure 7-11.
Figure 7-11: Most of the players combine a browser with a file system with the actual player.
Use the Amazon Cloud Player
The Amazon alternative allows you to buy popular music by top-rated artists, sometimes at a discount, and then either download it to your computer and then transfer it to your iPad, or store it on the Amazon Cloud and then use an Amazon Cloud player to listen to the music. The option of using your computer was discussed earlier in this chapter. Look here at using the Amazon cloud.
1. On your iPad’s Home screen, tap Safari. In the address box, type amazon.com, and press Go.
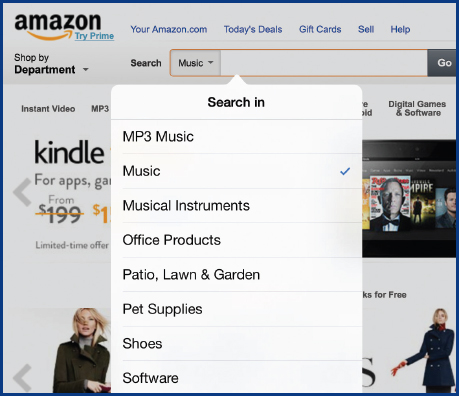
2. In Amazon’s search box, tap the All down arrow | Music, and type the music you are searching for.
NOTE Amazon sells CDs, which they ship to you and you can play them and rip them on your computer and, once ripped, transfer to your iPad. Amazon also sells MP3 electronic files, which you can download to your computer and transfer to your iPad, or put them on the Amazon Cloud and play them with the Amazon Cloud Player on your iPad. With most CDs, you can also have them put on Amazon Cloud at no extra cost. |
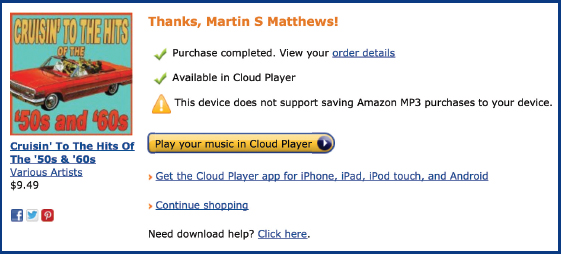
3. When you find what you are looking for (I searched for and found the same album I searched for on iTunes—Cruisin’ to the Hits of the ‘50s and ‘60s—see Figure 7-12), tap the album, review the content, and when you are ready, tap Buy. Enter your Amazon ID and password and continue to complete the purchase.

Figure 7-12: When an Amazon album is displayed, you can preview a song by tapping the arrowhead on the left of a song.
NOTE You are told when the purchase is complete that, unless you already have the Amazon Cloud Player app, your device (iPad) does not support playing or saving your purchase. You can, of course, fix this by getting the app. |
4. To get the Amazon Cloud Player app, either:
• Tap Get The Cloud Player App on the purchase completed page, and tap iPad | Get The App to open the App Store displaying the Amazon Cloud Player.
–Or–
• Tap App Store from the iPad’s Home screen and search for Amazon Cloud Player.
• Then, in either case, with the Amazon Cloud Player displayed, tap Free | Install App, enter your Apple ID password, tap OK, and tap Open when it is done.
5. When the Amazon Cloud Player opens (see Figure 7-13), enter your email address, enter your Amazon password, and tap Sign In. You will see the music you have purchased for the Amazon Cloud. Tap the albums and songs you want to play.
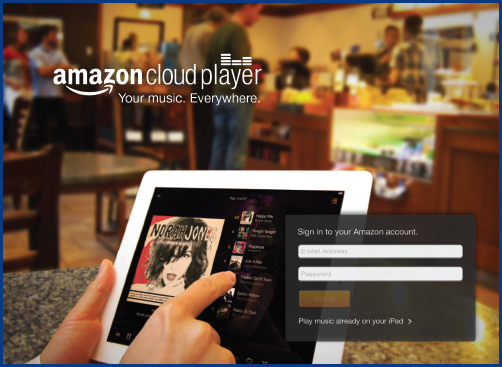
Figure 7-13: Amazon Cloud Player will also play other music it sees on your iPad.
A playlist is a list of songs from various albums that you want to play together in sequence. Selecting the playlist plays all the songs on it. You can create a playlist in Music, in third-party music players, and in the Amazon Cloud Player. The process of creating a playlist is similar in all cases—basically select the songs you want on a playlist and give it a name. Here is how you do it in the iPad’s default Music player.
1. From the iPad’s Home screen, tap Music | Playlists on the bottom left. If you have purchased several individual songs on an album, they will be shown as a playlist under the album’s name.
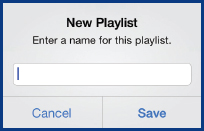
2. To create a new playlist, tap New Playlist in the upper-right corner, type a name, and tap Save. This will open a list of all the songs on all the albums you have either imported from your computer or purchased on iTunes, as shown in Figure 7-14.

Figure 7-14: You can also add songs from both the Albums and Artists pages using the buttons at the bottom of the page.
3. Either swipe up or use the alphabetic index on the far right to scroll through the list so you can find the songs you want.
4. Tap the songs you want on the playlist. When you have selected all the songs you want, tap Done. The list of songs on your playlist will appear.
5. Tap Edit in the upper left to go into edit mode, as you see in Figure 7-15.

Figure 7-15: You can change a playlist by opening a playlist as if to play it and tapping Edit in the upper-right corner.
NOTE Only playlists that you create on the iPad can be edited. Playlists that you bring over from your computer cannot be edited. |
6. To delete a song on the list, tap the white bar in the red circle and then tap Remove  . Drag the grip strip on the far right to reposition songs within the list.
7. To add a song to the list, tap the plus sign in the upper right and repeat Steps 3 and 4. When the list is the way you want it, tap Done | Playlists in the top-center area. Your new playlist will appear on Music’s Playlists page.
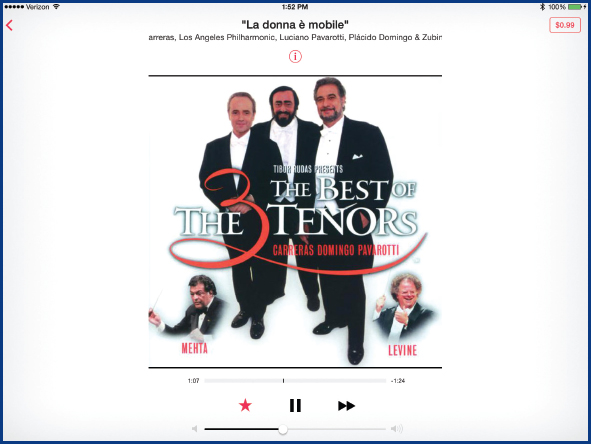
You can listen to music on your iPad using iPad’s Music app and using any of the third-party music players, including the Amazon Cloud Player. Music is the iPad’s built-in player and has a number of features to fulfill that function, as you see in Figure 7-16. On more recent iPads, unless it has been moved, the Music icon is on the right end of the dock at the bottom of the screen.

Figure 7-16: The Music app allows you to play not only music, but also podcasts and audiobooks.

Music’s controls include:
• Player controls with Previous and Next to step through an album one track at a time in either direction, and Play and Pause to start and stop playing the current song.
• Now Playing to enlarge the cover, provide enlarged player controls, and provide two additional controls as shown in Figure 7-17.

Figure 7-17: The Now Playing screen may be considered more attractive than the library image.
• Return to library leaves the album display and returns to the library display.
• Song List displays the list of songs in the album.

• Repeat repeats the current song.
• Current position shows where you are currently at in the song that is playing. You can drag the red position marker (also called a “playhead”) in either direction to move what is currently playing.
• Progress bar provides the span for marking the current position in a song that is playing. The number of minutes already played and remaining are at either end of the progress bar.
• Shuffle rearranges the list of songs in an album and plays them in a random order.
• Volume slider can be dragged left or right to lower or raise the volume of the music being played.
• Organization buttons open different organizational views of your music library.
• Store immediately opens the iTunes Store.
Set Up Music
Open Music’s settings from the Home screen by tapping Settings | Music. Options include:

• Sound Check, when turned on, levels out volume highs and lows.
• EQ allows you to select preset equalizer settings for various types of music.
• Volume Limit lets you set a maximum volume limit, which you might want to use with headphones.
• Group By Album Artist groups albums by one artist together.
• Show All Music provides for the display of all music that has been downloaded to the iPad or stored on your iCloud account.
• iTunes Match sets up the storing of all of your music on iCloud including music you have ripped from CD and downloaded from other sources. See the “Understanding iTunes Match” QuickFacts earlier in this chapter.
• Home Sharing displays the Apple ID used with Home Sharing. See the “Use Home Sharing” QuickFacts later in this chapter.
Play Music
Actually playing music is, at this point, anticlimactic and you probably have, with touch so obvious, figured it out. It, of course, varies a bit, depending on the view you have on the screen.
1. From the Home screen, tap Music. The most common view to open is the Album view, shown earlier in Figure 7-16.
2. From Album view, tap the album you want to play to open the list of songs.
3. On the list of songs, tap the song you want to play. The progress bar and its controls will open, as you see in Figure 7-18, and the song will begin. The entire album will play if you don’t interrupt it.
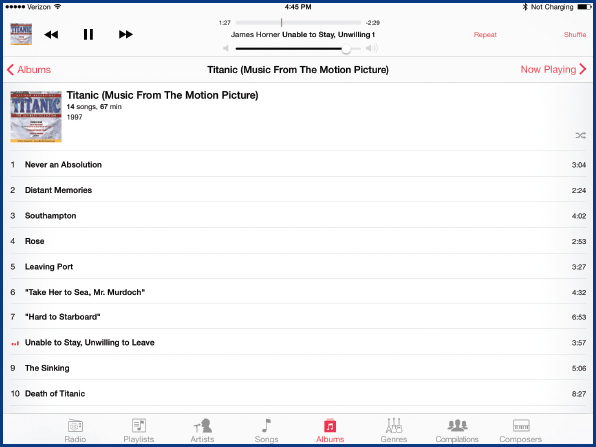
Figure 7-18: Some headphones, such as Apple’s EarPods, allow you to adjust the volume remotely on the wire to the headphones.
4. Tap Pause in the player controls on the left to temporarily stop playing the music. Tap Play to start playing again where you left off.
5. Tap Previous or Next to go to the previous or next song or track in the album.
6. Tap Now Playing in the top right to open the Now Playing view shown earlier in Figure 7-17.
7. If you open in or select Artists instead of Albums, you still get albums but they are organized by artist name, so Steps 2 through 6 apply. The same is true with Playlist, except that “playlist” replaces “album.”
8. If you open in or select Songs, you get a long list of all the songs on your iPad, as you saw earlier in Figure 7-14. It is organized (sorted) by song title and you can jump down or up the alphabet by tapping the letters on the far right. Steps 3 through 6 apply here.
Use the Audio Controls
If you are playing music while also using another app, like reading a book or magazine, you can quickly get to a set of audio controls in the Control Center without having to open the Music app and possibly losing your place in what you are reading, as you can see in Figure 7-19. Here is how you can display the audio controls:

Figure 7-19: The audio controls in the Control Center provide an alternative to opening the Music app.
From any open screen on your iPad, swipe up from the bottom of the screen.
With the release of iOS 7 and iTunes 11.1 on both PCs and Macs in the fall of 2013, Apple debuted iTunes Radio, a competitor of Pandora and other streaming (the music is sent to you as you are listening to it) Internet “radio” stations. iTunes Radio provides over 250 stations dedicated either to particular types or genres of music or groupings of music such as the current top 100 songs or The Beatles Radio. You can also create your own station, which is stored on iCloud, so you can listen to it and any of the other stations anywhere you have iTunes including your iPhone, iPod, and your PC or Mac computer.
NOTE iTunes Radio is itself free, but there will be occasional ads to listen to, and you are reminded that you can buy the current song for your own library by clicking the price associated with it. If you sign up for iTunes Match (explained earlier in this chapter) you will be spared the advertising. |
When you first open iTunes Radio a welcome message appears. You can tap Learn More to read a brief overview of iTunes Radio, or you can tap Start Listening to explore iTunes Radio, which opens as you see in Figure 7-20. Across the top are featured stations. On the bottom are a couple of suggested stations for you based on the music you have. To use iTunes Radio on your iPad:

Figure 7-20: iTunes Radio provides a great way to sample a very wide variety of music.
1. From within Music, tap Radio in the bottom-left area. Scroll either list of stations by swiping from right to left.
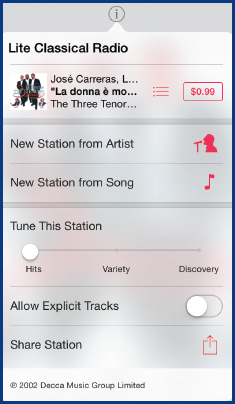
2. Select a station to listen to by tapping it. The station will begin playing. Tap Now Playing in the upper-right area to see the cover of the current song.
3. Tap the info icon  for more information about the current song and to create a new station based on the current artist or current song. You can also tune the current station to play only the top hits, a variety of related music, or explore some variations off the theme of the current station. Finally you can choose to allow explicit tracks and if and how you want to share this station with others.
4. There are several ways to start a station of your own. In Step 3 you saw how to start a new station based on an artist or a song you are currently playing. You can also tap New Station (the red plus sign) on the iTunes Radio page shown in Figure 7-20. On the screen that opens you can:
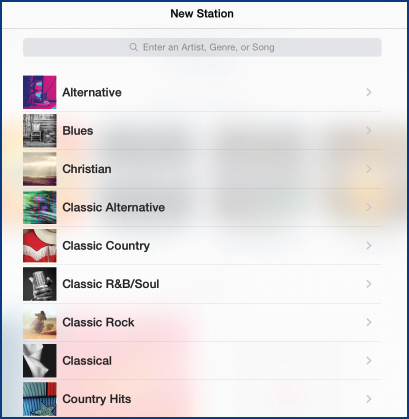
TIP If you only have two or three of your own radio stations, then you can see the New Station plus sign on the initial iTunes Radio screen. If you have four or more of your own stations, then will need to scroll up from bottom to top to see New Station. |

• Enter an artist, genre, or song on which to base a station. For example, I entered “Unchained Melody” and got five alternative songs and one artist. I then pick the one that is closest to what I had in mind. (Actually none of the suggestions were what I had in mind—the Platters recording.) A new station is created and the first selection begins playing.

• Alternatively, tap a selection and then follow it through to get the music you want. For example, I tap “Decades” and then tap ’’’50s” followed by tapping ’’’60” to hear a medley of song snippets to help me decide if I like that choice. If I do, I tap the plus sign on the right.

5. You can see and return to music you have recently listened to by tapping History in the upper-right area of the iTunes Radio page you saw in Figure 7-20. A list of the songs is displayed as you can see in Figure 7-21. Tap a song to hear it again and/or tap the price of the song on the right to add it to your library.

Figure 7-21: On iTunes Radio it is easy to focus on the music that you like.
6. To change or delete a radio station you have created, tap Edit on the left of the My Stations heading. Tap the station you want to work with. You can add artists, songs, and/or genre that you want more of or don’t want to hear. Alternatively, you can tap Delete Station and then tap Delete to remove the station.

Using Home Sharing
You do not have to download everything in iTunes on your computer to your iPad in order to listen on the iPad to all the music on your computer or on other computers on your home network. Apple’s Home Sharing allows you to do this, but it must be enabled on all the computers with which you want to share media. You can share not only music, but also videos, movies, and TV, which will be discussed in Chapter 8. Begin by enabling Home Sharing on your computer, then enable it on your iPad, and finally on any additional computers. iTunes must be installed on each device where you will also need to enable Home Sharing with the same Apple ID and password.
1. On your computer, open iTunes and in the menu bar click File | Home Sharing | Turn On Home Sharing.
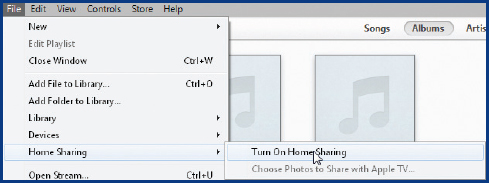
2. Type your Apple ID and password, and click Turn On Home Sharing (see Figure 7-22).

Figure 7-22: Using Home Sharing allows you to keep only what you are currently listening to on your iPad.
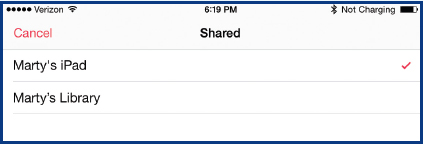
3. On your iPad, from the Home screen, tap Settings | Music, and, under Home Sharing, type the Apple ID and password used on your computer, and tap Return.
4. If you already have an Apple ID shown in Music settings and it is not the same as you used in iTunes on your computer, tap the Apple ID | Sign Out. Then do Step 3 with the correct ID.
5. From the iPad’s Home screen, tap Music | More (in the bottom-right area) | Shared and either computer name iPad to utilize the music on your iPad or computer name Library to access the music on that computer.
6. Add other computers to Home Sharing by installing iTunes and turning on Home Sharing as described in Steps 1 and 2.
READ ON THE iPAD
Reading on the iPad, especially with the Retina display, is a real joy, comfortable, easy on the eyes, and offers more to read than a person could do in several lifetimes. Many newspapers are available both in Safari and in their own apps. Next, there are a large number of magazines, again both online and in their own apps. Then there is the iBook app that comes with iPad with which you can buy books and read them. Finally, there are a number of third-party eBook readers available in the App Store, along with thousands of free books that you can read and a great number more that you can buy.
There is a great deal of material to read on the Internet that is available directly in Safari without another app. This includes web pages themselves, blogs (web logs, or ongoing writing about a particular subject), newspapers, and magazines. Here are examples of web pages and blogs (newspapers and magazines are very similar).
Read Web Pages
There are a number of websites with a lot of written material, for example, CNN.
1. From the Home screen, tap Safari.
2. Tap in the address box at the top center of the screen, and tap the X on the right end of the box to remove its contents.
3. Type cnn.com and tap Go. CNN’s home page will open.

4. When you see an article you want to read, tap Full Story to open a page with that story.
5. Tap Reader (the stack of lines) at the left end of the address bar. The article will appear in a well-formatted, easy-to-read page (see Figure 7-23).

Figure 7-23: The built-in reader in Safari is a significant asset to reading webpages.
Read Blogs
Blogs are an ongoing series of articles by one or more authors, generally on a single topic. You can search for and read a blog on the iPad.
1. In Safari, clear the address bar, type google.com, and tap Go.
2. In Google’s search box, type blogs about ipad and tap Search.

3. You may have to go through several pages by tapping links on each page to get to an article you want to read. In this case, you normally do not have the reader available, so you must read directly from the webpage, as you see here.

A number of major sites, especially newspapers and magazines, have their own dedicated reader apps to more fully control the reading experience.
Use a Newspaper App
Here is how to get and use The Seattle Times app, as an example:
1. From the Home screen, tap App Store.
2. Tap in and clear the search box, and then type Seattle Times and tap Search. The Seattle Times App appears.

3. Tap the price and then tap Install. As needed, enter your Apple ID and any identifying words or characters for the site. When the installation is done, tap Open.
4. The Seattle Times app opens with an actual image of the front page, as you can see in Figure 7-24.

Figure 7-24: A number of newspapers give you an actual image of their front page, as if you were reading the real paper.
5. Double-tap an article to open it in a reader, such as that shown in Figure 7-25.

Figure 7-25: Many dedicated readers are as good as, if not better than, the Safari reader.
Use Newsstand and a Magazine App
The Newsstand is a holder for certain newspapers and magazines whose app has been customized so that the publication goes into the Newsstand (the Newsstand itself is not an app). One such magazine is National Geographic. Here’s how to get it:
1. From the Home screen, tap the Newsstand icon to open the Newsstand.


2. Tap Store on the bottom-right corner of the Newsstand. The App Store will open and display several magazines, as you can see in Figure 7-26.

Figure 7-26: A large number of magazines don’t appear in the Newsstand Store, but are available and also work with Newsstand.
3. To locate a magazine you don’t immediately see, tap and clear the search box in the upper-right corner, type the magazine name, and tap Search. A set of magazine apps will appear.
4. Tap National Geographic in either the original set of magazines if it appeared in Step 2, or as a result of a search in Step 3.
5. Tap Free, tap Install, and then tap Open. A page opens showing recent copies of the magazine where you can buy individual issues or subscribe for a year.
6. Tap your choice, tap Buy, type your Apple ID password, and tap OK. Tap Download and the magazine will download and then be displayed, as you see in Figure 7-27.

Figure 7-27: Reading National Geographic on an iPad is a terrific experience. The photography is spectacular, and the interactive graphics and videos are stunning.
TIP Some magazines automatically download new issues and sometimes automatically charge you for that new issue, depending on your subscription arrangement with them. By tapping Settings | iTunes & App Store you can turn off the Automatic Downloads Updates. |
One of the great assets of the iPad is the ability to comfortably read books and store a number of books to read. With just the iPad, you can carry a small library around with you; add to that the iBookstore and the iCloud, and you have an endless supply of reading material. The iBooks app is not only a container and organizer for your books, as is Newsstand for magazines, but it is also an excellent reader, a portal to the iBookstore, and a means to fully annotate your books with bookmarks, highlighting, and notes.
Get and Set Up iBooks
Start your iBook experience by getting it and setting it up the way you want.
1. From the Home screen, tap App Store, tap and clear the search box, type ibooks, and tap Search. In the iBooks description that opens, tap Free twice, tap Install App, type your Apple ID password, tap OK, and tap Open.
2. Press Home and tap Settings | iBooks to open the iBooks settings.
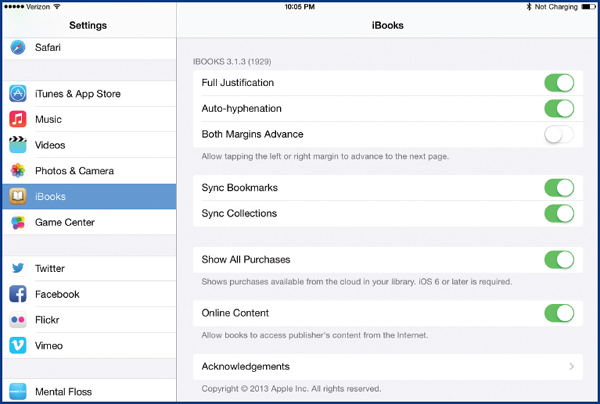
3. Review the settings and consider if you want to change any of them:
• Full Justification, when enabled, aligns the text to the margins on both the left and right edges by spreading out the characters and words. The alternative is to have a ragged right edge with consistent character and word spacing.
• Auto-hyphenation, when enabled, allows splitting words on the right margin to facilitate justification without drastic changes to the character and word spacing.
• Both Margins Advance, when enabled, allows you to advance to the next page on the right by tapping the left margin as well as the right margin. Otherwise, tapping the left margin will take you back one page.
• Sync Bookmarks and Sync Collections, when enabled, syncs your bookmarks, notes, and current page information, as well as the way you have organized your books into collections across your iOS devices such as iPhones and iPods.
• Show All Purchases, when enabled, displays book purchases that you have removed from your iPad but that are kept on iCloud.
• Online Content, when enabled, allows the book you are reading to go online and access content from the book’s publisher.
• Acknowledgements is Apple acknowledging the people that contributed to iBooks.
4. Press Home to leave Settings.
Search and Buy from the iBookstore
The iBookstore is like the iTunes Store except that it is for books. Here is how to buy or acquire (some are free) one or more books:
1. From the Home screen, tap iBooks and tap Store in the upper-left corner. The iBookstore will open as you see in Figure 7-28.
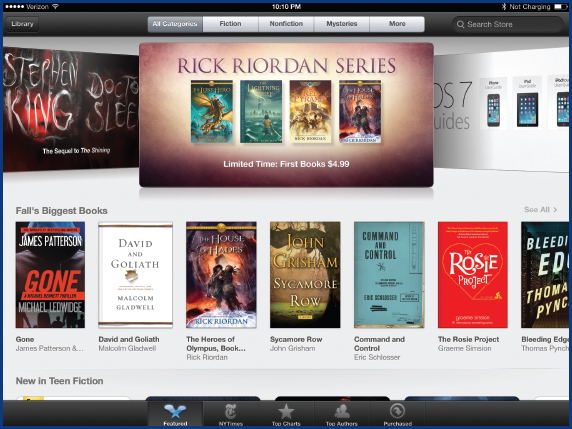
Figure 7-28: Only a small percentage of the books that are available are shown on the initial iBookstore screen. Look at the other categories and search for what you want.

2. Swipe from right to left the various lines of books. Swipe up to review various categories of books. You might want to explore the categories “Great Books for $3.99 or Less” and “Free Books.” You can also use the search box to search for specific books, authors, or categories.
3. When you find a book you are interested in, tap it to open detailed information about it. If desired, tap More to read a lengthier description.
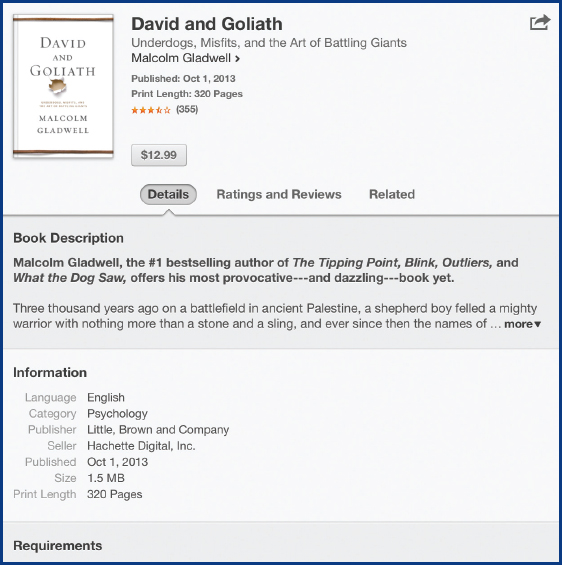
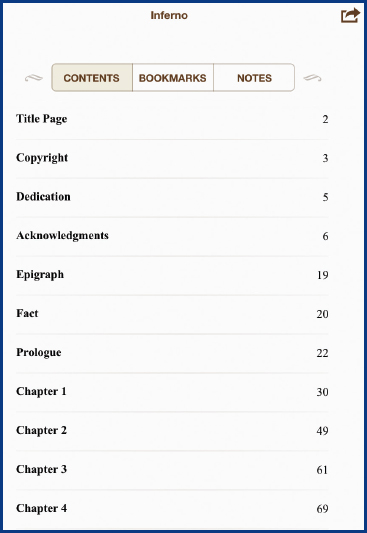
4. If you want to read a sample of the book, tap Sample. The book will appear on your bookshelf with the word “Sample” on the cover. Some samples are quite extensive. Dan Brown’s Inferno, pictured here, which is a 480-page book, has a 117-page sample.
5. When you are ready to buy a book, tap the book’s price | Buy Book, enter your Apple ID password, and tap Return. The book will appear in iBooks.
Use iBooks
While the principal purpose of iBooks is to facilitate the reading of books, it also provides for the acquiring, organization, display, and disposal of books. The functions that can be performed in iBooks include:
• View books either in the standard bookshelf view shown in the previous section or in a list view, shown next, by tapping the stack of lines icon in the upper-right corner.

• Sort List View by tapping one of the sort methods at the bottom of the list view screen.
• Arrange books on the bookshelf by touching and holding on a book while dragging it to another location.
• Search for a book by scrolling to the top (swiping from top to bottom) of the bookshelf or book list; tapping in the search box; entering the keywords such as author, title, or subject; and tapping Search.
• Delete books in either view by tapping Edit in the far upper-right corner and tapping the book or books you want to delete to place a white checkmark in a blue circle on the book(s). When you are ready, tap Delete. You then can tap either Delete This Copy to delete the copy on your iPad or Delete From All Devices to delete copies from your iPad as well as any copies on your other iOS devices. Finally, tap Done. The book will remain available to you in iCloud (see the icon in the upper-right corner of the book). Tap the book to bring a copy back onto the iPad.


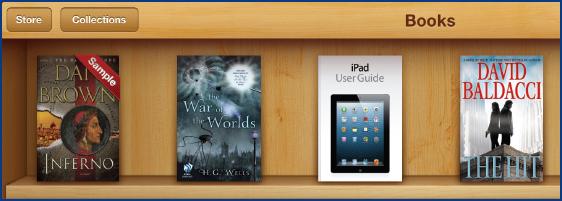
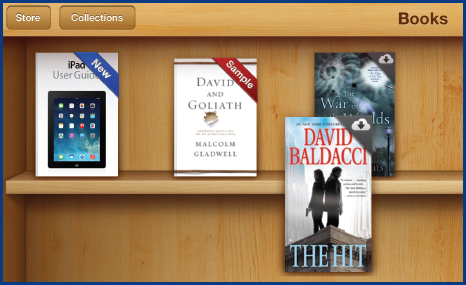
• Organize books by putting your library into collections or categories that you set up. You saw earlier how you can have iBook put your library into its categories in List view, but with Collections, you can put your library into your own categories (called “collections”) that appear in both Bookshelf and List views. Here’s how:
1. Tap Collections at the top left of either the Bookshelf or List view, and tap New. Type the name of the new collection and tap Done. Repeat this for additional collections.

2. Tap Edit on the far upper right, tap the books you want in a collection so they have a checkmark, tap Move in the far upper left, and tap the collection in which you want to place the selected books. The collection will open in a separate bookshelf or list.
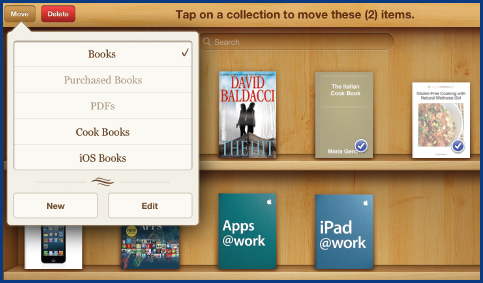
3. Return to the original bookshelf by tapping Collections | Books.
4. Swipe the bookshelf to either the left or right to display other collections.
Read a Book
Using iBook to read a book is quite easy, but iBook also provides the means to do much more than just read in terms of enlarging the page, changing the font size, jumping to a particular page, jumping to the table of contents, looking up the definition of a word, and adding a bookmark. Not all books that you read in iBooks have exactly the same features, but many have those that are described here.
• From iBook, if needed, swipe the bookshelf to open the collection and then tap the book that you want to read. The book will open. If you have never read any of the books on the iPad before, the book will open to page 1. If you have previously read some of the book on the iPad or other iOS device with which you are sharing the book, the book will open to where you were last reading, as shown in Figure 7-29.

Figure 7-29: The iPad provides an excellent and easy reading experience.
• Turn a page by tapping in the left margin or swiping from the left edge to go back a page, or by tapping in the right margin or swiping from the right edge to go forward a page.
• Display the controls (see Figure 7-30) by taping virtually anywhere on the page, although Apple recommends toward the center of the page.

Figure 7-30: The controls, which can be displayed or not, provide easy manipulation of a book, much more so than a paper book held in your hands.
• Return to the library by tapping the Library button  in the upper-left corner.
• Display the table of contents or a list of bookmarks or your notes by tapping the Contents icon  and then, if not Contents, tapping either Bookmarks or Notes.
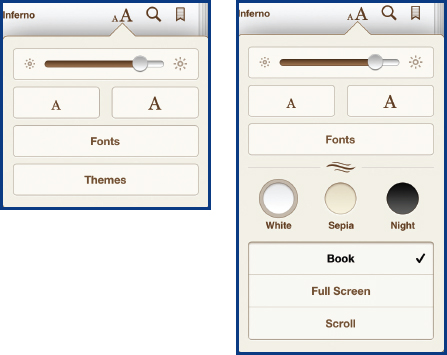
• Change the font and size by tapping the Fonts icon  to open the Fonts menu where you can change the brightness using the slider at the top, decrease or increase the font size by repeatedly tapping the smaller or larger “A,” change the font by tapping Fonts and tapping a font, and choose a different theme by tapping Themes and tapping a color and/or theme.
• Search the text by tapping the Search icon  to open the Search box. Type a word to search for and tap Search.

• Add a bookmark by tapping the Bookmark icon  on the far right. Tap the icon again to delete it. Since iBook keeps track of where you are currently reading, bookmarks are for other purposes you might have. See a list of bookmarks by tapping the Contents icon | Bookmarks.
• Go to another page by dragging the slider at the bottom of the page in either direction. 
Annotate a Book
For those who like to annotate the books they read, reading in iBook has to be a real asset. Besides leaving bookmarks, as discussed earlier, you can:
• Select text, any amount of it, by double-tapping some of what you want to select and then dragging the end points to enclose all of the text you want to select. When you do that, a menu appears that allows you to get a definition, highlight, make a note, or search the selection.

• Magnify a word by touching and holding on a particular word. A magnifying glass will appear above the word and allow you to move your finger to exactly select what you want. When you lift your finger, the word(s) will be underlined in red.

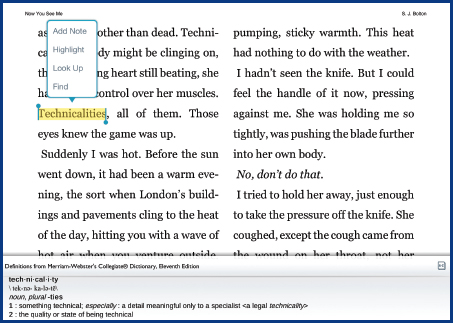
• Define a word by selecting it and tapping Define. A dictionary entry will appear and define the word, as shown in Figure 7-31. If that is inadequate, you can tap either Search The Web or Search Wikipedia for further information.
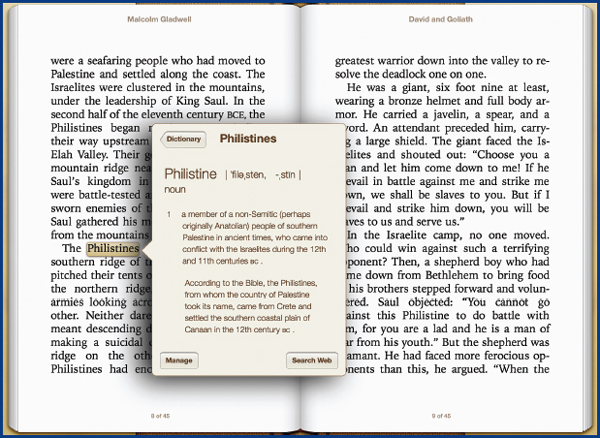
Figure 7-31: The ability to immediately look up words as you are reading can be helpful.
• Highlight text by selecting it and tapping Highlight. In the Highlight menu that opens, tap one of the five colors, the underline  , or add a note. By default, the highlight will be the highlight color you last used, or, if you have not used highlight before, it will be yellow. You can both highlight and add a note at the same time. Close the highlight menu by tapping anywhere outside of the highlight.

• Add a note by selecting the text to be noted and tapping Note. A blank note will appear where you can type the note you want. When you are finished, tap outside the note or highlight. The note will disappear and a little yellow icon will appear in the margin  .
.

• Remove highlight or a note by tapping the highlighted text or note and tapping the remove highlight icon  . If you have a note, you will be told that the note will also be deleted and you can tap Cancel or Delete; otherwise, just the highlight will be removed from the text and you are returned to the normal page.
• Search by selecting a word and tapping Search. The same search panel opens as shown earlier with the Search icon at the top of the page.
When you search the App Store, you will see that there are a number of third-party readers for books, magazines, and newspapers. Two of the better-known readers are Amazon’s Kindle reader and Barnes & Noble’s Nook, which allow you to read the many documents created for these devices.
Use the Kindle Reader
Amazon says that the Kindle app will give you access to over a million books and hundreds of newspapers and magazines.
1. From the Home screen, tap App Store and tap in and clear the search box. Type Kindle and tap Search. The Kindle information will be displayed.

2. Tap Free twice | Install App, type your Apple ID password, and tap OK | Open.
3. If available, enter your Amazon ID and password or register with Amazon, and tap Register This Kindle. If you have previously purchased Kindle books, they will appear.
4. To purchase books for the Kindle reader, open Safari, type Amazon.com in the address box, and tap Go. Search for the book you want, select the Kindle edition, and complete the purchase. The book you purchased will appear in your Kindle library.
5. Tap the book you want to read, and it will open in the reader. It looks and operates like iBooks. You can:
• Turn a page by tapping in the left margin or swiping from the left edge to go back a page, or by tapping in the right margin or swiping from the right edge to go forward a page.
• Display the controls (see Figure 7-32) by tapping toward the center of the page. The controls, from left to right, are used to go to various places within the book as shown next; change the brightness, font, font size, color, and layout of a page; search the book for a word or phrase; open a notebook of your notes and bookmarks; analyze the people and terms on a page (this is a unique feature); add a bookmark; with the slider at the bottom of the screen, jump to any page in the book; and return to the last page read.

Figure 7-32: The Kindle reader is very similar to iBook.

• Select a word by pressing and holding on it. A magnifying glass will appear to help you select it. When you remove your finger, the definition of the word will appear at the bottom of the page (if you haven’t already, you will have to first download a dictionary for Kindle) and the highlighter will open where you can add a highlight, a note, or share the information via Twitter or Facebook.

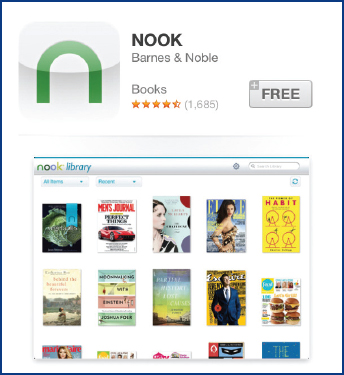
Use the Nook Reader
Barnes & Noble says that Nook reader gives you access to over three million books, including over a million free books.
1. From the Home screen, tap App Store and tap in and clear the search box. Type Nook and tap Search. The Nook information will be displayed.
2. Tap Free twice | Install App, type your Apple ID password, and tap OK | Open.
3. If you have a Barnes & Noble or Nook account, tap Sign In, select your country, tap Yes to accept the Nook end-user agreement, tap Submit, enter your email address and your password, tap Sign In, and proceed to Step 5.
4. If you do not have a Barnes & Noble or Nook account, press Home, tap Safari, type barnesandnoble.com in the address box, and tap Go. In the Barnes & Noble website, tap Sign In at the top center. Type your email address, tap No, and tap Secure Sign In. Enter the requested information and tap Create Account. Return to Step 3 and register your Nook reader.
5. To purchase books for the Nook reader, open Safari, type barnesandnoble.com in the address box, tap Go, and tap Nook Books. Search for the book you want, select the Nook edition, and complete the purchase. The book you purchased will appear in your Nook library.
6. Tap the book you want to read, and it will open in the reader. It operates much like iBooks and the Kindle reader. You can:
• Turn a page by tapping in the left margin or swiping from the left edge to go back a page, or by tapping in the right margin or swiping from the right edge to go forward a page.
• Display the controls (see Figure 7-33) by tapping toward the center of the page. The controls, from left to right, are used to return to your library of books; open the table of contents, list of bookmarks, or list of annotations; go to a particular page number; change the font size, font, color, line spacing, and margins; change the brightness; search the book for a word or phrase; see information about the book; add a bookmark; and with the slider at the bottom, jump to any page in the book.

Figure 7-33: The Nook has a slightly different look, but it operates similarly to other e-readers.

• Select a word by pressing and holding on it. When you remove your finger, the definition of the word will appear at the bottom of the page and a menu of options will open where you can add a note or a highlight, look up the word in a full-featured dictionary, or search for the word in the book.
Using Public Libraries
Many public libraries, even smaller ones, have programs for lending eBooks on the Internet. You need a library card and that is about all. There are differences among libraries on how the eBook lending works, and you’ll need to explore your own local library. To give you an example, I’ll demonstrate how my regional library’s program operates. It is the Sno-Isle Libraries and covers Snohomish and Island Counties in the northwest corner of Washington state. Here’s what I did to get onto my library’s program:
1. Open Safari | Google. In Google’s text box, I typed Sno Isle Libraries. This got me the Uniform Resource Locator (URL) for the library, and by tapping the link, I opened its home page, which you can see in Figure 7-34.
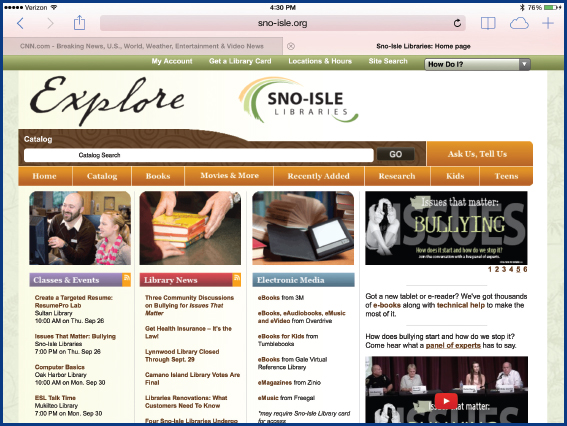
Figure 7-34: Many, if not most, libraries have electronic media available for loan.
2. I tapped Electronic Media and got a list of six eBook and eMagazine services. I tapped one of the services (OverDrive) and tapped All Fiction. There were 17,822 titles available.
3. I did a search on Dan Brown’s Inferno. The library had 39 electronic copies, none were immediately available, and 82 people were in line waiting for it, as shown in Figure 7-35. Also, it was available for Kindle and two other formats I was not familiar with.

Figure 7-35: Like paper books, libraries have a limited number of copies of eBooks and sometimes there are long waiting lists for them.
4. After looking at several more books, I found one I could immediately borrow. I tapped Borrow, entered my library card number, tapped Sign In | Download, selected a service (Kindle), and then tapped Confirm & Download.

5. The Amazon website opened and confirmed that I had gotten a Digital Library Loan that expired in two weeks (upon request, this can be lengthened to three weeks). In Amazon, I had to tap Get Library Book and make sure that the iPad was the selected device.
6. I opened the Kindle reader app, tapped the Sync icon  , and the library book appeared in the Kindle’s library. Tapping the book opened it so it could be read. A loaned library book looks and reads exactly like a purchased book, except that it will disappear in a limited time, usually two to three weeks.
USE MAPS
iPad’s Maps is one of its most useful and practical apps, as well as being fascinating and even fun. You can quickly find where an address is located as well as get directions to it. You can also see where you currently are and get information about your current area, as well as find out about points of interest and local establishments. You can see this in a standard map view, shown in Figure 7-36, in a 3-D satellite view, and in a hybrid view where the street names, points of interest, and establishments are overlaid on the satellite view, as you can see in Figure 7-37. If that wasn’t enough, you can view the satellite and hybrid views straight up and down, where you can better see the streets, or at an angle where you can better see the buildings. Maps has two primary purposes: to find out where something is located and to get directions to a location.
Figure 7-36: Maps standard map view provides a great amount of information and is similar to a paper map.

Figure 7-37: Maps hybrid satellite view, while harder to use as a map, is fascinating to look at.
NOTE Maps requires an Internet connection, either Wi-Fi or cellular, and voice driving directions requires a cellular connection that will incur data usage. To get your current location you must give permission for that. While maps are relatively accurate and quite useful, they are not perfect and you must allow for some error. |
Maps can be fun to explore, but are also very useful to find out where something is located.
1. From the Home screen tap Maps. Maps will open and show you where you are currently located with a blue dot in a white circle, as you can see in Figure 7-38.

Figure 7-38: You can always find your current location in Maps.
2. You can change what you are seeing:
• Move around a map by dragging it with a single finger.
• Change the orientation of the map by rotating it with two fingers.
• Return to the North at the top by tapping the compass in the upper-right corner, which only appears when you have rotated the map.
• Zoom in by double-tapping with a single finger or by spreading two fingers apart.
• Zoom out by tapping with two fingers or by bringing together two fingers.
3. Search for a location by tapping in the search box at the top of the screen and typing an address; the name or type of an establishment; or a landmark, area, town, city, zip code, or region. Maps may suggest a destination as you are typing. If you want the suggestion, tap it.
4. Tap Bookmarks in the upper-right corner to use the address of a contact, bookmarks you have created in Maps, or recent locations you have entered into Maps.
5. Touch and hold on a location on the map to drop a pin there, identify it, and mark it for future reference. Tap the info icon  and find out more information about that location.

6. Tap Reviews on some info drop-downs to see what others think about a restaurant or other establishment. With other options you can get directions, create a contact, see photos, add a bookmark, and review related apps.

7. Tap one of the many icons on the map to get information about that location or establishment.
8. Tap the arrowhead in the lower-left corner to see your current location.
9. Tap 3D in the lower-middle-left area while in Standard Maps view and zoom in to see a shadow of the buildings in that area.

10. Tap the Share menu icon in the lower-middle-right area to send map information of either your current location or a selected location to others using AirDrop, Message, Mail, or other means.
11. Tap the info icon in the lower-right corner to change the map view, drop a pin in the center of the map, print a map on a selected local wireless printer, report a problem with the map, or show traffic on local streets using increasingly thicker red dashed lines for increasing traffic congestion and yellow dotted lines for construction.


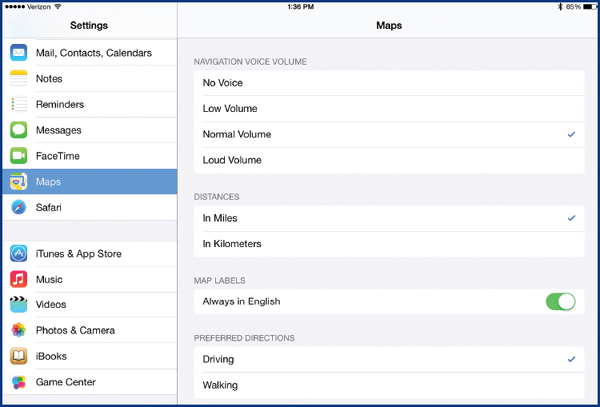
12. Press the Home button and tap Settings | Maps. Here you can control the volume of voice navigation, choose whether distance is in miles or kilometers, labels in English, and whether directions are for driving or walking.
It is one thing to locate a place or an establishment, but it might still be difficult to get there. Maps can show you how to get to a destination with alternative routes on a map, with a set of written instructions, and can give you turn-by-turn voice instructions.
1. From the Maps screen, tap Directions in the upper-left corner to open the Directions menu.
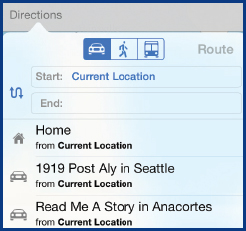
Alternatively you open directions by tapping the automobile symbol on a pin you dropped or appears when you touch and hold on a map feature or the map itself. You can also tap Directions To/From Here in information dropdowns.
2. At the top of the Directions menu select whether you want directions for driving, walking, or using transit.
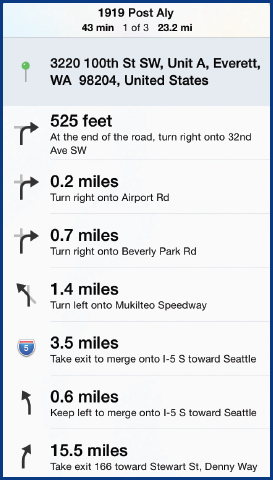
3. Enter or select the starting and ending locations and tap Route to display the route on the map. The recommended route will be shown in dark blue, while alternative routes will be shown in lighter blue with the approximate driving times shown with each route, as you can see in Figure 7-39.

Figure 7-39: Routes on a map are useful for overall information, but you will often also need turn-by-turn directions in by voice or written.
4. Start getting voice directions by tapping Start in the upper-right corner. The voice directions will begin and then pause until it detects that you have completed that step. You can stop the voice directions by tapping End in the upper-left corner, change the volume by tapping the loudspeaker in the lower-right corner, or display written directions by tapping the stack of lines at the bottom-middle of the screen.
5. Tap Clear in the upper-left corner, to remove a route from the map.

Bob Dent
My use of the iPad is not very broad, but I read a lot on it. Some subscriptions I read solely on the iPad even though I also get a paper version. The New Yorker magazine is an example of this. Another is a newspaper I get from the United Kingdom where I have recently canceled the paper version because it gets hung up in the mail. One reason that both The New Yorker and the UK newspaper are particularly good on the iPad is that their articles tend to be contiguous, all in one place, instead of jumping around the magazine. Newspapers generally, though, are not so easy to read on the iPad, and I tend to prefer the real thing.
I do like reading books on the iPad and have read a number of them there. I make a decision on whether I want to give a book to someone and, if not, I buy it for the iPad. I carry the iPad everywhere I go, generally in place of the laptop I used to carry, so the books and magazines are with me whenever I have a moment. One drawback to the iPad, though, is that I can’t leave it on the beach like I would a book. I’m pretty sure it would disappear in a short time when I go for a swim.
I go online with Safari occasionally. For example, I use airline sites to keep track of flights when I travel. I haven’t downloaded a boarding pass to either my iPad or iPhone, even though I could, principally because the paper boarding pass seems more secure. I have used Google Maps a bit, and I have done a little writing, generally in email messages to myself that I will put into real documents or letters on my iMac when I get home.
I find the iPad is handy, intuitive, and easy to use. Friends I have from Microsoft use iPads and agree it’s easy and intuitive. Our family has now gone fully to Apple products after many years of Microsoft products. Both my wife and I have replaced our laptops with iPads for our mobile and travel needs.
..................Content has been hidden....................
You can't read the all page of ebook, please click here login for view all page.