
Chapter 3
Exploring the Internet
QuickSteps to…
The Internet provides a major means for worldwide communication between both individuals and organizations, as well as a major means for locating and sharing information. The Internet is at the foundation of the iPad; the iPad wouldn’t exist without it because most of what you do with the iPad is done with the Internet. To use the Internet, you must have a connection to it using either a cellular or Wi-Fi connection. With this connection you then can send and receive email; access the World Wide Web; shop; use social networking sites such as Facebook; listen to music; watch movies and TV; and participate in blogs, forums, and newsgroups, among many other things.
In this chapter we’ll review how to get connected to the Internet, take a good look at Safari and its settings, and then see how you can use Safari to explore the Internet by both navigation and searching. Next, we’ll go over how to customize Safari with your opening screen, your tabs, your bookmarks, and how to use your history. Then we’ll review how to get and use information on the Internet, including audio and video files, and finally how to control Internet security.
CONNECT TO THE INTERNET
With a cellular service, you sign up with AT&T, Sprint, or Verizon (in the United States), start your iPad, tap the Safari icon, and you are on the Internet. With Wi-Fi, you can use someone else’s connection, such as in a coffee shop, library, hotel, or airport, often for free (we’ll talk about how to connect there in a moment). If you want Wi-Fi in your home or office and don’t already have a connection, you can get one from a telephone company, a cable TV company, a satellite link, or an independent Internet service provider (ISP). If you already have Wi-Fi available in your home or office and just need to connect your iPad to it, skip to “Establish an iPad Wi-Fi Connection” a little later in this chapter.
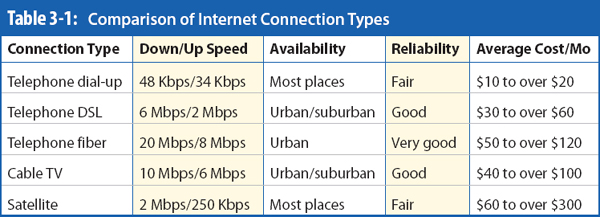
Across the various types of connections there are a number of speeds, degrees of reliability, and costs. The most important factor is what is available to you at the location where you want to use it. In urban and most suburban areas, you probably have several alternatives among phone and cable TV companies, all with several service options. As you move away from the urban area, your alternatives will decrease to a slow-speed telephone connection and/or a satellite link. With both higher-speed telephone and cable TV, you will probably have several speed options, as was shown in Chapter 1 with my phone company. Your task is to choose the service and speed that best suits your situation.
Reviewing Types of Internet Connections
Table 3-1 provides a summary of Internet connection types to give you a starting place for determining the type you want, if it is available to you. The speeds and costs in the table are representative averages and may not be correct for the ISP you are considering or for your location. You must get the correct numbers from your local providers. Dial-up service cannot be used with your iPad, and some satellite services may be problematic.
With most forms of Wi-Fi Internet connections, you have a choice of not only speed, but also ancillary services, such as the number of free email accounts and possibly a personal website. Also, depending on the type of connection, you may need dedicated equipment, such as a digital subscriber line (DSL) router, or satellite receiving equipment, which may or may not be included in the monthly price. Talk to your neighbors, friends, and associates about their experience using Internet service providers. Then contact a couple of ISPs, if you have that option, and ask them about the services and costs they offer.
TIP Often, setup, installation, and equipment charges for an Internet connection are waived if you sign a one- or two-year contract and/or prepay for a year or two of service. |
Set Up Wi-Fi Communications
To set up a Wi-Fi communications link between your iPad and the Internet, you must first choose and enter into a contract for a type of connection. The ISP that provides this service normally will help you set it up.
NOTE To connect to the Internet, you need to have an account with an ISP who will help you establish a user name and password for your account and give you an email address, the type of mail server (POP3, IMAP, or HTTP), and the names of the incoming and outgoing mail servers (such as mail.anisp.net). |
A broadband connection—made with a DSL phone line, a TV cable, or a satellite connection—is normally made with a device called a router that provides the Wi-Fi wireless connection to your iPad and to your computer, if you have one. This broadband connection is always on and connected to the Internet.
To use your iPad in a Wi-Fi area, called a “hotspot,” you must tell the iPad about it and probably give the iPad the password for the hotspot. When you first enter a Wi-Fi hotspot that you want to use with your iPad, after turning on your iPad:
1. Tap Settings | Wi-Fi and turn Wi-Fi on if it isn’t already. Review the list of Wi-Fi networks that are available at your location, as shown in Figure 3-1.

Figure 3-1: Many commercial locations have a number of Wi-Fi networks, necessitating knowing which one you should use.
2. Tap the wireless network you want to use. This may open the Password dialog box.

3. If needed, enter the network password and tap Join. You will be connected to the Wi-Fi network and, in most cases, to the Internet.
USE THE WORLD WIDE WEB
The World Wide Web (or just the Web) is the sum of all the websites in the world—examples of which are CNN, Amazon, and the BBC (which is shown in Figure 3-2). The World Wide Web is what you can access with a web browser, such as Safari.
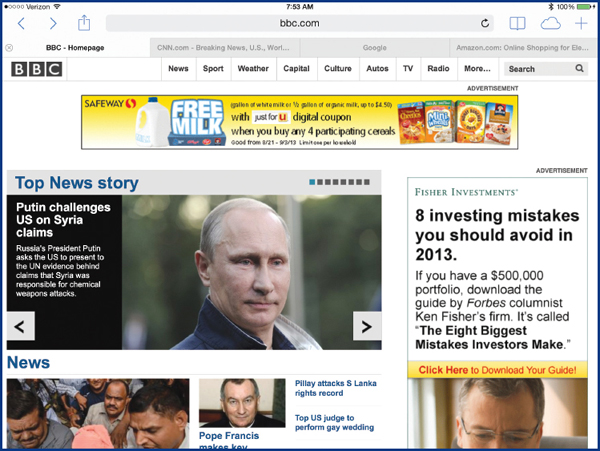
Figure 3-2: The easiest way to see if you have an Internet connection is to try to connect to the Internet.
Safari comes standard with the iPad and provides an excellent means to access the Internet and do anything it is possible to do with a web browser. Several other browsers, including Google Chrome, are available as apps you can download from the App Store, but this book assumes you are using Safari to access the Internet.
Review Safari’s Controls
Start Safari and review its controls.
From the iPad’s Home screen, tap Safari.
At the top of the Safari screen is a series of icons and features that let you control it. From left to right these are

• Previous and Next let you return to the pages you have visited previous to or following the present page.
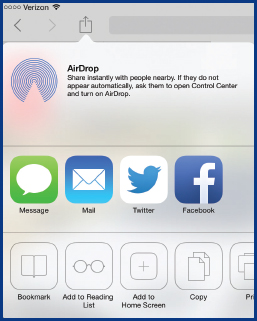
• Share menu allows you to tap various actions you can take to share the current website address, including AirDropping, text-messaging, or emailing it to a friend; putting it on Twitter or Facebook; adding it to your Home screen; printing or copying it; or adding it to either your Bookmarks or Reading List.

• Address and Search bar allows you to type in a web address or URL to open the website in Safari in the currently selected tab or in a new tab you have just opened (see the “New Tab” bullet). For example, if you wanted to open CNN, you would type cnn.com in the address bar. This same bar also allows you to enter keywords to use in searching the Internet, as you might do directly in Google. As you will see in the next section, you can select the search engine that is used to do the searching for this field. Google is the default, but Yahoo! and Bing are also options.
• Tabs identify separate website pages that you have opened; simply tap a tab to see its page.
• Reload lets you re-download the selected webpage from its server to see any changes in the page, such as late-breaking news or latest prices on an auction site. If a webpage is not behaving the way it should, reloading it can often fix the problem. While a webpage is being loaded, the Reload icon is replaced with a Stop icon (an X) that, if you click it, will stop the loading of the webpage.
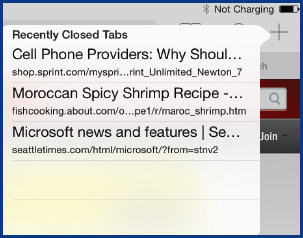
• Bookmarks, History, and Reading List opens a set of three lists: one for the bookmarks (website pages) that you tap to keep, one for the history of the webpages you have visited, and one for webpages with articles you want to come back and read.

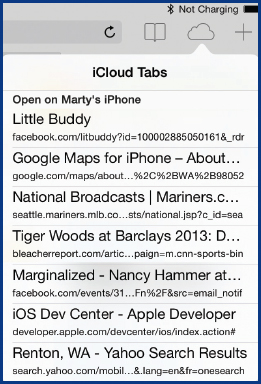
• iCloud tabs opens a list of webpages that have been opened on other Apple devices (Macs, iPhones, and iPods) that you have synced with through iCloud.
• Close closes the currently selected webpage and removes the tab.
• New Tab creates a new tab in which you can open a new webpage without replacing one of the webpages that are currently open. You can open up to ten separate tabs that are displayed. As you open additional tabs, the tab on the far left disappears and an ellipsis (…) appears on the right. When you tap the ellipsis, you will see the tabs that have disappeared and you can tap them to go to those sites.

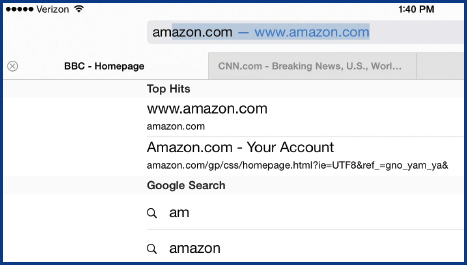
TIP When you see a web address like http://www.amazon.com, all you have to type is amazon.com; the “http://www.” is assumed. If you have been to the site recently, you only have to type enough of the name to be unique; as you see in the illustration, typing am got me Amazon.com. |
Look at Safari’s Settings
In iPad’s settings there is a full set for Safari, as shown in Figure 3-3.

Figure 3-3: Since you will probably be using Safari a lot, it is worthwhile exploring its settings.
From the Home screen, tap Settings | Safari.
Safari’s settings include the following:
• Search Engine allows you to choose the search engine that is used currently from Google (the default), Yahoo!, and Bing.
• Passwords & AutoFill allows you to turn on or off the automatic filling out of web forms with your contact information, including names, passwords, and other information that you have previously given to a website.
This is turned off by default and it is a good idea to leave it that way. While it is handy, it can lead to giving out information when you don’t want to do so.
• Favorites allows you to establish the defaults that are suggested when you enter an address or search term.
• Open New Tabs In Background allows you to control whether clicking a link or opening a new page replaces the current page in the current tab, or opens a new tab displaying the new page.
• Show Favorites Bar allows you to turn the Bookmarks bar (between the Address bar and the tabs—see more later in this chapter) permanently on or off. When the Bookmarks bar is not permanently on, you can open and use it by tapping the address bar.

• Block Pop-ups allows you to prevent a website from opening a second little window for whatever purpose. Here again, history has colored the prevailing view of pop-ups. They can be a pain if they are giving you information you don’t want, but if they open a web form you need to fill out, they can be useful. The default is On, blocking pop-ups. Depending on what you are doing, you might want to turn this off.
• Do Not Track allows you to turn on or off the prevention (if it is on) of collecting information, such as websites you visit and your name, address, and other information you have entered into web forms. With Do Not Track on, AutoFill does not collect information and it doesn’t fill in forms. Also, the history of the websites you have visited is not maintained.
• Block Cookies allows you to choose whether you want to always, never, or, only from sites you visit, accept cookies that are stored on your iPad. (Cookies are small snippets of information that identify you to the website based on information you gave them.)
• Smart Field Search allows you to accept search engine suggestions and loads the website of the top search result based on your browsing history (if you have visited any of the suggested sites in the past) and your bookmarks.
• Fraudulent Website Warning tells the iPad to warn you when you are visiting a website that is not what it seems to be and is suspected of phishing. Phishing sites masquerade as a real site, like your bank, and fraudulently ask you to enter your personal information, such as user names and passwords. If you get such a warning, you want to immediately leave the site and not enter any information.
• Clear History and Clear Cookies And Data allow you to remove the information on your iPad from or about the websites you have visited.
• Use Cellular Data tells the iPad that it can use your cellular network to save Reading List information to iCloud for offline reading.
• Advanced provides three more options:
• Website Data allows you to look at which websites are storing how much information on your iPad. The Web Inspector option is for use by app developers to debug (remove problems from) their apps.

• JavaScript allows you to turn off accepting programs or apps that use JavaScript, a programming language. Generally, you want to leave JavaScript turned on. Many apps legitimately use it, and if you want to use the app, you have to accept the use of JavaScript. Historically, bad things were done with JavaScript, and, of course they still can be, but if you are running apps from the App Store, they are reasonably safe. Apple has vetted these apps.
• Web Inspector allows you to open Safari on your computer, connect the computer to your iPad with a cable, and look at what a website is doing on the iPad using Safari’s Advanced Preferences option on your computer.
Browsing the Internet refers to using a browser, like Safari, to go from one website to another. You can browse to a site by directly entering a site address, navigating to a site from another site, or using the browser controls. First, of course, you have to open the browser as you saw earlier.
Enter a Site Directly
To go directly to a site:
1. Open your browser, tap in the address bar, and tap the X on the right of the bar to erase the current contents.
2. Type the address of the site you want to open (see Figure 3-4), and tap Go to open that webpage.

Figure 3-4: The iPad will give you suggestions on filling in the address bar. I got these after typing only “tes” and needed to only tap the suggestions to go there.
TIP The onscreen keyboards that appear when the address bar is tapped changes the label of the RETURN key to GO. |
Use Site Navigation
Site navigation uses a combination of links and menus on one webpage to locate and open another webpage, either in the same site or in another site.
• Links are words, phrases, sentences, or graphics that, when tapped, take you to another location. They are often a different color or underlined when you tap them.

• Menus contain one or a few words in a horizontal list, vertical list, or both that, when tapped, take you to another location.

If you hold your finger on a link or a menu option, which is really a link within a menu, a pop-up menu will be displayed, allowing you to open the link in the same tab, open it in a new tab, add it to your Reading List, or copy it, allowing you to paste it in an email, text message, or elsewhere.

Use Browser Navigation
Browser navigation uses the controls on your browser at the top of Safari, as described in “Review Safari’s Controls” earlier in this chapter, to go to another location.
You can search the Internet in two ways: by using the search facility built into Safari and by using an independent search facility on the Web.
Search from Safari
There are two parts of Safari’s search facility: search for sites you have recently visited, and search for sites that contain keywords.
• To search for recently visited sites, tap or delete the current contents of the address bar and begin typing what you want to search for. As you are typing, Safari looks at sites you have recently visited and, if a possible match is found, a site is suggested and others are listed, as you saw earlier in Figure 3-4 and elsewhere.
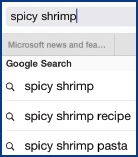
• To search for sites based on keywords, also type those words in the address bar, for example, spicy shrimp.
The search engine—Google is the default—will display several suggested webpages while you are typing, as well as whether there are any matches on the current webpage. You can tap any of the suggestions to open those pages, or you can tap Go on the keyboard and open the search engine’s (Google’s) page, displaying its search results, as you can see in Figure 3-5.

Figure 3-5: The results of a search using Safari’s search, which defaults to Google.
Search from an Internet Site
There are several other, directly accessed Internet search sites. Among these are Google, Bing, and Yahoo!.
1. In Safari, tap and delete the current address in the address bar, type bing.com, and tap Go.
2. In the site’s text box (Bing’s in this case), type what you want to search for, and tap Search. The resulting website is shown in a full webpage, shown in Figure 3-6.

Figure 3-6: The results of a search using Bing
3. Tap the link of your choice to go to that site.
TIP When you enter search criteria, place quotation marks around certain keywords or phrases to get only results that match those words exactly. |
Sometimes, you visit a site that you would like to return to quickly or often. As you have seen, Safari has the ability to save sites as bookmarks for easy retrieval.
Add a Bookmark
To save a site to the Bookmarks list:
1. Open the webpage you want to add to your Bookmarks list, and make sure its correct address (URL) is in the address bar.
2. Tap the Share menu icon next to the address box, and tap Bookmark. The Add Bookmark dialog box will open.

3. Adjust the name as needed in the text box (you may want to type a new name you will readily associate with the site).
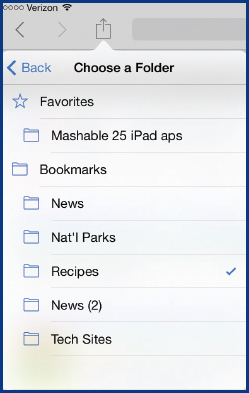
4. Initially, the Location option is “Favorites,” meaning that the link will be saved to the Favorites bar. If you tap that option, though, you can choose to save the link to the Bookmarks list.

5. Choose where you want to save the link and tap Save.
Save to the Home Screen
You can choose to have a link to a website added to the Home screen as you would an app.
1. Open the webpage you want to add to your Home screen, and make sure its correct address (URL) is in the address bar.
2. Tap the Share menu icon and tap Add To Home Screen. The Add To Home dialog box will open.
3. Adjust the name as needed in the text box and tap Add. You’ll see the icon for the page appear on the Home screen.

You will probably find over time that you have accumulated a number of bookmarks and it is becoming hard to find the one you want. Safari provides two places to store your Bookmarks: a Bookmarks list, which is presented to you in the form of a menu you can open, and a Favorites bar, which can be displayed at all times. There are several ways to organize your bookmarks.
TIP The webpages that you have pinned to the Home screen from Safari can also be organized in any way you want, as described in Chapter 2. |
Rearrange, Edit, and Delete Bookmarks
The items on your Bookmarks list are displayed in the order you added them, with the name you left them with, but you can move them to a new location, edit their names, and delete them.
1. In Safari, tap the Bookmarks icon. Tap Edit on the bottom right. The Bookmarks editing features are displayed.

2. Locate the site you want to reposition. Touch and hold the three bars (grip strip) on the right of the bookmark, and drag it up or down to where you want it.
3. To edit a bookmark’s name, tap the greater-than sign on the mid-right of the bookmark to open the Edit Bookmark dialog box.
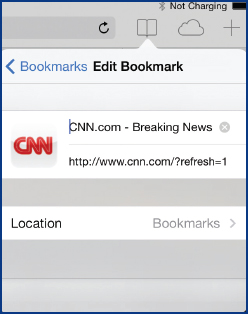
4. In the top text box, edit the name as you would edit other text on the iPad (see Chapter 2).
5. In the bottom text box opposite Location, tap the greater-than sign and tap where you want to store the bookmark (see the following section).
6. To delete a bookmark, tap the delete icon to the left of it and then tap Delete. When you are done editing bookmarks, tap Done.
Create New Folders
You can add your own folders within Bookmarks.
1. In Safari, tap the Bookmarks icon and tap Edit on the bottom right. The Bookmarks editing features are displayed, as you saw earlier.
2. Tap New Folder in the lower left, type the name for the folder, tap where you want to store the folder, and tap Done on the keyboard.

3. Use the steps in the “Rearrange, Edit, and Delete Bookmarks” section earlier to move the desired bookmarks to the new folder.
Put Bookmarks in Folders
You can put a site in either your own folders (see “Create New Folders”) or the default Bookmarks list or Favorites bar, which operate like folders.
1. Open the webpage you want in your Bookmarks, and make sure its correct address or URL is in the address bar.
2. Tap the Share menu icon, tap Bookmark, adjust the name as needed in the text box, tap Location at the bottom, tap the folder to use, and tap Save.
USE INTERNET INFORMATION
Of course, the reason for accessing the Internet is to use the information that you find there, to read it, save it, play its media, or send it to a friend.
An iPad screen displaying a webpage in Safari works just like any other iPad screen and gives you the same tools you’ve used elsewhere on the iPad. In Safari, you can
• Select pages, links, items, and options by tapping them
• Move a page being displayed up or down, left or right, by dragging it with your finger
• Change a page by swiping from right to left or bottom to top of a page
• Enlarge a page by spreading two fingers apart
• Reduce a page by pinching two fingers together
• Enlarge just an article if it is in a separate frame by double-tapping the article
• Scroll just an article if it is in a separate frame by dragging with two fingers
• See a link’s destination by tapping and holding the link, which also allows you to open the link in a new tab and add it to the Reading List

• Fill out a form by tapping the first field, typing what is requested, and then tapping Next or Previous
• Return to a closed page by tapping and holding on the New Tab plus sign
TIP Webpages from different publishers can behave very differently. One publication can present itself one screen wide and have you scroll down by dragging or swiping up to go through a lengthy section. Another publication can present itself one screen high and have you scroll right by dragging or swiping from right to left. |
The iPad with a Retina display is a particularly good device from which to read, and Safari has a reader with which you can separate out an article from advertisements and make reading an excellent experience.
1. Navigate in Safari to an article you want to read and tap it. On the left end of the address bar you should see the Reader icon, a stack of lines.

2. Tap the Reader icon. The article will appear in its own window, filling the screen, as you see in Figure 3-7.

Figure 3-7: The Safari Reader provides a great way to read webpage articles.
3. Scroll by swiping up (from bottom to top) as you would any other page.
4. To close the Reader, tap the Reader icon again in the address bar.
NOTE The Reader is a good way to forward an article since it removes the ads and transfers just the article. Use the Share menu to do this, which works with the Reader as well. |
You can play audio and some video files on the Internet with Safari directly from a link on a webpage. The exception is that the iPad cannot play video files that use the Adobe Flash technology (there are several apps in the App Store, such as the Rover browser, that will allow you to play Flash content). Many webpages have links to audio and video files, such as the one shown in Figure 3-8. To play these files, simply tap the play button. The player will open to play the requested piece.
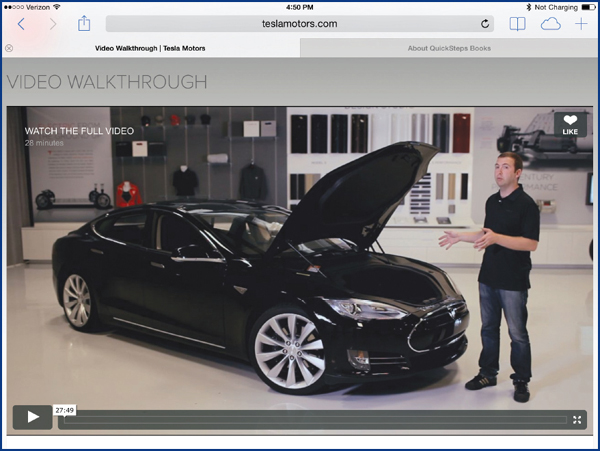
Figure 3-8: Play an audio or video file on a webpage by tapping the play button.
TIP To search for information within an open webpage in Safari, type the keywords you want to search for in the Address/Search bar at the top of the screen, and then tap the entry or entries under On This Page. |
As you saw earlier in this chapter, Safari Settings allow you to control several aspects of Internet security. You can determine how you want to handle cookies placed on your computer by websites and use Do Not Track to prevent the website from bothering you in the future, among several other settings (see Figure 3-3 earlier in this chapter). These controls are found in Settings.
Handle Cookies
Cookies are small pieces of data that websites store on your iPad so that they can remind themselves of who you are. These can save you from having to constantly enter your name and ID. Cookies can also be dangerous, however, letting people into your computer where they can potentially do damage. Safari lets you determine when you will block cookies.
1. In the Home screen, tap Settings | Safari.
2. In Safari Settings, tap Block Cookies.
3. Consider the three choices you have:
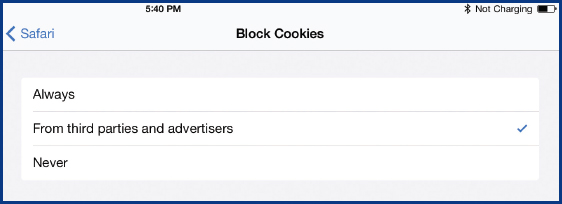
• Always means that every time you visit a site, you must sign in and there is no memory of your last visit that might take you back to what you were doing the last time you were on the site.
• Never means that any site you come across can add whatever information they want.
• From Third Parties And Advertisers means that you will only block cookies from these sites.
The default, and my recommendation, is From Third Parties And Advertisers. In my mind, cookies can be more of a benefit than a problem. You can see who has stored information on your iPad by tapping Advanced at the bottom of Safari Settings and then tapping Website Data, as discussed earlier in this chapter.
Use Do Not Track
Safari’s Do Not Track option in Safari Settings gives you a way to visit a website and not leave any information about your visit on either your iPad or the visited website. This allows you to take a peek at a website and not leave any trace so as to more safely browse and view websites. While you have Do Not Track turned on, your browsing history, temporary Internet files, and cookies are not stored on your iPad, preventing anyone looking at your iPad from seeing where you have browsed. In addition, information about you is not passed on to Internet content providers.
NOTE If you are using your iPad in a school or business that has security controls, they may be able to see where you have browsed, even with Do Not Track, and it is not perfect at preventing a website from knowing who you are. |

Joann Anderson
My iPad has become an extension of my life. I carry it with me all the time as a constant resource. I use it for email (synced with my desktop computer), Internet searches, the Dictionary app, weather tracking for my family (Intellicast), navigation on trips (Maps), searching hotels and restaurants when traveling (Yelp), Calendar, Netflix, Calculator, and Quicken 2013’s new iPad app, which will sync with my desktop computer. Another great app is Spider Oak for secure storage of such things as passwords. This is helpful when you are getting a lot of requests for password entries.
An important tip when buying apps is to check ratings and reviews before buying—both positive and negative. I’ve saved myself a lot of headaches by doing this.
I recommend buying extended service, a small stylus with a padded end, and a separate keyboard built into a case. At any rate, an iPad enhances life in many ways, no matter what our age! (I am nearly 80 and love it!)
..................Content has been hidden....................
You can't read the all page of ebook, please click here login for view all page.