
Chapter 5
Scheduling with Calendar, Reminders, and Notifications
QuickSteps to…
Unfortunately, our lives are too often controlled by the events that surround us, from meetings and special occasions, to appointments and invitations. The best we can do is to try and keep track of what is going on. The iPad provides three apps, Calendar, Reminders, and Notifications, to help you do that. This chapter provides a review of all three, showing you how to set them up, handle their settings, and use them in several circumstances.
SET UP AND USE CALENDAR
The primary purpose of a calendar, of course, is to keep track of upcoming events, such as weddings, birthdays, meetings, and appointments. You can also note date-related objectives, such as projects to be completed (book deadlines in my case), and goals to be accomplished, such as weight loss by a certain date. Whatever the purpose, Calendar has tools to work with it and several views to look at it.
The iPad Calendar has implemented on the screen four views of calendar entries and given you easy ways to navigate among them. Open Calendar by tapping its icon on the Home screen. One of Calendar’s four views will appear. Tap Day at the top of the screen if the Day view isn’t already selected. This will give us a common starting point to talk from, as you see in Figure 5-1.

Figure 5-1: Day view gives you the most detailed view of your schedule.

Review Calendar Controls
Calendar has controls across the top and bottom of its screen, as shown in Figure 5-1. These include:
• Views provides four views of the calendar, as described in the next section.
• Search opens a summary of near-term events and a search text box where you can enter keywords on which to search Calendar.

• Add Event  opens the Add Event dialog box, with which you enter the information about events into the calendar.
• Date Selector, which can be scrolled in either direction, allows you to select a date to view. See “Select a Date” later in this chapter.
• Today displays the current day.

• Calendars opens a list of the various calendars that you have available. From this list, you can choose which you want to display, if not all of them. Also, by tapping one of the calendars, you can choose which color you want to represent that calendar.
• Inbox displays the invitations you have received and lets you reply by accepting, declining, or returning “Maybe.”
Explore Calendar Views
Take a look at each of the four views:
• Day view provides a time-of-day display on the left and the detail for a selected event on the right, as you saw earlier in Figure 5-1. The time-of-day view is similar to the day books that were popular before computers.
• Week view provides the same information as you saw on the left side of the Day view, but for seven days at one time, as shown in Figure 5-2.

Figure 5-2: Week view is a good way to plan for a new week.
• Month view provides the typical paper-based wall calendar view with 35 days on it (see Figure 5-3). Each event in this case gets only a single short line.

Figure 5-3: Month view consolidates a lot of information in a small space.
Year view displays 12 months on one screen with the current day marked with a red dot, as you can see in Figure 5-4.
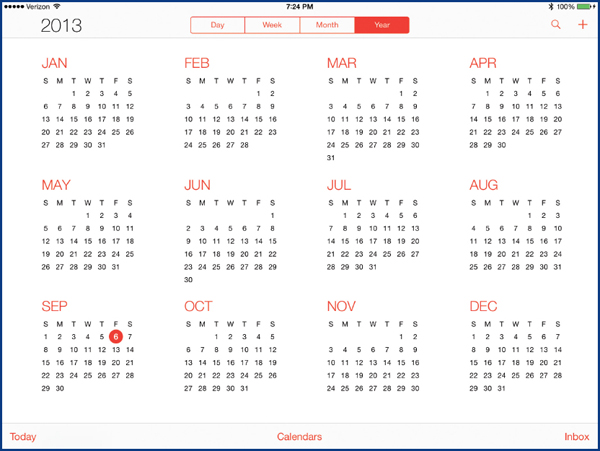
Figure 5-4: Year view primarily allows you to select the month in which you want to work.
All of the views have value to varying degrees. Try them all.
Change Calendar Settings
The calendar settings, opened by tapping Settings | Mail, Contacts, Calendars and scrolling down to the bottom of the right-hand pane, include:
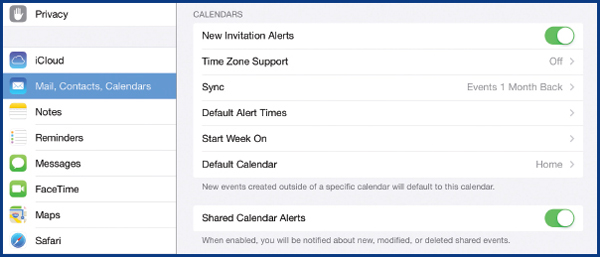
• New Invitation Alerts, if on, triggers an alert when an invitation is received.
• Time Zone Support allows you to associate a time zone with a calendar and thereby display events in that calendar in the event’s time zone. This is useful when you travel so you can keep in mind the local time. You can turn time zone support on or off and select the default time zone to use.
• Sync lets you automatically sync historical as well as future events. Tapping this option allows you to select among several time periods.
• Default Alert Times determines when alerts are created for birthdays, events, and all-day events. For each you have a choice of when the alert is posted and sounded, from the time of the event to one week before the event.
• Start Week On lets you specify which day of the week is on the left of a weekly calendar.
• Default Calendar lets you specify which calendar to use with events that are created outside of Calendar.
• Shared Calendar Alerts, if on, notifies you when changes are made to events that are shared with others.
The iPad’s Calendar app is made for active use as you are on the go. It will sync the entries you have from your desktop or laptop computer or such online calendar resources as Facebook and Google Calendar. It is also a good resource for directly entering and managing events as you go along.
Choose Your Calendar
Depending on your email accounts and what you have on desktop and/or laptop computers, you may have a number of calendars, as you can see from my calendar list shown earlier. To start, I’d recommend that you work with only one. Later in this chapter we’ll come back and look at how to handle multiple calendars.
If you have multiple calendars, begin by turning off all but one and make sure it is set as your default. You can then use it for the next several sections until we get to the discussion of multiple calendars.
1. From the Home screen, tap Calendar and then tap Calendars in the bottom-middle area. You will see the list of your calendars.
2. Choose which calendar will be your primary one. By default, the iPad uses your “Home” calendar for this purpose.
3. If you have other calendars turned on (they have a checkmark beside them), tap all but your primary calendar to turn them off.
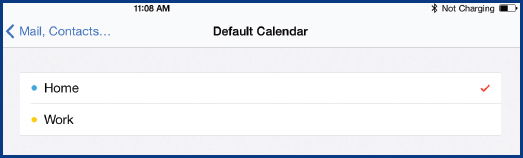
4. Make sure your chosen calendar is set as the default by pressing the Home button and tapping Settings | Mail, Contacts, Calendars.
5. Scroll down until you see the Calendar settings and then tap Default Calendar to open the list of your calendars.
6. Tap the calendar you want to be the default, where all events will be placed that are entered outside of Calendar.
Select a Date
Calendar events, of course, are on a certain date or series of dates, and so the first task in using Calendar is to select a date. You have several options, depending on where you start from.
• If you are seeking a date within a few days of the date currently displayed, swipe the Date Selector from right to left to select a future date, or from left to right to select a date prior to the current date.
• When in Day view, select a day by tapping that date in the Date Selector displayed in the upper part of the page.
• To select the current date, tap Today on the bottom-left area of the screen.
NOTE In Month view you can select an event within a day, but not the day itself. In Year view you can select a month, but not a day or week. |
Add Calendar Events
To add events and their specifics:
1. If the Home screen is not already displayed, press the Home button to display it.
2. Tap Calendar and select the date of the event as described in the previous section.
3. Tap Add Event in the top-right corner of the screen to open the Add Event dialog box.

TIP You can also open the New Event dialog box by pressing and holding for a moment on a day and time in Day and Week views, and on a day in Month view. |
4. Type the title of the event, tap in the Location text box, and type the location.
5. If it is an all-day event (or close enough to call it that), tap the On/Off button for that.
6. Tap the time block to open the Start & End dialog box. Move your finger up and down on the date to select it and then do the same thing with the hour, minutes, and AM/PM to select the start time.
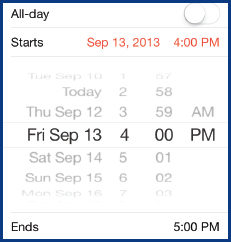
7. Tap the Ends time and select the appropriate time.
8. If you have Time Zone Support turned on in the Calendars settings (see “Change Calendar Settings” earlier in this chapter), change the Time Zone selection, if needed, and tap Done.
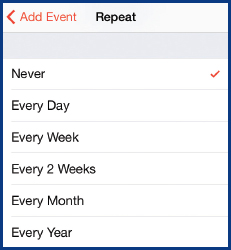
9. If the event will happen periodically, tap Repeat, and tap the period of repetition.
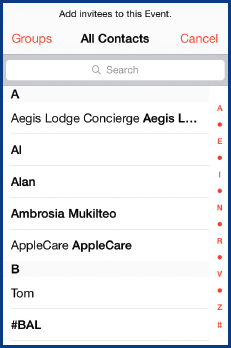
10. If you want to invite people to the event, tap Invitees.
a. Begin typing a name in your Contacts list. When the name that you want is displayed, tap that name.
b. To add more invitees, tap the Add icon (the plus sign) to open your All Contacts list, and tap the person you want to invite. Repeat this for as many people as you want to invite.
c. When you are finished adding invitees, tap Add Event to return there.
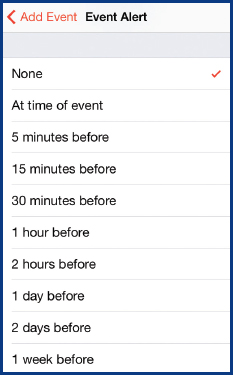
11. Tap Alert and tap when you want the alert. Repeat this for the second alert if desired.
12. Tap Calendar if you want this event listed on a calendar other than the default, tap the calendar (see “Work with Multiple Calendars” later in this chapter), and tap Add Event to return there, if necessary.
13. The default is to show your time as being “Busy” when you have an event. This is for shared calendars so others will not schedule events for you. If you want to change from “Busy” to “Free,” tap Show As and tap Free.
14. If desired, you may type in a uniform resource locator, or URL (a web address), and notes for the event. When you are ready, tap Done.
TIP For the URL and notes sections of a new event, you can copy and paste information from a website that might be of interest to the people you are inviting to an event. |
Change Calendar Events
Changing an event is very easy.
1. With Calendar open on the screen, select the date of the event, as described earlier in this chapter.
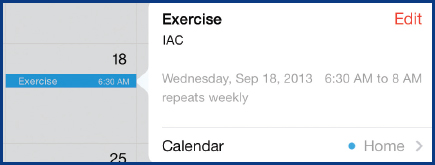
2. In Day, Week, or Month view, tap the event and tap Edit to open the Edit dialog box as shown in Figure 5-5.

Figure 5-5: The Edit dialog box is almost identical to the Add Event dialog box.
3. In the Edit dialog box, tap the field you want to change and make the desired changes. See “Add Calendar Events” earlier in this chapter for field-by-field considerations.
4. When you have made the changes that you want, tap Done.
Delete Calendar Events
Deleting events is even easier.
1. Follow Steps 1 and 2 in “Change Calendar Events” immediately preceding this section.
2. In the Edit dialog box, scroll to the bottom and tap Delete Event. Tap Delete Event a second time to confirm it.
If the event is repeated, you will have a choice of deleting the current event only or this and all future repetitions of the event.

As you begin to use Calendar, you may find that you are getting events from several sources that you would like to keep on different calendars so you can manage them as a group. Also, you probably want to look at all your calendar events together periodically on one calendar display. The iPad provides ways to do both of those.
When you start up your iPad for the first time after setting it up and syncing to iCloud, you will see that, by default, Calendar with iCloud starts out with three independent calendars labeled “Home,” “Work,” and “Birthdays.” You can, therefore, immediately place events on more than one calendar.
Add Events to a Different Calendar
To add events to one of several calendars, you can use one of three techniques:
• While entering a new event in the Add Event dialog box, tap Calendar, and then tap the calendar you want to use.

• To add a number of events to a single calendar—for example, your Work calendar—turn off all other calendars so that when you open the Add Event dialog box, the default is your Work calendar.
• If you are going to be working primarily with one calendar, but don’t want to turn off other calendars, you can change the default calendar in Settings. From the Home screen, tap Settings | Mail, Contacts, Calendars | Default Calendar and then tap the calendar you want to be the default.
Show Several Calendars Together
With just one calendar, there is no problem finding an event you want to look at, but as soon as you add another calendar, you have to ask the question, “Which calendar do I look at?” The answer, of course, is to superimpose one calendar on the other so you can see them both at the same time. Calendar allows you to do this by simply turning on the calendars that you want to display.
1. With Calendar open on your iPad, tap Calendars.
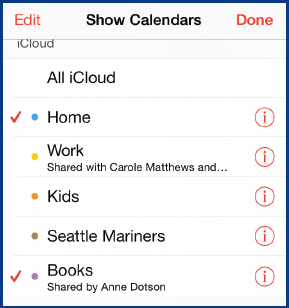
2. Tap the calendars in the Show Calendars dialog box that you want to be displayed, as you can see in Figure 5-6.
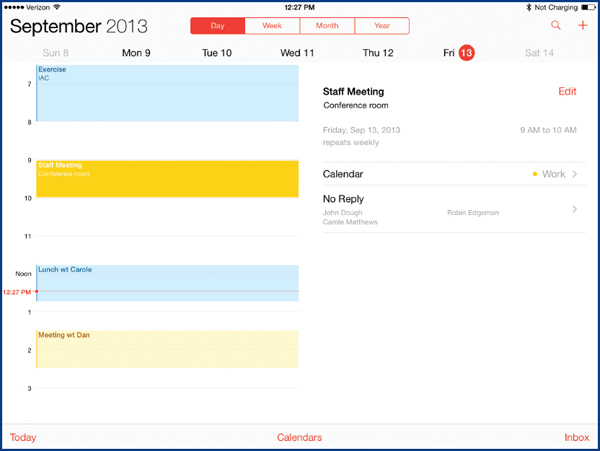
Figure 5-6: The colors of different calendars help you distinguish which one an event belongs to.
Add Another Calendar
The Calendar app has two types of calendars: those tied to mail accounts, like Gmail, Outlook, and iCloud, and those created within Calendar. You can, therefore, add calendars from either source. To add a calendar within Calendar and not connected with a mail account:
1. From within Calendar, tap Calendars to open the Show Calendars dialog box.
2. Tap Edit in the upper-right corner, and then tap Add Calendar.

3. In the Add Calendar dialog box that opens, type the name of the new calendar and tap the color that you want to associate with that calendar.

4. When you are ready, tap Done.
To add a calendar from a mail account:
1. Press Home to return to the Home screen.
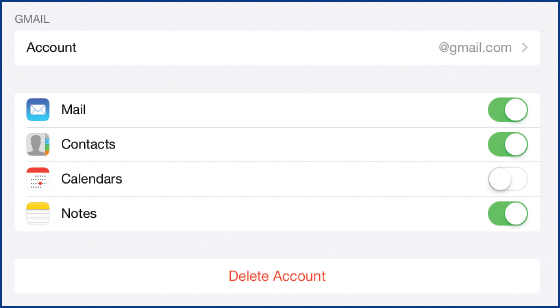
2. Tap Settings | Mail, Contacts, Calendars and tap the mail account whose calendar you want to add. The mail accounts settings will open. Tap the Calendars’ On/Off button on the right to turn it on (not all mail servers have calendar services).
3. Press Home and tap Calendar to return there and eventually see your mail calendar(s).
NOTE It takes a while before Calendar will see a new mail calendar. |
Delete a Calendar
As in adding calendars, you can delete them from either mail accounts or from Calendar itself. You can delete a mail account– related calendar by, in essence, turning it off.
1. From the Home screen, tap Settings | Mail, Contacts, Calendars.
2. Under Accounts on the right, tap the account with an associated calendar that you want to turn off (those with a calendar will say “Calendars”).
3. In the mail account details, tap the On/Off button to turn it off.
4. Tap Delete to confirm that is what you want to do, and tap Done.

To delete a calendar created within Calendar:
1. From the Home screen, tap Calendar | Calendars in the bottom middle.
2. Tap the right end (the “i” in a circle) of the calendar that you want to delete to open the Edit Calendar dialog box. You can alternatively tap Edit and tap the calendar that you want to delete.
3. Scroll to the bottom of the dialog box, tap Delete Calendar, and then tap Delete Calendar again to confirm the deletion.

TIP Facebook’s calendar is deleted like a mail account’s calendar. Tap Settings | Facebook | Calendar to turn a Facebook calendar off if it is on, and tap Contacts off to remove Facebook Birthdays. |
Add an Online Calendar
There are a number of calendars on the Internet that you can add to and display in your Calendar app on your iPad. Here is an example of how this works. I am a fan of the Seattle Mariners baseball team (yes, very long suffering!) and I want to keep track of their schedule on my iPad in Calendar. The schedules that can be used with Calendar on the iPad must conform to Apple’s iCalendar (files with an .ics extension) standards and can be used with the Mac’s iCal calendar, the Google and Yahoo! calendars, and the iPad’s calendar. To add the Mariners’ calendar:
NOTE In addition to iCal calendars, you can add calendars from Microsoft Outlook and Microsoft Exchange, as well as Google and Yahoo! Calendars. |
1. From the Home screen, tap Safari. In the address box, type the URL for the organization whose calendar you want. In my case, I type seattle.mariners.mlb.com, tap Go, and tap Schedule in the top menu bar (I could also have done a Google search on “Seattle Mariners schedule”).
2. One of the choices on the Mariners’ website is “Downloadable Schedule,” which I tap. This opens the page shown in Figure 5-7.

Figure 5-7: Most schedules on the Internet give you some means to download the schedule in the form that can generate an iPad calendar.
3. There is a link to “Download iCal” and instructions for the iPhone, which also work for the iPad. The easy solution is to tap Download iCal. A list of calendar entries appears.
4. Tap Add All  . When you do that, iPad’s Calendar opens the Choose Calendar dialog box.
NOTE If you are adding a calendar that was created in Google (you must have a Gmail account), you click the plus sign at the bottom right to add the calendar to your calendars. This brings up a dialog box that asks if you want to add this calendar and, if you do, adds it to your Gmail calendar, but not immediately to your iPad calendars. In the iPad Calendar you must have Gmail turned on as one of the calendars you can view, and then, after a bit, you will see the entries from the new calendar. |
5. Choose the calendar you want to use. Because of the quantity of calendar entries in the Mariners’ calendar, I tap New Calendar to create a separate calendar for the Mariners.

6. Type the name for the calendar; choose its color, tap Done, and then tap Done twice more. Close Safari and open Calendar.
7. Close all other calendars, leaving only your new one you just added to Calendar, as you can see in Figure 5-8.
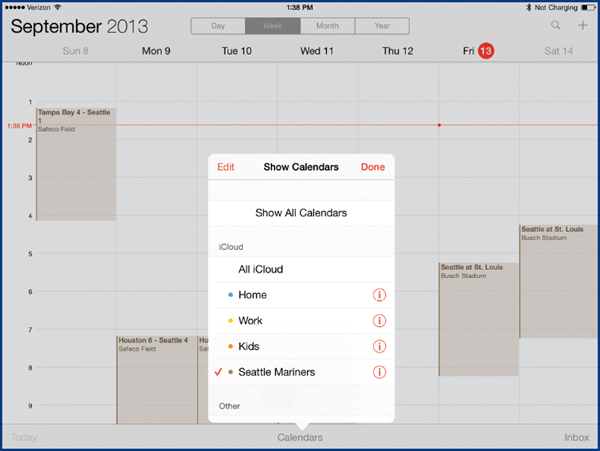
Figure 5-8: For organizations that are important to you, getting their complete schedule can be a real benefit.
TIP Your company or organization might publish a schedule or calendar that you can add to Calendar on your iPad. If they produce a schedule and it is not in Google Calendars, Exchange, or Outlook on Windows computers or iCal on Macs, you might suggest that they put it in one of those formats. |
Subscribe to iCalShare Calendars
One site that has a number of public calendars that you can subscribe to is iCalShare. To look at iCalShare and subscribe to a calendar:
1. From the Home screen, tap Safari. In the address box, type icalshare.com and tap Go. The iCalShare home page is displayed as shown in Figure 5-9.

Figure 5-9: iPad’s Calendar does not have holidays listed on it, as some other calendars do, but they are available on iCalShare.
2. Review the calendars on the Home page, then tap the options across the top (Categories, Calendars, Popular, and so on) and review the calendars. I find it useful to have the U.S. holidays on my calendar, so I can either tap US Holidays in the bottom center of the home page or tap Popular and review several alternatives.

3. When you find a calendar that you want to subscribe to, tap the calendar and then tap Subscribe To Calendar. Finally, tap Subscribe.
4. When you do that, your new calendar’s events are added to Calendar on your iPad. Tap View Events to see them.
5. Tap Calendars in the bottom-center area to see how your subscribed-to calendar is listed.
Handle Invitations
Earlier in this chapter you saw how you can add invitations to a new calendar event. When you do that, an email invitation is sent to the invitee. The mailed invitation has three links the recipient can click or tap to accept, decline, or maybe accept the invitation.
In the email (on top in Windows) there is an attachment that you can drag or double-click to add the date either Outlook’s Calendar in Windows (shown next) or iCal’s Calendar in a Mac.
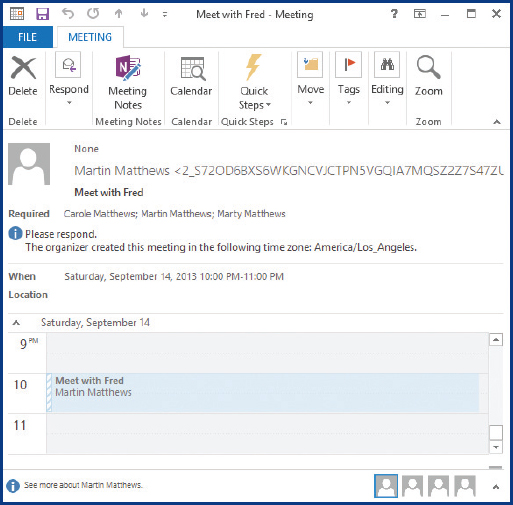
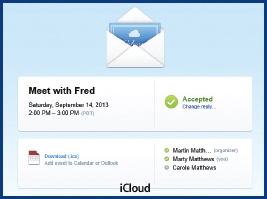
When the invitation is accepted or rejected, iCloud opens in the recipient’s default browser acknowledging the decision. Again there is a link that, if you click or tap it, will add the event to your calendar app.
On the iPhone in Mail, tap an invitation in the Inbox, tap its detail date in blue, and tap Show In Calendar to open Calendar and display the event.

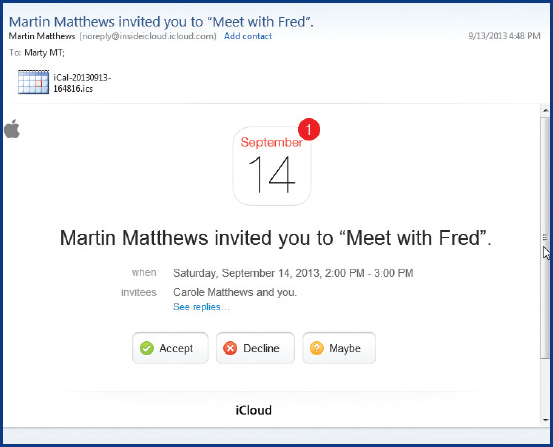
Invitations received by you on your iPad work and look very similar to what you have just seen. In Mail you will see an invitation that is similar to the one shown earlier with the Accept, Decline, and Maybe buttons you can tap. The attachment at the bottom generates a calendar event that you can see both by tapping the attachment (see Figure 5-10) and on the calendar.
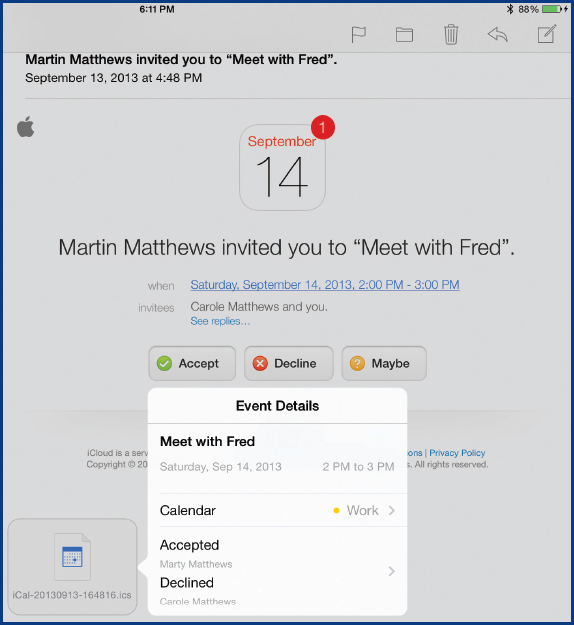
Figure 5-10: Email invitations you receive on your iPad contain an attachment that generates a calendar event.
If several people are working together, sharing a project, have a family in common, or are in an organization together, it can be worthwhile sharing a calendar to better coordinate what they are doing. iPad’s Calendar provides two tools to facilitate this: fully sharing with one, or a couple of other people, a calendar that all can change; and publishing a public calendar that others can subscribe to, but only you can change.
Share a Common Calendar
To create a common calendar that two or more people can share with equal ability to add and change events:
1. From the Home screen, tap Calendar. Tap Calendars and tap the right arrow on the calendar you want to share. This opens the Edit Calendar dialog box.

2. Under Shared With, tap Add Person and begin typing the name of the person in your address book with whom you want to share this calendar. The person and their email address should pop up. Tap the person to select them.
3. If you want to share with another person, either begin typing a name or tap the plus sign on the right and repeat Step 2.
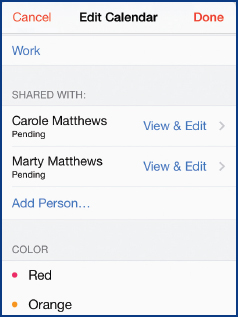
4. When you have added all the people you want, tap Add to be shown the Edit Calendar dialog box. Here you can tap View & Edit to disallow the other person from editing the calendar or making and changing events.
5. Tap Edit Calendar | Done when you are ready. Upon returning to the Show Calendars dialog box, you will see that the calendar you chose to share will now have “Shared With…” under the name of the calendar.
The recipient gets an email notification that you want to share a calendar with them. They need to tap Join Calendar and sign in to iCloud. You are then told that they have joined the offered Calendar.

If the recipient taps Calendar from the Home screen and then taps Calendars they should see the newly shared calendar in the list of calendars.
The originator will get a notice that the recipient has accepted the invitation.

On a PC, the recipient gets an invitation that looks like other invitations and is able to access the calendar through a link in the invitation to an iCloud PC web app, shown in Figure 5-11. On a Mac, the recipient gets an invitation and then can look at the calendar in iCal.
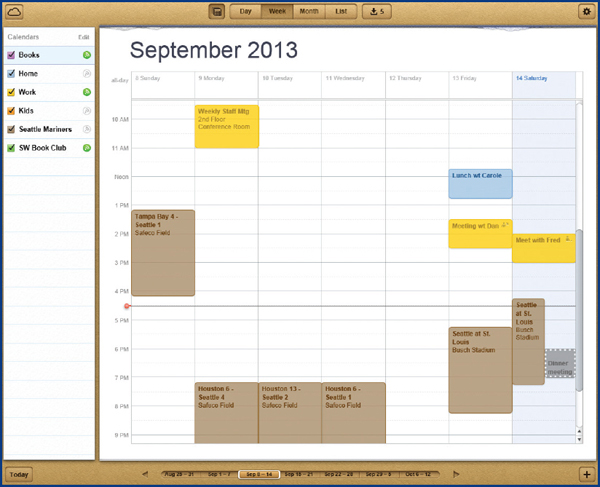
Figure 5-11: A person on a PC can share a calendar created on an iPad using an iCloud app.
Publish a Public Calendar
If you are responsible for a larger public group, such as a Boy or Girl Scout troop, a Little League team, or a book club, and you want to make available a calendar for that organization, you can make a calendar a public calendar that allows anyone to subscribe to it and peruse it. They will not be able to change or write to that calendar. To publicly share a calendar:
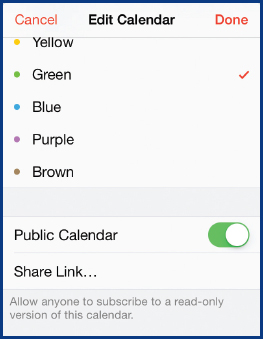
1. In Calendar, tap Calendars and tap on the right (the “i” in a circle) of the calendar that you want to make public.
2. In Edit Calendar, tap the On/Off button opposite Public Calendar to turn it on. This will allow anyone to subscribe to a read-only version of the calendar.
3. After turning on the public calendar, a new option appears: Share Link. Tap this.
4. You are allowed to send the Internet link (URL) for your public calendar to anyone you want using AirDrop, email, text messaging, or copying it to a document, website, or blog. Tap the option you want to use. For example, tap Mail, fill in the addressees, as you see in Figure 5-12, and tap Send.
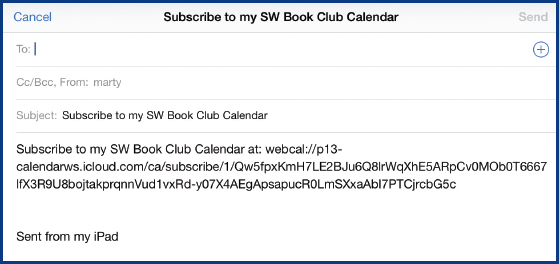
Figure 5-12: You can always go back to the public calendar and tap Share Link to send it to additional people.

5. When you are done, tap Cancel.
The recipient initially gets an email invitation, which, when they open it, gives them a very long Internet link. When they tap or click that link, they are asked if they want to subscribe to the public calendar. If they tap or click Subscribe, they are told that the calendar has been added, and they can tap or click View Events to see it.

WORK WITH REMINDERS
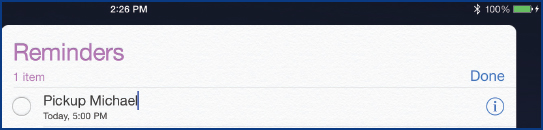
Reminders is for making lists, such as to-do lists, shopping lists, and lists of steps to complete a project, as shown in Figure 5-13. Reminders may be date- and time-sensitive and can be marked as completed. They can also remind you that an item has not been completed and can be assigned a priority. Lists can be by date or by list, several of which have been created for you, but you can create as many more as you like. You can sync lists with iCloud and several other products, such as Hotmail’s Calendar. If you add a date and time to an item on a list, the item will appear on both the Scheduled and Reminders lists as well as the original list on which you added it.

Figure 5-13: Anything you can put into a list can be entered into Reminders.
Reminders is very simple. The only setup necessary is the adding, deleting, renaming, and rearranging of lists, and there is only one setting to consider. To set up Reminders:
1. From the Home screen, tap Reminders, which should open a page similar to what you saw in Figure 5-13.
2. Tap Add List in the lower-left corner, type a name for the list, pick a color, and tap Done.

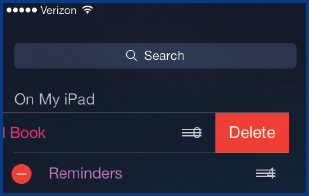
3. Tap Edit in bottom-right area of the left column, tap the list you want to delete, note the line changes from horizontal to vertical, and tap Delete twice, once on the word “Delete” and once again to confirm.
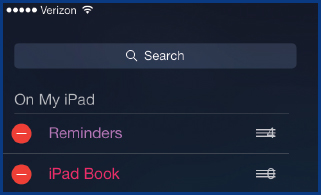
4. While in Edit mode (see Step 3), press and hold on the right end lines (“grab strips”) of the list you want to move up or down, and drag it as desired.
5. Tap Done in the bottom-right area of the left column when you have made the changes you want.
6. Tap Edit in the upper-right corner. Press and hold on the list name to place the insertion point to change the list name.
7. Tap Color and, if desired, select a different color.
8. Tap Done in the upper-right corner when you have made the changes you want.
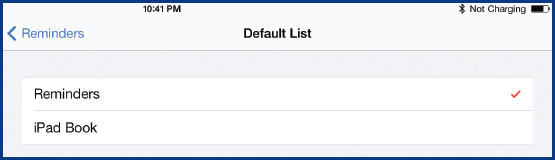
9. Review Reminders settings by pressing the Home button, and taping Settings | Reminders. Tap Default List, tap the list you want other apps outside of Reminders to automatically add to, and tap Reminders.
Using Reminders involves little more than entering something you want to be reminded about or that you want to be in a particular list. The first step is to make sure you have the list available in which you want to place the item. If not, go to the preceding section to create the list.
Enter Items
To enter an item once you have the list:
1. In Reminders, tap the list in which you want to enter one or more items.
2. Tap a line on the list and type the item you want on the list.
3. Tap Done or tap Return to complete the entry.
Add Details
The items you enter go in without a date or time. Other than the brief line that you typed, there is no other detail. To add detail to an item:
1. If you haven’t tapped Done or Return, tap the information icon  on the right of the line. If you have tapped Done or Return, tap the item to display its information icon.
2. Tap the information icon to open the Details pane.
3. Tap the item name in the Details pane to edit or change it. Use the standard iPad editing techniques of pressing and holding on a piece of text to place the insertion point there.
4. If you don’t want to be reminded, tap the On/Off button to change that feature.

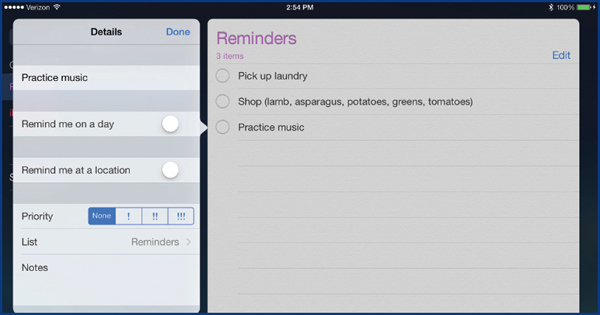
5. If you want to change the item’s date and time, tap that entry in the Details pane to open the Date/Time selector. Drag the selector’s elements to select what you want.

6. If you want to have this item repeat on a periodic basis, tap Repeat, tap the period, and tap Done.
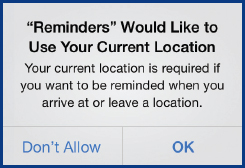
7. If you have a cellular-model iPad and want to be reminded based on your location, tap the On/Off button to change that feature. You will be asked if Reminders can use your current location. If you tap OK, you are asked if you want to be reminded when you leave or when you arrive at that location. Tap your choice.
TIP If you want to be reminded upon leaving or arriving at a location that is different from your current location, tap the current location shown, tap the location delete icon, and either type an address or tap the plus sign and select an address from Contacts. |
8. Tap a priority for the item, change the list it is on, or add notes to the item at the bottom of the Details pane.
9. When you have completed adding details to an item, tap Done at the top-right area of the Details pane.
Complete and/or Delete Items
To complete an item and indicate that you have finished it, tap the circle on the left of the item.

To remove an item from the list, tap Edit in the upper-right corner, tap the red circle on the left, and tap Delete. Tap Done when you are ready.

HANDLE NOTIFICATIONS AND ALERTS
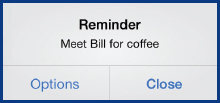
If you have used your iPad for any time, you have probably seen alerts pop up and notify you about something. They can come from your mail, from your calendar, or from apps you have installed, especially news, sports, and investment publications, as you have seen in the previous discussion of Reminders, as well as earlier in this and previous chapters. Alerts generally have self-explanatory buttons, such as “OK,” “View,” “Close,” and “Options,” that you can tap to carry out that command.
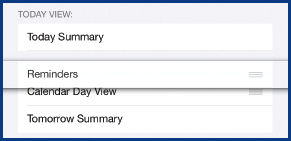
Notifications are another form of alerts, repeating their message. Not all notifications have a related alert, but all alerts have a notification. Notifications are in the form of a banner that can be pulled down from the top of the screen by swiping down, usually with a number of other notifications, as you can see in Figure 5-14. Tap a banner notification to open the related app and display the item in the notification.
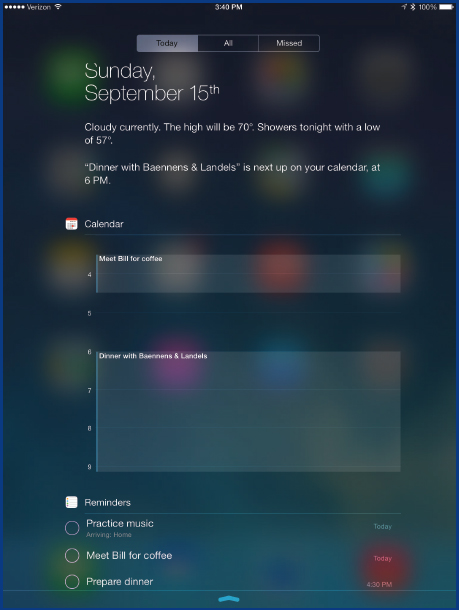
Figure 5-14: You only see notifications when you want to and swipe down from the top, but many notifications also pop up as alerts.
The most important aspect of notifications and alerts is the need to control what you get so you get what is important for you, and don’t get so much it overwhelms you. Notifications and alerts are controlled in Settings.
1. From the Home screen, tap Settings | Notification Center to open the list of apps in the Notification Center and other settings, as shown in Figure 5-15.

Figure 5-15: Depending on the apps you have downloaded, you may have more or fewer apps than shown here.
2. Many, if not most, apps, when they are downloaded and set up, put themselves in the Notification Center and you get a haphazard list of your apps. The default is the sorting of apps manually, but that means you must do it.
a. Tap Edit in the upper-right corner.
b. Press and hold on the grip strip (lines) on the right of an app you want to move.
c. Drag the app where you want it in the list.
d. Repeat Steps b. and c. for all the apps you want to move.
e. Tap Done when you are ready.
3. Each app has several settings within the Notification Center. As an example, tap Messages.

a. You have a choice of three styles of alerts:
• None
• A banner in the Notification Center pulled down from the top of the screen
• Alerts that pop up in the middle of the screen in addition to the banner
b. If you want to see on the Home screen that an app has notifications or alerts in the form of a number in a red circle, turn on Badge App Icon.
c. Set the tone that is played when a notification or alert happens by tapping Alert Sound to open a list of tones. You can hear what each of these sounds like by tapping it.
d. You can remove the app from the Notification Center by tapping the On/Off button to turn it off.
e. Determine the number of alerts/notifications you want to show by tapping Include and selecting the number of items you want.
f. If you want alerts to appear even when the screen is locked, which is the default for many apps, tap the On/Off button on the right of Show On Lock Screen.
4. Repeat Step 3 for all the apps whose notification settings you want to change. Some apps have one or more special settings, such as whether to repeat the alert and who to allow alerts from.
5. When you are ready, return to the Home screen.
NOTE At the bottom of the list of apps in the Notification Center is an equally important list of apps not in the Notification Center. For each of these, ask yourself if they are properly categorized. |
Using Do Not Disturb
Do Not Disturb, which you can turn on or off from the Control Center (the crescent moon icon) and from Settings | Do Not Disturb, allows you to silence alerts and incoming FaceTime calls by tapping the crescent moon icon in the Control Center or tapping the On/Off button opposite Manual in settings. If you tap Do Not Disturb in Settings, you can:


• Override the prohibition of alerts for scheduled events by tapping the On/Off button opposite Scheduled
• Allow FaceTime calls from certain individuals by tapping Favorites opposite Allow Calls From and tapping who to allow
• Allow FaceTime calls when the call is repeated from the same person within three minutes.
• When Do Not Disturb is turned on, do you want FaceTime calls and notifications silenced always or only while the iPad is locked?
When Do Not Disturb is turned on, a crescent moon icon  appears to the left of the group of icons on the right at the top of the screen.

Sherryl Christie Bierschenk
There are so many options for the iPad—I both love that and find it overwhelming! I think it’s important to decide what you really want to do with it and focus on that.
I want to get to the point where the iPad is the only computer I travel with, instead of the combination of a laptop and the iPad that I carry now. I need the ability to access a number of electronic documents, and that concerned me with the limited memory in the iPad. I solved it by putting my documents in Dropbox in the cloud (on the Internet) and have them available on my iPad as needed. I also write a lot and give presentations and have found that both the Apple Pages and Keynote apps work well for my needs, even though I have used Microsoft Office applications for most of my life. I have a case for my iPad that includes a removable Bluetooth keyboard in it that I find works well for writing.
Much of my writing involves taking notes, and I am exploring two approaches for that other than typing them out. One is handwritten notes using a stylus and apps like Notability and Note Anytime. I’m not far enough along with either of these to recommend them, but I can say that both are looking promising!
The second approach is dictating. I started working on this before Siri was available, so I have used Dragon Dictation. I am now also using Siri to send quick text messages to people and to send notes to myself.
I use a mail service shared with my iPad, my laptop, and my desktop computers, and, in spite of some earlier confusion, they are all now synced. The trick was to get my mail service fully engaged in helping me solve the problem, which they did, along with a warning not to use iCloud to sync my Contacts list. I also use Google Calendar by itself instead of as a part of iPad’s Calendar so I can keep it synced online with an assistant, colleagues, and family members, as well as with my other computers.
Other things I do with my iPad include purchasing and reading books from iBooks, doing a daily Bible and devotional reading, listening to music, using Skype to talk with my family, and using Instagram to share photos. I use CamCard on both my iPhone and my iPad to photograph and enter business cards into my address book and I’m exploring RTM (Remember the Milk) as a to-do list maker and tracker.
I continue to be amazed at what I can do with my iPad—it’s a great tool for so many things in my life—both for business and personally.
..................Content has been hidden....................
You can't read the all page of ebook, please click here login for view all page.