
27. Core Data
Using the C API for SQLite is one way to store and access data on the iPhone. The Core Data framework simplifies this process by providing an ORM for Objective-C and SQLite. ORM stands for Object-Relational Mapping. If you think of a table in a relational database as a class, then each row represents one instance of the class and each column represents an instance variable. Core Data fetches rows from the table and turns them into objects (Figure 27.1). When these objects are edited, Core Data updates the row in the table accordingly. It also takes care of inserting and deleting rows as objects are created and destroyed.
Figure 27.1. Role of Core Data
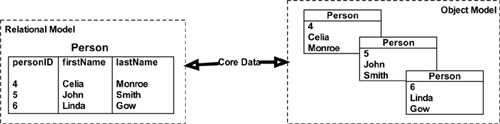
The class/table is known as an entity in Core Data. The column/instance variable is an attribute of that entity. In this diagram, there is one entity called Person. It has three attributes: personID, firstName, and lastName.
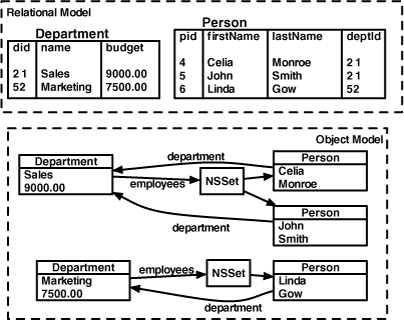
It gets a little more complicated if you have more than one table and relationships between them. In a relational database, these relationships are handled using primary keys and foreign keys. Each row in a table gets a unique ID number, which is the primary key of that table. If another table has a column that references that ID number, the column is a foreign key. The relationship from the table with the foreign key is “to-one”; after all, that unique ID can only refer to one row. The relationship going the other way is typically “to-many”. (If you’d like more help understanding relational data, we suggest reading Joe Celko’s SQL for Smarties.)
Thus, Core Data uses two distinct types of properties: attributes and relationships. Attributes can be expressed as simple data types: NSNumber, NSString, NSDate, NSData, etc. Relationships refer to other entities and are represented by pointers (for to-one relationships) and instances of NSSet (for to-many relationships) as shown in Figure 27.2.
To use Core Data, you must first describe your entities and their attributes and relationships in a model file. (Some programmers refer to this as “the model,” but since we are already using “model” to mean classes that are not views or controllers, we will specifically refer to “the model file.”) The model file is created in Xcode.
Objects that hold data are instances of NSManagedObject. You can subclass NSManagedObject to add custom behavior to your managed object. For example, consider the Person objects in Figure 27.1. You might create a subclass of NSManagedObject called Person so that you could give it a fullName method.
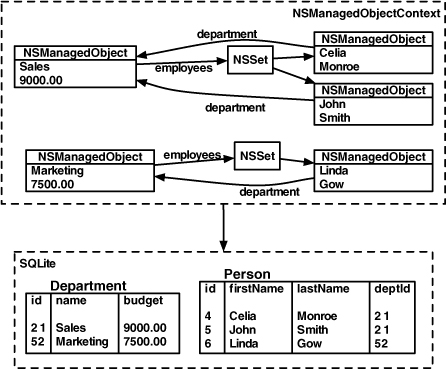
Core Data also needs to know when these objects are edited so that the changes can be written to the SQLite database. An instance of the class NSManagedObjectContext monitors the managed objects to provide this information. You fetch managed objects into a managed object context. When you want to save the changes, you ask the context to save them for you.
Figure 27.3. NSManagedObjectContext
Creating the Inventory Application
To get a feel for Core Data, you need an object model of some complexity. (For simple object models, using SQLite directly is just as easy.) So, in this chapter, you are going to write a real application called Inventory with several screens and a complex object model.
Big Nerd Ranch keeps an inventory of stuff like T-shirts and coffee mugs (“schwag”). The inventory, however, is kept in several locations. We need to write a simple application to keep track of our inventory using Core Data. We will have a table of locations (like “Jaye’s Basement”) and a table of assets (like “Coffee Mug”). There will be a third table with a count, a date, and references to the other two tables. (“There were 12 Coffee Mugs in Jaye’s Basement on March 12, 2010”l). We will refer to the rows of that table as “inventories.” The data model is shown in Figure 27.4.

In Inventory, you will keep the interface as simple as possible: the user will be able to create new assets and locations but not edit or delete them (Figure 27.5).
Figure 27.5. Screens for Inventory

In Xcode, create a new project of type Window-based Application and check the box labeled Use Core Data for storage. Name the project Inventory. When the project window appears, open the Resources group and open the Inventory.xcdatamodel.
Editing the model file
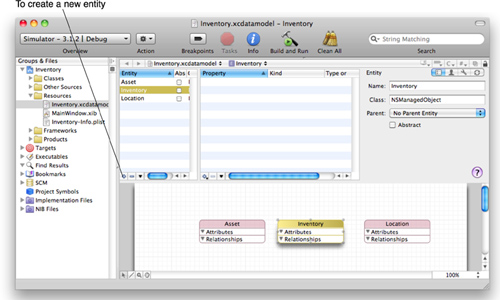
Create three new entities in the model: Asset, Inventory, and Location by clicking on the + button at the bottom of the Entity table. In each case, leave the class NSManagedObject as shown in Figure 27.6. These are concrete entities, not abstract. And they have no parent entity.
Figure 27.6. Create three entities
Now add the properties for each entity starting with Asset. Asset has one attribute and one relationship. The attribute is named label and is a String. The relationship is named inventories, and it is a to-many relationship with the Inventory entity (Figure 27.7).
Figure 27.7. Properties of Asset entity
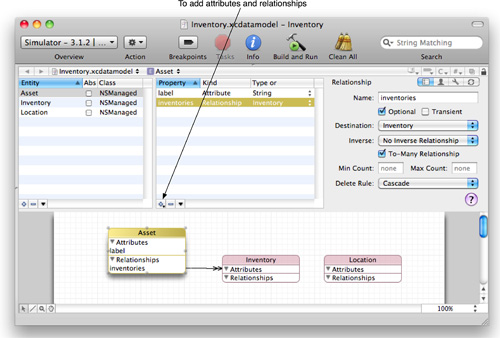
You must select a delete rule for the inventories relationship. The delete rule is the answer to the question “What happens to the Inventory objects associated with an asset when that asset is deleted?” There are four possible answers:

Set the delete rule for the inventories relationship to be Cascade.
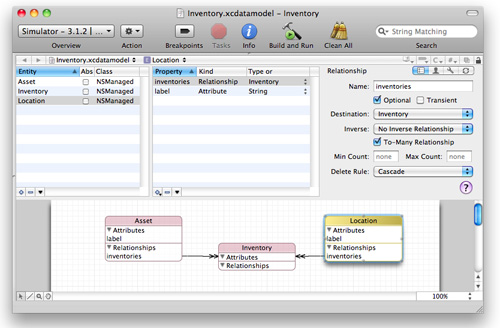
The Location entity is similar to Asset. It needs an attribute named label of type String and a to-many relationship to Inventory called inventories. Set the delete rule for the relationship to Cascade (Figure 27.8).
Figure 27.8. Properties of Location entity
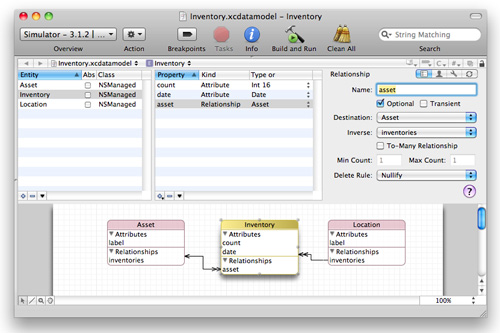
The Inventory entity is a little different from the others. It has two attributes: count (a 16-bit integer) and date (a date). Inventory also has relationships to the Asset and Location entities.
Add a to-one relationship named asset to the Inventory entity. The destination is the Asset entity. This relationship is the inverse to Asset’s inventories relationship. Set the delete rule to Nullify (Figure 27.9).
Figure 27.9. Inventory’s asset relationship
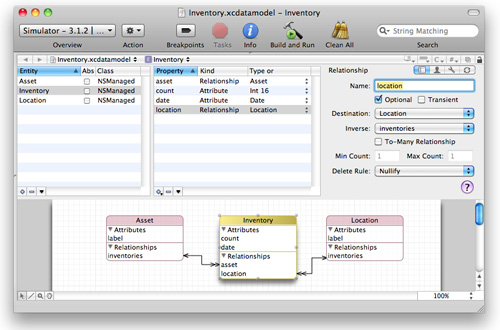
Add a second to-one relationship named location to the Inventory entity. The destination is the Location entity. This relationship is the inverse to Location’s inventories relationship. Set the delete rule to Nullify (Figure 27.10).
Figure 27.10. Inventory’s location relationship
Your model file is complete. Save it.
In this exercise, you are using generic instances of NSManagedObject, which are very much like dictionaries. If you wanted to, you could subclass NSManagedObject and create the classes Inventory, Asset, and Location.
AppController
The name InventoryAppDelegate is weak; this object is much more than just a delegate. So, let’s rename it AppController using the refactoring tool. Select the text InventoryAppDelegate after @interface in InventoryAppDelegate.h. In the Edit menu, select Refactor. In the panel, rename InventoryAppDelegate AppController:
Figure 27.11. Renaming InventoryAppDelegate

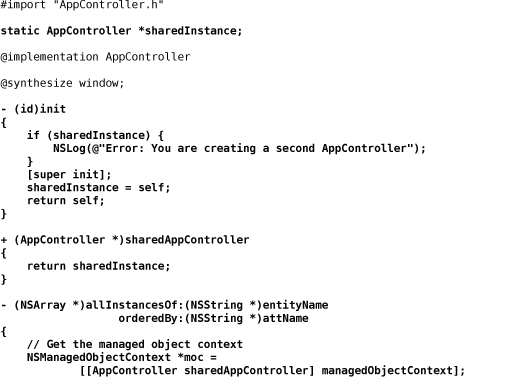
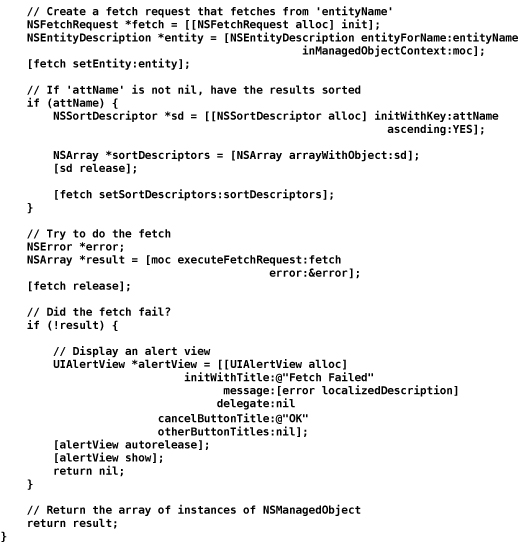
Take a minute before we go any further to browse AppController.m. Notice how it lazily loads the model, creates an NSPersistentStoreCoordinator, and puts an NSManagedObjectContext atop the coordinator. Also, notice that it saves the changes you have made to the objects when the application is terminating.
In AppController.h, add an instance variable to hold on to the navigation controller that you will be using later. Also add a class method for getting hold of the AppController (there will be only one). Finally, declare a method for fetching arrays of objects from the NSManagedObjectContext:

Open AppController.m. At the beginning of the class, add the static variable and methods that you will need:
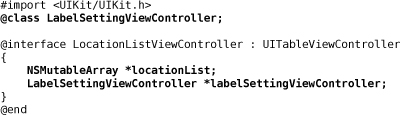
LabelSettingViewController
Now you’re going to create two subclasses of UITableViewController (no XIB file):
• LocationListViewController
• AssetListViewController
and two subclasses of UIViewController (with XIB file):
• LabelSettingViewController
• CountViewController
If you feel particularly stylish, you can create a group in your project for each view controller as shown in Figure 27.12.
Figure 27.12. New View Controllers

Depending on your version of Xcode, you may have boilerplate code that will not compile in LocationListViewController.m and AssetListViewController.m. It would look like this:

If this is the case, delete numberOfSectionsInTableView: and make the other method return 0:
![]()
In earlier chapters, we had you create subclasses of UITableViewController by creating a subclass of UIViewController and then changing the superclass in the header file to UITableViewController. We did this specifically to avoid the problem this template code might create. Now you are familiar enough with Xcode and UITableViewController that it doesn’t hurt to create your subclasses with this potentially problematic template.
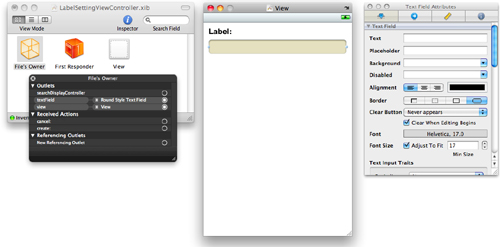
The least interesting view controller is LabelSettingViewController. Its only job is to give the user a text field to name new assets and locations (Figure 27.13).
Figure 27.13. LabelSettingViewController

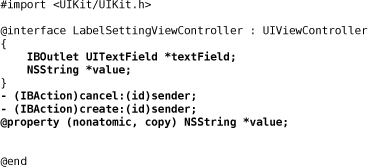
Open LabelSettingViewController.h and add an outlet, two actions, and a property called value:
Now open LabelSettingViewController.xib. Drop a label and a text field on the window. Set File’s Owner’s textField outlet to point to the text field as shown in Figure 27.14.
Figure 27.14. LabelSettingViewController.xib
In LabelSettingViewController.m, keep the variable value and the text field in sync:


LocationListViewController
LocationListViewController will fetch the Location objects into the NSManagedObjectContext and display them in a table view (Figure 27.15).
Figure 27.15. LocationListViewController

You’re also going to add a navigation item that the user can click to get to the LabelSettingViewController. In LocationListViewController.h, declare an instance variable to hold the fetched Location objects. Also, declare a variable to hold on to the LabelSettingViewController:
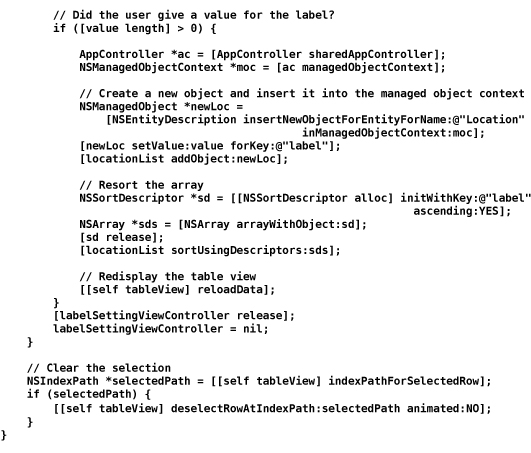
Now in LocationListViewController.m, add these methods:
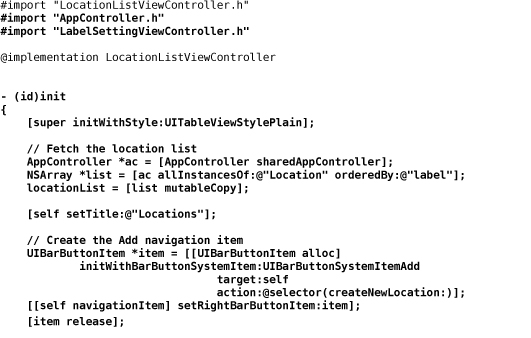


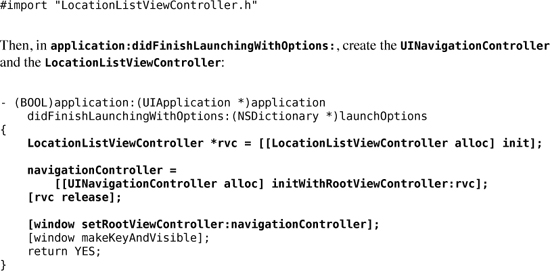
Now put this view controller in a navigation controller and onto the screen. Go back to AppController.m and import the header at the top:
#import "LocationListViewController.h"
Then, in application:didFinishLaunchingWithOptions:, create the UINavigationController and the LocationListViewController:
Build and run the application. You can add new locations, but selecting an existing location in the table view won’t do anything yet.
AssetListViewController
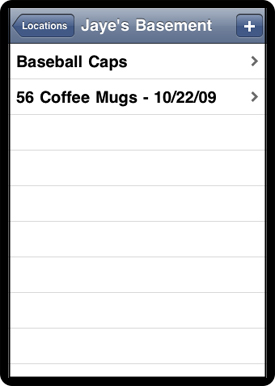
The AssetListViewController is a lot like the LocationListViewController. For a given location, it will display a list of all the assets. If there is an inventory for that asset at that location, it will display the inventory data (Figure 27.16).
Figure 27.16. AssetListViewController
Open AssetListViewController.h. Add variables to hold the selected location, the list of all assets, and the LabelSettingViewController:

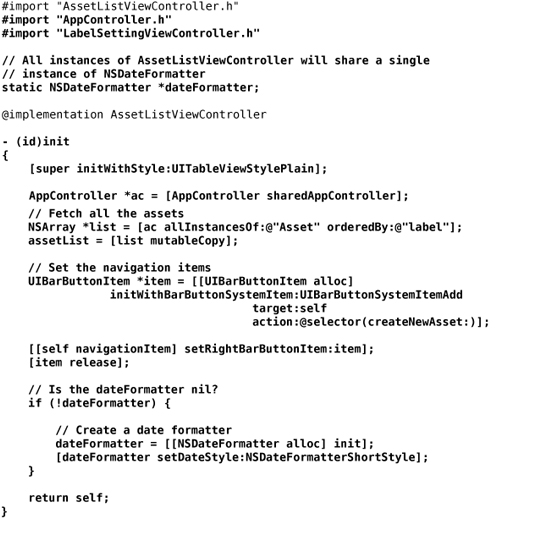
Open AssetListViewController.m.

A view controller is no good if you can’t get to it. Go back to LocationListViewController.m, and push the new view controller onto the navigation controller when the location is selected:
You also need to import AssetListViewController.h at the top of LocationListViewController.m.
Build and run the application. Now you can create new assets. Note, however, that a new asset appears at all locations.
CountViewController
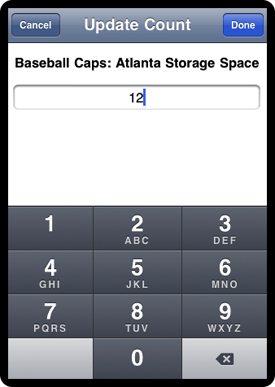
The last view controller that you are going to create enables the user to enter counts for assets at particular locations (Figure 27.17).
Figure 27.17. CountViewController
Open CountViewController.h and declare some instance variables and methods:

Save the file.
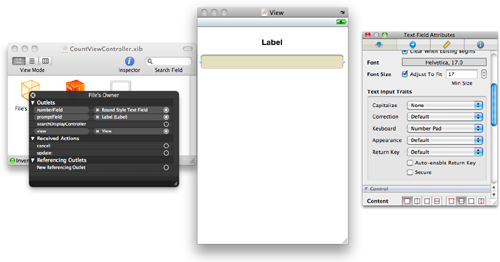
Open CountViewController.xib and drop a label and a text field on the view. Connect the outlet numberField to the text field. Connect the outlet promptField to the label. Set the text field to take number input as shown in Figure 27.18.
Figure 27.18. CountViewController.xib

Once again, the new view controller is unreachable. Go back to AssetListViewController.h and declare an instance variable to hold a reference to the CountViewController:
CountViewController *countViewController;
Near the top of AssetListViewController.h, let the compiler know about the class:
@class CountViewController;
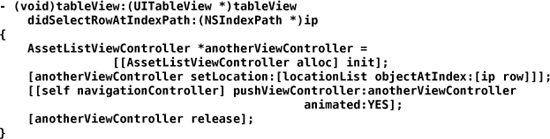
In AssetListViewController.m, display the view controller if the user selects a row:

You will also need to import the header file at the top of AssetListViewController.m:
#import "CountViewController.h"
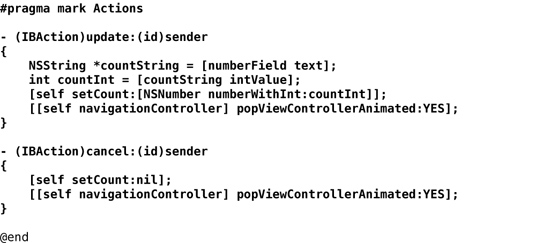
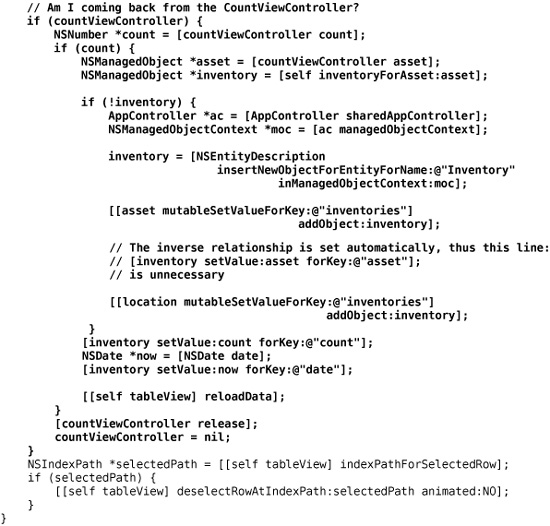
If the user returns from a CountViewController, take the input:

Be sure to import CountViewController.h at the top of the file!
Build and run the application. Nice, huh?
How It All Works
In the last chapter, you worked with SQLite directly. In this chapter, you used SQLite via Core Data. You might wonder what SQL commands Core Data is executing. Using private API, you can get Core Data to log its activities to the console. (While the SQL commands are interesting to see, the use of private API may cause this code to break one day. So do not ship an application that uses it.) Add to the init method in AppController.m:

Build and run the application again. Make sure the Debugger Console is visible so you can see the SQL logging. Add a few locations and inventory items; then navigate around the app looking at various items. Notice that managed objects are fetched in a lazy manner. This is done with faults.
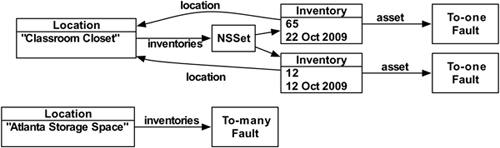
A managed object can have a relationship to another entity, either to-one or to-many (recall that you created relationships for your managed objects earlier in this chapter in your Inventory.xcdatamodel file). If a managed object has such a relationship, when it is fetched, the objects at the other end of the relationship are not fetched. Instead fault objects are created. There are to-many faults (which stand in for sets) and to-one faults (which stand in for managed objects). So, for example, when the locations are fetched into your application, the instances of Inventory and Asset are not. The relationship inventories is represented by a to-many fault that is pretending to be a set (Figure 27.19).

When you send a message to a set, it might actually be a fault, but luckily your code doesn’t need to know or care about that. If the set is a fault, Core Data will fetch the objects for that relationship as shown in Figure 27.20. (In practice, the message count usually triggers the to-many fault.)
This lazy fetching makes Core Data not only easy to use, but also quite efficient.
Watch the SQL in the console and notice that the data is only saved to the SQLite file when you quit the application.
Trade-offs of Persistence Mechanisms
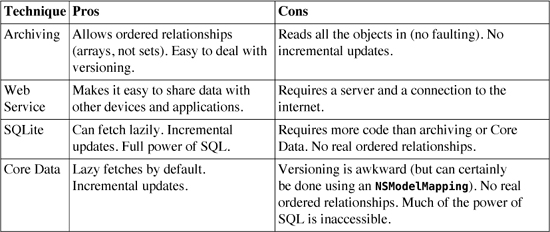
At this point, you have seen all the common ways that iPhone applications can store their data: archiving, web services, direct SQLite, and Core Data. Which is best for your application? Use Table 27.1 to help you decide.
Table 27.1. Data storage pros and cons
Challenge 1: Deleting
Add deletion of assets or locations to the application. You will need to tell the managed object context to delete the object:
![]()
Challenge 2: Custom NSManagedObject Subclasses
You may have noticed that you used the method valueForKey: many times. This can become awkward and error-prone in a large application. You can simplify this code by subclassing NSManagedObject to represent each of the entities you defined in your model. These subclasses will have @property declarations corresponding to the properties you created in the model editor, and you will replace code like this:
![]()
with direct accessor calls:
![]()
Hint: Xcode will generate the .h and .m files for you.