
28. Developing for the iPad
After revolutionizing personal computing and the mobile device, Apple has taken its game to tablet computing with the introduction of the iPad. Fortunately for you, the iPad runs iPhone OS. Writing an iPad application is nearly identical to writing an iPhone application – you will use the same classes and design patterns. However, there are a few minor differences that you should be aware of. This chapter will discuss those differences.
Throughout this chapter, we will refer to the iPad, iPhone, and iPhone OS. To clarify those terms: iPhone OS is the operating system that runs on the iPad, iPhone, and iPod touch; iPhone refers to both the iPhone and the iPod touch devices.
Universal Applications
When writing an application for iPhone OS, you can create two separate applications for the two devices (the iPad and the iPhone) or a single universal application. While you have the option of creating two applications and submitting them to the App Store independently, Apple recommends creating a universal application. A universal application runs on both the iPhone and iPad and is a single entry on the App Store, but it takes a bit more work to get it to run cleanly.
Porting existing projects to the iPad
An application built for the iPhone can be run on the iPad without any changes. However, it will run in an iPhone-sized window. If you wish for users to experience your application in all its glory on the iPad or take advantage of iPad-only features, you will need to upgrade your application to support the iPad. In this chapter, you will create a universal Wherewasi application. Open the Whereami.xcodeproj project that you created in Chapter 4. (Remember, we changed the name of the application to Wherewasi, but the project is still named Whereami.xcodeproj.)
In Whereami’s project window, locate the Whereami target in the Targets group. Right- or Control-click the Whereami target and select Upgrade Current Target for iPad from the contextual menu that appears. (Figure 28.1). You will be prompted with a sheet that asks if you want a universal application or device-specific applications. Choose One Universal application and hit OK (Figure 28.2).
Figure 28.1. Upgrading to a universal application 1
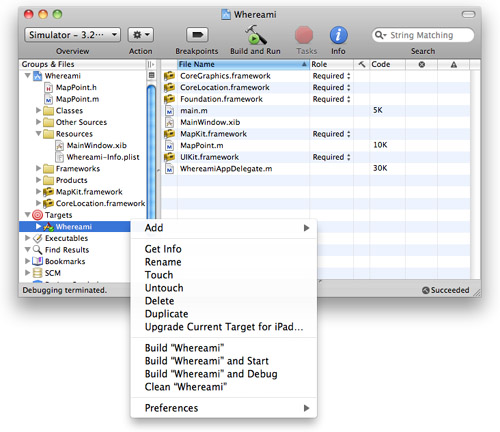
Figure 28.2. Upgrading to a universal application 2

Two noticeable things will happen after upgrading the target: a Resources-iPad group will appear in the project window and the Whereami-Info.plist will be updated. Open Whereami-Info.plist (found in the Resources group of the project window). A new key has been added to the property list: Main nib file base name (iPad), and it has been set to MainWindow-iPad. Now, when this application is executed, the operating system will determine the device it is being run on and choose the correct NIB file to load.
In addition to these two changes, some of the build settings for your project will have changed. These changes are taken care of by Apple; you shouldn’t try and set them manually.
Wherewasi now technically runs natively on the iPad, so build and run the application. Oh, gross! The interface is a disaster. Let’s fix that.
Re-designing Wherewasi’s interface
Check out the Resources-iPad group in the project window. Inside this group is a MainWindow-iPad.xib file, matching the name of the value for the Main nib file base name (iPad) key in the info property list. This is the NIB file that will get loaded when Wherewasi is launched on an iPad. Open this file in Interface Builder.
Double-click on the Window object to view it. This window is much larger than the window in the iPhone’s MainWindow.xib, and your interface is scattered about the window. Resize the MKMapView so it spans the entire window. Reposition the UITextField and UIActivityIndicator near the top and in the center of the window, as shown in (Figure 28.3).
Figure 28.3. Updated Wherewasi Interface

Save MainWindow-iPad.xib and exit Interface Builder. Yes, it was that simple. Build and run the application again to see your updated interface.
Want to make sure your iPhone interface still looks good? Select Set Active Executable from the Project menu and choose the iPhone option from the sub-menu that appears next to it. Build and run your application again to see the original iPhone application.
More considerations: universal view controllers
The previous section outlined the basic steps you must take to prepare a universal application. However, more complicated applications will require more changes. For instance, if your application has view controllers, you must load the correct view for the device your application is running on.
If your view controller is loading its view from a NIB file, you must create another NIB file that has a view configured for the larger window size. Stick with Apple’s convention and suffix your iPad NIB files with -iPad. (MainWindow.xib and MainWindow-iPad.xib, for example.)
Also, within your view controller’s init method, you will need to perform a run-time check to see which NIB file to load. Here is the point where you get excited that we taught you to override the designated initializer for your UIViewControllers to init and determine the NIB file to load from within that method. A view controller in a universal application will take advantage of the UI_USER_INTERFACE_IDIOM() function to determine which NIB file to load in its init method. Here is an example:

New iPad Stuff
iPad applications have a few more classes to work with than their itty-bitty predecessors. As of this writing, these classes are only available on the iPad. Time will tell if these new classes will become available on the iPhone. Some of the more important classes are:
• NSAttributedString: Strings can now have different attributes that change their look. Attributes are things like bold, italic, colors, alignment, and other things that make up rich text.
• UISplitViewController: A replacement or supplement for navigation controllers. In a way, it is a navigation controller that fits multiple views on the screen at once.
• UIGestureRecognizer (and subclasses): These classes will perform gesture recognition (like pinch-pull or rotate) for you so you won’t have to implement your own technique in the various UIResponder methods.
• Core Text: The text editing APIs from the desktop have made their way to the iPad. You can write your very own text editor!
All of the concepts and classes you have learned in this book leave you more than prepared to use these new features. Check out the documentation to add these new classes to your toolkit. And always remember, just because a feature is new doesn’t mean you have to use it.
For more information about developing for the iPad, check out the iPad Programming Guide in the developer documentation.