To start, you’ll create a simple form that accepts and displays data in the tblCompanies table in the Conrad Systems Contacts database. Later, you’ll create a form for the tblProducts table in this same database by using the Form Wizard. To follow along in this section, open the ContactsDataCopy.accdb database.
To begin building a new form that allows you to display and edit data from a table, you need to start with a blank Form window. You’ll build this first form without the aid of the Form Wizard so that you’ll understand the variety of components that go into form design. Click the Blank Form command in the Forms group on the Create tab. By default Access opens a blank Form window in Layout view with the field list displayed on the right, as shown in Figure 29-3.

Figure 29-3. When you click the Blank Form command on the Ribbon, Access opens a new Form window in Layout view.
Access does not know at this point from which tables or queries you want to display and edit data. The field list on the right displays a list of each local or linked table. If you click the plus symbol next to the name of a table, Access expands the list and displays the name of every field in that table. You can click on a field name in the field list and drag and drop it onto your form. If you click the Edit Table hyperlink on the right side of the field list, Access opens that specific table in Design view.
When you ask Access to create a new blank form, Access initially displays the form in Layout view. To switch to Design view, click the arrow under the View button in the Views group and click Design View. Access switches the Form window to Design view and provides several design tools on the Design contextual tab under Form Design Tools on the Ribbon, as shown in Figure 29-4.

Figure 29-4. When you open a form in Design view you can use the form grid and tools to create your form elements.
Access starts with a form that has only a Detail section. The section has a grid on a background that is the color defined for 3-D objects in the Appearance Settings dialog box—usually a light gray or beige. You can click the edge of the Detail section and then drag the edge to make the section larger or smaller. (To see more of the grid you might also want to collapse the Navigation Pane on the left.) You can remove the grid dots from the Detail section by clicking the Show Grid command in the Show/Hide group on the Arrange tab under Form Design Tools. If you want to add a Header section or a Footer section to the form, click the Form Header/Footer command in the same Show/Hide group.
Note
To set the color for 3-D objects, right-click on the desktop and then click Personalize. Click Windows Color And Appearance. In the Appearance Settings dialog box, click Advanced. In the Item list, click 3D Objects. Use the Color 1 list to set the color you want to use for 3-D objects.
The Detail section starts out at 5 inches (12.7 centimeters) wide by 2 inches (5.08 centimeters) high. The measurement gradations on the rulers are relative to the size and resolution of your screen. By default, Access sets the grid at 24 dots per inch horizontally and 24 dots per inch vertically. You can change the density of the grid dots by altering the Grid X and Grid Y properties in the form’s property sheet. To replace the field list with the property sheet, click the Property Sheet command in the Tools group on the Design tab under Form Design Tools. You can find the Grid X and Grid Y properties near the bottom of the list on the Format tab of the property sheet when you have the form selected.
The Grid X and Grid Y property settings determine the intervals per unit of measurement in the grid. You can enter a number from 1 (coarsest) through 64 (finest). You set the unit of measure (U.S. or metric) by default when you select a country on the Location tab in the Regional And Language Options dialog box. (You open this dialog box by first clicking Clock, Language, And Region in Control Panel and then clicking Regional And Language Options. If your Control Panel is set to Classic View, click Regional And Language Options.)
For example, if your unit of measurement is inches and you specify a Grid X setting of 10, Access divides the grid horizontally into 0.1-inch increments. When your measurement is in inches and you set the Grid X and Grid Y values to 24 or less, Access displays the grid dots on the grid. In centimeters, you can see the grid dots when you specify a setting of 9 or less. If you set a finer grid for either Grid X or Grid Y, Access won’t display the grid dots but you can still use the grid to line up controls. Access always displays grid lines at 1-inch intervals (U.S.) or 1-centimeter intervals (metric), even when you set fine Grid X or Grid Y values.
Before proceeding further, you need to specify a record source for your new form. Although you can drag and drop fields from the field list and Access will figure out the appropriate record source for you, you have more control if you select a record source first. Click the All tab in the property sheet, click the arrow to the right of the Record Source property, and select the tblCompanies table from the list as shown in Figure 29-5.

Figure 29-5. Select a record source to specify which table or query to use for the data on your form.
The following sections describe some of the tools you can use to design a form.
As you learned in Chapter 26, the Ribbon provides contextual tabs when Access displays objects in various views. When a form is in Design view, two contextual tabs appear—Design and Arrange under Form Design Tools. These contextual tabs, shown in Figure 29-6, are the "command center" of form design. These tabs provide all the essential tools and commands you need to design and modify your forms.

Figure 29-6. You can use the various commands on the two contextual tabs under Form Design Tools to create and edit your forms.
At the heart of these tabs is the Controls group found on the Design tab. This group contains buttons for all the types of controls you can use when you design a form. It also contains a button (named Insert ActiveX Control) that gives you access to all the ActiveX controls (for example, the calendar control that comes with Access) that you have installed on your system. To select a particular control to place on a form, click the control’s button in the group. When you move the mouse pointer over the form, the mouse pointer turns into an icon that represents the control you selected. Position the mouse pointer where you want to place the control, and click the left mouse button to place the control on the form. If you want to size the control as you place it, drag the mouse pointer to make the control the size you want. (You can also size a control after you place it by dragging the sizing handles at its sides or corners.)
Top to bottom, left to right, the buttons in the Controls group are described in Table 29-1.
Table 29-1. Controls Group Buttons
Use the field list in conjunction with the Controls group to place bound controls (controls linked to fields in a table or a query) on your form. You can open the field list by clicking the Add Existing Fields button in the Tools group on the Design tab. If the form is bound to a table or query, Access displays the name of the underlying table or query along with all the fields available, as shown in Figure 29-7. Any tables that have relationships to the underlying table defined are displayed under Fields Available In Related Tables. The last section of the field list, Fields Available In Other Tables, lists the tables and fields from all other tables in this database. Click the Show Only Fields In The Current Record Source link to remove the bottom two sections of the field list. You can undock the field list by clicking the title bar and dragging it away from the right edge of the Form window. After you undock the field list, you can drag the edges of the window to resize it so that you can see any long field names. You can drag the title bar to move the window out of the way. When the list of available field names is too long to fit in the current size of the window, use the vertical scroll bar to move through the list.

Figure 29-7. The field list shows the names of the fields in the bound table or query, any related tables, and fields from all other tables in the current database.
To use the field list to place a bound control on a form, first click the button for the type of control you want in the Controls group. Then drag the field you want from the field list and drop it into position on the form. If you click the button for a control that’s inappropriate for the data type of the field, Access selects the default control for the data type. For example, if you click anything but the Attachment button when placing an attachment field on a form, Access creates an attachment control for you anyway. If you try to drag any field after clicking the button for the subform/subreport, unbound object frame, line, rectangle, or page break control, Access creates a text box control or bound object frame control, as appropriate, instead. If you drag a field from the field list without clicking a control, Access uses either the display control you defined for the field in the table definition or a control appropriate for the field data type.
The form, each section of the form (header, detail, footer), and each control on the form have a list of properties associated with them, and you set these properties using a property sheet. Each control on a form, each section on a form, and the form itself are all objects. The kinds of properties you can specify vary depending on the object. To open the property sheet for an object, select the object and then click the Property Sheet button in the Tools group on the Design tab. Access opens a window similar to the one shown in Figure 29-8 on the right side of the Form window, replacing the field list. (You cannot have both the property sheet and the field list open at the same time.) If you have previously undocked either the field list or property sheet, the property sheet appears in the undocked window. If the property sheet is already open, you can view the properties specific to an object by clicking the object. You can also click the arrow under Selection Type and then select the object name from the list at the top of the property sheet.

You can drag the title bar to move the property sheet around on your screen. You can also drag the edges of the window to resize it so that you can see more of the property settings. Because a form has more than 100 properties that you can set and because many controls have more than 70 properties, Access provides tabs at the top of the property sheet so that you can choose to display all properties (the default) or to display only format properties, data properties, event properties, or other properties. A form property sheet displaying only the data properties is shown in Figure 29-9.

Figure 29-9. If you click the Data tab on the form property sheet, Access displays only the data properties.
When you click in a property box that provides a list of valid values, a small arrow appears on the right side of the property box. Click this arrow to see a list of the values for the property. For properties that can have a very long value setting, you can click the property and then press Shift+F2 to open the Zoom dialog box. The Zoom dialog box provides an expanded text box for entering or viewing a value.
In many cases, a window, dialog box, or wizard is available to help you create property settings for properties that can accept a complex expression, a query definition, or code (a macro or a Visual Basic procedure) to respond to an event. When such help is available for a property setting, Access displays a small button with an ellipsis next to the property box when you select the property; this is the Build button. If you click the Build button, Access responds with the appropriate window, dialog box, or wizard.
For example, suppose that you want to see the companies displayed in this form in ascending order by company name. The easiest way to accomplish this is to create a query that includes the fields from tblCompanies sorted on the CompanyName field, and then specify that query as the Record Source property for the form. To start, display the property sheet for the form, click the Data tab to display the form’s data properties, click in the Record Source property box, and then click the Build button next to Record Source to start the Query Builder. Access asks whether you want to build a new query based on the table that is currently the source for this form. If you click Yes, Access opens a new Query window in Design view with the tblCompanies field list displayed in the upper part of the window and the property sheet open either in an undocked window or to the right, as shown in Figure 29-10.

Figure 29-10. You can use the Query Builder to create a query for the form’s Record Source property.
Note
Unlike previous releases, after you open the property sheet in table, query, form, or report Design view, the window will be open for all objects in Design view until you close it. Likewise, if you close the property sheet in Design view, the window will be closed for all other objects in Design view until you reopen it.
You’ll need all the fields in the tblCompanies table for this form, so select them and drag them to the design grid. For the CompanyName field, specify Ascending as the sorting order. Close the property sheet for now by clicking the Close button on its title bar. Your Query Builder window should look like the window shown in Figure 29-11.

Figure 29-11. Select all the fields from the table to include them in the query for the Record Source property of the form.
If you close the Query Builder window at this point, Access asks whether you want to update the property. If you click Yes, Access stores the SQL text for the query in the Record Source property box. A better approach is to save the query and give it a name, such as qryCompaniesSortedByName. Do that now by clicking the Save As command in the Close group on the Design contextual tab under Query Tools, entering qryCompaniesSortedByName in the Save As dialog box, and then clicking OK. Now when you close the query, Access asks whether you want to save the query and update the property. Click Yes, and Access places the name of the query (rather than the SQL text) in the property sheet.
Now let’s create a simple input form for the tblCompanies table in the Conrad Systems Contacts database. If you’ve followed along to this point, you should have a blank form based on the qryCompaniesSortedByName query that you created using the Query Builder. If you haven’t followed along, click the Blank Form command in the Forms group on the Create tab.
Click the arrow under View in the Views group on the Design tab and click Design View to switch from Layout view to Design view. You’ll see the Form window in Design view and a set of design tools, as shown earlier in Figure 29-4. If necessary, open the property sheet by clicking the Property Sheet command in the Tools group of the Design tab under Form Design Tools. By default this new form is unbound, so click the Record Source property, click the arrow that appears next to the property box, and select tblCompanies from the list. Now the form is bound to the tblCompanies table, but we want to change the record source to a saved query based on the tblCompanies table. Select the Record Source property again, click the Build button, and follow the procedures discussed in the previous sections, whose results are shown in Figure 29-10 and Figure 29-11; this will create the query you need and make it the source for the form.
In the blank form that now has the qryCompaniesSortedByName query as its record source, drag the bottom of the Detail section downward to make some room to work. All the fields in tblCompanies are defined to be displayed with a text box, so you don’t need to click a button in the Controls group. If you’d like to practice, though, double-click the Text Box button in the Controls group before dragging fields from the field list. If the field list is not displayed, click the Add Existing Fields button in the Tools group on the Design tab. You can drag fields (for this exercise, all except the ReferredBy field) one at a time to the Detail section of the form, or you can click the first field (CompanyID), hold down the Shift key, and click the last field (Website) to select them all. After you drag and drop the fields, your form should now look something like the one shown in Figure 29-12. If you double-clicked the Text Box button to select it for multiple operations, click the Select button to unlock the selection.

Figure 29-12. You can drag the fields from the qryCompaniesSortedByName field list to place these text box controls on the form design grid.
When you position the field icon that you’ve dragged from the field list, the upper-left corner of the new text box will be at the position of the mouse pointer when you release the mouse button. Note that the default text box control has a label control automatically attached to display the bound field’s Caption property (or the field name if the field does not have a caption), positioned 1 inch to the left of the text box. Also, in Design view, the label control displays its Caption property, and the text box control displays its Control Source property (the name of the field to which it is bound).
You should drop each text box about 1.25 inches (3 centimeters) from the left edge of the Detail section to leave room to the left of the text box for Access to place the control labels. If you don’t leave room, the text boxes will overlap the labels. Even if you do leave room, if a caption is too long to fit in the 1-inch space between the default label and the default text box (for example, Company / Organization in Figure 29-12), the text box will overlap the label.
If you selected multiple fields in the field list and added them all with one drag-and-drop action, when you click the Property Sheet button immediately after adding the fields, the property sheet indicates that you have selected multiple controls. (In this example, we dragged all the selected fields to the Detail section at one time.) Whenever you select multiple controls on a form in Design view, Access displays the properties that are common to all the controls you selected. If you change a property in the property sheet while you have multiple controls selected, Access makes the change to all the selected controls.
By default, Access creates text boxes that are 1 inch wide (except for Hyperlink and Memo fields). For some of the fields, 1 inch is larger than necessary to display the field value—especially if you are using the default 8-point font size. For other fields, the text box isn’t large enough. You probably also want to adjust the location of some of the controls.
To change a control’s size or location, you usually have to select the control first. Be sure that you have clicked the Select button in the Controls group on the Design tab. Click the control you want to resize or move, and moving and sizing handles appear around the control. The handles are small boxes that appear at each corner of the control—except at the upper-left corner, where the larger handle indicates that you cannot use it for sizing. In Figure 29-12, handles appear around all the text boxes because they are all selected. To select just one control, click anywhere in the design area where there is no control; this changes the selection to the Detail section. Then click the control you want. If the control is wide enough or high enough, Access provides additional handles at the midpoints of the edges of the control.
To change the size of a control, you can use the sizing handles on the edges, in either of the lower corners, or in the upper-right corner of the control. When you place the mouse pointer over one of these sizing handles, the pointer turns into a double arrow, as shown in Figure 29-13. With the double-arrow pointer, drag the handle to resize the control. You can practice on the form by shortening the CompanyID text box so that it’s 0.5 inch long. You need to stretch the company name, department, and address fields until they are each about 1.75 inches long. You might also want to reduce the state or province field to display two characters and decrease the Web site field to 1.75 inches.
Figure 29-13. You can drag a corner handle of a selected control to change the control’s width or height or both.
To move a control that is not currently selected, click the control and drag it to a new location. After you click a control, you can move it by placing your mouse pointer anywhere between the handles along the edge of the control. When you do this, the mouse pointer turns into a pointer with a four arrow crosshair, as shown in Figure 29-14, and you can then drag the control to a new location. Access displays an outline of the control as you move the control to help you position it correctly. When a control has an attached label, moving either the control or the label in this way moves both of them.

You can position a control and its attached label independently by dragging the larger handle in the upper-left corner of the control or label. When you position the mouse pointer over this handle, the pointer again turns into a pointer with a four arrow crosshair, as shown in Figure 29-15. Drag the control to a new location relative to its label.
Figure 29-15. You can drag the large handle of a selected control to move the control independently of its label.
You can delete a label from a control by selecting the label and pressing the Delete key. If you want to create a label that is independent of a control, you can click the Label button. If you inadvertently delete a label from a control and you’ve made other changes so that you can no longer undo the deletion, you can attach a new label by doing the following:
Click the Label button in the Controls group on the Design tab to create a new unattached label.
Select the label, and then click the Cut command in the Clipboard group on the Home tab to move the label to the Clipboard.
Select the control to which you want to attach the label, and then click the Paste command in the Clipboard group.
The Font group on the Design tab under Form Design Tools, shown in Figure 29-16, provides a quick and easy way to alter the appearance of a control by allowing you to click buttons rather than set properties. Select the object you want to format and then click the appropriate button in the Font group. The Font group is also handy for setting background colors for sections of the form. Table 29-2 describes each of the buttons in this group.

Table 29-2. Font Group Buttons
Button | Description |
|---|---|
Font | Use to set the font for labels, text boxes, command buttons, toggle buttons, combo boxes, and list boxes. |
Bold | Click to set font style to bold. Click again to remove bold. |
Italic | Click to set font style to italic. Click again to remove italic. |
Underline | Click to underline text. Click again to remove underline. |
Font Size | Use to set font size. |
Align Left | Click to left align text. |
Center | Click to center text. |
Align Right | Click to right align text. |
Format Painter | Use to copy formatting from one control to another control. |
Font Color | Use to set the font color of the control. |
Fill/Back Color | Use to set the background color of the control or form area. You can also set the background color to transparent. |
Alternate Fill/Back Color | Use to set a background color for alternating rows for forms displayed in Datasheet, Split Form, or Continuous Form view. |
Conditional Formatting | Use to define dynamic modification of the formatting of text boxes and combo boxes by testing the value in the control, by comparing values in one or more fields, or when the control has the focus. |
Depending on the object you select, some of the Font group options might not be available. For example, you can’t set text color on an attachment or a bound object frame control. If you have the property sheet open and you scroll through it so that you can see the properties the Font group sets, you can watch the settings in the property sheet change as you click different options in the Font group.
You can find a special set of commands at the right end of the Controls group on the Design tab below Form Design Tools to further customize the look of the controls on your form, as shown in Figure 29-17. Table 29-3 explains each of these buttons.
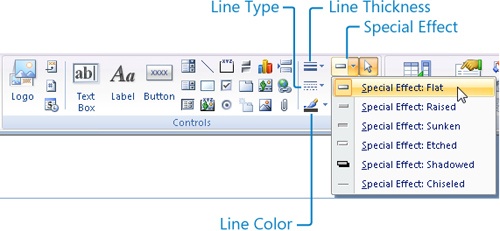
Figure 29-17. You can use commands in the Controls group on the Design tab to customize the borders of your controls.
Table 29-3. Border Formatting Commands for Controls
Button | Description |
|---|---|
Line Thickness | When Special Effect is set to Flat (see below), use this command to set the border width from hairline to 6 points wide. |
Line Type | You can make the border transparent or specify a border that is a solid line, dashes, short dashes, dots, sparse dots, dash dot, or dash dot dot. |
Line Color | Use this command to set the border color of the control. You can also set the border color to transparent. |
Special Effect | (Shown with list of options open.) You can set the look of the control to flat, raised, sunken, etched, shadowed, or chiseled. |
Depending on the object you select, some of the Controls group options might not be available. For example, you can’t set the border color on a toggle button or command button because the color is always set to gray for this kind of control. If you have the property sheet open and you scroll through it so that you can see the properties these border commands set, you can watch the settings in the property sheet change as you click different options in the group.
The next thing you might want to do is change some of the text box properties. Figure 29-18 shows some of the properties for the CompanyID text box control. Because the CompanyID field in the tblCompanies table is an AutoNumber field, which a user cannot change, you should change the properties of this control to prevent it from being selected on the form. Access provides two properties that you can set to control what the user can do. The Enabled property determines whether the control can receive the focus (the user can click in or tab to the control). The Locked property determines whether the user can enter data in the control. The defaults are Enabled Yes and Locked No.

Figure 29-18. You can set the Enabled and Locked properties of the CompanyID text box control so that users cannot click into that control.
You can set the Enabled property of the control to No so that the user cannot click in or tab to the control. When you do this, Access prohibits access to the field but causes the control and its label to appear dimmed because the control is not locked. (When Access sees that a control is disabled but is still potentially updatable despite being bound to an AutoNumber, it causes the control to appear dimmed.) To display the control and its label normally, just set Locked to Yes.
If you specify a Format, Decimal Places, or Input Mask property setting when you define a field in a table, Access copies these settings to any text box that you bind to the field. Any data you enter using the form must conform to the field validation rule defined in the table; however, you can define a more restrictive rule for this form. Any new row inherits default values from the table unless you provide a different default value in the property sheet. The Status Bar Text property derives its value from the Description property setting you entered for the field in the table.
You can also set separate properties for the labels attached to controls. Click the label for CompanyID to see the property sheet shown in Figure 29-19. Access copies the Caption property from the field in the underlying table to the Caption property in the associated control label. The default settings for the text box control on a form specify that all text boxes have labels and that the caption should have a trailing colon. When you added the CompanyID text box to the form, Access used the caption from the field’s definition in the tblCompanies table (Company ID instead of the field name CompanyID), and added the trailing colon. Also, all controls on a form must have a name, so Access generated a name (Label0) that is the control type followed by an integer.
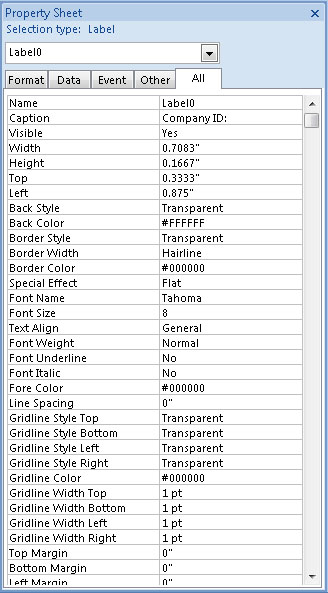
You also can correct the caption from inside a label by selecting the label, moving the mouse pointer inside the label until the pointer changes into an I-beam shape, and then clicking to set the insertion point inside the label text. You can delete unwanted characters, and you can type new characters. When you finish correcting a label caption, Access automatically adjusts the size of the control smaller or larger to adequately display the new name. You can change settings using the property sheet to adjust the size of a label, or you can also select the control and drag the control’s handles to override the automatic resizing and manually adjust the size and alignment of the control.
You can display the form’s properties in the property sheet (as shown in Figure 29-20) by clicking anywhere outside the Detail section of the form, by clicking the small square box in the upper-left corner of the Form window, or by selecting Form from the Selection Type combo box on the property sheet. On the Format tab in Figure 29-20, we set the caption to Companies / Organizations. This value will appear on the Form window’s title bar in Form view or in Datasheet view.

Figure 29-20. You can use the Caption property on the Format tab of the property sheet for the form to define a title for the form.
Toward the bottom of the list of properties on the Format tab are the Grid X and Grid Y properties that control the density of dots on the grid as discussed earlier in this chapter. The defaults are 24 dots per inch across (Grid X) and 24 dots per inch down (Grid Y), if your measurements are in U.S. units. For metric measurements, the defaults are 5 dots per centimeter in both directions. Access also draws a shaded line on the grid every inch or centimeter to help you line up controls. If you decide to turn on the Snap To Grid command in the Control Layout group on the Arrange tab below Form Design Tools to help you line up controls on your form, you might want to change the density of the grid dots to give you greater control over where you place objects on the form.
Note
You won’t see the grid dots if you set either the Grid X or Grid Y property to more than 24 in U.S. measurements or more than 9 in metric measurements.
You can set the properties beginning with On Current on the Event tab of the property sheet to run macros or Visual Basic procedures. The events associated with these properties can trigger macro actions.
Let’s explore some of the interesting effects you can design using colors. To make the fields on the form stand out, you can click in the Detail section and then set the background to dark gray using the Fill/Back Color button in the Font group on the Design tab. To make the labels stand out against this dark background, drag the mouse pointer around all the label controls or click the horizontal ruler directly above all the label controls, and then set the Fill/Back Color to white. If you haven’t already moved and resized the labels, you can select all the labels and then widen them all to the left by clicking the left edge sizing handle of any of the labels and dragging left. This pulls the long Company/Organization caption over so that it doesn’t overlap the CompanyName field. If you also want to make the Detail section fit snugly around the controls on your form, drag the edges of the Detail section inward.
When you finish working on this form in Design view, it might look something like the one shown in Figure 29-21.

Figure 29-21. You can add contrast to the Companies / Organizations form by using the Fill/Back Color button.
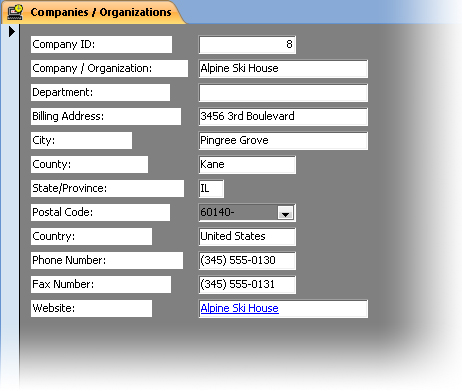
Click the arrow below the View button in the Views group on the Ribbon and click Form View to see your form. It will look similar to the form shown in Figure 29-22. (You can find this form saved as frmXmplCompany1 in the sample database.) Note that the labels are all different sizes and the contrast might be too distracting. You could further refine the look of this form by making all the labels the same size and perhaps aligning the captions to the right. You could also make the label background transparent or the same color as the Detail section and change the font color to white.
Click the Save button on the Quick Access Toolbar or click the Microsoft Office Button and then Save to save your new form design.