One quick and often effective way to add information and visual impact to your documents is to add a background or watermark (or both) to online and printed documents. Backgrounds are generally used to create backdrops for Web pages, online documents, and e-mail messages, and they usually aren’t the best choice for long documents or documents that will be printed in large quantities. In Word 2007, you can view backgrounds in all views except Draft view and Outline view.
If you want to create a more print-friendly background, you should consider using a watermark. A watermark is faded text or a pale picture that appears behind document text. Watermarks are often used to add visual appeal to a document or to identify a document’s status, such as Draft or Confidential. You can see watermarks in Print Layout view, in Print Preview, or on printed documents. In this section of the chapter, you’ll learn how to create, control, and delete backgrounds and watermarks on your Web pages and printed documents.
You can create custom backgrounds and watermarks for online pages (including Web pages and e-mail messages) as well as for printed documents. When you create a background for a document, you can use color gradients, patterns, pictures, solid colors, or textures that repeat, or tile, to fill the page. When you create a watermark, you add a light-colored picture (usually gray) or light-colored text that appears behind your document’s contents. If you use text in a watermark, you can choose from built-in phrases or enter one of your own.
To add a color background to a page (such as a Web page, an online document, or an e-mail message), click the Page Layout tab, click Page Color, and then perform any of the following actions.
Click a color on the color palette to add a background color.
Choose More Colors to access additional colors (standard colors and those that you mix yourself) that you can apply to your background.
Choose Fill Effects to access the Gradient, Texture, Pattern, and Picture tabs in the Fill Effects dialog box. Settings on these tabs enable you to create custom backgrounds.
After you choose a color or create a fill effect, Word applies the background to the document. You can see the background in all views except Draft and Outline views. By default, if you print the document, the background won’t be printed. To print a document with its background displayed, you must configure settings in the Word Options dialog box before you print, as follows.
Click the Microsoft Office Button, Word Options, Display.
In the Printing Options section, select the Print Background Colors And Images check box, and then click OK.
To add a watermark to a document, display your document in Print Layout view and click the Page Layout tab. In the Page Background group, click Watermark. The Watermark gallery appears, as shown in Figure 10-2.

Figure 10-2. The Watermark gallery includes built-in watermarks such as Confidential, Draft, and Urgent.
You can also create a custom watermark using a picture or text by configuring the settings in the Printed Watermark dialog box. To open the Printed Watermark dialog box, click Custom Watermark near the bottom of the Watermark gallery. Figure 10-3 shows the Printed Watermark dialog box.
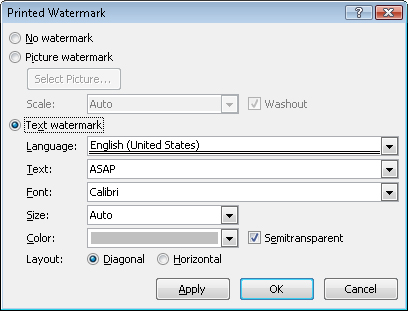
Figure 10-3. You can use the Printed Watermark dialog box to add picture and text watermarks to your documents.
You can insert a custom picture or text watermark by configuring the settings in the Printed Watermark dialog box, as described here.
Picture Watermark. To insert a picture watermark, click the Picture Watermark option and then click Select Picture to choose a picture for the watermark. You can use color or grayscale pictures for watermarks. The Scale option lets you specify a size for the watermark picture. In most cases, you should select the Washout check box (which is selected by default) so that the watermark doesn’t interfere with your document’s readability.
Text Watermark. To insert a text watermark, click the Text Watermark option and then type the text you want to use in the Text box or choose from text in the Text list. You can then select settings for the font, size, color, and layout for the watermark. You can display the watermark text diagonally or horizontally. In most cases, you should select the Semitransparent check box so that the watermark doesn’t interfere with your document’s readability.
After you have configured your picture or text watermark settings, click OK or click Apply to preview the watermark without closing the dialog box. If you like the results, click Close. Figure 10-4 shows a document (in Print Preview mode) that has a Confidential watermark.

After you have added backgrounds and watermarks to online pages and documents that will be printed, you’re free to change your mind at any time and change or remove them.
To change backgrounds or watermarks, use one of the following methods.
Change a background. Click the Page Layout tab, click Page Color, and then choose new background settings.
Change a watermark. Click the Page Layout tab, click Watermark, and then click a new thumbnail in the gallery or click Custom Watermark.
To remove backgrounds and watermarks, use one of these methods.
Remove a background. Click the Page Layout tab, click Page Color, and then choose No Color.
Remove a watermark. Click the Page Layout tab, click Watermark, and click Remove Watermark.
When you remove a background from a Web page, the page will be displayed using the default background color specified by the user’s Web browser. Generally, the default background color is white or gray.