This is my favorite part of working with the new Office Open XML Formats. You can customize the Ribbon for any document or template in Word, Excel, or PowerPoint.
What’s the catch? XML is the only way to get this done. Should that bother you? Not at all. If you successfully completed the preceding exercises and you feel comfortable with the basic components of an Office Open XML Format ZIP package, this is going to be a breeze.
For Excel and PowerPoint fans, the toolbar and menu customizations you can make from the Customize dialog box in earlier versions aren’t stored in the document or template—you have to generate those from VBA if you want to share them with other computers. So, this new approach in the 2007 release provides more flexibility.
However, the Word devotees among you might be troubled by the fact that you can’t customize the Ribbon from something like a Customize dialog box, because those customizations are saved in documents or templates in earlier versions. All I can say is this: Give XML a chance and you just might be delighted with the flexibility and simplicity of the new approach.
In this section, I’ll take you through the required structure and basic syntax for customizing the user interface (referred to as the UI for the remainder of this section). Then, we’ll walk through exercises to add a custom tab to the Ribbon and add a custom group to a built-in tab.
As with comments or images, or even the main document text, when you customize the UI for a document, template, or add-in, you need to add the appropriate relationship. However, there’s not much more to it than that. UI customization requires the following components.
A folder stored in the root of the ZIP package, named customUI.
A document part inside the customUI folder named customUI.xml. (This is where the specific custom settings are stored.)
A relationship for the customUI file in the top-level .rels file, located in the _rels folder in the root of the ZIP package. The syntax of that relationship is as follows (where
valuerefers to a unique ID value, such as"rID5"):<Relationship Type="http://schemas.microsoft.com/office/2006/relationships/ui/ extensibility" Target="/customUI/customUI.xml" Id="value" />
When you add a custom tab to the Ribbon, you can choose to add that tab to the built-in Ribbon, or to use only your custom tabs. You specify the name for your custom tab and the name for each group on that tab, and then identify each item to be included. Custom tabs can contain built-in features, including custom Building Block galleries, and can also contain your own VBA macros.
The following image shows the content of a customUI.xml file that suppresses all built-in tabs and adds a custom tab named My Tab, with one custom group in which three built-in features are displayed, two of which have been given unique labels.

The resulting Ribbon for the preceding automation looks like this:

Note that, if you were to omit startFromScratch from the <ribbon... code, the custom tab would appear at the end of the Ribbon, following the built-in tabs. Notice a few things in particular about the preceding code.
The hierarchy is very straightforward. The code referencing the Ribbon is the outermost code, inside that is the tabs collection, inside that is the individual tab, then the group, then within the group is each individual item you want to add to that group.
The term
idMsorefers to a built-in item and the termidrefers to a custom item.If you omit a label value from a built-in item, the built-in label is used. But, you can add a custom label to custom or built-in items.
Note
You can add custom images to buttons, just as you are able to do with toolbar and menu items in earlier versions. That is not done in the preceding sample code, but it is done in the second Ribbon customization exercise in this chapter, "Add a Group to a Built-In Ribbon Tab".
After this code is added in customUI.xml, and that file is added to the customUI folder in the root of the ZIP package, all you need to do is add the relationship provided at the start of this section to the .rels file in the top-level _rels folder.
Inside Out: Watch Out for the Microsoft Office Button When Using startFromScratch
When you use the startFromScratch command referenced earlier in this section to replace the built-in Ribbon tabs with your custom tabs, don’t forget about the Microsoft Office Button, which is a part of the Ribbon and can (for the most part) be customized as well.
When you start from scratch, the Microsoft Office Button still appears, but the only options that remain accessible by default through that button are New, Open, Save, Recent Documents, <Program> Options, and Exit. (To see an example of this, open the file Generate GUID.docm, available in the sample files included on this book’s CD. This file is used for the data binding exercise later in this chapter.)
Ready to give it a try? The following exercise walks you through creating a custom tab for your document at the end of the built-in Ribbon in Word, with one custom group containing a selection of built-in commands.
Note
You don’t need a sample file to execute this exercise. However, you can see a completed example of the exercise in the file named My tab.docx, in the sample files included on this book’s CD.
In Word, create a new, blank document. Save your file to the Windows desktop as a .docx with a .zip file extension. As explained earlier in this chapter, in "Breaking into Your Document", type the entire file name (including extension) in quotation marks when in the Save As dialog box to save using the .zip file extension. Name the file First tab.zip and save it to your Windows desktop, for ease when following the remaining instructions. You can add content to the document if you like, but it’s not necessary to do so. Close the file once it’s saved.
On the Windows desktop, create a new folder named customUI. Note that this folder name is case sensitive, as are most XML commands.
Open Notepad and save a new file, named customUI.xml, into the customUI folder you just created.
In Notepad, add the following code to the file you just saved. This code matches the sample shown earlier in this section. (As with earlier exercises that require significant amounts of code, you can find this code in the sample file named Copy XML.txt, if you prefer to copy it rather than typing it yourself. For those who prefer to type it, see the image that follows showing the code structured as it appears in Internet Explorer, for ease of reference.)
<customUI xmlns="http://schemas.microsoft.com/office/2006/01/customui">
<ribbon><tabs><tab id="customTab" label="My Tab"><group id="customGroup"
label="My Sample Group"><button idMso="PasteSpecialDialog" visible="true"
size="large" label="Choose a Paste Option"/><gallery idMso="TableInsertGalle
ry" visible="true" size="large" label="Add Table" /> <button idMso="FileSave"
visible="true" size="large"/></group></tab></tabs></ribbon></customUI>
Once you add this code to customUI.xml, save and close the file. You might want to open the file in Internet Explorer to check your code against the preceding image.
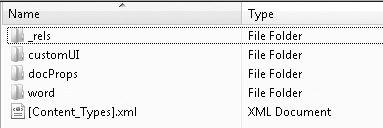
Open First tab.zip. Drag the folder customUI and drop it into the root of the ZIP package, so that the top level of the ZIP package looks like the following image. (You can, of course, also cut or copy the folder and paste it into the ZIP package, instead of dragging it.)
Open the _rels folder in the root of the ZIP package. Then, copy the .rels file out of the ZIP package.
Open .rels in Notepad and add the following code before the
</Relationships>code. Be sure not to place this code in the middle of another relationship definition. (Note that # in the following code represents a number not already used for a relationship in this file.)<Relationship Type="http://schemas.microsoft.com/office/2006/relationships/ui/ extensibility" Target="/customUI/customUI.xml" Id="rId#" />
Save and close .rels and then copy it back into the ZIP package, overwriting the existing .rels file.

That’s all there is to it. Time to open your file and check out the results.
To get comfortable with this code, I strongly recommend editing customUI.xml a few times with different settings. Try small buttons instead of large (just remove the size="large" reference to change the button size to small), add or remove a custom label for one of the commands, try adding a second group (just give the new group a unique name, such as customGroup2), or try using different commands. See the note that follows for help finding the correct syntax for the command you need.
Note
Find files that contain control IDs for every Word, Excel, and PowerPoint command in the sample files included on this book’s CD. Control IDs refer to the idMso values in the preceding exercise.
The files, named WordRibbonControls.xlsx, ExcelRibbonControls.xlsx, and PowerPoint-Ribbon-Controls.xlsx, as well as the icon gallery workbook and customUI schema file (discussed in the next section) are available on the CD thanks to the 2007 release product team.
Adding a group to a built-in tab is an almost identical process to the preceding exercise. The difference is simply in how you reference the tab name. So, in the following exercise, you’ll edit the customUI.xml file you created in that exercise to add your new custom group to the Home tab instead of a custom tab, and then specify the position on the Home tab where you want your new group to appear. And, because making this change requires just a minor edit to your existing customUI.xml file, we’ll also customize the image for one of the buttons in this same exercise.
Note
In the file named Office2007IconGallery.xlsm, located in the sample files included on this this book’s CD, you can find the idMso values for every available built-in button image. As with the control ID files mentioned earlier, this file was created by the 2007 release product team. Instructions for using this file are available directly in the file.
To begin, if you don’t still have a copy (outside of the ZIP package) of the customUI.xml file you just created, copy this file out of the ZIP. Open the file in Notepad, and then do the following.
Find the code
<tab id=... and edit that code to read as follows.<tab idMso="TabHome">
Note that the label definition has been removed from this code. If you leave the label in the code when you change the tab id reference to the idMso reference to the Home tab, you’ll rename the Home tab with the label value. (If you want to use a different built-in tab for this exercise, you can find the correct control ID for the tab names along with the control ID for feature names in the <Program>RibbonControls workbooks mentioned in the preceding section.)
Change the
<group...code as follows.<group id="customGroup" label="My Sample Group" insertAfterMso = "GroupFont">
All you’ve done here is add
insertAfterMsoand set its value to"GroupFont". As you’ll find in the WordRibbonControls workbook,GroupFontis the control ID for the built-in Font group that appears on the Home tab. TheinsertAfterMsosetting specifies the position on the tab where you want your new group to appear. If you omit this setting, your group will appear at the end of the tab.The last edit you’ll make in this file is to add an idMso value for a custom image setting to appear in place of the built-in Paste Special image. To do this, edit the button code for the Paste Special dialog box to look like the following.
<button idMso="PasteSpecialDialog" visible="true" size="large" imageMso = "Cre
ateReportFromWizard" label="Choose a Paste Option" />
Notice that all you need to do here is add the
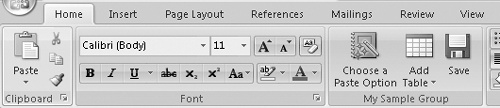
imageMsostatement with its value ofCreateReportFromWizard. TheimageMsoIDs are available in the Office-2007IconGallery workbook mentioned earlier in this section. The icon I chose appears in Gallery 1 in that file, in the second column of the fourth row. You can choose any ID from any of those galleries provided in place of the one I selected. Just point to an icon in one of those galleries to find the correct syntax for referencing that icon.When you’ve finished making changes, save and close the file and then copy it back into the ZIP package, overwriting the existing customUI.xml file. Change the file back to the .docx extension if you want to do so, and then open the file to see your new custom group added to the Home tab, following the Font group, as you see in the following image.
Having fun yet? I certainly hope so. Now check out the next section of this chapter to learn how to bind Word Content Controls to custom XML data.