
Dreaweaver Lesson 5: Managing your Website: Reports, Optimization, and Maintenance
When it’s time to release your website to the world, you’ll want to take some final steps to make sure your site works and looks its best. Dreamweaver has a powerful set of reports, link checkers, and problem-solving tools to locate and fix any potential issues before final upload. When you’re ready, the built-in FTP and synchronization features of the Files panel will get you up-and-running.
What you’ll learn in this lesson:
- • Uploading and managing files
- • Optimizing pages for performance and search engines
- • Checking site integrity
- • Using site reports
Starting up
Before starting, make sure that your tools and panels are consistent by resetting your workspace. See “Resetting the Dreamweaver workspace” in the Starting up section of this book.
You will work with several files from the dw05lessons folder in this lesson. Make sure that you have loaded the CClessons folder onto your hard drive from www.digitalclassroombooks.com/CC/DesignTools. See “Loading lesson files” in the Starting up section of this book.
Before you begin, you need to create a site definition that points to the dw05lessons folder. Go to Site > New Site, or, for details on creating a site definition, refer to Dreamweaver Lesson 2, “Setting Up a New Site.”
Working with the Files panel
You’ve already used the Files panel throughout this book to locate and open files within your site projects. In addition to serving as a useful file browser, the Files panel also serves as a full-featured file transfer application and synchronization tool. From the Files panel, you can upload your site to a web server, synchronize local and remote files, and manage files and notes between multiple designers.
Creating a remote connection
The Files panel uploads, retrieves, and synchronizes files between your local site and a web server. Typically, this is done using File Transfer Protocol (FTP), which connects to and allows interaction between your local machine and a web server (there are other options as well, including SFTP, WebDav, and more). Before you can transfer files, you’ll first need to establish a remote connection to the web server that stores your website files.
 You will not be able to proceed with this portion of the lesson if you do not have FTP information available for a web server. If you do not have this information or do not have a connection to the Internet, you can choose to read through the steps or skip to the Testing Site Integrity exercise in this lesson.
To get started, make sure you have the following:
- • The FTP address of the web server and specific directory. This would be provided by your web-hosting provider as part of your account details, or from your company or organization’s IT department. A typical FTP address looks like ftp.mysite.com.
- • A user login and password for access to the server. Most web servers require a user login and password for access. This information should be available from your web-hosting provider as part of your account details, or from your organization’s IT department.
- • The specific directory to which your files should be uploaded. In many cases, this is the main directory or folder that appears when you connect to your web server. However, in certain cases, you’ll need to upload files to a specific directory other than the main directory.
- • The web address (URL) or IP address where you can view your uploaded files on the server. Sample addresses would be www.mysite.com/, www.mysite.com/2013/, or http://100.0.0.1.
1 To begin creating a remote connection, choose Site > Manage Sites. The Manage Sites dialog box appears.
2 Select the dw05lessons site from the list of Your Sites (you set this up at the beginning of the lesson) and click the pencil icon in the lower-left corner (Edit the currently selected site). If you haven’t created a site definition for this lesson, make sure you do so now, as discussed in Dreamweaver Lesson 2, “Setting Up a New Site.”
3 The Site Setup window appears. Click the Servers button to access the server setup screen. Click the Plus button in the lower left.
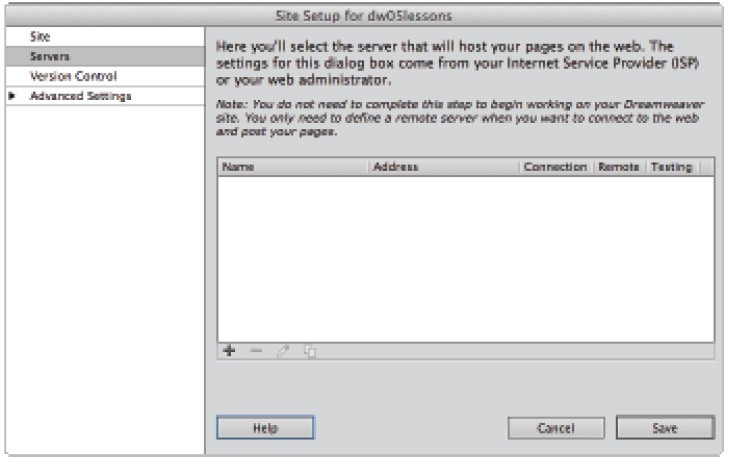
Click the Add new Server button.
This opens up the Basic tab where you will need to add the required information to access your server.
4 Enter your specific FTP information in the text fields (not our sample information). The Server Name should be a common sense label that will help you identify which site you are modifying. The FTP Address, Username, and Password are the mandatory pieces of information.

Sample remote connection information. Your information should include an FTP address, login, and password, with a possible folder name.
5 Click the Test button to verify that Dreamweaver can connect to your server. If the information you’ve provided is valid and you have a live Internet connection, a dialog box appears, confirming that Dreamweaver has successfully connected to your web server.

A dialog box lets you know if your connection was successful. If you receive an FTP error, double-check your FTP information, and make any necessary corrections.
6 Click the Save button and you will see your site listed in the Server window.

Your site is now listed in the Server window.
7 Click the Save button in the Site Setup window. This might trigger an activity window that updates your site settings. Now that you’re finished editing the site definition, click Done in the Manage Sites dialog box.
Viewing files on a remote web server
Once you’ve established a connection to your web server, you can expand the Files panel for a split view that displays both your remote and local files. You can easily drag and drop between both sides to upload or download files and update existing files.
1 If necessary, choose Window > Files to open the Files panel. Click the Expand button (![]() ) at the top of the Files panel to ungroup and expand it to full view.
) at the top of the Files panel to ungroup and expand it to full view.
2 Locate and click the Connect button (![]() ) above the left column at the top of the panel. Dreamweaver attempts to connect to your remote server, and, if successful, displays all its files on the left side of the Files panel.
) above the left column at the top of the panel. Dreamweaver attempts to connect to your remote server, and, if successful, displays all its files on the left side of the Files panel.
It’s important to note that web servers can be configured in many different ways, and you might need to edit your site settings again once you have made a successful connection (in particular, the folder information). A discussion of the different ways that web servers might be configured is outside the scope of this book. If you have specific questions regarding your site, you should contact an IT professional or your web-hosting company.
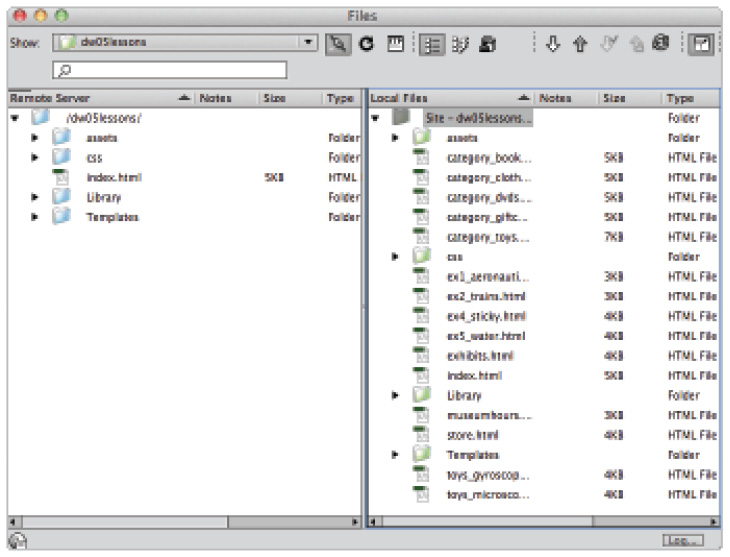
Click the Connect button to view files on your remote server in the left column of the Files panel.
Transferring files to and from a remote server with Get and Put
The built-in FTP and file transfer functionality of the Files panel makes it a snap to place files on your remote server or download files onto your local machine. This can be accomplished using the Get and Put buttons, or by dragging and dropping files between the Remote and Local file listings in the Files panel. Please note again, this exercise involves publishing your sample documents to a remote server, and therefore publishing them to the Internet. Be very careful not to overwrite any pre-existing files that might be crucial to your website.
1 Make sure you’ve connected to the remote server as described in the previous exercise, and that you can see your remote files in the left column of the Files panel.
2 Select the index.html file from the local file listing on the right side of your Files panel, and click the Put button (![]() ) at the top of the panel. Choose No when asked if you would like to include dependent files.
) at the top of the panel. Choose No when asked if you would like to include dependent files.

Select a file and click the Put button to upload it to the remote server.
 When you transfer a document between a local and remote folder, a window could open, offering you the option of transferring the document’s dependent files. Dependent files are images, external style sheets, and other files referenced in your document that a browser loads when it loads the document. This feature can be very useful: think of it as a way to make sure that any files which are linked to a particular document come along for the ride. For the purposes of this exercise, it will not be necessary to transfer dependent files.
Alternatively, you can click and drag a file from the right (local) column to the left (remote) column.

Drag a file from the right column to the left to upload it to the remote server.
To get (download) a file from the remote server:
1 Make sure you’ve connected to the remote server as described in the previous exercise, and that you can see your remote files in the left column of the Files panel.
2 Select the index.html file from the remote file listing on the left side of your Files panel, and click the Get button (![]() ) at the top of the panel. Note that in your case this does not make a lot of sense since you just uploaded your index.html document.
) at the top of the panel. Note that in your case this does not make a lot of sense since you just uploaded your index.html document.
 You can update the local or remote file listing at any time by clicking the Refresh button (
![]() ) at the top of the Files panel.
) at the top of the Files panel.
Using Check In/Check Out and Design Notes
If you’re collaborating with others on a project, you’ll want to set up an environment where everyone can edit files independently without overlapping or overwriting someone else’s work. For these situations, the Check In/Out and Design Notes features can help you manage workflow and communicate with others on a Dreamweaver site project.
Check In and Check Out
Dreamweaver’s Check In/Check Out feature is a way of letting others know that you are working on a file and don’t want it disturbed. When Check In/Check Out is enabled, a document that you’re editing becomes locked on the remote server to prevent others from modifying the same file at the same time. If you attempt to open a file that’s been checked out by another user, you see a warning that lets you know that the file is in use and also who is currently working with it. Check In/Check Out doesn’t require any additional software to run, and other Dreamweaver users can check out files if they also have Check In/Check Out enabled in their site definition.
 The Check In/Check Out system does not work with a testing server. To transfer files to and from a testing server (if one is set up), use the standard Get and Put commands.
1 Choose Site > Manage Sites. Select the Dreamweaver site that you want to enable Check In/Check Out for and choose the pencil icon to edit the currently selected site.
2 In the Site Setup window, click the Servers button, then select your site and click the pencil icon at the bottom to edit the server settings.
3 Click the Advanced button and then click the Enable file check-out check box.
Type your name and e-mail. This information will appear to other users who attempt to retrieve a file that you have checked out (as long as they are using Dreamweaver). Click Save and then click Save again to exit.

Enable check in/check out in the Site Definition panel to manage workflow between several users.
 A user will be allowed to override your lock and switch checkout status to themselves. Make sure you establish rules with others about how to share and manage locked files.
Checking files in and out
When you check a file out, you are downloading it from the remote server to your local root folder, and placing a lock on the remote copy. Both your local copy and the remote copy appear with check marks next to them, which indicate that the file is currently checked out for editing. When you check a file back in, you are uploading the modified version to the remote server, and removing any locks currently on it.
1 Launch the Files panel and click the Expand button to expand it so that you can see both your local and remote files listed.
2 Select the file in your local folder that you want to check out, and use the Check Out button (![]() ) at the top of the panel. Note that Dreamweaver overwrites your local copy of the file, as it needs to get the remote file from the server. The local and remote versions of the file appear with check marks next to them in the Files panel.
) at the top of the panel. Note that Dreamweaver overwrites your local copy of the file, as it needs to get the remote file from the server. The local and remote versions of the file appear with check marks next to them in the Files panel.

Check files out before modifying them so other users won’t accidentally overwrite your work.
3 Open the checked file from your Local Files panel for editing. Make any necessary changes to the file, then save and close it.
4 From the Files panel, select the file again in the local Files panel and check it back in, using the Check In button (![]() ) at the top of the panel. The file is uploaded to—and unlocked on—the remote server.
) at the top of the panel. The file is uploaded to—and unlocked on—the remote server.
 When you transfer a document between a local and remote folder, a window could open offering you the option of transferring the document’s dependent files. Dependent files are images, external style sheets, and other files referenced in your document that a browser loads when it loads the document. For this exercise, it won’t be necessary for you to transfer dependent files.
Your local copy becomes read-only, and appears with a padlock next to it. Next time you open the file for editing, Dreamweaver will automatically check out and get the latest copy from the server.
5 Collapse the Files panel to return it to the dock.
Using Design Notes
Design Notes store additional information about a file or media object in your Dreamweaver site. These notes can be for your own use, or they can be shared with others using the same root folder. Design Notes can be set to appear automatically when the file is opened, making it easy to display up-to-date information to others working on the same site. All Design Notes are stored as separate files in a _notes folder inside of your site’s root directory.
What can be put in Design Notes?
Design Notes can contain any information that is important to the file or project; you can store design instructions, updates about the project, or contact information for project managers and supervisors. You can also store sensitive information that you ideally would not want in the file itself, such as the name of the last designer to work on the file or the location of important assets. You can even set the status of the file to indicate what stage of the revision the file is in.
1 To create a Design Note, under the Files panel, open the store.html file from the current site.
2 Choose File > Design Notes. The Design Notes dialog box appears.
3 Type a message in the Notes field. If you want to insert the current date stamp, you can click the Calendar button (![]() ) above the Notes field on the right side. If you want the note displayed when the file is next opened, check Show when file is opened.
) above the Notes field on the right side. If you want the note displayed when the file is next opened, check Show when file is opened.
The Status menu is used to set the document status; this can be useful in letting other collaborators know the revision stage of the current document.
4 Click OK to create the Design Note.
To view a Design Note, choose File > Design Notes when a file is open in the document window. As mentioned earlier, you can also choose to have Design Notes automatically appear when the file is first opened.
 Design Notes can also be created or viewed directly from the Files panel. Simply right-click (Windows) or Ctrl+click (Mac OS) a document in the files list and choose Design Notes from the context menu.
Sharing Design Notes
By default, Design Notes are stored only in the local site folder, and are not automatically copied to the remote server. However, you can share Design Notes with other collaborators by having Dreamweaver automatically upload and update them on the remote server.
1 Choose Site > Manage Sites. Select your site and choose Edit (the pencil in the bottom-left corner of the Sites dialog box). The Site Setup window appears.
2 Click the Advanced Settings options and choose Design Notes from the left.
3 Under the Design Notes panel, check Enable Upload Design Notes for sharing. Design Notes are now copied and updated on the remote server so that other users can share them.

Set up Design Notes for sharing so other Dreamweaver users can see and modify Design Notes on the remote server.
4 Choose Save to update the site definition, then click Done to close the Manage Sites dialog box.
Displaying Design Notes in the Files panel
A convenient way to view and access Design Notes is by enabling the Design Notes column in the Files panel. An icon that can be used to open and edit Design Notes accompanies documents that have an associated Design Note. This feature also allows you to see all available Design Notes at a glance.
1 Choose Site > Manage Sites. Select your site from the Sites panel and choose Edit. In Advanced Setting options, choose File View Columns.

Use the Site Definition panel’s File View Columns category to show Design Notes in both the local and remote file listings.
2 Double-click the Notes item from the list and click the Show check box and then click Save.
3 Choose Save to update the site definition, then click Done to close the Manage Sites dialog box. You will likely see the Background File Activity window appear; wait for this to complete. A Notes column appears in the Files panel; a Notes icon (![]() ) is displayed next to each file that is currently associated with a Design Note.
) is displayed next to each file that is currently associated with a Design Note.
Testing site integrity
Catching potential issues on a page before your visitors do is key to ensuring success from the start. Broken links, display issues, or unreadable pages can make the difference between a great first impression and a poor one. To help you identify and address problems before you publish your site, Dreamweaver provides useful tools that can point out potential hazards and, in some cases, help you find a solution.
Checking links sitewide
Dreamweaver can check links on a single document, on multiple documents (through the Files panel), or on an entire local site.
1 Choose Site > Check Links Sitewide.
2 The Link Checker panel appears; by default, all broken links are displayed. Most of the broken links here are referencing the same incorrect link to category_books_cds.html. This could have happened if you or a collaborator on the site changed the name of the file within the operating system or another web editor.

Choose Site > Check Links Sitewide to check for broken links throughout the current local site. The Link Checker panel opens and displays any broken links found.
3 To view external links, choose External Links from the Show drop-down menu at the top of the panel. This site will have none, but any links to outside web pages that you have on your site would be listed here.
 External links are displayed, but aren’t validated by Dreamweaver. The Link Checker can only validate links between local documents and files.
4 To view orphaned files, choose Orphaned Files from the Show drop-down menu at the top of the panel. In this site, a number of files will appear. Orphaned files are files in your site that are not currently being linked to. This might include stray multimedia files that have not been added to a page yet. You will not be doing anything with these files at this time.
5 Choose Broken Links from the Show drop-down menu to return to the broken links report. Click the first of the broken links shown to edit it. Click the Folder icon and browse through your site folder to locate the category_bookscds.html file. Select this file, click Open and then press Enter (Windows) or Return (Mac OS).
6 A dialog box appears, asking if you’d like to make the same correction throughout the entire current local site.

Adjust a link directly from the Link Checker panel to correct it across the site.
7 Click Yes. Behind the scenes Dreamweaver will go through all the pages and automatically update to the correct link. This feature is a great timesaver since you don’t need to open the files to make changes.
Generating site reports
Dreamweaver’s site reports feature is an indispensable asset for detecting potential design and accessibility issues before publishing your site to the Web. Reports can be generated in several categories to give you a virtual picture of health, and the opportunity to locate and fix minor or major issues across an entire Dreamweaver site. These issues can include missing alternate text or titles and recommendations for better accessibility practices, based on the W3C’s Web Consortium Accessibility Guidelines (WCAG).
Reports can be generated for a single page, selected documents, or the entire current local site. Any results open and display in the Results panel, where you can see a list of issues and the pages on which they are located.
1 To run a site report, choose Site > Reports. The Reports dialog box opens, displaying two categories of reports: Workflow and HTML.
 It is not necessary to have a document open in order to run sitewide reports.
Workflow reports display information about Design Notes, Check In and Check Out operations, and recently modified files. HTML reports display potential design, accessibility, and display issues based on best practices and W3C/WCAG accessibility guidelines.
2 In the Reports panel, check all the reports under the HTML category. At the top of the panel, select Entire Current Local Site from the Report on drop-down menu.

Choose Site > Reports, and select the reports you’d like to run in the Site Reports dialog box.
3 Click Run in the top-right corner of the Reports panel. The Results panel appears, displaying any potential issues. Note that depending on the size of your site and number of issues found, it might take a few moments for all results to display.
4 Leave the Results panel open; you’ll learn how to read and address issues in the next exercise.
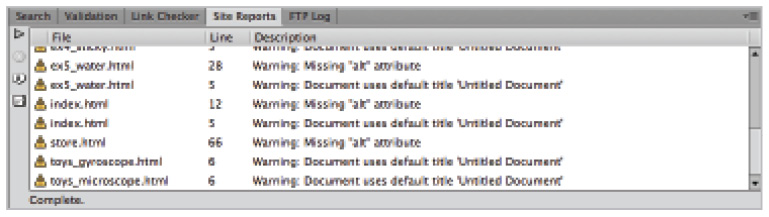
The Results panel displays issues found across your entire current local site.
Understanding report results
At first glance, you might be overwhelmed at the amount of information returned by site reports. Keep in mind that many of the listings returned are recommendations or possible issues that should be looked into, not necessarily items that will prevent a site from working. Learning to read these site reports a little more closely will enable you to decide which items are crucial to your site’s performance, requiring immediate action. Listings are displayed with three distinct icons.
|
Icon |
Name |
Use |
|
|
Question Mark |
These listings suggest possible accessibility issues that should be investigated. Many of these issues have a reference to a specific W3C/WCAG guideline. |
|
|
Red X |
These listings indicate a failure to meet a certain guideline or requirement. Possible listings could include missing header information, deprecated HTML markup, or page titles that are not defined properly. |
|
|
Warning Sign |
Warnings indicate missing information that could be potentially detrimental to a site’s performance, such as missing ALT text for images. |
Addressing a listed item
After you’ve sifted through the report results, you’ll want to use the Results panel to address items listed in the Site Reports tab.
1 Go to the Site Reports tab on the Results panel. Click the Description column header to sort the results. Scroll to the bottom of the page as needed, and locate the store.html listing.

Select a listing and click the More Info button to display a detailed description about the issue found.
The Description column shows that an image on this page is missing the ALT attribute and alternate text. This attribute can potentially affect accessibility of your site; you don’t need to fix it, but we highly recommend you do.
2 Double-click the store.html listing to open the page for editing. Your document window will divide into the Code view and Design view; the image appears selected in the Design view and highlighted in the Code view.
3 In the Property Inspector, type MKI Gift Cards are now available! in the Alt field and press Enter (Windows) or Return (Mac OS).

Select the problem image and enter text in the Alt field to rectify the problem.
Whenever you have multiple results as you do here, you might want to save them for future reference. Reports can be saved as XML for import into databases, existing template files, and archival files. You can sort report results using the Results panel before saving them.
4 Click the Save Report button (![]() ) on the left edge of the Results panel. When the Save Report dialog box appears, assign the report a name, and choose a location for the file.
) on the left edge of the Results panel. When the Save Report dialog box appears, assign the report a name, and choose a location for the file.
5 Save and close the page, and close the Results panel.
 A full listing of accessibility guidelines, or WCAG, for web page designers and developers is available at the World Wide Web Consortium (W3C) website at W3.org.
Optimizing pages for launch
Although page optimization is discussed at this latter point in the book, it is by no means an afterthought. A big part of preparing a site for success involves making it accessible to users with special needs, such as those who are visually impaired, or preparing it for indexing by various search engines. In addition to clean design and well-written content, pages can be optimized through the use of keywords, descriptions, and often-overlooked tag attributes, such as alternate text (alt) for images and a page’s Title area. Combined, these pieces of information facilitate site usability and visibility in several essential ways.
Search engine visibility and Search Engine Optimization
A big part of a website’s success stems from its visibility. Visibility comes through good advertising, networking with other sites, and, above all, proper indexing and listings on the Web’s major search engines. Search engines can be a key to generating business and visits to your site, but only if your website can be easily found. Major search engines such as Google (which powers AOL, MySpace, and Netscape searches), Yahoo! (which powers AltaVista and others), and Bing (formerly LiveSearch) use a variety of factors to index and generate listings for websites. Many of these factors start at home, or more appropriately, on your home page.
Titling your documents with the <title> tag
Each document’s head area contains a <title> tag, which Dreamweaver automatically inserts with any new HTML/XHTML document. At its most basic, the <title> tag sets a display title for a page that appears at the top of the browser window. You can modify the <title> tag contents using the Title text field that sits at the top of your document window. By default, each new document is issued the default title of Untitled Document. The <title> tag and its contents, however, can be a powerful and effective way to assist search engines in indexing your page.
What makes a good title?
A good document title ideally should include keywords that describe your site’s main service, locale, and category of business or information. In addition to the obvious—your company’s name—think about the categories you would want your site to appear under on a web directory or as the result of a web search. For instance, the McKnight Institute would ideally want users looking for science museums or exhibits in the Philadelphia, Pennsylvania, area to find them first. A possible title could be: The McKnight Institute: Science Museum, Educational Exhibits and Attractions, Philadelphia, Pennsylvania.
This title contains several important keywords that describe the Institute’s offerings, and features the Institute’s name and location. In addition, reshuffling these phrases and words produces several other search terms that could be beneficial to the Institute, such as:
- • Science Exhibits
- • Philadelphia Museum
- • Pennsylvania Attractions
 Avoid the rookie mistake of including only your company name in the document title. Remember, web searchers who haven’t used your business before will only search by terms that apply to the service they are seeking (for example, wedding photographers, Washington, D.C.). Even the most recognized names on the Web, such as eBay and Amazon, include generic search terms in their page titles.
To add a title to your web page:
1 From the Files panel, select and open the index.html document to open it for editing.
2 Locate the Title text field at the top of the document window. It currently displays the default title of Untitled Document. Select its contents and type The McKnight Institute: Science Museum, Educational Exhibits and Attractions, Philadelphia, Pennsylvania and press Enter (Windows) or Return (Mac OS).

Add a well-constructed title to the index.html page to make it more search-engine and bookmark friendly.
3 Choose File > Save to save the document, and then choose File > Preview in Browser > [Default browser] to open the document in your system’s primary browser.
4 Note the title that now appears in the bar at the top of the browser window. Close the browser window and return to Dreamweaver.

The most basic purpose of the <title> tag is to display a title at the top of the browser window. If used properly, it can also be used as a powerful hook for search engines.
 While there is technically no limit to title length, the W3C’s Web Consortium Accessibility Guide recommends that page titles be a maximum of 64 characters to be considered ‘well-defined.’ Titles exceeding this length could generate warnings in the Site Reports Results panel. Longer titles could also appear truncated (cut off) when displayed in some browser windows.
Adding meta keywords and descriptions
While Search Engine Optimization (SEO) is a broad topic that’s far beyond the scope of this book, good SEO methods begin at the design level. Search engines use a variety of factors to rank and list web pages. Keywords and descriptions can help specify the search terms that are associated with your site and how it’s listed. The HTML <meta> tag enables you to associate any page with a specific list of search terms, as well as a brief description of the page or the website itself. Like the <title> tag, <meta> tags are placed in the <head> section of a page, and can be added from the Common Insert bar on the right side of your workspace.
1 If it’s not already open, open the index.html document for editing.
2 From the Common Insert bar, choose the Keywords button from the Head tags group.
3 When the Keywords window appears, add a comma-separated list of search keywords that you’d like associated with this page, or the site in general. While there is no general consensus on the limit of how many keywords you can use, common sense says that you should be able to categorize your site in roughly 20 keywords or fewer. For example, type museum, technology exhibits, attractions, family attractions, philadelphia, pennsylvania museums. Click OK to add the keywords.

From the Common category of the Insert panel, choose the Keywords object from the Head tags group and enter a list of keywords in the resulting dialog box.
4 Now you’ll add a description that a search engine can use to summarize your page when creating a listing for it. Choose the Description button from the Head tags group on the Common Insert bar.
5 When the Description dialog box appears, type in a brief descriptive paragraph (fewer than 250 characters, including spaces). For example, type The McKnight Center is a family-oriented education center and museum that explores the history of technology and scientific discovery through hands-on exhibits and events. Click OK.

Add a short description that search engines can use to display a caption for your site listing.
6 Choose File > Save, then choose File > Close to close the file.
Launching your site
Before launching your site for the public—and to ensure that your site looks and works at its best—take a moment to go over this pre-flight checklist.
Site launch checklist
- • Enter FTP or upload information and test your FTP connection.
- • Check links sitewide and repair missing or broken links and images.
- • Run site reports and address crucial issues. Put special emphasis on:
- – Missing document titles
- – Missing alt text
- – Invalid markup that could cause display issues
- • Open the homepage (index.html, and so on) and navigate through your site, using menus, links in copy, and linked images to check page flow. Do this in several browsers, and, if possible, on both Windows and Macintosh platforms.
- • View your home page and major section pages in a web browser in the three most common screen resolutions: 640 × 480, 800 × 600, and 1024 × 768.
Uploading your site
From this point forward, the exercise assumes that you have access to a remote FTP server.
1 If you’re ready to upload your site to the remote web server, make sure that the Files panel is open (Window > Files).
2 Click the Expand button (![]() ) at the top of the Files panel to display it in two-column expanded view.
) at the top of the Files panel to display it in two-column expanded view.
3 Click the Connect button (![]() ) above the left (remote view) column to connect to your remote web server.
) above the left (remote view) column to connect to your remote web server.
 You need to have created a valid connection, as described earlier in the lesson.
Once a successful connection is made, the remote files (if any) display in the left column.
4 In the right column, click and select the Folder icon at the very top of the file listing. This should be the root folder, and displays the current site definition title (dw05lessons).
5 Click the Put button at the top of the Files panel to copy the entire current local site and all included files to the current directory on the remote server. A dialog box appears with the message, Are you sure you wish to put the entire site?
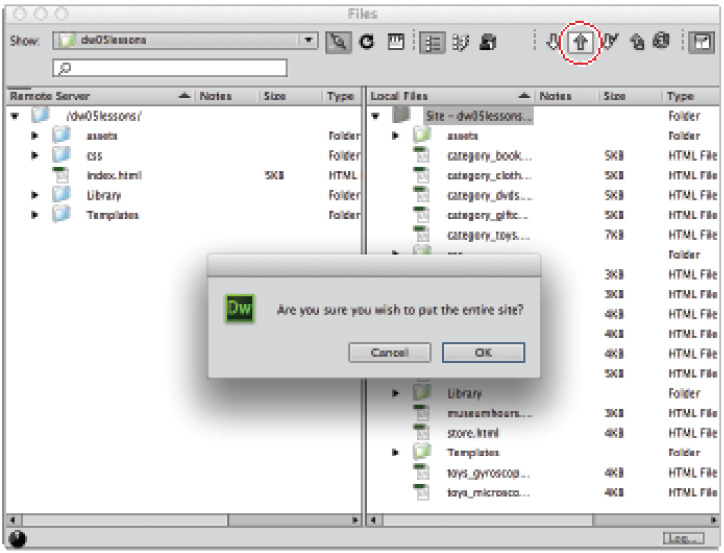
Select the root folder of your local site, and click the Put button to upload the entire site to the web server.
6 Click OK to begin copying the files to the remote server. The Background File Activity window appears with a progress bar and a list of the files being transferred.

Files being transferred in the Background File Activity window.
7 Collapse the Files panel to return it to the dock. Your site is now live!
Getting help
Whether you are seeking a solution to a Dreamweaver-specific problem, or looking up the appropriate CSS rule to format a page item, you can use Dreamweaver’s built-in Help system and integrated reference guides. In addition, the Help menu provides direct links to many online resources and Adobe support areas where you can seek help from Adobe professionals and the Dreamweaver user community.
1 To access the Help system, choose Help > Dreamweaver Help. The Adobe Help Viewer panel appears.
2 Enter a search term at the top of the panel, or browse by topic on the left side of the panel.
3 For more help options and a searchable knowledge base, choose Help > Dreamweaver Support Center. For the Dreamweaver support forums, choose Help > Adobe Online Forums.
Suggested next steps
You have now launched your first Dreamweaver site project. There’s nothing more exciting than having your hard work on the Web and available for the world to see. The important thing to remember is that your website should not be static; part of maintaining a successful website requires continuously evolving it to meet the needs of your viewers, and keeping the content fresh and new.
Whether your site is for business, pleasure, or self-promotion, be sure to solicit feedback from friends, family, and colleagues after you’ve launched. Alert a small and trusted group about the launch by sending out an e-mail, mailing a postcard, or posting a notice on a blog (sometimes this is referred to as the ‘beta’ stage). Feedback and constructive criticism (a little praise is OK, too) are the best ways to objectively know what needs improvement. You’ll probably receive more feedback and suggestions than you can handle, so focus on points that are common across multiple users, and address any major issues before making a more public launch (for instance, to your entire client base).
Focus on focus groups
Focus groups are an excellent way to get nonbiased feedback on a major new site or product launch, and they have been a regular practice in product marketing and research for years. A focus group is composed of a group of individuals who are brought together to analyze, try out, and comment on a specific product—in this case, your website—for the purpose of obtaining feedback and testing the product’s effectiveness.
Groups can be guided through certain portions or processes on the site, or can be encouraged to navigate it on their own. Afterwards, they are polled with specific questions about their experience, and the results are put together to form a picture of the site’s usability, effectiveness, and impact. This can include questions such as the following:
- • Did you feel the website was easy to navigate? On a scale from 1 to 10, how would you rate the difficulty level in locating specific pages or topics?
- • Did the design, including graphics and color themes, effectively help communicate the website’s offerings?
- • On a scale from 1 to 10, how would you rate the quality of the written content on the site?
Focus groups are often interactive, encouraging participants to talk with each other and share their opinions. In some cases, a moderator can be used to regulate group discussions and hand out questionnaires. Participants can be composed of a focused demographic group (for instance, 25- to 35-year-old technology professionals), or they can represent a diverse professional and demographic range.
Focus groups are reasonable for any size company to organize—even if it’s just you and five friends—and are a highly effective way to find out what’s currently working and what’s not. Give it a try; you might find the results encouraging, surprising, or even slightly discouraging. The trick is to use this feedback wisely toward the main purpose of making a better website, and you’ll be glad you did.
Website design resources
There is a vast amount of information, and many tutorial-based websites, covering topics from web page standards to advanced CSS design. Here is a small sampling of some useful sites that can help you take your skills and knowledge further. Use these in conjunction with Dreamweaver’s built-in reference guides and Adobe’s online support forums:
- • W3C (World Wide Web Consortium) — www.w3.org
- • Adobe’s Dreamweaver Developer Center — www.adobe.com/devnet/dreamweaver
- • DigitalClassroom — www.DigitalClassroom.com
Self study
Import a site from a previous lesson from this book or import your own site, and run a site report for broken links, orphaned files, and so on.
Review
Questions
1 What does FTP stand for, and what is it used for?
2 What three purposes do document titles serve, and why are they important?
3 What are three possible pre-flight checklist items you need to address before launching a website?
Answers
1 File Transfer Protocol. FTP is used to connect to and transfer files between your local machine and a web server.
2 Document titles display a title at the top of the browser window, in a user’s bookmarks bar, and are an important hook for search engines.
3 a. Enter and test your FTP connection information in the Site Definition panel.
b. Run site reports to rectify any potential design or accessibility issues, such as missing alternate text for images or empty document titles.
c. Run the Link Checker site wide to check for broken links between pages or incorrect image references.