
Photoshop Lesson 4: Painting and Retouching

In this lesson, you’ll get a quick primer in color and color models. You will then have an opportunity to practice using Photoshop’s painting and retouching tools, such as the Brush, Clone Stamp, and a variety of healing tools.
What you’ll learn in this lesson:
- • Selecting color
- • Using the Brush tool
- • Applying transparency
- • Using blending modes
- • Retouching images
Starting up
Before starting, make sure that your tools and panels are consistent by resetting your preferences. See “Resetting the Photoshop workspace” in the Starting up section of this book.
You will work with several files from the ps04lessons folder in this lesson. Make sure that you have loaded the CClessons folder onto your hard drive from www.digitalclassroombooks.com/CC/DesignTools. See “Loading lesson files” in the Starting up section of this book.
Setting up your color settings
Before you begin selecting colors for painting, you should have an understanding of color modes and Photoshop’s color settings. Let’s start with a basic introductory overview of the two main color modes that you will use in this lesson, RGB and CMYK.
Color primer
This lesson is about painting, adding colors, and changing and retouching images. It is important to understand that what you see on the screen is not necessarily what your final viewers will see on the variety of paper stocks and devices available to them. Bright colors tend to become duller when output to a printer, and some colors can’t even be reproduced on the screen or on paper. This is because each device—whether it’s a monitor, printer, or TV screen—has a different color gamut.
Understanding color gamut
The gamut represents the number of colors that can be represented, detected, or reproduced on a specific device. You might not realize it, but you have experience with different gamuts already; your eyes can see many more colors than your monitor or a printing press can reproduce.

A. Colors that your eye recognizes. B. Colors that your monitor recognizes. C. Colors that your printer reproduces.
In this lesson, you will learn how you can address some of the color limitations that are inherent when working with color that is displayed or output by different devices. A quick introduction to the RGB and CMYK color models will help you get a better grasp on what you can achieve. There are entire books on this subject; in this section, you will gain enough information to apply effectively to your images in Photoshop.
If you receive a Missing or Mismatched Profile warning dialog box on any images used in this lesson, click OK to accept the default setting.
The RGB color model
The RGB (Red, Green, Blue) color model is an additive model in which red, green, and blue are combined in various ways to create other colors.
1 Choose File > Open, and navigate to the ps04lessons folder. Open the file named ps05rgb.psd. An image with red, green, and blue circles appears. Try to imagine the three color circles as light beams from three flashlights with red, green, and blue colored gels.

Red, green, blue.
2 Select the Move tool (
), and then select the Auto-Select check box in the Options bar. By selecting Auto-Select Layer, you can automatically activate a layer by choosing pixel information on that layer. One at a time, click and drag the red, green, and blue circles around on the image.
Notice that white light is generated where the three colors intersect.
3 Now, turn off the visibility of the layers by selecting the Visibility icon (![]() ) to the left of each layer name, with the exception of the black layer. It is just like turning off a flashlight; when there is no light, there is no color.
) to the left of each layer name, with the exception of the black layer. It is just like turning off a flashlight; when there is no light, there is no color.
4 Choose File > Close. Choose to not save changes.
The CMYK color model
CMYK (Cyan, Magenta, Yellow, and Black [or Key]—black was once referred to as the Key color) is a subtractive color model, meaning that as ink is applied to a piece of paper, these colors absorb light. This color model is based on mixing CMYK pigments to create other colors.
Ideally, by combining CMY inks together, the color black should result. In reality, the combination of those three pigments creates a dark, muddy color, and so black is added to create a panel with true blacks. CMYK works through light absorption. The colors that are seen are the portion of visible light that is reflected, not absorbed, by the objects on which the light falls.
In CMYK, magenta plus yellow creates red, magenta plus cyan creates blue, and cyan plus yellow creates green.

Cyan, magenta, yellow, and black.
1 Choose File > Open, and navigate to the ps04lessons folder. Open the file named ps05cmyk.psd. An image with cyan, magenta, and yellow circles appears. Think of the colors in this file as being created with ink printed on paper.
2 With the Move tool (
) selected, and the Auto-Select Layer check box selected, individually click and drag the cyan, magenta, and yellow circles around on the image to see the color combinations that are created with ink pigments of these three colors. Notice that black appears at the intersection of all three, but, as mentioned earlier, it would never reproduce that purely on a printing press.
3 Choose File > Close to close the ps05cmyk.psd image. Do not save your changes.
4 Uncheck the Auto-Select Layer check box in the Options bar.
Working in the RGB mode
Unless you use an advanced color management system, you should do much of your creative work in the RGB mode. The CMYK mode is limited in its capabilities (fewer menu selections), and if you work in this mode, you have already made some decisions about your final image output that might not be accurate. Follow this short color primer to help you achieve the results that you expect.
In this lesson, you’ll use generic profiles for your monitor and output devices. If you want to create a custom monitor profile, follow the instructions in the Photoshop Help menu, under the heading, “Calibrate and profile your monitor.” You can also type Calibrate Monitor into the Search field on adobe.com to find additional helpful tips for calibrating your display.
1 Choose File > Browse in Bridge to bring Adobe Bridge to the front.
2 Navigate to the ps04lessons folder and open the image ps0501.psd. A very colorful image of a woman appears.

A colorful RGB image.
3 Press Ctrl+Y (Windows) or Command+Y (Mac OS); some of the colors become duller. By pressing Ctrl+Y/Command+Y, you have turned on the Proof Colors. This is a toggle keyboard shortcut, which means you can press Ctrl+Y/Command+Y again to turn the preview off. Note that the text in your title bar indicates whether this preview is active or not. Keep the file open for the next part of this lesson.
The Proof Colors preview attempts to visually simulate what the colors in this image would look like if it were to be printed. This simulation is controlled by the choices you make in the color settings. This is why understanding the color settings is important, since the settings you choose not only affect your preview, but also how the image appears in its final destination, print or on-screen.
Editing color settings
For this lesson, you will adjust the color settings for Photoshop as if the final destination for this image were print. Note that if you have other applications from the Creative Cloud installed, you can adjust your color settings throughout all of them using Adobe Bridge CC. Applying color settings through Adobe Bridge saves you the time of making sure that all the colors are consistent throughout your production process. If you want to adjust color settings throughout all your Creative Cloud applications, follow the instructions for using Adobe Bridge. If you only want to change the color settings in Adobe Photoshop, follow the steps starting at step 4.
1 Choose File > Browse in Bridge to bring Adobe Bridge to the front. If you do not have Bridge installed, you can install it when the Adobe Application manager launches.
2 Choose Edit > Color Settings and select North America Prepress 2, if it is not already selected. Click the Apply button.
The new color settings are applied to all of your Creative Cloud applications. Note that the setting you selected is a generic setting created for a printing process that is typical in North America. If your selections are not exactly the same, choose the setting that states it is a prepress setting.
3 Click the Return to Adobe Photoshop boomerang icon (![]() ) at the top of Bridge.
) at the top of Bridge.
4 In Photoshop, choose Edit > Color Settings, even if you have already set them in Adobe Bridge.
5 If North America Prepress 2 is not selected in the Settings drop-down menu, choose it now. Leave the Colors Settings dialog box open.
6 While still in the Color Settings dialog box, press Ctrl+Y (Windows) or Command+Y (Mac OS) to use the toggle shortcut for the CMYK preview. You can tell if you are in the CMYK preview by looking at the title bar of the image window. Notice that CMYK appears in parentheses at the end of the title.

The title bar indicates that this image is in the CMYK preview mode.
It is good to get this sneak peek into what your CMYK image will look like, but there is still the issue of having many different kinds of CMYK output devices. You might have one printer that produces excellent results and another that can hardly hold a color. In the next section, you will learn about the different CMYK settings and how they can affect your image.
7 Make sure that the CMYK preview is still on. If not, press Ctrl+Y (Windows) or Command+Y (Mac OS). From the CMYK drop-down menu in the Working Spaces section of the Color Settings dialog box, choose U.S. Sheetfed Uncoated v2.
Notice the color change in the image. You might need to reposition the Color Settings dialog box to see your image. Photoshop is now displaying the characteristics of the color space for images printed on a sheetfed press. This would be the generic setting you might choose if you were sending this image to a printing press that printed on individual sheets of paper.
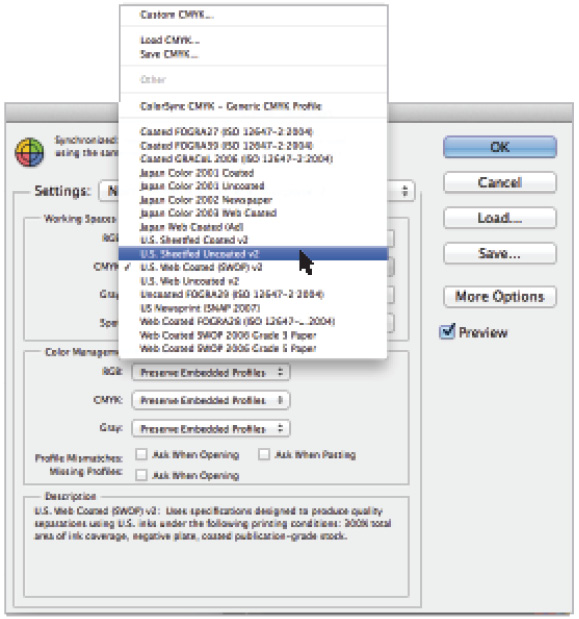
Choose various CMYK specifications from the CMYK drop-down menu.
8 From the CMYK drop-down menu, choose Japan Web Coated (Ad). Notice that the color preview changes again. You might use this selection if you were sending this image overseas to be printed on a large catalog or book press. A web press is a high-volume, high-speed printing press that prints on large rolls of paper rather than individual sheets.
You do not want to pick a CMYK setting simply because it looks good on your screen; you want to choose one based upon a recommendation from a printer, or you should use the generic settings that Adobe provides. The purpose of selecting an accurate setting is not only to keep your expectations realistic; it also helps you accurately adjust an image to produce the best and most accurate results.
9 From the Settings drop-down menu, choose the North America Prepress 2 setting again, and click OK. Keep the file open for the next part of this lesson.
 Keep in mind that if you are using your images for web only, you can use the preview feature to view your image on different platforms. To make this change, choose View > Proof Setup and choose either Internet Standard RGB or Legacy Macintosh RGB from the menu.
Selecting colors
There are many methods that you can use to select colors to paint with in Photoshop. Most methods end up using the Color Picker dialog box. In this section, you will review how to use the Color Picker to choose accurate colors.
1 Click once on the Set foreground color box at the bottom of the Tools panel. The Color Picker appears. It is tough to represent a 3D color space in 2D, but Photoshop does a pretty good job of interpreting colors in the Color Picker. Using the Color Picker, you can enter values on the right, or use the Color slider and color field on the left to create a custom color.
2 Now, with the Color Picker open, click and drag the color slider to change the hue of your selected color. The active color is represented as a circle in the color field.

A. Selected color. B. Color field. C. Color slider. D. Color values.
3 Now, click in the color field, and then click and drag your selected color toward the upper-right corner of the color field, making it a brighter, more saturated color. To choose a lighter color, click and drag the selected color to the upper-left corner of the color field. Even though you can select virtually any color using this method, you might not achieve the best results.
4 Press Ctrl+Shift+Y (Windows) or Command+Shift+Y (Mac OS) to see how Proof Colors affects the colors in the Color Picker. Notice that colors that will not print well in CMYK show up with in gray (gamut warning). Press Ctrl+Shift+Y/Command+Shift+Y again to turn off Proof Colors.
Perhaps you are creating images for the Web and you want to work with web-safe colors only. This is very restrictive, but you can limit your color choices by selecting the Only Web Colors check box in the Color Picker.
5 Select and deselect the Only Web Colors check box to see the difference in selectable colors in the color field.
There are warning icons in the Color Picker to help you choose the best colors for print and the Web.
6 Click in the lower-left corner of the color field and drag up toward the upper-right corner. Note that at some point, when you enter into the brighter colors, an Out of gamut for printing warning icon (![]() ) appears. This indicates that, although you might have selected a very nice color, it is never going to print based on your present color settings. Click the Out of gamut warning icon, and Photoshop redirects you to the closest color you can achieve.
) appears. This indicates that, although you might have selected a very nice color, it is never going to print based on your present color settings. Click the Out of gamut warning icon, and Photoshop redirects you to the closest color you can achieve.

A. Out of gamut for printing warning. B. Not a web safe color warning. C. Only Web Colors.
7 Click and drag your selected color in the color field until you see the Not a web safe color alert icon (![]() ) appear. Click the Not a web safe color icon to be redirected to the closest web-safe color.
) appear. Click the Not a web safe color icon to be redirected to the closest web-safe color.
8 Position the Color Picker so that you can see part of the ps0501.psd image, then position the cursor over any part of the image. Notice that the cursor turns into the Eyedropper tool (![]() ). Click to select any color from the image.
). Click to select any color from the image.

Click outside the Color Picker to sample a color from your image.
9 Click OK in the Color Picker dialog box.
10 Choose File > Close. If asked to save changes, select No.
Starting to paint
Now that you know a little more about color and how to find it in Photoshop, you will start to do some painting. You will work on a new blank document to begin with, but once you have the basics of the painting tools down, you’ll put your knowledge to work on actual image files.
1 Under the File menu, choose New. The New dialog box appears.
2 Type painting in the File name text field. From the preset drop-down menu, choose Default Photoshop Size. Leave all other settings at their defaults and click OK. A new blank document is created; keep it open for the next part of this lesson.
Using the Color panel
Another way to select color is to use the Color panel.
1 If the Color panel is not visible, choose Window > Color.
Place your cursor over the color ramp at the bottom of the panel, then click and drag across the displayed color spectrum. Notice that the RGB sliders adjust to indicate the color combinations creating the active color. If you have a specific color in mind, you can individually drag the sliders or key in numeric values.
Note that the last color you activated appears in the Set foreground color swatch, located in the Color panel, as well as near the bottom of the Tools panel.

A. Set foreground color. B. Set background color. C. Slider. D. Color ramp.
2 Click once on the Set Foreground Color box to open the Color Picker. Type the following values in the RGB text fields on the right side of the Color Picker dialog box: R: 74 G: 150 B: 190. Click OK.
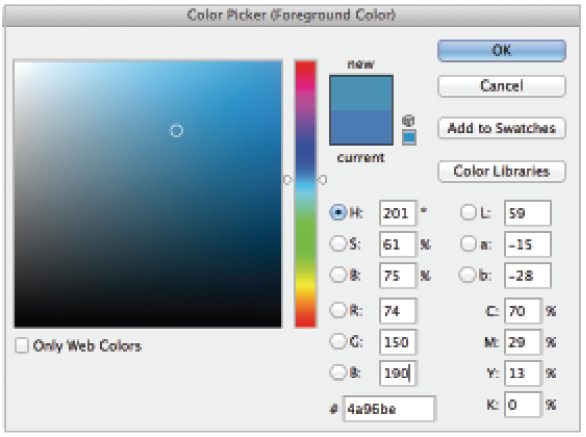
Manually enter values in the Color Picker.
Using the Brush tool
The Brush tool paints using the foreground color. You can control the brush type, size, softness, mode, and opacity with the Brush tool Options.
1 Select the Brush tool (![]() ) in the Tools panel.
) in the Tools panel.
2 Click the arrow next to the brush size in the Options bar to open the Brush Preset picker.

Click the arrow in the Brush Options bar to open the presets.
3 If you are not in the default panel view, click and hold the panel menu, which looks like a gear icon (![]() ), in the upper-right corner of the Brush Preset picker, and choose Small Thumbnail View.
), in the upper-right corner of the Brush Preset picker, and choose Small Thumbnail View.

You can use the panel menu to choose different views.
4 Position your cursor over any of the brushes to see a tooltip appear. The tooltip provides a description of the brush, such as soft, airbrush, hard, or chalk. Some will also display the brush size in pixels.
5 Locate the brush with the description Soft Round Pressure Size pixels, toward the top of the panel, and click it.
6 Use the Size slider or enter 45 px into the Size text field to change the diameter of the brush to 45 pixels, and press the Enter (Windows) or Return (Mac OS) key. The brush is selected and the Brushes Preset picker is closed.
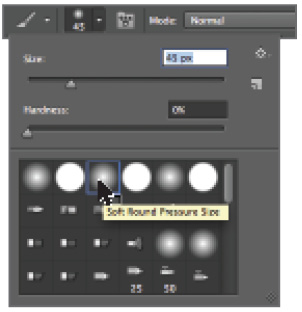
The Brush Preset picker and the Soft Round 45 pixel brush.
7 Position your cursor on the left side of the image window, then click and drag to paint a curved line similar to the example below. If you do not see your brush stroke, make sure that the Mode in the Options bar is set to Normal.

Painted brush stroke.
8 Using the Color panel, click a different color from the color ramp (no specific color is necessary for this exercise). Then paint another brush stroke that crosses over, or intersects, with the first brush stroke.

Painting a second brush stroke.
Note that when you paint, the Brush tool cursor displays the diameter of the brush that is selected. To resize the brush, you can return to the Brush Preset picker in the Options bar, but it is more intuitive to resize your brush dynamically, using a keyboard shortcut.
 If you have the Caps Lock key pressed, your Brush tool cursor appears as a crosshair.
9 Press the ] (right bracket) key to increase the brush size. Now press the [ (left bracket) key to decrease the size of the brush. As this blank document is for experimentation only, you can paint after resizing to see the size difference.
10 Choose File > Save to save the file. Keep the file open for the next part of this lesson.
Changing opacity
Changing the level of opacity affects how transparent your brush strokes look over other image information. In this section, you will experiment with different opacity percentages.
1 If the Swatches panel is not visible, choose Window > Swatches. The Swatches panel appears with predetermined colors ready for you to use.

The Swatches panel.
2 Position your cursor over any swatch color and you’ll see an eyedropper, along with a tooltip indicating the name of the color. Click any one of the swatches; it becomes your current foreground color.
3 Now, to change its opacity, go to the Options bar at the top and click the arrow next to 100%. A slider appears. Drag the slider to the left to lower the opacity to about 50 percent, and then click the arrow to collapse the slider. Alternatively, you can type 50 into the Opacity text field. Understand that changing the opacity of a color does not affect any of the painting that you have already completed, but it will affect future painting.

Change the opacity of the brush to 50 percent.
 You can change the opacity by hovering over the word Opacity in the Options bar. A double-arrow appears (
![]() ), allowing you to slide the opacity down or up without revealing the slider.
), allowing you to slide the opacity down or up without revealing the slider.
4 Click and drag with the Brush tool to paint over the canvas. Make sure to overlap existing colors to see how one color interacts with another. Take some time here to experiment with different colors, opacity settings, and brush sizes.
5 Choose File > Save and then File > Close to close the file.
Save time—learn the shortcuts
There are many keyboard shortcuts to help you when painting in Photoshop, most of which are integrated into the exercises in this lesson. Here is a list that will help you save time and work more efficiently.
|
Brush function |
Brush keyboard shortcuts |
|
Open the Brush Preset picker |
Right-click (Windows) Ctrl+click (Mac OS) |
|
Increase Brush size |
] (right bracket) |
|
Decrease Brush Size |
[ (left bracket) |
|
Make Brush Harder |
Shift+] (right bracket) |
|
Make Brush Softer |
Shift+[ (left bracket) |
|
Change Opacity |
Type a value, such as 55 for 55 percent or 4 for 40 percent |
|
100% Opacity |
Type 0 (zero) |
Using the Brush Presets
In this section, you find out how to take advantage of the preset brushes that come with Photoshop.
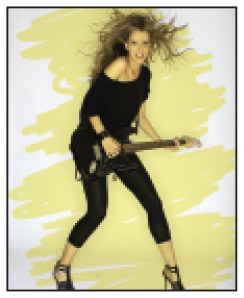
1 Choose File > Browse in Bridge, and then navigate to the ps04lessons folder and open image ps0502.psd. An image of a woman playing a guitar appears.

The file before you apply new brush strokes.
2 Choose File > Save As. In the Save As dialog box, name the file ps0502_work. Navigate to your ps04lessons folder and click Save.
3 Select the Brush tool (![]() ) and then select the Toggle the Brush panel button (
) and then select the Toggle the Brush panel button (![]() ) in the Options bar. The Brush panel appears.
) in the Options bar. The Brush panel appears.
4 Select the Brush Presets tab to bring it forward, and then select Small List from the panel menu. This will make it easier for you to identify the brushes by name.
5 Click the Round Curve Low Bristle Percent preset.
6 Using the Size slider, click and drag the size of the brush to approximately 205 px. You can preview the tip by activating the Toggle the Live Tip Brush Preview button (![]() ). Note that this brush preview does not work with all the brush tips.
). Note that this brush preview does not work with all the brush tips.
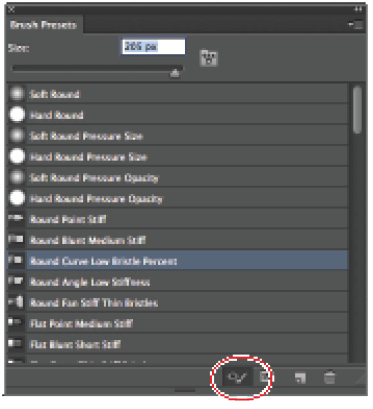
Select the Round Curve Low Bristle brush and change the size to 205 px.
7 With the Brush tool still selected, press and hold the Alt (Windows) or Option (Mac OS) key and sample a color of the woman’s skin color. Choose a darker shade if possible.
8 In the Options bar, click the Mode drop-down menu and select Multiply.
9 Using large wide brush strokes paint over the woman playing the guitar. Since you are using a blending mode with a light color, the image is still visible. If you want to erase and try again, press Ctrl+Z (Windows) or Command+Z (Mac OS)
Note that as you paint, a preview of your brush appears and shows the movement of the bristles as you paint.
The image after you apply the brush stroke.
You can store your brushes for future use by taking advantage of the Brush preset feature.
10 Click the Create new brush (![]() ) button in the lower right of the Brush Presets panel. The Brush Name dialog box appears. Type the name My Large Rounded Brush, and click OK. This brush now appears in the Brush Preset panel for future use.
) button in the lower right of the Brush Presets panel. The Brush Name dialog box appears. Type the name My Large Rounded Brush, and click OK. This brush now appears in the Brush Preset panel for future use.

Store your brush for future use.
Using the Airbrush feature
In this section, you discover how to change the brush characteristics to act more like an airbrush. Using the airbrush option allows your paint to spread, much like the effect you would have using a true (non-digital) airbrush.
1 Select Round Fan Stiff Thin Bristles from the Brush Preset panel. Make sure the size is still close to 205 px. If not, use the slider to change it to that value now.
2 Press D to return to the Photoshop default colors of Black and White.
3 If the Mode drop-down menu (in the Options bar) is not set to Normal, set that to Normal now.
4 Click and release with your cursor anywhere on the image to stamp a brush stroke onto the image. Do this a couple more times. You can press the [ (left bracket) or ] (right bracket) keys to change the size of the stamped brush.

Stamp the brush stroke to produce the effect of dabbing the brush onto the image.
5 Now, Select the Enable airbrush-style build-up effects (![]() ) in the Options bar. Notice that you can change the flow, or pressure, of the paint coming out of the airbrush using the Flow control to the left. In this example, this is set to 50%.
) in the Options bar. Notice that you can change the flow, or pressure, of the paint coming out of the airbrush using the Flow control to the left. In this example, this is set to 50%.
6 Using the same brush preset, click and hold your image to notice that the paint spreads as you hold.

With the Enable airbrush option, the paint spreads as you click and hold the brush.
Experiment with different flows and sizes to see the effects that you have created.
7 When you are finished experimenting, return the Flow control back to 100%.
Creating a Border using the Bristle brushes
In this next section, you use a bristle brush to create an artistic border around the edge of the image.
1 Select the Round Blunt Medium Stiff bristle brush from the Brush Presets panel.
2 Choose any color that you want to use for the border you are about to create. In this example, we use the default black.
3 Click in the upper-left corner of the image. This is the top-left corner for your border.
Press and hold the Shift key and click in the lower-left corner. By Shift+clicking, you have instructed Photoshop that you want a stroke to connect from the initial click to the next.
4 Shift+click in the lower-right corner, and then continue this process until you return to your original stroke origin in the upper-left corner.

The completed border.
5 Press Ctrl+S (Windows) or Command+S (Mac OS) to save this image, then choose File > Close.
Applying color to an image
You can color anything realistically in Photoshop by using different opacity levels and blending modes. In this part of the lesson, you’ll take a grayscale image and tint it with color. Understand that you can also paint color images to change the color of an object, like clothing for a catalog, or just to add interesting tints for mood and effect.
1 Choose File > Browse in Bridge, and then navigate to the ps04lessons folder and open image ps0503.psd. A grayscale image of a small boy appears.

The original grayscale image.
2 Double-click the Zoom tool (![]() ) in the Tools panel to change the view to 100 percent. You might need to resize the image window to view more of the image.
) in the Tools panel to change the view to 100 percent. You might need to resize the image window to view more of the image.
3 Choose Image > Mode > RGB Color. This will not change the visual look of the image, but in order to colorize a grayscale image, it needs to be in a mode that supports color channels.
4 Choose File > Save As; the Save As dialog box appears. Navigate to the ps04lessons folder and type ps0503_work into the File name text field. Choose Photoshop from the Format drop-down menu and click Save.
5 Select the Brush tool and right-click (Windows) or Ctrl+click (Mac OS) on the canvas to open the contextual Brush Preset picker. Select the Soft Round brush (this is the first brush.) Slide the Size slider to 25 and the Hardness slider to 5. Press Enter (Windows) or Return (Mac OS) to exit.

Change the brush size to 25 pixels, and the hardness to 5%.
6 Using the Opacity slider in the Options bar, change the opacity of the brush to 85 percent, or type 85 into the Opacity text field.
7 If you do not see the Swatches panel, choose Window > Swatches.
8 Position your cursor over a brown color in the Swatches panel. In this example, Dark Warm Brown is selected, but you can choose any color you want.
9 Using the Brush tool, paint the boy’s hair. Notice that at 85 percent, the color is slightly transparent but still contains some of the image information underneath. You’ll now paint the boy’s hair more realistically.
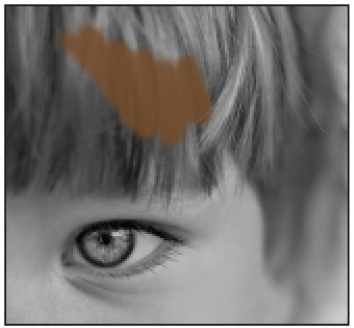
Painting the hair at 85 percent opacity.
10 Choose File > Revert to return the image to the last saved version. Leave the file open.
Changing blending modes
Opacity is one way to alter the appearance or strength of a brush stroke. Another method is to change the blending mode of the painting tool you are using. The blending mode controls how pixels in the image are affected by painting. There are many modes to select from, and each creates a different result. This is because each blending mode is unique, but also because the blending result is based upon the color you are painting with and the color of the underlying image. In this section, you will colorize the photo by adjusting the opacity and changing the blending mode.
1 Make sure that ps0503_work.psd is still open and double-click the Zoom tool (![]() ) in the Tools panel to verify that your view is still set to 100 percent.
) in the Tools panel to verify that your view is still set to 100 percent.
Also, make sure the Swatches panel is forward and the Brush tool (![]() ) is selected for this part of the lesson.
) is selected for this part of the lesson.
2 Make sure that you still have the brown color selected in the Swatches panel.
3 In the Options bar, change the opacity to 50 percent.
4 Select Color from the Mode drop-down list. This is where you select various blending modes for your painting tools. Color is close to the bottom of this drop-down menu, so you might have to scroll to see it.

Change the blending mode to Color.
5 Using the Brush tool, paint over the boy’s hair. Notice that the strength or opacity of the color varies according to the tonality of the painted area. This is because using the color blending mode you selected (Color) retains the grayscale information in the image. Where the image is lighter, the application of the brown color is lighter, and where the image is darker, the application of the brown color is darker.
6 Finish painting the hair brown, and then choose File > Save at this point so you can experiment with painting and blending modes.
Experiment with different colors to colorize the photo. Try using different modes with the same color to see how differently each mode affects the colorization. Some modes might have no effect at all. Experiment all you want with painting at this point. You can choose Ctrl+Z (Windows) or Command+Z (Mac OS) to undo a brush stroke that you do not like, or use Ctrl+Alt+Z (Windows) or Command+Option+Z (Mac OS) to undo again and again.
 Don’t like what you have done in just one area of the image? Select the Eraser tool and press and hold Alt (Windows) or Option (Mac OS); then click and drag to erase to the last version saved. You can also change the brush size, opacity, and hardness of the Eraser tool using the Options bar.
7 Choose File > Revert to go back to the last saved version; leave the file open for the next section.
The Eyedropper tool
The Eyedropper tool is used for sampling color from an image. This color can then be used for painting, or for use with text color. In this section, you will sample a color from another image to colorize the boy’s face.
1 Make sure that ps0503_work.psd is still open, choose File > Browse in Bridge, and then navigate to the ps04lessons folder and open the file named ps0504.psd.
2 Select Window > Arrange > 2-up Vertical to see both images.
3 Click the title bar for the ps0504.psd image to bring that image forward.

Images tiled vertically.
4 Choose the Eyedropper tool (![]() ) and position it over the boy’s face in the color image. Click once on his left cheek. The color is selected as the foreground color in the Tools panel.
) and position it over the boy’s face in the color image. Click once on his left cheek. The color is selected as the foreground color in the Tools panel.
 You can access the Eyedropper tool while you have the Brush tool selected by pressing the Alt (Windows) or option (Mac OS) Keys. When you release the Alt/Option key, you are returned to the Brush tool.
5 Select the Brush tool, then using the Options bar at the top, make sure that Color is selected from the Mode drop-down menu and that the Opacity slider is set at 15 percent.
6 Position your cursor over the image to see the brush radius size. Press the ] (right bracket) key several times until the brush is approximately 150 pixels wide. You can see the size reflected in the Options bar.
7 Click the title bar for the ps0503_work.psd image and with the Brush tool (![]() ) selected, paint the boy’s face with the color you just sampled. Paint without releasing the mouse to give the face a good coverage of color.
) selected, paint the boy’s face with the color you just sampled. Paint without releasing the mouse to give the face a good coverage of color.
8 Keep in mind that you have an opacity setting of 15%, which means that you can build up the skin tone color by painting over areas again. You can sculpt the image by adding more tone in the areas where you want more color.

Add a light tint of skin color to the image.
9 With your Brush tool still selected, press and hold the Alt (Windows) or Option (Mac OS) key and sample the blue color from the striped shirt in the color image.
10 Press the [ (left bracket) key until the brush size is about 60 pixels.
11 Press the number 5. By pressing 5 you can indicate that you want 50% opacity. This works with all values; for instance, you can press 43 for 43%, or 2 for 20%. To change the opacity to 100% you would press 0 (zero).
12 Position the paint brush over one of the boy’s eyes in the grayscale image and click to paint it blue. Repeat this with the other eye.
13 Choose File > Save, then File > Close All to close both the ps0503_work.psd and the ps0504.psd files.
Retouching images
There are many techniques you can use to clean up an original image, from using any of the healing tools to the Clone Stamp tool. In this lesson, you will retouch an image using a variety of tools available in Photoshop CC.
1 To view the final image, choose File > Browse in Bridge and then navigate to the ps04lessons folder and open image ps0505_done.psd.

The image after using the retouching tools.
2 You can choose File > Close after viewing this file, or leave it open for reference.
Using the Clone Stamp tool
One of the problems with old photographs is that they most likely contain a large number of defects. These defects can include watermarks, tears, and fold marks. There are many different ways to fix these defects; one of the most useful is the Clone Stamp tool. The Clone Stamp tool lets you replace pixels in one area of the image by sampling from another area. In this part of the lesson, you’ll use the Clone Stamp tool, and you will also have an opportunity to explore the Clone Source panel.
1 Choose File > Browse in Bridge, and then navigate to the ps04lessons folder and open image ps0505.psd.
2 Choose File > Save As; the Save As dialog box appears. Navigate to the ps04lessons folder and type ps0505_work into the File name text field. Choose Photoshop from the Format drop-down menu and click Save.
You’ll first experiment with the Clone Stamp tool (![]() ). Don’t worry about what you do to the image at this stage, since you will revert to saved when done.
). Don’t worry about what you do to the image at this stage, since you will revert to saved when done.
3 Select the Zoom tool and click and drag a marquee around the top half of the image to zoom in closer to the face.
4 Select the Clone Stamp tool.
5 Position your cursor over the nose of the girl in the image and press and hold the Alt (Windows) or Option (Mac OS) key. Your cursor turns into a precision crosshair. When you see this crosshair, click with your mouse. You have just defined the source image area for the Clone Stamp tool.
6 Now position the cursor to the right of the girl’s face, then click and drag to start painting with the Clone Stamp tool. The source area that you defined is recreated where you are painting. Watch carefully, since you will see a coinciding crosshair indicating the area of the source that you are copying.
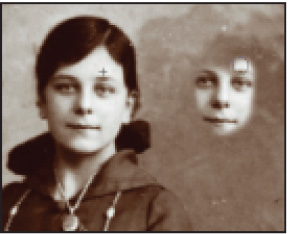
The clone source and results.
7 Press the ] (right bracket) key to enlarge the Clone Stamp brush. All the keyboard commands you reviewed for the Brush tool work with other painting tools as well.
8 Type 5. By typing a numeric value when a painting tool is active, you can dynamically change the opacity. Start painting with the Clone Stamp tool again and notice that it is now cloning at 50 percent opacity.
9 Type 0 (zero) to return to 100 percent opacity.
10 You have completed the experimental exercise using the Clone Stamp tool.
Choose File > Revert to go back to the original image.
Repairing fold lines
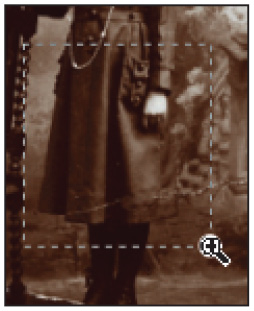
You will now repair the fold lines in the upper-right corner of the image.
1 Select the Zoom tool from the Tools panel, and if it is not already selected, choose the Resize Windows To Fit check box in the Options bar. By selecting this check box, the window will automatically resize when you zoom.
2 Click approximately three times in the upper-right corner of the image. There you see fold marks that you will repair using the Clone Stamp tool.

Fold marks that you will repair.
3 Select the Clone Stamp tool (![]() ) from the Tools panel.
) from the Tools panel.
4 Right-click (Windows) or Ctrl+click (Mac OS) on the image area to open the Brush Preset picker. Click the Soft Round brush and change the Size to 13 pixels. Press Enter or the Return key.
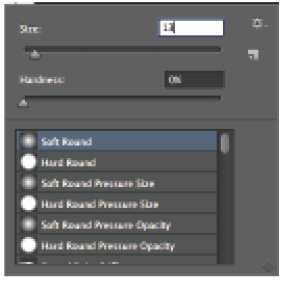
Select a soft round brush.
5 Position your cursor to the left of the fold mark, approximately in the center of the fold. Press and hold Alt (Windows) or Option (Mac OS), and click to define that area as the source.
6 Position the Clone Stamp tool over the middle of the fold line itself, and click and release. Depending upon what you are cloning, it is usually wise to apply a clone source in small applications, rather than painting with long brush strokes.
7 Press Shift+[ (left bracket) several times to make your brush softer. This way, you can better disguise the edges of your cloning.
8 Continue painting over the fold lines in the upper-left corner. As you paint, you will see crosshairs representing the sampled area. Keep an eye on the crosshairs; you don’t want to introduce unwanted areas into the image.
It is not unusual to have to redefine the clone source over and over again. You might have to Alt/Option+click in the areas outside of the fold line repeatedly to find better-matched sources for cloning. You might even find that you Alt/Option+click and then paint, and then Alt/Option+click and paint again, until you conceal the fold mark.
Don’t forget some of the selection techniques that you learned in Photoshop Lesson 3, “Making Selective Changes in Photoshop CC.” You can activate the edge of the area to be retouched so you can keep your clone stamping inside the image area and not cross into the white border.

Create selections to help you control the cloning.
 With the Clone Stamp tool, it is important to sample tonal areas that are similar to the tonal area you are covering. Otherwise, the retouching will look very obvious.
9 Choose File > Save. Keep this image open for the next part of this lesson.
The History panel
You can use the History panel to jump to previous states in an image. This is an important aid when retouching photos. In this section, you will explore the History panel as it relates to the previous section, and then continue to use it as you work forward in Photoshop.
1 Make sure that ps0505_work.psd is still open from the last section.
2 Choose Window > History. The History panel appears. Grab the lower-right corner of the panel and pull it down to expand the panel and reveal all the previous states in History.

Resizing the History panel.
3 You see many Clone Stamp states, or a listing of any function that you performed while the image was open. As you click each state, you reveal the image at that point in your work history. You can click back one state at a time, or you can jump to any state in the panel, including the top state, which is the state of the original image when it was first opened. You can use this as a strategy for redoing work that does not meet with your satisfaction.
4 If you need to redo some of the cloning that you did in the previous section, click a state in the History panel for your starting point, and redo some of your work.
 All states in the History panel are deleted when the file is closed. If you want to save a state, click the Create new document button (
![]() ) to create a new file at the present history state.
) to create a new file at the present history state.
5 Choose File > Save. Keep this file open for the next part of the lesson.
The Spot Healing Brush
The Spot Healing Brush tool paints with sampled pixels from an image and matches the texture, lighting, transparency, and shading of the pixels that are sampled to the pixels being retouched, or healed. Note that unlike the Clone Stamp tool, the Spot Healing Brush automatically samples from around the retouched area.
1 With the ps0505_work.psd file still open, select View > Fit on Screen, or use the keyboard shortcut Ctrl+0 (zero) (Windows) or Command+0 (zero) (Mac OS).
2 Select the Zoom tool (![]() ), then click and drag the lower-right section of the image to zoom into the lower-right corner.
), then click and drag the lower-right section of the image to zoom into the lower-right corner.

Click and drag with the Zoom tool.
Because you do not have to define a source with the Spot Healing tool, it can be easier to retouch. It is not the absolute answer to every retouching need, but it works well when retouching sections of an image that are not defined and detailed, like blemishes on skin or backgrounds.
3 Select the Spot Healing Brush tool (![]() ), and then click and release repeatedly over the fold marks in the lower-right corner of the image. The tool initially creates a dark region, indicating the area that is to be retouched, but don’t panic–it will blend well when you release the mouse. Now, using the Spot Healing Brush, repair the fold lines. Use the History panel to undo steps, if necessary. You can experiment with the brush size; sometimes a smaller brush size works better with this tool.
), and then click and release repeatedly over the fold marks in the lower-right corner of the image. The tool initially creates a dark region, indicating the area that is to be retouched, but don’t panic–it will blend well when you release the mouse. Now, using the Spot Healing Brush, repair the fold lines. Use the History panel to undo steps, if necessary. You can experiment with the brush size; sometimes a smaller brush size works better with this tool.
4 Choose File > Save. Keep this file open for the next part of this lesson.
The Healing Brush
The Healing Brush tool also lets you correct imperfections. Like the Clone Stamp tool, you can use the Healing Brush tool to paint with pixels you sample from the image, but the Healing Brush tool also matches the texture, lighting, transparency, and shading of the sampled pixels. In this section, you will remove some defects in the girl’s dress.
1 Make sure that ps0505_work.psd is still open from the last section, and choose View > Fit on Screen.
2 Select the Zoom tool, then click and drag over the bottom area of the girl’s dress.
Click and drag to zoom into the dress.
3 Click and hold the Spot Healing Brush (![]() ) in the Tools panel to select the hidden tool, the Healing Brush (
) in the Tools panel to select the hidden tool, the Healing Brush (![]() ).
).
4 Position your cursor over an area near to, but outside the fold line in the skirt, since you are going to define this area as your source. Press and hold Alt (Windows) or Option (Mac OS), and click to define the source for your Healing Brush tool.
5 Now, paint over the fold line that is closest to the source area you defined.
6 Repeat this process; Alt/Option+click in appropriate source areas near the folds across the dress, then paint over the fold lines, using the Healing Brush tool. Don’t forget to change the size using the left and right brackets, if necessary.

Define a source and then paint with the Healing Brush tool.
7 Choose File > Save, and leave this file open for the next part of this lesson.
Using the Patch tool
You might find that there are large areas of scratches or dust marks that need to be retouched. You can use the Patch tool to replace large amounts of an image with image data that you sample as your source. In this section, you will fix the large dusty area in the upper-left part of the image.
1 With the ps0505_work.psd file still open, choose View Fit on Screen, or use the keyboard shortcut Ctrl+0 (zero) (Windows) or Command+0 (zero) (Mac OS).
2 Select the Zoom tool (![]() ), and then click and drag to zoom into the upper-left area of the image.
), and then click and drag to zoom into the upper-left area of the image.
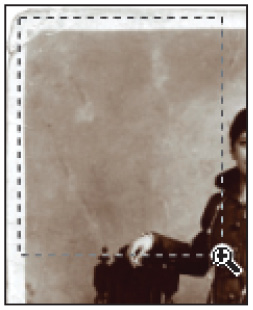
Click and drag to zoom into the upper-left corner.
3 Click and hold the Healing Brush tool (![]() ) and select the hidden Patch tool (
) and select the hidden Patch tool (![]() ).
).
4 Click and drag a selection to choose a small area with defects. Then click and drag that selection over an area of the image with fewer defects, to use that area as a source.
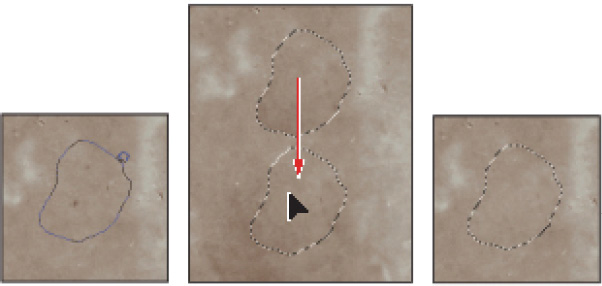
The original. Drag with the Patch tool.
The result.
5 Continue to make selections and patch with the Patch tool to clean up most of the dust marks in the upper-left corner of the image.
6 Choose File > Save. Keep the file open for the next part of this lesson.
Using the Clone Source panel
When using the Clone Source panel, you can set up to five clone sources for the Clone Stamp or Healing Brush tools to use. The sources can be from the same image you are working on or from other open images. Using the Clone Source panel, you can even preview the clone source before painting, and rotate and scale the source. In this section, you will clone the upper-left corner of the ps0505_work.psd image and rotate it to repair the upper-right corner of the image. You will also define a second clone source to add an art deco border around the edge of the image.
1 Make sure that ps0505_work.psd is still open, and choose View > Fit on Screen.
2 Choose Window > Clone Source to open the Clone Source panel.
3 If it helps to zoom in to the image, press Ctrl+plus sign (Windows) or Command+plus sign (Mac OS), and then scroll to the upper-left corner.

The Clone Source panel.
The Clone Source panel displays five icons, each representing a sampled source. You will start out using the first clone source.
4 Choose the Clone Stamp tool (![]() ). Verify in the Options bar that the Mode is Normal and Opacity is 100 percent.
). Verify in the Options bar that the Mode is Normal and Opacity is 100 percent.
5 Press the ] (Right bracket) until the Clone Stamp size is approximately 80 pixels. The size is indicated in the Options bar.
6 Click the first Clone Source icon in the Clone Source panel and position your cursor over the top-left corner of the image. Press and hold the Alt (Windows) or Option (Mac OS) key and click to define this corner as the first clone source.
You will now use this corner to replace the damaged corner in the upper right.

Select the first Clone Source icon.
Alt/Option+click the upper-left corner.
7 If you zoomed into the upper-left corner, press and hold the spacebar to turn your cursor into the Hand tool (![]() ), then click and drag to the left. Think of the image as being a piece of paper that you are pushing to the left to see the upper-right corner of the image.
), then click and drag to the left. Think of the image as being a piece of paper that you are pushing to the left to see the upper-right corner of the image.
8 When you are positioned over the right corner, select the Show Overlay check box (if it is not selected already) in the Clone Source panel. A ghost image of your clone source is displayed. If necessary, hover over Opacity in the Clone Source panel and drag it to a lower level.
Note that you can deselect the Clipped check box to see the entire clone source, but for this example, keep it selected.

Select Show Overlay to see your clone source before cloning.
9 Now, type 90 in the Rotate text field in the Clone Source panel. The corner is rotated so you can fit it in as a new corner in the upper-right area of the image.
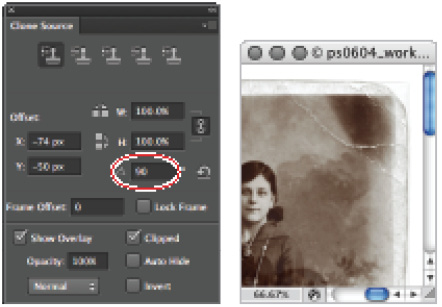
Use the Clone Source panel to rotate your source.
10 Verify that your brush size is approximately the width of the white border. You can preview the brush size by positioning your cursor over the white border. If you do not see the brush size preview, you might have your Caps Lock key pressed. If necessary, make your brush smaller using the [ (left bracket), or larger using the ] (right bracket) keys repeatedly.
11 Make sure the corner is aligned with the outside of the underlying image (original upper-right corner). Don’t worry about aligning with the original inside border.

Align the corner before starting to clone.
12 Start painting only the corner with the Clone Stamp tool. Now the corner has been added to the image. Deselect the Show Overlay check box to better see your results.
13 Choose File > Save and keep this file open for the next part of this lesson.
Cloning from another source
In this section, you will open an image to clone a decoration, and then apply it to the ps0505_work image.
1 Choose File > Browse in Bridge, and then navigate to the ps04lessons folder and double-click the image named ps0506.psd. An image with a decorative border appears.
2 If the Clone Source panel is not visible, choose Window > Clone Source. Make sure that the Show Overlay check box is deselected.
3 Select the Clone Stamp tool (![]() ), and then click the second Clone Source icon.
), and then click the second Clone Source icon.
4 Position your cursor over the upper-left corner of the decorative border, and then press and hold the Alt (Windows) or Option (Mac OS) key and click to define this area of the image as your second clone source.

Define the upper-left corner as the second clone source.
5 Select the third Clone Source icon in the Clone Source panel.
6 Position your cursor over the upper-right corner of the decorative border, then press and hold the Alt (Windows) or Option (Mac OS) key and click to define this area of the image as your third clone source.
7 Choose Window > ps0505_work.psd to bring that image to the front.
8 If you cannot see your entire ps0505_work.psd image, choose View > Fit on Screen, or use the keyboard shortcut Ctrl+0 (zero) (Windows) or Command+0 (zero) (Mac OS).
9 To make the clone of the decorative border appear antique, you will make some modifications to the Clone Stamp tool options. With the Clone Stamp tool selected, go to the Options bar and select Luminosity from the Mode drop-down menu. Type 50 into the Opacity text field.
10 Select the second Clone Source icon, and then select the Show Overlay check box in the Clone Source panel.
11 Position your cursor in the upper-left corner of the ps0505_work.psd image; you see the preview of the decorative border. When you have the decorative corner positioned roughly in the upper-left corner, start painting. Try to follow the swirls of the design as best you can, but don’t worry about being exact. The blending mode and opacity that you set in the Options bar helps to blend this into the original image. Keep in mind that when you paint with a lighter opacity, additional painting adds to the initial opacity. If it helps to see the results, turn off the Show Overlay check box. Select it to turn it back on for the remainder of this lesson.

Paint with the Clone tool.
The result.
Now you will clone the third source to the upper-right corner of the image. This time, you can experiment with the position of the decoration on the image.
12 Navigate to the upper-right side of the ps0505_work image and select the third Clone Source icon from the Clone Source panel. You will now use the Clone Source panel to reposition the upper-right corner clone source.
13 Press and hold Alt+Shift (Windows) or Option+Shift (Mac OS) and press the left, right, up, or down arrow key on your keyboard to nudge the overlay into a better position. No specific position is required for this lesson; simply find a location that you feel works well.
14 Once you have the clone source in position, start painting. Lightly paint the decoration into the upper-right corner. If you feel your brush is too hard-edged, press Shift+[ (left bracket) to make it softer.
15 Choose File > Save. Keep the ps0505_work.psd file open for the next part of this lesson. Choose Window > ps0506.psd to bring that image forward. Then choose File > Close. If asked to save changes, select Don’t Save.
Self study
Return to the ps0505_work.psd image and use a variety of retouching tools, such as the Clone Stamp, Spot Healing, and Healing Brush tools to fix the rest of the damaged areas in the image. Also use the retouching tools to remove dust from the image.
Use the Clone Source panel to repair the lower-left and lower-right corners of the ps0505_work.psd image.
Review
Questions
1 If you have an image in the grayscale mode and you want to colorize it, what must you do first?
2 What blending mode preserves the underlying grayscale of an image and applies a hue of the selected color? Hint: it is typically used for tinting images.
3 What is the main difference between the way the Clone Stamp and Healing Brush replace information in an image?
4 How many clone sources can be set in the Clone Source panel?
Answers
1 To use color, you must choose a color mode that supports color, such as RGB or CMYK. You can change th e color mode by selecting the Image > Mode menu.
2 The Color blending mode is used for tinting images.
3 The Clone Stamp makes an exact copy of the sampled area, whereas the Healing Brush makes a copy of the sampled area and matches the texture, lighting, transparency, and shading of the sampled pixels.
4 You can set up to five clone sources in the Clone Source panel.