Illustrator Lesson 2: Adding Color
Adobe Illustrator CC provides a number of methods to help add color to your artwork. In this lesson, you’ll discover how to enhance your artwork with color.
What you’ll learn in this lesson:
- • Using the Appearance panel
- • Applying and adjusting fills and strokes
- • Using the Live Paint Bucket tool
- • Creating and applying a gradient
- • Creating and updating a pattern swatch
Starting up
Before starting, make sure that your tools and panels are consistent by resetting your workspace. See “Resetting Adobe Illustrator CC Preferences” in the Starting up section of this book.
You will work with several files from the ai02lessons folder in this lesson. Make sure that you have loaded the CClessons folder onto your hard drive from www.digitalclassroombooks.com/CC/DesignTools. See “Loading lesson files” in the Starting up section of this book.
Basics of the Appearance panel
The Appearance panel in Illustrator allows you to adjust an object’s fill and stroke, in addition to keeping track of any effects that have been applied to the object. The Appearance panel is also an indispensable tool for determining the structure of an object. Fills and strokes are shown in the order that they are applied to an object, the same way that other effects are ordered chronologically. As your Illustrator artwork increases in complexity, the Appearance panel becomes more important, since it makes the process of editing your illustration much easier. In this section, you have the opportunity to explore the Appearance panel by creating a simple illustration from scratch.
1 Launch Adobe Illustrator CC and choose File > New. The New Document dialog box appears.
2 In the Name text field, enter Appearance. Choose Print from the New Document Profile drop-down menu. Leave all other items the same and click OK. The new artboard appears.
To help you understand how powerful the Appearance panel is, you will create a simple shape and apply attributes to it.
3 Click and hold the Rectangle tool (![]() ) and select the hidden Star tool (
) and select the hidden Star tool (![]() ).
).
4 To make sure that you have the default color settings of a white fill and black stroke, press the letter D. This returns your colors to the default black stroke and white fill.
5 Click and drag out on the artboard anywhere to create a new star shape. Any size is fine for this exercise.
6 If the Appearance panel is not visible, choose Window > Appearance now.
The Appearance panel offers you the ability to track or make changes to the properties that have been applied to a selected object.
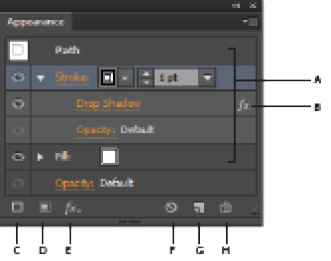
A. Path with stroke, fill, and drop shadow. B. Indicates path has effect applied. C. Add New Stroke. D. Add New Fill. E. Add New Effect. F. Clear Appearance. G. Duplicate Selected Item. H. Delete Selected Item.
Click the tab of the Appearance panel and drag it out of the docking area. This ensures that the Appearance panel does not go away when you select other panels.
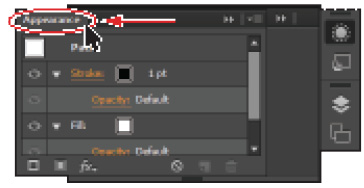
Click and drag the Appearance panel out of the panel group.
The Appearance panel indicates that this shape has a Stroke of 1 pt and it is black, and a Fill of white. The Opacity is also noted as being the default (100%).
Changing colors
When you have a shape active in Adobe Illustrator, you can change the colors using multiple methods, including using the Appearance panel.
1 Click the color box to the right of Stroke in the Appearance panel, then click the arrow; this makes the Swatches panel accessible from within the Appearance panel.
2 With the Swatches panel open, choose CMYK Red. The stroke is changed to red.
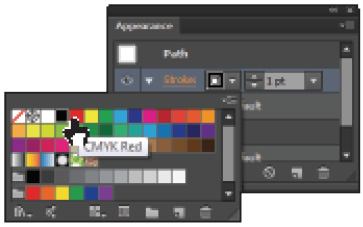
Change colors right in the Appearance panel.
3 Now click the fill color box to the right of Fill, and click the arrow. Choose CMYK Yellow from the Swatches panel.
Adding Effects
In this next section, you will discover how you can apply effects and then update them using the Appearance panel.
Keep in mind that, by using the Appearance panel, you can independently apply effects, such as drop shadows, outer glows, scribble effects and more, to strokes and fills. For example, you can apply the drop shadow effect to the stroke, but not to the fill.
1 Select the Stroke in the Appearance panel, then click the Add New Effect (![]() ) button at the bottom. From the list that appears, choose Stylize > Drop Shadow; the Drop Shadow dialog box appears. Leave the default settings and click OK. A drop shadow appears on the stroke, and Drop Shadow is listed as a property applied to the Stroke in the Appearance panel. Note that you can click to expand the arrow to the left of Stroke or Fill to see individual properties associated with them.
) button at the bottom. From the list that appears, choose Stylize > Drop Shadow; the Drop Shadow dialog box appears. Leave the default settings and click OK. A drop shadow appears on the stroke, and Drop Shadow is listed as a property applied to the Stroke in the Appearance panel. Note that you can click to expand the arrow to the left of Stroke or Fill to see individual properties associated with them.
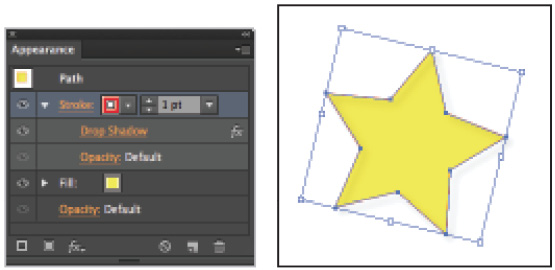
The Property is listed in the Appearance panel.
The star with a drop shadow effect.
2 Double-click the Drop Shadow property listed under Stroke, the Drop Shadow dialog box appears. Use this method to make changes to any effects that are applied to your object, otherwise you might end up applying an additional effect.
3 In the Drop Shadow dialog box change the following settings:
Opacity: Change to 100% by either entering 100 into the Opacity text field, or clicking the arrow buttons to the left of the field.
X Offset: Use the down-arrow to change the offset to a value of 3.
Y Offset: Use the down-arrow to change the offset to a value of 3.
Blur: Change to 1 pt by either entering 1 into the Blur text field, or clicking the arrow buttons to the left of the field.
4 Change the color of the drop shadow by clicking the color box; this displays the Color Picker. The Color Picker provides a color spectrum from which you can visually select colors, or enter color values into the text fields to manually define colors.
5 Click and drag the slider down toward red on the color spectrum, then click a red color in the Color Field. Click OK.
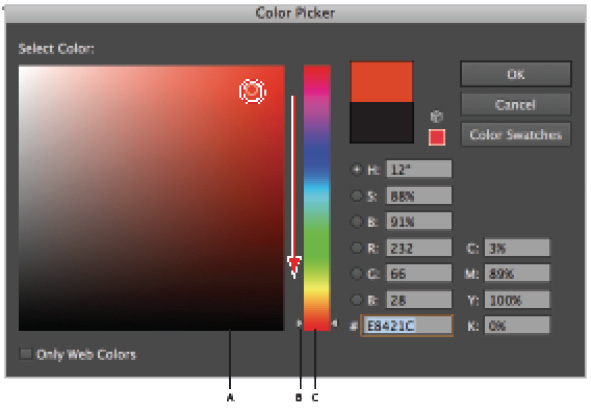
A. Color Field. B. Color slider. C. Color spectrum.
6 Click OK in the Drop Shadow dialog box. The drop shadow has been changed.

Make changes to the drop shadow.
The result.
7 You will not be saving this file, choose File > Close, and choose No (Windows), or Don’t Save (Mac OS) when the Adobe Illustrator warning dialog box appears.
Throughout this lesson, you will be using alternate methods from which you can select color. But, keep in mind the power and ease of use the Appearance panel provides.
Creating a colorful illustration
In this next exercise, you create a colorful illustration. While creating this illustration, you have the opportunity to use features that will speed up your production time, and also offer you creative solutions for color.
1 To begin, you will open the finished file. Choose File > Browse in Bridge and click the Favorites tab (in the upper-left corner). Click Desktop and open the ai02lessons folder.
2 Locate the file named ai0402_done.ai inside the ai02lessons folder, and double-click it to open it in Illustrator CC. An illustration of a retro bus appears.
You are looking at the final illustration that you will create. In this lesson, you will have the opportunity to experiment with fills, strokes, patterns, Live Paint and gradients.
3 You can either choose File > Close, to close this file, or keep it open as a reference.
Using Live Paint
Illustrator provides two methods of painting: you can select a fill, stroke, or both to an object, or you can convert the object(s) to a Live Paint group and assign fills and strokes to the separate edges and faces of paths within. Live Paint is a brilliant solution to painting illustrations with multiple faces that are not necessarily independent shapes that can be easily filled.
1 Choose File > New to create a new file. In the Name text field, type ai0402_work.
2 Choose Print as the New Document Profile.
3 Select Inches from the Units drop-down menu. Leave all other settings at their default and click OK.

Create a new print document.
4 Choose File > Save to save this file. Make sure that you are saving into the ai02lessons folder. Leave ai0402_work in the File name text field and make sure that Illustrator is selected in the Save as type drop-down menu and then click Save. When the Illustrator Options dialog box appears, click OK.
5 Press D to make sure that you are at the default color settings of a black stroke and a white fill.
6 Click and hold the Star tool () to select the Ellipse tool (![]() ). Instead of clicking and dragging to create a shape, you will enter exact values into the shapes dialog box. Click once out on the artboard. The Ellipse dialog box appears. Enter 5 into the Width and Height text fields. Click OK. The circle appears on the artboard.
). Instead of clicking and dragging to create a shape, you will enter exact values into the shapes dialog box. Click once out on the artboard. The Ellipse dialog box appears. Enter 5 into the Width and Height text fields. Click OK. The circle appears on the artboard.
7 Choose the Selection tool, and then press and hold the Alt (Windows) or Option (Mac OS) key and position your cursor over the ellipse. When you see a double cursor, click and drag to clone (copy) the ellipse toward the lower-right by about .25 inch. Exact position is not important.

Press and hold the Alt/Option key to clone the ellipse to the lower-right.
Clone again to the lower-left.
8 Click the original ellipse that you created, press and hold the Alt/Option key, and then drag to the lower-left to clone another ellipse.
For the next step, you will make the fill transparent.
9 Using the Selection tool, click and drag so that you create a marquee area that touches all three ellipses. This selects all the ellipses that the marquee crosses over.
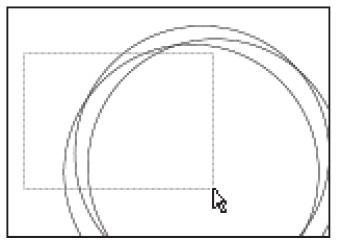
Click and drag with the Selection tool to create a selection of all three ellipses.
10 Click Fill in the Control panel at the top of the workspace and choose None (). This allows you to see all the intersecting faces that have been created. These individual faces are not individual objects that can easily be filled in with the traditional fill and stroke options available in Illustrator. To fill the faces, you will create a new Live Paint object.

Change the fill to None.
Converting the artwork to a Live Paint group
1 Make sure that all three ellipses are still selected and then click and hold the Shape Builder tool (![]() ) in the Tools panel to select the hidden Live Paint Bucket tool.
) in the Tools panel to select the hidden Live Paint Bucket tool.
2 Position the cursor over the selected ellipses, and when you see the message, click to make a Live Paint group, click. The ellipses are converted to a group of faces that can now be easily filled with color.

Use the Live Paint Bucket tool to convert your ellipses to a Live Paint group.
Applying Live Paint to the group
In this next step, you will select colors and apply them to the individual faces in the newly created Live Paint group.
1 If the Swatches panel is not visible, choose Window > Swatches. Click the tab of the panel and drag it out into the workspace to undock it from the panel docking area.
2 Select the color named CMYK Red, and then (with the Live Paint Bucket tool still selected) hover over anyone of the faces in the Live Paint group. Notice that the individual face becomes highlighted. When you have picked a face that you want to fill with red (any one will do) click. The face fills with the red color.

Hover over a face in the Live Paint group and then click.
The result.
You might have noticed the color selection appearing above the cursor. You can use this color selection to navigate through the rest of your colors in the swatches panel.
3 Hover over another face in your Live paint group, but this time press the right-arrow key to navigate to the color to the right of CMYK Red in the Swatches panel (CMYK Yellow), then click to fill the face.
4 For the rest of this lesson, use the colors in the Swatches panel to fill random faces in the Live Paint group. No specific color assignment is necessary.

Fill the faces of the Live Paint group with color.
5 Select File > Save, or press Ctrl+S (Windows) or Command+S (Mac OS) to save this file. Keep it open for the next part of this lesson.
6 Choose Window > Workspace > Reset Essentials to reset the panels.
Adding a symbol to your artwork
Symbols offer you the ability to create artwork that can be used dynamically throughout your illustration. For example, you can create a snowflake and use it over 100 times in the illustration. Every time you use the snowflake, it is referred to as an instance. If you edit the symbol, all instances are updated.
Symbols can also be used to store frequently used artwork, such as logos, or clip art. In this lesson you use an existing symbol to add the retro bus to the illustration.
1 Choose Window > Symbols, the Symbols panel appears. There are only a few symbols included in the Symbols panel by default, but many more that you can access in the library.
2 Click the panel menu in the upper-right of the Symbols panel and select Open Symbol Library > Retro. A separate panel appears with retro symbols included in it.

Select Open Symbol Library from the panel menu.
The Retro symbols.
3 Click the Mini Bus symbol and drag it to the artboard.
 Easily navigate through all the Symbol libraries by clicking the arrow buttons at the bottom of an open Symbol Library panel.
4 Using the Selection tool (![]() ), reposition the mini bus so that it is in the center of the ellipses.
), reposition the mini bus so that it is in the center of the ellipses.
5 With the bus still selected, double-click the Scale tool (![]() ) in the Tools panel. The Scale dialog box appears.
) in the Tools panel. The Scale dialog box appears.
6 Type 175 in the Uniform Scale text field, and click OK. The bus is scaled to 175% of the original size.

Use the Scale tool to enter an exact scale amount.
 If you want to visually resize the bus, you can position your cursor over any corner point in the bounding box. Press and hold the Shift key and drag inward or outward to scale down or up proportionally.
7 Press Ctrl+S (Windows) or Command+S (Mac OS) to save this file; keep it open for the next part of this lesson.
Expanding the symbol
As mentioned earlier, using symbols as clip art is an easy way to access lots of artwork, but perhaps you want to edit the symbol without affecting the original stored version. In this next lesson, you expand the mini bus so that you can recolor some of the artwork.
1 With the bus still selected, choose Object > Expand. The Expand dialog box appears.
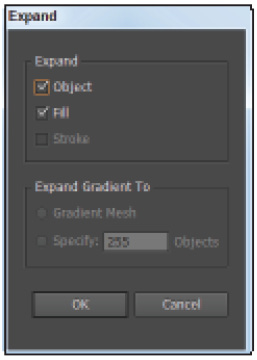
Expanding a symbol.
2 Leave the options in the Expand dialog box the same and click OK. Most of the vector paths are now accessible and ready for you to edit. This has also removed any link to the original symbol.
Saving swatches
The Swatches panel allows you to store colors for multiple uses in your document. You can create colors using several different methods in Illustrator, and, by adding them to the Swatches panel, you can store them for frequent and consistent use. Storing a swatch of a color that you plan to reuse guarantees that the color is exactly the same each time it is used. Let’s create a new swatch for your document.
1 Click the artboard (the white area surrounding the page) to deselect any objects in your document. You can also use the keyboard shortcut, Shift+Ctrl+A (Windows) or Shift+Command+A (Mac OS).
2 Double-click the Fill color at the bottom of the Tools panel.
3 When the Color Picker appears, type the values of C:0 M:70 Y:100 K:0. Click OK.
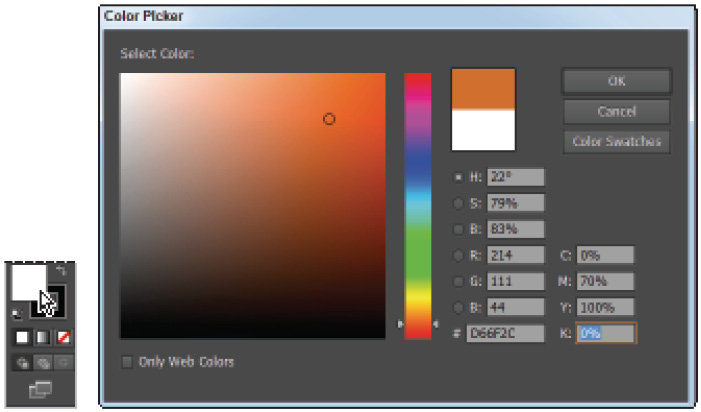
Click Fill.
Enter values into the Color Picker.
4 If the Swatches panel is not open, choose Window > Swatches now, then click the New Swatch icon (![]() ) at the bottom of the panel.
) at the bottom of the panel.
5 In the Swatch Name text field, type Hippie Orange, then check the box to the left of Global and click OK. The color has been added to the Swatches panel, and has a white triangle in the lower-right side of the swatch indicating that this color has been defined as Global.

Click the New Swatch icon.
Name the Swatch and select Global.
What is a Global Color?
Taking advantage of global colors allows you to apply a color to multiple fills and strokes, and make updates to the colors dynamically. This is extremely useful when you want to tweak your color, or perhaps replace it with an entirely different set of color values.
In this part of the lesson, you will apply the new Hippie Orange to several shapes in the bus, and then update them.
1 Click and hold the Direct Selection tool (![]() ) and select the Group Selection tool.
) and select the Group Selection tool.
2 Select any shape on the bus and then click the newly added Hippie Orange swatch.
3 Assign the Hippie Orange color to at least three other shapes. Select any shapes in the mini bus art except for the purple windshield, which you will use in the next exercise.
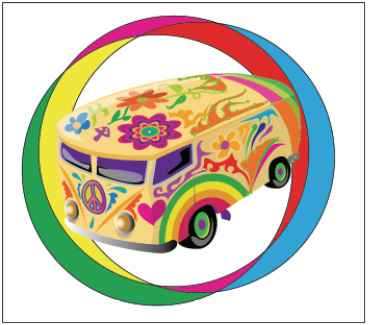
Select at least four shapes to apply the new global color to.
4 Choose Select > Deselect, or use the keyboard shortcut Shift+Ctrl+A (Windows) or Shift+Command+A (Mac OS) to deselect everything.
5 Double-click the Hippie Orange swatch in the Swatches panel; the Swatch Options dialog box appears.
6 Type 50 into the M (Magenta) text field, and click OK. All the instances of Hippie Orange have been changed.
Selecting the Same color
Editing colors when they have been defined as global is fairly simple, but what if you already used a non-global swatch in multiple instances in your illustration? For these situations you can take advantage of selecting the Same fill, stroke or both.
1 Using the Group Selection tool (![]() ) select the large purple windshield.
) select the large purple windshield.
2 Choose Select > Same > Fill Color. Any additional objects using that same fill are selected.
To make editing colors easier in the future, you should save this color and convert it to global.
3 With the objects still selected, click the New Swatch button at the bottom of the Swatches panel. The New Swatch dialog box appears.
4 Type Hippie Purple into the Swatch Name text field and check Global, then click OK.
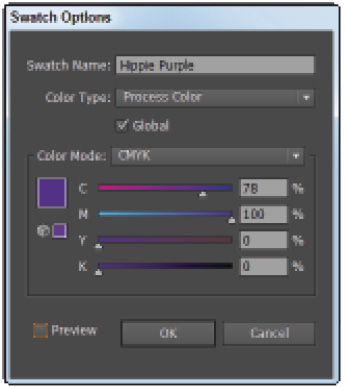
Collect like colors and convert them to global.
Saving a set of colors as a group
When working in Illustrator, you’ll often end up with quite a few swatches in your Swatches panel. As you experiment with colors and make adjustments, the number of swatches can increase to a point that makes it difficult to find a particular color. Fortunately, Illustrator simplifies the process of locating specific swatches by allowing you to create color groups to organize swatches into logical categories. Let’s organize the swatches in the Swatches panel into color groups.
1 In the Swatches panel, press and hold the Ctrl key (Windows) or the Command key (Mac OS) and select the Hippie Orange, Hippie Purple, CMYK Green, and CMYK Cyan color swatches.
2 Click the New Color Group button (![]() ) at the bottom of the panel. The New Color Group dialog box appears.
) at the bottom of the panel. The New Color Group dialog box appears.
3 In the New Color Group dialog box, type Retro Colors in the Name text field. Choose the Selected Swatches option button, and then click OK. The colors are collected in a group at the bottom of the Swatches panel, making it easy to locate them.

Select five colors, then click the New Color Group button.
Save them to a color group.
Creating a color group from selected colors
You can also extract colors from existing artwork to create a color group.
1 Choose the Selection tool (![]() ) and then click the ellipses you created earlier.
) and then click the ellipses you created earlier.
2 Click the New Color Group button at the bottom of the Swatches panel; the New Color Group dialog box appears.
3 Type Base Colors into the Name text field, then select the option button to the left of Selected Artwork and make sure that both options, Convert Process to Global and Include Swatches for Tints, are selected. Click OK, the color group is added to your Swatches panel.
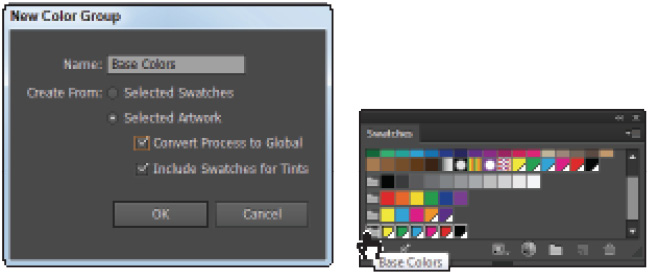
Create a color group from colors already used.
The Color group is added to the Swatches panel.
4 Choose File > Save to save your work. Keep the file open.
 You can add a color to an existing color group by selecting the color in the Swatches panel, then dragging it to the folder to the left of the color group.
Using the Color panel
Another method for creating or editing colors is the Color panel. The Color panel displays color sliders depending upon the color model you choose to work in.
1 Open the Color panel by clicking the Color button (![]() ) in the dock on the right side of the workspace, or choose Window > Color.
) in the dock on the right side of the workspace, or choose Window > Color.
 As a default, the Color panel comes up displaying the default color model. If you want to switch from CMYK, RGB, HSB (Hue, Saturation, and Brightness), or Grayscale modes, press and hold the Shift key and click the color ramp at the bottom of the Colors panel. This cycles you through the available color models.
2 Make sure that you have the CMYK values displaying, if not, choose CMYK from the Color panel menu. From the panel menu in the upper-right, choose Show Options to expand the panel.
3 Using the Group Selection tool, click an instance where you used the Hippie Orange color to notice that only one color slider (named Hippie Orange) is displayed. This is another benefit of using a global color.
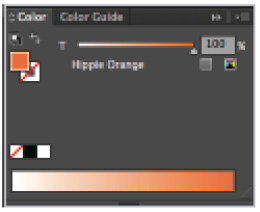
You can easily apply tints of a global color.
4 Click the slider and change the value to 50%. By defining this color as global, you now have the ability to use it multiple times at various shades.
5 Click a color (any) that was not defined as global to notice that all four CMYK color sliders appear in the Color panel.
6 Using the color slider choose any color and drag its slider to the left or right to change the color value.
7 Now, press and hold the Shift key and drag the same slider. Notice that multiple sliders now move simultaneously. By pressing and holding the Shift key, you can create tints of a CMYK color that was not defined as global.
8 Choose File > Save. Then choose File > Close to save the illustration.
Adding Pantone (Spot) Colors
In the next example, you will open a completed color logo and convert it to be used as a logo on a business card. When creating artwork that will be printed in multiple locations on various media, it is important to use spot colors.
1 Choose File > Browse in Bridge or click the Go to Bridge button (![]() ) in the application bar.
) in the application bar.
2 Navigate to the ai02lessons folder within Bridge and open the file ai0403.ai by double-clicking it.
3 After the file opens in Illustrator, choose File > Save As. In the Save As dialog box, navigate to the ai02lessons folder and type ai0403_work in the File name text field. Choose Adobe Illustrator (ai) from the Save as type drop-down menu and choose Save. Click OK when the Illustrator Options dialog box appears.
4 Choose Select > All and then press D. By pressing D, you change all selected objects to the default stroke and fill of black-and-white.
Adding Pantone colors
The PANTONE COLOR MATCHING SYSTEM®, also referred to as PMS colors, is a largely standardized color reproduction system. By standardizing the colors, different manufacturers in different locations can all refer to the Pantone system to make sure colors match without direct contact with one another. Adobe Illustrator groups Pantone colors into a color library called Color Books.
Pantone colors are numbered, making it easy to identify a frequently used color, whether for corporate identity or for ease of use, when searching for a specific color. In this lesson, you add several Pantone colors to the document.
1 If the Swatches panel is not visible, choose Window > Swatches.
2 Click the Swatches panel menu and choose Open Swatch Library > Color Books > Pantone+ Solid Coated. The Pantone+ Solid Coated panel appears.
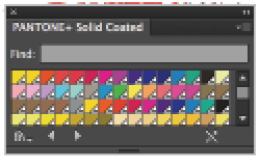
Opening a Pantone color book.
 Choose Solid coated for illustrations that will be printed as solid ink colors (not combinations of CMYK color) on coated paper. Choose Pantone+ Solid Uncoated for uncoated paper.
3 In the Pantone+ Solid Coated panel, locate the Find field, which is a text field that you can input a Pantone number into.
Next, you will identify color values and their associated numbers easier by changing the view of the Pantone Solid Coated panel.
4 Click the Pantone Solid Coated panel menu and choose Small List View. The Pantone colors are now listed with descriptive text.

The Pantone colors in a list with the Find Field visible.
5 Type 3005 into the Find Field. Pantone 3005 is highlighted in the list.
6 Select the Group Selection tool (![]() ), then click a shape on the artboard, then click the highlighted Pantone 3005 color in the list. The shape is filled with the Pantone color, and the Pantone swatch is automatically added to the Swatches panel.
), then click a shape on the artboard, then click the highlighted Pantone 3005 color in the list. The shape is filled with the Pantone color, and the Pantone swatch is automatically added to the Swatches panel.
7 If the Swatches panel is not visible, choose Window > Swatches. Note that the Pantone 3005 swatch has been added, and it not only has the white triangle identifying it as a global color, but also has a dot, indicating that this color is a spot color. It is made up of one ink color, not a combination of multiple inks.
8 Choose Select > Deselect all, or use the keyboard shortcut Shift+Ctrl+A (Windows) or Shift+Command+A (Mac OS) to make sure nothing is selected.
9 Type 173 into the Find field to select an orange color.
 Depending on the numerical value you select, you might have to press the Space bar at the end of the value to see only the three digit PMS color.
10 Click Pantone 173 C in the panel to add the color to your swatches panel without using it. This technique allows you to set up your entire color palette before you start to work.
11 Select any object in the illustration and then click Fill in the Control panel. Select the Pantone 173 color from the swatch panel that appears.
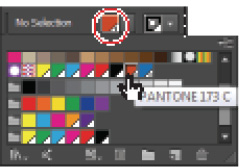
Assign colors using the Control panel.
12 Choose Window > Color to open the Color panel. Using the tint slider, apply various shades of the Pantone color throughout your Illustration. Repeat this procedure with the Pantone 300 color.
13 Choose File > Save, then File > Close. Keep in mind that if you used spot colors, they are automatically imported and added to the Swatches panel in InDesign when you use the File > Place command.
Taking advantage of the new and improved Kuler panel
If you like using color in your illustrations, you’ll love being able to save combinations of colors as themes. You can do this by accessing the Kuler website directly from Adobe Illustrator.
In this part of the lesson, you create a new document to take advantage of some existing color themes from the Kuler website.
1 Choose File > New and select Devices for the Profile. Note that you can select the device you are building graphics for in the Size drop-down menu. You can leave it set to iPad and click OK.
2 If you do not see the Kuler panel, choose Window > Kuler now. Note that it will most likely be empty, unless you have previously used the Kuler website with an Adobe log in.
3 Click the Launch Kuler website button (); kuler.adobe.com launches.

Select the Launch Kuler website button.
4 Sign in using your Adobe ID in the upper-right corner. Once you are signed in you can save, edit and create color themes.
5 Select Most Popular in the column on the left and the most popular themes populate the column to the right.

Select the Most popular themes.
 Keep in mind that you can use the Search text field to search existing color themes as well. Themes can be found by creator, keyword, and title.
6 Select any one of the Most Popular themes and note that you now have the option Add to Favorites, Download the theme as an Adobe Swatch Exchange file, or Make changes to this theme and view color values.
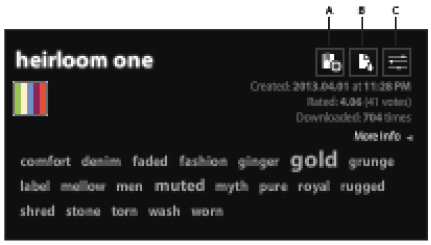
A. Add to Favorites. B. Download the theme as an Adobe Swatch Exchange file. C. Make changes to this theme and view color values.
7 For this lesson, choose Make changes to this theme and view color values. A window appears where you can select each color and edit its values. For this lesson, you will make a simple change to one of your color values. You can experiment more with the Kuler website on your own after you have a better idea of how to use it.
8 Select the any color, and then use the color sliders beneath it to change the value.
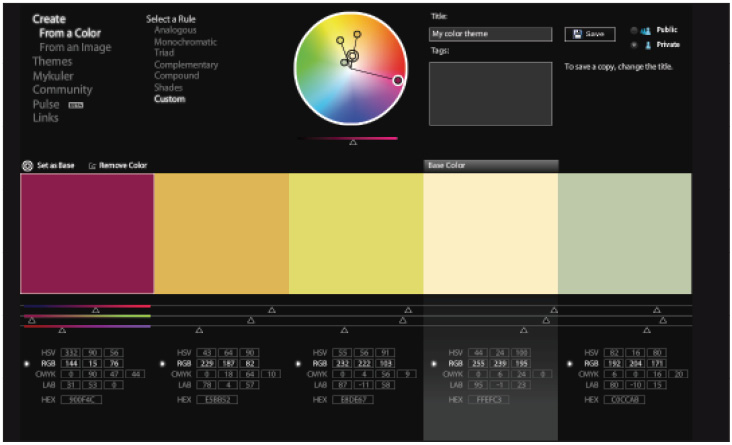
Change the color values of any one of the color swatches.
9 Add a name to the Title text field. In this example My color theme was used as the name, but you can name your color theme anything you would like. Click Save. This color theme has been saved under your account. You will now return to Adobe Illustrator to access it.
10 Return to Adobe Illustrator and locate the Kuler panel.
11 Click the Refresh () button; your color theme appears.

Click Refresh to see your own color themes in Illustrator.
12 Select my color theme in the Kuler panel and then select the Panel menu in the upper-right corner and choose Add to Swatches. You can now use your color theme in your own graphics. This was just an introduction to using Kuler. There are many other capabilities that you will want to explore on your own.
Self study
In this lesson, you were introduced to several great new features of Adobe Illustrator CC, as well as some features that aren’t so new, but deserve further investigation nonetheless.
The Appearance panel is a highly underused feature of Adobe Illustrator; practice on your own by exploring the capabilities harnessed in it. Start by drawing a line with the Line Segment tool then expanding the weight of the stroke. Add another stroke to it from within the Appearance panel, setting it to a different weight and color; you’ll see that you can apply more than one stroke to a single object.
Explore Live Paint and Live Color in more detail. See Illustrator Lesson 3, “Working with the Drawing Tools,” for information about converting a picture into a vector-based piece of art using the Live Trace feature and then coloring it using Live Paint. Furthermore, you can experiment with Color Groups and the Recolor Artwork dialog box to change how your artwork is colorized in Illustrator.
Launch the Kuler website from the Kuler panel and experiment with creating your own color themes or editing existing themes.
Review
Questions
1 What does the appearance of a dot in the lower-right area of a swatch indicate?
2 In Adobe Illustrator CC, where would you look to identify the fill and stroke properties of a selected object?
3 True or false: You can share swatches that you created in Adobe Illustrator CC with other Adobe CC programs.
4 What is a global color?
5 What is the benefit of using Live Paint?
Answers
1 If a swatch has a dot in the lower-right corner, it is defined as a spot color.
2 You can locate the attributes of a selected object in the Appearance panel.
3 True. You can choose the Save Swatch Library as ASE command from the panel menu of the Swatches panel. This saves all your swatches as a separate Swatch Library file (.ase) that can be imported into other CC applications.
4 A global color is one that is dynamically linked to all instances in the illustration. Use a global color if you want color updates to be less time-consuming.
5 The Live Paint feature allows you to individually paint faces of an illustration without defining new shapes.
