
InDesign Lesson 2: Working Smarter with Master Pages

Master pages serve as the foundation for InDesign documents that are more than a few pages in length. You can use master pages to maintain consistency throughout your document and work more efficiently. If you plan to create only short documents, such as one-page sales sheets or two-page flyers, you can skip this lesson and go to InDesign Lesson 3, “Working with and Formatting Text.”
What you’ll learn in this lesson:
- • Creating and saving custom page sizes
- • Creating page guides
- • Adding sections
- • Using automatic page numbering
- • Creating master pages and applying them to document pages
Starting up
Before starting, make sure your tools and panels are consistent by resetting your preferences. See “Resetting the InDesign workspace and preferences” in the Starting up section of this book.
In this lesson, will work with several files from the id02lessons folder. Make sure that you have copied the CClessons folder onto your hard drive from www.digitalclassroombooks.com/CC/DesignTools. See “Loading lesson files” in the Starting up section of this book. This lesson might be easier to follow if the id02lessons folder is on your desktop.
The project
In this lesson, you will create a magazine. You will use master pages to create layout templates for each section in the magazine, including running headers, which run across the top of the page, and running footers, which run across the bottom of the page. Master pages give the publication a consistent look and feel and save you time and effort by alleviating the need for you to create this content on every page manually.
This lesson provides a foundation in creating InDesign documents, and is focused on a print-layout example.
Planning your document
Before you start creating a print document using InDesign, you need some important information: the final size of the document after it is finished, also known as the trim size; how the pages will be held together, also known as the binding; and whether the document has images or graphics that extend to the edge of the document—this is known as bleed. Once you have this information, you can create the templates for your document pages. Digital documents have different considerations, such as the screen size and resolution.
 When you create simple designs or small documents for one-time use, you can work directly on the document pages, and not create master pages. Master pages are more suitable for longer documents or documents that use a repeating design on several pages.
Creating custom page sizes
For this lesson, you will create the print version of a custom-sized magazine with colors that extend to the edge of the page. You’ll start by creating a new document and saving the custom size as a preset, which you can use to create subsequent issues of the magazine.
Creating a new custom-sized document
This document will be measured using inches, so you’ll start by setting your units of measurement to inches, and then you’ll create the custom document size.
1 With no documents open, choose Edit > Preferences > Units & Increments (Windows), or InDesign > Preferences > Units & Increments (Mac OS). When the Preferences dialog box appears, choose Inches from the Vertical and Horizontal drop-down menus in the Ruler Units section. Click OK.
Changing the unit of measurement when no documents are open causes InDesign to use these settings for all new documents you create.
 When working in a document, you can switch the unit of measurement for that document by right-clicking (Windows) or Control+clicking (Mac OS) the vertical or horizontal ruler.
2 Choose File > New > Document, or press Ctrl+N (Windows) or Command+N (Mac OS), to open the New Document dialog box, which is the first step in creating a new InDesign document.
3 In the New Document dialog box, confirm that the Facing Pages check box is selected and that Print is chosen from the Intent drop-down menu. In the Page Size section, type 8.125 in for the Width and 10.625 in for the Height.

Setting the size of the new document.
4 In the Margins section, make sure that the Make all settings the same button (![]() ) is not selected. Type .5 in the Top, Inside, and Outside margin text fields, and .75 in the Bottom text field.
) is not selected. Type .5 in the Top, Inside, and Outside margin text fields, and .75 in the Bottom text field.
5 In the Bleed and Slug section, make sure that the Make all settings the same button (![]() ) is selected, and then type .125 in any of the four bleed fields, then press the tab key on the keyboard to populate all of the fields with the same value. Keep the Slug value set at 0.
) is selected, and then type .125 in any of the four bleed fields, then press the tab key on the keyboard to populate all of the fields with the same value. Keep the Slug value set at 0.
 Bleed area is located outside the edges of a document. By printing an image or color outside the page edge, imperfections in the trimming process go unnoticed.
Slug is additional area beyond the bleed where production notes such as a job number or printing date can be placed and then trimmed off before final delivery of the document.
6 Click the Save Document Presets button ( ![]() ) at the top of the New Document dialog box. This saves the custom settings you just entered.
) at the top of the New Document dialog box. This saves the custom settings you just entered.
Type Newsletter in the Save Preset As text field, then click OK. In the New Document dialog box, the Newsletter preset is listed in the preset drop-down menu. This preset is available the next time you need to create a document with similar specifications.
Click OK to create your new document using the settings in the New Document dialog box. A new, untitled document is created with the specifications you entered.
7 Choose File > Save As. In the Save As dialog box, navigate to the id02lessons folder and type id02_work.indd in the File name (Windows) or Save As (Mac OS) text field. Click Save.
It’s a good idea to save your work often, even though InDesign includes an automatic recovery feature that helps recover the document if your computer crashes, or InDesign quits unexpectedly.
You formatted some items with styles in InDesign Lesson 1, “InDesign CC Essential Skills.” Here you will also work with styles, but you will import them from another InDesign document. In InDesign Lesson 4, “Using Styles to Save Time,” you will discover how to create and define new styles.
8 Choose Window > Workspace > Advanced or choose Advanced from the Workspace Switcher in the Application bar at the top of the InDesign interface. Next choose Window > Workspace > Reset Advanced so that all the panels for this workspace are displayed.
9 Click the Paragraph Styles button (![]() ) in the panel docking area in the right side of the workspace to open the Paragraph Styles panel. From the Paragraph Styles panel menu (
) in the panel docking area in the right side of the workspace to open the Paragraph Styles panel. From the Paragraph Styles panel menu (![]() ) in the upper-right corner, choose Load All Text Styles. The Open a File dialog box appears. In the Open a File dialog box, navigate to the id02lessons folder and select the file named id02_styles.indd. Click Open. The Load Styles dialog box appears.
) in the upper-right corner, choose Load All Text Styles. The Open a File dialog box appears. In the Open a File dialog box, navigate to the id02lessons folder and select the file named id02_styles.indd. Click Open. The Load Styles dialog box appears.

Loading styles lets you import and use styles created in another document.
10 In the Load Styles dialog box, click the Check All button and then click OK. All the paragraph and character styles from this publication are imported into your document.
11 Choose File > Save to save your work. Keep this file open for the next part of the lesson.
Creating and formatting master pages
Master pages serve as a template upon which all document pages are created. They provide the framework for the design of all pages in your document. Different master pages can be created for various sections of your publication, such as a magazine or a catalog. By creating master pages for each section, you can maintain a consistent appearance for all pages in these sections.
The document you are creating for this lesson currently contains one document page and one master page. You will add more document pages and more master pages. You will add master pages for the various sections of the magazine. Each of these sections has a different layout, with a different number of columns, margins, and headers. By creating the master pages before working on the document, you can quickly create pages with a consistent design.
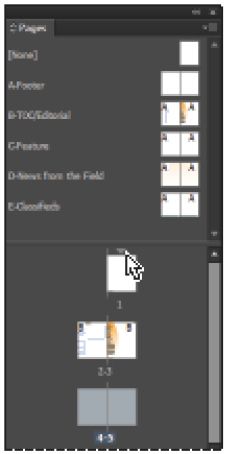
1 Click the Pages button (![]() ) in the panel docking area, or press the keyboard shortcut Ctrl+F12 (Windows) or Command+F12 (Mac OS), to open the Pages panel. Double-click the A-Master label in the top portion of the Pages panel.
) in the panel docking area, or press the keyboard shortcut Ctrl+F12 (Windows) or Command+F12 (Mac OS), to open the Pages panel. Double-click the A-Master label in the top portion of the Pages panel.
The A-Master page is displayed and centered within your workspace. Keep the A-Master page selected in the Pages panel. Every new InDesign document that you create contains one master page by default called A-Master. You’ll use this as your first master page.

Double-clicking a page label in the Pages panel centers the page in the workspace.
2 In the Pages panel, click the panel menu button (![]() ) and select Master Options for A-Master. Alternatively, you can press and hold the Alt (Windows) or Option (Mac OS) key and click once on the A-Master text (not the Page icon) in the Pages panel. The Master Options dialog box appears. Next you will rename this master page to reflect the role of this master page in the layout.
) and select Master Options for A-Master. Alternatively, you can press and hold the Alt (Windows) or Option (Mac OS) key and click once on the A-Master text (not the Page icon) in the Pages panel. The Master Options dialog box appears. Next you will rename this master page to reflect the role of this master page in the layout.
3 In the Name text field of the Master Options dialog box, type Footer. Leave all other settings unchanged, and click OK. This changes the name from A-Master to A-Footer. You will now add a footer that runs across the bottom of this master page, and then apply this master page to document pages.

Change the name of a master page using the Master Options dialog box.
Formatting master pages
For this publication, the A-Footer page will also serve as the foundation for the other master pages. Although master pages can be used independently of one another, for this publication all items appearing on A-Footer will also appear on all other master pages. This allows you to quickly create a consistent footer across every page. The other master pages will have unique header information identifying each section of the magazine.
Adding automatic page numbers
You can have InDesign automatically apply page numbers, and using master pages makes it easy to have them applied in the same location on every page.
1 In the Pages panel, double-click the Left Page icon for the A-Footer master page. This fits the left side of your A-Footer master page in the window. Before you add a page number, you’ll create a guide to help you place it in the ideal location on your page.
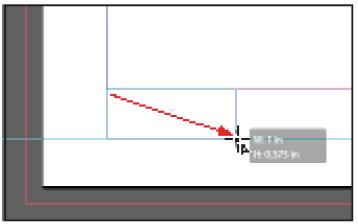
2 Using the Selection tool (![]() ), position the cursor onto the horizontal ruler running across the top of the page. Ctrl+click (Windows) or Command+click (Mac OS) and drag down from the ruler to create a horizontal ruler guide. Continue dragging until the ruler guide is positioned at 10.25 inches. You can determine the location of the guide in the Control panel, and by using the live transformation values that appear as you drag the guide. The position updates as you drag the guide.
), position the cursor onto the horizontal ruler running across the top of the page. Ctrl+click (Windows) or Command+click (Mac OS) and drag down from the ruler to create a horizontal ruler guide. Continue dragging until the ruler guide is positioned at 10.25 inches. You can determine the location of the guide in the Control panel, and by using the live transformation values that appear as you drag the guide. The position updates as you drag the guide.
Pressing and holding the Ctrl or Command key while dragging causes the guide to go across the entire spread, rather than only one page.
 If the page rulers aren’t visible, choose View > Show Rulers or press Ctrl+R (Windows) or Command+R (Mac OS).
3 Select the Type tool (![]() ) from the Tools panel. Position the Type tool so the upper-left bounds of the tool are positioned at the bottom-left corner of the page margin guides, where the left margin guide and the bottom margin guide meet. This is just above the ruler guide you created in the previous step. Click and drag down and to the right, creating a text frame that extends from the bottom margin guide down to the guide you created in the previous step and to the right to the 1 inch position. You can see the position of the frame being created in the Control panel and in the horizontal ruler located at the top of the page.
) from the Tools panel. Position the Type tool so the upper-left bounds of the tool are positioned at the bottom-left corner of the page margin guides, where the left margin guide and the bottom margin guide meet. This is just above the ruler guide you created in the previous step. Click and drag down and to the right, creating a text frame that extends from the bottom margin guide down to the guide you created in the previous step and to the right to the 1 inch position. You can see the position of the frame being created in the Control panel and in the horizontal ruler located at the top of the page.
Creating a frame for the automatic page number on the master page.
4 Choose Type > Insert Special Character > Markers > Current Page Number to automatically have InDesign enter the page number on all pages to which this master page is applied. If you prefer to use keyboard commands, you can press Shift+Alt+Ctrl+N (Windows) or Shift+Option+Command+N (Mac OS) to have an automatic page number inserted. The letter A is inserted into the text frame and acts as a placeholder for the actual page number. The placeholder displays the master page letter when viewed on a master page, and the actual page number when viewed on a document page.
 The Insert Special Characters menu can also be accessed by right-clicking (Windows) or Control+clicking (Mac OS) when the cursor is within a text frame.
5 Using the Type tool, select the letter A that you inserted into the text frame so you can customize the appearance of the page number. In the Character Formatting Controls portion of the Control panel, choose Myriad Pro and Bold from the font and style drop-down menus, and choose 12pt from the font size drop-down menu. Continuing to work in the Control panel, click the Paragraph Formatting Controls button (![]() ) and then click the Align away from Spine button (
) and then click the Align away from Spine button (![]() ). This aligns the text to the opposite edge of the binding of the publication.
). This aligns the text to the opposite edge of the binding of the publication.
6 Choose Object > Text Frame Options or press Ctrl+B (Windows) or Command+B (Mac OS). The Text Frame Options dialog box appears. In the General tab, locate the Vertical Justification section and choose Bottom from the Align drop-down menu. Click OK. The baseline of the text aligns to the bottom of the text frame.
Now you will place a copy of the automatic page number on the opposite page.

Using the Text Frame Options dialog box to vertically align text to the bottom of the frame.
7 Choose the Selection tool and make certain the text frame containing the footer text frame is selected. Choose Edit > Copy to copy the frame.
8 Double-click the page to the right of the A-Footer master in the Pages panel. Choose Edit > Paste to place the copied text frame into the page on the right.
9 Use the Selection tool to reposition the text frame so that the top of the frame is aligned to the bottom margin, and the right edge of the frame aligns to the right margin.
Notice that the page number automatically changes to align to the right side of the text frame because you selected the Align away from Spine option.
Using text variables
Use text variables to insert dynamic text that changes contextually. InDesign includes several pre-defined text variables including Chapter Number, File Name, Output Date, and Running Header. You can also edit any of these variables, or create new variables. This makes it easy to consistently apply text across a document, and easily update the text in one place and have all other occurrences of the text updated in a single step.
Defining new text variables
You will create variable text for your magazine title and page footers.
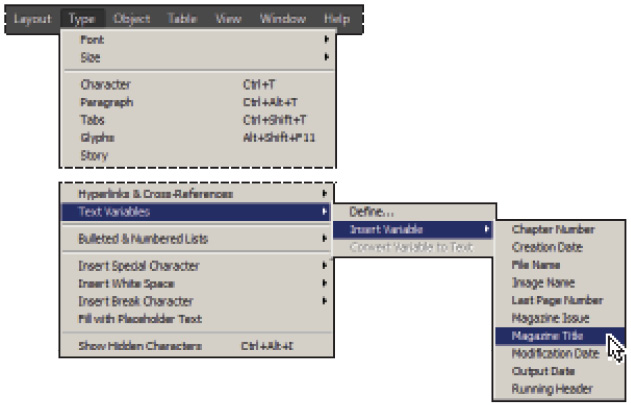
1 Choose Type > Text Variables > Define. The Text Variables dialog box appears.
2 Select Running Header from the Text Variables section of the dialog box and click the New button on the right side of the dialog box. The New Text Variable dialog box appears.

Creating a new text variable.
3 In the New Text Variable dialog box, type Magazine Title in the Name text field. Leave the Type text field as Running Header (Paragraph Style). From the Style drop-down menu, choose the MagTitle paragraph style. In the Options section, select the Change Case check box, then select the Title Case radio button below it. Click OK.
A new Magazine Title variable appears in the Text Variables dialog box.

Defining the settings for text variables.
4 Repeat steps 1 and 2 to create another Running Header text variable. Name this text variable Magazine Issue and select the MagIssue paragraph style from the Style drop-down menu. All the other settings should match the settings used in step 3. Click OK and note that the variables for Magazine Title and Magazine Issue are now available in the Text Variables dialog box. Click Done to save these new variables, which you will use in the next part of this lesson.
Creating page footers
In the previous steps, you created a Running Header text variable. Even though it is called a Running Header variable, it can be used anywhere on the page. Now you will use these variables to create the footers.
1 In the Pages panel, double-click the left page icon of the A-Footer master page.
2 Select the Type tool (![]() ) from the Tools panel. Position the cursor at the bottom-right corner of the page, where the bottom and right margin guides meet. Click and drag down and to the left until the bottom of the frame you are creating reaches the bottom ruler guide and the left edge of the frame is approximately at the center of the page. A guide appears once the cursor has reached the center of the page.
) from the Tools panel. Position the cursor at the bottom-right corner of the page, where the bottom and right margin guides meet. Click and drag down and to the left until the bottom of the frame you are creating reaches the bottom ruler guide and the left edge of the frame is approximately at the center of the page. A guide appears once the cursor has reached the center of the page.

Creating a text frame for the magazine title.
3 In the Control panel, click the Character Formatting Controls button (![]() ) and set the font to Minion Pro Italic, the size to 12 pt, and the leading (
) and set the font to Minion Pro Italic, the size to 12 pt, and the leading (![]() ) to Auto. Click the Paragraph Formatting Controls button (
) to Auto. Click the Paragraph Formatting Controls button (![]() ) and click the Align toward Spine button (
) and click the Align toward Spine button (![]() ).
).
4 Choose Type > Text Variables > Insert Variable > Magazine Title. The variable text <magazine Title> is placed into the frame. Press the spacebar to separate this variable from the next variable that you will enter.
Inserting the Magazine Title variable text.
5 In the Control panel, click the Character Formatting Controls button and change the font to Minion Pro Regular. Choose Type > Text Variables > Insert Variable > Magazine Issue. The variable text <magazine Issue> is placed into the frame.
6 Choose the Selection tool (![]() ) from the Tools panel and make sure the text frame that you drew in Step 2 is selected. Choose Object > Text Frame Options. In the Text Frame Options dialog box, select Bottom from the Align drop-down menu located in the Vertical Justification section in the General Tab. This causes the text to align to the bottom of the text frame. Click OK. You will now duplicate this box, placing a copy of it on the adjacent page.
) from the Tools panel and make sure the text frame that you drew in Step 2 is selected. Choose Object > Text Frame Options. In the Text Frame Options dialog box, select Bottom from the Align drop-down menu located in the Vertical Justification section in the General Tab. This causes the text to align to the bottom of the text frame. Click OK. You will now duplicate this box, placing a copy of it on the adjacent page.
7 Continuing to use the Selection tool, press and hold the Alt key (Windows) or Option key (Mac OS). While holding this key, click and drag the box you created to the page on the right side of the layout. The box is duplicated. Pressing and holding the Alt or Option key duplicates objects as you move them.
 As you are dragging an object such as the text frame in step 7, you can press the Shift key. This constrains the movement of the object horizontally, ensuring that the original and duplicate objects are aligned. The Shift key can also be used to constrain the movement of an object vertically, maintaining the left-right position on the page.
8 Position the duplicate frame so that the left edge aligns with the left margin guide, and the bottom of the duplicate frame remains aligned to the ruler guide you created.

Position the duplicate text frame along the ruler guide, aligning the left edge with the left margin guide.
9 Double-click in the duplicated text frame to switch to the Type tool and place the cursor in the text frame. Press Ctrl+A (Windows) or Command+A (Mac OS) to select the type, and then press the Delete key.
10 Continuing to work in the same text frame, type DigitalClassroom.com.
11 Choose File > Save to save your work.
Basing master pages on other master pages
You can create additional master pages, and these pages can use the same formatting and layout that you’ve already created for the A-Footer master page. In the next exercise, you’ll import master pages that have already been created in another document. You’ll then apply the A-Footer master page to these master pages to create a consistent layout and appearance.
 To create your own master pages, choose the New Master command from the Pages panel menu (
![]() ).
).
1 Open the Pages panel by clicking the Pages button (![]() ) in the panel dock. In the Pages panel, click the panel menu button (
) in the panel dock. In the Pages panel, click the panel menu button (![]() ) and choose Master Pages > Load Master Pages. The Open a File dialog box appears.
) and choose Master Pages > Load Master Pages. The Open a File dialog box appears.
2 In the Open a File dialog box, navigate to the id02lessons folder and select the file id02_styles.indd. Click Open. Four new master pages are added to your document and are displayed in the Master Pages section of the Pages panel. If necessary, click and drag downward on the horizontal line separating the master pages from the document pages in the Pages panel. These master pages correspond to the various sections of the magazine. Next, you’ll apply the A-Footer master page you created earlier to these new master pages so they have a consistent appearance.

Click and drag downward on the line separating the master pages from the document pages to display the newly added master pages.
3 Double-click the name B-TOC/Editorial master page in the Pages panel. By clicking the name instead of the icon, the entire spread is displayed.
4 In the Pages panel menu, choose Master Options for B-TOC/Editorial. You can also access the Master Options by pressing and holding the Alt (Windows) or Option (Mac OS) key while clicking the name of the master page. The Master Options dialog box is displayed.
5 In the Master Options dialog box, click the Based on Master drop-down menu and choose A-Footer, then click OK.
Notice that the B-TOC/Editorial master page now includes the footer you created. In the Pages panel, the page icons for B-TOC/Editorial display the letter A, indicating that these master pages are based on the master page A you created.

Base the page on the A-Footer master page.
The A indicates that this master page is based on master page A.
6 In the Pages panel, click and drag the name A-Footer onto the name C-Feature in the master page section. This applies the formatting found on Master Page A to the destination page. By dragging the pages using their name, all pages in the spread are affected.
7 Drag and drop the A-Footer master page on top of master pages D and E.
Overriding master page items
When you apply a master page to another page, the items on the master page are locked and cannot be accidentally modified on the page to which they have been applied.
In the next exercise, you’ll unlock some of the master page items that have been applied to another page and then selectively delete items from the master page that might not be needed on certain document pages.
1 In the Pages panel, double-click the left side of the B-TOC/Editorial master page. Notice that the text frames’ edges surrounding the footer that you created appear as dotted lines. This indicates that these items are part of a master page that has been applied to this page and that they are locked and cannot be edited.
2 Choose the Selection tool (![]() ) from the Tools panel. Place the cursor anywhere over the footer and click. Notice that it is not selected because it was applied from a master page, and remains locked for editing as long as it remains attached to a master page. To modify this frame, you will indicate to InDesign that the object should be made available for editing. This process is known as overriding a master page item.
) from the Tools panel. Place the cursor anywhere over the footer and click. Notice that it is not selected because it was applied from a master page, and remains locked for editing as long as it remains attached to a master page. To modify this frame, you will indicate to InDesign that the object should be made available for editing. This process is known as overriding a master page item.
3 Continuing to use the Selection tool, press the Shift+Ctrl keys (Windows) or Shift+Command keys (Mac OS) and click the text frames containing the page number and footer. Using these keys you can select master page items and make them available for editing. Press Delete to remove these frames from this page.
4 Choose File > Save to save your work.
 When you use Shift+Control+click (Windows) or Shift+Command+click (Mac OS) to select and change a master page item, the changed item is referred to as a local override. The master page remains applied to the page, and only the items you select and modify are considered to have a local override to their appearance. To override all master page items on a page, select a page in the Pages panel and choose Override All Master Page Items from the Pages panel menu (
![]() ).
).
Adding placeholder frames to master pages
Creating text and image frames on master pages makes it easier to develop a consistent layout, and you can quickly add content to the placeholder frames. When you create image frames on a master page, you can use frame-fitting options to control how images are sized after they are placed into the frames.
1 Select the Type tool (![]() ) from the Tools panel and create a text frame on the left side of the B-TOC/Editorial master page, which contains the headline In This Issue. The position and dimensions of the text frame you create are not important, since you will define these in the next step.
) from the Tools panel and create a text frame on the left side of the B-TOC/Editorial master page, which contains the headline In This Issue. The position and dimensions of the text frame you create are not important, since you will define these in the next step.
2 Choose the Selection tool (![]() ) from the Tools panel and make sure the text frame you created in the previous step is still selected. In the Control panel, set the reference point (
) from the Tools panel and make sure the text frame you created in the previous step is still selected. In the Control panel, set the reference point (![]() ) to top-left and type 3 in for X and 1.4 in for Y to set the location of the frame. Then type 4.625 in for W and 3.6 in for H to set the width and height of the frame.
) to top-left and type 3 in for X and 1.4 in for Y to set the location of the frame. Then type 4.625 in for W and 3.6 in for H to set the width and height of the frame.

Use the Control panel to set the exact location of the text frame.
3 Now you’ll add a number of image frames on the left side of the page. Select the Rectangle Frame tool (![]() ) from the Tools panel and draw a small rectangle to the left of the text frame you created in the previous step. You will also use the Control panel to set the exact position and dimensions for this frame.
) from the Tools panel and draw a small rectangle to the left of the text frame you created in the previous step. You will also use the Control panel to set the exact position and dimensions for this frame.
4 Choose the Selection tool from the Tools panel and make sure the frame you created in the last step is selected. In the Control panel, make sure the reference point (![]() ) is set to top-left and type the following values to set the dimensions and position: X: -.125 in Y: 1.4 in W: 2.4 in H: 1.625 in.
) is set to top-left and type the following values to set the dimensions and position: X: -.125 in Y: 1.4 in W: 2.4 in H: 1.625 in.
The image frame you created is aligned to the top of the text frame, and bleeds off the left side of the page. Next you will define how images placed in this frame will be sized. This is not required for frames, although it saves time when creating a design template or master page that could be used for many jobs or publications.
5 Continuing to use the Selection tool, make certain the image frame you created in step three is still selected (if it’s not, click to select it). Choose Object > Fitting > Frame Fitting Options. In the Frame Fitting Options dialog box, choose Fill Frame Proportionally from the Fitting drop-down menu, located in the Content Fitting section. Click OK. This will cause any image placed into this frame to be scaled so that it fully fits within the frame.
You’ll now duplicate the empty frame, using a feature that allows you to make multiple copies of an object while dragging.
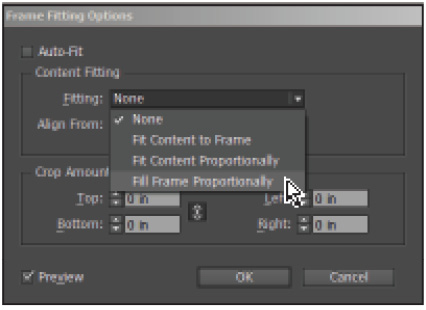
Choose Fill Frame Proportionally in the Frame Fitting Options dialog box to control how images placed in this frame are sized.
6 With the image frame still selected, press and hold the Alt key (Windows) or the Option key (Mac OS) and begin dragging the frame down towards the bottom of the page. With the mouse button still held down, release the Alt key (Windows) or Option key (Mac OS) and press the up-arrow key on your keyboard twice. Before letting go of the mouse button, press and hold the Shift key on your keyboard, then release the mouse button.
Three new frames have been created.

Create three duplicates of the text frame using Step and Repeat.
7 Choose File > Save to save your document, and keep it open for the next part of the lesson.
Locking Master Items and setting text wrap
In the first lesson, you discovered how to wrap text around an object on a document page. Here you will wrap text around a shape on a master page.
1 In the Pages panel, double-click the right page icon of the B-TOC/Editorial master page. Using the Selection tool (![]() ), select the oval shape on the left side of the page and right-click (Windows) or Control+click (Mac OS) the shape. Be certain to select the oval shape and not the text frame that sits on top of the oval. In the contextual menu, turn off the Allow Master Item Overrides option so that it does not display a check mark. This prohibits designers from making changes to this master page object once it is part of a document page.
), select the oval shape on the left side of the page and right-click (Windows) or Control+click (Mac OS) the shape. Be certain to select the oval shape and not the text frame that sits on top of the oval. In the contextual menu, turn off the Allow Master Item Overrides option so that it does not display a check mark. This prohibits designers from making changes to this master page object once it is part of a document page.
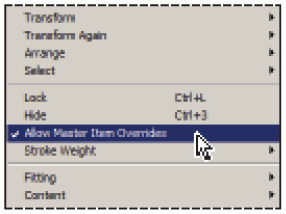
The Allow Master Item Overrides option is enabled by default. When disabled, master items cannot be changed on a document page.
2 Choose Window > Text Wrap. This opens the Text Wrap panel. From the panel, select the Wrap around object shape option (![]() ) and set the Top Offset to .25 inches, causing any text that is placed adjacent to this frame to wrap around the oval, placing ¼-inch distance between the text and the oval.
) and set the Top Offset to .25 inches, causing any text that is placed adjacent to this frame to wrap around the oval, placing ¼-inch distance between the text and the oval.

Use the Text Wrap panel to push the image, offset by ¼ inch.
Here the text wraps above text away from a frame or object.
 When the Wrap around object shape option is chosen for this object, all the offset fields are grayed-out except for the top value. This is because this object has an irregular shape. The top value will be used to specify the wrap on all sides. For rectangular or square objects, the value can be adjusted on all four sides independently.
3 Close the Text Wrap panel.
Adding layout pages
Now that you have created and formatted all the master pages, you can start to lay out the document pages of the magazine. You’ll start by adding pages to the document.
1 Double-click page 1 in the Pages panel and choose Layout > Pages > Add Page, or use the keyboard shortcut Shift+Control+P (Windows) or Shift+Command+P (Mac OS), to add a page to the document. The Pages panel now displays two page icons, as the new page is added to the end of the document.
Next you’ll insert the pages that will contain the Table of Contents and editorial content.

Adding a page to the document using the Layout menu.
2 In the Pages panel, Alt+click (Windows) or Option+click (Mac OS) the Create new page button (![]() ) at the bottom of the Pages panel to open the Insert Pages dialog box.
) at the bottom of the Pages panel to open the Insert Pages dialog box.
3 In the Insert Pages dialog box, type 2 in the Pages field, and from the Insert drop-down menu, select After Page and type 1 to have two pages added after page 1. Select B-TOC/Editorial from the Master drop-down menu, and then click OK.
This causes two pages to be added after page 1, and the new pages use the B-TOC/Editorial master page.

Adding multiple pages to the document. The new pages are based on a specific master page.
Two pages are inserted between pages 1 and 2, and the B-TOC/Editorial master page is applied to the new pages. This magazine has 12 pages. Because the pages will belong to different sections of the magazine, different master pages will be applied to them. Here you will add the pages to the document, and later in the exercise you will discover how to apply master pages to the document pages.
4 At the bottom of the Pages panel, Alt+click (Windows) or Option+click (Mac OS) the Create new page button (![]() ). The Insert Pages dialog box appears.
). The Insert Pages dialog box appears.
5 In the Insert Pages dialog box, type 9 in the Pages text field. Select After Page from the Insert drop-down menu, and type 4 in the text field. Choose None from the Master drop-down menu, then click OK.
This inserts nine blank pages into your file after page 4. You now have 13 pages in the document. Because the document is only 12 pages, you’ll practice deleting a page.
6 Double-click the icon representing Page 4 in the Pages panel. This highlights the icon in the Pages panel and displays this document page.
7 Click the Delete selected pages button (![]() ) at the bottom of the Pages panel. This deletes page 4 and leaves you with the 12 pages you need for this issue.
) at the bottom of the Pages panel. This deletes page 4 and leaves you with the 12 pages you need for this issue.
8 Choose File > Save to save your document. Keep it open for the next exercise.

Setting numbering and section options
Now that you have the pages needed for the magazine, you can define the numbering and sections. The first page of the document is sensibly considered to be page 1, since the page numbers are automatically applied to the document. In this magazine, the first page will be the cover and the back side of the cover will contain the table of contents. The third page of the publication is where the page numbering will start. You will change the page numbering using the numbering and section options.
1 In the Pages panel, double-click the triangle (![]() ) located above the first page icon. This is the section start icon; double-clicking it opens the Numbering & Section Options dialog box.
) located above the first page icon. This is the section start icon; double-clicking it opens the Numbering & Section Options dialog box.
Double-click the section start icon in the Pages panel.
2 In the Numbering & Section Options dialog box, select I, II, III, IV from the Style drop-down menu, located in the Page Numbering section, and then click OK.
This change adjusts the document’s numbering to uppercase Roman numerals. You will now create a new section on the third page, so that page 1 will be located at the start of the new section.
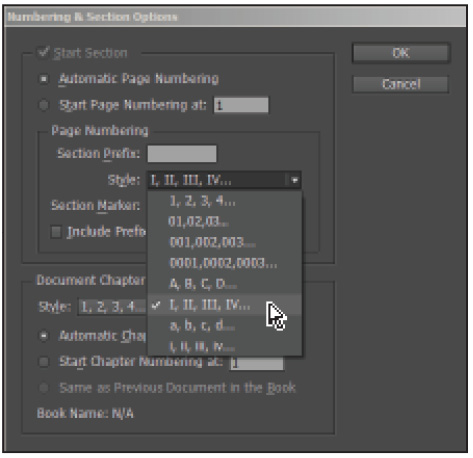
Select Roman Numeral style from the Styles drop-down menu.
3 In the Pages panel, double-click page III to select it. Click the panel menu button (![]() ) in the Pages panel and select Numbering & Section Options. Select the Start Page Numbering at radio button and type 1 in the text field. In the Page Numbering section, select 1, 2, 3, 4 from the Style drop-down menu and click OK.
) in the Pages panel and select Numbering & Section Options. Select the Start Page Numbering at radio button and type 1 in the text field. In the Page Numbering section, select 1, 2, 3, 4 from the Style drop-down menu and click OK.
This starts a new section on the third page of the document. The new section starts using the page number 1.

Use Numbering and Section Options to set the numbering for the new section of the magazine.
Placing formatted text
Next you will add some content to the editorial page, importing text from a Microsoft Word document that includes pre-formatted text styles. You’ll then complete the editorial page by adding a picture of the editor.
1 In the Pages panel, double-click the third page of the document. This is the page you set to page 1 in the previous exercise.
2 Select the Type tool (![]() ) from the Tools panel and draw a small text frame on the right side of the page. The exact size and location isn’t important; you’ll use the Control panel to specify these values.
) from the Tools panel and draw a small text frame on the right side of the page. The exact size and location isn’t important; you’ll use the Control panel to specify these values.
3 Choose the Selection tool (![]() ) from the Tools panel (or press the Escape key on your keyboard to switch to the Selection tool) and make sure the text frame is selected. In the Control panel at the top of the workspace, make sure the reference point is set to top-left. Type 11" in the X text field and 3" in the Y text field. Also type 4.75" in the W text field and 6.875" in the H text field.
) from the Tools panel (or press the Escape key on your keyboard to switch to the Selection tool) and make sure the text frame is selected. In the Control panel at the top of the workspace, make sure the reference point is set to top-left. Type 11" in the X text field and 3" in the Y text field. Also type 4.75" in the W text field and 6.875" in the H text field.

Use the Control panel to define the size and position of the text frame after you create it.
4 With the text frame still selected, choose File > Place. At the bottom of the Place dialog box, make sure Show Import Options and Replace Selected Item are both selected. Navigate to the id02lessons folder and select the file Editorial.doc, then click Open. The Microsoft Word Import Options dialog box appears.
5 In the Microsoft Word Import Options dialog box, make sure the Preserve Styles and Formatting from Text and Tables radio button is selected. Confirm that Import Styles Automatically is selected, and that Use InDesign Style Definition is selected for both Paragraph Style Conflicts and Character Style Conflicts. Leave all other settings unchanged, and then click OK.
The Word document is placed into the selected text frame. Text styles from the Word document are automatically converted to the InDesign paragraph styles because the styles in each application have been identically named.

Use the Import Options to adjust styles created in Microsoft Word when importing a Microsoft Word document into an InDesign layout.
 When importing text from Microsoft Word, you can have headlines, titles, body copy, and other formatting defined in the Microsoft Word document carried over into the InDesign layout. By choosing the Use InDesign Styles option in the Import Options dialog box, you can have identically named styles in a Microsoft Word document mapped to an InDesign style of the same name. You can use this to have editors and writers identify the styles that should be applied to text before it is brought into a layout.
6 Because the editor’s picture is likely to remain the same in every issue of the magazine, it makes sense to place this photo on the master page. In the Pages panel, double-click the page on the right of the B-TOC/Editorial master page. Choose File > Place. In the Place dialog box, navigate to the id02lessons folder and select the file editor.jpg. Uncheck Show Import Options and also uncheck Replace Selected Item. Click Open to import this image. The cursor changes to a loaded cursor, indicating that InDesign is ready to place an image into your layout.
7 Move the loaded cursor to the top-right portion of the page, below the From the Editor text. Click once to place the photo.
8 Choose the Selection tool from the Tools panel, and then click and drag the photo until the right side of the frame snaps to the right margin guide. Use the arrow keys to nudge the photo into place.

Place the editor’s photo on the master page, then position it beneath the From the Editor text.
9 Choose File > Save to save your work.
Creating the classified page
Goods for sale and professional services are often advertised on a classified advertising page located in the back of a magazine. Because most of the space is sold to smaller merchants, these layouts typically involve narrow columns to pack as many small ads as possible into the space. For this exercise, a four-column layout with an appropriate header has already been created for you. You will apply the master page and then import the text for the classified advertisements.
1 In the Pages panel, double-click page 9. Click the Pages panel menu button (![]() ) and choose Apply Master to Pages. The Apply Master dialog box appears.
) and choose Apply Master to Pages. The Apply Master dialog box appears.
2 From the Apply Master drop-down menu, choose the master page E-Classifieds. Confirm that the page to which this will be applied is listed as page 9. If necessary, type 9 in this field. Click OK. The header, footer, and four-column layout of the E-Classifieds master page are applied to page 9.

Use the Apply Master option to apply a master page to page 9 of the document.
3 Choose File > Place to import the text into the page. At the bottom of the Place dialog box, check Show Import Options and leave Replace Selected Item unchecked. Navigate to the id02lessons folder and select the file Classifieds.rtf. Click Open.
4 In the RTF Import Options dialog box, make sure the Preserve Styles and Formatting from Text and Tables radio button is selected. Leave all the other settings at their defaults and click OK.
 InDesign remembers the last settings used in the Import Options dialog box. Settings you make will impact similar files you import until you change the import options.
5 On page 9, move the cursor anywhere within the first column and click with the mouse.

The text flows into the columns of a multi-column frame.
 Here the text flowed into a single frame containing multiple columns. If there are column guides on the page but no text frame, you can have InDesign automatically create frames within the column guides by pressing the Shift key while clicking to place the text onto the page.
6 Choose File > Save to save your work.
 In this lesson, you have imported Microsoft Word files and Rich Text Format files. You can use InDesign to create layouts using most common file formats for text and graphics. The Import Options dialog box changes to reflect the type of file that you import.
Adding images and text to the master frames
Earlier in this lesson, you added frames to a master page. Now that this master page has been applied to document pages, you will add content to these frames on the document pages.
1 In the Pages panel, double-click page II, which will contain the table of contents. The image and text frames you added earlier have dotted borders, indicating that these frames are located on a master page.
2 Choose File > Place. In the Place dialog box, uncheck Show Import Options and Replace Selected Item so these items are not selected. If necessary, navigate to the id02lessons folder and locate the TOC images folder. Double-click to open the folder and select the file photo1.jpg. Click Open to select this file. The cursor changes to reflect that an image is ready to be placed into the layout.
3 Move the cursor over the top image frame located on the left side of the page and click, placing the image inside the frame. The image is automatically resized using the fitting options you specified when creating the frame on the master page.
 When images and text are placed into frames that were created on master pages, they are referred to as placeholder frames; those frames become document page items and can be selected or modified, although they retain the properties from the master page. These objects are considered to have a local override applied to them and will update if changes are made to their original master page objects.
4 Choose File > Place and click the image photo2.jpg; Shift+click photo4.jpg to select all three images at the same time. Click Open. The cursor icon contains the number (3), indicating that there are three images to place in the document.
5 Click the second frame from the top, placing the next photo. Continue clicking the empty frames, placing the remaining photos.
 If the photos in your loaded cursor don’t appear in the order that you’d like, pressing the up or down-arrow keys on your keyboard cycles through the images that you have selected to place into your layout.
Now you’ll finish the TOC/Editorial spread by adding the Table of Contents to the text frame on the right side of page II.
6 Choose File > Place. In the Place dialog box, navigate to the id02lessons folder. Select the TOC.rtf file. Make sure that Show Import Options and Replace Selected Item are still unchecked. Click Open.
7 Move your cursor over the text box on the right side of page II, to the right of the four images, and click to place the text into the layout.
Just like the Editorial and Classified sections, the TOC.rtf file is pre-formatted using paragraph styles. In the next section of this exercise, you’ll apply the remaining master pages and see how InDesign updates the content in the footer of each page.

The completed Table of Contents page.
Applying master pages to multiple pages
Next you’ll complete your work on this magazine by assigning master pages to the remaining pages in the magazine. The editorial content for this publication might not be complete, but you’ll get the design ready for the final text to be placed as soon as it is completed.
1 In the Pages panel, click the panel menu button (![]() ) and choose Apply Master to Pages. In the Apply Master dialog box, choose C-Feature from the Apply Master drop-down menu. In the To Pages text field, type 2-4 so that master page C-Feature is applied to pages 2–4. Be sure to add the hyphen (-) between the 2 and 4. Click OK. The master page is applied to the pages.
) and choose Apply Master to Pages. In the Apply Master dialog box, choose C-Feature from the Apply Master drop-down menu. In the To Pages text field, type 2-4 so that master page C-Feature is applied to pages 2–4. Be sure to add the hyphen (-) between the 2 and 4. Click OK. The master page is applied to the pages.
2 Click the Pages panel menu button again and choose Apply Master to Pages. In the Apply Master dialog box, choose D-News from the Field from the Apply Master drop-down menu and type 5-8 in the To Pages text field. Click OK to apply master page D to pages 5–8.
In the main document window, scroll through the document pages. The text variables inserted in the footer have been automatically populated with the magazine title and issue. The master pages and text variables provide a convenient way to save time and maintain consistency throughout your design.
3 Choose File > Save to save your work. After reviewing your document, choose File > Close to close the document.
Self study
Create a newsletter for your friends or family. Include a number of sections such as a page with profiles of people, stories relating to events or travels, favorite quotes, top ten lists, and photo galleries. Think about which of these sections share common elements, and design master pages to create a consistent design across these sections. Use headers, footers, guides, text frames, and picture frames on your master pages. If you find yourself repeating steps on multiple pages, consider how you can use features like master pages and text variables to streamline your design process.
Review
Questions
1 Do automatic page numbers always start with page 1?
2 If you want to modify content on a page that is linked to a master page, how do you select this locked content?
3 How can you access styles created in other InDesign documents?
Answers
1 No, automatic page numbers don’t always start with page 1. You can start page numbering with any page number using the Numbering and Sections dialog box to specify where automatic page numbers start and end.
2 To modify content on a page that is linked to a master page, begin by using the Selection tool (![]() ), Shift+Control+click (Windows) or Shift+Command+click (Mac OS) to detach the object from the master page. You can then modify the detached object as needed.
), Shift+Control+click (Windows) or Shift+Command+click (Mac OS) to detach the object from the master page. You can then modify the detached object as needed.
3 To access styles created in other InDesign documents, use the Load Styles command found in the panel menu of the Paragraph or Character Styles panels.