
Flash Lesson 3: Delivering Your Final Movie
Although Flash is commonly thought of as a web design and development program, it’s also a full-featured multimedia authoring tool. With Flash Professional CC, you can publish content for distribution to the Web, mobile devices and even as full-featured desktop applications.
What you’ll learn in this lesson:
- • Exploring the Publish Settings dialog box
- • Adjust settings for movies on the Web
- • Publishing movies as desktop applications with AIR
- • Creating Publish presets
- • Publishing options for mobile devices with AIR for iOS and Android
Starting up
Before starting, make sure that your tools and panels are consistent by resetting your preferences. See “Resetting the Flash workspace” in the Starting up section of this book.
You will work with several files from the fl03lessons folder in this lesson. Make sure that you have loaded the CClessons folder onto your hard drive from www.digitalclassroombooks.com/CC/DesignTools. See “Loading lesson files” in the Starting up section of this book.
The project
In this lesson, you won’t be creating a movie or even a piece of one. Instead, you’ll be publishing existing movies so you can put your creations to work. You will also learn how to customize publish settings for a variety of output formats across web, mobile and desktop (AIR).
The publishing process
By now you should be very familiar with the Test Movie command. As you learned in previous lessons, the command generates an SWF file so that you can preview how your animation looks and how well its interactive elements behave.
Although Test Movie works very well for preview purpose, the Publish command gives you a much wider range of options. By default, the Publish command creates an HTML page with your SWF file embedded into it for display in a browser. You can also specify other file types such as web-ready image formats (JPEG/GIF/PNG), stand-alone projector files and more.
Publishing to the Web
For viewing in a web browser (the most common option), a Flash file must be embedded into a web page. Flash’s Publish command does all the work for you by creating an SWF file, as well as an HTML wrapper file (web page) that has your SWF file contained within it. Once you have published these files you can easily upload them to your website to display your work to the world.
Publishing a file is simple. With your FLA file open, select File > Publish. Flash then creates HTML, SWF, and any supplemental JavaScript files (for version checking and browser support), and saves them to the directory that contains the FLA file, or another directory that you specify.
Before you publish, you might want to explore, and work with, some of the Publish settings that can tweak the appearance and behavior of your movie, as well as generate any additional file types you might need.
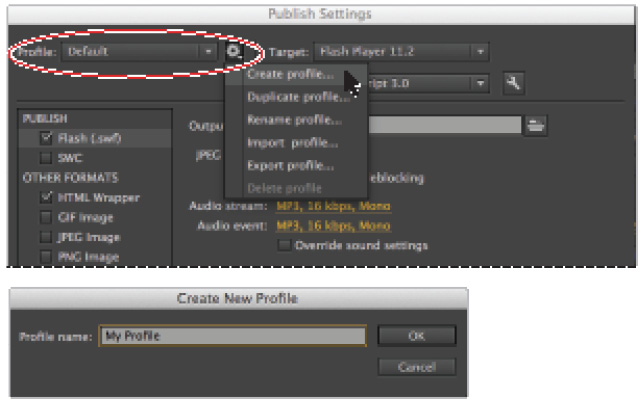
Customizing the Publish settings
The default settings are fine for many situations, but you can customize the Publish settings for better results. Give it a try:
1 From the fl03lessons folder, open the file named fl0301.fla, which is an animated footer for a website.
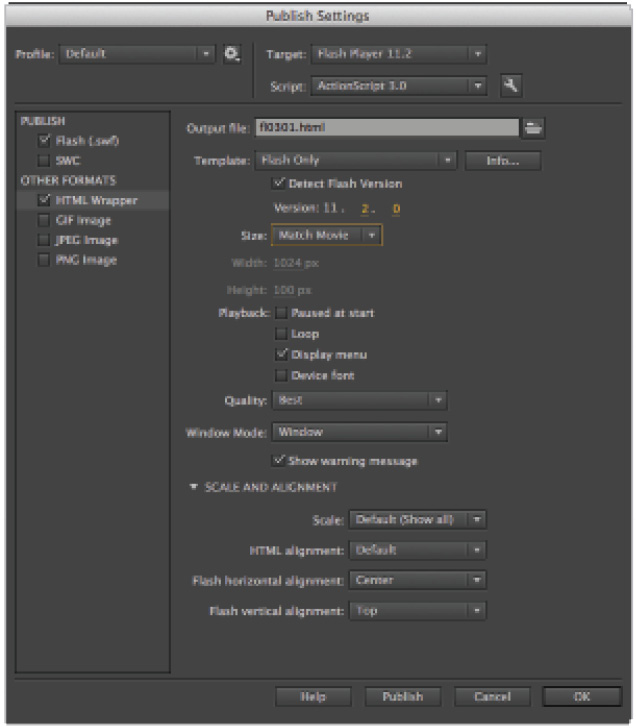
2 Choose File > Publish Settings to open the Publish Settings dialog box. Make sure you are targeting the latest version of Flash Player by selecting Flash Player 11.2 from the Target drop-down in the upper-right corner (by default, the latest version of Flash player should be selected). The dialog box will display available file formats on the left as shown in the figure below.

Open the Publish Settings dialog box through the File menu.
3 Under Publish on the left, click and select Flash (.swf) if it’s not already selected, so that you display the available publishing options for this format on the right.
4 Here we can tell Flash how much to compress images used in our movie, which helps reduce overall file size. Click and drag to the left over the JPEG Quality value until it reads at about 85. This will increase the amount of compression on the bitmap images in your movie, and lower the file size with minimal sacrifice to image quality.

Drag the JPEG quality slider to 85.
5 At the bottom of the Publish Settings panel, click OK to apply the new settings and close the dialog box.
 You can set three additional options for the Flash file export under the Advanced options. For example, Omit Trace Statements and Permit Debugging are specifically geared toward working with ActionScript, while Generate Size Report creates a text file that breaks down the size of each scene and symbol in your movie.
6 At this point, you can take a quick look at how your selected Publish Settings will affect the final movie. You can do this by using Test Movie which you have used previously in this book. Choose Control > Test Movie > In Flash Professional.

Preview your Publish Settings using the Test Movie feature.
 Although the example file does not use any audio effects, you can use the Audio Stream and Audio Event options in the Publish Settings panel to control audio quality and how those types of audio objects are compressed. The default MP3 setting is very efficient in most situations.
7 The Publish Settings dialog box has some additional options to help compress movies and lower overall file size. Use these options to bring down the overall .swf size a bit more: choose File > Publish Settings once again to open up the Publish Settings dialog box. You should once again see the Flash (.swf) publishing options on the right side of the panel. Locate the Advanced section and, if necessary, click the arrow next to it to reveal advanced publishing options.
8 Locate the Compress movie option and check it. A drop-down list is enabled to let you select one of two efficient and loss-less (no information discarded) compression options: DEFLATE and LZMA. For now, choose LZMA from the drop-down list.
9 Click OK to exit the Publish Settings dialog box and apply the new settings. You should notice that the file size has decreased slightly to about 38Kb. Every byte counts, so this option can come in handy fairly often.
10 Once more, choose File > Publish Settings. Under the Other Formats category on the left, click the HTML Wrapper option to view the publish options for the HTML file that will contain your .swf file.
11 Locate the Size drop-down list and Width and Height values. By default, the Flash player is instructed to set your movie’s dimensions to 100% of the browser window dimensions. This could cause some unwanted side effects, so if you want to keep your movie pixel-perfect, select “Match Movie” from the Size drop-down list. This will set the publish size to match the actual movie dimensions. You’ll notice you can’t change the Width and Height to arbitrary values any longer. (Those fields are now disabled.)
Modify size settings for the HTML Wrapper that will contain your movie.
12 Leave Window Mode, HTML Alignment, and Scale at the default settings. Window Mode controls the appearance of the box in which the SWF file appears; you can use it to create an SWF file with a transparent background. For now, leave this option set as Window.
 Note that because the example movie uses a nested movie clip symbol, the HTML tab’s Paused at Start and Loop Playback options would have no effect; they target the main Timeline only.
13 Click the arrow next to SCALE & ALIGNMENT to reveal these options. Set Flash Horizontal alignment to Center and Flash Vertical alignment to Center, which will place the SWF file in the center of the browser window.
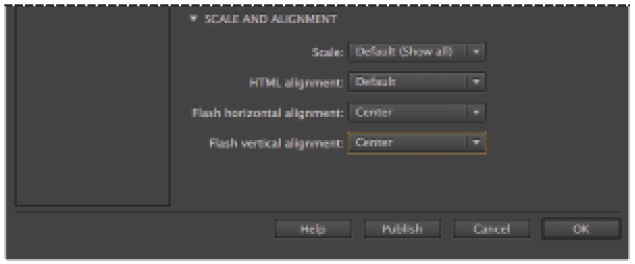
Choose Center from both the Flash Horizontal alignment and Flash Vertical alignment drop-down menus.
14 Click the Publish button to publish your file with the settings you’ve chosen. Click OK to close the Publish Settings dialog box and File > Close to close the file. You might be asked if you want to save the changes, if so, click Yes or Save to save changes.
In the lesson files folder, you should see a newly created fl0301.swf and fl0301.html file sitting in this folder. Double-click the HTML file to view your published movie in a browser.
Publishing for the Desktop with Adobe AIR
With all the capabilities Flash has to offer when it comes to building rich Internet applications, it seems natural that it has evolved to become a great tool for building desktop and mobile applications, as well.
The Adobe AIR runtime makes it possible to deploy your Flash movies as full-blown desktop applications in a few clicks from your Publish Settings dialog box. Your movies will behave exactly as they do in a browser, and with a bit of ActionScript you can extend their capabilities to interact with the user’s operating system, work with local files, and connect to outside services to get data.
The Adobe AIR runtime (in version 3.6 at the time of this writing), much like the Flash Player, is available as a free download from the Adobe website, and is a quick install for most users. Best of all, AIR applications are cross-platform, so there’s no need to create separate installers for Windows vs. Mac OS platforms. One installer package can handle both.
Before you begin the next exercise, make sure you download and install the Adobe AIR runtime at http://get.adobe.com/air/.
 You can also publish AIR applications from other applications in the Adobe Creative Cloud. For example, Dreamweaver CC enables you to publish websites, including HTML, CSS and Javascript files, as AIR applications too.
1 Open the WeatherMate_start.fla file from the fl03lessons folder. This file contains the beginnings of a basic weather application widget. If you do not have the font used in this exercise, you can replace it with any other font on your computer. The exact font you use is not important for this exercise.
2 Choose File > Publish Settings to open the Publish Settings dialog box. Locate and click the Flash tab at the top to see Flash-specific publishing options.
3 From the Target drop-down menu at the top of the dialog box, select AIR 3.6 for Desktop, which will set the necessary publish options to deploy and install your movie as an AIR application on a user’s computer.

Set up your Target as AIR 3.6 for Desktop. The Player Settings button sits next to the Target drop-down menu and allows you to open up additional dialog boxes to fine-tune your settings.
4 Click the Player Settings button (![]() ) next to the Target drop-down menu to open the AIR Settings dialog box.
) next to the Target drop-down menu to open the AIR Settings dialog box.
The Air Settings dialog box
Here you can set several options within this dialog box that will affect how your installer will be packaged, how it appears to the user, and how the application behaves on the desktop. You’ll focus on the most essential ones for this exercise.
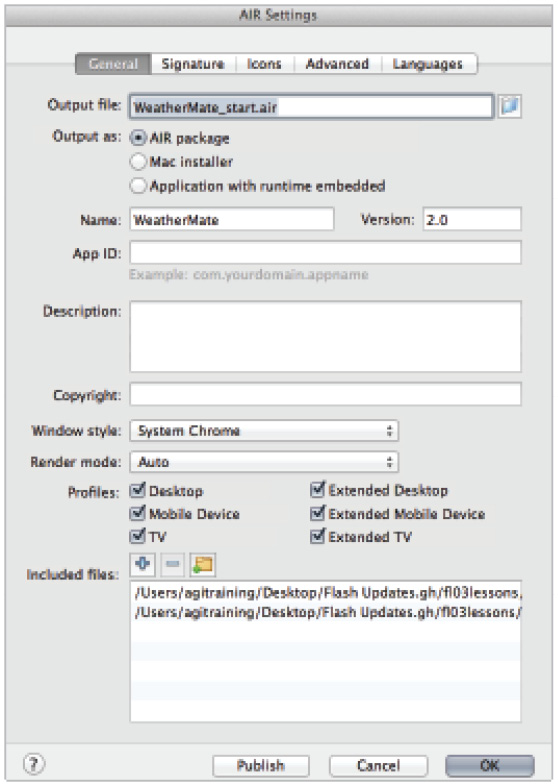
5 First, you’ll set the general options that determine your file and application name. In the Output file field, change the name of your output file to WeatherMate.air; make sure to include the .air extension. This will be the name of the installer file that’s created. If you’d like, you can change the save location of the file using the folder icon to the right of the field, but for the sake of this lesson, we’ll leave the default save location which is the same folder as your original .fla file.
6 Under the Name and Version, enter WeatherMate and 2.0, respectively. These specify your application’s name as your users will see it, and a version number to correspond with the specific release you’re offering. If you are not creating an official release, you can enter temporary information and set a default Version number. This is mostly to help your users identify your application.
7 Locate the App ID field; here you can enter a unique ID for your application to distinguish it from other applications the user might have installed on their system. The suggested convention is known as “reverse DNS,” which includes your company domain and application name. If your company is digitalclassroombooks.com and the application is Weather, the ID should read: com.digitalclassroombooks.weathermate as stated above. For now, enter this in the field.
8 Next, enter some descriptive text in the Description text field, and relevant copyright info in the Copyright text field. These are optional, so you can leave them blank if nothing comes to mind at the moment.
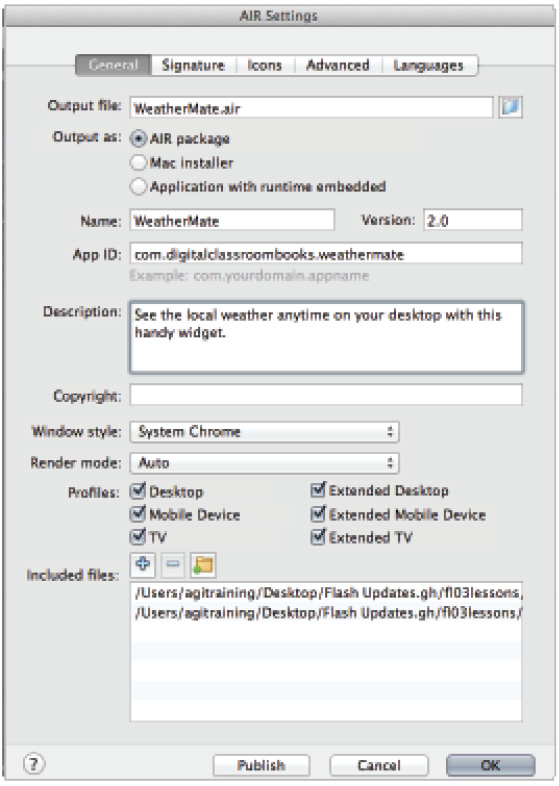
Enter important information about your application such as its name, App ID, description, and any relevant copyright information.
9 Next, you’ll set the Window Style, which determines how your application is framed, and how it appears on the desktop. The default option is System Chrome, which places a system window around your application. For this application, however, it would be pretty cool to have it be transparent and reveal the user’s desktop below, so select the Custom Chrome (transparent) option instead.
10 Select the Signature tab at the top of the dialog box.
The digital signature of your application verifies its authenticity and provides a level of confidence to your end users/buyers, and is required by most sales and distribution channels. For commercial distribution, it’s recommended you purchase a digital certificate (see the section “About Digital Certificates”). For now, you’ll continue the steps to create a self-signed certificate for this example.
11 Next to the Certificate drop-down menu, click the New (Mac OS) or Create (Windows) button to begin creating a self-signed certificate.
12 Fill in the text fields for Publisher Name, Organization Unit, Organization Name, and Country (these will be specific to your business).
13 Create a password by entering it in the Password and Confirm Password text fields. You’ll be asked for this again later, when signing your application.
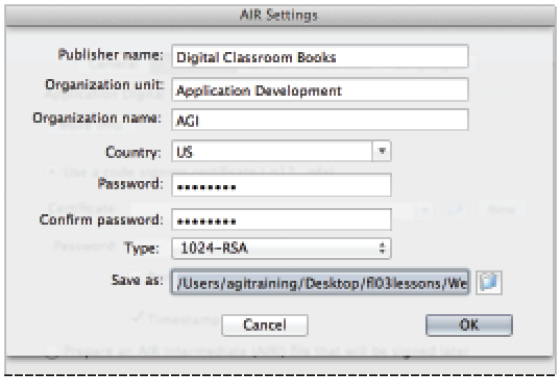
Creating a self-signed certificate allows you to install and run your application for testing or limited distribution.
14 Next to Save As, click the Folder icon and select a location on your computer to save the certificate in. Enter the file name MyDigitalCertificate for your new certificate, and click Save. Click OK to create the certificate and return to the AIR Settings dialog box.
15 The new certificate should be shown in the Certificate field. Enter the password you created for your certificate in the password text field, and for the sake of convenience, check Remember Password for this Session. Click OK to exit the AIR Settings dialog box.
16 In the Publish Settings dialog box, click the Publish button to create your .air installer file. If you are prompted for your password, please re-enter the password for the self-signed certificate you created in step 12. When the process is complete, click OK to exit the Publish Settings dialog box. Note that you might be prompted to enter the password for your new digital certificate again; do so, and then click the Publish button once again, if necessary.
17 Choose File > Save to save your work, then close your document. If you return to the fl03lessons folder, you should see a series of new files created, including a file named WeatherMate.air.
About Digital Certificates
Digital certificates are used to verify the security and authenticity of a software application, and are commonly used for distribution of commercial and non-commercial applications. Depending upon your needs, you can purchase these certificates from vendors such as Thawte (http://www.thawte.com) and VeriSign (http://www.verisign.com).
While a self-signed certificate will work for testing and limited distribution, if you are considering making your AIR application available for sale, or wide distribution, a certificate can provide an extra level of confidence for your consumers.
Installing your new AIR application
Installing your new AIR application is an easy task, especially if you’ve already taken the time to install the Adobe AIR Runtime. Adobe AIR does the work for you, registering your new application on the system and making it available, just like any other application on your computer.
 Make sure you have the Adobe AIR 3.2 runtime installed on your system. If you attempt to install an AIR 3.2 application on a system running an older version of AIR, you might receive an error message.
1 From your Windows Explorer or Mac Finder, locate the WeatherMate.air installer file that you published to the fl03lessons folder.
On Windows, if your extensions are hidden, you might need look closely at each weathermate file and choose the Adobe Air application. If you are still unsure, select a file, right-click and choose Properties, then locate the type. You can double-click Adobe Air applications to open them.
2 Double-click the installer file; this will open the Adobe AIR installer dialog box.
3 The dialog box will confirm that you want to install the application. Click Install to begin installation. Note: You might get security warnings if you’re using your own self-signed certificate.

The various stages of installing your AIR application.
4 When the installation is complete, locate your new application under the Start menu (Windows) or the Applications folder (Mac OS), and launch it.
You will notice that the WeatherMate application appears with no defined background or window; the desktop below, and only the application artwork itself shows. This is because you chose the Custom Chrome (Transparent) option in your publish settings in the previous exercise. Remember that a Flash movie is actually transparent, so the Stage will not appear in this environment.
Publishing for mobile devices
The Adobe AIR runtime has made it possible to take Flash beyond the browser and onto the desktop, and now you can author and publish native iOS and Android applications using the AIR for iOS and AIR for Android document and publish options.
There are many steps to take toward publishing stable and successful mobile applications: you’ll need to become familiar with the respective SDKs and developer guidelines, set up developer accounts and testing devices, to name a few. These activities are beyond the scope of this book, but in this section we’ll touch on the very basics for setting up your FLA for publishing to the iOS and Android platforms.
Publishing for iOS
The following steps take you through the basics of publishing an existing Flash document for installation on an iOS device such as an iPhone, iPad, or iPod touch. This assumes you are using the appropriately sized document template and have followed the basic guidelines suggested by Apple.
1 Open the fl03_iphone.fla file from the fl03lessons folder. This file contains a simple movie based on the AIR for iOS document template.
2 Choose File > Publish Settings to open the Publish Settings dialog box. Next to the Target drop-down menu in the upper-right corner, click the Player Settings button (![]() ) to open the AIR 3.6 for iOS settings dialog box.
) to open the AIR 3.6 for iOS settings dialog box.
3 You’ll start at the General settings tab. Fill in the appropriate name and output file for your app, as well as the appropriate settings for Aspect Ratio, Render Mode, and Device.
4 Select the Deployment tab, choose the certificate provided to you for iOS development as part of your developer account, and specify your provisioning profile.
 These files and settings are available under the Apple Developer Center as part of your profile.

Enter important settings for your iOS application, such as name, certificate, and icons.
 A provisioning profile is created as part of your iOS Developer Center account, and connects you and other developers in a group to test devices and to an authorized development group. If you work as part of a larger development team within an organization, it’s possible that you can obtain this from your IT or development manager (or the person responsible for your company’s developer account with Apple).
5 Choose the Deployment type, which determines how the app is packaged. You can package it for final App Store delivery or specifically for local testing and debugging. If you are still in testing and development, you can leave the default setting (Quick publishing for device testing).
6 Select the Icons tab. In each respective field, specify a graphic file for each of the required icon sizes, as shown. For specs and guidelines on preparing icons for an iPhone or iPad application, you can check the iOS developer center or this article at http://developer.apple.com/library/ios/#documentation/userexperience/conceptual/mobilehig/IconsImages/IconsImages.html.
7 Select the Languages tab, and choose the languages you will be targeting for your application. If you are targeting only North American and English speaking users, select English for now. If you are working as part of a team, make sure to consult the project lead or development manager to verify these settings.
8 Click OK to close the AIR for iOS Settings dialog box.
9 Click OK to close the Publish Settings dialog box and save your options, or click Publish to publish your application right away.
 To save time, check out the “Creating Publish Profiles” sidebar earlier in the chapter to learn how to save your Publish Settings for reuse across other projects and files.
Publishing for Android OS
Just as with iOS devices, you can target and publish native applications for Android devices, and specify the appropriate settings in the Publish Settings dialog box. With Android devices, however, you have some added abilities to easily install and debug on a connected Android device, a feature added in Flash CS 5.5, to make testing and setup a bit easier. Make sure to consult the Android Developer guidelines for creating an Android application and setting up testing devices.
1 Open the fl03_android.fla file from the fl03lessons folder. This file contains a simple movie based on the AIR for Android document template.
2 Choose File > Publish Settings to open the Publish Settings dialog box, and click the Player Settings icon next to the Target drop-down list in the upper-right corner. (It should read AIR 3.6 for Android.)
3 Under the General settings tab, enter the appropriate name and output file for your app. Make sure that settings for Aspect Ratio, Render Mode, and Device are correct for your specific application.

Specify settings for your new Android application.
4 Select the Deployment tab. Choose an .apk certificate provided to you for development, or create a self-signed certificate for temporary use and debugging by clicking the Create button. Certificates are essential for distribution in the Android Marketplace and installation on a test device. For more details and information about app signing, visit http://developer.android.com/guide/publishing/app-signing.html.
5 Select your deployment type. This will depend on whether you are creating a final app installer for distribution or a test build for debugging on a connected test device or emulator.

Specify settings for your new Android application.
6 Select the Icons tab, and specify the icon graphic files to use for each required size.
7 Select the Permissions tab, and specify the permissions necessary for your application to function properly. For example, if your application is designed to use the device camera, check ‘CAMERA’.
8 Select the Languages tab, select the languages your application is targeting. If you are primarily focused on North American and English-speaking users, select English for now.
9 Click OK to close the AIR for Android Settings dialog box.
10 Click OK to close the Publish Settings dialog box and save your options, or Publish to publish your application right away.
11 Choose File > Close to close the file.
Exporting PNG sequence
Sometimes it’s handy to be able to export your animations in a way that can be used by other applications. If you need to export graphics for use within a website, mobile application or within a CSS or JavaScript based animation, you can now export a selected symbol as a PNG Sequence.
1 In the fl03lessons folder, open the file named fl0304.fla. You’ll see a single movie clip on the Stage.
2 Choose Control > Test Movie > In Flash Professional. You’ll see an animation sequence of a small dot expanding into a word balloon. Close the window to return to the document.
3 Right-click the movie clip on the Stage. From the contextual menu that appears, locate the Export PNG Sequence option and select it. You’ll be prompted to save the sequence somewhere on your hard drive. Note: It’s highly recommended to create a folder for the resulting images, since there might be quite a few. Choose a location to save the resulting images and click Save.

Right-click any button, graphic, or movie clip symbol to select the Export PNG Sequence command.
4 The Export PNG Sequence dialog box appears. Here you’ll see how many frames will be created (based on the length of the animation), and get a chance to adjust width, height and resolution. For now, leave all settings at their defaults and click Export.
5 Navigate to the folder or location where you exported the sequence; you should see a sequence of numbered PNGs, each of which represents a frame in your animation.
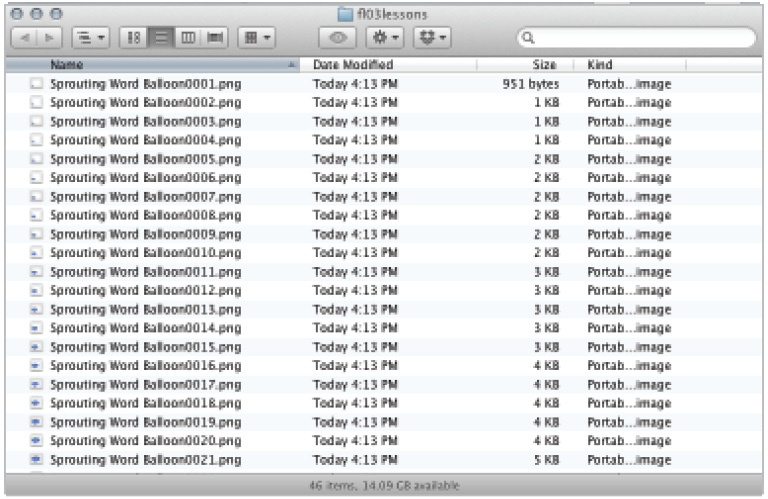
PNG images generated by the Export PNG Sequence command.
An overview of FTP
FTP is an acronym for the phrase File Transfer Protocol. These are the set of rules that allow different computers to connect to each other over the Web. Once you have created and published your Flash movie, you need to upload it to a web server in order to allow people to view it online. Whether this web server is one that you maintain yourself, one set up for you by your company’s IT department, or space you rent from a web host, the publishing process is basically the same. While there are stand-alone FTP applications that allow you to connect to a web server, Adobe’s industry-leading web design application, Dreamweaver, comes complete with an internal FTP engine that integrates very well with Flash content. The basic steps to follow when uploading Flash content for the Internet are:
1 Create a Flash movie and publish it to your local hard drive.
2 Upload your Flash movie to your web server, along with any secondary content (HTML and JavaScript files) created by the publishing process. Your web hosting service or IT department can provide you with information on where to upload your files, as well as the login and password information you need to connect.
 If you published a Flash movie with an accompanying HTML file, chances are that some additional JavaScript files were also created. It is essential that these files are copied with your .swf and .html files up to the web server in order for the Flash movie to appear properly.
3 If you want to make any changes to the movie, edit the file you published to your local hard drive, not the version on the web server.
4 Re-upload the edited version of your Flash movie to the web server, including any secondary content you might have modified.
Self study
Open the masthead.fla file in the fl03lessons folder, and publish it as a Flash movie embedded in an HTML document. Experiment with different JPEG quality settings to see the effects on the resulting SWF file’s size.
Review
Questions
1 What is the advantage of using the Publish command instead of the Test Movie command?
2 Why would you want to export your animation as a PNG sequence?
3 What are the advantages of publishing an application as Adobe AIR rather than a stand-alone projector?
Answers
1 The advantage of using the Publish command instead of the Test Movie command is that the Publish command can create a playable SWF file and automatically embed it into an HTML page. The Publish command also offers a wide range of exportable formats in addition to standard .swf creation.
2 To save your Flash animation for use within a website, mobile application or within a CSS or JavaScript based animation, you would export a selected symbol as a PNG sequence.
3 Adobe AIR applications are able to interact with the user’s operating system and local files. Projectors have security restrictions that prevent this, and don’t feature the same ActionScript capabilities necessary to work with the operating system.