
Sculpt!
You’re About to:
Make the best of a musical fest
Solve a problem for the unicorns of the ocean
Cook up a better date night
Sketch a solar-powered backpack
Find forms in foam core
Did You Know?
Clay is one of the first materials used for creating sculptures, but an amazing variety of substances have followed. Glass, metal, even trash and ice have been used to make great works of art.
Clay is especially effective when creating initial forms, or prototypes, that you can refine by adding and cutting away material. Once the clay sculpture looks right, it becomes the pattern for the molds that will help reproduce the form in a hardier substance. In this chapter, you’ll cut, add, refine, and mold your concept until it becomes something more robust!
Have you ever noticed that two or more movies with the same basic plot often come out at the same time? Why does this happen?
Occasionally, something engages the attention of a large percentage of the world’s population. Moviemakers notice this, and ideas for movies follow. A previously untracked comet came close to the earth in 1996, inspiring two movies - Deep Impact and Armageddon - which came out within two months of each other. Mayan predictions that the world would end in 2012 contributed to the enormous number of movies with “end of the world” themes such as Seeking a Friend for the End of the World, 2012, and The World’s End (among others).
Designers, like moviemakers, track events or trends that have the attention of potential audiences - because they suggest concepts that audiences may find desirable. But sketching a good concept based on “what’s hot” isn’t enough to ensure a successful movie or a successful design. Those basic concepts need to be detailed and sculpted by a strong creative vision to inspire loyalty among their users and encourage repeat usage (or viewings.)
Like a scene from a well-made movie, each feature of a solution should be well chosen and meticulously crafted to provide an experience that’s useful, delightful, and achievable with the technology and business resources at hand. Sometimes that even means saying no to some great ideas - but making those hard choices only clears the way for the right approach.
Try it yourself. It’s time to Sculpt!
In this adventure you’ll look at a broad range of concepts like those you generated in SPLATTER, and choose which ones to focus on and refine. This process is called SCULPT because, like a sculptor, you’ll start by removing big chunks (or groups of concepts), and then refine what you have left by molding, adding, or cutting away features.

Questions to Ponder:
• What’s easier? Adding a new feature to a product that people are using, or removing a feature that already exists?
• If people desire a particular concept, what barriers may exist that could stop that concept from being developed?
• Can you mimic the use of something with only a sketch?
What You’ll Do:
• Explore the context in which a solution may be used.
• Create and apply your own design principles.
• Learn how to say no to unworthy concepts.
• Refine your design.
• Make a prototype and test it with others.
Yes AND, No BECAUSE

The Power of a Savvy No
It may seem that the most difficult part of design is coming up with ideas for solutions, concepts, and features. But professional designers will tell you that knowing when to say “no” to a concept, or a particular feature, is really tough - and getting your whole team to agree is even tougher!
Why is it so difficult to say no? Here are some reasons:
• Creation is a personal and gratifying activity that can make you feel strongly attached to your ideas. Saying no means walking away from something that feels like part of you.
• A valued team member may have had the idea and you don’t want to disappoint or contradict them.
• The concept that you’re saying no to addresses a genuine need that you or a team member finds important. It’s hard to prioritize.
• If you’re redesigning a solution that already exists, you might think that the people you’re designing for will miss the feature you’re removing.
Sounds difficult! But don’t worry. You’ve said no already. You said it in Spark and Splatter when you chose just one solution to present or brainstorm.
The challenge now is to find a Savvy No.
A Savvy No is a decision that’s based on consistent intentions and objective information. For example, you could base your decision on:
• Research you’ve conducted with users (as you did in Sponge)
• Constraints you need to work with (as we discussed in Spark)
• Design principles and standards that you choose for your solution
• The context in which your solution will most likely be used
• Your available resources and technology (called feasibility)
• The idea’s business value (called viability)
We’ve talked about the first two sources for a Savvy No - let’s take a closer look at the rest!

Game: Saying No Like a Pro
Goal
Sculpting ain’t easy, but some people - such as news editors - do it every day. Practice making tough sculpting decisions with this newspaper game.
What You’ll Need
• Simultaneous Internet access for all players
• Pens & paper
• Timer
Step 1: All Hail to the Editor in Chief
Imagine that you’re on the staff of a national newspaper. Select one person to be Editor, and everyone else is a reporter. Each reporter must select a “beat” - a subject matter that he or she will report on, i.e. international news, sports, crime, education, arts, etc.
Step 2: Prep the Printing Press
Cut a piece of paper into strips so that each reporter has a piece large enough to write down their beat and a headline.
Step 3: Hot Scoop! (5 minutes)
Editor, start your timer! Your reporters have five minutes to comb the Internet, newspaper, and any other current sources to find the most important story of the day on their beat. When the time is up, each reporter must write a headline on their strip of paper.
Step 4: The Front Page Kerfuffle
The editor must now collect the headline strips and build a front page by placing the headlines in order from most important to least important. Reporters: Argue why your headline should be the top news story of the day! Editor: Act in the best interest of your readership. Imagine that your audience is the same age as you are. Consider which stories are most important for your audience and why, and then use that reasoning to support your editorial decisions. The reporter who brings in the top news article gets one point; the second article gets two points, and so on.
Step 5: News Cycle
Play again and take turns until everyone has had the opportunity to act as the Editor. To mix up the news headlines, the Editor should pick a different day of that month from which the reporters select headlines. Don’t forget to keep track of points! The player with the lowest point total wins.
Did more than one Editor use the same reasoning in picking the lead headline for the day? What were some of the common themes among the headline rankings? The justifications for these decisions are called design principles. Let’s take a closer look at how design principles can help you Sculpt your Solution Ideas.
Design Principles
Design principles are guiding statements that set the standard for what you’re going to create. They help you make choices at all levels - from Solution Ideas, to concepts, to features - and say no to ideas that may have low impact.
Your principles can be based on your user insights, interesting patterns you found during Splatter, or an understanding of your solution’s context of use. You can use these principles to choose a Solution Idea, to rule out concepts, or to prioritize features.
For example, here are the three Solution Ideas we considered when planning Adventures in Experience Design (page 30):
1. Develop a video game that requires individuals to design their way out of a sticky situation.
2. Host a design challenge event staffed by volunteer designers.
3. Write a book that uses activities and games to explain design practices.
We chose these design principles for our solution:
• Our creation should be highly repeatable for both individuals and groups. (You can easily use the games and activities multiple times, with different Challenge statements.)
• It can be used with low-cost materials so that it’s more accessible for students.
• Activities should be relevant to real projects.
You could take these principles and make them even more memorable by writing them like this:
• Repeatable Process
• Accessible Play
• Real-Life Relevance
Using these principles, we ruled out the design challenge event (2) because we knew it would be tough to repeat it in every city, multiple times. And we ruled out the video game because it requires a computer or mobile device, which compromised our principle of “Accessible Play.”
The video game also didn’t fit one of the main “contexts of use” we were targeting: classrooms. Let’s talk more about context of use, which ultimately helped us choose our design principles.
Activity: The Principles’ Office
Looking back at Splatter, write down three solutions you considered for the Spark Frame from your final challenge.
For example: Creating a video game to teach experience design.______________________________________________________
__________________________________________________________________________________________________________
__________________________________________________________________________________________________________
__________________________________________________________________________________________________________
Now, think about the criteria you used to evaluate those Solution Ideas. A good place to start is to ask what attracted you to those solutions in the first place (such as findings from research). These are your design principles. Write them down below:
Video games are fun, because they teach experiences by putting the user into a story._____________________________________
__________________________________________________________________________________________________________
__________________________________________________________________________________________________________
__________________________________________________________________________________________________________
Finally try to boil down those design principles into phrases of two to ten memorable words.
Immersive, Personal Lessons__________________________________________________________________________________
__________________________________________________________________________________________________________
__________________________________________________________________________________________________________
__________________________________________________________________________________________________________
Context of Use
When you went out to observe people in Sponge, you chose to meet them in a particular context. Maybe it was their workplaces, their homes, or some other places in-between.
The context doesn’t include just the place itself, but also several things that affect a person’s actions or thoughts at a particular time. Think of how a bus differs for the driver and the passengers.
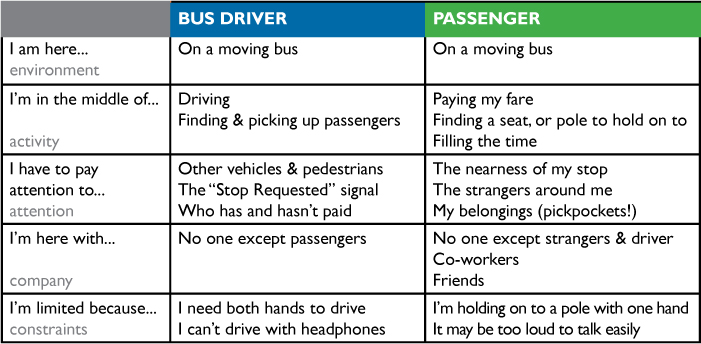
If you were designing a system that warned a bus driver when someone hasn’t paid the fare, you’d have to create a design principle like “Free Hands & Ears.” What other principles come to mind?
Activity: Sketch Challenge: Context of Use
Imagine that you are designing a mobile app for an outdoor summer music festival. Consider how the various people described on this page might experience a music festival, and sketch the many different contexts in which they’d use their mobile phones.
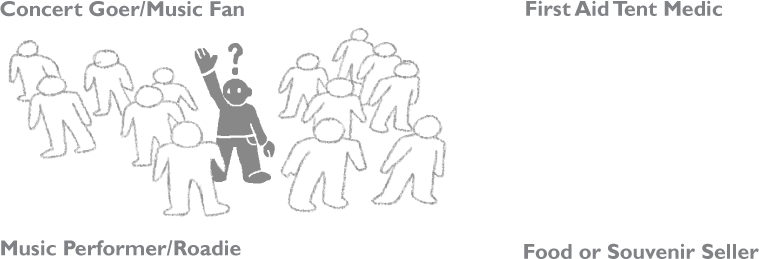
If you’ve ever been to a crowded music festival, you probably have experienced the frustration of poor phone reception due to an overloaded network. It’s important when defining the context of use to also consider potentially less-than-ideal circumstances in a situation.
Feasibility, Viability, Desirability
During these adventures, you may not have been too focused on what’s actually possible to create. This is called “Blue Sky Design” because you ignore the stormy clouds of reality for a while. If you’re working on a real-world project, though, you’re going to need to consider the feasibility and viability of your ideas. These sculpting factors, plus desirability, are three pillars of how to innovate through design (introduced by Tim Brown of design firm IDEO).
Feasibility
Feasibility is the ability to actually create your design with the technology that’s available today, or in the very near future.
Leonardo da Vinci is famous for sketching visions of flying machines centuries before the Wright brothers had their first successful flight. Visions like his are important to realize larger change! If you want to create something quickly, however, you’ll need to choose concepts that can be created with technology you have at hand, or with technology that has a good chance of being developed soon (perhaps with your own concept as a motivation.)
Viability
The technology could be possible, but can your concept be developed and used in a way that supports a business goal? This doesn’t necessarily mean that your idea has to make money, but it has to help reach a goal that has value to whoever develops the concept, such as growing customer loyalty or improving student test scores.
Product solutions obviously have a cost of development, but so do process or people solutions (if you have to pay someone to develop it, or be trained in the new process).
If you’re creating something that makes no money and has no business value, be prepared to either do it for personal practice, or out of a love for the concept!
Desirability
Desirability is the third pillar of innovative design. It’s the human element. Do people feel a need for your solution? Will it make an obvious difference in their lives? Is it better than what’s available elsewhere?
Watching people use competitive solutions is a great way to find out what they like and dislike, and to find to find the gaps that may exist in how their needs are being being addressed. Just be careful not to get stuck in the trap of copying your competitors. You’ll need to be different, and better!
Your stiffest competition may actually be a solution that people are using today, even if your idea seems superior. There’s a cost for people to switch from one solution to another. Sometimes it’s money, but it’s often the time and effort it takes to learn how to use something new. Why should people bother to change to your way of doing things?
All right, let’s put these sculpting tools to work! Read the following case study, along with information on related problems and the people who are encountering them. Then choose the concept you think is best, based on factors such as context of use, feasibility, viability, and desirability.
Sleepin’ with the Fishes, Sea?
The managers of the Nemo Maritime Aquarium are at their wits’ end. A large amount of money was spent on building a new pool for a temporary narwhal exhibit, opened just last month. No narwhals have been successfully kept in captivity, in any country, but a rescued narwhal and her new baby are undergoing four months of treatment before being released. It’s a rare and limited opportunity to see the toothed whales.
After an initial rush of narwhal enthusiasts, the number of ALL visitors has dropped off dramatically - by 30%! Something has to be done.
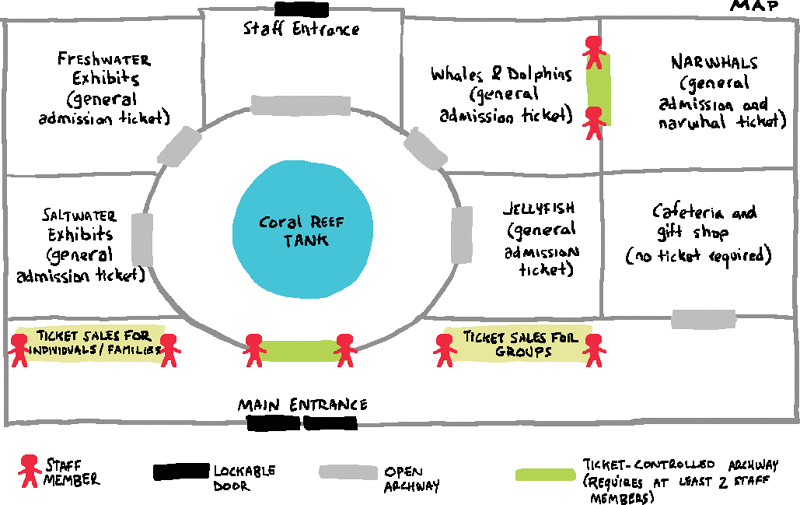
The managers ask you for help. You decide to observe visitors, stopping some to ask them about their experiences. You find visitors are frustrated with crowd congestion, caused in part by the following problems:
International visitors often come as part of a tour group, and can’t easily read the English-only signs. As a result, they often stand in the wrong ticket line, and get lost when trying to find the narwhal exhibit.
Those who are visiting mainly to see the narwhals have to walk through general use space, thereby adding to the crowds.
Make the aquarium less congested by designing a better system for groups visiting the narwhals.
Choose a concept on page 93, using the context provided.
Constraints
• Non-paying visitors need to be able to enter the gift shop and cafeteria without buying a ticket.
• The narwhal exhibit ticket requires a general admission ticket also, but general admission does not have to include a narwhal ticket.
• The cost of developing your concept should be lower than the ticket revenue loss currently projected (about $60,000 total, over the remaining three months of the exhibit)
Design Principles
• Focus people on the exhibits, not the path to them.
• Encourage exploration of all exhibits.
• Don’t make things worse for non-group visitors.
• Make sure the solution is repeatable for future special exhibits.

Sleepin’ with the Fishes, Sea?
Sleeping with the Fishes: Personas
TRAVELING JOAQUíN

Goals
• Travel the world, and see things he may never get another chance to see - like a real narwhal!
• Guide the members of his group to the right place quickly, with minimal confusion. He wants to be good at his job.
Frustrations
• When areas are crowded, Joaquín may lose track of some of his group members. He ends up wandering around to find them, and they become frustrated.
• It can be difficult to find specific areas within places like the aquarium. The signs aren’t always clear, and paths aren’t as straightforward as they could be.
• Every time the group has to go through a line, it’s a lot of work for him. He wishes there was a way to avoid lines altogether.
MUSEUM MEREDITH

Goals
• Introduce her children to new experiences, expanding their knowledge of the natural world.
• Feel comfortable and safe, so she can focus more on the exhibits and her children, rather than directions and crowds.
Frustrations
• When areas are crowded, Meredith worries about keeping track of both of her children. They tend to wander off in different directions!
• Meredith doesn’t like paying upfront for things she may not use. If she could make her decision to pay for narwhal tickets near the end of the visit, when she knows whether or not they’ll have time, she may do it. But she thinks it’ll be more of a hassle than it’s worth to get to the right the ticket area and wait in line.
Activity: Sleepin’ with the Fishes, Sea?
Which concept below do you think would be best to develop to meet the challenges outlined on page 90.
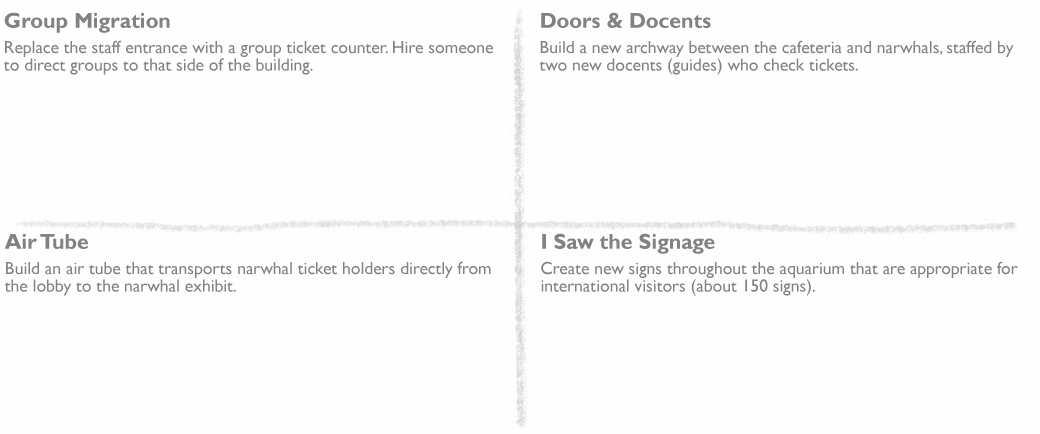
Why is your chosen concept the best? Do you have a better one? Consider context of use, design principles, feasibility, viability, and desirability. Research the costs that may be involved, such as the average salary of a museum staff member.
__________________________________________________________________________________________________________
__________________________________________________________________________________________________________
__________________________________________________________________________________________________________
Now Featuring... Features!
A large part of desirability isn’t just the solution behind your concept, but the details of your concept’s design - the way it looks and feels, the features included, and how a person goes about using it (his interaction with it). If you design a product that people enjoy using and feel proud to own, they’re likely to spread the word to others. But if your concept is weighed down with too many competing features, people may feel the effort to learn it isn’t worth the time.
Think of features as the building blocks of a concept, each of which has an inherent, independent value (although many will be more valuable or usable when grouped together). How you choose and prioritize the features of your concept is an important part of the design process.
Let’s say you had chosen to address our narwhal challenge by creating a digital product - a mobile app that helps guide a person to the exhibits she’d like to visit. There are basic features, or requirements, that represent the minimum functionality that you need to include. You could say that a user of this app must be able to:
• Download information specific to the museum she’s visiting (in this case, the aquarium.)
• Browse the exhibits that are currently available to view at that museum.
• Select which exhibits she wants to see.
What other basic features do you think this app must have? Do you think it’s essential that a user of this application be able to search for a specific type of sea creature to find where it’s located, or is that just nice-to-have?
Performance and Delight Features
In addition to basic features, consider performance and delight features. Designers sometimes use Kano Analysis to break these features out into groups: http://uxmag.com/articles/leveraging-the-kano-model-for-optimal-results
Performance
Performance features are often competitive with features from other solutions. People are more satisfied when your solution has them, and dissatisfied when it doesn’t (but they’ll weigh their dissatisfaction against their satisfaction with other features you offer).
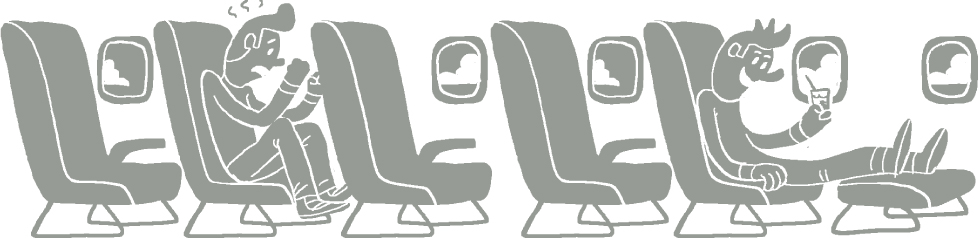
Take our airline example. Performance features of an airline trip could be extra leg room. If another airline has less leg room but offers free gourmet snacks and headphones for watching movies, a traveler will weigh the competitive performance features against each other when making his choice.
Delight
Delight features are those that are unexpected - perhaps no other competitors have them - and they add a sense of fun, surprise, or meaning to your solution. For example, on overnight flights, British Airways gives passengers a “comfort” kit with sleeping mask, socks, toothbrush and toothpaste.
People don’t expect a delight feature, so they aren’t dissatisfied if it’s not in your solution. But having a delight feature can lead to greater user satisfaction. When your solution’s users are delighted, they’re more likely to use the solution again - and more likely to tell others about it.
Activity: Splattering Features
Pretend it’s your job to create a mobile application for the Nemo Aquarium (p. 90). Hold a mini-brainstorm session to think up app features that fulfill basic user requirements, meet users’ performance feature expectations, and add a few extras to surprise and delight them. Write descriptions or sketch simple icons of your features below:

Under Prioritization Pressure
Just as you had to cut away concepts at the beginning of this chapter, you’ll probably also feel some pressure to cut away some of the features on your list.
You can start by using the same factors we covered when evaluating concepts for the Nemo Aquarium (p. 93), such as context of use, design principles, and feasibility.
You may still have too many features, but you won’t know for sure until you develop more detailed visual or interactive designs for your concept, using techniques such as sketching or prototyping.
Expressing your designs visually brings out the features that are causing pressure - crowding the areas where users can see and interact with your solution (the interface), or blocking access to important features.
Pressure isn’t a bad thing. It helps you categorize your basic, performance, and delight features. Also, pressure helps you and your team give up features that seem exciting or interesting, but don’t really contribute to the impact of the solution.
Put yourself under prioritization pressure by sketching a better backpack in the activity on the next page.
Activity: Back That Pack Up: Prioritize Your Features
Why would you include some features and not others? Learn about the need for feature prioritization in this sketch activity. Decorate the three blank backpacks below with features from the list on the right (or other features that you dream up on your own!). Follow the instructions regarding how many features to sketch directly onto each backpack.
• Basic: One compartment with a zipper and straps
• Performance: Phone pocket, headphone clip, drink bottle clip, belt strap, padded straps, water resistant
• Delight: Solar panels, yoga mat carrier, inflatable pillow, attached bedroll, collapsible bag poncho

Interactive Prototypes
Even after you’ve sketched, your chosen features may not be in complete harmony. You won’t know for sure until you create a variation on your concept that demonstrates how a person may use it. A prototype is an expression of your solution that lets you or a potential user mimic interacting with it.

• Prototypes can range from low-fidelity (such as a series of sketches) to high-fidelity (such as a fully working version of a physical product or digital app).
You sketched a low-fidelity version of a backpack. If you actually sew together a model backpack that someone could wear, you’ve made a higher-fidelity prototype.
Why create a prototype?

• Prototypes make your solution more real to your team. You’ll get a better feeling for how people will interact with it, and a shared team understanding when discussing which features to include and which to cut.
• You’ll begin to see how features interact with each other - which features are stronger when combined with others, and which seem disconnected.
• You’ll have something you can test with potential users - which you’re well on the way to doing in this chapter.
Digital solutions tend to be easier to express and test with a sketched prototype. Let’s sketch one and test it out! We’ll use the case of TooCooks.

TooCooks
Too often cooking can be the lonely job of an individual. Sometimes it seems as if kitchens work only for one person - or for two people who cook together often. But cooking can be educational, fun, and collaborative. It can bring together people who may not know each other well, or those looking for a new activity.
TooCooks is a solution that makes cooking with another person easier and more fun by assessing skill levels and assigning steps accordingly. Each recipe step is timed, and waiting periods are filled with interactive challenges like conversation starters or trivia questions.
Constraints
• Design for only two cooks at a time of potentially different ages and skill levels. For example, cooks can be an adult and a child, or two adults on a date.
• Design for one shared device during the cooking.
Design Principles
• Those with lower skill levels should feel like an important, valuable member of the team.
• Playful interaction wins over culinary perfection.
• Celebrate the kitchen as the heart of the home.
Features
• A cook profile that stores information about a player’s skill level, food preferences, and allergies. This should be gathered via a short questionnaire and stored for use during multiple cooking events.
• A kitchen profile to determine what kinds of equipment or utensils will generally be available.
• An event picker that allows players to choose the tone of the cooking event (such as “Romantic,” “Educational,” “Silly”), the meal type (breakfast, lunch, dinner), and how many people are dining.
• Recipe suggestions (three to six) based on data from the event picker, the kitchen profile, and cook profiles, with a way for players to choose one of the recipes.
• A recipe stepper for the chosen recipe, with timed tasks and audible alerts customized for each cook playing.
• A fun gap-filler! Consider conversation starters, mini-games, trivia, or educational challenges. These will appear while players are waiting for water to boil. Players should be able to pause and resume.
TooCooks: Personas
LONG-TERM LAWSON

Goals
• Have a fun date that helps the two of them get to know each other better.
• Impress Jessica with his home, and with his desire to develop a serious relationship.
Frustrations
• So many recipe sites call for ingredients or utensils that he doesn’t have yet! He doesn’t want to buy half his kitchen.
• Lawson doesn’t know if Jessica is a great cook or a pure beginner. An overcomplicated recipe could backfire. He wants to look open and fun, but not ridiculous.
MAKE-A-HOME MEGAN

Goals
• Strengthen her relationship with Angie.
• Form traditions for their new home together.
Frustrations
• Most nights Megan, Angie, and Ben end up in front of the television. It’s easy but impersonal. Megan wants an interesting way to spend one-on-one time with Angie doing something active that they’ll both enjoy.
• Angie hasn’t done much cooking, and she can get anxious when faced with a challenge that she doesn’t understand. Megan doesn’t want Angie to get stressed out over making something perfect. She just wants them both to have a good time creating something together.
Sketching a Digital Prototype
When you’re working with digital solutions, you don’t have to show all of your features and their interactive elements (such as buttons and fields) at once. You can make some elements appear or hide based on what the user does. Or, you can spread elements across multiple screens that users access one by one. That allows you to fit more features into a product.
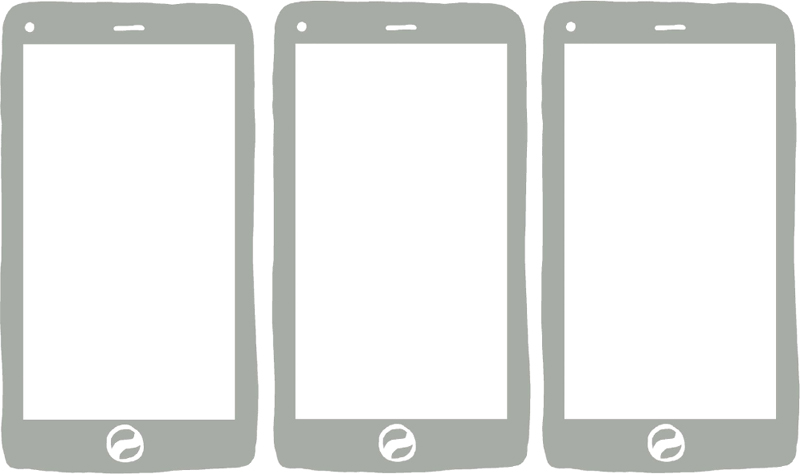
Take a look at the following interface elements. They’re part of a questionnaire, which will generate the cook profile feature mentioned on page 100. Here, they’re scattered around on one page. Using the mobile phone outlines you’ll find next, sketch in these elements over three screens. If you feel a particular element is unnecessary based on your priorities, drop it!
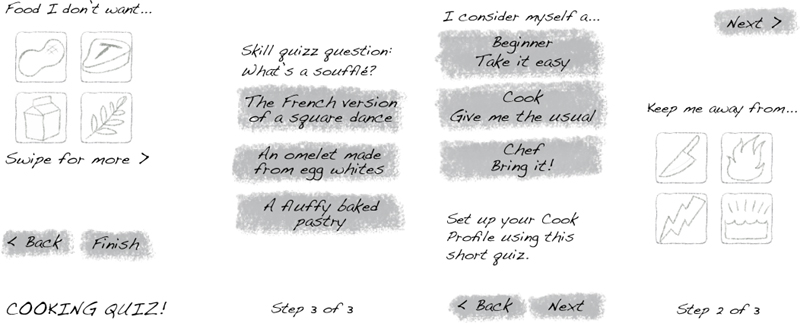
Activity: Sketch for a Cook
Use the design challenge on page 100 and the elements on page 102 to sketch a three-screen prototype.

Hey you down here: if you were designing a real mobile interface, users would also be able to scroll down to see more features. But we’re keeping this example simple, so try keeping all features on one screen and assume there’s no scrolling. Stumped? See how we did it on page 145.
Testing a Paper Prototype
Finished with your sketching? You just created a prototype! Those three screens represent steps of a particular task a user should be able to complete within the TooCooks solution. But how easily could they complete it? Would the person you’re designing for know how to interact with your prototype, and what impact would their interactions have?
Let’s finish up a prototype and find out. It’s time to choose your own adventure. You can:
1 Add two to four screens of your own sketches and test them with someone else. This is a good option if you’re working solo, although you’ll need to find a few friendly folks to test what you come up with.
2 Level up and take on one of the other features from TooCooks on page 100 from scratch, like the event picker, or recipe stepper. If you’re working in a larger group, individuals or small teams can each take a different feature to prototype, then test the results across teams.
How to Do It:
• Copy or print multiple pages of the templates on the next page, and use them to sketch your screens.
• Cut out each screen to make individual pages.
• Place the first screen in front of someone who will test the prototype. Ideally, it’s someone who fits your target user group; but for this activity, don’t let it stop you if someone else is willing!
• Ask a few initial questions (like those on the next page). Then ask your test participant to complete a particular task.
• When she says she would select something that would take her to another screen (have her point it out on the page), remove the page she’s looking at and replace it with the new one. If you don’t have a page for a particular screen, just tell her that screen hasn’t been designed yet.
• Repeat until your test participant gets confused and gives up, or finishes the task.
• Repeat with other people. Try for five!
Run a test yourself, using the following activity sheets. Remember your skills from Sponge: avoid leading questions, and don’t give participants the answers too quickly. Listen to them!
Templates for Test Screens
Copy or print these to sketch screens. You can also find free templates online: http://www.interfacesketch.com/
Testing Activity
Test Questions:
__________________________________________________________________________________________________________
__________________________________________________________________________________________________________
__________________________________________________________________________________________________________
__________________________________________________________________________________________________________
__________________________________________________________________________________________________________
Participant Info:
Name:
_____________________________________________________________________ Age: ________________________________
Relevant info such as occupation:
__________________________________________________________________________________________________________
Answers and observations from this test:
Interesting quotes, areas of confusion, likes or dislikes...
__________________________________________________________________________________________________________
__________________________________________________________________________________________________________
__________________________________________________________________________________________________________
__________________________________________________________________________________________________________
After the Test
You just finished a usability test! If you were working as a professional researcher, there would be quite a bit more to it. But as informal as this test was, it can still tell you a great deal and save design heartache later.
Be careful when analyzing your results. Try to keep that objective researcher’s eye when you’re considering the impact of issues or suggestions that came up.
Analysis is one of the most difficult parts of conducting research!
What makes analysis hard? After all, you have direct feedback. The next steps should be clear, right?
Well, on one hand, you don’t want to dismiss someone’s feedback just because it doesn’t support a favorite feature or element that you’d like to include. Ideally, you test several people (5-10) so that it’s clear when something is really an issue.
On the other hand, you don’t want to react to every comment, and change your design completely, every time you talk to a new person!
Analysis involves a difficult yet important aspect of a designer’s job: to take in a lot of information, such as context of use, design principles, and now direct user feedback, and weigh them all to make decisions.
These decisions could be:
• Which problems to solve
• Which Solution Ideas to sketch as concepts
• Which concepts to use when refining details
• Which tasks to test
• Which features to include
• How to design elements expressing those features
• How to incorporate feedback affecting all of the above
And guess what? You’ve done most of this already! Be sure to do the last one, too. Take the feedback from your test, and revise your screens in a way that you think improves your solution.
Game: Improv Testing: Prototype Theater
Goal
Take your prototyping skills to the next level with this real-time testing game that turns your paper prototype into an interactive puppet show.
What You’ll Need
• Colored markers, pens, or pencils
• 2 poster boards
• Large sheets of paper (about 11 by 17 inches)
• 2 pairs of scissors
Step 1: Divide and Design
Separate into two groups. Each group is going to design a paper prototype for the same Challenge statement, then act as the test subjects for each other’s solutions.
Step 2: Pick a Digital Challenge Statement
Pick a Challenge statement! You can use one from this chapter; one you’ve been working on for each final challenge; or make up a new one. Your Challenge statement must require the teams to design a mobile digital solution, such as an app or mobile website.
Step 3: From Poster Board to Handheld Device
Draw on and cut your poster board to make it resemble an oversized mobile device. Consider the screen shape and don’t forget to include physical elements, such as buttons. Cut out the screen so that the poster is a frame.
Step 4: Create your Solution Elements
Spend time with your group designing your solution. Consider which features you plan to create, and think through the user interactions from start to finish. Once you have a solid plan, sketch the screens and screen elements. Where possible, draw screen elements that will change – such as icons or buttons – on a separate sheet of paper, and cut them out so they can “move” around on your screen.
Step 5: Testing, Testing!
Coordinate your team so that one person is holding up your “device” frame. Have other team members hold up the paper pieces of your team’s solution in the screen space. As the testers interact with the screen elements, have the puppeteers react by re-arranging the paper pieces “on screen.” Try to improvise multiple user paths based on testers’ feedback. Try guiding users through two different interaction sequences, and ask testers which they liked better.
Physical Prototypes: Totally Doable
Making a physical prototype may sound expensive, difficult, and time-consuming; but a ton of cost-effective resources are out there to help you bring your design into the real world, or the digital space.
At any craft store, you can purchase clay, foam core, and other physical components to create working models of your design. Some clays, such as Sculpey or plaster, can be baked or set to harden, creating solid and durable physical models of your own creation! Don’t be afraid to borrow from or otherwise alter existing objects, too. You can find almost anything at second-hand stores for cheap, so you can experiment with taking objects apart and reconfiguring them according to your own design. A little paint can hide just about any unsightly physical hacking.

In the digital space, tools such as Axure or Balsamiq allow you to create animated, digital “wireframe” prototypes that you can easily alter after testing. Websites like Code.org offer free tutorials and other resources that can set you on the path to becoming your own developer. Downloading a free trial of software that you want to learn, or taking a class via Lynda.com, can help expand your skills. Some 3D printing companies, like Shapeways, enable you to submit your own designs, which they will print and send back to you.
The SCULPT Challenge!
You’ve come a long way from your first Sponge challenge. Now it’s time to test and refine your Solution Idea to see how it may play in the real world!
Prototype your concept and test it with four to five people.
If you’ve been developing the same Solution Idea into concepts throughout this book, you can continue to use that concept here.
If you’d like to take on this Challenge using concepts based on a different Solution Idea, you could also use one of the cases in this book to generate concepts (using techniques from Splatter) and refine them into a prototype for testing.
“Sleepin’ with the Fishes, Sea?” (pp 90-92) and “TooCooks” (pp 100-101) both include digital Solution Ideas you could work from. They may also provide a good avenue if your original concept is physical and you’re not sure how to prototype it.
If you choose to work through this book more than once, you can try each one!

__________________________________________________________________________________________________________
__________________________________________________________________________________________________________
__________________________________________________________________________________________________________
__________________________________________________________________________________________________________
__________________________________________________________________________________________________________
Participant info:
Name:
___________________________________________________________ Age: ________________________________________
Relevant info like occupation:
__________________________________________________________________________________________________________
Answers and observations from this test:
Interesting quotes, areas of confusion, likes or dislikes...
__________________________________________________________________________________________________________
__________________________________________________________________________________________________________
__________________________________________________________________________________________________________
__________________________________________________________________________________________________________
The Debrief
That was it. Right there. That was the moment. If you’re reading this, you’ve just finished one iteration of the process that Experience Designers go through when creating a concept for something brand spanking new. (Or you’ve skipped ahead from previous chapters, Spoilers!)
“Just one iteration,” you ask? Yes, it’s true. A designer may go through many iterations with her work. She may try a path, test and refine it, and work through that path again. When she’s gone through Sculpt, the feedback she hears may lead her to reframe her Spark question and repeat Splatter. Then back through Sculpt!
It’s ok to iterate. It’s not a failure when you learn and adjust. After all, you probably gathered some feedback in your testing that led you to refine. It’s better to incorporate that feedback now, rather than when you try to develop something into a real solution and potentially waste money and time in the process!

You may have heard this question: “If a tree falls in the forest and no one is there to hear it, does it make a sound?” Well, if a designer creates a concept, but doesn’t make an effort to explain why it’s important, it probably doesn’t make much of an impact. In the last step, Storytell, you’ll learn how to represent your creation in a way that matters to those who may use it - or help you build it!