
Splatter!
You’re About to:
Learn the language of your eyes
Solve a problem for bald heads
Redesign your bedroom
Dissect a corpse
Paper a wall with ideas

Did You Know?
Jackson Pollock was an artist who became well-known for his abstract art. In particular, he had a style of drip painting where he used splatters of paint dripped onto flat canvases.
To some, this kind of splatter art can seem random. But abstract artists like Pollock excel at creating forms and shapes that seem to have an underlying meaning. Our brains WANT to form patterns in things, whether they’re splatters of paint on a canvas or the shapes of clouds in the sky. So splatter at random for a while, and see what your brain can make of it!
Have you ever tried to paint on a blank canvas? If so you may know that it’s very hard to go from nothing to something that’s beautiful, moving, or thought provoking.
It may seem like the great painters could naturally handle a blank canvas–that they just knew how to see things differently and paint amazing works. But when you go to an exhibition of artists like Pablo Picasso or Salvador Dali, you’ll see that they spent a lot of time sketching variations of the forms they were about to paint.
Picasso himself ended up painting 58 versions of another painter’s work (Las Meninas by Velazquez), to explore differences in style, color, and form! In Leonardo da Vinci’s sketchbooks you can see several sketches of the same person’s arm from slightly different angles, as well as concepts for flying machines that were centuries ahead of their time.
These artists knew one of the most important rules of design: To come up with something really different and impactful, you need to let yourself explore lots of possibilities. You need to open up your mind and express things, without the pressure of getting something right the first time that you put pen to paper. You need to splatter the paint for a while!
Then, when you have a lot of mess and color to look at, you’ll see patterns and find inspiration that you never would have seen if you stuck with your first idea.
In this adventure you will learn how to take a Solution Idea like the ones you SPARKED in the last chapter, and quickly generate a lot of different concepts related to it. We call this SPLATTER because, like splattering paint, you don’t worry too much about where it all lands - just get a bunch of ideas out in a visual way using techniques like sketching and posting up concepts. Once you have your concepts splattered on the wall or table, the patterns that you’ll find can be very interesting!

Questions to Ponder:
• Why is a picture “worth a thousand words?”
• If sketching is so powerful, why don’t people use it more often?
• Why should we spend any time talking about concepts that seem impossible to create?
What You’ll Do:
• Try your hand at the basics of sketching and learn about its importance when you’re generating ideas.
• Go big or go home. Then go big at home! Create a large number of concepts in a group challenge, then keep going for the next 24 hours.
• Learn how to find patterns in your splatter of ideas. Build on them or use them to splatter even more.
More on Concepts

Why Designers Sketch Concepts
Sketching is a quick method for expressing ideas in a visual way, rather than just using words. But why is it so important to express information visually? Here are a few of the many reasons:

Some concepts, such as emotions, have more impact when expressed visually. Which of these two boxes seem to have a bigger impact on you?

Images can also be more effective at communicating such things as the relationships between objects, and their relative sizes.

Signs are designed to communicate regardless of which language you speak. If you were on the beach in Japan and considering a swim, which sign would you rather have?

Verbal directions are useful for step-by-step instructions, but the visual form is often easier to grasp at a higher level, or to understand your current location.
Verbal and visual information activates different sides of your brain. If you’re not used to using both sides often, it can be difficult to get started. Let’s try a game that will exercise your ability to transcend the verbal/visual divide!
Game: Talk Sketchy to Me
Goal
Learn firsthand why a picture is worth a thousand words (or, in this case, at least 25!) by successfully getting your partner to guess the phrase you are drawing.
What You’ll Need
• Pen & paper
Step 1: Choose Your Roles
Pick one person to be the artist, and another to be the guesser.
Step 2: Pick a Noteworthy Statement
The artist should flip to page 144 and pick a statement from the list. The person who is going to guess should NOT look at that list.
Step 3: Sketch Your Statement
The artist then begins to sketch that statement, using only pictures! That means no letters or numbers, but symbols - such as a star or a heart - are OK.
Step 4: Best Guessed
The guesser should immediately begin guessing words and phrases out loud to identify the full statement. If the guesser says a correct word, you may write it down at the top of the page. Each word guessed correctly can be written down in the correct order. Keep going until the guesser correctly says the entire statement out loud.
Step 5: Think Sketchy
What words were difficult to sketch? Which were easier? How did the artist use the paper to visually communicate how words related to each other? Can you isolate parts of the sketch where one image was able to capture several words?
Step 6: Replay Value
• Have a big group and want to play again? Have teams compete against each other to see who can get it right first. (Level up the challenge: Have each team write the statement for the opposing team.)
• Go digital: Play again but have the artist communicate solely through images found using Google Image Search.
Visual Language
In the fantastic book Gamestorming, by Gray, Brown, and Macanufo (O’Reilly Media, 2010), the authors write about visual language as a distinct skill unlike reading, writing, and arithmetic:
“Nearly every human endeavor, when examined, reveals the importance of visual language. In legal proceedings, visual aids help juries decide complex cases. Filmmakers create storyboards to help them bring screenplays to life. Medical illustration helps surgeons and other medical professionals learn their trade. The road signs we navigate by, the interfaces on our computer screens, and the logos that help us find the stores we like are all examples of visual language in action.”
The authors go on to outline a basic visual vocabulary of 12 shapes from which all other shapes can be made:
Flow shapes are linear and can be linked together in a sequence. They include dot, line, angle, arc, spiral, and loop.
Closed shapes feel more like solid objects. They include oval, eye, triangle, rectangle, house, and cloud.
Try drawing the following using the shapes above. Don’t worry too much about erasing!

Sketching Many Concepts
Another reason that designers love sketching is because it’s fast and cheap. With nothing more than a pencil and some paper, you can sketch many concepts of one Solution Idea. This kind of exercise is called “generative” because the goal is to generate a lot of different possibilities.
For example, if your Challenge is:
Make biking more luxurious for bald people
And your Solution Idea is:
Design a helmet that is safe and comfortable for those who are hairless
You could sketch three different concepts for a helmet, like:
• One with a sun-resistant screen
• One with a built-in wig
• One with slip-resistant rubber
Or you could sketch three different designs for one concept, such as three mullet styles for the built-in wig concept. Maybe you just concentrate on the design of the clasp for a while.
Sketching is collaborative. You can compare your sketches with those of others, or start a sketch and then pass it to someone else who adds to it. She may come up with an entirely different interpretation of where you were going!
Read the following case study and try your hand at creating multiple sketches.
Just Draw the Line

The Case of the Bald Biker
Nick, Leslie, and Ryan formed a team that was given the following design challenge:
Make biking more luxurious for bald people
They broke up the Sponge step. Leslie did qualitative interviews with bald bikers. Ryan observed bald bikers in the wild. Nick did online research to understand current product offerings for bikers.
Then they shared their findings with each other. They found an important problem. Bald bikers were not happy with their helmets because:
• Many helmets are not solid caps, but have holes in the top for ventilation. These holes put the bald scalp at risk of sunburn. The more advanced the helmet, the more pronounced the issues were. The nicest helmet cost $180 and looked like swiss cheese.
• Many helments are padded with a foam which, when lubricated with sweat, makes it slip on a smooth head.

Activity: The Bald Biker Spark Frame
Use the Case of the Bald Biker to fill out the rest of the Spark Frame below!

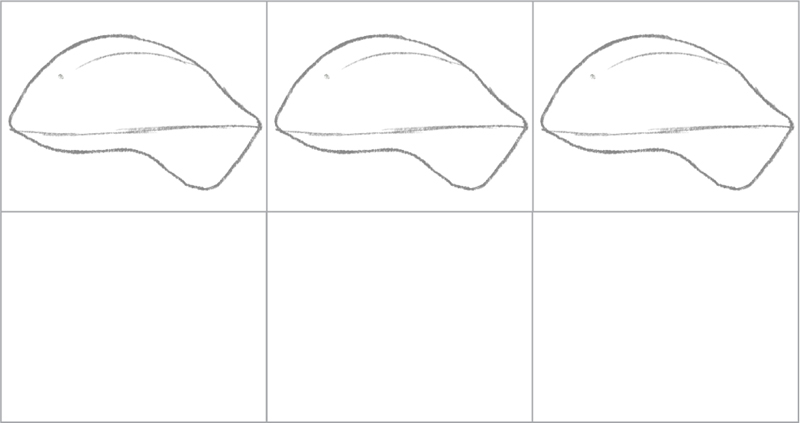
Activity: Bald Biker Sketch Challenge
Sketch three designs using the outlines below, and three more from scratch! Then compare yours with someone elses’ if you can.
Activity: An Alarming Digital Sketch Challenge
Designers sketch for digital solutions as well as physical products. Try your hand at digital sketching below by drawing two different digital alarm clock interfaces for a handheld mobile device. Try to design a digital alarm clock that would make waking up less heinous for night owls:

Did you enjoy digital sketching? If so, try to design a digital interface that would help our bald bikers plan for the day.
It’s No Shame to Reframe
During your sketching, you may reach a point where the original Solution Idea just doesn’t seem strong enough. Maybe something else you sketched made you think of another way to address the root cause of the problems.
You may even start to wonder if the “how might we” Spark you used to find a Solution Idea was really the right question to ask.
It’s not unusual for this to happen. Thinking visually activates more of your mind, and it may connect to something from your previous field research that you didn’t think of earlier.
Pay attention to this! The way you ask a question impacts the types of solutions you explore. It forms the frame of your solution, and sometimes the first frame you try doesn’t end up fitting as well as it might.
Changing the question that you ask is called “reframing.” It’s a natural part of the design process. Let’s say you wanted to make biking more luxurious for bald people, which led you to ask:
How might we make helmets more safe and comfortable against skin?
That question makes the assumption that you’re working only with helmts. Reframe by asking:
How might we make helmets unnecessary?
This reframe might lead you to design a shock-triggered force field around the biker, or air bag sunglasses that inflate when the biker’s head is about to hit something at high speed.
Reframing is an excellent technique for thinking even bigger. It helps you break out of current assumptions. Try writing three different sparks for our bald biker challenge.
Consider how we might:
• Amp up the good
• Remove the bad
• Use unexpected resources
• Challenge an assumption
• Look from a different person’s point of view
• Use an analogy (How might we make biking like flying? Or student dropoff like an assembly line?)
These questions are from: IDEATE Mixtape, Stanford d.school - http://dschool.stanford.edu/wp-content/uploads/2012/02/ideate-mixtape-v8.pdf
Game: Reframe in the Membrane
Goal
Brainstorm new possibilities by introducing unexpected and downright strange elements to your Spark Frame.
What You’ll Need
• Pen & paper
Step 1: Refit Your Challenge
Write down your Challenge statement at the top of a piece of paper. You are going to modify that statement by adding a physical or contextual constraint. Pick one Object or Scenario.
Step 2: Generate a List
• If you picked Object, write down the first 25 objects that pop into your head. They can be anything: taco, cat, computer, fleas, etc.
• If you picked Scenario, write down the first 25 possible scenarios for the challenge that pop into your head. They can be digital, such as “on a mobile device”; physical, such as “at the drive-in movie theater”; or even completely unrealistic, such as “on a world with no gravity.”
Step 3: Stretch Your Concepts
Referring back to your Challenge statement, retrofit it to include each term in your list, and quickly generate one to three ideas for the new Challenge. Be silly! Be weird! Have fun! For example, if your Challenge was: “Make going to the beach more fun for the easily sunburned,” and your Object was “coat hanger,” then maybe a concept is using the hanger as a DIY tent frame so pale-skinned beach-goers can relax in the shade, using their towel as a tent.
Step 4: Review Your Results
How did adding unexpected design constraints change the way you looked at your Challenge? Did you come up with any new concepts that you think might actually work?
More Ways to Play: For a Group
Pair people up and have partners generate the list of Objects or Scenarios for each other - without knowing the other player’s Challenge, of course.

Working with Constraints
When you added new objects or scenarios to your Challenge in the Reframe game, you were basically adding constraints.
Constraints are limitations that affect what you can design. For example, if you want to design a vegetable garden for your backyard, you may be constrained to certain areas (or certain kinds of plants) due to the amount of sun they can get during the day. Or, if you want to design an app for CIA agents, you may be constrained by security procedures.
Constraints may sound like bad things, but they often can be helpful. Starting with a totally blank slate can be difficult - just ask a novelist about starting with a blank screen when she’s beginning a new book!

Sometimes, adding constraints helps you start with a structure that you can work within. It helps you focus on a smaller set of possibilities, and can also help you reframe the question you’re trying to answer.
We’ll talk about how constraints help you simplify when we get to Sculpt. For now, let’s explore how adding (or removing) constraints can help you generate a lot of different variations when you’re trying to Splatter a lot of concepts.
Game: Interior Design Your Life
Goal
Understand designing with constraints by rearranging your bedroom furniture to suit different needs.
What You’ll Need
• Ruler
• Pen & paper
• Scissors
Step 1: Measure Up
Using a ruler or measuring tape, measure your bedroom. Then, converting feet to inches, draw your room proportionally on a piece of paper. So, an 10.5 foot by 6 foot room would be 10.5 inches by 6 inches on paper.
Step 2: Doors, Windows, Closets
Now, measure your doorways, closets, windows - and any other openings in the walls of your room. Convert those measurements from feet to inches, too. Then, mark that distance off in your room drawing, being careful to place them correctly.
For example, if you have a three-foot window on your six-foot wall, measure where that window begins (two feet in from the corner) before marking off the proportionate three-inch window space in your drawing.
Helpful Hint: For doors that swing into your room, don’t forget to measure the length of the door along with its opening radius (see the example on the next page) - or else you might “arrange” yourself into your room with no escape!
Step 3: Furniture
Last but not least! Measure all your furniture, again converting feet to inches. Draw your furniture on a separate piece of paper and cut them out. So, if your bed is 6 foot by 4.5 foot, draw a 6 inch by 4.5 inch rectangle, and cut it out. If you want to get fancy, you can “decorate” your paper furniture with photos. If not, you still might want to label each piece so you don’t forget what it represents.
Step 4: Constraints? No Complaints!
Arrange your furniture in your room drawing to mirror the way you currently have it placed in your room. How could you rearrange your room to make it more fun? More convenient? What if you had to add in a second bed for a roommate? What if you wanted to move all the furniture around to have a party? Play with your furniture without breaking a sweat!
What elements in your room take up the most space? How does that constraint affect how you want to rearrange your space for different purposes?

Brainstorming Essentials
A generative brainstorm is a group discussion that’s meant to generate or explore a lot of concepts in a relatively short period of time. You can then explore those concepts as a group to find interesting patterns. This is part of a process called ideation, which we’ll be doing for the rest of Splatter.
Brainstorms work well when:
1. There’s a clear goal to be accomplished.
For example, generate at least 20 concepts for a helmet solution.
2. There’s a good set of questions or constraints to prompt ideation.
Like our How Might We questions on page 64.
3. Someone takes the role of facilitator.
It’s a great skill to have! See Facilitation Tips for more.
4. Everyone is dedicating their time and attention.
No mobile phones or multitasking!

5. The tone of the discussion is open and playful.
During idea generation, no ideas are wrong, or too crazy.
6. You take time to build on ideas and detect patterns.
Look at the problem in multiple ways. Reframe, add, or remove constraints.
We’ve explored the first few points already. Let’s dive deeper into the last two.
Be Open and Playful
Every day, multiple times a day, you’re faced with needs and making judgments about ways to address them.
Let’s say you’re trying to decide how to get to work during the summer. The bias you’ll most likely have is for ways that are familiar, real, or feasible. If you usually take the bus, that’s your most likely course. If the weather is nice, maybe you’ll walk. You’re not very likely to decide to fly because that’s probably not feasible–unless you can fly or pay someone else to fly you!

When you brainstorm, it’s OK to start by saying you’ll fly to work. The point is to explore possibilities that may not usually occur to you. Jet packs? Mini-helicopters? Hovercrafts? These things aren’t available now, but someone out there is trying to design them. As you heard in Spark, we didn’t get cars by redesigning horses!
A good generative brainstorm is open to ideas that may seem silly. When you feel the judging part of your brain saying “that’ll never work,” “that makes no sense,” or “this idea is a waste of time,” just shut it off. Give the rest of your brain permission to play.
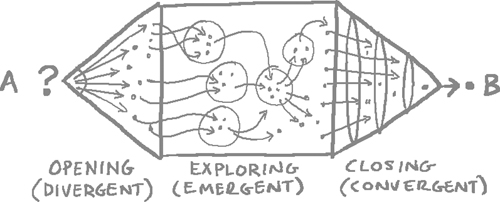
Your Spark is a focus for generating a lot of different ideas, and some of them should seem silly or crazy. That’s how you get a wide set of ideas to work from. You open up a lot of different concepts and explore them (as you can see in A in the diagram below, from Gamestorming). Later, in Sculpt, you’ll close in on part B - the concepts to focus on.
Let’s try some games to open your brain!
Game: Brainstorm Warm-Up: Shoe Tie, Shoe
Goal
Approach a need from several different angles by lacing your shoe in as many different ways as you can!
What You’ll Need
• A shoe (unlaced) and a shoelace
• Pen & paper
Step 1: Investigate the Standard
Lace your shoe in the typical manner (crossing laces above and below where the two sides meet.) What are the benefits and disadvanages of this process? Write them down.
Step 2: Mix It Up
Now unlace and re-lace your shoe in as many different ways as you can think of. Each time you lace it, draw a quick sketch of your approach and write down some of the pros and cons of lacing your shoe that way.
Step 3: Think It Through
Were any of the lacing methods that you came up with better than the standard method? Why do you think most people lace up their shoes the way they do?
Feeling Competitive?
If you’ve got a group, set the timer for 30 minutes and see who can come up with the most ways to lace a shoe. Compare everyone’s results at the end: What similar methods did people try? Why do you think that was? What unique methods did the winners come up with? Why did no one else think of the winners’ lacing options?
Added Challenge
Try to lace and tie shoes in as many different ways as you can using any material you can find or think of, from wire to an iPhone cord... What works?

Game: Brain Cardio: The Game of Phones
Goal
Stuck on one concept? This brainstorm technique is designed to illustrate how even one message can be expressed in a cornucopia of ways.
Step 1: Establish a Connection
Determine a linear order for all the players. Sit in a line or other configuration that clearly begins with one player and ends with another player.
Step 2: Send a Message
Player one gets the honor of choosing a one-sentence message. Try to use colorful and descriptive adjectives.
Step 3: Scramble the Airwaves
Just as in the game of Telephone, player one will whisper her message to player two, who will whisper the same message to player three, and so on until you get to the final player, who will relay the message out loud for everybody to hear. (For those of you unfamiliar with Telephone, try to keep the message a secret as it is transferred via whisper from player to player. And no repeating the message if you don’t hear it right the first time!)
Unlike Telephone, however, players in The Game of Phones will actively try to alter the wording of the message without altering its content. For example, if the message is, “The bird is blue,” then player two might pass on the message, “The winged beast is blue.” Player three might evolve that further to: “The winged beast is azure.”
Step 4: Uh, Operator?
When the message gets to the last player, she must also tweak it to be a little different before repeating it to the group. Did the meaning survive? How did the message transform? Did the words become more general, or more specific?

Game: Boss-Level Brainstorming: “Exquisite Corpse”
Goal
Open your mind to unexpected sources of inspiration through collaborative sketching.
What You’ll Need
• A sheet of paper for every player
• Markers and pens for everyone to sketch with
• A timer
Step 1: Pick a Theme
As a group, select a Challenge statement. This will be the theme of your brainstorm. Everyone will be sketching potential solutions to this Challenge.
Step 2: Sketch your Corpse!
Everyone in the group should start off with a clean sheet of paper in front of them. Set the timer for five minutes. During that time, everyone must sketch a potential solution to the Challenge statement. Draw in a corner of your sheet of paper. When you are done, you will be folding the paper over so that no one can see what you drew.
When the timer is up, everyone gets two minutes to add a title or line of text to their drawing. For example, if the Challenge statement you picked was, “Make brushing your teeth more fun for kids,” you might sketch a brush that plays music only when it is being used. Over that, you could write your favorite song lyric, coming from the toothbrush. Fold over the paper, so that all you can see is the text, and none of the drawing.
Step 3: Get Exquisite
Once everyone has folded over their paper, switch papers! Now, you must sketch a potential solution to the Challenge statement that also incorporates the text that you can see from the folded-over sketch. Repeat Steps 2 and 3 until there’s no more space to sketch on the paper.
Step 4: Dissect your Corpse!
Completely unfold all the corpses and pin them up around the room so that everyone can check them out! What assumptions did people make about each other’s copy?
Detecting Patterns
When you have a lot of different concepts to look at, they may initially seem unrelated. But if you start moving them around, you may may see invisible connections that link some of them into groups. Sometimes you may find more than one set of connections among those groups. Each kind of meaningful grouping forms a pattern.
Designers will often put their ideas up on a wall on sticky notes. They do this so they can move each one around and see how they relate to each other. New connections form patterns that they can build on and add more detail to. This is why the “sticky wall” approach works well when looking for patterns among individual ideas or sketches created during a brainstorm.
Some ideas may be tackling a particular part of the problem to solve with a product solution. Still others may try to fix something else in the process (see page 46). Maybe there’s a strong trend towards solutions available on a mobile phone that you discuss and build on.
Here’s a simple exercise in pattern-finding.
Cars
Clowns
Lions
Planes
Birds
Boats
Criminals
Piranha
Police Officers
Fishermen
Tuna
Butterflies
At first look, the terms above may seem unrelated. But if you start moving them around, you’ll start seeing connections. Let’s say you move the following terms together in a group - what connection do they have?
1. Birds, Lions, Butterflies, Tuna, and Piranha
________________________________________________________________________
2. Planes, Birds, Butterflies
________________________________________________________________________
3. Police Officers & Criminals Fishermen & Tuna
________________________________________________________________________
4. Clowns, Criminals, Lions, Piranha
Things that Carolyn is afraid of______________________________________________
What other patterns can you make with these terms?
Game: Pick a Peck of People Patterns
Goal
Practice detecting patterns after brainstorming design concepts with a group.
What You’ll Need
• A pad of sticky notes
• Pen
Step 1: Pick a Challenge
As a group, choose a Challenge. You can refer back to your results from the Sponge activity, or you can make up a new one. We recommend, “Make tacos less messy for children to eat.”
Step 2: Hand out the Sticky Notes
Give each of the players the same number of sticky notes. Nine is a pretty good number to start with.
Step 3: Design Solutions
Without talking or consulting each other, everyone must come up with as many different design concepts as they can in the time allotted to address the Challenge. Write or sketch one concept per Post-It note.
Step 4: Sort Results
One by one, go around the room and have each player present his concepts. After each concept is explained, stick it on a board or wall that everyone can see.
Place similar concepts near to each other. As a group, discuss where to put each concept. Using the taco example from Step 1, you might place all concepts that revolved around re-designing the taco shell into one group. Name each group. In the case of our example, we’d call it “taco shells.”
Don’t be afraid to rearrange groups and further sub-divide as you go! For example, you might find that within the taco shell ideas, some people tried to create containers, while other redesigned the taco shells to replace utensils.
Step 5: The Big Picture
After you’ve plotted all of the concepts, step back and look at the patterns that emerged. What group is the biggest? Which is the smallest? Why do you think that some groups were bigger than others? After the brainstorm is over, keep sketching more concepts on your own over the next day. How are those concepts different?
The SPLATTER challenge!
For your final chapter Challenge, hold a generative brainstorm and find patterns among the concepts you create.
Ideally, brainstorm with a group of three to six people and have one person take on the role of a facilitator. Try this multiple times with different Challenge statements, to give everyone a chance to facilitate!
What to bring:
• Use the Spark Frame you created at the end of the Spark chapter.
• Have someone bring at least two constraints and two Spark questions (or everyone can bring just one).
• Have sketch paper, sticky notes, pens, paper, and tape on hand so you can post your ideas.
Go somewhere quiet where you can spread out and put things up on the wall to see the big picture and find patterns. Use Brainstorm Fuel on page 77 to get started.
For timing, consider spending:
5 minutes
going over your Spark Frame and making sure everyone knows how you developed it, and what you’re trying to do.
5-10 minutes
individually sketching concepts for one Solution Idea in your Spark Frame. Sketch as many concepts as you can in that time.
5 minute blocks
to sketch concepts for EACH constraint and each Spark question. (So if you have two of each, that will take 20 minutes total.)
10 minutes
to go around and have everyone explain their concepts and put them up on the wall.
10-20 minutes
to group concepts and identify patterns while working together. Feel free to group and regroup, discussing the importance of each pattern you find.
Constraints
______________________________
______________________________
______________________________
______________________________
Spark Questions
______________________________
______________________________
______________________________
______________________________
After sharing your concepts, capture patterns here.
Consider the types of solutions that you’re tending toward (people, process, context, and product), the problems you’re trying to solve, and the areas of opportunity that seem to be of most interest.
__________________________________________________________________________________________________________
__________________________________________________________________________________________________________
__________________________________________________________________________________________________________
__________________________________________________________________________________________________________
__________________________________________________________________________________________________________
The Debrief
Phew! We hope you had fun. Brainstorming is best when it involves play, but it also gets your mind working (think of it as plerking). That’s why it’s best to have a session when everyone’s open and ready. If your brain hurts, treat yourself to something relaxing. You’ve earned it!
Now you should have identified a large number of concepts, and the interesting relationships between them. Some concepts may seem like something you could do today. Others may seem like a dream. You may love each and every one of them, but you’re going to have to focus on a few and leave some of them behind (or at least, set them aside for now).
You’re about to get even more real. In the next chapter we’ll talk about validating design concepts to figure out which ones you should continue to work on. You’ll winnow down these ideas to a few of the best, then visualize them with more refined sketches, and possibly a physical model! The key is to create something that you can give to the people you’re designing for, to test your concept. That’s what it means to SCULPT your concepts. It’s time to trim!