
Chapter 16. Android web development
This chapter covers
- Understanding Android web development
- Introducing WebKit
- Optimizing web applications for Android
- Storing data in the browser
- Building a custom JavaScript handler
Mobile software development has usually required working with a proprietary toolset to build applications. The term SDK is a familiar one—the majority of this book covers Android software development using the Android SDK. But the Android SDK isn’t the only way to build and deliver applications for the Android platform. With the emergence of accessible and powerful mobile browser capabilities, it’s now possible to develop applications for the Android platform with web technologies such as HTML, CSS, and JavaScript.[1]
1 See Hello! HTML5 and CSS3 at http://manning.com/crowther. The book is to be published in spring 2011.
Opening up the world of mobile development to web technologies introduces a wide array of possibilities for developers and Android users alike. Mobile devices rich in user experience (including Android) are in essence shrinking our world as internet connectivity is becoming the norm rather than the exception. Being connected to the internet allows Android users to share and access information from virtually anywhere, at any time. In some ways, the web itself is being redefined as an increasing percentage of content consumption and creation is taking place on mobile devices, with Android powering that growth as it reaches new heights of adoption and market share.
This chapter aims to equip you with an understanding of various approaches to deploying web technologies so that you can deliver an enhanced Android user experience. We start by surveying the major options for Android web technology development, all of which rely on the WebKit open source browser engine. After a brief introduction to WebKit, we look at creating universal web applications—apps that run well on the desktop as well as the Android browser. From there we move on to demonstrating the use of the SQL capabilities available in the browser, commonly referred to as HTML 5 databases. Note that although the browser SQL functionality was originally part of HTML 5, it has since been extracted from the core HTML 5 specification.
The chapter concludes with an example of building a “hybrid” application—one that uses Android SDK Java code along with browser-based HTML and JavaScript code.
16.1. What’s Android web development?
Aside from a brief sojourn down the native C path in chapter 13, all of the coding to this point has employed the Java-based Android SDK. This chapter breaks from that mold and demonstrates various web programming capabilities of the Android platform.
In short, web development is all about building applications with the traditional tools that web developers use: HTML for content, CSS for presentation, and JavaScript for programmatic control. In order for this capable and complementary trio to work their magic, the Android platform relies on the WebKit browser engine.
16.1.1. Introducing WebKit
The WebKit browser engine stems from an open source project that can be traced back to the K Desktop Environment (KDE). WebKit made its significant mobile debut when the iPhone was released, and since then WebKit has been adopted by Android and other mobile platforms.
Prior to the adoption of WebKit, early mobile web solutions ranged from laughable, to mediocre, to tolerable, though always limited. These early mobile web offerings were often so constrained that they required content providers to generate a mobile-specific stream in addition to the normal desktop version of their material. In some cases, a server-side component would perform on-the-fly distillation of the HTML into a format more readily digested by the mobile browser. Regardless of the implementation, any requirement for content providers to generate multiple copies of their material severely constrained the volume of content the early mobile devices could readily consume. The early mobile web was virtually nonexistent because browsers were not capable of rendering full pages and sites made for mobile were rare.
Fortunately, WebKit has changed the game thanks to its impressive rendering capabilities and its envelope-pushing feature set. You can expect the WebKit engine to render any web page on a par with your desktop browser. This means that virtually the entire web is open and accessible to an Android user! The pages of your favorite website will render on your Android device’s browser, though you’ll likely need to scroll the page due to the small screen dimensions, and certain navigation systems that rely on hovering aren’t accessible. Despite these drawbacks, the capabilities of WebKit open the broad range of the web to mobile users. In this chapter we demonstrate how to scale your web applications to accommodate for smaller browser windows in a manner that retains desktop browsing compatibility, all without the necessity of creating and managing multiple sites.
WebKit powers the browser on the Android device, but it’s also available as an embedded control or widget, permitting SDK-based applications to render HTML directly within a compiled application. This embeddable browser control is highly customizable and thereby empowers the Android developer to exercise a tremendous amount of control over the user experience.
Web programming for Android is a broad and versatile topic. In the next section we examine the approaches to using web technologies for Android application development.
16.1.2. Examining the architectural options
When it comes to employing web technologies in an Android application, you have to examine a few distinct categories of application architecture. Let’s look at the pillars of Android web technologies.
The first and most basic intersection of web technologies and Android application development involves the standalone browser. The Android browser is a capable HTML and CSS rendering engine, and it also implements a JavaScript engine. The JavaScript engine is capable of running sophisticated JavaScript, including Ajax, and supports popular scripting libraries such as JQuery and Prototype. As such, the browser itself is capable of running rich internet applications.
The browser can be a good augmentation to an SDK-based application. Let’s say you’ve released a software application for distribution. As part of your application you’d like to register users or perhaps provide access to a list of FAQs. It doesn’t make sense to ship all that content with your application because it’ll both take up space unnecessarily and will likely be out of date by the time the application is installed on a client device. Likewise, why should you implement data-collection functionality directly in your application if it can be more readily accomplished on your website? In this case, it’d be more appropriate to have the application launch the browser, taking the user to the website, where you can readily maintain your list of FAQs and your registration form. As you’ve learned, an Android application launches the browser through the use of an Intent and the startActivity() method of the Context class.
A variant of this model is embedding the browser control directly into an Activity’s UI. In this scenario, the browser control is defined in a layout file and inflated at runtime. The control is manipulated directly by Java code and directed to render either locally provided content or to navigate to a location on the web. An advantage of this approach is that although users may visit a remote site, they haven’t actually left the application. This approach helps in creating a highly scripted experience for the user. If users are taken out of an application, there’s a chance they won’t return.
A further refinement of the embedded browser experience is the practice of extending the JavaScript environment, thereby permitting the boundary between in-the-browser JavaScript and SDK Java code to be breached, to the benefit of the user experience. Further, the hybrid application can exercise control over which pages are shown and how the browser reacts to events such as bad digital certificates or window opening requests.
Whether your objective is to leverage your web development skills to bring Android applications to market or to enhance your SDK application with browser-based capabilities, the options are plentiful.
It’s time to expand on this introduction of WebKit and demonstrate web technologies in action on the Android platform. The next section explores ways in which you can design a traditional web application running in the standalone browser to accommodate Android clients.
16.2. Optimizing web applications for Android
We start this discussion by considering how to code web applications so they’re viewable both by desktop clients and by mobile platforms such as Android. Developing web applications for Android can be viewed as a continuum of options. On one end is a site created for universal access, meaning that it’ll be visited by both desktop and mobile users. On the other end of the spectrum is a website designed specifically for mobile users. Between these two extremes are a couple of techniques for improving the user experience. We’ll use the term mobile in mind—this refers to a website that’s not exclusively written for mobile users but expects them as part of the regular visitor list. Let’s begin with a discussion of designing your site with mobile in mind.
16.2.1. Designing with mobile in mind
There are millions of websites, but only a small percentage were created with mobile devices in mind—in fact, many sites were launched prior to the availability of a “mobile browser.” Fortunately, the browser in Android is capable of rendering complex web content—even more powerful than any of the early desktop browsers for which those early sites were designed.
When designing a universal website—a site that’s to be consumed by desktop and mobile users alike—the key concept is to frequently check your boundary conditions. For example, are you considering fly-out menus that rely on hovering with a mouse? That approach is a nonstarter for an Android user; there’s no mouse with which to hover. And unless you’re a giant search engine provider, you want to avoid coding your site to the least common denominator approach of a single field per page. That might get you by for a while on a mobile browser, but your desktop users will be both confused and annoyed. You need to meet the needs of both sets of users concurrently. You may be starting from a position that creating two sites—one for desktop and one for mobile—is out of your reach from a budgetary perspective. We’ll come back to the multiple-site approach later, but for now let’s design with mobile in mind.
To meet that objective, we examine two approaches to improve the visual appearance and usability of a mobile-in-mind website. Start with a simple HTML page, shown in the following listing.
Listing 16.1. Sample HTML page
<html>
<head>
</head>
<body>
<h1>Unlocking Android Second Edition</h1>
<h2>Chapter 16 -- Android Web Development</h2>

<hr />
<div style="width:200px;border:solid 5px red;">
<p>For questions or support you may visit the book's companion <a
href="http://manning.com/ableson2">website</a> or contact the author via
<a href="mailto:[email protected]">email</a>.</p>

</div>
<img src="http://manning.com/ableson2/ableson2_cover150.jpg" /></body>
</html>
When this HTML page is rendered in the browser, the content is “zoomed out” such that it all fits onto the page. Go ahead; try it yourself by pointing your Android browser to http://android16.msi-wireless.com/index.php. Figure 16.1 shows the content rendered in the standalone browser on an Android device.
Figure 16.1. Simple web page
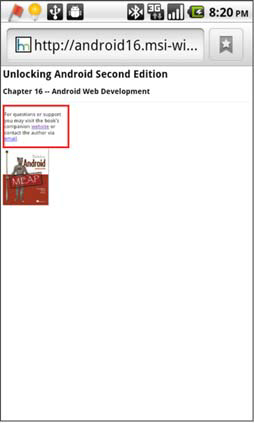
The text is too small to easily be read on the phone. The user can of course pinch, zoom, and scroll the content to make it more easily consumed. But if you know that the site visitor is viewing your site on a mobile device, wouldn’t it be a good idea to put out the welcome mat for them, keeping their pinching and zooming to a minimum? Fortunately, there’s a simple means of modifying the visual appearance of your site so that when visitors arrive at your site via their Android device, you can make them feel like you were expecting them. To accomplish this simple but important task, you use the viewport meta tag.
16.2.2. Adding the viewport tag
The lowest-cost and least-obtrusive solution to the default view being too small to see is the use of a special meta tag. Meta tags have long been the domain of the search engine optimization (SEO) gurus.[2] A meta tag is placed within the <head></head> tags of a web page to specify such things as the page keywords and description—which are used by search engines to help index the site.
2 See http://searchenginewatch.com for everything SEO related.
In this case, the meta tag of interest is the viewport. A viewport tag tells the client browser how to craft a virtual window, or viewport, through which to view the website. The viewport tag supports a handful of directives that govern the way in which the browser renders the page and interacts with the user.
To provide a more appealing rendering of our sample HTML page, you’ll add a viewport tag between the head tags. Listing 16.2 shows the same web page, but it now includes the viewport meta tag. If you want to view the page on your own Android device, you can do so at http://android16.msi-wireless.com/index_view.php.
Listing 16.2. Adding the viewport meta tag

This web page has been made more mobile friendly by the addition of the viewport meta tag ![]() . The content attribute of the tag conveys directives to govern how the viewport should behave. In this case, the browser is instructed
to create a viewport with a logical width equal to the screen width of the device.
. The content attribute of the tag conveys directives to govern how the viewport should behave. In this case, the browser is instructed
to create a viewport with a logical width equal to the screen width of the device.
Figure 16.2 demonstrates the impact this one line of code has on the visual appearance of the web page. Note how the text of the page is larger and more accessible. To be fair, this is an ultrasimple example, but the point is that you can provide a readable page right from the start and the user can easily scroll down vertically to view the remainder of the site without needing to zoom in or out just to make out what the page says.
Figure 16.2. The viewport tag modifies the appearance of the web page.

You can specify the width in pixels rather than requesting the width to be equal to the device-width. This approach can be useful if you want to display a graphic in a certain manner or if your site can remember a user’s preferences and by default set up the logical dimensions according to the user’s liking. Table 16.1 describes the ways in which you can customize the viewport.
Table 16.1. Viewport meta tag options
|
Directive or attribute |
Comment |
|---|---|
| width | Used to specify the width of the logical viewport. Recommended value: device-width. |
| height | Used to specify the height of the logical viewport. Recommended value: device-height. |
| initial-scale | Multiplier used to scale the content up (or down) when the page is initially rendered. |
| user-scalable | Specifies whether the user is permitted to scale the screen via the pinch zoom gesture. Value: yes or no. |
| maximum-scale | Upper limit on how far a page may be scaled manually by the user. Maximum value is 10.0. |
| minimum-scale | Lower limit of how far a page may be scaled manually by the user. Minimum value is 0.5. |
Adding a viewport meta tag to a web page is safe, because any meta tags that aren’t supported by a client browser are ignored, with no impact on the page. This one tag provides a simple yet useful enhancement to an existing website. Although this isn’t a magic bullet to solve every challenge associated with viewing a website on an Android phone, it does aid in the first impression, which is important.
Before moving on, we have one additional feature of the viewport tag to demonstrate: scaling. Figure 16.3 shows the same web page scaled to 1.3 times the original size. This approach can be used to scale a page up or down, within the constraints defined by the minimum-scale and maximum-scale directives as described in table 16.1.
Figure 16.3. Scaled-up web page

This scaled-up web page may or may not provide your desired effect. The good news is that you can adjust the initial-scale value to your liking. In practice you’ll likely set the value to somewhere between 0.7 and 1.3.
The viewport tag is almost a freebie: add the tag and if the browser recognizes it, the page’s rendering will be modified and likely improved. You can take a bit more control than this by selectively loading content or style sheets based on the type of browser visiting your site. That’s what we explore next.
16.2.3. Selectively loading content
Assuming your budget doesn’t provide for creating and managing entirely parallel websites to meet the needs of your desktop and mobile visitors, you need a strategy for adequately delivering quality content to both types of users. To go beyond the functionality of the viewport tag, you want to have a more predictable experience for your mobile visitors. To accomplish this, you’re going to selectively load CSS based on the type of visitor to your site.
Browser detection approaches have matured over time. Next we explore two basic methods to accomplish this task, keeping in mind that your site is meant to be universal and expecting browsers of different shapes, sizes, and capabilities.
16.2.4. Interrogating the user agent
The first approach involves the examination of the user agent string. Every time a browser connects to a web server, one of the pieces of information it provides in the HTTP request is the browser’s user agent. The user agent is a string value representing the name of the browser, the platform, the version number, and other characteristics of the browser. For example, the user agent of a Nexus One running Android 2.2 looks like this:
Mozilla/5.0 (Linux; U; Android 2.2; en-us;Nexus One Build/FRF91) AppleWebKit/
     533.1 KHTML, like Gecko) Version/4.0 Mobile Safari/533.1
The contents of this string may be examined and subsequently used to decide which content and or CSS files to load into the browser. The following listing demonstrates the use of the user agent string to selectively choose a CSS file.
Listing 16.3. Interrogating the user agent

This HTML snippet includes a viewport meta tag, specifying that the viewport’s width should match the width of the device.
A CSS file is included named corestuff.css ![]() . Regardless of the platform, this file contains required classes and styles related to the application. Using this approach,
the web application includes a style sheet aimed at more than one target platform. This enables you to have a more deterministic
impact on the behavior on a particular device, leaving less to chance. Your primary content hasn’t changed—remember, you’re
still targeting a universal website but keeping mobile users in mind. Clearly, more work is being done here, as various stylistic
elements have been extracted into platform-specific files. As such you’re taking taken a measured step down the continuum
toward a made-for-mobile site. If the user agent string contains the word “Android”
. Regardless of the platform, this file contains required classes and styles related to the application. Using this approach,
the web application includes a style sheet aimed at more than one target platform. This enables you to have a more deterministic
impact on the behavior on a particular device, leaving less to chance. Your primary content hasn’t changed—remember, you’re
still targeting a universal website but keeping mobile users in mind. Clearly, more work is being done here, as various stylistic
elements have been extracted into platform-specific files. As such you’re taking taken a measured step down the continuum
toward a made-for-mobile site. If the user agent string contains the word “Android” ![]() , the code loads the user-supplied android.css style sheet. If the user agent isn’t from an Android device, the code loads
a style sheet named desktop.css. Additional conditional statements may be included here for other mobile platforms, such as
the iPhone or BlackBerry.
, the code loads the user-supplied android.css style sheet. If the user agent isn’t from an Android device, the code loads
a style sheet named desktop.css. Additional conditional statements may be included here for other mobile platforms, such as
the iPhone or BlackBerry.
User agent strings contain a considerable amount of information, though just how much of it is useful and trustworthy is a topic of debate. For example, it’s not uncommon for a hacker to write code to programmatically bombard a target website and in the process craft a user agent that masquerades as a particular kind of browser. Some versions of websites are more secure than others. A user agent value is easy to forge, and although the security implications aren’t expressly of concern to us in this discussion, it’s something to keep in mind.
The user string has so much data that you have to do a bit of homework to interpret it properly. Some JavaScript libraries can aid in this process, but ultimately it may not be the best approach. There’s another way: the media query.
16.2.5. The media query
Early web styling included inline markup such as font and bold tags. The best practice in web design today is to separate styling information from the content itself. This involves adding class attributes to elements of content and relying on a style sheet to dictate the specific colors, sizes, font face, and so on. Providing multiple CSS files for a given page enables flexible management of the numerous styles needed to deliver a crisp, clean web page. This approach also permits flexibility in terms of which styles are used for a particular device.
Professional content sites have leveraged this approach through the use of multiple, targeted style sheets along with extensive use of the link statement’s media attribute. The media attribute acts as a filter for determining which style sheets should be loaded. For example, consider the familiar scenario where you purchase something online and you’re shown your receipt. The page may have fancy graphics and multiple elements organized in a creative manner. But when the page is printed, the output is relatively benign and thankfully easy to read. This is accomplished through the use of the media attribute applying a print-oriented style sheet. You can leverage this same approach to build mobile-in-mind web pages.
The following listing presents a snippet from a web page with support for many style sheets, including two for mobile-specific use.
Listing 16.4. Sample link statements

The media query of all ![]() indicates that the associated style sheet (all.css) is appropriate for all devices. The screen.css file
indicates that the associated style sheet (all.css) is appropriate for all devices. The screen.css file ![]() is filtered for screen or projectors only. An additional screen- or projector-targeted style sheet named screenfonts.css
is filtered for screen or projectors only. An additional screen- or projector-targeted style sheet named screenfonts.css
![]() is included to organize all font-related styles. For hard-copy output, the media value of print is used
is included to organize all font-related styles. For hard-copy output, the media value of print is used ![]() . The media value of handheld
. The media value of handheld ![]() is intended for handheld devices, though when the media query specifications were first drafted, the capabilities of mobile
browsers were quite limited—certainly much less feature rich than the Android browser is today. Therefore, a better approach
is to use a media query related to specific attributes such as screen dimensions. For example, if you’re targeting a particularly
small device, you can use a specific attribute-oriented media query. The hand-held-small.css file
is intended for handheld devices, though when the media query specifications were first drafted, the capabilities of mobile
browsers were quite limited—certainly much less feature rich than the Android browser is today. Therefore, a better approach
is to use a media query related to specific attributes such as screen dimensions. For example, if you’re targeting a particularly
small device, you can use a specific attribute-oriented media query. The hand-held-small.css file ![]() will be used when you have a screen width of no more than 320 pixels.
will be used when you have a screen width of no more than 320 pixels.
As with all things browser related, your mileage may vary over time with different releases. There’s no substitute for regression testing.
The actual technique of employing CSS within your code is beyond our scope and interest here; you can find many good references on the topic. The takeaway from this discussion is to be prepared to employ the appropriate CSS for each visitor to the site based on their respective web browser capabilities. The media query is a powerful tool in your arsenal.
Of course, no matter the amount of effort you put into making your universal website mobile friendly, there are times when a site should simply be designed from the ground up for mobile users.
16.2.6. Considering a made-for-mobile application
Here we are, finally at the other end of the spectrum where we look at web applications that are designed explicitly for mobile devices. After all, the best mobile web applications are designed to be mobile applications from the start and aren’t simply the full application versions crammed onto a smaller screen, relying on the browser to render them. The Android browser will display the pages, but the full-blown websites are often too heavy and busy for the typical mobile user. The reason is simple: using a mobile device is a different experience than sitting at your desk with a mouse and full keyboard.
More often than not the Android user is on the move and has little time or patience for dealing with data entry-intensive UIs or sifting through large result sets. Mobile transactions need to be thought out and targeted to the mobile user profile. Pretend you’re standing on a train looking at a piece of content or making a status update to a service ticket. If you have to select multiple menus or enter too many fields to perform your work, it likely won’t get done.
Consider two axioms for made-for-mobile applications.
The first is to simplify, reduce, and eliminate. Simplify the UI. Reduce the data entry required. Eliminate anything that’s not needed. Seriously; pull out the scalpel and cut out things that don’t matter to someone in the field. Consider figure 16.4, which shows the mobile version of the Facebook application. There’s no nonsense here, just two fields: Email or Phone and Password, and a button to log in. Three links round out the page.
Figure 16.4. Facebook mobile

The second axiom is to provide a link to the full site and make sure that you don’t reroute the user to the mobile version if they’ve explicitly requested to go to the main page. Note the Full Site link in the lower-right corner of figure 16.4. Sometimes people have the time and need to dig deeper than the mobile version permits. When this occurs, let the user go to the main page and do whatever you can through the viewport tag and the media queries to make the site as palatable as possible, but with the full features.
It’s time to move beyond the browser-only visual aspects of web application development to consider more advanced techniques that Android developers have at their disposal. We look next at browser database management technology, which has the promise to take web applications, mobile and desktop, to unprecedented levels of functionality and utility.
16.3. Storing data directly in the browser
One of the historical challenges to web applications is the lack of locally stored data. When performing a frequent lookup, it’s often too time- and bandwidth-intensive to constantly fetch reference rows from a server-side database. The availability of a local-to-the-browser SQL database brings new possibilities to web applications, mobile or otherwise. Support for SQL databases varies across browsers and versions, but fortunately for us, the Android browser supports this functionality. Once again the WebKit engine relationship pays dividends as we demonstrate using the desktop version of the browser to debug our application. It’s mobile development, but that doesn’t mean you’re constrained to working exclusively on the device! The sample application used in this portion of the chapter illustrates the basics of working with a locally stored SQL database.
16.3.1. Setting things up
The local SQL database accessible through the Android browser is essentially a wrapper around SQLite. As such, any syntactical or data type questions can be satisfied by referring to the documentation for SQLite. To learn more about the underlying database technology, refer to the discussion in chapter 6 and or visit the SQLite website at http://sqlite.org.
For this application we’re managing a single table of information with two columns. Each row represents a version of the Android operating system releases. A simple web application is used to exercise the database functionality. Figure 16.5 shows the application screen when first loaded.
Figure 16.5. The sample SQL application

The sample application, which we present in the next section, is accessible on the web at http://android16.msi-wireless.com/db.php. Before diving into the code, let’s walk through the operation of the application.
Running the application is straightforward. The first thing to do is click the Setup button. This attempts to open the database. If the database doesn’t exist, it’s created. Once the database is opened, you can add records one at a time by populating the two text fields and clicking the Save button. Figure 16.6 shows the process of adding a record.
Figure 16.6. Saving a new record

The List Records button queries the database and displays the rows in a crudely formatted table. Figure 16.7 shows the result of our query after a single entry.
Figure 16.7. Listing the records from the table

The final piece of demonstrable functionality is the option to remove all records. Clicking the Delete All Rows button opens the prompt shown in figure 16.8. If you confirm, the application proceeds to remove all the records from the database.
Figure 16.8. Confirming deletion of records

Remember, all of this is happening inside the browser without any interaction with the server side beyond the initial download of the page. In fact, there’s no database on the server! If 10 people all hit the site, download this page, and add records, they’ll be working independently with independently stored databases on their respective devices.
Let’s look at the code for this application.
16.3.2. Examining the code
Working with a SQL database within the browser environment involves the use of some nontrivial JavaScript. If you’re not comfortable working in the flexible JavaScript[3] language, the code may be difficult to follow at first. Stick with it—the language becomes easier as you let the code sink in over time. One helpful hint is to work with a text editor that highlights opening and closing braces and brackets. Unlike a compiled Android SDK application where the compiler points out coding problems during the development process, JavaScript errors are found at runtime. Anomalies occur and you have to track down the offending areas of your code through an iterative process of cat and mouse.
3 For more on JavaScript, take a look at Secrets of the JavaScript Ninja at http://www.manning.com/resig. The book, by John Resig, is to be published by Manning in June 2011.
Let’s begin by examining the UI elements of this application.
16.3.3. The user interface
We break down the code into two sections. The following listing contains the code for the UI of the application, stored in db.html.
Listing 16.5. User interface elements of the SQL sample page in db.html

The db.html file presents a simple GUI. This page runs equally well in either the Android browser or the desktop WebKit browser.
It’s coded with mobile in mind, and as such includes the viewport meta tag ![]() . All of the database interaction JavaScript is stored externally in a file named db.js. A script tag
. All of the database interaction JavaScript is stored externally in a file named db.js. A script tag ![]() includes that code in the page. A div element with an ID of outputarea
includes that code in the page. A div element with an ID of outputarea ![]() is used for displaying information to the user. In a production-ready application, this area would be more granularly defined
and styled. Clicking the Setup button
is used for displaying information to the user. In a production-ready application, this area would be more granularly defined
and styled. Clicking the Setup button ![]() calls the JavaScript function named setup found in db.js. Ordinarily this kind of setup or initialization function would be called from an HTML page’s onload handler. This step was left as an explicit operation to aid in bringing attention to all the moving pieces related to this
code sample. We look more deeply at these JavaScript functions in the next section, so sit tight while we finish up the GUI
aspects.
calls the JavaScript function named setup found in db.js. Ordinarily this kind of setup or initialization function would be called from an HTML page’s onload handler. This step was left as an explicit operation to aid in bringing attention to all the moving pieces related to this
code sample. We look more deeply at these JavaScript functions in the next section, so sit tight while we finish up the GUI
aspects.
Two text fields are used to gather information when adding a new record ![]() . When the Save button is clicked
. When the Save button is clicked ![]() , the saveRecord function is invoked. Listing the records is accomplished by clicking the List Records button
, the saveRecord function is invoked. Listing the records is accomplished by clicking the List Records button ![]() . Deleting all the records in the database is initiated by clicking the Delete All Records button
. Deleting all the records in the database is initiated by clicking the Delete All Records button ![]() , which in turn invokes the deleteAllRecords function found in db.js.
, which in turn invokes the deleteAllRecords function found in db.js.
With the basic GUI explanation behind us, let’s examine the functions found in db.js, which provide all of the heavy lifting for the application.
16.3.4. Opening the database
Now it’s time to jump into the db.js file to see how the interactions take place with the browser-based SQL database. The code for opening the database and creating the table is found in the following listing.
Listing 16.6. Code that opens the database and creates the table


All interactions with the database require a handle, or variable, representing an open database. In this code, the variable named db ![]() is defined and used for this purpose. A variable named entryCount
is defined and used for this purpose. A variable named entryCount ![]() is used to keep track of and display the number of records currently in the database. This variable isn’t essential to the
operation of the code, but it’s a helpful tool during development. In the setup function, the variable db is initialized with
a call to the openDatabase function
is used to keep track of and display the number of records currently in the database. This variable isn’t essential to the
operation of the code, but it’s a helpful tool during development. In the setup function, the variable db is initialized with
a call to the openDatabase function ![]() . The arguments to the openDatabase function include a name, version, description, and initial size allocation of the database. If the database exists, a valid
handle is returned. If the database isn’t yet in existence, it’s created and a handle returned to the newly created database.
Calling the transaction
. The arguments to the openDatabase function include a name, version, description, and initial size allocation of the database. If the database exists, a valid
handle is returned. If the database isn’t yet in existence, it’s created and a handle returned to the newly created database.
Calling the transaction ![]() method of the database object invokes a piece of SQL code.
method of the database object invokes a piece of SQL code.
The mechanics of the transaction method are nontrivial and are described in detail in section 16.3.5. For now understand that the argument to the transaction method is a function that has four arguments: a SQL statement, parameters,
a callback function for handling a successful invocation of the SQL statement, and an error-handling function invoked when
an error occurs processing the SQL. The SQL statement invoked here attempts to get a count of the rows in the table named
versions. This value is stored in the entryCount variable ![]() . If the table doesn’t exist, an error is thrown
. If the table doesn’t exist, an error is thrown ![]() . This is your cue to go ahead and create the table with a call to a user-supplied function named createTable
. This is your cue to go ahead and create the table with a call to a user-supplied function named createTable ![]() . The createTable function executes a single piece of SQL to create a table
. The createTable function executes a single piece of SQL to create a table ![]() . This method could be used to do any number of database initialization activities, such as creating multiple tables and populating
each with default values.
. This method could be used to do any number of database initialization activities, such as creating multiple tables and populating
each with default values.
Before we go through the balance of the transactions, it’s important to grasp how the transaction method of the database object is wired.
16.3.5. Unpacking the transaction function
All interactions with the database involve using the transaction method of the database object, so it’s important to understand how to interact with each of the four arguments introduced previously.
The first argument is a parameterized SQL statement. This is simply a string with any parameterized values replaced with a question mark (?). For example, consider a SQL statement that selectively deletes the iPhone from a table named smartphones:
delete from smartphones where devicename = ?
The second argument is an array of JavaScript objects, each element representing the corresponding parameter in the SQL statement. Keeping with our example, you need to provide the value needed for the where clause of the delete statement within the array:
['iPhone']
The net effect of these two lines together results in this SQL statement:
delete form smartphones where devicename = 'iPhone'
This approach keeps you from worrying about delimiters and reduces your exposure to SQL injection attacks, which are a concern when working with dynamically constructed SQL statements.
The third argument is a function that’s invoked when the SQL statement is successfully executed. The arguments to this callback function are a handle to the database transaction identifier along with an object representing the result of the statement.
For example, when you perform a select query against a database table, the rows are returned as part of the result, as you can see in listing 16.7, which shows the list-Records function from our sample application. In this listing, you use the returned rows to construct a rudimentary HTML table to dynamically populate the screen. There are other ways of accomplishing this task, but we kept it simple because our primary focus is on the interaction with the returned results set.
Listing 16.7. Processing returned rows from a query

The SQL statement is passed as the first argument ![]() . In this case we’re pulling two columns from the table called versions. The second parameter
. In this case we’re pulling two columns from the table called versions. The second parameter ![]() is the Java array holding any available parameterized values. In this sample, there are no parameterized values to pass along
to the transaction, but you’ll see one in the next section. Upon a successful execution of the select query, the results function is invoked
is the Java array holding any available parameterized values. In this sample, there are no parameterized values to pass along
to the transaction, but you’ll see one in the next section. Upon a successful execution of the select query, the results function is invoked ![]() . The second parameter to the results function, which is named result in this code, provides access to the returned record set. The result object contains a collection of rows. Looping over the result set is as easy as walking through an array
. The second parameter to the results function, which is named result in this code, provides access to the returned record set. The result object contains a collection of rows. Looping over the result set is as easy as walking through an array ![]() . Each row is pulled out of the result set
. Each row is pulled out of the result set ![]() and individual columns are extracted by name
and individual columns are extracted by name ![]() .
.
The fourth and final argument to the transaction method is the error handler. Like the success handler, this is also a callback function that takes two parameters. The first parameter is again the transaction identifier and the second is an object representing the trapped error.
With this basic understanding of the database object’s transaction method, let’s review the remaining functions contained in the db.js file.
16.3.6. Inserting and deleting rows
Thus far you’ve seen how to open a database, create a table, and select rows from the table. Let’s round this example out with an examination of the code required to insert a row and to remove all the rows from the table. The following listing shows the saveRecord and deleteAllRecords functions.
Listing 16.8. Data handling functions

Inserting a row into our sample database takes place in the saveRecord method ![]() . This method takes two arguments: id and name. A parameterized SQL insert statement
. This method takes two arguments: id and name. A parameterized SQL insert statement ![]() is crafted providing a placeholder for each of the values required for the versions table. The parameters themselves are
provided in an array
is crafted providing a placeholder for each of the values required for the versions table. The parameters themselves are
provided in an array ![]() . The success handler
. The success handler ![]() is invoked after a successful insertion. When an error occurs during the SQL statement’s execution, the user is notified
via a simple JavaScript alert
is invoked after a successful insertion. When an error occurs during the SQL statement’s execution, the user is notified
via a simple JavaScript alert ![]() . Of course, more sophisticated error responses can be crafted as desired. In the deleteAllRecords function you see a delete statement executed
. Of course, more sophisticated error responses can be crafted as desired. In the deleteAllRecords function you see a delete statement executed ![]() .
.
If you’re starting to get the feeling that this is just plain old SQL like you hoped, you’re correct. And remember, this is running in the client side of your browser on your Android device!
Though the code runs happily in the Android browser, your phone isn’t necessarily the most expedient way of testing the core functionality outside of the visual appearance. Testing on either a real Android device or the emulator both provide an acceptable experience, but for web applications such as this one, there’s a better way to test: WebKit on the desktop.
16.3.7. Testing the application with WebKit tools
The good news about SQL development is that you can do it; the bad news is that the tools are limited compared to other SQL environments you’re accustomed to in the desktop world. Fortunately, you can leverage the WebKit desktop browser, and its built-in development tools aid in your database work.
The Web Inspector[4] and Error Console found beneath the Develop menu in WebKit on the desktop provide helpful tools. When you’re working with JavaScript, one of the challenges is that code tends to die silently. This can happen because something is misspelled or a function doesn’t get properly defined thanks to a parsing error. When working in Eclipse with an Android SDK application, this kind of problem doesn’t occur at runtime because the compiler tells you long before the application ever runs. With WebKit you can leverage the Error Console, which provides helpful pointers to parsing problems in JavaScript code. This is one of those “don’t leave home without it” kind of tools.
4 For more details on the Web Inspector, try: http://trac.webkit.org/wiki/WebInspector.
When you’re working explicitly with a SQL database, the Web Inspector provides a helpful database tool that permits you to peer into the database and browse each of the defined tables. Although this tool isn’t nearly as powerful as tools for commercial databases, there’s something particularly reassuring about seeing your data in the table. Figure 16.9 shows a row in our versions table along with the web application running within the WebKit desktop browser.
Figure 16.9. Testing in the WebKit browser

The ability to move between the powerful WebKit desktop environment and the Android-based browser is a tremendous advantage to the Android developer looking to create a mobile web application.
As you’ve seen, the ability to store and manage relational data in a persistent fashion directly in the browser opens up new possibilities for application creation, deployment, and life-cycle management.
Storing data locally is a tremendous capability, but there may be times when you simply need more raw power and flexibility—and that calls for an SDK-based application. How do you get the best that HTML, CSS, and JavaScript have to offer but still go deeper? The answer is to build a hybrid application, which we cover next.
16.4. Building a hybrid application
So far we’ve explored some of the capabilities of the Android browser and the flexibility it can provide to Android web developers. Fortunately those capabilities aren’t constrained to pure web application developers only—you can bring the power of WebKit directly into your Android SDK applications. Including the browser control into an application is much more than a web page on a form, though of course if that’s what you need, it’s simple to implement. This section walks through the basics of building a hybrid application and demonstrates some features of the hybrid application model. It all starts with putting a browser on the screen, so let’s begin there.
16.4.1. Examining the browser control
The browser control, found in the android.webkit package, may be added to any UI layout in the same way that you add a TextView or a Button to an Activity in your application. From there you can programmatically direct the browser to load content from a remote web page, from a file shipped with your application, or even content generated on the fly. This control’s behavior may be overridden at any number of points and is a topic worthy of an entire book itself!
In its default condition, the control behaves just like the Android browser—minus the menus for navigating forward and back through your history and other typical browser actions. A common use for the control is for displaying a help screen for an application. Help written in HTML and downloaded from the vendor’s website is the most convenient means of keeping information up-to-date, particularly if there’s a user-community aspect to an application.
Things become more interesting as you consider the desired behavior of the web control. For example, have you ever wished you could provide a different message box for your application? Or how about implementing a feature in Java rather than JavaScript? All these things and more can be accomplished with the browser control—or you can just use it to browse your application’s help docs. You decide when you configure the control in your Activity. Let’s start there.
16.4.2. Wiring up the control
An application may override significant portions of functionality of the WebView browser control, including the WebChromeClient, the WebViewClient, and one or more JavaScript handlers, as described in table 16.2.
Table 16.2. Overriding browser behavior
|
Handler |
Description |
|---|---|
| WebChromeClient | WebChromeClient controls visual aspects of the browser, including everyday tools such as the alert, confirm, and prompt functions. You can override WebChromeClient if you want to make a unique browsing user interface experience. |
| WebViewClient | WebViewClient modifies how the browser controls content navigation and lets you change the pages accessible to the user. Override WebViewClient if you want to filter the content in some fashion. |
| JavaScriptInterface | Custom JavaScript “libraries” are mapped into the namespace of the browser’s JavaScript environment. JavaScriptInterface is the mechanism by which you can bridge the JavaScript/Java programming environments. |
The following listing demonstrates setting up the browser control when the Activity starts.
Listing 16.9. Setting up a browser control

As with any aspect of Java programming, you have to create the required import statements. In this case, the android.webkit package ![]() provides functionality for the browser control. An Activity-scoped variable
provides functionality for the browser control. An Activity-scoped variable ![]() is defined for accessing the WebView browser control. A constant
is defined for accessing the WebView browser control. A constant ![]() is defined as the starting page for the Activity. The layout is inflated in the same way virtually every Android Activity operates
is defined as the starting page for the Activity. The layout is inflated in the same way virtually every Android Activity operates ![]() ; the interesting point here is that when this layout inflates, it instantiates a browser control that’s subsequently set
up with a call to the method setupBrowser
; the interesting point here is that when this layout inflates, it instantiates a browser control that’s subsequently set
up with a call to the method setupBrowser ![]() . findViewById is used to obtain a reference to the browser control
. findViewById is used to obtain a reference to the browser control ![]() . With this reference, a number of characteristics of the browser may now be defined. Some of those characteristics are managed
by the WebSettings object associated with the browser, so it’s important to get a reference to the settings
. With this reference, a number of characteristics of the browser may now be defined. Some of those characteristics are managed
by the WebSettings object associated with the browser, so it’s important to get a reference to the settings ![]() . With the settings object available, you enable JavaScript
. With the settings object available, you enable JavaScript ![]() . Next you customize the behavior for this browser instance by installing your own handlers for UI events with the UAChrome class
. Next you customize the behavior for this browser instance by installing your own handlers for UI events with the UAChrome class ![]() , a JavaScript extension
, a JavaScript extension ![]() , and a WebViewClient to handle navigation events
, and a WebViewClient to handle navigation events ![]() . Finally, you get things started with the browser by loading a page of content into the control
. Finally, you get things started with the browser by loading a page of content into the control ![]() .
.
As we mentioned earlier, the browser control may load content from a remote web page, a locally stored page, or even from content generated dynamically. For the sample application built for this chapter, the initial page is stored under a folder named assets. The assets folder isn’t created automatically and must be created by the developer. Figure 16.10 shows the index.html file in relation to the project.
Figure 16.10. index.html used in our sample application

Android maps this folder at runtime to the logical path name of android_asset, as in file:///android_asset/index.html. Figure 16.11 shows the index.html page running in the application.
Figure 16.11. index.html in our browser control

The sample application is broken up into three demos, each highlighting a slightly different aspect of working with a browser control in an SDK application (a hybrid application). This approach is typical of hybrid applications where the browser control provides the UI and the Java code of the application provides much of the functionality and program logic. The next few sections break down each of these pieces of functionality along with the respective demonstration. Let’s begin by looking at the technique of adding a JavaScript handler to our code.
16.4.3. Implementing the JavaScript handler
There are three pillars to the hybrid application, each supporting one of the major areas of functionality that the WebView browser provides. The most straightforward of these is the JavaScript handler. The browser control permits an application to “install” one or more JavaScript handlers into the JavaScript namespace of the browser. You’ve already seen in listing 16.9 how the browser is set up. To emphasize the JavaScript handler initiation, it’s repeated here:
browser.addJavascriptInterface(new UAJscriptHandler(this),
 "unlockingandroid");
The arguments to the addJavascriptInterface mechanism are simple. The first is an application-provided handler and the second is a textual string. Listing 16.10 presents the class for the handler. Note that this kind of class may also be implemented as an inner class to the Activity, but we broke it out for clarity in this example. One consequence of breaking the class out on its own is the need to provide a Context for the code in order to access various elements of the SDK. You accomplish this by passing the context into the constructor, as in this listing.
Listing 16.10. JavaScript interface code implementation


The UAJscriptHandler class ![]() implements various functions that are mapped to the browser control’s JavaScript environment. Because this class is implemented
outside of the browser control’s containing Activity, you store a reference to the Context
implements various functions that are mapped to the browser control’s JavaScript environment. Because this class is implemented
outside of the browser control’s containing Activity, you store a reference to the Context ![]() , which is passed in with the constructor
, which is passed in with the constructor ![]() . A custom function named Log
. A custom function named Log ![]() takes a String parameter and adds an entry to the LogCat file when invoked. Troubleshooting JavaScript code is a nontrivial exercise; the
ability to add entries to the LogCat is a big help during development. A custom function named Info
takes a String parameter and adds an entry to the LogCat file when invoked. Troubleshooting JavaScript code is a nontrivial exercise; the
ability to add entries to the LogCat is a big help during development. A custom function named Info ![]() takes a provided String and presents it as a Toast notification. This is helpful for providing information to the user while browsing without the annoyance of an alert pop-up
box.
takes a provided String and presents it as a Toast notification. This is helpful for providing information to the user while browsing without the annoyance of an alert pop-up
box.
An excellent example of bridging the gap between web page and SDK programming is found in the PlaceCall function ![]() . When this function is invoked, the code initiates a Dial to call a phone number that was provided by the user on the HTML page. When the number is received and passed to this function,
an Intent is crafted to initiate a dial action
. When this function is invoked, the code initiates a Dial to call a phone number that was provided by the user on the HTML page. When the number is received and passed to this function,
an Intent is crafted to initiate a dial action ![]() . The final portion of the JavaScript interface is a function named SetSearchTerm. We’ll discuss this further when we examine the WebViewClient. For now, note that this function obtains a reference to the application’s global class named WTApplication
. The final portion of the JavaScript interface is a function named SetSearchTerm. We’ll discuss this further when we examine the WebViewClient. For now, note that this function obtains a reference to the application’s global class named WTApplication ![]() . With this reference the passed-in string is assigned as a search term
. With this reference the passed-in string is assigned as a search term ![]() .
.
Remember that some functionality implemented in the JavaScript handler may require you to add entries to the application’s manifest file. For example, the Place-Call method relies on the application having the android.permission.CALL_PHONE entry in the AndroidManifest.xml file.
Now that you’ve defined the JavaScript implementation class, let’s look at how this code is invoked. To do that, we need to jump over to the index.html file.
16.4.4. Accessing the code from JavaScript
When the JavaScript interface code was installed, two arguments were passed to the addJavaScriptInterface method. The first was the implementation class, which we just introduced. The second argument is a string representing the namespace of the code as known to the calling JavaScript code. In our example, you passed in a string named unlockingandroid as the second value. This means that in order to access the functions within that JavaScript interface, you need to prefix the functions in the JavaScript code with the string unlockingandroid. So, to call the Info function you use code such as window.unlockingandroid.Info('Hi Android'),.
Let’s delve further into the code and examine how the JavaScript interface is utilized.
16.4.5. Digging into the JavaScript
The following listing presents the index.html file, which contains the UI for this application. For each of the buttons on the HTML page, there exists a simple onclick handler that invokes the respective JavaScript functionality.
Listing 16.11. index.html
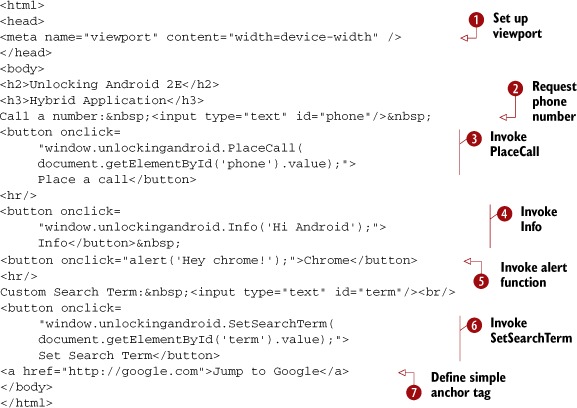
You include a viewport meta tag reference ![]() to this page, making it scale nicely to the Android device window. The first input text box
to this page, making it scale nicely to the Android device window. The first input text box ![]() accepts a phone number to be passed to the PlaceCall function
accepts a phone number to be passed to the PlaceCall function ![]() . Note the fully qualified name of the function: window.unlockingandroid.PlaceCall. Likewise, the Info function
. Note the fully qualified name of the function: window.unlockingandroid.PlaceCall. Likewise, the Info function ![]() is called, passing in a static string. The alert function
is called, passing in a static string. The alert function ![]() is invoked; this is the same alert function web developers have been using for over a decade. You’ll see how this function
is handled later when we review the WebChromeClient implementation. Also, for a later demonstration of the WebViewClient, the SetSearchTerm function
is invoked; this is the same alert function web developers have been using for over a decade. You’ll see how this function
is handled later when we review the WebChromeClient implementation. Also, for a later demonstration of the WebViewClient, the SetSearchTerm function ![]() passes a user-supplied textual string to the code, which is subsequently managed by the JavaScript interface in the Java
code. A link to Google’s home search page
passes a user-supplied textual string to the code, which is subsequently managed by the JavaScript interface in the Java
code. A link to Google’s home search page ![]() is provided to demonstrate traditional links and to provide a launching point for the WebViewClient demo.
is provided to demonstrate traditional links and to provide a launching point for the WebViewClient demo.
As you can see, the JavaScript side of things is simple. All you have to do is prefix the function name with the namespace used when the code was registered in the SDK code side of our hybrid application. Note that the structure of the JavaScript interface technique permits adding multiple JavaScript handlers, each registered independently and uniquely identified with their own namespace.
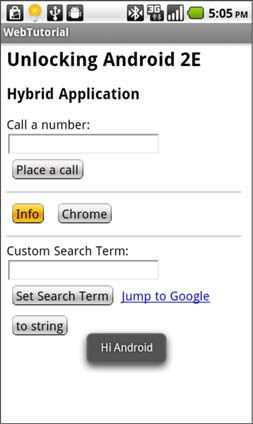
Figure 16.12 shows the collection of a phone number in the browser window.
Figure 16.12. Entering a phone number in the web page

Once the user clicks the button, the window.unlockingandroid.PlaceCall function is invoked, passing in the value of the input text field. From here, the Java code behind the PlaceCall function creates the Intent to start the dial action. Figure 16.13 shows the number ready to be dialed.
Figure 16.13. Ready to dial!

When the user clicks the Info button on the web page, the button’s onclick handler invokes window.unlockingandroi.Info, passing in a string of “Hi Android”. Figure 16.14 demonstrates the result of that action.
Figure 16.14. The Info button shows a Toast notification.
Clearly, the JavaScript implementation is powerful—so powerful that many commercial applications are written with an open source project named Phone-Gap that leverages this WebKit browser control technique. PhoneGap provides a framework for developers to create their applications in HTML, CSS, and JavaScript, where the device-specific features are provided in Android SDK Java code. For more information about PhoneGap, visit http://phonegap.com.
With power comes responsibility. There are some security concerns with this interfacing technique.
16.4.6. Security matters
Using the JavaScript interfacing capabilities opens your application to potential security risks because anyone who knows your custom “API” implemented in your JavaScript handler can exploit those features. It may be wise to permit this functionality only for HTML that you’ve written yourself. To demonstrate just how wired-in this JavaScript interface actually is to your application, consider this JavaScript code, which may be implemented by a malicious piece of JavaScript:
<button onclick=
     "alert(window.unlockingandroid.toString());">
     toString</button>
The result? Look at figure 16.15.
Figure 16.15. The toString method called from JavaScript

A simple method call identifies the name of the class behind the interface!
If you determine that a page isn’t of your own creation and want to disable the connection between your JavaScript code and Java code, you can re-register the JavaScript interface with a class that contains limited functionality, a class with zero methods (like that in the following listing), or even a null object.
Listing 16.12. A no-op class
private class UANOOP {
}
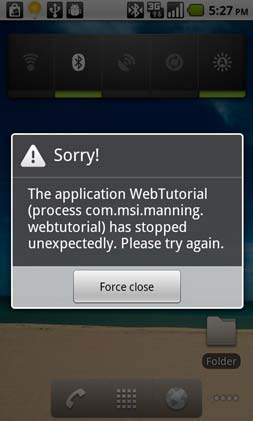
Even a class with no methods isn’t immune from trouble. Consider this JavaScript code run against our noop class: window.unlockingandroid.wait(). Guess what this does to our application? Figure 16.16 demonstrates the destructive power of a malicious code calling methods of the root Java Object class.
Figure 16.16. A crashed application thanks to the wait function
If you plan on taking this approach of putting in a “safe” class implementation, a better move is to install null as the class to handle the Javascript interface: browser.addJavascriptInterface(null,"unlockingandroid");. Or better yet, don’t allow navigation away at all.
Okay, enough of the drama. For now, let’s assume that the web is a safe place to navigate and you can lock things down as you see fit. If you want to exercise more control over navigating the web with your in-the-app browser, you can implement your own WebViewClient. We’ll show you how.
16.4.7. Implementing a WebViewClient
The basic approach to controlling a browser control’s navigation is to subclass the WebViewClient, which is also part of the android.webkit package. This class provides methods such as onPageStarted(), onPageFinished(), and numerous other methods related to browser navigation. For example, the class also has a method named onReceivedSslError(), which is invoked when a visited site has a digital certificate that either has expired or is invalid for some other reason. The range of functionality here is significant and beyond the scope of this section, so we’ll focus on a narrower and more practical example to demonstrate the use of this class.
16.4.8. Augmenting the browser
As mentioned earlier, the application associated with this chapter, WebTutorial, contains a few demos. In this portion of the code, we demonstrate the WebViewClient functionality by monitoring the loading of pages in the browser control, searching for a predefined term. It’s designed to be a simple browsing augmentation tool: you could take this basic framework and build a browser with customized functionality.
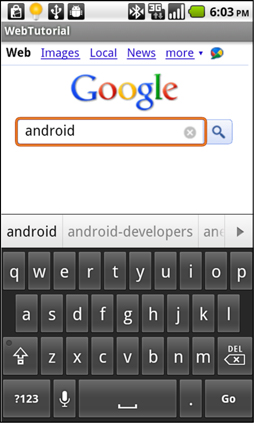
Here’s how the application works. Starting in our application’s home page, enter a search term, as shown in figure 16.17. In our case we’re interested in the term HTC, which is a company that manufactures a number of Android phones. We’re interested in how many times the term HTC shows up on any page that we load in the browser.
Figure 16.17. Setting up a search term

When we click the Set Search Term button, our Java code is invoked, which stores this search term in the application globals. Listing 16.13 shows portions of both the JavaScript handler code and the WTApplication class. The WTApplication code manages the application’s global variables.
Listing 16.13. Managing the search term

A strategy to manage application globals in an Android application is to provide an implementation of the android.app.Application class ![]() . This class is accessible to every Activity, Service, BroadcastReceiver, and ContentProvider within a given application, and as such is a convenient means of sharing information. In this case you implement a simple
pair of setter/getter methods for managing the search term
. This class is accessible to every Activity, Service, BroadcastReceiver, and ContentProvider within a given application, and as such is a convenient means of sharing information. In this case you implement a simple
pair of setter/getter methods for managing the search term ![]() . When a user clicks the Set Search Term button in the browser control, the code gets a reference to the android.app.Application implementation
. When a user clicks the Set Search Term button in the browser control, the code gets a reference to the android.app.Application implementation ![]() and then updates the search term
and then updates the search term ![]() .
.
With the search term safely stored, it’s time to navigate the web.
16.4.9. Detecting navigation events
Now you need to begin browsing the internet. For lack of a better place to start, jump to the Google home page and enter the search term android, as shown in figure 16.18.
Figure 16.18. Searching the web via Google
As soon as the page is launched, we want to remind our users that we’re searching for the term HTC, and when the page is fully loaded we want users to know whether the term was found, as shown in figure 16.19.
Figure 16.19. Hit indicator
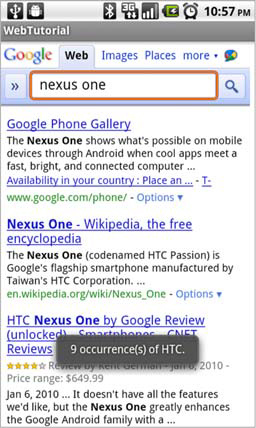
As you can see, searching the web for android + HTC is a different operation compared to searching for android and then HTC. Yes, this functionality can be accomplished with some search engine magic. The point is that you want to be able to have this browsing assistant follow you wherever you go on the internet—even beyond the search engine launching point. Any time you browse to a new page, you receive a Toast notification letting you know how many times your search term appears on the page. To show you how this is implemented, let’s examine the following listing, which shows the implementation of the UAWebViewClient class.
Listing 16.14. UAWebViewClient.java

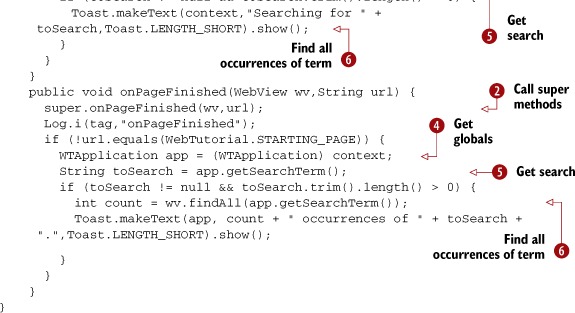
Extending the WebViewClient ![]() for our purposes involves a custom constructor plus two subclassed methods. For each of the three methods, you call the respective
super methods
for our purposes involves a custom constructor plus two subclassed methods. For each of the three methods, you call the respective
super methods ![]() to make sure the parent class has an opportunity to perform necessary housekeeping. When filtering the page loads, you don’t
want your augmented behavior to fire if you’re on the starting index.html page shipped with the application, so you do a basic
string comparison
to make sure the parent class has an opportunity to perform necessary housekeeping. When filtering the page loads, you don’t
want your augmented behavior to fire if you’re on the starting index.html page shipped with the application, so you do a basic
string comparison ![]() to selectively ignore the additional functionality if you’re back on the starting page within your own content. Assuming
you’re on a subsequently loaded web page, you need to access the android.app.Application instance
to selectively ignore the additional functionality if you’re back on the starting page within your own content. Assuming
you’re on a subsequently loaded web page, you need to access the android.app.Application instance ![]() to gain access to the globally stored searchTerm
to gain access to the globally stored searchTerm ![]() . In the onPageStarted method, you remind the user of the term you’re searching for through the use of a Toast notification. In onPageFinished, you call the findAll method to search the newly downloaded page for the search term
. In the onPageStarted method, you remind the user of the term you’re searching for through the use of a Toast notification. In onPageFinished, you call the findAll method to search the newly downloaded page for the search term ![]() . When the search is completed, you again let the user know via a Toast notification.
. When the search is completed, you again let the user know via a Toast notification.
This WebViewClient extension is installed with a call to
browser.setWebViewClient(new
 UAWebViewClient(this.getApplicationContext()));
This simple application is begging for enhancements, so feel free to download the sample code and extend the WebViewClient yourself and enjoy the feeling of adding functionality to the world’s most popular application—the browser!
If you have a taste for improving additional behavior modification of the browser, you’ll want to try your hand at updating the chrome by subclassing WebChromeClient.
16.4.10. Implementing the WebChromeClient
The WebChromeClient class is responsible for handling client-side events such as JavaScript alerts, prompts, and the like. Additionally, the WebChromeClient is notified when a window is being closed or a new window is attempting to load. Like the WebViewClient, this class is a topic unto itself. For our purposes here, we demonstrate its use by overriding the alert() JavaScript function.
Referring to the index.html file from listing 16.11, you see the code for handling the Chrome button: <button onclick="alert('Hey chrome!'),">Chrome</button>. There’s no special namespace qualifier on this function—it’s the same JavaScript alert function used since client-side programming first littered our world with pop-up messages. This function’s sole purpose is to inform the user of information that’s hopefully relevant to their browsing activity. Listing 16.15 demonstrates subclassing the WebChromeClient and implementing the onJsAlert method. Again, this method is invoked when the JavaScript alert function is encountered in a running web page.
Listing 16.15. UAChrome.java

The UAChrome class extends the WebChromeClient ![]() . In the constructor, you call the constructor of the super class with a call to super
. In the constructor, you call the constructor of the super class with a call to super ![]() . In order to process alert statements, you need to implement the onJsAlert method
. In order to process alert statements, you need to implement the onJsAlert method ![]() . This method takes four arguments: the WebView instance hosting the JavaScript code, the URL of the page, the message to be displayed, and a JsResult argument. The JsResult object has methods for indicating to the caller whether the user confirmed or canceled the prompt. In this sample implementation,
you replace the pop-up box with a tidy Toast notification
. This method takes four arguments: the WebView instance hosting the JavaScript code, the URL of the page, the message to be displayed, and a JsResult argument. The JsResult object has methods for indicating to the caller whether the user confirmed or canceled the prompt. In this sample implementation,
you replace the pop-up box with a tidy Toast notification ![]() and because the Toast notification clears on its own, you need to inform the caller that the notification was “confirmed.” This is accomplished
with a call to the confirm method of the JsResult parameter named result
and because the Toast notification clears on its own, you need to inform the caller that the notification was “confirmed.” This is accomplished
with a call to the confirm method of the JsResult parameter named result ![]() . Finally you return a Boolean true
. Finally you return a Boolean true ![]() to indicate that this overridden method has processed the event.
to indicate that this overridden method has processed the event.
16.5. Summary
This chapter covered a fair amount of material related to web development for Android. As with most topics related to programming, we’ve only scratched the surface—and hopefully provided you with inspiration and guidance on where to dig deeper on your own.
Starting with the idea of making pure web applications as friendly as possible on the Android standalone browser, we explored the viewport meta tag along with the technique of loading platform-specific CSS files. Style sheet management is an important and recommended skill for any kind of web development today.
Moving beyond the look and feel aspects of the in-the-browser application model, we explored the technique of SQL database access directly from the client-side JavaScript. After a basic demonstration of the data access methods, we looked at a convenient testing platform in the desktop version of WebKit.
We then moved on to cover perhaps the most exciting aspect of web programming in the mobile world today: creating hybrid applications. Hybrid applications can enhance an Android SDK application with highly capable formatting of selective areas such as help screens or tutorials. Or, as demonstrated in this chapter’s sample code, a hybrid application can enable a purely HTML and CSS user interface while permitting the underlying Java code to perform the heavy lifting. Regardless of your approach, having an understanding of the basics of Hybrid application development is a benefit to the Android programmer.
In the next chapter, we’ll look at one of the “game changing” features of the Android platform: the AppWidget.